13: Expanding PowerPoint Functionality
What You’ll Do
Enhance a Presentation with VBA
Add a Digital Signature to a Macro Project
Assign a Macro to a Toolbar or Ribbon
Save and Open a Presentation with Macros
Set ActiveX Control Properties
Play a Movie Using an ActiveX Control
Change the Document Information Panel
Introduction
An add-in extends the functionality of PowerPoint and other Microsoft Office programs. An add-in is typically a third-party program you can purchase—some are shareware—and download from the Web. You can find a list of add-ins for PowerPoint on the Microsoft Office.com Web site. Before you can use an add-in, you need to load it first. After you load an add-in, the feature may add a command to a Ribbon tab.
If you want to customize Microsoft PowerPoint and create advanced presentations, you’ll need to learn how to work with the Microsoft Office programming language, Microsoft Visual Basic for Applications (VBA). VBA is powerful and flexible, and you can use it in all major Office applications. To create a VBA application, you have to learn VBA conventions and syntax. Office makes VBA more user-friendly by providing the Visual Basic Editor, an application that includes several tools to help you write error-free VBA applications. The Visual Basic Editor provides extensive online Help to assist you in this task.
A practical way to use VBA is to create macros. Macros can simplify common repetitive tasks that you use regularly in PowerPoint. Macros can reside on the Ribbon or Quick Access Toolbar for easy access. If a macro has a problem executing a task, the Visual Basic Editor can help you debug, or fix the error in your macro. VBA may be a difficult language for the new user, but its benefits make the effort of learning it worthwhile.
An ActiveX control is a software component that adds functionality to an existing program. An ActiveX control supports a customizable, programmatic interface for you to create your own functionality, such as a form. PowerPoint includes several pre-built ActiveX controls—including a label, text box, command button, and check box—to help you create a user interface.
Viewing and Managing Add-ins
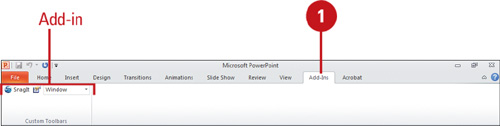
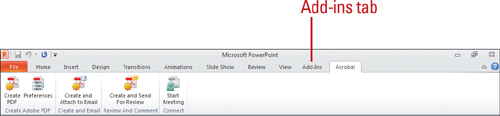
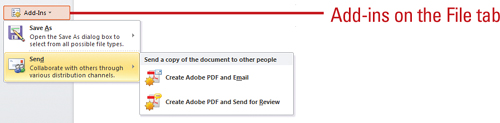
An add-in extends functionality to PowerPoint and other Microsoft Office programs. An add-in can add buttons and custom commands to the Ribbon or menu items on the File tab (New!). You can get add-ins for PowerPoint on the Office.com Web site in the Downloads area, or on third-party vendor Web sites. When you download and install an add-in, it appears on the Add-Ins or other tabs depending on functionality, and includes a special ScreenTip that identifies the developer. You can view and manage add-ins from the Add-Ins pane in PowerPoint Options.
View Installed Add-ins
![]() Click the Add-Ins tab, or click the File tab, click Add-Ins, point to an add-in menu option, and then select a command (New!).
Click the Add-Ins tab, or click the File tab, click Add-Ins, point to an add-in menu option, and then select a command (New!).
Add-ins with buttons and controls appear on the Ribbon. To display a ScreenTip, point to a button or control.
![]() Click the File tab, and then click Options.
Click the File tab, and then click Options.
![]() In the left pane, click Add-Ins.
In the left pane, click Add-Ins.
The installed add-ins appear in the list by category.
![]() Active Application Add-ins. Lists the registered and running add-ins. A selected check box for a COM add-in appears here.
Active Application Add-ins. Lists the registered and running add-ins. A selected check box for a COM add-in appears here.
![]() Inactive Application Add-ins. Lists the installed add-ins, but not currently loaded. A cleared check box for a COM add-in appears here.
Inactive Application Add-ins. Lists the installed add-ins, but not currently loaded. A cleared check box for a COM add-in appears here.
Document Related Add-ins. Lists template files currently open in a document.
![]() Disabled Application Add-ins. Lists automatically disabled add-ins causing Office programs to crash.
Disabled Application Add-ins. Lists automatically disabled add-ins causing Office programs to crash.
![]() Click an add-in to display information about it.
Click an add-in to display information about it.
![]() Click OK.
Click OK.

![]() Click the File tab, and then click Options.
Click the File tab, and then click Options.
![]() In the left pane, click Add-Ins.
In the left pane, click Add-Ins.
![]() Click the Manage list arrow, and then click the add-in list you want to display:
Click the Manage list arrow, and then click the add-in list you want to display:
![]() COM Add-ins. Opens the COM Add-Ins dialog box and lists the Component Object Model (COM) add-ins.
COM Add-ins. Opens the COM Add-Ins dialog box and lists the Component Object Model (COM) add-ins.
![]() PowerPoint Add-ins. Opens the Add-Ins dialog box and lists the currently installed PowerPoint add-ins.
PowerPoint Add-ins. Opens the Add-Ins dialog box and lists the currently installed PowerPoint add-ins.
![]() Actions. Opens the AutoCorrect dialog with the Actions tab and list the installed actions (New!).
Actions. Opens the AutoCorrect dialog with the Actions tab and list the installed actions (New!).
![]() Disabled Items. Opens the Disabled Items dialog box and lists the disabled items that prevent PowerPoint from working properly. If you want to try and enable an item, select it, click Enable, click Close, and then restart PowerPoint.
Disabled Items. Opens the Disabled Items dialog box and lists the disabled items that prevent PowerPoint from working properly. If you want to try and enable an item, select it, click Enable, click Close, and then restart PowerPoint.
![]() Click Go.
Click Go.
![]() Click OK.
Click OK.

Loading and Unloading Add-ins
Add-ins are additional programs, designed to run seamlessly within PowerPoint or Office. There are two main types of add-ins: PowerPoint and Component Object Model (COM). PowerPoint add-ins are custom controls designed specifically for PowerPoint, while COM add-ins are designed to run in one or more Office programs and use the file name extension. dll or. exe. Some add-ins are installed when you run the Setup program, while others can be downloaded from Microsoft Office Online or purchased from third-party vendors. To load or unload add-ins, PowerPoint provides commands you can access from an added button on the Quick Access Toolbar, Developer tab, or the Add-Ins pane in PowerPoint Options. When you load an add-in, the feature may add a command to a tab or toolbar. You can load one or more add-ins. If you no longer need an add-in, you should unload it to save memory and reduce the number of commands on a tab. When you unload an add-in, you also may need to restart PowerPoint to remove an add-in command from a tab.
Load or Unload a PowerPoint Add-in
![]() Click the Developer tab.
Click the Developer tab.
![]() To display the Developer tab, use the Customize Ribbon pane in PowerPoint Options.
To display the Developer tab, use the Customize Ribbon pane in PowerPoint Options.
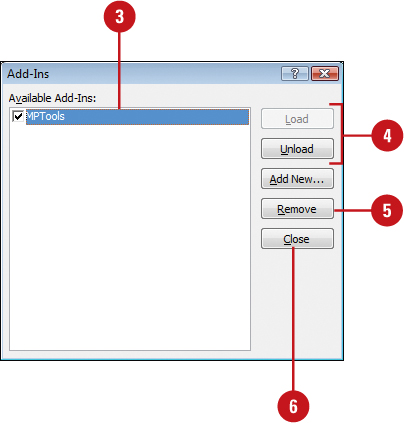
![]() Click the Add-Ins button.
Click the Add-Ins button.
![]() Click the add-in you want to load or unload.
Click the add-in you want to load or unload.
TROUBLE? If the add-in is not available in the list, click Add New, locate and select the add-in you want, and then click OK.
![]() Click Load or Unload.
Click Load or Unload.
![]() To remove the selected add-in, click Remove.
To remove the selected add-in, click Remove.
![]() Click Close.
Click Close.
![]() Click the Developer tab.
Click the Developer tab.
![]() To display the Developer tab, use the Customize Ribbon pane in PowerPoint Options.
To display the Developer tab, use the Customize Ribbon pane in PowerPoint Options.
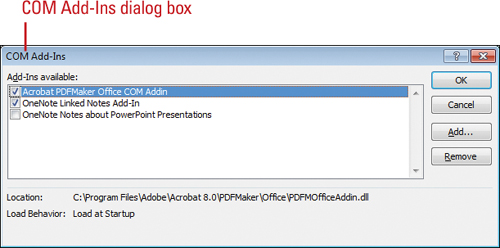
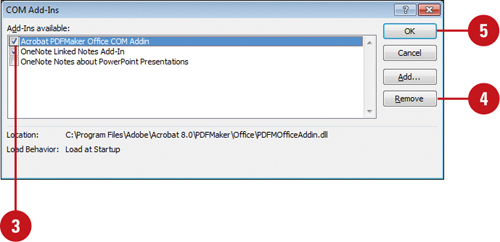
![]() Click the COM Add-Ins button.
Click the COM Add-Ins button.
![]() Select the check box next to the add-in you want to load, or clear the check box you want to unload.
Select the check box next to the add-in you want to load, or clear the check box you want to unload.
TROUBLE? If the add-in is not available in the list, click Add, locate and select the add-in you want, and then click OK.
![]() To remove the selected add-in, click Remove.
To remove the selected add-in, click Remove.
![]() Click OK.
Click OK.
Did You Know?
You can can get more information about COM online. Visit www.microsoft.com/com.
You can open an add-in dialog box from PowerPoint Options. Click the File tab, click Options, click Add-ins, click the Manage list arrow, click PowerPoint Add-ins or COM Add-ins, and then click Go.
For Your Information
Dealing with an Add-in Security Alert
When there is a problem with an add-in, PowerPoint disables it to protect the program and your data. When a problem does occur, a security alert dialog box appears, displaying information about the problem and options you can choose to fix or ignore it. You can choose an option to help protect me from unknown content (recommended), enable this add-in for this session only, or enable all code published by this publisher. See “Setting Add-ins Security Options” on page 378 for more information about setting options that trigger the Add-in security alert.
Enhancing a Presentation with VBA
Office applications like PowerPoint, Access, Excel, Word, and Visio share a common programming language: Visual Basic for Applications (VBA). With VBA, you can develop applications that combine tools from these Office products, as well as other programs that support VBA. Because of the language’s power and flexibility, programmers often prefer to use VBA to customize their Office applications.
Introducing the Structure of VBA
VBA is an object-oriented programming language because, when you develop a VBA application, you manipulate objects. An object can be anything within your presentation, such as a shape, text box, picture, or table. Even PowerPoint itself is considered an object. Objects can have properties that describe the object’s characteristics. Text boxes, for example, have the Font property, which describes the font PowerPoint uses to display the text. A text box also has properties that indicate whether the text is bold or italic.
Objects also have methods, actions that can be done to the object. Deleting and inserting are examples of methods available with a record object. Closely related to methods are events. An event is a specific action that occurs on or with an object. Clicking a button initiates the Click event for the button object. VBA also refers to an event associated with an object as an event property. The form button, for example, has the Click event property. You can use VBA to either respond to an event or to initiate an event.
Writing VBA Code
A VBA programmer types the statements, or code, that make up the VBA program. Those statements follow a set of rules, called syntax, that govern how commands are formulated. For example, to change the property of a particular object, the command follows the general form:
Object.Property = Expression
Where Object is the name of a VBA object, Property is the name of a property that object has, and Expression is a value that will be assigned to the property. The following statement sets the ViewType property of the ActiveWindow to Slide View:
ActiveWindow.ViewType = ppViewSlide”
You can use Office and VBA’s online Help to learn about specific object and property names. If you want to apply a method to an object, the syntax is:
Object.Method arg1, arg2, …
Where Object is the name of a VBA object, Method is the name of method that can be applied to that object, and arg1, arg2, … are optional arguments that provide additional information for the method operation. For example, to exit all running slide shows, you could use the Exit method as follows:
SlideShowWindows(1).View.Exit
You don’t run VBA commands individually. Instead they are organized into groups of commands called procedures. A procedure either performs an action or calculates a value. Procedures that perform actions are called Sub procedures. You can run a Sub procedure directly, or Office can run it for you in response to an event, such as clicking a button or opening a form. A Sub procedure initiated by an event is also called an event procedure. Office provides event procedure templates to help you easily create procedures for common events. Event procedures are displayed in each object’s event properties list.
A procedure that calculates a value is called a function procedure. By creating function procedures you can create your own function library, supplementing the Office collection of built-in functions. You can access these functions from within the Expression Builder, making it easy for them to be used over and over again.
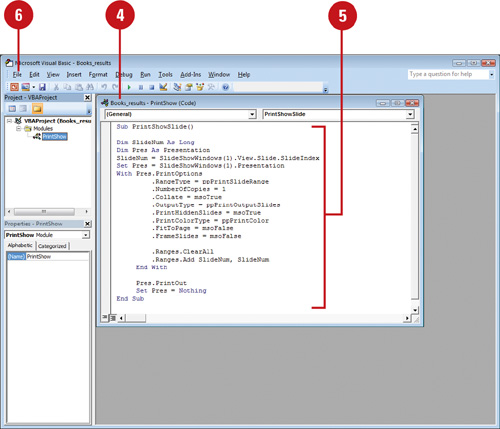
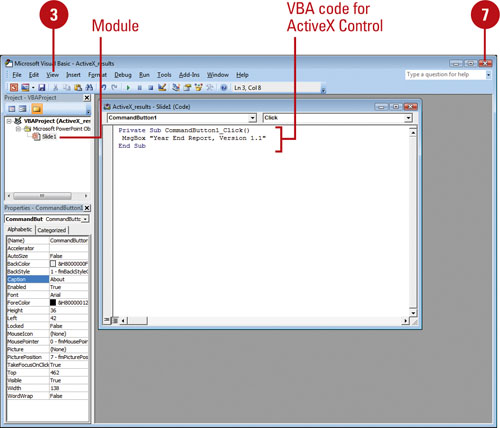
Working with Modules
Procedures are collected and organized within modules. Modules generally belong to two types: class modules and standard modules. A class module is associated with a specific object. In more advanced VBA programs, the class module can be associated with an object created by the user. Standard modules are not associated with specific objects, and they can be run from anywhere within a database. This is usually not the case with class modules. Standard modules are listed in the Database window on the Modules Object list.
Building VBA Projects
A collection of modules is further organized into a project. Usually a project has the same name as a presentation. You can create projects that are not tied into any specific presentation, saving them as PowerPoint add-ins that provide extra functionality to PowerPoint.
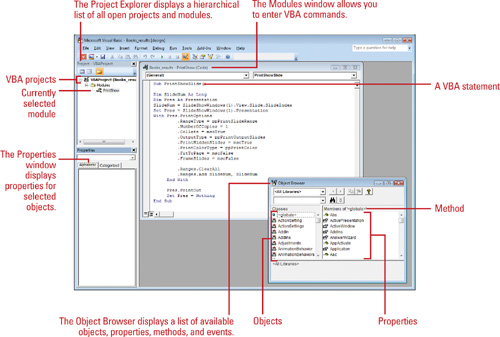
Using the Visual Basic Editor
You create VBA commands, procedures, and modules in Office’s Visual Basic Editor. This is the same editor used by Excel, Word, and other Office programs. Thus, you can apply what you learn about creating programs in PowerPoint to these other applications.
The Project Explorer
One of the fundamental tools in the Visual Basic Editor is the Project Explorer. The Project Explorer presents a hierarchical view of all of the projects and modules currently open in PowerPoint, including standard and class modules.
The Modules Window
You write all of your VBA code in the Modules window. The Modules window acts as a basic text editor, but it includes several tools to help you write error-free codes. PowerPoint also provides hints as you write your code to help you avoid syntax errors.
The Object Browser
There are hundreds of objects available to you. Each object has a myriad of properties, methods, and events. Trying to keep track of all of them is daunting, but the Visual Basic Editor supplies the Object Browser, which helps you examine the complete collection of objects, properties, and methods available for a given object.
Viewing the Visual Basic Editor
Setting Developer Options
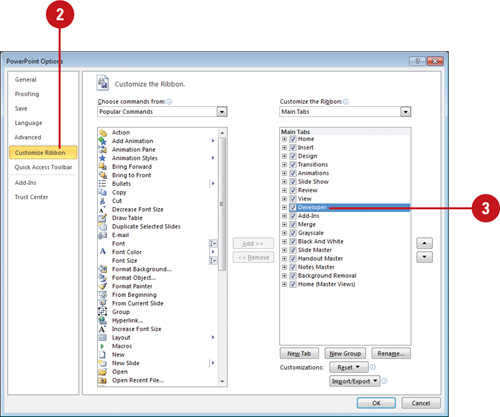
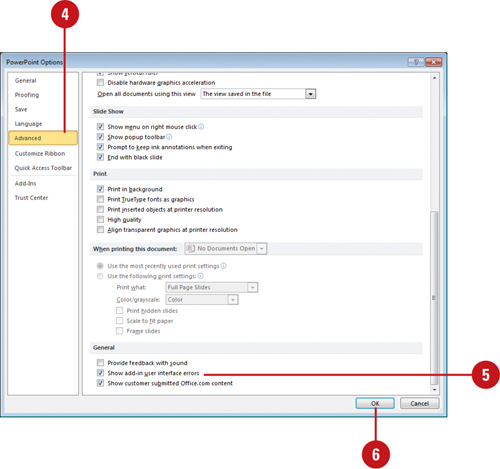
The Developer tab is a specialized Ribbon that you can use to access developer controls, write code, or create macros. You can set an option in the Customize Ribbon section (New!) in PowerPoint Options to show or hide the Developer tab. As a developer, you can also set an option to show errors in your user interface customization code.
Set Developer Options
![]() Click the File tab, and then click Options.
Click the File tab, and then click Options.
![]() In the left pane, click Customize Ribbon.
In the left pane, click Customize Ribbon.
![]() Select the Developer check box to display the Developer tab.
Select the Developer check box to display the Developer tab.
![]() In the left pane, click Advanced.
In the left pane, click Advanced.
![]() Select the Show add-in user interface errors check box.
Select the Show add-in user interface errors check box.
![]() Click OK.
Click OK.
Simplifying Tasks with Macros
If you find yourself repeating the same set of steps over and over or if you need to add new functionality to PowerPoint, you could create a macro. Macros can run several tasks for you at the click of a button. You create macros using a programming language called Microsoft Visual Basic for Applications (VBA). With VBA, you create a macro by writing a script to replay the actions you want. The macros for a particular presentation are stored in a macro module, which is a collection of Visual Basic codes.
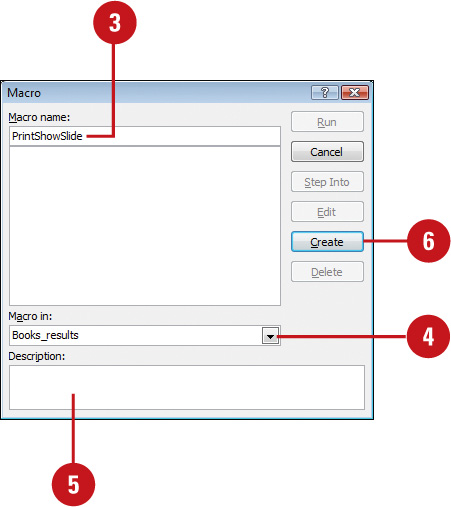
Create a Macro
![]() Click the View or Developer tab.
Click the View or Developer tab.
![]() Click the Macros button.
Click the Macros button.
![]() Type a name for the macro.
Type a name for the macro.
![]() Click the Macro in list arrow, and then click All open presentations or the presentation to which you want the macro stored.
Click the Macro in list arrow, and then click All open presentations or the presentation to which you want the macro stored.
![]() If you want, add a macro description in the Description box.
If you want, add a macro description in the Description box.
![]() Click Create.
Click Create.
The Microsoft Visual Basic window opens.
![]() Click the Module window, and then type new Visual Basic commands, or edit existing ones.
Click the Module window, and then type new Visual Basic commands, or edit existing ones.
![]() When you’re done, click the File menu, and then click Close and Return to Microsoft PowerPoint.
When you’re done, click the File menu, and then click Close and Return to Microsoft PowerPoint.
Did You Know?
You can use macros from earlier versions of PowerPoint. If you created a macro using the Macro Recorder in an earlier version of PowerPoint (97-2003), you can use VBA to edit the macro. The Macro Recorder actually writes a program in VBA to create a macro.

![]() Click the View or Developer tab.
Click the View or Developer tab.
![]() Click the Macros button.
Click the Macros button.
TIMESAVER Click the Marcos button on the Status bar.
![]() Click the name of the macro you want to run.
Click the name of the macro you want to run.
![]() Click Run.
Click Run.
Did You Know?
You can stop a macro. Press Ctrl+Break to stop a macro before it completes its actions.
Delete a Macro
![]() Click the View or Developer tab.
Click the View or Developer tab.
![]() Click the Macros button.
Click the Macros button.
![]() Click the macro name.
Click the macro name.
![]() Click Delete.
Click Delete.
![]() Click Delete to confirm the macro deletion.
Click Delete to confirm the macro deletion.
Did You Know?
You can set up a macro to run during a slide show. In Normal view, click the text or object you want to use to run a macro, click the Insert tab, click the Action button, click the Mouse Click tab or the Mouse Over tab, click the Run Macro option, click the list arrow, select the macro you want, and then click OK.

Controlling a Macro
If a macro doesn’t work exactly the way you want it to, you can fix the problem using Microsoft Visual Basic for Applications (VBA). VBA allows you to debug, or repair, an existing macro so that you change only the actions that aren’t working correctly. All macros for a particular presentation are stored in a macro module, a collection of Visual Basic programming codes that you can copy to other presentation files. You can view and edit your Visual Basic modules using the Visual Basic editor. By learning Visual Basic you can greatly increase the scope and power of your programs.
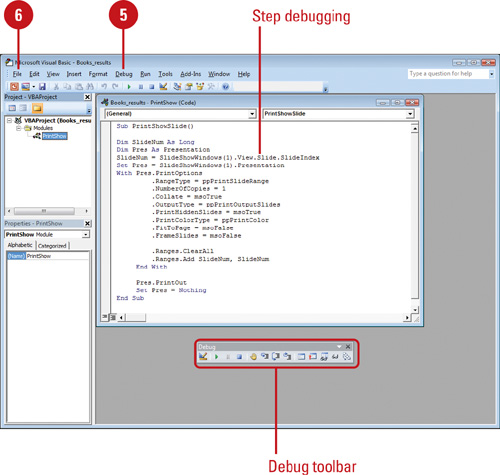
Debug a Macro Using Step Mode
![]() Click the View or Developer tab.
Click the View or Developer tab.
![]() Click the Macros button.
Click the Macros button.
![]() Click the name of the macro you want to debug.
Click the name of the macro you want to debug.
![]() Click Step Into.
Click Step Into.
The Microsoft Visual Basic window opens.
![]() Click the Debug menu, and then click Step Into (or press F8) to proceed through each action.
Click the Debug menu, and then click Step Into (or press F8) to proceed through each action.
![]() Use other commands like Step Over and Step Out to debug the code.
Use other commands like Step Over and Step Out to debug the code.
![]() When you’re done, click the File menu, and then click Close and Return to Microsoft PowerPoint.
When you’re done, click the File menu, and then click Close and Return to Microsoft PowerPoint.
![]() Click OK to stop the debugger.
Click OK to stop the debugger.
Did You Know?
You can display the Debug toolbar. In the Visual Basic editor, click the View menu, point to Toolbars, and then click Debug.
![]() Click the View or Developer tab.
Click the View or Developer tab.
![]() Click the Macros button.
Click the Macros button.
![]() Click the name of the macro you want to edit, and then click Edit.
Click the name of the macro you want to edit, and then click Edit.
![]() Click the Module window containing the Visual Basic code for your macro.
Click the Module window containing the Visual Basic code for your macro.
![]() Type new Visual Basic commands, or edit the commands already present.
Type new Visual Basic commands, or edit the commands already present.
![]() Click the File menu, and then click Close and Return to Microsoft PowerPoint.
Click the File menu, and then click Close and Return to Microsoft PowerPoint.
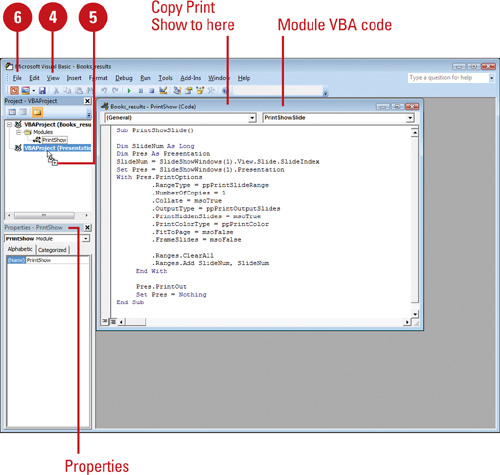
Copy a Macro Module to Another Presentation
![]() Open the presentation files you want to copy the macro from and to.
Open the presentation files you want to copy the macro from and to.
![]() Click the Developer tab.
Click the Developer tab.
![]() Click the Visual Basic button.
Click the Visual Basic button.
![]() Click the View menu, and then click Project Explorer.
Click the View menu, and then click Project Explorer.
![]() Drag the module you want to copy from the source presentation to the destination presentation.
Drag the module you want to copy from the source presentation to the destination presentation.
![]() Click the File menu, and then click Close and Return to Microsoft PowerPoint.
Click the File menu, and then click Close and Return to Microsoft PowerPoint.
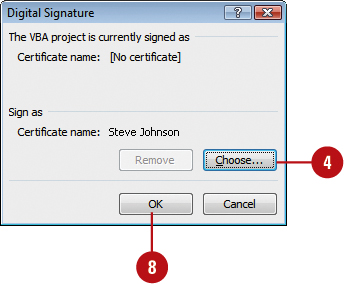
Adding a Digital Signature to a Macro Project
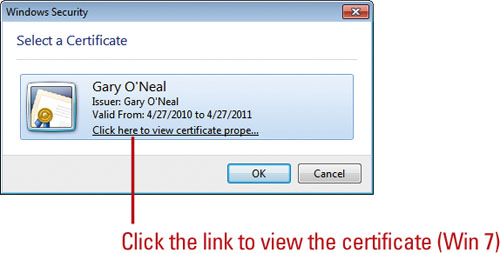
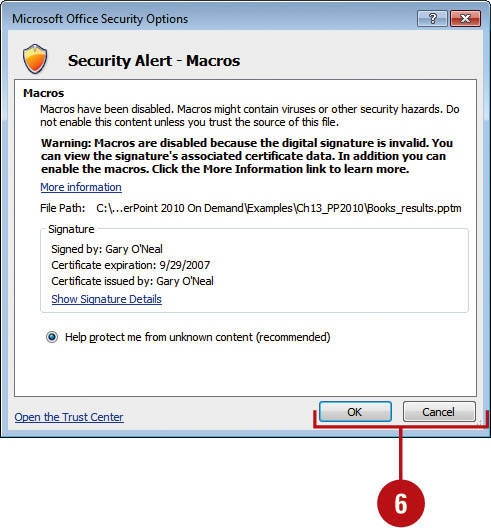
If you want to add a digital signature to a presentation with a macro, you need to add it using the Visual Basic editor. If you open a presentation that contains a signed macro project with a problem, the macro is disabled by default and the Message Bar appears to notify you of the potential problem. You can click Options or Enable Content in the Message Bar to view information about it. For more details, you can click Show Signature Details to view certificate and publisher information. If a digital signature has problems—it’s expired, not issued by a trusted publisher, or the presentation has been altered—the certificate information image contains a red X. When there’s a problem, contact the signer to have them fix it, or save the presentation to a trusted location, where you can run the macro without security checks.
Sign a Macro Project
![]() Open the presentation that contains the macro project, and then click the Developer tab.
Open the presentation that contains the macro project, and then click the Developer tab.
![]() Click the Visual Basic button to open the Visual Basic window.
Click the Visual Basic button to open the Visual Basic window.
![]() Click the Tools menu, and then click Digital Signature.
Click the Tools menu, and then click Digital Signature.
![]() Click Choose.
Click Choose.
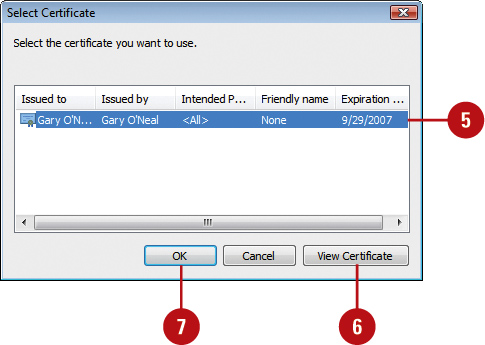
![]() Select a certificate in the list.
Select a certificate in the list.
![]() To view a certificate, click View Certificate or a link, and then click OK.
To view a certificate, click View Certificate or a link, and then click OK.
![]() Click OK.
Click OK.
![]() Click OK again.
Click OK again.
![]() Click the Save and Close button in the Visual Basic window.
Click the Save and Close button in the Visual Basic window.
Did You Know?
You can create a self-signing certificate for a macro project. Click the Start button, point to All Programs, click Microsoft Office, click Microsoft Office Tools, click Digital Certificate For VBA Projects, enter a name, and then click OK. Office programs trust a self-signed certificate only on the computer that created it.
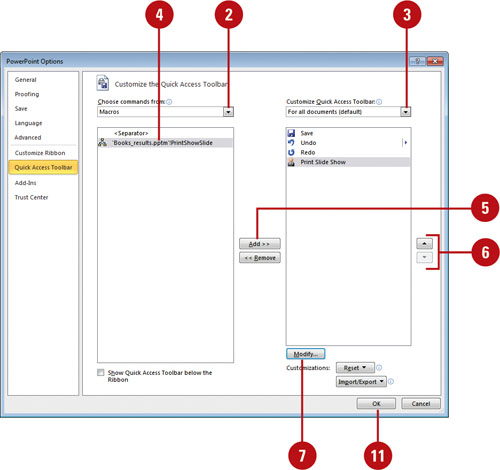
Assigning a Macro to a Toolbar or Ribbon
After you create a macro, you can add the macro to the Quick Access Toolbar or Ribbon (New!) for easy access. When you create a macro, the macro name appears in the list of available commands when you customize the Quick Access Toolbar or Ribbon in PowerPoint Options. When you point to a macro button on the Quick Access Toolbar or Ribbon, a ScreenTip appears, displaying Macro: presentation name!macro name.
Assign a Macro to a Toolbar or Ribbon
![]() Click the File tab, click Options, and then click Quick Access Toolbar or Customize Ribbon.
Click the File tab, click Options, and then click Quick Access Toolbar or Customize Ribbon.
![]() Click the Choose commands from list arrow, and then click Macros.
Click the Choose commands from list arrow, and then click Macros.
![]() Click the Customize Quick Access Toolbar and then click For all documents (default), or click the Customize the Ribbon list arrow, and then click For All Tabs.
Click the Customize Quick Access Toolbar and then click For all documents (default), or click the Customize the Ribbon list arrow, and then click For All Tabs.
![]() Click the macro you want to add (left column).
Click the macro you want to add (left column).
![]() Click Add.
Click Add.
![]() Click the Move Up and Move Down arrow buttons to arrange the commands in the order you want them to appear.
Click the Move Up and Move Down arrow buttons to arrange the commands in the order you want them to appear.
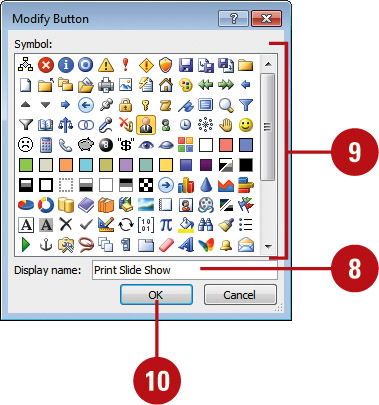
![]() Click Modify or Rename.
Click Modify or Rename.
![]() Type a name for the button.
Type a name for the button.
![]() Click an icon in the symbol list.
Click an icon in the symbol list.
![]() Click OK.
Click OK.
![]() Click OK.
Click OK.
See Also
See “Working with Toolbars” on page 6 and “Accessing Command Not in the Ribbon” on page 392 for information on using the Quick Access Toolbar.
Saving a Presentation with Macros
Macros are created using Visual Basic for Applications (VBA) code. If you add a macro to a presentation, you need to save it with a file name extension that ends with an “m”, either PowerPoint Macro-Enabled Presentation (.pptm), PowerPoint Macro-Enabled Show (.ppsm), or PowerPoint Macro-Enabled Design Template (.potm). If you try to save a presentation containing a macro with a file name extension that ends with an “x” (such as. pptx,. sldx, or.potx), PowerPoint displays an alert message, restricting the operation. These PowerPoint file types are designated to be VBA code-free.
Save a Presentation with Macros
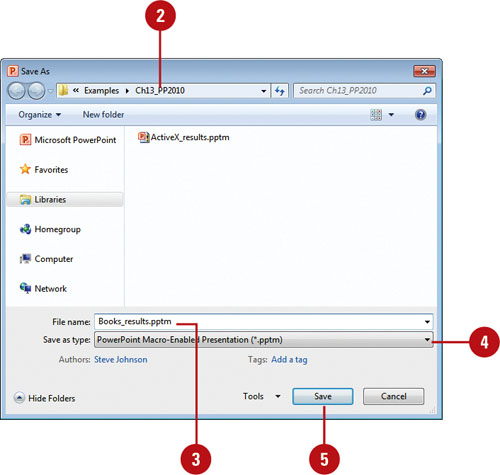
![]() Click the File tab, and then click Save As.
Click the File tab, and then click Save As.
![]() Click the Save in list arrow, and then click the drive or folder where you want to save the file.
Click the Save in list arrow, and then click the drive or folder where you want to save the file.
![]() Type a presentation file name.
Type a presentation file name.
![]() If necessary, click the Save as type list arrow, and then click one of the following:
If necessary, click the Save as type list arrow, and then click one of the following:
![]() PowerPoint Macro-Enabled Presentation. A presentation(.pptm) that contains VBA code.
PowerPoint Macro-Enabled Presentation. A presentation(.pptm) that contains VBA code.
![]() PowerPoint Macro-Enabled Show. A presentation slide show (.ppsm) that includes preapproved macros.
PowerPoint Macro-Enabled Show. A presentation slide show (.ppsm) that includes preapproved macros.
![]() PowerPoint Macro-Enabled Design Template. A template(.potm) that includes preapproved macros.
PowerPoint Macro-Enabled Design Template. A template(.potm) that includes preapproved macros.
![]() Click Save.
Click Save.
Opening a Presentation with Macros
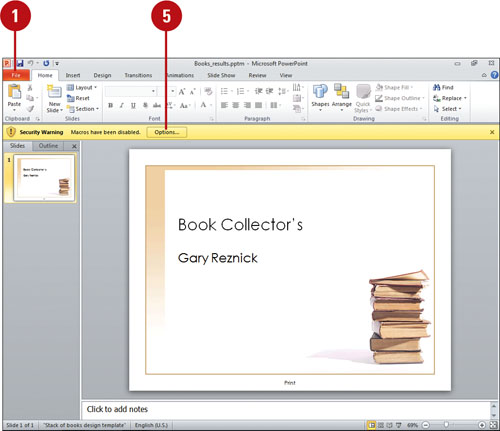
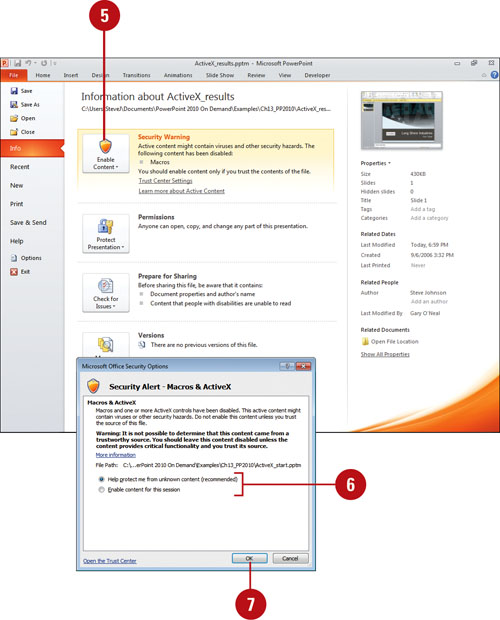
When you open a presentation with a macro, VBA, or other software code, PowerPoint displays a security warning to let you know the presentation might contain potentially harmful code that may harm your computer. If you know and trust the author of the presentation, you can change security options to enable the macro content and use the presentation normally. If you don’t trust the content, you can continue to block and disable the content and use the presentation with limited functionality in Protected view (New!). If you don’t want a security alert to appear, you can change security settings in the Trust Center in PowerPoint Options.
Open a Presentation with Macros
![]() Click the File tab, and then click Open.
Click the File tab, and then click Open.
![]() Click the Files as type list arrow, and then click one of the following presentation types with macros:
Click the Files as type list arrow, and then click one of the following presentation types with macros:
![]() PowerPoint Macro-Enabled Presentation. A presentation(.pptm) that contains VBA code.
PowerPoint Macro-Enabled Presentation. A presentation(.pptm) that contains VBA code.
![]() PowerPoint Macro-Enabled Show. A presentation slide show (.ppsm) that includes preapproved macros.
PowerPoint Macro-Enabled Show. A presentation slide show (.ppsm) that includes preapproved macros.
![]() PowerPoint Macro-Enabled Design Template. A template(.potm) that includes preapproved macros.
PowerPoint Macro-Enabled Design Template. A template(.potm) that includes preapproved macros.
![]() If the file is located in another folder, click the Look in list arrow, and then navigate to the file.
If the file is located in another folder, click the Look in list arrow, and then navigate to the file.
![]() Click the presentation with macros you want to open, and then click Open.
Click the presentation with macros you want to open, and then click Open.
![]() Click Options in the Message Bar.
Click Options in the Message Bar.
![]() You can also click the File tab, click Info, click the Enable Content button (New!), and then click Advanced Options.
You can also click the File tab, click Info, click the Enable Content button (New!), and then click Advanced Options.
![]() Click OK to enable content or click Cancel to keep disabled.
Click OK to enable content or click Cancel to keep disabled.
Inserting ActiveX Controls
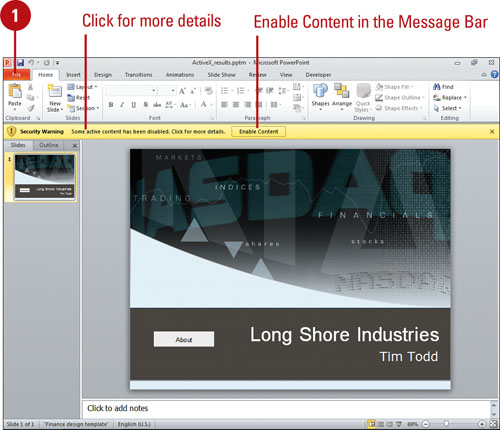
An ActiveX control is a software component that adds functionality to an existing program. An ActiveX control is really just another term for an OLE (Object Linking and Embedding) object, known as a Component Object Model (COM) object. An ActiveX control supports a customizable, programmatic interface. PowerPoint includes several pre-built ActiveX controls on the Developer tab, including a label, text box, command button, image, scroll bar, check box, option button, combo box, list box, toggle button, and more controls. To create an ActiveX control, click the control you want in the Developer tab, and then drag to insert it with the size you want. If there is a problem with an ActiveX control, PowerPoint disables it to protect the program and your data. When a problem does occur, a security alert dialog box appears, displaying information about the problem and options you can choose to leave it disabled in Protected view (New!) or enable it.
Insert ActiveX Controls
![]() Click the Developer tab.
Click the Developer tab.
![]() Click the button with the ActiveX control you want to use.
Click the button with the ActiveX control you want to use.
See the next page for a list and description of each ActiveX control.
![]() Display the slide where you want to place the ActiveX control.
Display the slide where you want to place the ActiveX control.
![]() Drag (pointer changes to a plus sign) to draw the ActiveX control the size you want.
Drag (pointer changes to a plus sign) to draw the ActiveX control the size you want.
![]() To resize the control, drag a resize handle (circles) to the size you want.
To resize the control, drag a resize handle (circles) to the size you want.

Deal with an ActiveX Control Security Alert
![]() Click the File tab, and then click Open.
Click the File tab, and then click Open.
![]() Click the File as type list arrow, and then click the presentation type that contains the Active X control.
Click the File as type list arrow, and then click the presentation type that contains the Active X control.
![]() If the file is located in another folder, click the Look in list arrow, and then navigate to the file.
If the file is located in another folder, click the Look in list arrow, and then navigate to the file.
![]() Click the presentation with the ActiveX control you want to open, and then click Open.
Click the presentation with the ActiveX control you want to open, and then click Open.
![]() Click the File tab, click Info, click the Enable Content button (New!), and then click Advanced Options. To enable all content (make trusted), click Enable All Content on the menu.
Click the File tab, click Info, click the Enable Content button (New!), and then click Advanced Options. To enable all content (make trusted), click Enable All Content on the menu.
![]() You can also click Enable Content in the Message Bar with the Security Warning.
You can also click Enable Content in the Message Bar with the Security Warning.
![]() If you trust the document content, click the Enable content for this session option to use it. If you don’t trust it, click the Help protect me from unknown content (recommended) option to block and disable the macros & activeX.
If you trust the document content, click the Enable content for this session option to use it. If you don’t trust it, click the Help protect me from unknown content (recommended) option to block and disable the macros & activeX.
![]() Click OK.
Click OK.
See Also
See “Setting ActiveX Security Options” on page 379 for more information about setting options that trigger the ActiveX security alert.
Using ActiveX Control

Setting ActiveX Control Properties
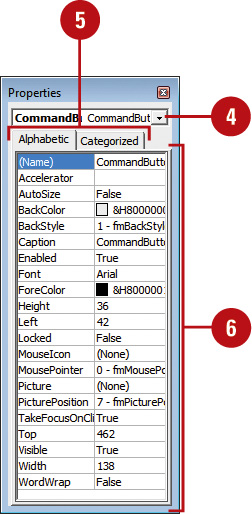
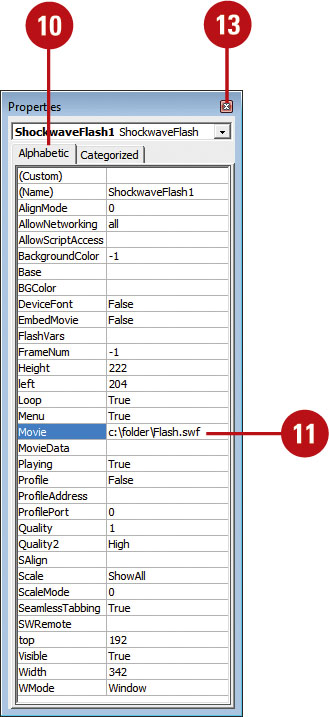
Every ActiveX control has properties, or settings, that determine its appearance and function. When you work with a control, you can open a property sheet that displays all the settings for that control in alphabetic or category order. The ActiveX controls appear in the Properties window in two columns: the left column displays the name of the control, and the right column displays the current value or setting for the control. When you select either column, a list arrow appears in the right column, allowing you to select the setting you want. After you set properties, you can add VBA code to a module to make it perform.
Set ActiveX Control Properties
![]() Select the control whose properties you want to modify.
Select the control whose properties you want to modify.
![]() Click the Developer tab.
Click the Developer tab.
![]() Click the Properties button to display the Properties window only, or the View Code button to open the Visual Basic Editor.
Click the Properties button to display the Properties window only, or the View Code button to open the Visual Basic Editor.
If necessary in the Visual Basic Editor, click the Properties Window button to show it.
![]() To switch controls, click the Controls list arrow (at the top), and then select the one you want.
To switch controls, click the Controls list arrow (at the top), and then select the one you want.
![]() Click the Alphabetic or Categorized tab to display the control properties so you can find the ones you want.
Click the Alphabetic or Categorized tab to display the control properties so you can find the ones you want.
![]() Click the property box for the property you want to modify, and then do one of the following.
Click the property box for the property you want to modify, and then do one of the following.
![]() Type the value or information you want to use.
Type the value or information you want to use.
![]() If the property box contains a list arrow, click the arrow and then click a value in the list.
If the property box contains a list arrow, click the arrow and then click a value in the list.
![]() If a property box contains a dialog button (...), click it to open a dialog box to select options or insert an object, such as a picture.
If a property box contains a dialog button (...), click it to open a dialog box to select options or insert an object, such as a picture.
![]() When you’re done, click the Close button on the Properties window.
When you’re done, click the Close button on the Properties window.
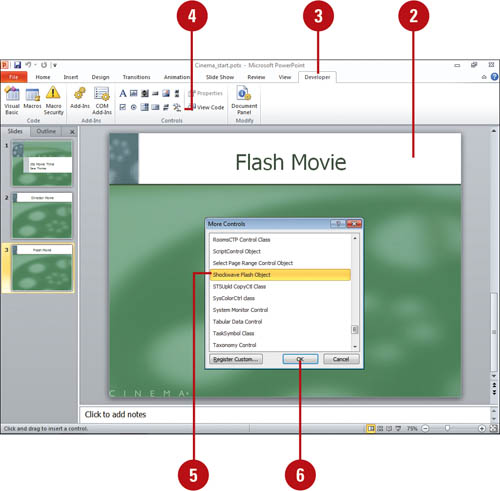
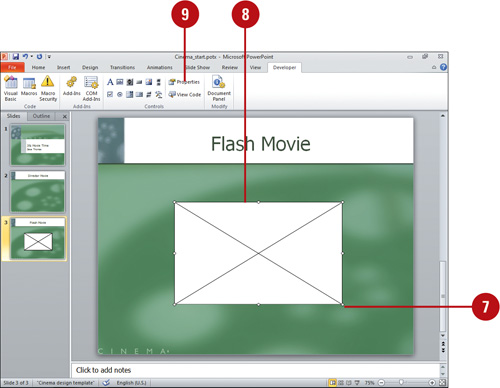
Playing a Movie Using an ActiveX Control
Although you cannot insert a Flash movie into a PowerPoint presentation, you can play one using an ActiveX control and the Flash player. Before you can use the control, the ActiveX control and Flash player need to be installed on your computer. You can get the ActiveX control at http://activex.microsoft.com/activex/activex/. To play the Flash (.swf) movie, you add the Shockwave Flash Object ActiveX control to the document and create a link to the file. If a movie doesn’t play, check ActiveX security options in the Trust Center in PowerPoint Options.
Play a Flash Movie
![]() Save the Flash file to a Flash movie file (.swf) using the Flash software.
Save the Flash file to a Flash movie file (.swf) using the Flash software.
![]() In Normal view, display the slide on which you want to play the Flash movie.
In Normal view, display the slide on which you want to play the Flash movie.
![]() Click the Developer tab.
Click the Developer tab.
![]() Click the More Controls button.
Click the More Controls button.
![]() Click Shockwave Flash Object.
Click Shockwave Flash Object.
![]() Click OK.
Click OK.
![]() Select the Shockwave Flash Object.
Select the Shockwave Flash Object.
![]() Click the Properties button.
Click the Properties button.
![]() Click the Alphabetic tab.
Click the Alphabetic tab.
![]() Click the Movie property, click in the value column next to Movie, type full path and file name (c:MyFolderMovie.swf), or the URL to the Flash movie file you want.
Click the Movie property, click in the value column next to Movie, type full path and file name (c:MyFolderMovie.swf), or the URL to the Flash movie file you want.
TIMESAVER If you place the.dcr file in the same folder as your presentation, you only need to type the file name.
![]() To set specific options, choose any of the following:
To set specific options, choose any of the following:
![]() To play the file automatically when the slide appears, set the Playing property to True.
To play the file automatically when the slide appears, set the Playing property to True.
![]() To play the movie once, set the Loop property to False.
To play the movie once, set the Loop property to False.
![]() To embed the Flash file, set the EmbedMovie property to True.
To embed the Flash file, set the EmbedMovie property to True.
![]() When you’re done, click the Close button.
When you’re done, click the Close button.
Changing the Document Information Panel
The Document Information Panel helps you manage and track document property information—also known as metadata—such as title, author, subject, keywords, category, and status. The Document Information Panel displays an XML-based mini-form using an InfoPath Form Template (.xsn) file developed in Microsoft InfoPath 2007. By using an XML InfoPath form, you can create your own form templates to edit the document property data and perform data validation.
Select a Document Information Panel Template
![]() Click the Developer tab.
Click the Developer tab.
![]() Click the Document Panel button.
Click the Document Panel button.
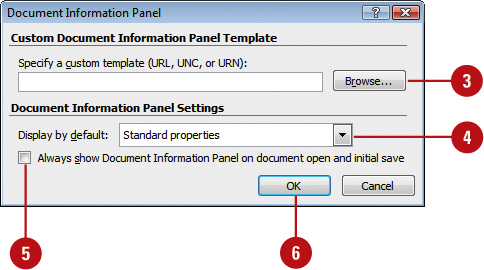
![]() Click Browse, locate and select the custom template you want, and then click Open.
Click Browse, locate and select the custom template you want, and then click Open.
![]() URL. Short for Uniform Resource Locator. The address of resources on the Web.
URL. Short for Uniform Resource Locator. The address of resources on the Web.
http://www.perspection.com/index.htm
![]() UNC. Short for Uniform or Universal Naming Convention. A format for specifying the location of resources on a local-area network (LAN).
UNC. Short for Uniform or Universal Naming Convention. A format for specifying the location of resources on a local-area network (LAN).
\server-nameshared-resource-pathname
![]() URN. Short for Uniform Resource Name.
URN. Short for Uniform Resource Name.
![]() Click the Display by default list arrow, and then select the default properties you want.
Click the Display by default list arrow, and then select the default properties you want.
![]() Select the Always show Document Information Panel on document open and initial save check box.
Select the Always show Document Information Panel on document open and initial save check box.
![]() Click OK.
Click OK.