
The subject of designers needing to know a little code to enhance user interfaces created in Blend is a pretty contentious issue among certain groups, because Blend has been sold as the collaborative piece for designers and Visual Studio as the piece for developers.
My belief is that while XAML is a dream scripting language in a lot of ways, XAML alone is not enough to allow complete freedom in design implementation, much the same as really complex Flash pieces often rely on some level of ActionScript.
In saying all this, I also strongly believe it is unreasonable to expect a designer to be able to simply “just learn to code.” There is a particular mindset and logic process to being able to code well, and while a lack of these traits would never suggest an unintelligence of designers, it points out that, for the most part, designers think and work one way, and developers do the other.
In this chapter you learn some important coding concepts, which are shown in blocks. Considering that “how to code .NET” books are rarely fewer than 500 pages, be sure to keep the expectation of what you learn in perspective. This chapter shows you only what I consider to be absolute must understand concepts. Should you need to know more (which in all probability you will), you will at least have a conceptual understanding of what it is that you need to learn and limit the amount of time you waste getting up to speed.
Several data types are commonly used in most applications. When developers talk about a “type,” they are referring to the type of data that resides within and is ultimately retrievable from a variable of that type.
You declare a variable in C# using the following syntax:
datatype identifier;
An example using the int datatype would, therefore, be as follows:
int myInt;
After you declare a variable, you can assign a value to it:
myInt = 10;
Initializing a variable with a value is good practice so, technically, you should write the code as follows:
int myInt = 10;
So what is an int? An int is a datatype that represents whole numbers. If you needed to create an object that represented a car, for example, you would use an int type variable to store the amount of wheels that the car would have, seeing as it is unlikely that a car would have half a tire.
You use different datatypes to store values that you use within your application and to ensure performance and accuracy. You should always choose a datatype that best suits the object (such as a tire) it describes.
Table 10.1 shows the most common types (which are referred to as primitives), a brief description of the data types, and an example of the syntax used with the data type.
Table 10.1. A Description of C# Primitive Types
Description | Syntax Example | |
|---|---|---|
Int | Integer values represent whole numbers. | int MyInt = 12; |
Examples:
| ||
double | A decimal value that allows greater precision when working with numbers. | double MyDouble = 12.9828; |
Examples:
| ||
Bool | The Boolean value represents a True or a False. | bool MyBool = false; |
Example:
| ||
Char | Represents a single Unicode character. | char MyChar = ‘T’; |
String | Holds a collection of character, symbols, and numbers and is always quoted. | string MyString=“Hello”; |
Example:
| ||
Object | This is the base of all types and can hold different types to be parsed to other objects. | object MyObject = 2; object MyObject = “a String” ; |
While these data types represent the most commonly used data types, it is not uncommon to need to create your own types, which are generally made up of the types shown in Table 10.1 or collections of other user-defined types.
By following the steps described below in Visual Studio, you will attain some valuable experience at defining variables and assigning values to them.
Open Blend and create a new application.
Add a Button element called btnShowResult to the artboard.
Save the application.
Open the Properties panel and select the Event icon (the icon at the top, with the lightning bolt)
Search for the ClickEvent, which should be near the top.
Double-click in the input field to launch Visual Studio and automatically add a click event handler.
Add the code shown in Listing 10.1 to the click handler. Try changing the values as well as defining new types.
Example 10.1. Combining Strings and ints to Make a Message
        private void btnShowResult_Click(object sender, RoutedEventArgs e)
        {
            string FirstName = "Brennon";
            string LastName = "Williams";
            string CompleteName = FirstName + " " + LastName;

            int MyRealAge = 34;
            int AgeIFeel = 54;

            MessageBox.Show(FirstName);

            MessageBox.Show(MyRealAge.ToString() );
        }
After you enter the code, click on the File menu in Visual Studio and then click Save All. If a dialog box pop ups, prompting you to save the solution file, agree. Press F5 to run the application and then click the Show Result button.
Notice that you added .ToString() to the variable MyRealAge when you used it in the MessageBox. You did this because the MessageBox requires a value of type String to display.
As you can see in Listing 10.1, the string type variable CompleteName uses the mathematic symbol “+” to concatenate (join together) values of the same type (two string variables).
In the case of numeric data types, you can apply calculations, as follows:
int TrueAge = (AgeIFeel /2) + MyRealAge;
Joining two types (concatenation) is generally fine as long as they are the same type. But if you want to join two numeric types—for example, a variable of type int with the value 3 assigned and another with the value of 4—you need to first convert these two variables to a string. Look at the following differences to understand this well:
        int Value1 = 3;
        int Value2 = 4;

        //Equals 7
        int AddedValues = Value1 + Value2;

        //Equals "34"
        string JoinedValues = Value1.ToString() + Value2.ToString();
Now, what if you want to display “my age” in a sentence, using the strings and the ints declared?
You can use the “+” symbols to concatenate the string types (don’t forget to add the spaces between the words by adding “”) and join the string version of the int to the sentence being assigned to the variable:
string MyStatement = CompleteName + " " + "feels " + Convert.ToString(TrueAge);
Add a textbox element to your application and name it txtResult. Then enter the code into the Click handler block, as shown in Listing 10.2.
Example 10.2. Showing the Correctly Formatted Message
        private void btnShowResult_Click(object sender, RoutedEventArgs e)
        {
            string FirstName = "Brennon";
            string LastName = "Williams";
            string CompleteName = FirstName + " " + LastName;

            int MyRealAge = 34;
            int AgeIFeel = 54;
            int TrueAge = (AgeIFeel / 2) + MyRealAge;

            string MyStatement = CompleteName + " " + "feels " +
Convert.ToString(TrueAge);
            this.txtResult.Text = MyStatement;

        }
In this code you removed the MessageBox calls and instead directed the variable value of MyStatement to the TextBox (txtResult) in the user interface. Notice that you added a .Text part after txtResult, which says that you want to assign a value to the Text property of the txtResult TextBox.
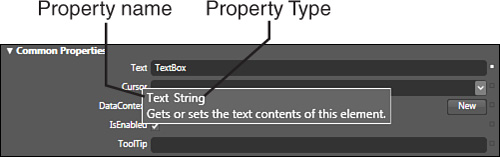
This is no different from opening the UI in Blend, selecting the txtResult TextBox, and finding the Text property in the Common Properties category of the Properties tab.
Think about the following carefully:
The txtResult TextBox that you created in Blend has a
Textproperty in Blend.The same txtResult object in code, which represents the TextBox you created in Blend, also has a
Textproperty to which you can assign a value.
So the same must be true for a button? Correct.
The Button element in Blend has a Content Property that you specify the label shown in the Button. If you named the Button in Blend, for example, you can type the Button name in code, type .Content =, and then type the value you want shown.
Simple stuff, right?
In Listing 10.2, you also called a Convert method and asked to convert the value to a string. There is no difference in calling the Convert method to using the .ToString() method, but it’s important to note that there is a way to convert between specific types.
You can convert many types to other types, but it needs to be a valid conversion. Otherwise, an exception results (that is, a big ugly message box appears, or your application may even crash).
An example of a valid string to int conversion is shown in the following code:
int MyValue = Convert.ToInt32("192");An example of an invalid string to int conversion is shown in the following code:
int MyValue = Convert.ToInt32("A192");This string is invalid because the compiler cannot convert the letter A into a number.
The compiler in .NET is very sophisticated, so most of the time, it will tell you what is wrong with your code. In the case of conversions, however, you won’t know it’s wrong until you run your application (runtime).
To rehash data types, take a moment and review the following:
Data types store particular types of data, specific for certain types of values.
You can convert between the data types if the conversion will result in a valid value, such as the whole number of a string converted to an int.
You can perform mathematical operations on numeric types using standard mathematic symbols.
The “+” mathematic symbol allows you to concatenate (or join) string types.
You can assign variable values to an objects’ properties (such as
Text,Content, and so on) just the same as you can enter values in element properties in Blend.
A class is an awesome concept in coding. Without it, you would not be able to perform some of the complex scenarios required in applications today.
The .NET Framework contains thousands of classes that are ready for you to use in your own code, but it does take some time to get to know them and the purposes for which they are best used.
There are different types of classes, such as base classes and abstract classes. This chapter covers the public, non-static classes that you can use anywhere in your application.
In design time, you can build a class in Visual Studio by using the correct syntax and by providing public methods and properties that a user of the class can access in order to set or get information held within the class. During runtime, the class becomes an object when a new instance (called instantiation) occurs. This generally takes the following format:
ClassName InstanceName = new ClassName();
Similar to when you created a variable of the type int, you first specify the type (ClassName), then an identifier (InstanceName), and then you assign a new instance of the type to the identifier: = new ClassName();.
The concept of a class is similar to that of a blueprint, whereby you design an object to be a generic description of something.
A car is a pretty simple example.
You create a class that describes a car, which means that it needs to have properties that refer to the number of wheels on the car, the number of doors, or even an engine size.
When creating your class, create a generic blueprint of a car. When you have a separate instance of the blueprint, you can then create a specific type of car.
The following steps take you through creating a simple class:
In Visual Studio, right-click on the project file and select the Add menu item.
From the submenu that appears, at the bottom, select the Class menu item.
The Add New Item dialog appears, prompting you to enter a name for the class. Name the class Car.cs.
Visual Studio creates a new class for you, with syntax similar to the following:
class Car
    {
      }
The concept of scope is one that either you get or you don’t. In coding terms, something that is “public” means that everything else in the code (other classes and so on) has access to that public item. The opposite to this is “private,” which means that only items that have a direct level of ownership can access the item.
To demonstrate this, the following sample creates a public and a private variable, similar to what you did with Data types.
Inside the class you just created, add the code shown in Listing 10.3.
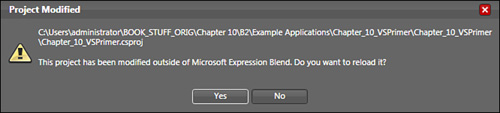
Save All in Visual Studio and then return to Blend. You may be prompted to update the solution, as shown in Figure 10.2, because you added a new class file.
Blend will probably close your current screen, but you should switch to the Project tab and then make sure that it shows the new file addition: Car.cs. If this file isn’t present, shut down the solution and then open it again.
Double-click on the Window1.xaml file to open it again in Blend.
Create a new button called btnMakeCar.
Add a Click handler for this new button by double-clicking in the input field for the Click event.
Add the code in Listing 10.4 to create a new instance of the generic Car type.
You can see how the new Car is created. Now it’s time to see the effects of scope.
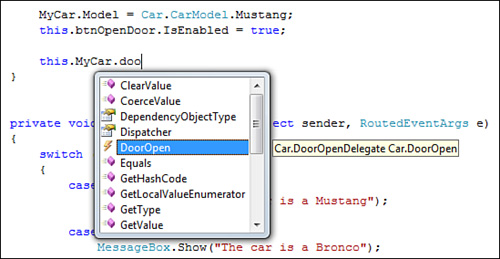
In Listing 10.3 you can see that a variable with the type “public” and an another one with the type “private” have been declared. Under the new instance of MyCar, type the word MyCar. (be sure to include the dot after it) to view the IntelliSense output (see Figure 10.3).
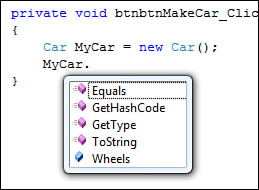
You should see that the member variable Doors is not present but Wheels is. This is because Wheels is public and Doors is not. The only way Doors can have a value is to set inside its own class. How can you get around this?
Properties allow you to give controlled access (make it read-only or read and write) to any member variable. There are a number of ways to make a property, but this section looks at two specific types. This section also explains the advantages of using one over the other.
CLR (Common Language Runtime or .NET) properties are really very simple, but this simplicity comes at the cost of reduced functionality. Still, the following example shows the concept of Properties clearly:
If you typed MyCar. in Window1.xaml.cs, remove it.
In the Solution Explorer, find the Car.cs class file and double-click to open it again.
Consider this for the concept: The property should have a private backing member and a public accessor method allowing the user to get and set values.
Add the code from Listing 10.5.
Breaking this down, you can see that the int Wheels member is now private. This is called the private backing field. Being private now means that the member variables can only be assigned a new value by either the “set” of the public property accessor NumberOfWheels or somewhere else internally in the code of this class only.
If you remove the “set” altogether, the property effectively becomes read-only, because your user can get the value but can’t set it. If this is your intention, make sure you define a default value of the private backing field.
Go back to the code point where you created an instance of the Car class and again type MyCar. (Be sure to include the ending dot.) This time you should see both the properties to which you can assign values, as shown in Listing 10.6.
There you have it, nice and simple! You can now create properties of an object and control how the user of the object can interact with it using scope.
A DependencyProperty (DP) is not that dissimilar from a CLR property. In fact, a DP is an extension of the CLR property concept, allowing for much greater flexibility in control over the values contained by the property.
I explain the DP concept in two parts, the first being the “public” accessor (CLR wrapper) for the property, as shown in Listing 10.7.
Listing 10.7 shows you the slight changes to the “public” property interface compared with the CLR property.
You still have the get/set, which means that if you want to work with this property, you call it using exactly the same method as shown in Listing 10.6.
Internally, the get/set instances call the WPF property API by using GetValue/SetValue, as shown in Listing 10.7.
The second part is about the backing field. DPs also have a backing field, but instead of the field being a private member variable, the DependencyProperty type is the field, as shown in Listing 10.8.
Example 10.8. The Static DependencyProperty Declaration
        // Using a DependencyProperty as the backing store for NumberOfSeats. This
enables animation, styling, binding, etc...
        public static readonly DependencyProperty NumberOfSeatsProperty =
            DependencyProperty.Register("NumberOfSeats", typeof(int), typeof(Car));
This code contains quite a few changes and added complexity compared with the “private” backing field member used in CLR events. But the complexity is worth it considering the additional benefits, such as support for binding, animation, styling, property inheritance (the parent supplies the value), and the ability to modify or create your own metadata for the property.
Listing 10.8 shows the bare minimum code required to create a DependencyProperty to which the naming convention NumberOfSeatsProperty is very important, because it is the name of the property that is looked up by the WPF property system.
On creation you can also see that you are required to register the DependencyProperty details. As shown in Listing 10.8, at the minimum, three values are required:
The name of the property: NumberOfSeats
The data type of the property: typeof(int)
The owner class type: typeof(Car)
To implement this property, as shown in Listings 10.7 and 10.8, you are required to also add a using statement at the top of the class file:
using System.Windows;
Remember how I mentioned previously that the .NET Framework has thousands of classes? DependencyProperty is one of those classes, and it lives in the System.Windows namespace.

Your class must also be a DependencyObject, so you need to inherit from this type to enable the functionality DependencyObject provides, which happens to be the GetValue() and SetValue() methods in the public accessor. You will also want this class to be publicly accessible for other areas of the application to work, so please take note that the scope changes here as well.
Modify your class declaration to look like the following:
public class Car : DependencyObject
Until you add the using directive for System.Windows, your class will not know about the DependencyObject type either. Again, place the cursor at the end of the word (on the t in DependencyObject) and then select the small red underscore to add the using directive as required.
Back in the Window1.xaml.cs file, you can now set the property, as shown in Listing 10.9.
As shown in Listing 10.9, the code is no different from when you use a CLR property.
Using the properties in markup is a different scenario, however. For XAML you can only set a property if it is a DependencyProperty. If you want to include an instance of your Car in XAML, you need to convert all your properties to DPs to have access to them.
For more information on properties, especially WPF property types, visit http://msdn2.microsoft.com/en-us/library/ms753192.aspx or do a search on the web for DependencyProperties.
Without the capability to conditionally branch code logic, you would be unable to react to different interactions from users. Conditional coding happens many times within an application. C#, like most languages, provides a number of ways to test conditions. Probably the most ubiquitous method is the humble if-else, which allows you to test “if” something equals x, then do y; “else” do z.
The generalized concept of the if-else is the following:
if(CONDITION)
... //do this
else
... //do this
The CONDITION is an evaluation that can either be true or false, so it is a Boolean evaluation.
Consider the following three variables:
            int a = 5;
            int b = 5;
            int c = 10;
Now consider the following:
a is equal to b
a + b is equal to c
a is not equal to c
These are all true statements that in code are written as follows:
            if (a == b)
            {
                //do something here
            }

            if ((a+b) == c)
            {
                //do something here
            }

            if (a != c)
            {
                //do something here
            }
Notice that not a single equals (=) sign is present.
a = c would mean that “a” would then contain a value of 10 (or as some people say “a gets c”)
whereas
a == c is a statement asking if “a” is equal to “c”
The second example shows that a mathematic equation should be contained within a set of parentheses, so the addition is performed to get a value to then compare against c.
The last example also shows that you can query if something is not equal to something else, using the != symbols.
You can also use additional mathematic notation for conditional determinations, such as < or > or even <= and >=.
You don’t have to rely on local values within variables for these conditional tests, however. You can also call methods that return a value that would then be tested. Imagine a method called GetNumberOfWheels exists in the Car class and returns the value of 4. To use this method in the if statement, you would write something like the following:
if (MyCar.GetNumberOfWheels() == 4)
            {
                //Do this is the car has 4 wheels
            }
At the moment you don’t have this method in the car class, but because the DependencyProperty NumberOfWheels does exist, you could also just call the property value for a return such as the following:
            if (MyCar.NumberOfWheels == 4)
            {
                //Do this is the car has 4 wheels
            }
The else statement allows you to deal with the scenario that a CONDITION is either a true or a false, or vice versa.
            if (MyCar.NumberOfWheels == 4)
            {
                //Do this if the car has 4 wheels
            }
            else
            {
                //Do something here if the car has more or less than 4 wheels
            }
The preceding example also raises additional questions, such as, “What if there are three or five wheels?”
You can use the else statement with additional if conditional testing to deal with multiple scenarios, as demonstrated in the following code:
if (MyCar.NumberOfWheels == 3)
            {
                //Do this if the car has 3 wheels
            }
            else if (MyCar.NumberOfWheels == 4)
            {
                //Do this if the car has 4 wheels
            }
            else if (MyCar.NumberOfWheels == 5)
            {
                //Do this if the car has 5 wheels
            }
            else
            {
                //Do something here if the car has
                //less than 3 or more than 5 wheels
            }
Within your code you can use numerous other conditional statements, such as do while loops and switch logic (which is discussed shortly). Each method has its positives and negatives, but essentially all are about allowing you to determine what should occur “if” something happens.
Enums are wonderful in that you get to provide a specific set of scenarios to which a data type can be equal. An example of where you can use enumerations is when you need to know the day of the week.
A week has only seven days, so by putting these into an enum type, the code using the type is constrained to using one of these types, thereby reducing the chances of errors in the code logic.
This does not mean that an enum type must contain a specific number of known values. It means that you are free to specify what you want the known values to be, which you will see shortly.
Starting simple here, consider the example of the days of the week as a concept of how to declare an enum type.
A day-of-the-week enum would be declared similarly to Listing 10.10.
Except for the last value, notice that all the values have a comma after them.
Now that the enum is defined, elsewhere in your code you could create a member of this type.
Recall that you previously added private members for use as the backing fields in the CLR property types. Now you can create a member using this enum as the data type as well.
The last paragraph should now have you thinking about properties. You should now understand that the enum is a type, just the same as a string, an int, or a bool (just specific about the values that can be set to it). You use the type in exactly the same way.
Consider an int type declared as a global member variable:
private int MyIQ = 64;//Oh dear...
Notice the similarities of using your enum as the data type, as shown in the following:
private DayOfTheWeek CurrentDay = DayOfTheWeek.Saturday;
The difference is that with the int member, you are free to set its value at whatever valid integer you please, whereas with the DayOfTheWeek type member, you must set its value to one of the values as defined within the enum.
Moving back to the Car class, create the enum type, as shown in Listing 10.11.
Now add the code shown in Listing 10.12 to create a DependencyProperty of type CarModel. Pay close attention to how the default value of the property is set.
Example 10.12. Creating the CarModel DependencyProperty
        public CarModel Model
        {
            get { return (CarModel)GetValue(ModelProperty); }
            set { SetValue(ModelProperty, value); }
        }

        public static readonly DependencyProperty ModelProperty =
            DependencyProperty.Register("Model", typeof(CarModel), typeof(Car), new
PropertyMetadata(CarModel.Fairlane));
Return to the Window1.xaml.cs file. Set this new property using the following syntax:
MyCar.Model = Car.CarModel.Mustang;
The switch statement is really another form of conditional coding and is extremely well suited to the use of enums because the value required for a switch must be a constant, which enum values are. You can’t add more values to an enum in runtime, so the ones you declare are implicitly constant.
The switch statement looks like a really fancy if statement, and the logic reads similarly. The following is a sample to demonstrate the concept, using a member variable CurrentDay, which is of enum type DayOfWeek as previously shown in Listing 10.10.
            switch (CurrentDay)
            {
                case DayOfTheWeek.Sunday:
                    //Should be asleep
                    ... do something here
                    break;
                case DayOfTheWeek.Monday:
                    //Get up early :-(
                    ... do something here
                    break;
                case DayOfTheWeek.Tuesday:
                    //Feel ok, getting used to being up early
                    ... do something here
                    break;
                case DayOfTheWeek.Wednesday:
                    //Hump day.. looking forward to weekend
                    ... do something here
                    break;
                case DayOfTheWeek.Thursday:
                    //Start winding down.. can't overdo it now
                    ... do something here
                    break;
                case DayOfTheWeek.Friday:
                    //Pretty much a standard holiday day.. don't tell the boss
                    ... do something here
                    break;
                case DayOfTheWeek.Saturday:
                    //Hangover from Friday
                    ... do something here
                    break;
                default:
                    //Should never get here
                    ... do something here - log or throw an error
                    break;
            }
The code is a little sarcastic, but the idea is that you test for the current value in the case and exit from the switch logic by using a break; at the end of each case.
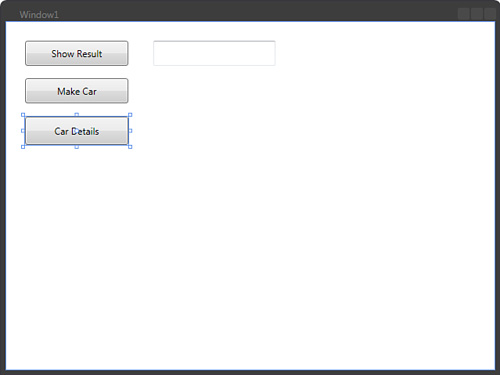
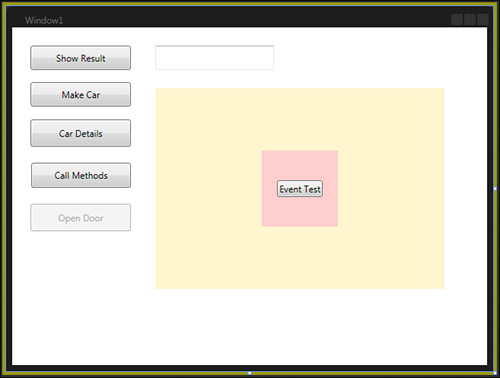
Add another button to your test application, calling it btnCarDetails (see Figure 10.5).
Add a Click event handler for the new button to return to Visual Studio.
In the previous button click handler, you created a new instance of the Car class (MyCar) and set its property values. While doing this, you created an instance that was only local to that particular handling method, so now that you have a new click handler, you will be unable to access the MyCar instance.
To change the scope of the declared MyCar instance from local to global, take out the declaration of the previous handler and place it above the click handler, as shown in Listing 10.13.
Example 10.13. Making an Object Instance Global in Scope
        //Make the MyCar instance global in scope
        private Car MyCar = new Car();

        private void btnMakeCar_Click(object sender, RoutedEventArgs e)
        {
            MyCar.NumberOfDoors = 2;
            MyCar.NumberOfWheels = 4;
            MyCar.NumberOfSeats = 7;

            MyCar.Model = Car.CarModel.Mustang;
        }
Note that the scope declaration of private was added to the front of the declaration. Although this is not required (by default, all global member variables are private in .NET C#), it is good practice to declare the scope, as shown.
Now add the code in Listing 10.14, which makes use of the MyCar instance now being accessible as a global and demonstrates a usage of the switch statement.
Example 10.14. Switch and Case Statements Make Code Readability Simple
        private void btnCarDetails_Click(object sender, RoutedEventArgs e)
        {
            switch (this.MyCar.Model)
            {
                case Car.CarModel.Mustang:
                    MessageBox.Show("The car is a Mustang");
                    break;
                case Car.CarModel.Bronco:
                    MessageBox.Show("The car is a Bronco");
                    break;
                case Car.CarModel.Escort:
                    MessageBox.Show("The car is an Escort");
                    break;
                case Car.CarModel.Fairlane:
                    MessageBox.Show("The car is a Fairlane");
                    break;
                case Car.CarModel.Mondeo:
                    MessageBox.Show("The car is a Mondeo");
                    break;
                default:
                    MessageBox.Show("Error.. the car model is not set");
                    break;
            }
        }
Note that the value being tested is written like so:
switch (this.MyCar.Model)
The this. says that the MyCar instance is a member of this class. This is not required, but it can make readability a lot better in complex code because you can instantly tell that MyClass is local to the class.
The case statements cover every possible combination of the enum type that the member variable Model also represents. It is quite easy to follow the code through when reading it.
Enums have other benefits and are quite often used to track the state of objects and where the user is within the application. Enums are great and reduce the potential for logical errors, so I advise that you use them as often as possible.
Some old-school programmers probably remember methods being called functions. I am unsure as to why the name changed, but no doubt it kept someone in a job at Microsoft and the marketing department busy for another year.
You already used a method when you called the MessageBox object and asked it to show some information in a dialog box:
MessageBox.Show(FirstName);
The Show() is the method, and as the IntelliSense in Visual Studio describes, the Show() method “Displays a message box in front of the specified window.”
Actually, the name method is much better suited than function (sorry Microsoft people; you were right), because two blocks of code can provide the same functionality but each can contain completely different code in order to achieve the same thing, as shown in Listing 10.15.
The code in both methods performs the same functionality, but achieves that functionality with differing methods. They return the same value.
A method is a block of code that is written to perform a certain function in a certain way. It can specify a returning value (as shown in Listing 10.15) and can accept values to work with, which are referred to as parameters (or arguments), as shown in Listing 10.16.
Parameters are not required, however it is not uncommon to simply branch code because a block of code is becoming very large and harder to manage. Branching code in this fashion is continually being carried out on a large application to improve readability and understanding and, in some cases, performance. The process is known in the industry as “refactoring.”
You can name two methods the same as long as their parameters differ in either the number or the types of parameters. This is called method overloading, as shown in Listing 10.16.
Example 10.16. Two Ways to Add Two Numbers
        public int AddTwoNumbers(int NumberOne, int NumberTwo)
        {
            int Result = NumberOne + NumberTwo;
            return Result;
        }

        public int AddTwoNumbers(string NumberOne, string NumberTwo)
        {
            int Result = Convert.ToInt32(NumberOne) + Convert.ToInt32(NumberTwo);
            return Result;
}In code, you use what is called a dot (or period) notation to call a method. A method belongs to the object where it is written in, so in the case that you added the methods shown in Listing 10.16, you could call them from a button click handler like the following:
this.DoCalculation_Divide();
Alternatively, the second method would be called as follows:
this.DoCalculation_Multiply();
If these methods were written inside a different class object, for example, the Car class, you would call them either as
this.MyCar.DoCalculation_Divide();
this.MyCar.DoCalculation_Multiply();
Looking at the following code (the first method from Listing 10.16), you see a simple yet well defined method.
        public int AddTwoNumbers(int NumberOne, int NumberTwo)
        {
            int Result = NumberOne + NumberTwo;
            return Result;
        }
Let’s start with the first line of this method:
public int AddTwoNumbers(int NumberOne, int NumberTwo)
The word public represents the scope of the method, or who can use it. This again means that if this method was inside the Car class, it would need to be public—the same as the properties—in order to use it outside of the code of the class.
Next you see that an int is declared. This states that this method must return a value of type int.
The method has a name to be referred by: AddTwoNumbers. This is an ideal name for the method because, just by looking at the name, you know what the method does. You should try to implement meaningful names to every area of your code, because anyone else looking at it might otherwise find it difficult to understand what you are trying to achieve.
Next is an open parenthesis, followed by a parameter declaration (int NumberOne), a comma separating the first parameter from the second (int NumberTwo), and then a closing parenthesis.
The next line creates the opening brace, or {, for which you will see a closing brace, or }, at the end of the method listing. These braces tell the application that this is a block of code. When the execution path of the application enters this “block” of code, every line should be executed until the ending brace is met or an instruction is given to exit the code block. This is the same as the click handler blocks of code. In fact, the click handler is just another method.
The next line declared a variable (int Result) and at the same time initialized the variable and assigned (=) the resulting value by performing the addition of the two supplied parameters (NumberOne + NumberTwo).
Finally, you use the keyword return to fulfill the requirement to return a value of int: return Result;
In the situations where you want to perform an action but don’t want the method to have to return a value, you use a special type called void, so the first line of the method becomes the following:
public void AddTwoNumbers(int NumberOne, int NumberTwo)
Methods get very complex at times, and there are many different ways to parse values into them using parameters.
Add another button called btnCallMethods to your application.
Try adding the code for Listing 10.17, modifying the original button click handler you added for the btnShowResult button. Run the application and click the new button to try and follow the code logic.
Example 10.17. Method Calling Example
        private void btnCallMethods_Click(object sender, RoutedEventArgs e)
        {

            int MyNumber1 = 25;
            int MyNumber2 = 50;

            int AdditionResult = AddTwoNumbers(MyNumber1, MyNumber2);

            this.txtResult.Text = AdditionResult.ToString();
        }

        public int AddTwoNumbers(int NumberOne, int NumberTwo)
        {
            int Result = NumberOne + NumberTwo;
            return Result;
        }

        public int AddTwoNumbers(string NumberOne, string NumberTwo)
        {
            int Result = Convert.ToInt32(NumberOne) + Convert.ToInt32(NumberTwo);
            return Result;
        }
Did you notice that you didn’t have to specify which of the two methods should be used? The compiler is very clever; it works it out based on the types that you are parsing to the method as parameters.
You can have as many methods as you need, and you should use them as often as you need to ensure that specific blocks of code run as required. Another benefit of creating a method is that you can call the method throughout multiple areas of your remaining code with much less risk of errors creeping in. Essentially, if you need to change the functionality of the code and are doing the same thing in lots of different places throughout your code, you only need to change it in one place if all those areas are calling the same method, which also reduces the chances of defects in your code.
The principle is the same as creating a Style Template for a Button element. If you need to change the Style, do it in its template once, and every button that uses that particular style will automatically update.
It is good practice to comment your methods so that other people who read your code or use your code in theirs can understand exactly what it is you are asking them to parse and what you are going to give them back. Code comments are also very handy for the person writing the code, as inevitably most developers look back over their code, find comments, and think, “What was I thinking when I wrote this?”
The IntelliSense in Visual Studio uses the information that you add, so it becomes a handy instruction to others who use your code (see Figure 10.6). These special comments can also be used to generate help files and so on.
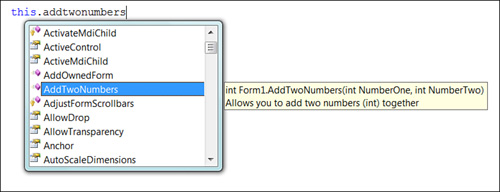
In Visual Studio C#, you achieve this by placing three forward slashes on the line just before the method declaration. Visual Studio then puts in a special comment block for you; you just need to fill it out.
The following code shows the comments completed for the first method:
    /// <summary>
        /// Allows you to add two numbers (int) together
        /// </summary>
        /// <param name="NumberOne">The first number to add</param>
        /// <param name="NumberTwo">The second number to add</param>
        /// <returns>The two numbers added together</returns>
        public int AddTwoNumbers(int NumberOne, int NumberTwo)
        {
            int Result = NumberOne + NumberTwo;
            return Result;
        }
You will now practice creating and calling a method that relates to the controls of the user interface: the txtResult TextBox and the btnShowResult Button elements. For this, remove the code previously added to the btnCallMethods click handler method and add the code in Listing 10.18.
Example 10.18. Validating User Input in Code
        private void btnCallMethods_Click(object sender, RoutedEventArgs e)
        {
            try
            {
                //Take the number given and make the textbox width
                //change
                int WidthIn = Convert.ToInt32(this.txtResult.Text);
                this.txtResult.Width = ValidateWidth(WidthIn);
            }
            catch (Exception x)
            {
                MessageBox.Show("There is an error : " + x.ToString());
            }

        }

        private int ValidateWidth(int NewWidthValue)
        {
            //Make sure the number entered is minimum 100, maximum 250
            if (NewWidthValue < 100)
                return 100;
            if (NewWidthValue > 250)
                return 250;
            //Number supplied is valid
            return NewWidthValue;
        }
When you run this application, enter different values in the textbox and click the Call Methods button. What happens?
The TextBox width changes. You can now see how referring to objects you add in Blend (as long as you give them a name) are accessible in code, and you can set values to them, just as you would in the Blend property panel.
In Listing 10.18, there is a new keyword called try, which has the code brace { directly under it. If you follow the code down in the click handler method, the code also includes the closing brace }. A separate code block below it reads as follows:
            catch (Exception x)
            {
                MessageBox.Show("There is an error : " + x.ToString());
            }
Collectively, this is called a try-catch statement, which means that you can protect the integrity of the application by capturing any error that occurs during the execution of the code with the first block.
Why put it there? Because the user must enter a number into the textbox, and you cannot be 100% certain that the value entered will be a number. For example, the value might be a letter or symbol. You want to catch the error, if it occurs, and relay the information back to the user.
If you do not catch errors like this, your application will either crash or hang, neither a particular confidence booster to your end user.
The first line of code is as follows:
catch (Exception x)
This code states that you want to catch any Exception that occurs. The x will be used later as a reference to that error. You can specify a number of different types of Exceptions, which allow you to fully understand any issues that have occurred during execution. For now, understand that the Exception keyword means that you are not discriminating; you wish to catch any and all errors that occur.
You entered a code block with braces and then added the following line:
MessageBox.Show("There is an error : " + x.ToString());The code is pretty descriptive in that you are calling the Show() method of the MessageBox object, discussed previously, designed to display for the user a message in a standard message box dialog. Note also the concatenation of the string value and the x.ToString() statement, again, so that the details of the error can be shown to the user.
What Information Does the Exception Contain?
At the end of this sample, when you run the application, put some characters in the textbox instead of numbers. Clicking the Show Result button should yield a dialog box similar to that shown in Figure 10.7.
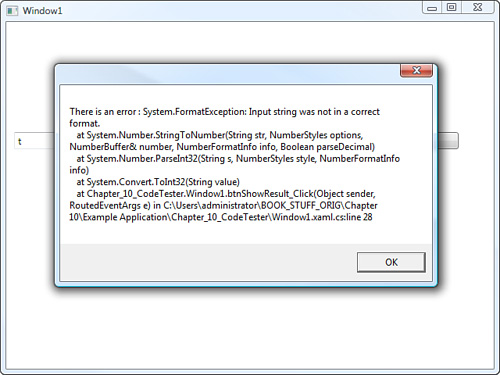
Figure 10.7 shows the volume of information given back about the error, including the line number where the error occurred.
The information shown may be somewhat cryptic at the moment, but eventually most of the information becomes recognizable and is invaluable when determining where errors have occurred and why.
Most importantly, the try-catch statement has handled any potential errors gracefully. The user can click the OK button and give it another go. Without the try-catch statement, things would be a lot more unpredictable for the end user, and he or she certainly wouldn’t be able to continue using the application.
Now on to the next two lines of code, as follows:
    int WidthIn = Convert.ToInt32(this.txtResult.Text);
    this.txtResult.Width = ValidateWidth(WidthIn);
You should be able to tell that you created a variable of int type (WidthIn) and assigned the value of the number entered into the textbox (txtResult.Text).
The next line may appear somewhat more cryptic. You are assigning a value to the Width property of the textbox, but the value is returned by a method call:
ValidateWidth(WidthIn);
The Width property shown here is exactly the same property that you manipulate in Blend in order to change the width of the TextBox element as it appears on the artboard—the same as the Text property.
It is good practice to validate the input that users make, so in this case, you created a new method—ValidateWidth—that took a parameterized value of type int and checked that it was within the correct range, returning a value to be assigned to the textbox’s Width property. Let’s examine the new method:
private int ValidateWidth(int NewWidthValue)
You can see that the first line of the new method sets the scope (private), the returning type (int), the identifier (ValidateWidth), and the parameter requirements (NewWidthValue, which is of type int).
The code inside the method does a number of things with the int value (NewWidthValue) that is parsed into the method. The code validates the value of NewWidthValue by checking it against certain rules that are put in place with the if statements.
            //Make sure the number entered is minimum 100, maximum 250
            if (NewWidthValue < 100)
                return 100;
            if (NewWidthValue > 250)
                return 250;
            //Number supplied is valid
            return NewWidthValue;
Understanding the mathematical symbols for greater than (>) and less than (<) help you to follow what is happening in this method. You can also see that the code simply returns out of the method with a valid returning data type (an int) after a rule is met. If none of the rules is met, it is declared that the value initially parsed meets the requirements, so the original value is returned as the result.
This last part is probably a lot to take in if you are new to coding. Getting errors in methods and compilers about missing lines and more is all part of the steep learning curve associated with coding. The important thing here is to keep trying to use the correct syntax. Coding is a repetitive task, which you soon get good at by repetition (hence the term code monkey). Methods are a big key to creating a complex application. The more you start moving toward complex interactions in WPF, the more code you need to understand.
Events are a common concept in the vast majority of modern coding languages. The name is self-explanatory in that you know this particular area of coding is based around the idea of “something has happened that something else might need to know about.”
As with most areas of .NET development, there are many ways to achieve the same thing. They all have pros and cons, so the more you understand the different options, the better your chances of making the right decision on which method to implement.
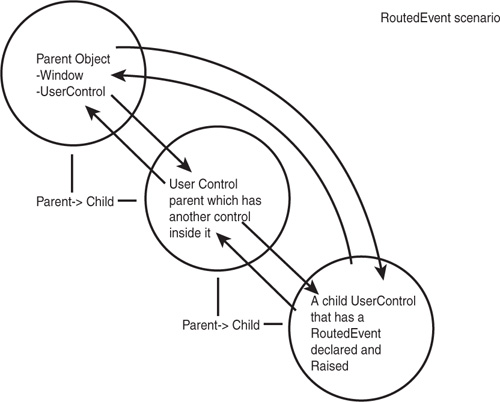
The two methods this book covers are the CLR event and the new RoutedEvent. The simple process of events is described in Figure 10.8.
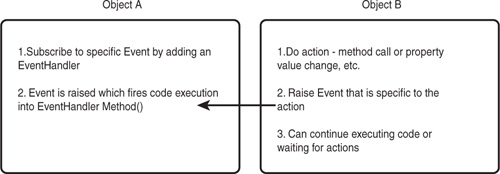
The CLR event model works on a concept of “publishers and subscribers.” At any point in an object that you declare an event, that object becomes the event publisher, and any other object that needs to listen for the event becomes a subscriber.
CLR events require an understanding of delegate objects, which in detail is beyond the scope of this chapter, but the concept of the event is the same for both CLR and RoutedEvents.
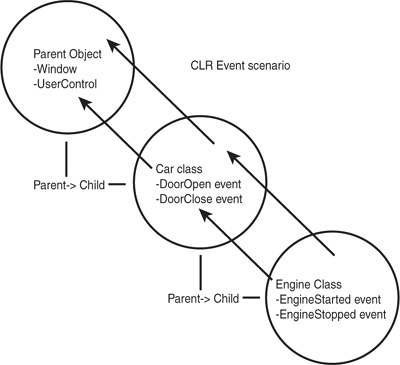
As Figure 10.9 shows, the CLR event travels through to the parent object by way of publicly declared members in each parent object.
Think of this as a “bubble” solution.
You now learn how to implement the DoorOpen CLR event, which makes understanding the RoutedEvent much easier.
Open the Car.cs file in Visual Studio so that you are working in the Car class again.
Add the code shown in Listing 10.19.
The first line in Listing 10.19 shows the delegate object declaration for the event. This declaration says that whichever method() or event uses this object, it returns nothing (void), but a bool value must be provided as a parameter.
The next line declares the actual event:
public event DoorOpenDelegate DoorOpen;
The scope is set to public so that other objects have access to it and then the keyword event is used to describe what is being declared.
Next you are declaring an instance of the DoorOpenDelegate object and an identifier for it. Think of this being similar to a member variable declaration, such as public string MyString.
Next, is the public method:
        public void OpenTheDoor()
        {
            this.DoorOpen(true);
        }
In the OpenTheDoor() method, you call the identifier of the event DoorOpen. Because it is of type DoorOpenDelegate, you need to parse to it a parameter of type bool. This is called raising the event.
Now that your event is declared and will be raised when the OpenTheDoor() method is called, you need to subscribe to this event in both the object that declared the event (the publisher) and any other objects that want to subscribe to it.
You have not yet added a constructor to your Car class. A constructor is one of the best places to add your subscription declaration.
A constructor is a special method that gets called when a class is first instantiated. The constructor is public in scope and has no return type, but it may have parameters. A constructor with no parameters is called a default constructor.
Add the code for the default Car constructor method, as shown in Listing 10.20.
The first line is the default constructor declaration.
The next line is interesting:
this.DoorOpen += new DoorOpenDelegate(Car_DoorOpen);
This code shows that the event is handled (+= is a sign for addition) by a method (Car_DoorOpen) that is parsed as a parameter to a new instance of a DoorOpenDelegate.
The method declared below the constructor (known as the EventHandler) has the exact signature of the DoorOpenDelegate object, being that it is void and takes a bool type as a parameter.

Inside the method Car_DoorOpen, remove the following line of code:
throw new NotImplementedException();
This method gets called each time your event is raised. By not removing this code, you would receive and error.
Open Blend. To the UI, add another button called btnOpenDoor and set the IsEnabled property to false.
Add a Click handler for the button, returning you to Visual Studio.
Find the original method you used to create the car, called btnMakeCar_Click.
At the end of the code that creates and instance of the Car, add the following line of code:
this.btnOpenDoor.IsEnabled = true;
Now you can only try to open the door of the car after the Car is created.
The Car now has the event that you previously created in the Car class, which you can add a handler for now using almost the same syntax. (Remember to use the IntelliSense). Figure 10.11 shows how the IntelliSense knows that you added the event to the object. Notice the small lightning bolt icon? The same icon is used in Blend when you need to add a click handler event.
this.MyCar.DoorOpen += new Car.DoorOpenDelegate(MyCar_DoorOpen);
If you used the IntelliSense, method called MyCar_DoorOpen should appear. However, you could call this method anything as long as the signature is the same as the Delegate object.
Add the following line to the event handler method:
MessageBox.Show("The Car Door was opened");The last thing to do is hook up the btnOpenDoor click handler, which you added from Blend after you created the button.
Because the MyCar instance of the Car class is global, you can now call the method that opens the car door directly from the click event handler, as shown below:
private void btnOpenDoor_Click(object sender, RoutedEventArgs e)
        {
            this.MyCar.OpenTheDoor();
           }
Run the application by pressing F5 and then click on the button to create your car. The button to open the door becomes enabled, and you can now click it to open the car door.
Now that you have this event in place, you could add a state handler in the Car class to maintain whether the door is opened or closed, using enums and properties. The event that you added takes a bool, so you could always parse in a false for when the door is not opened. Alternatively, you could really go to town and add an enum for the door states and then use a switch statement to determine which message box to show based on the state of the door in the Car class instance.
RoutedEvents were introduced back in Chapter 8, “An Example Control Using Just the Tools Palette,” when working with the event trigger system in Blend for a button that you had created. The RoutedEvent you create now allows you to subscribe to event notifications in Blend and, therefore, trigger an animation or some other action you desire.
As mentioned in Chapter 8, a RoutedEvent has three different routing strategies that can be employed:
Bubble: The event notification travels up the visual tree of elements.
Tunnel: The event notification travels down the visual tree of elements.
Direct: Acts similar to a standard CLR event.
You are going to be adding a Bubbling event in the following code, but as you will see, to employ any of the other two strategies, it is a simple matter of changing a parameter value.
RoutedEvents are generally used in visual elements, such as user controls, because they require the owning object to be derived from the type UIElement to enable a call to the RaiseEvent() method. When working with custom classes that contain no design surface, continue to use CLR events as previously shown.
Compare Figure 10.9 with Figure 10.12 to see the high-level differences between CLR events and RoutedEvents.
Open the solution again in Blend.
Add a relatively large grid element to your Window’s LayoutRoot and name it Child. Figure 10.13 shows the layout and positioning.
Set the background to a light yellow SolidColorBrush.
Double-click the Child grid and add an additional grid in the center of its parent, setting the background to a light pink and naming the grid GrandChild.
Double-click to activate the new grid element (GrandChild) and add a Button element to its center, calling the button btnEventTest.
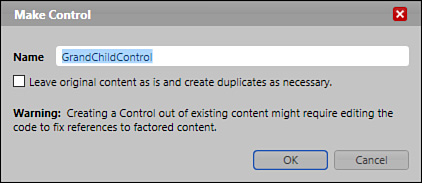
Select the GrandChild grid element in the Objects and Timeline category, right-click, and then select the Make Control menu item.
A warning Make Control dialog displays (see Figure 10.14) to let you know that if you modified code or references to the elements inside and including the GrandChild grid, you may need to make changes to get all the references worked out again. This happens because the Make Control feature takes the grid and makes it into a UserControl, but it cannot copy any code or animations. What is also important to note here is that the name of your element (GrandChild) automatically gets the word “Control” appended to it, so from here on out, it will be called GrandChildControl in code.
Click OK.
You should now see a new user control that contains a pink background with your btnEventTest button element already added to it, which is a real time-saving workflow on large UIs.
Note that the UserControl is automatically given the name of the element that is used as the root element for the control, which in this case was GrandChild, and as previously stated the word “Control” has been appended to the name.
Save your solution in Blend before continuing.
Select the button element and add a Click handler for it from the event viewer in the Properties panel. An error dialog appears, as shown in Figure 10.15.
This issue is raised because the new user control(s) is not added to the solution that Visual Studio currently has open. Switch to Visual Studio. A dialog prompts you that the project has been modified and asks if you want to reload it. Click on Reload.
Your solution reloads in Visual Studio, and your new user control is added to the Solution Explorer dialog. Return to Blend. Again, add the Click handler event for the btnEventTest button element.
In the generated Click handler method, add the code to raise the event after you have created it.
Add a the code shown in Listing 10.21, which is a RoutedEvent declaration.

Example 10.21. Declaring the TestButtonClicked RoutedEvent
public static readonly RoutedEvent TestButtonClickedEvent = EventManager.RegisterRoutedEvent(
            "TestButtonClicked",
            RoutingStrategy.Bubble,
            typeof(RoutedEventHandler),
            typeof(GrandChildControl));

        // Provide CLR accessors for the event
        public event RoutedEventHandler TestButtonClicked
        {
            add { AddHandler(TestButtonClickedEvent, value); }
            remove { RemoveHandler(TestButtonClickedEvent, value); }
        }
Move through the RoutedEvent declaration one line at time, starting at the declaration:
public static readonly RoutedEvent TestButtonClickedEvent =
This instance is created as a static read-only RoutedEvent. Being static enables you to add handlers for this event when an instance of the Engine class has not been made, which is covered shortly. You can also see that the type is RoutedEvent.
Now onto the next line:
EventManager.RegisterRoutedEvent(
This is a call to a method (of a static object called EventManager) that registers your event with the WPF event system and then returns your RoutedEvent object.
Next is the name of the Event, which is of type string:
"TestButtonClicked",
Next is the Routing strategy that you wish to employ:
RoutingStrategy.Bubble,
The required value is an enum type of RoutingStrategy.
Next is the event handler type:
typeof(RoutedEventHandler),
As a default you should use a RoutedEventHandler. In more advanced scenarios, however, you can create your own types of event handlers.
Next is the owner of the event:
typeof(GrandChildControl));
This parameter is important, as you will see when adding a handler. Generally, the owner type should be the class in which the event is created.
Below this you see the CLR accessors that are provided for the event:
        public event RoutedEventHandler TestButtonClicked
        {
            add { AddHandler(TestButtonClickedEvent, value); }
            remove { RemoveHandler(TestButtonClickedEvent, value); }
        }
You could think of this as being the same as the public CLR assessors that you added for the Dependency Property example at the start of the chapter. This “wrapper” is what lets you add Handlers for the event in code.
Now that you have declared the event and the CLR accessors, you can create an instance of a RoutedEventArgs object and raise the event, as shown in Listing 10.22.
The method text should be familiar to you now, so this disucssion starts with the next line of interest:
RoutedEventArgs newEvent = new RoutedEventArgs(GrandChildControl.TestButtonClickedEvent);
The WPF event model is flexible and so allows you to mash the event in a way that best suits your application. Generally speaking, the .NET event model parses two parameters to the event handler, the first being the object that raised the event and the second being an object that derives from the EventArgs type, as you will see when you create a handler for this event.
In this line, you create an instance of a specific EventArgs type made for the RoutedEvent type, called RoutedEventArgs. In the constructor(s) of the RoutedEventArgs type, you can specify what event your RoutedEventArgs object is for, which is a static call to the owner and specific event (in this case, your GrandChildControl.TestButtonClicked event).
RaiseEvent(newEvent);
This final line of your method is what Raises the Event.
Go back to the Window1.xaml.cs code file.
Find the constructor for the Window class and add the code shown in Listing 10.23.
Example 10.23. Creating the RoutedEvent Handler Method
    public partial class Window1
    {
        public Window1()
        {
            this.InitializeComponent();

            // Insert code required on object creation below this point.
            this.AddHandler(GrandChildControl.TestButtonClickedEvent, new
RoutedEventHandler(OnTestButtonClickedEvent));
        }

        void OnTestButtonClickedEvent(object sender, RoutedEventArgs e)
        {
            MessageBox.Show("Event Worked!");
        }
The line that you are first interested in is as follows:
this.AddHandler(GrandChildControl.TestButtonClickedEvent, new
RoutedEventHandler(OnTestButtonClickedEvent));
The method AddHandler is built in to the Window type. As you see, this parses in a reference to the static event in the GrandChildControl, which you created previously. The new parameter allows you to declare a method() that will be called when the event is raised.
Because the event handler type you declared in the RoutedEvent declaration is a RoutedEventHandler, you now create a new instance of this type of handler and specify a method name in its constructor, which you do by using the name OnTestButtonClickedEvent. You can name this whatever you like as long as the method signature is the same as what is shown in Listing 10.23 for the method handler void OnTestButtonClickedEvent.
Next is the event handler method:
        void OnTestButtonClickedEvent(object sender, RoutedEventArgs e)
        {
            MessageBox.Show("Event Worked!");
        }
As previously mentioned about the WPF event model, the event raised is expecting to parse two parameters: object representing the object that raised the event and the parameters that can be parsed through with the event.
Test the application now by clicking F5 in Visual Studio. With any luck, you should see a message box when you click the Event Test button.
So far, so good. But what you really have here is the same scenario as shown in the CLR example, in which you have a child control referenced in the main Window. The following pushes this further by deepening the levels of children.
Return to Expression Blend and open the Window1.xaml file.
This time, find the Child grid control in the Objects and Timeline category. Again, right-click on the control and select Make Control from the context menu.
Another dialog warns you about the modification of the code. Again, remember that it will be renamed to ChildControl. When you are satisfied, click OK.
Now you have the same scenario shown in Figure 10.12, where you have a control (button) embedded in a control (GrandChildControl) with a RoutedEvent raised from the Click handler. You also now have the GrandChildControl embedded inside another UserControl (ChildControl), which has no event handlers declared. The ChildControl is now embedded as a UserControl of the main Window1.xaml.
You should be able to just run the application by clicking F5 in Blend. Upon clicking the element, you should again get the message box that tells you it worked!
How easy was that? The really big benefit to that also is that now you could create a storyboard in your Window (or ChildControl and GrandChildControl controls) that listens for the TestClickedEvent to be raised. You can’t this do with a CLR event.
For further information on the RoutedEvent object or any of the supporting objects, please see the MSDN library at http://msdn2.microsoft.com/en-us/library/ms742806.aspx.
You’ve no doubt heard the term arrays before. But in case not, an array is a group of objects that are put together in a stack, one after the other, where the new item added to an array always goes on the bottom of the pile.
In .NET you have had the ability to create all sorts of weird and wonderful arrays of objects from day one. I believe that every modern development language supports the concept of arrays in one shape or another. It appears that we need this facility regardless of what we are doing with a development language.
Collections (specifically, generic collections) were introduced properly into the .NET Framework 2.0. They were created as a way of improving performance and efficiency over arrays, especially over arrays that contained large sets of objects that were of differing types.
Consider the following array:
            object[] MyArray = new object[3];
            MyArray[0] = "hello";
            MyArray[1] = new Car();
MyArray[2] = 45;You can see that there are three different types being added to the array, which doesn’t appear to be a bad thing, but where it becomes an issue is when you start recalling the array elements:
Car MyNewCar = MyArray[2] as Car ;
The problem here is that the compiler won’t complain because it does not understand what type is inside the array element. Worse still is that, if there is an issue and the number 45 can’t be converted to a Car instance won’t be picked up until runtime.
A whole host of other issues called boxing and un-boxing play a specific role in the performance issues of arrays. Be sure to “Google” these terms in the context of C# to better understand them.
What is different about a generic object collection is that it is, first and foremost, type safe, so if you create a collection of ints, that collection can contain only ints.
The compiler also understands that your generic collections must be type specific, so the following will certainly generate an error before you even get to runtime:
            List<int> NewList = new List<int>();
            NewList.Add("testing");
There exist quite a few generic collection types that I encourage you to research, but for the purposes of simplicity and practicality, this chapter looks at two specific types of generic collections (Lists and Dictionaries) that, given some understanding, make it easier to deal with a third type (ObservableCollection), which is used in CLR data binding and explored in Chapters 12, “Templates,” and 13, “Data Binding.”
Open your solution in Blend. Add another button called btnListMaker and then add a Click event for it, opening Visual Studio.
Before you begin using generic collection types, you need to indicate to the compiler that you are “using” this functionality by adding a using directive at the top of your code page. For Generics, you add the following:
using System.Collections.Generic;
What is so special about generics is that you specify the type values that are contained within them, so the collection becomes “strongly typed.” That is why you are reading the term List<T>, where the T represents the type. Strongly typed generic collections speed up code performance dramatically when compared with trying to cast or convert objects from arrays.
You declare a List<T> generic using the following syntax:
scope List<T> Identifier;
A valid List of int values would be declared and look something like the following:
private List<int> myIntCollection = new List<int>();
Several methods included with the List type help you to manage the List. In this section you see the most commonly used methods.
The code in Listing 10.24 shows how to add a new int value to a List collection.
Example 10.24. Adding int Values to a Global List<int> Object
private List<int> myIntCollection = new List<int>();

        private void btnListMaker_Click(object sender, RoutedEventArgs e)
        {
            this.myIntCollection.Add(1);
            this.myIntCollection.Add(4);
            this.myIntCollection.Add(5);
            this.myIntCollection.Add(Convert.ToInt32("19"));
        }
In Listing 10.24 a global member List is declared (myIntCollection) as a collection of Ints. That is the only type of object that can be added to the list, as you can see in the method calls:
this.myIntCollection.Add(5);
The List, or indeed any other Generic collection, does not need to just hold primitive data types, such as int or string. You can create your own objects (such as your Car class) and create a collection of those types of objects as well.
In .NET, when you are thinking about collections or arrays, you need to remember that all collections or arrays are termed as zero-based. This means that the first item in a collection or an array will hold the position 0 in the collection. This is called the item index, or just index, which is important when you start dealing with the collection in terms of finding a specific object.
The following line retrieves the number of items in the collection:
int CollectionCount = this.myIntCollection.Count;
Even though the value returned by the property Count will be 4, in the case of the List created and filled in Listing 10.24, the int object with the value of 1, will be located at position 0 in the collection.
Several methods used by Generic collections require you to know the index of the object that you wish to work with.
This is confusing at first, if you have never counted this way, and it will throw you out at some stage. But hopefully you will see the error of your ways soon enough!
In the situation where you want to specify the position of an object when you are adding to a generic collection, call the insert() method of the collection, specifying the required index position and the object:
    int myInt = 8;
        this.myIntCollection.Insert(1, myInt);
You can also remove objects from the collection by calling the RemoveAt() method and specifying the index of the object to remove:
this.myIntCollection.RemoveAt(0);
In this method call, the object at index or position 0 is being removed, not the object with a value of 0 (if one exists).
Sometimes you may want to remove all the items from the collection, so instead of calling the RemoveAt() method for each item, a call to the Clear() method is all that is required:
this.myIntCollection.Clear();
Using the objects stored in the collection is not terribly difficult, but you need to know the index position of the object. The following line of code shows how an object at index position 2 is assigned to a variable of the same type—int:
int IntAtPosition2 = this.myIntCollection[2];
Notice that square brackets, [ ], are used at the end of the collection to retrieve the object. This assigns the object to the variable IntAtPosition2. This is not a reference, however, so changing the value of the IntAtPosition2 member has no effect on the object stored in the collection.
Generally, working with a List<T> is very simple and very fast, and the methods for adding and removing items are always the same.
Not terribly distant from the List<T> in terms of functionality and methods that are available, the Dictionary is a key pair collection. This means you specify a type to be used as a key and a type to be used as the corresponding value for the item.
Listing 10.25 shows you how to create a simple Dictionary<T,T>, in much the same way as you previously created a List<T>.
Example 10.25. Declaring a Global Dictionary<T,T> Is Simple
private Dictionary<int, string> myDictionary = new Dictionary<int, string>();

        private void btnListMaker_Click(object sender, RoutedEventArgs e)
        {
            this.myDictionary.Add(4, "The number 4");
            this.myDictionary.Add(14, "The number 14");
            this.myDictionary.Add(24, "The number 24");
            this.myDictionary.Add(34, "The number 34");
        }
What is important to understand from Listing 10.25 is that the key of the Dictionary<T,T> should not be confused with the concept of the item index.
Can you add the same objects to a list and a dictionary?
You can always add the same instance of an object at anytime—and as many times as you want to both a List<T> and a Dictionary<T,T>. What you can’t do in the case of a dictionary is create and add the same Key value.
Before you add a new item to your collection (List or Dictionary), you can call a method to check whether it already exists:
            if (!this.myIntCollection.Contains(62))
                this.myIntCollection.Add(62);
For the Dictionary you can check whether the key exists:
if (!this.myDictionary.ContainsKey(15))
                this.myDictionary.Add(15, "The number is 15");
You can also check the value:
            if(!this.myDictionary.ContainsValue("The number 34"))
                this.myDictionary.Add(34, "The number 34");
As previously mentioned, the types used in the collection do not have to be primitive types, such as int and string., You may decide to use your own custom object such as the Car class you worked on in this chapter.
public Dictionary<int, Car> CarsInStock = new Dictionary<int, Car>();
In the preceding code, you can see that the key is specified as an int type and the value is specified as a Car type.
“What is the purpose of this?” you may ask.
Pretend that you have a collection of 100,000 cars, and you need to find the one that Mr. Jones ordered, custom designed to his specifications. You could iterate through the entire list, but this would be time consuming (even more so with complex objects), because you would need to check the properties of each car until you matched the specs.
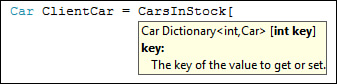
If you know the key of the object, for example “5552125” (which might be Mr. Jones’s phone number), you could ask the Dictionary to return this value directly, without having to go through every object until you find it, as shown in Figure 10.16.
Car ClientCar = CarsInStock[5552125];
The foreach statement allows you to loop through a type-specific collection at high speed. For example, if you have several objects stored in your Generic collection, you can traverse the collection, changing the value of every object each time the loop works through the collection.
Because the foreach statement allows you to retrieve type-specific references within a collection, you get the entire object back from a collection every time the loop cycles in the statement.
            foreach (Car CarObject in this.CarsInStock.Values )
            {
            }
Note that you need to specify the Values property of the collection if you are iterating a Dictionary<T,T>. The Car object is the class that you previously created; the concept is that a Car object contains details about an instance of the Car—how many wheels, how many doors, engine size, and so on—and it also contains an enum variable type for Manufacturer.
Continuing with the car yard example, this car yard has all the same vehicles from the same manufacturer, safety checked at the same time. Broncos are done on a Tuesday, and Mustang’s are done on a Wednesday.
Open Blend and add yet another button called btnMakeCars.
Add another button called btnUpdateServiceStatus is setting its IsEnabled property to false.
If you have been following the application layout, you probably have quite a few buttons down the left side of your UI. Select all the buttons by holding down the Ctrl key before drawing the selection rectangle on the artboard.
You should see all the buttons are selected in the Objects and Timeline category, right-click on one of the selected buttons and then select Group Into from the context menu, selecting Stack Panel from the child menu that appears from there.
Add a small Grid and embed inside it two RadioButton elements.
Name one RadioButton radBronco and the other radMustang.
Save the project in Blend.
Add a Click handler for both of the new buttons, which should return you to Visual Studio.
Open your Car class and add a new DependencyProperty called IsServiced of type bool.
Return to Window1.xaml.cs.

The code in Listing 10.26 shows a new method being called. This method creates a new instance of the Car class from a set of provided parameters. The method returns the Car instance, which is then added to the Car’s global collection for use in Listing 10.27.
Example 10.26. Creating the Stock List
        //Global Dictionary created for the car yard
        public Dictionary<int, Car> CarsInStock = new Dictionary<int, Car>();

        private void btnMakeCars_Click(object sender, RoutedEventArgs e)
        {
            //Simple list of Client references that will be used as a Key in the
collection
            int ClientRef_1 = 5552129;
            int ClientRef_2 = 5553241;
            int ClientRef_3 = 5555481;
            int ClientRef_4 = 5553197;
            int ClientRef_5 = 5558724;

            //Building the collection of clients in the collection
            this.CarsInStock.Add(ClientRef_1, this.MakeNewCar(4, 4, 3,
Car.CarModel.Bronco));
            this.CarsInStock.Add(ClientRef_2, this.MakeNewCar(2, 4, 2,
Car.CarModel.Mustang));
            this.CarsInStock.Add(ClientRef_3, this.MakeNewCar(2, 4, 4,
Car.CarModel.Mustang));
            this.CarsInStock.Add(ClientRef_4, this.MakeNewCar(4, 4, 4,
Car.CarModel.Escort));
            this.CarsInStock.Add(ClientRef_5, this.MakeNewCar(4, 4, 3,
Car.CarModel.Bronco));

            //Allow the cars to be serviced now
            this.btnUpdateServiceStatus.IsEnabled = true;

        }

        /// <summary>
        /// Makes the new car.
        /// </summary>
        /// <param name="NumberOfDoors">The number of doors.</param>
        /// <param name="NumberOfWheels">The number of wheels.</param>
        /// <param name="NumberOfSeats">The number of seats.</param>
        /// <param name="CarModel">The car model.</param>
        /// <returns></returns>
        private Car MakeNewCar(int NumberOfDoors,
            int NumberOfWheels,
            int NumberOfSeats,
            Car.CarModel CarModel)
        {
            Car NewCar = new Car();

            NewCar.NumberOfDoors = NumberOfDoors ;
            NewCar.NumberOfWheels = NumberOfWheels  ;
            NewCar.NumberOfSeats = NumberOfSeats ;

            NewCar.Model = CarModel ;

            return NewCar;

        }
Example 10.27. The Finishing Touches
/// <summary>
        /// Handles the Click event of the btnUpdateServiceStatus control.
        /// </summary>
        /// <param name="sender">The source of the event.</param>
        /// <param name="e">The <see cref="System.Windows.RoutedEventArgs"/>
instance containing the event data.</param>
        private void btnUpdateServiceStatus_Click(object sender, RoutedEventArgs e)
        {
            //Determine which car should be serviced
            Car.CarModel ServiceType;

            if (this.radBronco.IsChecked == true)
                ServiceType = Car.CarModel.Bronco;
            else
                ServiceType = Car.CarModel.Mustang ;


            foreach (Car item in this.CarsInStock.Values)
            {
                if (item.Model == ServiceType)
                    item.IsServiced = true;
            }

            MessageBox.Show("All " + ServiceType.ToString() + "'s are now
serviced.");
        }
The code in Listing 10.27 enables the iteration of the collection using a foreach loop, setting the IsServiced status of the Car type as selected by the user with the RadioButtons.
This is a simple enough example, but using foreach is invaluable in data binding management and various other areas of an application. You can use a foreach loop for many other types of collections, not just Generic Lists and Dictionaries. This example showed you how suited the foreach is to a scenario that occurs often in applications.
By this stage you can see just how much functionality you can add to your application, just by knowing a little about these concepts. Coding can be as simple or as complex as you like, and while performance and elegance should always be a primary concern, readability of code to understand the intended actions takes an even higher precedence.
The concepts of creating classes and using those classes with your UI are at the core of creating complex WPF applications. After all, the humble Button is a class, as are all the control elements you use in your user interface. Understanding how their properties are created and how you may extend these objects will be shown in Chapter 18, “Creating a Custom Control,” with modifying an existing control type being the subject of the chapter.
If you are interested at learning how to code with a much greater explanation of .NET concepts and C#, I recommend Sams Teach Yourself C# in 21 Days by Bradley L. Jones. He starts from the beginning and leads you to some more advanced uses of the language in a very nice way.