
When you first start using Expression Blend and the WPF (Windows Presentation Foundation) through Visual Studio, there are a few notable controls and or elements missing from the collection—ones that developers in particular were used to having. The DataGrid is not there, and there are no date and or calendar controls either. What really ate me was the fact that a particular piece of functionality that developers had been wanting for a long time, functionality that was added to .NET 2.0, is not implemented in the .NET Framework 3.0/3.5. This very simple functionality was the ability to build a simple AutoComplete collection for a text box control.
Although DataGrids are available from a few vendors, the calendar controls are still missing. It’s a lot of fun creating custom controls, but not much fun when you are under a deadline to get a project complete (which of course is always when you realize that a requirement of the project can’t be met with what is provided for you).
In this chapter, you are going to create a custom text box control, which takes a list of potential matches for the text the user types into it, and displays the matches in a drop-down list from the control. This control will not be 100% commercial quality, but it will give you a great insight into what you can do to create your own controls with specific functionality.
The .NET Framework comes with several thousand classes that belong to varying families of namespaces. Many of these classes are known as base classes, which means they represent the base of a type. Panel is a base class for example, providing functionality to all Panel types used in WPF, such as StackPanel, DockPanel, and so forth.
The following is the hierarchy of inheritance for several Button elements you use in Expression Blend:
System.Object
   System.Windows.Threading.DispatcherObject
     System.Windows.DependencyObject
       System.Windows.Media.Visual
         System.Windows.UIElement
           System.Windows.FrameworkElement
             System.Windows.Controls.Control
               System.Windows.Controls.ContentControl
                System.Windows.Controls.Primitives.ButtonBase

                   System.Windows.Controls.Button
                   System.Windows.Controls.GridViewColumnHeader
                   System.Windows.Controls.Primitives.RepeatButton
                   System.Windows.Controls.Primitives.ToggleButton
As you can see in the inheritance hierarchy, all four Button elements derive from the ButtonBase type, which in turn inherits from the ContentControl, and so on down the line.
What is most important to note is that every single class in the .NET Framework inherits from System.Object. Even empty classes you create in Visual Studio inherit from Object. You don’t see the syntax showing the inheritance because it is implicitly created along with the class.
It is important to realize that after you start inheriting from classes that are at a much lower level than FrameworkElement, you really are in some very powerful areas. And along with this, you will be losing quite a bit of built-in functionality that Control and ContentControl can provide to your controls.
There are four levels you should look at when you need to create a custom control. Each of these levels represents a level of inheritance as listed in the inheritance hierarchy, which derives from the root of System.Object:
System.Object
   System.Windows.Threading.DispatcherObject
     System.Windows.DependencyObject
       System.Windows.Media.Visual
         System.Windows.UIElement
           System.Windows.FrameworkElement
             System.Windows.Controls.Control
               System.Windows.Controls.ContentControl
                 System.Windows.Controls.UserControl
Each of the levels are shown this way to enforce the fact that each level inherits from the previous level.
You certainly need to understand what is going on in WPF to even consider creating a control that sits on this level (well, the level above it, actually). All the existing WPF controls are not even on this level (as you can see, System.Windows.Controls.Control), which means that although basic functionality is available, many of the most desirable attributes of a control (such as templates or a proper content model for children) are left up to you to implement. This level is where base-level controls such as Panel are created.
This level implements the ControlTemplate functionality that allows you to modify the appearance of a control by providing a modified or custom ControlTemplate. Most of the WPF control types inherit directly from Control, so although the power of this inheritance level is obvious, the complexity is also much greater.
This is a very powerful method of taking an existing control and extending the functionality that the control gives you in its standard format. You will use this method in this chapter, taking a text box and extending its functionality to suit your requirements. When inheriting a control (such as a Button or Grid, for example), you modify the functionality in the code-behind files and as per normal, you can supply a custom control template or style template to modify the existing appearance.
The UserControl inherits directly from ContentControl so it makes it easy for you to add existing elements defined by WPF to your customized control. There are a few disadvantages to this in that UserControls do not support templates at all, so any complex customization of the appearance of the control can only be performed directly on each element that you add. Still the UserControl is very common because of its simplicity and is the level that is directly supported by the Blend UI.
Think about what your control needs to do and, at every opportunity, always consider first whether you can modify existing controls to get the job done. This is pretty much what we are going to do in this chapter. Merge the functionality of three existing controls to provide a single UserControl, and at the same time take advantage of the functionality already built in to all the controls.
For a more advanced look at objects and base classes, I direct you to the Windows SDK, which can provide you with the most accurate and intimate details of all classes available to you through the .NET Framework.
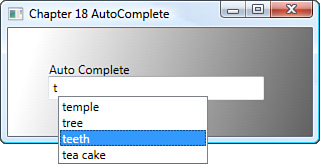
The remit for this particular control is: Provide a text box type control that, when the user starts typing into it, displays a filtered list of predefined words for the user to select from; if so required.
Figure 18.1 shows the control in action. Similar to an IntelliSense type feature if you will, but a standalone control that can be used as required by the client and its developers.
On more complex controls, you will most likely (and should) perform a design analysis to make sure that what you are required to build will be the end result based on functionality, appearance, and usability.
The overall functionality and usability were part of the wider project’s UI specification; my point here is that even with a very simple control, there was some element of design and validation between the developer and the customer.
Thinking about the control, there are a couple of standout areas that make creating such a control fairly trivial:
You can inherit from the TextBox control and use its functionality in your own class.
Styles and templates could them be applied to the TextBox (not the entire control).
A Popup control could also be employed, which enables the Auto Complete (AC) control to be used inside Grid cells without constriction.
Use of a customized ListBox element inserted into the Popup element will provide the listing functionality.
By using a generic collection of type List<T>, you can store the word match dictionary and use a predicated search delegate.
You are going to create this control in a separate control library so that you can use it later on when required.
Start a new project in Expression Blend.
Save the project, select the solution inside the Project panel, and right-click to select Edit in Visual Studio from the Project menu.
In Visual Studio, open the Solution Explorer panel if it is not already visible by selecting Solution Explorer from the View menu.
Right-click on the Solution icon at the top of the Solution Explorer panel, and then select Add and then New Project from the subsequent menu.
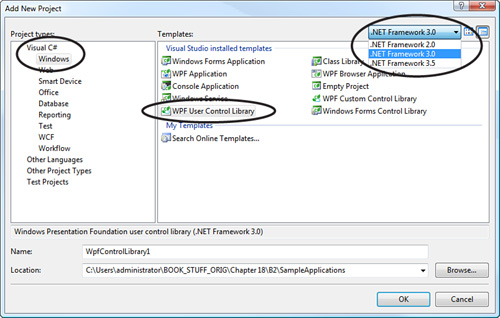
In the resulting Add New Project dialog that appears, you need to navigate to the Visual C# - Windows project types and then select WPF Custom Control Library from the templates as shown in Figure 18.2.
Figure 18.2 also shows how you can choose the target Framework from the combo box at the top of the dialog. You can choose either Framework 3.0 or 3.5 for this project because we are not using any Framework 3.5–specific coding.
Name the project MyCustomControl.
Ensure that the project is going to be located where you want it to be, and then click OK to complete the actions.
Visual Studio will now go through the creation of your new project and add a default control called
UserControl1.xamlto your project. Sometimes Visual Studio automatically opens the new control as well, which can be painfully slow in Visual Studio 2005 because of the rendering surface initialization. In Visual Studio 2008, you can press the Esc key to stop this from occurring.From the Window menu item at the top of Visual Studio, select Close All Documents.
Right-click on the
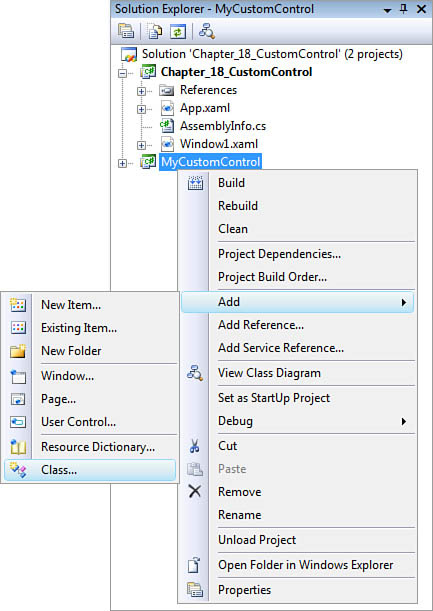
UserControl1.xamlfile in the Solution Explorer panel and then select Delete from the subsequent context menu. You are not going to be using this control for this project.As Figure 18.3 shows, right-click on the MyCustomControl project inside the Solution Explorer.
Select Add from the context menu and then subsequently select Class.
Call the class
AutoComplete_TextBox.cs.You now have your original project and the new project in the solution. You are now going to continue through coding up the new class, and then adding the project as a reference before returning to Blend to test the control.
Modify the class as shown in Listing 18.1 to inherit from the
TextBoxclass provided by the Framework.You are going to create two constructor methods now. One is a standard constructor and the other allows the user to parse in a predefined List<T> of words to add to the dictionary of words. Listing 18.2 shows the dependency property added to accommodate the List<T> as well as the constructors. Note that the dependency property does not contain any change notification.
Example 18.2. Building Out the Dictionary Functionality
public class AutoComplete_TextBox : System.Windows.Controls.TextBox
{
    public AutoComplete_TextBox()
    {

    }

    public AutoComplete_TextBox(List<string> WordDictionary)
    {
        this.STORED_LIST = WordDictionary;
    }

    public List<string> STORED_LIST
    {
        get { return (List<string>)GetValue(STORED_LISTProperty); }
        set { SetValue(STORED_LISTProperty, value); }
    }

    public static readonly DependencyProperty STORED_LISTProperty =
    DependencyProperty.Register("STORED_LIST", typeof(List<string>), typeof(AutoComplete_TextBox),
    new FrameworkPropertyMetadata(null,
    FrameworkPropertyMetadataOptions.None));
}
Regardless of how the user instantiates this object, you want to create the Popup control immediately so that it is ready to use as soon as the user starts typing into the TextBox. Before doing this, though, you need to create a customized ListBox control that enables better handling for the user workflow for this type of control. By this I mean that when the user selects a word from the ListBox and presses the Enter key, you want to assume that he has made his choice. So, you need a way to listen for the events and to ensure that the control then places the selected text into the TextBox part of the control. Listing 18.3 shows the custom class inheriting from the ListBox. It contains a single event that simply instructs the TextBox that the user has made a choice. You can see the overridden methods that allow you to listen for specific actions from which you can then raise the event.
You will also need to add the following
usingdirective for the ListBox:using System.Windows.Controls;
Example 18.3. Creating the Custom ListBox Control
/// <summary>
/// Custom listbox class to allow user actions to act as a click
/// </summary>
class AutoCompleteListBox : ListBox
{
    public AutoCompleteListBox()
    {
        this.EnterKeyPressed += delegate() { };
    }

    public delegate void EnterKeyPressedDelegate();
    public event EnterKeyPressedDelegate EnterKeyPressed;

    protected override void OnKeyUp(KeyEventArgs e)
    {
        base.OnKeyUp(e);

        if (e.Key == Key.Enter)
            this.EnterKeyPressed();
    }

    protected override void OnMouseDoubleClick(MouseButtonEventArgs e)
    {
        base.OnMouseDoubleClick(e);
        this.EnterKeyPressed();
    }

    protected override void OnMouseDown(MouseButtonEventArgs e)
    {
        base.OnMouseDown(e);
        this.EnterKeyPressed();
    }
}
Now you can create the method that builds the Popup control (inside the AutoComplete_TextBox class) as well as sets up the ListBox you just created. Listing 18.4 shows the method used to create the Popup, and you should add a call to this method from both constructors inside the AutoComplete_TextBox class. Note the event handlers added for both the ListBox and the Popup control. Both the ListBox and the Popup controls are defined as global types.
You will need to add the following
usingdirectives for the Popup control, theRectclass, and for the type of event arguments that are generated:using System.Windows.Controls.Primitives; using System.Windows.Input; using System.Windows;
Example 18.4. Creating the Popup Control
private Popup ListPopUp = new Popup();
private AutoCompleteListBox ListDisplay = new AutoCompleteListBox();
private void BuildPopUp()
{
    ListDisplay.MaxHeight = 80;
    ListDisplay.Width = 150;
    ListDisplay.MouseDown += new System.Windows.Input.MouseButtonEventHandler
(ListDisplay_MouseDown);
    ListDisplay.EnterKeyPressed += new AutoCompleteListBox.
EnterKeyPressedDelegate(ListDisplay_EnterKeyPressed);

    ListPopUp.MouseDown += new System.Windows.Input.MouseButtonEventHandler
(ListPopUp_MouseDown);
    ListPopUp.Child = this.ListDisplay;
    ListPopUp.StaysOpen = false;
    ListPopUp.PopupAnimation = PopupAnimation.Fade;
    ListPopUp.Placement = PlacementMode.Relative;
    ListPopUp.PlacementTarget = this;
    ListPopUp.PlacementRectangle = new Rect(10, 20, 300, 300);
}

void ListPopUp_MouseDown(object sender, System.Windows.Input.MouseButtonEventArgs
e)
{
    if (this.ListDisplay.SelectedItem != null)
    {
        this.Text = this.ListDisplay.SelectedItem.ToString();
        this.ListPopUp.IsOpen = false;
    }
}

void ListDisplay_EnterKeyPressed()
{
    if (this.ListDisplay.SelectedItem != null)
    {
        this.Text = this.ListDisplay.SelectedItem.ToString();
        this.ListPopUp.IsOpen = false;
    }
}

void ListDisplay_MouseDown(object sender, System.Windows.Input.MouseButtonEventArgs
e)
{
    if (this.ListDisplay.SelectedItem != null)
    {
        this.Text = this.ListDisplay.SelectedItem.ToString();
        this.ListPopUp.IsOpen = false;
    }
}
As you can see, each of the event handler methods simply sets the Popup to close and assigns the selected value from the ListBox to the TextBox control using the
this.Textproperty.Because the user can opt to use the default constructor and provide a List<T> (or different List<T> objects throughout runtime) at a later stage, you need to provide a method that will clear the existing collection, which is simply calling the
Clear()method of the STORED_LIST:/// <summary> /// Clear the store of its current values /// </summary> public void ClearStore() { this.STORED_LIST.Clear(); }You should also provide a public method that allows the user to add single words to the list at any time, possibly each time a new word is entered in the TextBox, to build a dynamic history dictionary. Listing 18.5 shows the method created.
Example 18.5. Adding New Values to the Dictionary
/// <summary> /// Supply a new value to add to the store /// </summary> /// <param name="NewValue">A string representing the new value</param> public void AddNewValueToStore(string NewValue) { //Keep only one copy of the item if (!this.STORED_LIST.Contains(NewValue)) this.STORED_LIST.Add(NewValue); }Now you need to add the methods required to filter the dictionary, which involves supplying a predicate to the
List<T>.FindAll()method.What is a predicate?
It is shown like this:
NewList<T> = OriginalList<T>.FindAll(Predicate<string> match);
In this scenario, the predicate requires the creation of a delegate method that performs the value-matching logic. This means that the original collection will attempt to match a value one at a time in the collection by parsing the string value to the method specified, and with the delegate method returning a Bool value (true for matched), the original collection generates a new collection of the same type with only the matched values.
Listing 18.6 demonstrates this as you can see the point where the STORED_LIST generic type object has the
FindAll()method called, parsing the name of the method to perform the matching.Example 18.6. Filtering the Dictionary
private void BuildFilteredList() { if (this.Text.Length > 0) { List<string> FilteredStore = this.STORED_LIST.FindAll(DoMatch); if (FilteredStore.Count == 0) { this.ListPopUp.IsOpen = false; return; } else { this.ListDisplay.Items.Clear(); foreach (string var in FilteredStore) { this.ListDisplay.Items.Add(var); } this.ListPopUp.IsOpen = true; } } } private bool DoMatch(string ValueToTest) { if (ValueToTest.StartsWith(this.Text, true, null)) return true; else return false; }In this line of Listing 18.6:
if (ValueToTest.StartsWith(this.Text, true, null))
You are testing the value by calling the
StartsWith()method, which has three overloaded options. The first parameter we are testing for is the text that the user has already entered into the text box, the second true specified whether the method should ignore case sensitivity, and the third parameter is for culture information. A null value tells the method to use the current culture information.The last method you need to create (see Listing 18.7) is an overridden instance of the
OnKeyUpevent handler for the TextBox, which allows you to control the PopUp control and then call the method you just added to filter the dictionary (List<T>) based on what the user has already entered.Example 18.7. Implementing the
OnKeyUpMethod Handler/// <summary> /// Checks to see if the currently entered text is available from /// the Store. If so, display the popup /// </summary> /// <param name="e"></param> protected override void OnKeyUp(KeyEventArgs e) { base.OnKeyUp(e); if (e.Key == Key.Down) { if (!this.ListPopUp.IsOpen) this.ListPopUp.IsOpen = true; this.ListDisplay.SelectedIndex = 0; this.ListDisplay.Focus(); } if (this.STORED_LIST.Count > 0) this.BuildFilteredList(); }
The complete listing of the control will be at the end of this chapter should you need to review its creation.
That wasn’t too hard after all, was it? A very simple and clean control that you can now add to any project, which is what you should now try to do. Before doing this, though, you need to build the new control and then add a reference to it from the testing project you initially created.
Click the SaveAll button in Visual Studio or Save All from the File menu.
Now select Build Solution from the Build menu in Visual Studio. Hopefully everything builds correctly for you and you are now ready to move on.
In the Solution Explorer panel, locate the References folder of the first project you created—not the control project.
Right-click and select Add Reference. Visual Studio might take a little while to display the Add Reference dialog box, but this is just because it is finding a lot of information in your computer about other available references.
As Figure 18.4 shows, select the Projects tab of the dialog box and you should see the MyCustomControl project available.
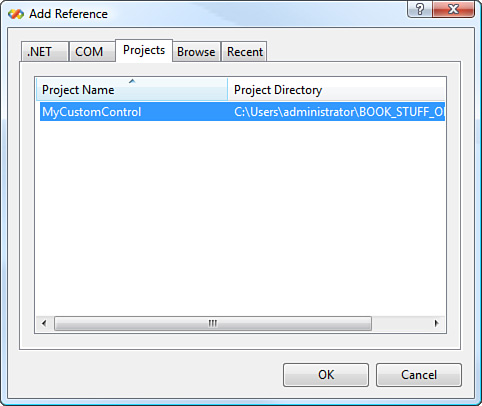
You should now be able to see your control in the Reference list under the References folder.
Now to the moment of truth: testing your new control.
Open the solution in Expression Blend, checking that both projects are available. If you still only have the first project open in Blend, you will need to close the project and then select Open -> Project/Solution (Ctrl + Shift + O) from the File menu, navigating to the
.slnfile, or check to see if the.slnfile is listed in your Recent Projects list (available from the File menu).Make sure that you have
Window1.xamlopen inside Blend.Open the Asset Library and select the Custom Controls tab.
You should see your AutoComplete_TextBox control in the list, complete with the correct icon, thanks to the TextBox you inherited. Add the control to your project. It should look like an ordinary text box at this stage.
Open the Properties panel and name the new control actxtTest.
Clear out the default text that is populated in your control.
Select the Window element inside the Objects and Timeline category of the Interaction panel.
Locate and add the
Loadedevent handler for the Window, taking you back to Visual Studio.You can now define a simple list to parse to the control for testing as shown in Listing 18.8. You will need to add the following
usingdirective for the List<T> type:using System.Collections.Generic;
Example 18.8. Building a Test Dictionary
private void Window_Loaded(object sender, RoutedEventArgs e)
{
//Create a new list to add to the auto complete control
List<string> DictionaryList = new List<string>();
DictionaryList.Add("temple");
DictionaryList.Add("tree");
DictionaryList.Add("teeth");
DictionaryList.Add("tea cake");
DictionaryList.Add("dog");
DictionaryList.Add("dilbert");
DictionaryList.Add("dam");
DictionaryList.Add("pretty");
DictionaryList.Add("polly");
this.actxtTest.STORED_LIST = DictionaryList;
}When you run the application, type the letter t into the TextBox. You should get a ListBox showing you the result of the filter. You can click on the down arrow to move through the list and then press the Enter key to make it the text inside the control.
Well, that was a pretty simple test and by no stretch of the imagination would it even be considered a commercial test of a control. This control does not support localization in the form of flow direction any more than the individual components inside of it, and then there is the fact that a dictionary could get quite large, so a more efficient way to store and extract a match list would be required. But those were not really the goals of the chapter now were they?
If you had issues with building the control from Visual Studio, Listing 18.9 is a complete listing of the classes inside the control.
Example 18.9. The Complete Control Listing
using System;
using System.Collections.Generic;
using System.Text;
using System.Windows.Controls.Primitives;
using System.Windows.Controls;
using System.Windows.Input;
using System.Windows;
namespace MyCustomControl
{
public class AutoComplete_TextBox : System.Windows.Controls.TextBox
{
public AutoComplete_TextBox()
{
this.BuildPopUp();
}
public AutoComplete_TextBox(List<string> WordDictionary)
{
this.STORED_LIST = WordDictionary;
this.BuildPopUp();
}
public List<string> STORED_LIST
{
get { return (List<string>)GetValue(STORED_LISTProperty); }
set { SetValue(STORED_LISTProperty, value); }
}
public static readonly DependencyProperty STORED_LISTProperty =
DependencyProperty.Register("STORED_LIST", typeof(List<string>),
typeof(AutoComplete_TextBox),
new FrameworkPropertyMetadata(null,
FrameworkPropertyMetadataOptions.None));
private Popup ListPopUp = new Popup();
private AutoCompleteListBox ListDisplay = new AutoCompleteListBox();
private void BuildPopUp()
{
ListDisplay.MaxHeight = 80;
ListDisplay.Width = 150;
ListDisplay.MouseDown += new System.Windows.Input.
MouseButtonEventHandler(ListDisplay_MouseDown);
ListDisplay.EnterKeyPressed += new AutoCompleteListBox.
EnterKeyPressedDelegate(ListDisplay_EnterKeyPressed);
ListPopUp.MouseDown += new
System.Windows.Input.MouseButtonEventHandler(ListPopUp_MouseDown);
ListPopUp.Child = this.ListDisplay;
ListPopUp.StaysOpen = false;
ListPopUp.PopupAnimation = PopupAnimation.Fade;
ListPopUp.Placement = PlacementMode.Relative;
ListPopUp.PlacementTarget = this;
ListPopUp.PlacementRectangle = new Rect(10, 20, 300, 300);
}
void ListPopUp_MouseDown(object sender, System.Windows.Input.
MouseButtonEventArgs e)
{
if (this.ListDisplay.SelectedItem != null)
{
this.Text = this.ListDisplay.SelectedItem.ToString();
this.ListPopUp.IsOpen = false;
}
}
void ListDisplay_EnterKeyPressed()
{
if (this.ListDisplay.SelectedItem != null)
{
this.Text = this.ListDisplay.SelectedItem.ToString();
this.ListPopUp.IsOpen = false;
}
}
void ListDisplay_MouseDown(object sender, System.Windows.Input.
MouseButtonEventArgs e)
{
if (this.ListDisplay.SelectedItem != null)
{
this.Text = this.ListDisplay.SelectedItem.ToString();
this.ListPopUp.IsOpen = false;
}
}
/// <summary>
/// Clear the store of its current values
/// </summary>
public void ClearStore()
{
    this.STORED_LIST.Clear();
}
/// <summary>
/// Supply a new value to add to the store
/// </summary>
/// <param name="NewValue">A string representing the new value</param>
public void AddNewValueToStore(string NewValue)
{
    //Keep only one copy of the item
    if (!this.STORED_LIST.Contains(NewValue))
        this.STORED_LIST.Add(NewValue);
}
/// <summary>
/// Checks to see if the currently entered text is available from
/// the Store. If so, display the popup
/// </summary>
/// <param name="e"></param>
protected override void OnKeyUp(KeyEventArgs e)
{
base.OnKeyUp(e);
if (e.Key == Key.Down)
{
if (!this.ListPopUp.IsOpen)
this.ListPopUp.IsOpen = true;
this.ListDisplay.SelectedIndex = 0;
this.ListDisplay.Focus();
}
if (this.STORED_LIST.Count > 0)
this.BuildFilteredList();
}
private void BuildFilteredList()
{

    if (this.Text.Length > 0)
    {

        List<string> FilteredStore = this.STORED_LIST.FindAll(DoMatch);

        if (FilteredStore.Count == 0)
        {
            this.ListPopUp.IsOpen = false;
            return;
        }
        else
        {
            this.ListDisplay.Items.Clear();

            foreach (string var in FilteredStore)
            {
                this.ListDisplay.Items.Add(var);
            }

            this.ListPopUp.IsOpen = true;
        }
    }

}

private bool DoMatch(string ValueToTest)
{
    if (ValueToTest.StartsWith(this.Text, true, null))
        return true;
    else
        return false;
}
}
/// <summary>
/// Custom listbox class to allow user actions to act as a click
/// </summary>
class AutoCompleteListBox : ListBox
{
public AutoCompleteListBox()
{
this.EnterKeyPressed += delegate() { };
}
public delegate void EnterKeyPressedDelegate();
public event EnterKeyPressedDelegate EnterKeyPressed;
protected override void OnKeyUp(KeyEventArgs e)
{
base.OnKeyUp(e);
if (e.Key == Key.Enter)
this.EnterKeyPressed();
}
protected override void OnMouseDoubleClick(MouseButtonEventArgs e)
{
base.OnMouseDoubleClick(e);
this.EnterKeyPressed();
}
protected override void OnMouseDown(MouseButtonEventArgs e)
{
base.OnMouseDown(e);
this.EnterKeyPressed();
}
}
}I hope you have enjoyed creating this handy control and in the process taken in just how powerful inheritance really is by allowing you to maintain functionality that is present in the original control(s). You could do a lot more with this control in terms of providing design-time support for list objects and giving the user better control of the pop-up positioning and so on. I leave it to you to improve the outcome. Please don’t be shy and by all means send me a copy of your modifications!
This chapter has been about code though, so although we yell at the top of our voices about the brilliance of XAML, its simplicity and ease of use, you should always keep the thought in the back of your mind about what technologies are best at which types of jobs. If working with code, especially in the areas of creating new controls, you should also think about just how complex you need to go to achieve the desired solution.
As also discussed in the early part of the chapter, making the choice of which level of the inheritance hierarchy your control sits can also make the difference between functionality and simplicity to the end user of your control.