
Chapter 2. The Path to Cloud Native Java
Πάντα ῥεῖ (Panta rei) - A famous aphorism from Heraclitus, a philosopher, describing the mutable condition of our existence where everything flows, where our call is to react and adapt. This describes perfectly the right approach with regards to the evolution we are experiencing in the IT world in general, and specifically with programming languages and frameworks, where heterogeneous, distributed, multi-cloud workloads are more common and essential for business purposes.
Java and Java EE are evolving as well in that direction, balancing the benefits that come from the consolidated experience on enterprise solutions, together with the need to a fast-changing cloud-aware scenario where our applications can run in many clouds seamlessly.
In this chapter we outline the components needed for a transition to Cloud Native Java, walking you through an e-commerce store Java implementation called Coolstore.
Cloud Native Workshop
Microservices are an accepted and well-recognized practice nowadays. For JavaEE developers this means a lift-and-shift change of the paradigm, where a single Application Server does not contain all our business logic. Instead, it gets rather split into different microservices running in their application servers, like Tomcat or Undertow, with a minimal footprint and optimizations to keep this coexistence functional and performant also in the Cloud Native world.
The monolithic approach today can be refactored into a heterogeneous and even programming language agnostic model, where each module is managed by a specific component running in a different application. Beyond the best practices such as API-driven models, the challenge here is how to maintain this diversity. However Java today provides a set of tools and frameworks that help us focus on our preferred tools and collaborate easily.
In this chapter, you will learn how to develop and deploy a microservices-based application split across different Java frameworks.
Architecture
Our e-commerce application Coolstore, is a typical web app containing three components:
-
Presentation Layer: a frontend to show available items to acquire
-
Model Layer: a backend providing the business logic to catalog and index all items to sell
-
Data Layer: a database storing all records about transactions and items
The outcome of these components is an online store with a catalog of product items and an inventory of stock, that we can organize with the architecture shown in Figure 2-1
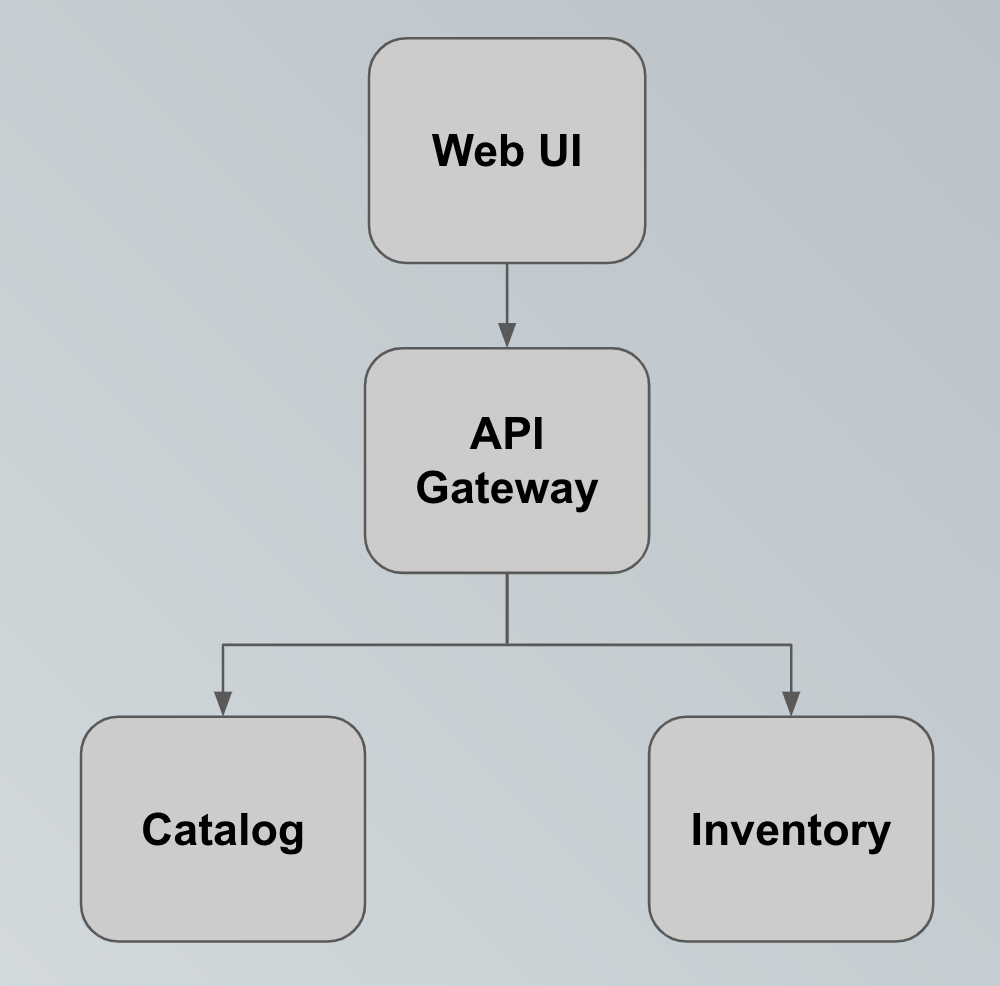
Figure 2-1. Coolstore Architecture
We map the three previously mentioned components into several microservices, each one responsible for its layer.
-
Catalog Service exposes using a REST API content of a catalog stored in a relational database
-
Inventory Service exposes using a REST API the inventory stored in a relational database
-
Gateway Service calls the Catalog Service and Inventory Service in an efficient way
-
WebUI Service calls Gateway Service to retrieve all the information.
The Presentation and the Model layer are represented by such microservices, with the latter having an interface to the Data layer delegated to some DBMS.
Our e-store implementation is called Coolstore and it looks like the picture in Figure 2-2

Figure 2-2. Coolstore Dashboard
Create an Inventory Microservice with Quarkus
Quarkus is a full-stack, Kubernetes-native Java framework made for Java virtual machines (JVMs) and native compilation, optimizing Java specifically for containers and enabling it to become an effective platform for serverless, cloud, and Kubernetes environments.
It is designed to work with popular Java standards, frameworks, and libraries like Eclipse MicroProfile and Spring, as well as Apache Kafka, RESTEasy (JAX-RS), Hibernate ORM (JPA), Spring, Infinispan, Camel, and many more. It also provides the correct information to GraalVM (a universal virtual machine for running apps written in several languages, including Java and JavaScript) for a native compilation of your application.
Quarkus is a good choice for implementing microservices architectures and it provides a set of tools that help developers debug and test at ease. For our e-commerce store, we will start using Quarkus for the Inventory microservice (as shown in Figure 2-3).

Figure 2-3. Inventory Quarkus microservice
You can find all the source code for this example in the book’s GitHub repository.
Create Quarkus Maven project
With Quarkus, you can scaffold a new project either with Maven than Gradle.
Tip
Both Maven and Gradle are popular ways to setup a Java project and manage all dependencies. They differs in the dependency management strategy and they have different configuration formats (XML vs Kotlin DSL), but they are mostly equivalent in terms of capabilities. In this book we will use Maven as it has wider support through IDEs and tools.
We set up a new Maven project using quarkus-maven-plugin with this command:
mvn io.quarkus:quarkus-maven-plugin:1.7.2.Final:create-DprojectGroupId=com.redhat.cloudnative-DprojectArtifactId=inventory-quarkus-DprojectVersion=1.0.0-SNAPSHOT-DclassName="com.redhat.cloudnative.InventoryResource"-Dextensions="quarkus-resteasy,quarkus-junit5,rest-assured,↳quarkus-resteasy-jsonb,quarkus-hibernate-orm,quarkus-jdbc-h2"
Tip
You can also bootstrap a Quarkus app with the online configurator available at https://code.quarkus.io/
This will create a skeleton project, with an InventoryResource class that we will use for implementing our e-commerce Inventory microservice.
Let’s have a look at the generated pom.xml file:
<?xml version="1.0" encoding="UTF-8"?><project><modelVersion>4.0.0</modelVersion><groupId>com.redhat.cloudnative</groupId><artifactId>inventory-quarkus</artifactId><version>1.0.0-SNAPSHOT</version><properties><quarkus-plugin.version>1.7.2.Final</quarkus-plugin.version><quarkus.platform.artifact-id>quarkus-bom</quarkus.platform.artifact-id><quarkus.platform.group-id>io.quarkus</quarkus.platform.group-id><quarkus.platform.version>1.7.2.Final</quarkus.platform.version><compiler-plugin.version>3.8.1</compiler-plugin.version><surefire-plugin.version>3.0.0-M5</surefire-plugin.version><project.build.sourceEncoding>UTF-8</project.build.sourceEncoding><maven.compiler.source>11</maven.compiler.source><maven.compiler.target>11</maven.compiler.target><maven.compiler.parameters>true</maven.compiler.parameters></properties><dependencyManagement><dependencies><dependency><groupId>io.quarkus</groupId><artifactId>quarkus-bom</artifactId><version>${quarkus.platform.version}</version><type>pom</type><scope>import</scope></dependency></dependencies></dependencyManagement><dependencies><dependency><groupId>io.quarkus</groupId><artifactId>quarkus-resteasy</artifactId></dependency><dependency><groupId>io.quarkus</groupId><artifactId>quarkus-junit5</artifactId><scope>test</scope></dependency><dependency><groupId>io.rest-assured</groupId><artifactId>rest-assured</artifactId><scope>test</scope></dependency><dependency><groupId>io.quarkus</groupId><artifactId>quarkus-resteasy-jsonb</artifactId></dependency><dependency><groupId>io.quarkus</groupId><artifactId>quarkus-hibernate-orm</artifactId></dependency><dependency><groupId>io.quarkus</groupId><artifactId>quarkus-jdbc-h2</artifactId></dependency></dependencies>...<build><plugins><plugin><groupId>io.quarkus</groupId><artifactId>quarkus-maven-plugin</artifactId><version>${quarkus-plugin.version}</version><executions><execution><goals><goal>native-image</goal></goals><configuration><enableHttpUrlHandler>true↳</enableHttpUrlHandler></configuration></execution></executions></plugin>...</profiles></project>

Here we setup
groupId,artifactIdandversion. For a full list of available option, please see Table 2-1
Here you find the import of the Quarkus BOM, allowing you to omit the version on the different Quarkus dependencies.

Here you find all the dependencies for the project, that we expressed as extensions to add. We included for our purposes:
-
JSON REST Services: It allows you to develop REST services to consume and produce JSON payloads
-
Hibernate ORM: The de facto JPA implementation and offers you the full breadth of an Object Relational Mapper
-
Datasources (H2): Datasources are the main way of obtaining connections to a database, in this example, we will use H2, an in-memory database ready to use for Java apps.
-

The
quarkus-maven-pluginwhich is responsible for the packaging of the application and also providing the development mode
| Attribute | Default Value | Description |
|---|---|---|
projectGroupId |
org.acme.sample |
The group id of the created project |
projectArtifactId |
mandatory |
The artifact id of the created project. Not passing it triggers the interactive mode. |
projectVersion |
1.0-SNAPSHOT |
The version of the created project |
platformGroupId |
io.quarkus |
The group id of the target platform. Given that all the existing platforms are coming from io.quarkus this one won’t practically be used explicitly. But it’s still an option. |
platformArtifactId |
quarkus-universe-bom |
The artifact id of the target platform BOM. It should be quarkus-bom in order to use the locally built Quarkus. |
platformVersion |
If it’s not specified, the latest one will be resolved. |
The version of the platform you want the project to use. It can also accept a version range, in which case the latest from the specified range will be used. |
className |
Not created if omitted |
The fully qualified name of the generated resource |
path |
/hello |
The resource path, only relevant if className is set. |
extensions |
[] |
The list of extensions to add to the project (comma-separated) |
Tip
To check all the extensions available, use this command from project dir: ./mvnw quarkus:list-extensions
Create a Domain Model
It’s time to write some code now and create a Domain model and a RESTful endpoint to create the Inventory service. Domain model is a popular pattern in software engineering, and it fits very well also in the Cloud Native World. The level of abstraction given by the pattern, makes it still valid as an object-oriented way of modeling microservices business logic.
You can find the Domain Model definition in the Inventory class in this book’s GitHub repository.
Our Domain Model implementation consists to an Entity mapped to the Persistence Layer, representing an inventory of items.
packagecom.redhat.cloudnative;importjavax.persistence.Entity;importjavax.persistence.Id;importjavax.persistence.Table;importjavax.persistence.Column;importjava.io.Serializable;@Entity@Table(name="INVENTORY")publicclassInventoryimplementsSerializable{privatestaticfinallongserialVersionUID=1L;@IdprivateStringitemId;@Columnprivateintquantity;publicInventory(){}publicStringgetItemId(){returnitemId;}publicvoidsetItemId(StringitemId){this.itemId=itemId;}publicintgetQuantity(){returnquantity;}publicvoidsetQuantity(intquantity){this.quantity=quantity;}@OverridepublicStringtoString(){return"Inventory [itemId='"+itemId+'''+", quantity="↳+quantity+']';}}
@Entity marks the class as a JPA entity
@Table customizes the table creation process by defining a table name and database constraint, in this case it is
INVENTORY@Id marks the primary key for the table
Once we defined the model, we can update our Properties expressed in the application.properties file, in order to provide the instructions on how to populate data for our microservice.
quarkus.datasource.url=jdbc:h2:mem:inventory;DB_CLOSE_ON_EXIT=FALSE;↳ DB_CLOSE_DELAY=-1quarkus.datasource.driver=org.h2.Driver quarkus.datasource.username=sa quarkus.datasource.password=sa quarkus.hibernate-orm.database.generation=drop-and-create quarkus.hibernate-orm.log.sql=true quarkus.hibernate-orm.sql-load-script=import.sql%prod.quarkus.package.uber-jar=true
JDBC path for the in-memory DB, this can be changed for other types of DB like any RDBMS.
An SQL script that we’ll use to populate the Coolstore with some data
An uber-jar contains all the dependencies required packaged in the jar to enable running the application with java -jar. By default, in Quarkus, the generation of the uber-jar is disabled. With the %prod prefix, this option is only activated when building the jar intended for deployments.
Create a RESTful Service
Quarkus uses JAX-RS standard for building REST services. When scaffolding a new project as we saw before, a hello example service is created in the className path we defined. Now we want to expose REST service to retrieve the number of available items in the store from the inventory, defined as in Table 2-2.
| Path | HTTP Method | Description |
|---|---|---|
|
GET |
Returns the quantity for a given item id present in the inventory database |
Let’s change the InventoryResource class definition as the following.
packagecom.redhat.cloudnative;importjavax.enterprise.context.ApplicationScoped;importjavax.inject.Inject;importjavax.persistence.EntityManager;importjavax.ws.rs.GET;importjavax.ws.rs.Path;importjavax.ws.rs.PathParam;importjavax.ws.rs.Produces;importjavax.ws.rs.core.MediaType;@Path("/api/inventory")@ApplicationScopedpublicclassInventoryResource{@InjectEntityManagerem;@GET@Path("/{itemId}")@Produces(MediaType.APPLICATION_JSON)publicInventorygetAvailability(@PathParam("itemId")StringitemId){Inventoryinventory=em.find(Inventory.class,itemId);returninventory;}}
We just implemented a parametric REST endpoint for our microservice, serving the JSON representation of the items contained in our Coolstore. In this way we provided a layer to query via HTTP GET requests our Inventory Data Model we implemented in the previous step.
Tip
With Quarkus, there is no need to create an Application class. It’s supported, but not required. In addition, only one instance of the resource is created and not one per request. You can configure this using the different Scoped annotations (ApplicationScoped, RequestScoped, etc).
Run the app in Dev Mode
Development mode in Quarkus is one of the coolest features we have today for Cloud Native Java development. It enables hot deployment with background compilation, which means that when you modify your Java files or your resource files and then refresh your browser, the changes automatically take effect. This also works for resource files such as the configuration property file. In addition to that, refreshing the browser triggers a scan of the workspace, and if any changes are detected, the Java files are recompiled and the application is redeployed; your request is then serviced by the redeployed application. If there are any issues with compilation or deployment an error page will let you know.
You can start the app in dev mode with a built-in Maven goal for that named quarkus:dev. It enables hot deployment with background compilation, which means that when you modify your Java files or your resource files and refresh your browser these changes will automatically take effect. This works too for resource files like the configuration property file.
./mvnw compile quarkus:dev
After you start the app in dev mode, you should see an output like this:
...
Hibernate:

    drop table if exists INVENTORY CASCADE
Hibernate:

    create table INVENTORY (
       itemId varchar(255) not null,
        quantity integer,
        primary key (itemId)
    )
Hibernate:
    INSERT INTO INVENTORY(itemId, quantity) VALUES (100000, 0)
Hibernate:
    INSERT INTO INVENTORY(itemId, quantity) VALUES (329299, 35)
Hibernate:
    INSERT INTO INVENTORY(itemId, quantity) VALUES (329199, 12)
Hibernate:
    INSERT INTO INVENTORY(itemId, quantity) VALUES (165613, 45)
Hibernate:
    INSERT INTO INVENTORY(itemId, quantity) VALUES (165614, 87)
Hibernate:
    INSERT INTO INVENTORY(itemId, quantity) VALUES (165954, 43)
Hibernate:
    INSERT INTO INVENTORY(itemId, quantity) VALUES (444434, 32)
Hibernate:
    INSERT INTO INVENTORY(itemId, quantity) VALUES (444435, 53)
__  ____  __  _____   ___  __ ____  ______
 --/ __ / / / / _ | / _ / //_/ / / / __/
 -/ /_/ / /_/ / __ |/ , _/ ,< / /_/ /
--\___\_\____/_/ |_/_/|_/_/|_|\____/___/
2020-12-02 13:11:16,565 INFO  [io.quarkus] (Quarkus Main Thread)↳
inventory-quarkus 1.0.0-SNAPSHOT on JVM (powered by Quarkus 1.7.2.Final)↳
started in 1.487s. Listening on: http://0.0.0.0:8080
2020-12-02 13:11:16,575 INFO  [io.quarkus] (Quarkus Main Thread)↳
Profile dev activated. Live Coding activated.
2020-12-02 13:11:16,575 INFO  [io.quarkus] (Quarkus Main Thread)↳
Installed features: [agroal, cdi, hibernate-orm, jdbc-h2, mutiny, narayana-jta,↳
resteasy, resteasy-jsonb, smallrye-context-propagation]
From the output, you can see that Hibernate created a database with the name of our Domain Model and populated it with some initial data defined in our Properties file.
Note
When we skaffolded the project at the beginning of this chapter, we included a series of dependencies like Hibernate ORM and we use it to map our Data Model as Entity into a database.
We can also see that our app is up and running, listening to port 8080. If you open your browser now at http://localhost:8080 you will see a Quarkus Welcome page (as in Figure 2-4)
Figure 2-4. Quarkus Welcome Page
Tip
You can stop the app running in dev mode by using CTRL-C from the same terminal where you launched it.
You can now try querying one of the items we inserted from the import.sql file, to test if our microservice is running properly.
Just navigate to http://localhost:8080/api/inventory/329299
You should have the following output:
{"itemId":"329299","quantity":35}
The REST API returned a JSON object representing the inventory count for this product. Congratulations on your first Cloud Native microservice with Quarkus!
Note
We are going now to develop the other microservices that will consume this one, so leave this open in order to have the Coolstore up and running at the end of this chapter.
Create a Catalog Microservice with Spring Boot
Spring Boot is an opinionated framework that makes it easy to create stand-alone Spring based applications with embedded web containers such as Tomcat (or JBoss Web Server), Jetty and Undertow that you can run directly on the JVM using java -jar. Spring Boot also allows producing a war file that can be deployed on stand-alone web containers.
The opinionated approach means many choices about Spring platform and third-party libraries are already made by Spring Boot so that you can get started with minimum effort and configuration.
Spring Boot is very popular for Cloud Native Java development because, quoting the official website, it makes it easy to create stand-alone, production-grade Spring based Applications that you can “just run”1. We will include Spring Boot in our architecture for a Catalog microservice (as shown in Figure 2-5).
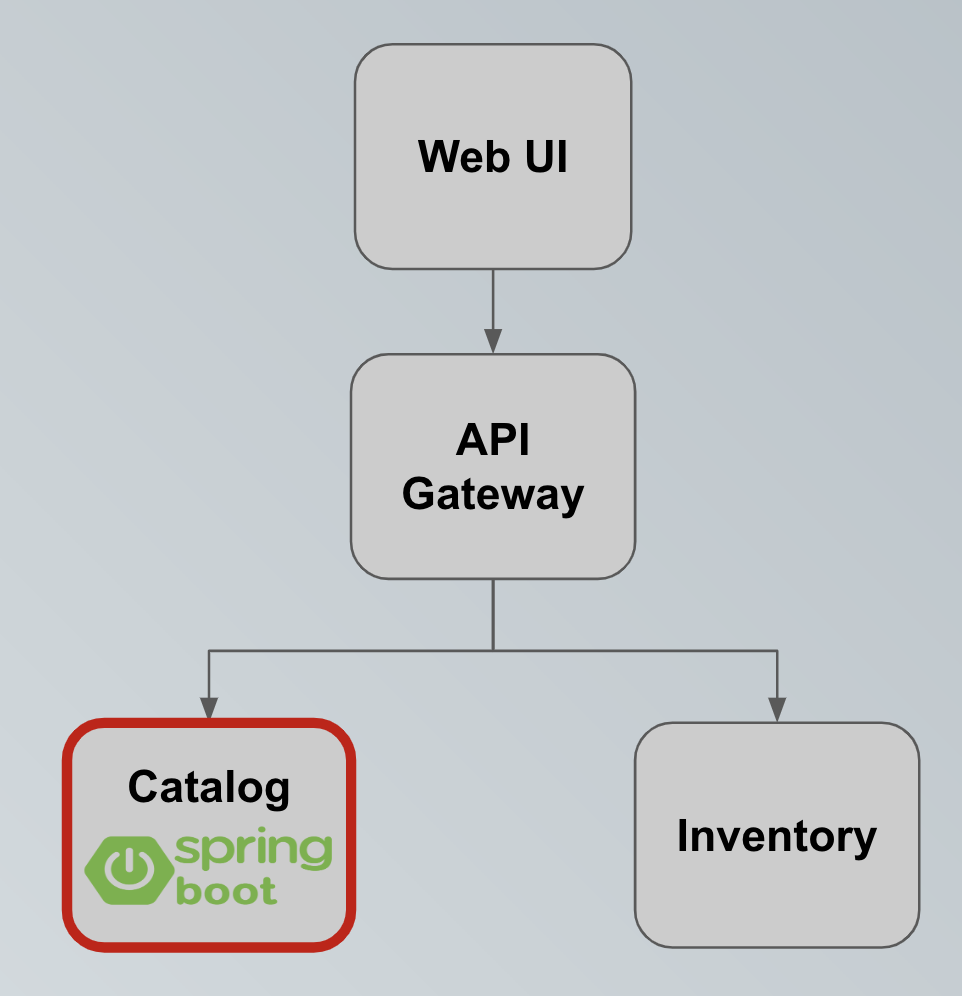
Figure 2-5. Catalog Spring Boot microservice
You can find all the source code for creating the Spring Boot microservice in the book’s GitHub repository.
Create a Maven Project
Also in this case you can bootstrap your Spring boot project either with Maven and Gradle. The easiest way to do it is with Spring Initializr, an online configurator that helps to generate the project structure with all dependencies needed.
In this case, we will use a Red Hat supported Spring boot version from Red Hat Maven repositories, and will use these Project Metadata defined in Table 2-3.
| Key | Value | Description |
|---|---|---|
|
4.0.0 |
POM model version (always 4.0.0). |
|
com.redhat.cloudnative |
Group or organization that the project belongs to. Often expressed as an inverted domain name. |
|
catalog |
Name to be given to the project’s library artifact (for example, the name of its JAR or WAR file). |
|
1.0-SNAPSHOT |
Version of the project that is being built |
|
CoolStore Catalog Service |
Name of the app |
|
CoolStore Catalog Service with Spring Boot |
A description for the app |
Let’s have a look at our pom.xml file:
<?xml version="1.0" encoding="UTF-8"?><projectxmlns="http://maven.apache.org/POM/4.0.0"xmlns:xsi="http://www.w3.org/2001/XMLSchema-instance"↳xsi:schemaLocation="http://maven.apache.org/POM/4.0.0↳ http://maven.apache.org/xsd/maven-4.0.0.xsd"><modelVersion>4.0.0</modelVersion><groupId>com.redhat.cloudnative</groupId><artifactId>catalog</artifactId><version>1.0-SNAPSHOT</version><name>CoolStore Catalog Service</name><description>CoolStore Catalog Service with Spring Boot</description><properties><spring-boot.version>2.1.6.SP3-redhat-00001</spring-boot.version><spring-boot.maven.plugin.version>2.1.4.RELEASE-redhat-00001↳</spring-boot.maven.plugin.version><spring.k8s.bom.version>1.0.3.RELEASE</spring.k8s.bom.version><fabric8.maven.plugin.version>4.3.0</fabric8.maven.plugin.version></properties><repositories><repository><id>redhat-ga</id><url>https://maven.repository.redhat.com/ga/</url></repository></repositories><pluginRepositories><pluginRepository><id>redhat-ga-plugins</id><url>https://maven.repository.redhat.com/ga/</url></pluginRepository></pluginRepositories><dependencyManagement><dependencies><dependency><groupId>me.snowdrop</groupId><artifactId>spring-boot-bom</artifactId><version>${spring-boot.version}</version><type>pom</type><scope>import</scope></dependency><dependency><groupId>org.springframework.cloud</groupId><artifactId>spring-cloud-kubernetes-dependencies</artifactId><version>${spring.k8s.bom.version}</version><type>pom</type><scope>import</scope></dependency></dependencies></dependencyManagement><dependencies><dependency><groupId>org.springframework.boot</groupId><artifactId>spring-boot-starter-web</artifactId></dependency><dependency><groupId>org.springframework.boot</groupId><artifactId>spring-boot-starter-data-jpa</artifactId></dependency><dependency><groupId>org.springframework.boot</groupId><artifactId>spring-boot-starter-actuator</artifactId></dependency><dependency><groupId>org.springframework.cloud</groupId><artifactId>spring-cloud-starter-kubernetes-config</artifactId></dependency><dependency><groupId>com.h2database</groupId><artifactId>h2</artifactId></dependency></dependencies>...</project>
Project metadata we generated by Initializr or manually
Spring Boot version used
Dependencies we need:
-
JPA: Spring Data with JPA
-
Spring Cloud: support and tooling from Spring for Cloud Native Java apps
-
H2: an in-memory database that we will use for this purpose
-
This is a minimal Spring Boot project with support for RESTful services and Spring Data with JPA for connecting to a database. Any new project contains no code other than the main class, in this case, the CatalogApplication class which is there to bootstrap the Spring Boot application.
You find it in this book’s GitHub repository
packagecom.redhat.cloudnative.catalog;importorg.springframework.boot.SpringApplication;importorg.springframework.boot.autoconfigure.SpringBootApplication;@SpringBootApplicationpublicclassCatalogApplication{publicstaticvoidmain(String[]args){SpringApplication.run(CatalogApplication.class,args);}}
A convenience annotation that adds auto-configuration, component scan and also enables defining extra configurations. It is equivalent to using
@Configuration,@EnableAutoConfiguration, and@ComponentScanwith their default attributes
Create Domain Model
Next, we need to provide some data to consume for our microservice representing the Catalog of our Coolstore e-commerce website. Also here, we define a Domain model for the high-level interaction with the Persistence Layer, and an interface that enables the communication between a REST endpoint to expose the Service and the data model (as shown in Figure 2-6).
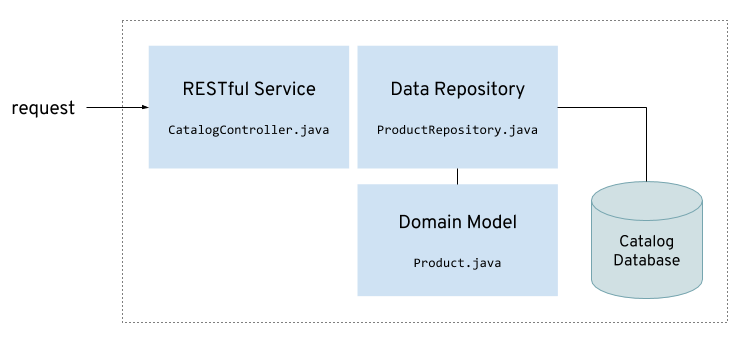
Figure 2-6. Data Model flow
The database is configured using the Spring application configuration file which is located in the properties file application.properties. Let’s have a look at this file to see the database connection details.
You find it in this book’s GitHub repository
spring.application.name=catalog server.port=8080 spring.datasource.url=jdbc:h2:mem:fruits;DB_CLOSE_ON_EXIT=FALSEspring.datasource.username=sa spring.datasource.password= spring.datasource.driver-class-name=org.h2.Driver
JDBC URL for H2 DB
Use of H2 in-memory database
Let’s create our Domain model, which is similar to the one we created for the Inventory microservice before.
You find it in this book’s GitHub repository
packagecom.redhat.cloudnative.catalog;importjava.io.Serializable;importjavax.persistence.Entity;importjavax.persistence.Id;importjavax.persistence.Table;@Entity@Table(name="PRODUCT")publicclassProductimplementsSerializable{privatestaticfinallongserialVersionUID=1L;@IdprivateStringitemId;privateStringname;privateStringdescription;privatedoubleprice;publicProduct(){}publicStringgetItemId(){returnitemId;}publicvoidsetItemId(StringitemId){this.itemId=itemId;}publicStringgetName(){returnname;}publicvoidsetName(Stringname){this.name=name;}publicStringgetDescription(){returndescription;}publicvoidsetDescription(Stringdescription){this.description=description;}publicdoublegetPrice(){returnprice;}publicvoidsetPrice(doubleprice){this.price=price;}@OverridepublicStringtoString(){return"Product [itemId="+itemId+", name="+name+", price="+price+"]";}}
@Entitymarks the class as a JPA entity@Tablecustomizes the table creation process by defining a table name and database constraint, in this case a table named CATALOG@Idmarks the primary key for the table
Create a Data Repository
Spring Data repository abstraction simplifies dealing with data models in Spring applications by reducing the amount of boilerplate code required to implement data access layers for various persistence stores. Repository and its sub-interfaces are the central concept in Spring Data which is a marker interface to provide data manipulation functionality for the entity class that is being managed. When the application starts, Spring finds all interfaces marked as repositories and for each interface found, the infrastructure configures the required persistent technologies and provides an implementation for the repository interface.
We create now a new Java interface named ProductRepository in com.redhat.cloudnative.catalog_ package and extend the CrudRepository interface in order to indicate to Spring that you want to expose a complete set of methods to manipulate the entity.
You find it in this book’s GitHub repository
packagecom.redhat.cloudnative.catalog;importorg.springframework.data.repository.CrudRepository;publicinterfaceProductRepositoryextendsCrudRepository<Product,String>{}
CrudRepository: interface used to indicate to Spring that we want to expose a complete set of methods to manipulate the entity.
Now that we have a domain model and a repository to retrieve the domain model, let’s create a RESTful service that returns the list of products.
Create a RESTful Service
Spring Boot uses Spring Web MVC as the default RESTful stack in Spring applications. We now create a new Java class named CatalogController in com.redhat.cloudnative.catalog package for that, exposing a REST endpoint as defined in Table 2-4.
| Path | HTTP Method | Description |
|---|---|---|
|
GET |
Returns a catalog for all items available in the store, matching items from Inventory service with data from Catalog service. |
You find it in this book’s GitHub repository
packagecom.redhat.cloudnative.catalog;importjava.util.List;importjava.util.Spliterator;importjava.util.stream.Collectors;importjava.util.stream.StreamSupport;importorg.springframework.beans.factory.annotation.Autowired;importorg.springframework.http.MediaType;importorg.springframework.web.bind.annotation.GetMapping;importorg.springframework.web.bind.annotation.RequestMapping;importorg.springframework.web.bind.annotation.ResponseBody;importorg.springframework.web.bind.annotation.RestController;@RestController@RequestMapping(value="/api/catalog")publicclassCatalogController{@AutowiredprivateProductRepositoryrepository;@ResponseBody@GetMapping(produces=MediaType.APPLICATION_JSON_VALUE)publicList<Product>getAll(){Spliterator<Product>products=repository.findAll().spliterator();returnStreamSupport.stream(products,false).collect(Collectors.toList());}}
@RequestMappingindicates the above REST service defines an endpoint that is accessible via HTTP GET at /api/catalogSpring Boot automatically provides an implementation for ProductRepository at runtime and injects it into the controller using the @Autowire annotation.
The
repositoryattribute on the controller class is used to retrieve the list of products from the databases.
Everything now is ready to start our second microservice, which will listen to port 9000 to avoid conflicts with the other one.
mvn spring-boot:run
You should see an output like this:
[INFO] --- spring-boot-maven-plugin:2.1.4.RELEASE-redhat-00001:run (default-cli)↳
@ catalog ---
[INFO] Attaching agents: []
2020-12-02 17:12:18.528  INFO 61053 --- [           main]↳
trationDelegate$BeanPostProcessorChecker : Bean 'org.springframework.cloud.autoconfigure.ConfigurationPropertiesRebinderAutoConfiguration' of type [org.springframework.cloud.autoconfigure.ConfigurationPropertiesRebinderAutoConfiguration$$EnhancerBySpringCGLIB$$e898759c] is not eligible for getting processed by all BeanPostProcessors (for example: not eligible for auto-proxying)

  .   ____          _            __ _ _
 /\ / ___'_ __ _ _(_)_ __  __ _
( ( )\___ | '_ | '_| | '_ / _` |
 \/  ___)| |_)| | | | | || (_| |  ) ) ) )
  '  |____| .__|_| |_|_| |_\__, | / / / /
 =========|_|==============|___/=/_/_/_/
 :: Spring Boot ::        (v2.1.6.RELEASE)
StandardService   : Starting service [Tomcat]
2020-12-02 17:12:20.064  INFO 61053 --- [           main]↳
org.apache.catalina.core.StandardEngine  : Starting Servlet Engine: Apache Tomcat/9.0.7.redhat-16
2020-12-02 17:12:20.220  INFO 61053 --- [           main]↳
o.a.c.c.C.[Tomcat].[localhost].[/]       : Initializing Spring embedded WebApplicationContext
2020-12-02 17:12:20.220  INFO 61053 --- [           main]↳
...
Your app is now listening on port 9000 to the endpoint we configured, you can verify it by navigating to http://localhost:9000/
You should see this output from the REST API returning a JSON object representing the product list:
[{"itemId":"100000","name":"Red Fedora","description":"Official Red Hat Fedora","price":34.99},{"itemId":"329299","name":"Quarkus T-shirt","description":"This updated unisex essential fits like a well-loved favorite,↳featuring a crew neck, short sleeves and designed with superior combed and↳ring- spun cotton.","price":10.0},{"itemId":"329199","name":"Pronounced Kubernetes","description":"Kubernetes is changing how enterprises work in the cloud.↳But one of the biggest questions people have is: How do you pronounce it?","price":9.0},{"itemId":"165613","name":"Knit socks","description":"Your brand will get noticed on these full color knit socks.↳Imported.","price":4.15},{"itemId":"165614","name":"Quarkus H2Go water bottle","description":"Sporty 16. 9 oz double wall stainless steel thermal bottle↳with copper vacuum insulation, and threaded insulated lid. Imprinted. Imported.","price":14.45},{"itemId":"165954","name":"Patagonia Refugio pack 28L","description":"Made from 630-denier 100% nylon (50% recycled/50% high-tenacity)↳plain weave; lined with 200-denier 100% recycled polyester. ...","price":6.0},{"itemId":"444434","name":"Red Hat Impact T-shirt","description":"This 4. 3 ounce, 60% combed ringspun cotton/40% polyester↳jersey t- shirt features a slightly heathered appearance. The fabric↳laundered for reduced shrinkage. Next Level brand apparel. Printed.","price":9.0},{"itemId":"444435","name":"Quarkus twill cap","description":"100% cotton chino twill cap with an unstructured, low-profile,↳six-panel design. The crown measures 3 1/8 and this features a Permacurv↳visor and a buckle closure with a grommet.","price":13.0},{"itemId":"444437","name":"Nanobloc Universal Webcam Cover","description":"NanoBloc Webcam Cover fits phone, laptop, desktop, Pc,↳MacBook Pro, iMac, ...","price":2.75}]
Note
The output has been formatted in pretty mode in book’s code listing. You’ll notice the combination of our items from the Quarkus Inventory microservice with the description and the price from the Spring boot Catalog microservice. If you recall the info from the previous test with item 329299, it’s a Quarkus T-shirt.
Congratulations on creating your second microservice, now it’s time to connect a Frontend to our Backends. In order to do it, we will use a software API gateway with Reactive Java in the next section.
Create a Gateway Service with Vert.x
Eclipse Vert.x is an event-driven toolkit for building reactive applications on the Java Virtual Machine (JVM). Vert.x does not impose a specific framework or packaging model, it can be used within your existing applications and frameworks in order to add reactive functionality by just adding the Vert.x jar files to the application classpath.
Eclipse Vert.x enables building reactive systems as defined by The Reactive Manifesto and build services that are:
-
Responsive: to handle requests in a reasonable time
-
Resilient: to stay responsive in the face of failures
-
Elastic: to stay responsive under various loads and be able to scale up and down
-
Message-driven: components interact using asynchronous message-passing
It is designed to be event-driven and non-blocking, in fact events are delivered into an event loop that must never be blocked. Unlike traditional applications, Vert.x uses a very small number of threads responsible for dispatching the events to event handlers. If the event loop is blocked, the events won’t be delivered anymore and therefore the code needs to be mindful of this execution model (as shown in Figure 2-7).

Figure 2-7. Vert.x Event Loop
In our Architecture, this microservice will act as an asynchronous software API Gateway, developed as a reactive Java microservice that routes and dispatches efficiently the traffic to the Inventory and Catalog component of Cloud Native e-commerce website.

Figure 2-8. API Gateway Vert.x microservice
You find the source code of this microservice in this book’s GitHub repository
Create Vert.x Maven project
Vert.x supports both Maven and Gradle, and the easiest way to bootstrap a new Vert.x Maven project is through a template project structure offered by Vert.x community available at https://github.com/vert-x3/vertx-maven-starter .
In our case we are using Red Hat Maven repositories and added the settings shown in Table 2-5.
| Key | Value | Description |
|---|---|---|
|
4.0.0 |
POM model version (always 4.0.0). |
|
com.redhat.cloudnative |
Group or organization that the project belongs to. Often expressed as an inverted domain name. |
|
gateway |
Name to be given to the project’s library artifact (a JAR in this case) |
|
1.0-SNAPSHOT |
Version of the project that is being built |
|
CoolStore Gateway Service |
Name of the app |
Let’s have a look at how the pom.xml will look like:
<?xml version="1.0" encoding="UTF-8"?><projectxmlns="http://maven.apache.org/POM/4.0.0"↳xmlns:xsi="http://www.w3.org/2001/XMLSchema-instance"↳xsi:schemaLocation="http://maven.apache.org/POM/4.0.0 http://maven.apache.org/xsd/maven-4.0.0.xsd"><modelVersion>4.0.0</modelVersion><groupId>com.redhat.cloudnative</groupId><artifactId>gateway</artifactId><version>1.0-SNAPSHOT</version><packaging>jar</packaging><name>CoolStore Gateway Service</name><description>CoolStore Gateway Service with Eclipse Vert.x</description><properties><vertx.version>3.6.3.redhat-00009</vertx.version><vertx-maven-plugin.version>1.0.15</vertx-maven-plugin.version><vertx.verticle>com.redhat.cloudnative.gateway.GatewayVerticle↳</vertx.verticle><fabric8.maven.plugin.version>4.3.0</fabric8.maven.plugin.version><slf4j.version>1.7.21</slf4j.version></properties>...<dependencyManagement><dependencies><dependency><groupId>io.vertx</groupId><artifactId>vertx-dependencies</artifactId><version>${vertx.version}</version><type>pom</type><scope>import</scope></dependency></dependencies></dependencyManagement><dependencies><dependency><groupId>io.vertx</groupId><artifactId>vertx-core</artifactId></dependency><dependency><groupId>io.vertx</groupId><artifactId>vertx-config</artifactId></dependency><dependency><groupId>io.vertx</groupId><artifactId>vertx-web</artifactId></dependency><dependency><groupId>io.vertx</groupId><artifactId>vertx-web-client</artifactId></dependency><dependency><groupId>io.vertx</groupId><artifactId>vertx-rx-java2</artifactId></dependency><dependency><groupId>io.vertx</groupId><artifactId>vertx-health-check</artifactId></dependency><dependency><groupId>org.slf4j</groupId><artifactId>slf4j-api</artifactId><version>${slf4j.version}</version></dependency><dependency><groupId>org.slf4j</groupId><artifactId>slf4j-jdk14</artifactId><version>${slf4j.version}</version></dependency></dependencies>...</project>
Project metadata
Vert.x version used
GatewayVerticle: the name of the main Verticle, it’s the entry point for our appA list of dependecies:
-
Vert.x libraries: vertx-core, vertx-config, vertx-web, vertx-web-client
-
Rx support for Vert.x: vertx-rx-java2
-
Create an API Gateway
Next, we want to create an API Gateway as the entry point for the web frontend of our website, to access all backend services from a single place. This pattern is expectedly called API Gateway and is a common practice in Microservices architecture.
The unit of deployment in Vert.x is called a Verticle. A verticle processes incoming events over an event-loop, where events can be anything like receiving network buffers, timing events, or messages sent by other verticles.
We define our main Verticle as GatewayArticle as we declared it previously in the pom.xml, and expose the REST endpoint that will be routed to the Catalog /api/catalog as shown in Table 2-6.
| Path | HTTP Method | Description |
|---|---|---|
|
GET |
Routes the traffic to Catalog and returns a JSON object containing all items available in the store, matching items from Inventory service with data from Catalog service. |
You find it in this book’s GitHub repository
packagecom.redhat.cloudnative.gateway;importio.vertx.core.http.HttpMethod;importio.vertx.core.json.JsonArray;importio.vertx.core.json.JsonObject;importio.vertx.ext.web.client.WebClientOptions;importio.vertx.reactivex.config.ConfigRetriever;importio.vertx.reactivex.core.AbstractVerticle;importio.vertx.reactivex.ext.web.Router;importio.vertx.reactivex.ext.web.RoutingContext;importio.vertx.reactivex.ext.web.client.WebClient;importio.vertx.reactivex.ext.web.client.predicate.ResponsePredicate;importio.vertx.reactivex.ext.web.codec.BodyCodec;importio.vertx.reactivex.ext.web.handler.CorsHandler;importio.vertx.reactivex.ext.web.handler.StaticHandler;importorg.slf4j.Logger;importorg.slf4j.LoggerFactory;importio.reactivex.Observable;importio.reactivex.Single;importjava.util.ArrayList;importjava.util.List;publicclassGatewayVerticleextendsAbstractVerticle{privatestaticfinalLoggerLOG=LoggerFactory.getLogger(GatewayVerticle.class);privateWebClientcatalog;privateWebClientinventory;@Overridepublicvoidstart(){Routerrouter=Router.router(vertx);router.route().handler(CorsHandler.create("*")↳.allowedMethod(HttpMethod.GET));router.get("/*").handler(StaticHandler.create("assets"));router.get("/health").handler(this::health);router.get("/api/products").handler(this::products);ConfigRetrieverretriever=ConfigRetriever.create(vertx);retriever.getConfig(ar->{if(ar.failed()){// Failed to retrieve the configuration}else{JsonObjectconfig=ar.result();StringcatalogApiHost=↳config.getString("COMPONENT_CATALOG_HOST","localhost");IntegercatalogApiPort=↳config.getInteger("COMPONENT_CATALOG_PORT",9000);catalog=WebClient.create(vertx,newWebClientOptions().setDefaultHost(catalogApiHost).setDefaultPort(catalogApiPort));LOG.info("Catalog Service Endpoint: "+catalogApiHost↳+":"+catalogApiPort.toString());StringinventoryApiHost=↳config.getString("COMPONENT_INVENTORY_HOST","localhost");IntegerinventoryApiPort=↳config.getInteger("COMPONENT_INVENTORY_PORT",8080;inventory=WebClient.create(vertx,newWebClientOptions().setDefaultHost(inventoryApiHost).setDefaultPort(inventoryApiPort));LOG.info("Inventory Service Endpoint: "↳+inventoryApiHost+":"+inventoryApiPort.toString());vertx.createHttpServer().requestHandler(router).listen(Integer.getInteger("http.port",8090));LOG.info("Server is running on port "↳+Integer.getInteger("http.port",8090));}});}privatevoidproducts(RoutingContextrc){...}privateSingle<JsonObject>getAvailabilityFromInventory(JsonObjectproduct){...}privatevoidhealth(RoutingContextrc){...}}
A
Verticleis created by extending fromAbstractVerticleclassThe
start()method creates an HTTP serverA
Routeris retrieved for mapping the REST endpointsA REST endpoint is created for mapping
/api/catalogCatalog endpoint through aproduct()function that will retrieve the content
An HTTP Server is created which listens on port 8090

Give
Inventorymicroservice hostname and port to connect to
The microservice supports ENV vars to change its hostname and port from Properties, this is important for the portability of our architecture across clouds.
Note
We use port 8090 to avoid conflict while running it in local development. The port number can be changed also with a property file like described in Vert.x Config doc. When developing with Microservices, the use of environment variables to map hosts and ports is highly encouraged, we use them to map Inventory and Catalog endpoints dynamically.
We are now ready to start our API Gateway:
mvn compile vertx:run
The output should be similar to this:
[INFO] Scanning for projects...
[INFO]
[INFO] -------------------< com.redhat.cloudnative:gateway >-------------------
[INFO] Building CoolStore Gateway Service 1.0-SNAPSHOT
[INFO] --------------------------------[ jar ]---------------------------------
[INFO]
[INFO] --- vertx-maven-plugin:1.0.15:initialize (vmp) @ gateway ---
[INFO]
[INFO] --- maven-resources-plugin:2.6:resources (default-resources) @ gateway ---
[WARNING] Using platform encoding (UTF-8 actually) to copy filtered resources,↳
i.e. build is platform dependent!
[INFO] Copying 3 resources
[INFO]
[INFO] --- maven-compiler-plugin:3.6.1:compile (default-compile) @ gateway ---
[INFO] Changes detected - recompiling the module!
[WARNING] File encoding has not been set, using platform encoding UTF-8,↳
i.e. build is platform dependent!
[INFO] Compiling 1 source file to↳
/home/bluesman/git/cloud-native-java2/↳
labs/gateway-vertx/target/classes
...
 com.redhat.cloudnative.gateway.GatewayVerticle↳
lambda$start$0
[INFO] INFO: Catalog Service Endpoint: localhost:9000
[INFO] dic 02, 2020 6:56:56 PM com.redhat.cloudnative.gateway.GatewayVerticle↳
lambda$start$0
[INFO] INFO: Inventory Service Endpoint: localhost:8080
[INFO] dic 02, 2020 6:56:56 PM com.redhat.cloudnative.gateway.GatewayVerticle↳
lambda$start$0
[INFO] INFO: Server is running on port 8090
[INFO] dic 02, 2020 6:56:56 PM
Let’s verify it is up and running and correctly routing traffic navigating to http://localhost:8090
You should get the JSON object from Catalog’s endpoint, in the pretty format:
[{"itemId":"165613","name":"Knit socks","description":"Your brand will get noticed on these full color knit socks.↳Imported.","price":4.15,"availability":{"quantity":45}},{"itemId":"165614","name":"Quarkus H2Go water bottle","description":"Sporty 16. 9 oz double wall stainless steel thermal bottle↳with copper vacuum insulation, and threaded insulated lid. Imprinted. Imported.","price":14.45,"availability":{"quantity":87}},{"itemId":"329199","name":"Pronounced Kubernetes","description":"Kubernetes is changing how enterprises work in the cloud.↳But one of the biggest questions people have is: How do you pronounce it?","price":9.0,"availability":{"quantity":12}},{"itemId":"100000","name":"Red Fedora","description":"Official Red Hat Fedora","price":34.99,"availability":{"quantity":0}},{"itemId":"329299","name":"Quarkus T-shirt","description":"This updated unisex essential fits like a well-loved favorite,↳featuring a crew neck, short sleeves and designed with superior combed and ring-↳spun cotton.","price":10.0,"availability":{"quantity":35}},{"itemId":"165954","name":"Patagonia Refugio pack 28L","description":"Made from 630-denier 100% nylon (50% recycled/50% high-tenacity)↳plain weave; lined with 200-denier 100% recycled polyester. ...","price":6.0,"availability":{"quantity":43}},{"itemId":"444434","name":"Red Hat Impact T-shirt","description":"This 4. 3 ounce, 60% combed ringspun cotton/40% polyester↳jersey t- shirt features a slightly heathered appearance. The fabric laundered↳for reduced shrinkage. Next Level brand apparel. Printed.","price":9.0,"availability":{"quantity":32}},{"itemId":"444437","name":"Nanobloc Universal Webcam Cover","description":"NanoBloc Webcam Cover fits phone, laptop, desktop, Pc,↳MacBook Pro, iMac, ...","price":2.75},{"itemId":"444435","name":"Quarkus twill cap","description":"100% cotton chino twill cap with an unstructured, low-profile,↳six-panel design. The crown measures 3 1/8 and this features a Permacurv↳visor and a buckle closure with a grommet.","price":13.0,"availability":{"quantity":53}}]
Our Backend is now complete. We are ready to provide some data to show from a nice Frontend.
Create a Frontend with NodeJS and AngularJS
NodeJS is a popular open source framework for asynchronous event-driven JavaScript development. Even if this is a book about Modern Java development, in Microservices architecture it is common to have a heterogeneous environment with multiple programming languages and frameworks involved. The challenge here is how to let them communicate efficiently - one solution is having a common interface like API Gateway exchanging messages via REST calls or queue systems.
AngularJS is a JavaScript-based front-end web framework whose goal is to simplify both the development and the testing of such applications by providing a framework for client-side model–view–controller (MVC) and model–view–viewmodel (MVVM) architectures. When used with NodeJS, it provides a fast way to easily bootstrap a frontend.
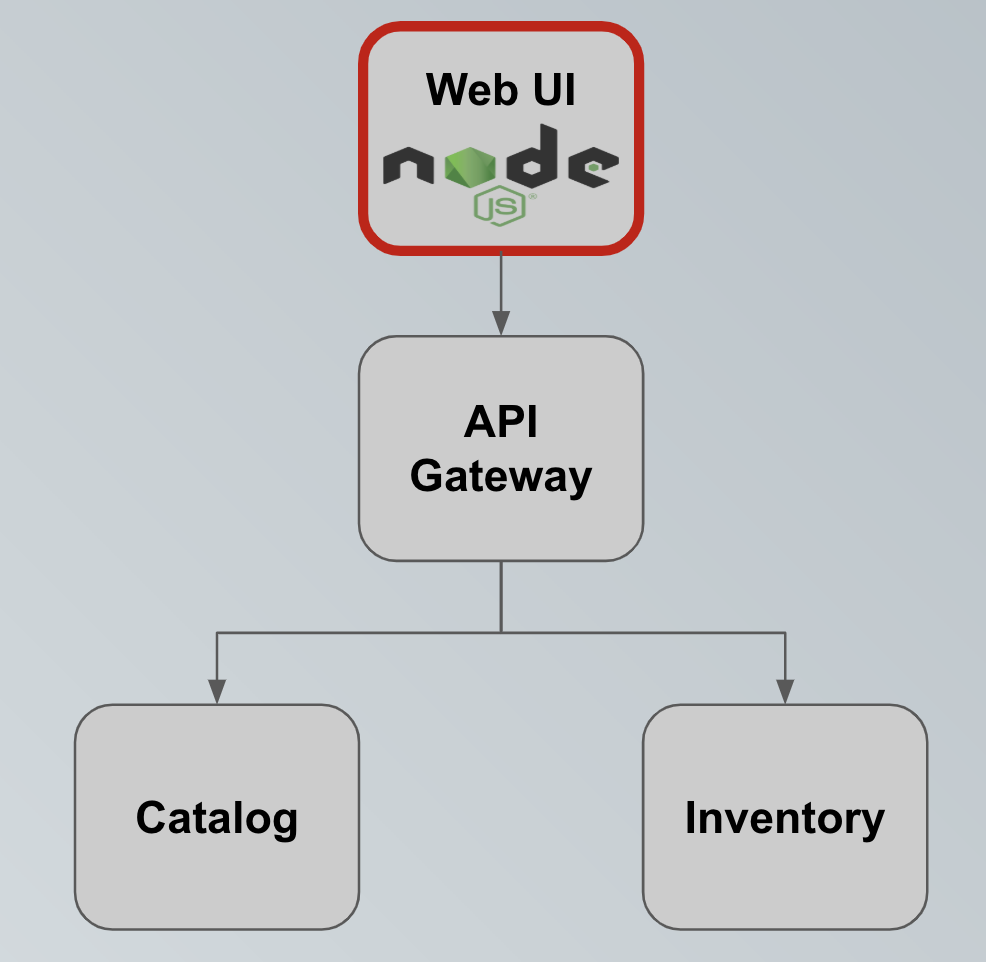
Figure 2-9. NodeJS + AngularJS Dashboard
You find the source code of this microservice in this book’s GitHub repository
Run the Frontend
All the HTML and Javascript code has been already prepared and we are ready to just link this frontend to our backends showing our Coolstore app up and running.
Get NPM
NPM is a package manager for Javascript, similar to Maven, that will help us download all dependencies and starting our frontend.
Install Dependencies
We can resolve all dependencies within the web-nodejs directory and launching npm command:
npm install
You should get an output like this:
...
added 1465 packages from 723 contributors and audited 1471 packages in 26.368s

52 packages are looking for funding
  run `npm fund` for details

found 228 vulnerabilities (222 low, 6 high)
  run `npm audit fix` to fix them, or `npm audit` for details
Start the app
We are now ready to verify if our frontend can consume correctly the backend services through the API Gateway, mapping images with data received.
Since we are in local development, we will use the environment variable to change NodeJS default port to avoid conflicts. We will also use an environment variable to map the API Gateway REST endpoint, as shown in Table 2-7.
| ENV | Value | Description |
|---|---|---|
|
3000 |
Global env for NodeJS to map the port to use for starting the process, we use 3000 in this case |
|
|
Enviroment variable defined in the frontend to map the API Gateway service hostname |
Start the app with this command:
COOLSTORE_GW_ENDPOINT=http://localhost:8090PORT=3000npm start
Navigate to the address where we exposed our NodeJS app at http://localhost:3000
Congratulations! Your Cloud Native Coolstore e-commerce website is up and running now, you can verify if from Figure Figure 2-10

Figure 2-10. Coolstore Demo Complete
Summary
In this chapter we walked through a complete Microservices-based architecture implementation, using different Java frameworks for different components. We gave an overview on how to split the typical monolithic approach, into a more diverse and heterogeneous environment, lightweight and ready to run in multiple contexts such as local development or production system. This is an example of what we call Cloud Native development.