
Chapter 4. A Kubernetes based Software Development Platform
In the previous chapter, we outlined our methodology around modernization and the steps required to design and develop modern architectures. We described the need for a platform like Kubernetes that can help you with requirements to make your applications cloud-native, ready to scale up proportionally to your business need.
We have also demonstrated that a microservices-based architecture is usually implemented using container technology, which makes apps portable and consistent. Let’s now see in detail how Kubernetes can help us modernize our Java applications and what are the steps to achieve that using its declarative approach through a rich set of APIs.
Developers and Kubernetes
Kubernetes, which in Greek translates to “pilot” or “governor”, is an open-source project which is currently the “de facto” target environment for modern architectures, and the most popular container orchestration platform. Started from Google’s experience in managing distributed complex applications for their software stack back in 2015, it is today one the biggest open source community, managed by a foundation , the Cloud Native Computing Foundation (CNCF), embraced by vendors and individual contributors.
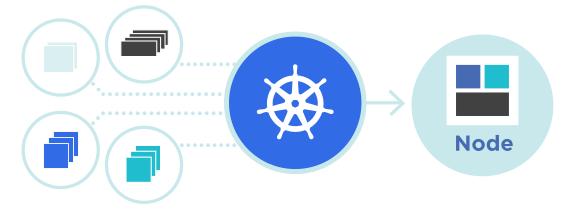
Figure 4-1. A Kubernetes Cluster running apps in Nodes
As a container-orchestration platform, its focus is primarily on ensuring that our apps are running correctly, providing out-of-the-box self-healing, recovery, and a powerful API to control this mechanism. You may be wondering now: as a Developer, why should I care about Kubernetes if it is so self-proficient?
That’s a good question, and maybe a better answer is with analogy: you have a Formula1 car with auto-pilot, but if you want to win the race you need to tune and setup your car to compete with all other good ones. The same is for your apps, that can benefit from all the capabilities offered by the platform to tune them so they run optimaly.
What Kubernetes does
When you have Kubernetes as a target platform to run your applications, you can rely on an ecosystem of APIs and components put in place to make deployments easier, so that developers can focus only on the most important part: coding. Kubernetes provides you with “a framework to run distributed systems resiliently”1.
In practice, this means you don’t need to reimplement custom solutions when it comes to:
-
Service discovery: Kubernetes uses internal DNS resolution to expose your apps, this is automatically assigned, and can also be used to send the traffic to multiple instances of our app.
-
Load balancing: Kubernetes takes care of managing the load on your apps, balancing the traffic, and distributing user requests accordingly.
-
Self-healing: Kubernetes discovers and replaces failing containers automatically, providing a health-check and self-healing mechanism out of the box.
-
Rollout and Rollback: Kubernetes ensures your app is always running consistently at the desired state, providing control to scale-up and scale-down workloads. In addition to that, it offers the capability to rollout or rollback to a specific version of your application.
What Kubernetes doesn’t
Many headaches that developers usually need to deal with in production are already solved and delegated to a platform, whose primary goal is to ensure applications are running. But does that solve all that you need for modernizing our apps? Probably not.
As we discussed in the previous chapter, the modernization steps towards a cloud-native approach are more closely tied to a methodology rather than a specific technology. Once you converted your mindset from building monolithic apps to creating microservices, we are in a good position to start thinking big. Nowadays, many apps run on cloud platforms targeting Kubernetes, and those are the ones running global reach workloads. Anyway, here’s some considerations:
-
Kubernetes doesn’t know how to handle our app. It can restart it if fails, but cannot understand why that is happening, so we need to ensure we have full control of our microservices-based architecture and be able to debug each container. This is particularly important in case of a large scale deployment.
-
Kubernetes doesn’t provide any middleware or application-level services. Granular discovery services need to be addressed by interacting with Kubernetes API or relying on some service on top of Kubernetes, such as a Service Mesh framework. There is no ecosystem for developers out of the box.
-
Kubernetes doesn’t build our app. You are responsible for providing your app compiled and packaged as a container image or relying on additional components on top of Kubernetes.
With that in mind, let’s start digging into a Kubernetes journey for developers, to make our first steps to bring our app into the next cloud-native production environment.
Infrastructure as a Code
Kubernetes provides a set of APIs to manage the desired state of our app as well as the whole platform. Each component in Kubernetes has an API representation that can be consumed. Kubernetes offers a declarative deployment pattern that allows you to use a way to automate the execution of upgrade and rollback processes for a group of Pods2. The declarative approach is granular and it is used also to extend Kubernetes APIs with the concept of Custom Resources.
Note
Custom resources are extensions of the Kubernetes API. A Custom Resource represents a customization of a particular Kubernetes installation, bringing additional objects to extend cluster capabilities. You can get more info about it from the official Kubernetes documentation.
Some of the core objects you have to manage an application in Kubernetes are:
Pod: A group of one or more containers deployed into a Kubernetes cluster. This is the entity that Kubernetes manages and orchestrates, so any application packaged as a container needs to be declared as a Pod.
Service: This is the resource responsible for service discovery and load balancing. For any Pod to be discoverable and consumable, it needs to be mapped to a Service.
Deployment: It allows describing an application’s life cycle, driving the creation of Pods in terms of which images to use for the app, the number of pods there should be, and how they should be updated.
Each of these objects, along with all other resources in the cluster, can be defined and controlled with a YAML representation, or by Kubernetes API. There are also other useful API objects such as those related to Storage (PersistentVolume) or specifically to manage stateful apps (StatefulSet). In this chapter, we will focus on the fundamental ones to bring our app up and running inside of a Kubernetes platform.
Container images
The first step for you in this journey is to containerize our microservices so that they can be deployed into Kubernetes as Pod, and which are controlled using a YAML file, invoking the API, or using a Kubernetes Java client.
You can use the Inventory Quarkus microservice from Coolstore as an example to create your first container image. Containers are defined by a manifest called Dockerfile or Containerfile, where you will define your software stack as a layer, from the Operating system layer to your application binary layer. The benefits of this approach are multiple: easy to track versions, easy to inherit from existing layers, easy to add layers, and expand the container. A diagram of layers is shown in Figure 4-2.

Figure 4-2. Container Image Layers
Dockerfile
Writing a Dockerfile to package our app as a container is pretty straightforward for simple use cases. There are some basic directives called Instructions to use, such as the ones listed below in Table 4-1.
| Instruction | Description |
|---|---|
|
Used to inherit from a base image. It can be for example a Linux distribution like |
|
Use environment variable for the container. These variables will be visible to the application and can be set at runtime. |
|
Execute a command in the current layer, like installing a package or executing an application. |
|
Copy files from your workstation to the container layer, like a JAR file or a configuration file. |
|
If your application is listening to some port, you can expose it to the container network so that Kubernetes can map it to a Pod and a Service. |
|
The command you use to start your application, the final step of the container image building process where you have all your dependencies in the layers, and you can run your app safely. |
The process for creating your container from your Dockerfile is described also in Figure 4-3.

Figure 4-3. Building Container Image
An example of a Dockerfile for the Inventory Quarkus Java microservice that we created in Chapter 2 is listed below, and you find it in this book’s GitHub repository
FROM registry.access.redhat.com/ubi8/openjdk-11ENV PROFILE=prodADD target/*.jar app.jarEXPOSE 8080CMD java -jar app.jar

Starting from OpenJDK 11 Layer to build our container image

Set an environment variable that can be consumed within the app for differientiating profiles or configurations to load

Copy the JAR artifact built during compilation into the container image

Expose port 8080 to the container network

Run the application invoking the artifact we copied into the layer.
In this section we defined our to skaffold a Dockerfile with the minimum instructions set to build up a container image. Let’s see now how to create container images from a Dockerfile.
Building Container images
Now you need to create the container image. Docker is a popular open-source project to create containers, you can download it for your operating system, and start using it to build and run your containers. Podman is another open-source alternative to do that, and it can also generate Kubernetes objects.
When you have Docker or Podman on your workstation, you can start building your container from the Dockerfile with this command:
docker build -f Dockerfile -t myreponame/inventory-quarkus:latest
This will generate your container image reading the instructions from the Dockerfile. Then it will tag your container image in the form <repository>/<name>:<tag>, in this case, docker.io/modernizingjavaappsbook/inventory-quarkus:latest. You will see an output similar to this:
STEP 1: FROM registry.access.redhat.com/ubi8/openjdk-11
Getting image source signatures
Copying blob 57562f1b61a7 done
Copying blob a6b97b4963f5 done
Copying blob 13948a011eec done
Copying config 5d89ab50b9 done
Writing manifest to image destination
Storing signatures
STEP 2: ENV PROFILE=prod
STEP 3: ADD target/*.jar app.jar
STEP 4: EXPOSE 8080
STEP 5: CMD java -jar app.jar
STEP 6: COMMIT inventory-quarkus:latest
Getting image source signatures
Copying blob 3aa55ff7bca1 skipped: already exists
Copying blob 00af10937683 skipped: already exists
Copying blob 7f08faf4d929 skipped: already exists
Copying blob 1ab317e3c719 done
Copying config b2ae304e3c done
Writing manifest to image destination
Storing signatures
--> b2ae304e3c5
b2ae304e3c57216e42b11d8be9941dc8411e98df13076598815d7bc376afb7a1
Your container image is now stored in Docker’s or Podman’s local storage called Docker cache or Container cache, and it is ready to be used locally.
Run Containers
Running containers refers to pulling the container images from the container cache to run applications. This process will be isolated by the Container Runtime (such as Docker or Podman) from the other ones in our workstation, providing a portable application with all dependencies managed inside a container and not in our workstation.
To start testing the Inventory microservice packaged now as a container image, you can just run the command below:
docker run -ti docker.io/modernizingjavaappsbook/inventory-quarkus:latest
You see that the Quarkus microservice is up and running in a container, listening to the port 8080. Docker or Podman takes care of mapping container networking into your workstation, open your browser at http://localhost:8080 and you will see the Quarkus Welcome page (as in Figure 2-4).
Tip
Docker Network documentation contains more info on how to map ports and networks within containers and hosts running Docker.
Registry
As we described in the previous section, container images are stored in a local cache. However, if you want to make them available outside your workstation, we need to send them over in some convenient way. A container image’s size is generally around hundreds of megabytes. That’s why you need a Container image registry.
The registry essentially acts as a place to store container images and share them via a process of uploading to (pushing) and downloading from (pulling). Once the image is on another system, the original application contained within it can be run on that system as well.
Registries can be public or private. Popular public registries include DockerHub, or Quay.io. They are offered as a SaaS on the internet and allow images to be available publicly with or without authentication. Private registries are usually dedicated to specific users, and are not accessible for public usage. However, you may make them available to private environments, such as private Kubernetes clusters.
In this example, we created an Organization at DockerHub for the book, called modernizingjavaappsbook that maps into a repository of this public registry where we want to push our container image.
First, you need to login to the registry. You need to authenticate against it in order to be able to push new content, then you will leave the container image publicly available.
docker login docker.io
After you log in successfully, you can start uploading the Inventory container image to the registry.
docker push docker.io/modernizingjavaappsbook/inventory-quarkus:latest
This command pushes the images to the registry, and you should get output similar to the following as confirmation:
Getting image source signatures
Copying blob 7f08faf4d929 done
Copying blob 1ab317e3c719 done
Copying blob 3aa55ff7bca1 skipped: already exists
Copying blob 00af10937683 skipped: already exists
Copying config b2ae304e3c done
Writing manifest to image destination
Storing signatures
The Quarkus microservice, packaged as a container image, is now ready to be deployed everywhere!
Deploying to Kubernetes
Deploying applications to Kubernetes is done by interacting with Kubernetes API to create the objects representing the desired state of the app in a Kubernetes cluster. As we discussed, Pods, Services, and Deployments are the minimum objects created to let Kubernetes manage the entire application life-cycle and connectivity.
Note
If you don’t have a Kubernetes cluster yet, you can download and use Minikube, a standalone Kubernetes cluster designed for local development.
Every object in Kubernetes contains the following values.
-
apiVersion: Kubernetes API version used to create this object
-
kind: The object type (e.g. Pod, Service)
-
metadata: Pieces of information that help uniquely identify the object, such as a name or UID
-
spec: The desired state for the object
We defined in this section the basic structure of any Kubernetes objects. Let’s explore now the fundamental objects to run applications on top of Kubernetes.
Pod
A Pod is a group of one or more containers, with shared storage and network resources, and a specification for how to run the containers3. In Figure 4-4 you can see a representation of two Pods in a Kubernetes cluster, with an example IP address assigned by Kubernetes to each one of them.
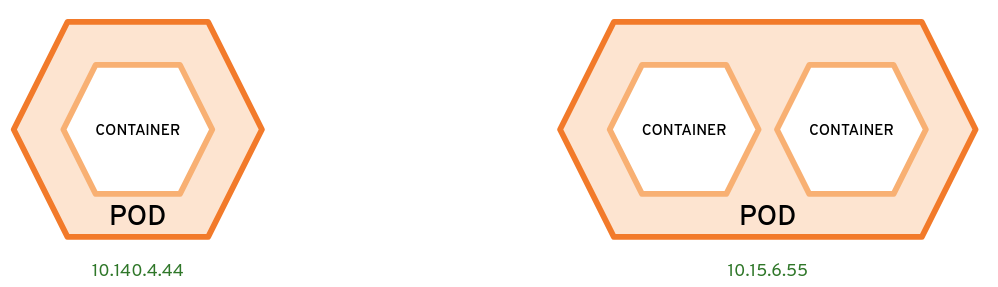
Figure 4-4. Pods and container
Kubernetes doesn’t work directly with containers, it relies on the Pod concept to orchestrate containers. So you need to provide a Pod definition that matches your container.
apiVersion:v1kind:Podmetadata:name:inventory-quarkuslabels:app:inventory-quarkusspec:containers:-name:inventory-quarkusimage:docker.io/modernizingjavaappsbook/inventory-quarkus:latestports:-containerPort:8080
Name for the Pod objectInventory Quarkus microservice, unique per Namespace
A list of key/value pairs to apply to this object
A list of containers used in this Pod
The container image URI, in this case a repository publicly available in DockerHub
The port exposed by this container, to be mapped into a Pod
You can create any of the Kubernetes objects described above as YAML file with the Kubernetes CLI kubectl. Run the command as shown below, to deploy your first microservice as a single Pod. You can find it in this book’s GitHub repository
kubectl create -f pod.yaml
To check that it is running on Kubernetes:
kubectl get pods
You should get an output similar to:
NAME               READY  STATUS   RESTARTS  AGE
inventory-quarkus  1/1    Running  0         30s
If you look at the STATUS column, it shows the Pod is running correctly and all default health checks are correctly satisfied.
Tip
If you want further details on how to make more granular health checks, please refer to the official Kuberentes documentation for liveness and readiness probes.
Service
Kubernetes Services are used to expose an application running on a set of Pods4. This is useful because a Pod gets a random IP address from Kubernetes network, which may change if it is restarted, or moved to another node within a Kubernetes cluster. Services offers a more consistent way to communicate with Pods, acting as a DNS server and load balancer.
A Service is mapped to one or more Pods, it uses the internal DNS to resolve to an internal IP from a mnemonic short hostname (e.g. inventory-quarkus), and balances the traffic to the Pods as shown in Figure 4-5. Each Service get its own IP address from a dedicated IP address range, which is different from Pods IP address range.
Note
The balancing method offered by Kubernetes Services is Layer 4 (TCP/UDP). The only two strategies usable are: Round-robin and Source IP. For application layer balancing (e.g. HTTP) there are other objects like Ingress not covered in this book, but you can find the documentation for them here.
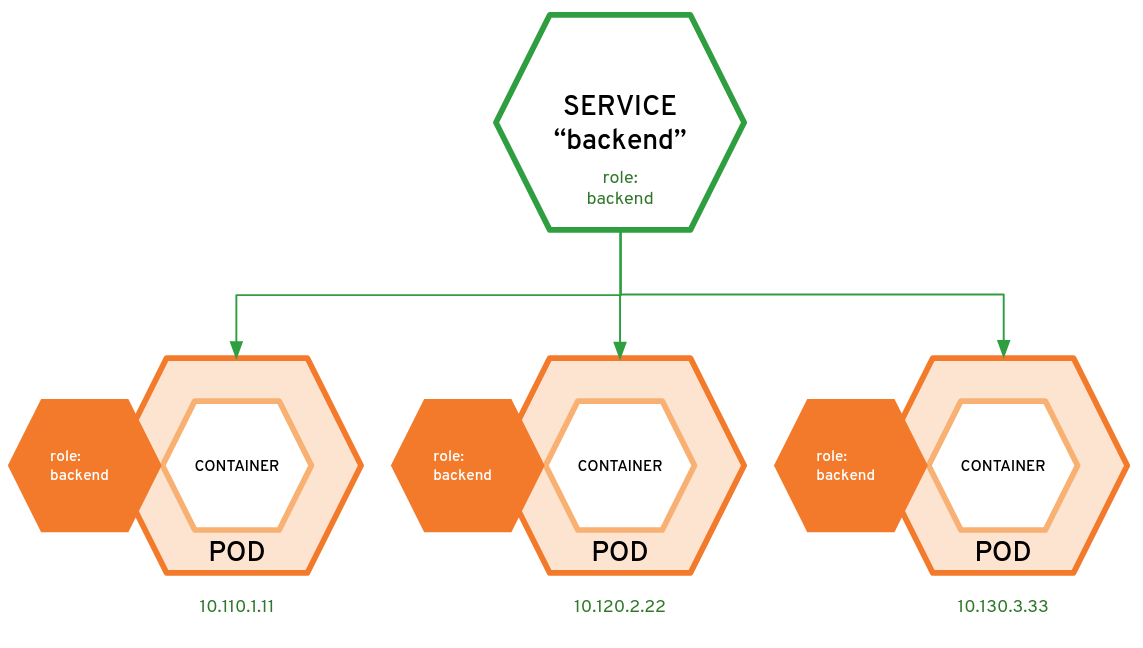
Figure 4-5. Container Image Layers
Let’s have a look at a Service that could map our Pod:
apiVersion:v1kind:Servicemetadata:name:inventory-quarkus-servicespec:selector:app:inventory-quarkusports:-protocol:TCPport:8080targetPort:8080
Name for the Service object.
The label exposed by the Pod to match the Service.
The L4 protocol used, TCP or UDP.
The port used by this Service.
The port used by the Pod and mapped into the Service.
To create your Service, run the command as shown below. You also find it in this book’s GitHub repository
kubectl create -f service.yaml
To check that it is running on Kubernetes:
kubectl get svc
You should get output similar to:
NAME TYPE CLUSTER-IP EXTERNAL-IP PORT(S)AGE inventory-quarkus-service ClusterIP 172.30.34.73 <none> 8080/TCP 6s
Note
You just defined a Service, mapped to a Pod. This is only accessible from the internal Kubernetes network, unless you expose it with an object that can accept the traffic from outside the cluster, like Ingress.
Deployment
Deployments are Kubernetes objects created for managing an application lifecycle. A deployment describes a desired state and Kubernetes will implement it using either a Rolling or Recreate deployment strategy. The rollout lifecycle consists of progressing, complete, and failed states. A deployment is progressing while it is performing update tasks, such as updating or scaling pods.
Kubernetes deployments offer a set of capabilities on top of the basic Pod and Service concepts as listed below and in Figure 4-6.
-
Deploy a ReplicaSet or Pod
-
Update Pods and ReplicaSets
-
Rollback to previous deployment versions
-
Scale a deployment
-
Pause or continue a deployment

Figure 4-6. Deployments manage applications life-cycle and updates
Managing applications with a Kubernetes deployment includes the way in which an application should be updated. A major benefit of a deployment is the ability to start and stop a set of pods predictably. There are two strategies for deploying apps in Kubernetes:
-
Rolling update: It provides a controlled, phased replacement of the application’s pods, ensuring that there are always a minimum number available. This is useful for the business continuity of an application, where the traffic is not routed into a new version of the application until the health checks (probes) on the desired number of Pods deployed are not satisfied.
-
Recreate: It removes all existing pods before new ones are created. Kubernetes first terminates all containers from the current version and then starts all new containers simultaneously when the old containers are gone. This provides downtime for the app, but it ensures there aren’t multiple versions running at the same time.
A Deployment object driving Pods deployment on Kubernetes is listed in the example below:
apiVersion:apps/v1kind:Deploymentmetadata:name:inventory-quarkus-deploylabels:app:inventory-quarkusspec:replicas:1selector:matchLabels:app:inventory-quarkustemplate:metadata:labels:app:inventory-quarkusspec:containers:-name:inventory-quarkusimage:docker.io/modernizingjavaappsbook/inventory-quarkus:latestports:-containerPort:8080
Name for the Deployment object.
The label for this object.
The desired number of Pod replicas.
The selector to find which Pods to manage using labels.
The Pod template to use, including labels to inherit or containers to create.

The container image section like for the Pod example above.
Run the command below, to create your deployment. You can also find it in this book’s GitHub repository
kubectl create -f deployment.yaml
Run the command below to verify that the Deployment has been created, and to get the status:
kubectl get deploy
You should get output similar to:
NAME READY UP-TO-DATE AVAILABLE AGE inventory-quarkus-deploy 1/11110s
Looking at READY column, you have your desired state correctly matched, having requested one replica for the Inventory microservice running on Kubernetes. You can cross-check that a Pod has been created:
kubectl get pods
You should get similar output:
NAME READY STATUS RESTARTS AGE inventory-quarkus 1/1 Running01m inventory-quarkus-deploy-5cb46f5d8d-fskpd 1/1 Running030s
Now a new Pod has been created using a randomly generated name, starting from inventory-quarkus-deploy Deployment name. If the app crashes or if we kill the Pod managed by the Deployment, Kubernetes will recreate it automatically for us. This is not true for the Pod generated without a Deployment.
kubectl delete pod inventory-quarkus inventory-quarkus-deploy-5cb46f5d8d-fskpd
You can see that the desired state is always met:
kubectl get pods
You should get output similar to:
NAME                                        READY   STATUS    RESTARTS   AGE
inventory-quarkus-deploy-5cb46f5d8d-llp7n   1/1     Running   0          42s
Kubernetes and Java
Kubernetes has a tremendous amount of potential for managing applications’ lifecycle, and there a number of studies on how developers and architects could best fit in its architecture, like patterns. Kubernetes patterns are reusable design patterns for container-based applications and services.
From a Java developer perspective, the first step is to migrate from the monolithic approach to a microservice-based approach. Once that is complete, the next step is to get into the Kubernetes context and maximize the benefit that this platform offers: API extendibility, a declarative model, and a standarized process where the IT industry is converging.
There are Java frameworks that help developers connect to Kubernetes and convert their apps to containers. You already containerized the Inventory Quarkus microservice with a Dockerfile. Now let’s drive this containerization from Java, generating a container image for the Catalog Spring Boot microservice using Maven and Gradle.
Jib
Jib is an open source framework make by Google to build container images compliant to the Open Container Image format (OCI), without the need of Docker or any container runtime. You can create containers even from your Java codebase, because it offers a Maven and Gradle plugin for that. This means Java developers can containerize their app without writing and/or maintaining any Dockerfiles, delegating this complexity to Jib.
We see the benefits from this approach as the following: as:5
-
Pure Java: No Docker or Dockerfile knowledge is required, simply add Jib as plugin and it will generate the container image for you. The resulting image is commonly referred as distro-less, since it doesn’t inherit from any base image.
-
Speed: The application is divided into multiple layers, splitting dependencies from classes. There’s no need to rebuild the container image as is necessary for Dockerfiles, Jib takes care for deploying the layers that changed.
-
Reproducibility: Unnecessary updates are not triggered as the same contents always generate the same image.
The easiest way to kickstart a container image build with Jib, on existing Maven, is by adding the plugin via command line:
mvn compile com.google.cloud.tools:jib-maven-plugin:2.8.0:build -Dimage=<MY IMAGE>
Alternatively, you can do so by adding Jib as plugin into pom.xml:
<project>...<build><plugins>...<plugin><groupId>com.google.cloud.tools</groupId><artifactId>jib-maven-plugin</artifactId><version>2.8.0</version><configuration><to><image>myimage</image></to></configuration></plugin>...</plugins></build>...</project>
In this way you can also manage other settings such as authentication or parameters for the build. Run the command below if you want to build the Catalog service and push it directly to Docker Hub:
mvn compile com.google.cloud.tools:jib-maven-plugin:2.8.0:build↳
-Dimage=docker.io/modernizingjavaappsbook/catalog-spring-boot:latest↳
-Djib.to.auth.username=<USERNAME>↳
-Djib.to.auth.password=<PASSWORD>
The authentication here is managed as command line options, but Jib is able to manage existing authentication with Docker CLI, or read credentials from your settings.xml.
The build takes a few moments, and the result is a distroless container image built locally and pushed directly to a registry, in this case Docker Hub.
[INFO]Scanningforprojects...[INFO][INFO]-------------------< com.redhat.cloudnative:catalog >-------------------[INFO]Building CoolStore Catalog Service 1.0-SNAPSHOT[INFO]--------------------------------[jar]---------------------------------[INFO][INFO]--- maven-resources-plugin:2.6:resources(default-resources)@ catalog ---[INFO]Copying4resources[INFO][INFO]--- maven-compiler-plugin:3.6.1:compile(default-compile)@ catalog ---[INFO]Nothing to compile - all classes are up to date[INFO][INFO]--- jib-maven-plugin:2.8.0:build(default-cli)@ catalog ---[INFO][INFO]Containerizing application to modernizingjavaappsbook/catalog-spring-boot...[WARNING]Base image'gcr.io/distroless/java:11'does not use a specific image digest↳ - build may not be reproducible[INFO]Using credentials from <to><auth>formodernizingjavaappsbook/catalog-spring-boot[INFO]Using base image with digest:↳ sha256:65aa73135827584754f1f1949c59c3e49f1fed6c35a918fadba8b4638ebc9c5d[INFO][INFO]Container entrypointsetto[java, -cp, /app/resources:/app/classes:/app/libs/*, com.redhat.cloudnative.catalog.CatalogApplication][INFO][INFO]Built and pushed image as modernizingjavaappsbook/catalog-spring-boot[INFO]Executing tasks:[INFO][==============================]100,0%complete[INFO][INFO]------------------------------------------------------------------------[INFO]BUILD SUCCESS[INFO]------------------------------------------------------------------------[INFO]Totaltime: 27.817 s[INFO]Finished at: 2021-03-19T11:48:16+01:00[INFO]------------------------------------------------------------------------
Note
Your container image is not present in your local cache, as you don’t need any container runtime to build images with Jib. You won’t see it with docker images command, but you pull it from Dockerhub afterwards and it will be stored in your cache.
In case you also want to store it locally from the beginning, Jib connects also to Docker hosts and can do it for you.
JKube
Eclipse JKube, a community project supported by the Eclipse Foundation and Red Hat, is another open source Java framework to help interacting with Kubernetes from a Java developer perspective. It supports building container images using Docker/Podman, Jib and Source-2-Image. Eclipse JKube also provides a set of tools to deploy automatically to Kubernetes, and manage the application with helpers for debugging and logging. It comes from Fabric8 Maven Plugin, as rebranded and enhanced project to target Kubernetes.
Tip
JKube supports Kubernetes and OpenShift. OpenShift brings Source-2-Image on top of Kubernetes, a mechanism to compile automatically from source code a container image. In this way also the build is made on Kubernetes, so developers can test and deploy their apps directly on the target platform.
As with Jib, jKube provides Zero Configuration mode for a quick ramp-up where opinionated defaults will be pre-selected. It provides Inline Configuration within the plugin configuration using an XML syntax. Furthermore, it provides External Configuration templates of real deployment descriptors which are enriched by the plugin.
JKube is offered in three forms:
-
Kubernetes Plugin: It works in any Kubernetes cluster, providing either distroless and Dockerfile-driven builds.
-
OpenShift Plugin: It works in any Kubernetes or OpenShift cluster, providing either distroless, Dockerfile-driven builds or Source-to-Image (S2I) builds.
-
JKube Kit: A toolkit and a CLI to interact with JKube Core, acts also as a Kubernetes Client and provides an Enricher API to extend Kubernetes manifests.
JKube offers more functionality than Jib, in fact, it can be considered as a superset for it. You can do distroless Jib builds, but you can also work with Dockerfile and deploy Kubernetes manifests from Java. In this case we don’t need to write a Deployment or Service, JKube will take care of building the container and deploy it to Kubernetes.
Let’s include jKube in our Catalog POM file, and configure it to do a Jib build and a deploy to Kubernetes. Doing so will make the plugin persistent . You can also find the source code in this book’s GitHub repository.
First we need to add JKube as a plugin:
<project>...<build><plugins>...<plugin><groupId>org.eclipse.jkube</groupId><artifactId>kubernetes-maven-plugin</artifactId><version>1.1.1</version></plugin>...</plugins></build>...</project>
After that, you can drive the container image build with properties. In this case you may want to use Jib for building the image, and pushing it to Docker Hub. Afterwards you will deploy it to Kubernetes.
...<properties>...<jkube.build.strategy>jib</jkube.build.strategy><jkube.generator.name>docker.io/modernizingjavaappsbook/catalog-spring-boot:${project.version}</jkube.generator.name></properties>...
Let’s build the image:
mvn k8s:build
You should get output similar to:
JIB>... modernizingjavaappsbook/catalog-spring-boot/1.0-SNAPSHOT/build/deployments/catalog-1.0-SNAPSHOT.jar JIB> : JIB>... modernizingjavaappsbook/catalog-spring-boot/1.0-SNAPSHOT/build/Dockerfile ... JIB>[========================]80,0%complete> building image to tar file JIB> Building image to tar file... JIB>[========================]80,0%complete> writing to tar file JIB>[==============================]100,0%complete[INFO]k8s: ... modernizingjavaappsbook/catalog-spring-boot/1.0-SNAPSHOT/tmp/docker-build.tar↳ successfully built[INFO]------------------------------------------------------------------------[INFO]BUILD SUCCESS[INFO]------------------------------------------------------------------------[INFO]Totaltime: 36.229 s[INFO]Finished at: 2021-03-19T13:03:19+01:00[INFO]------------------------------------------------------------------------
JKube using Jib created the container image locally, and it is now ready to be pushed to Docker Hub. You can specify credentials in one of three ways:
-
Docker login: You can login to your registry, in this case Dockerhub, and jKube will read
~/.docker/config.jsonfile to get authentication details. -
Provide credentials inside POM: Provide registry credentials as part of XML configuration.
-
Provide credentials inside Maven Settings: You can provide registry credentials in your
~/.m2/settings.xmlfile like this and plugin would read it from there.
In this case you use the third option and setup credentials into Maven Settings, so you can copy this file using your credentials. You also find the source code in this book’s GitHub repository.
<?xml version="1.0" encoding="UTF-8"?><settingsxmlns="http://maven.apache.org/SETTINGS/1.0.0"xmlns:xsi="http://www.w3.org/2001/XMLSchema-instance"xsi:schemaLocation="http://maven.apache.org/SETTINGS/1.0.0↳http://maven.apache.org/xsd/settings-1.0.0.xsd"><servers><server><id>https://index.docker.io/v1</id><username>USERNAME</username><password>PASSWORD</password></server></servers></settings>
To push it to Docker Hub you just run this maven goal:
mvn k8s:push
You should see output similar to:
JIB>[=========================]81,8%complete> scheduling pushing manifests JIB>[=========================]81,8%complete> launching manifest pushers JIB>[=========================]81,8%complete> pushing manifestforlatest JIB> Pushing manifestforlatest... JIB>[===========================]90,9%complete> building images to registry JIB>[===========================]90,9%complete> launching manifest list pushers JIB>[==============================]100,0%complete[INFO]------------------------------------------------------------------------[INFO]BUILD SUCCESS[INFO]------------------------------------------------------------------------[INFO]Totaltime: 01:08 min[INFO]Finished at: 2021-03-19T13:21:28+01:00
Now it’s time to deploy the Catalog on Kubernetes. JKube will connect to your Kubernetes cluster reading the ~/.kube/config file on your workstation.
mvn k8s:resource k8s:apply
You should get output similar to:
[INFO]Scanningforprojects...[INFO][INFO]-------------------< com.redhat.cloudnative:catalog >-------------------[INFO]Building CoolStore Catalog Service 1.0-SNAPSHOT[INFO]--------------------------------[jar]---------------------------------[INFO][INFO]--- kubernetes-maven-plugin:1.1.1:resource(default-cli)@ catalog ---[INFO]k8s: Running generator spring-boot ...[INFO]k8s: Creating a Service from kubernetes.yml namespace default name catalog[INFO]k8s: Created Service: target/jkube/applyJson/default/service-catalog.json[INFO]k8s: Creating a Deployment from kubernetes.yml namespace default name catalog[INFO]k8s: Created Deployment: target/jkube/applyJson/default/deployment-catalog.json[INFO]k8s: HINT: Use thecommand`kubectl get pods -w`to watch your pods start up[INFO]------------------------------------------------------------------------[INFO]BUILD SUCCESS[INFO]------------------------------------------------------------------------[INFO]Totaltime: 7.464 s[INFO]Finished at: 2021-03-19T13:38:27+01:00[INFO]------------------------------------------------------------------------
The app has been deployed successfully to Kubernetes, using generated manifests:
kubectl get pods
NAME                       READY   STATUS    RESTARTS   AGE
catalog-64869588f6-fpjj8   1/1     Running   0          2m2s
kubectl get deploy
NAME READY UP-TO-DATE AVAILABLE AGE catalog 1/1113m54s
To test it, let’s have a look at the Service:
kubectl get svc
NAME TYPE CLUSTER-IP EXTERNAL-IP PORT(S)AGE catalog ClusterIP 10.99.26.127 <none> 8080/TCP 4m44s
Tip
By default, Kubernetes exposes the application only internally to the cluster, using ClusterIP Service type. You can expose it externally using a Service Type NodePort or using an Ingress. In this example you will use kubectl port-forward to map Kubernetes exposed port to our workstation’s port.
Let’s try our app using kubectl port-forward command:
kubectl port-forward deployment/catalog 8080:8080
If you open your browser now at http://localhost:8080/api/catalog you will see the Coolstore’s Catalog JSON output.
Summary
In this chapter, we discussed how Java developers can benefit from Kubernetes capabilities to modernize and enhance their apps. We have demonstrated how create container images and how to deploy them to Kubernetes. We also walked through steps to drive containers creation and deploy directly from Java with Maven thanks to Jib and JKube.
Modernization is important for developers in order to make apps Cloud Native and portable, ready for serving highly available productions and services. In the next chapter we will look deeper into modernization of existing Java application, and what are the steps needed for achieving it.
1 https://kubernetes.io/docs/concepts/overview/what-is-kubernetes/
2 https://www.redhat.com/en/topics/containers/what-is-kubernetes-deployment
3 https://kubernetes.io/docs/concepts/workloads/pods/
4 https://kubernetes.io/docs/concepts/services-networking/service/
5 https://speakerdeck.com/coollog/build-containers-faster-with-jib-a-google-image-build-tool-for-java-applications?slide=36