|
Name |
Countdown block |
|
Module Type |
Block |
|
Author |
Matthew Cannings |
|
Released |
2007 |
|
Maintained |
Actively |
|
Languages |
English, Polish (available separately) |
|
Compliance |
OK |
|
Documentation |
|
|
Errors |
Errors displayed when error reporting is turned on |
The Countdown block allows a teacher to build anticipation towards an event or some point in time. The block displays a countdown in a number of simple formats, making use of a Flash animation.
Note
There is an assumption that students will have the Flash plug-in installed in their browser; while this is quite likely, the block should not be relied upon to convey critical information.
The block needs to be downloaded from the author's site.
Copy the countdown directory from the zip file into the /moodle/blocks/ directory. There are a number of FLA files at the root of the same zip file that do not need to be copied.
Visit the Notifications page to install the block.
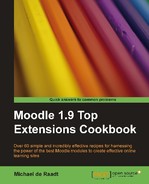
Once installed, you will want to adjust the global settings for the block. Navigate to Site Administration | Modules | Blocks | Countdown:
You will need to adjust the Start Year and End Year settings to create a range of years that a teacher can select from when configuring the block. The default range from 2008 to 2010 is becoming dated (literally).
With global configuration settings in place, you can now add the block to a course page. The block appears listed as Countdown in the Blocks list.
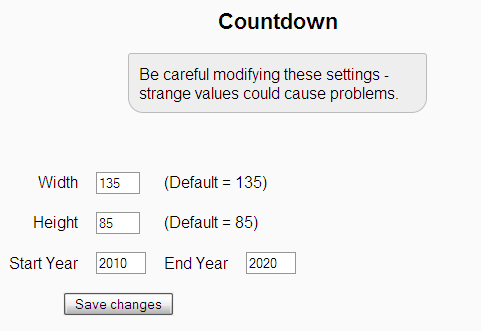
After adding the block, click on the configuration icon to change the settings for the block. The block configuration stretches over a number of screens.
At the top of the configuration page are settings that control the clock's appearance. First, there is a setting that allows you to set a title for the block. This is a good place to indicate what the Countdown block is counting down to, although there are also settings that allow you to add text before and/or after the countdown clock. Leaving the Title setting blank will cause the block header to be hidden (when editing is turned off).
The second setting allows a teacher to choose whether the countdown relies on the User's computer or the Server Time. Normally using the server clock as a basis for the countdown would be preferable, as this would achieve greater accuracy, consistency, and also ensure students studying remotely are seeing the countdown in the local time zone at the Moodle site. However, during testing, the server time functionality didn't work; instead the countdown ended abruptly when the block was shown. Assuming you are not using the block for any critically important form of countdown (the next rocket launch perhaps), the User's computer setting can be used.
The third setting allows you to choose from three clock formats. All formats fit nicely in a block space, so the choice will depend on what you want to emphasize.
Scrolling down on the configuration page reveals more settings.
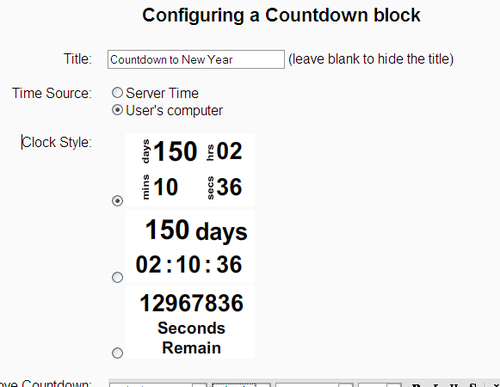
The first advanced text editor allows you to add text that will appear in the block above the countdown. Following this are some settings that are of critical importance to the countdown; they are the date and time to count down to. For the year, there is an annual option which causes the clock to begin a new countdown once it reaches its goal, aiming at the same time each year.
Following the time settings there is a textbox that can be used to input a message that will appear when the goal is reached. This needs to be simple text as it is displayed in the Flash element.
Towards the bottom of the configuration page there is a final screen of settings.
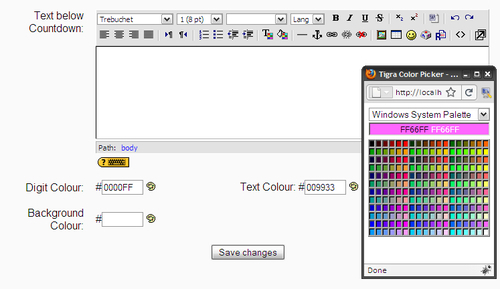
The advanced text editor labeled Text below Countdown allows the teacher to specify a message that will appear below the countdown Flash object.
Finally, there are three settings to control the colors of the digits, the text, and the background of the countdown object. The values that need to be entered for these settings use hexadecimal red-green-blue codes. Clicking the palette icon next to each setting pops up a small window that allows the user to select a color; the corresponding code is placed into the appropriate setting.
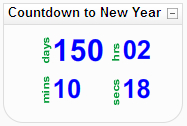
The countdown appears in the block, in the format specified. The clock updates itself before your eyes:
There is no option to disable the display of seconds, so each second slips by in animated style. This could be distracting for students who may be attempting to concentrate on something in the central area of the page.
Here are some ideas for how the Countdown block could be used in a Moodle course:
- Countdown to an assignment or exam deadline
- Countdown to a topical event related to the course (for example, an election)
- Countdown to the holidays
- Where a Moodle instance is used for a public event, such as a conference, there could be a countdown to the start of the event