
After reading this chapter, you will be able to
Use the Entity Framework (EF) to build a data access layer using an existing database or with the Model First approach
Generate entity types from the Entity Data Model (EDM) Designer using the ADO.NET Entity Framework POCO templates
Learn about data caching using the Microsoft Windows Server AppFabric (formerly known by the codename “Velocity”)
The Plan My Night (PMN) application allows the user to manage his itinerary activities and share them with others. The data is stored in a Microsoft SQL Server database. Activities are gathered from searches to the Bing Maps Web services.
Let’s have a look at the high-level block model of the data model for the application, which is shown in Figure 8-1.
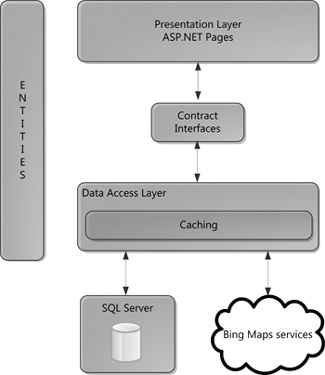
Defining contracts and entity classes that are cleared of any persistence-related code constraints allows us to put them in an assembly that has no persistence-aware code. This approach ensures a clean separation between the Presentation and Data layers.
Let’s identify the contract interfaces for the major components of the PMN application:
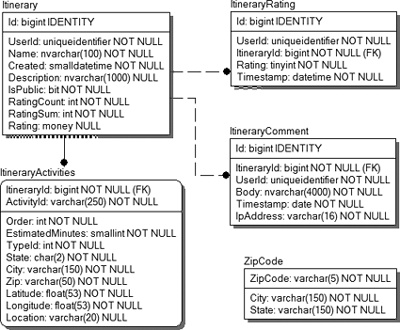
PMN stores the user’s itineraries into an SQL database. Other users will be able to comment and rate each other’s itineraries. Figure 8-2 shows the tables used by the PMN application.
Important
The Plan My Night application uses the ASP.NET Membership feature to provide secure credential storage for the users. The user store tables are not shown in Figure 8-2. You can learn more about this feature on MSDN: ASP.NET 4 - Introduction to Membership (http://msdn.microsoft.com/en-us/library/yh26yfzy(VS.100).aspx).
It would be straightforward to create the Plan My Night application in Visual Studio 2008 because it offers all the required tools to help you to code the application. However, some of the technologies used back then required you to write a lot more code to achieve the same goals.
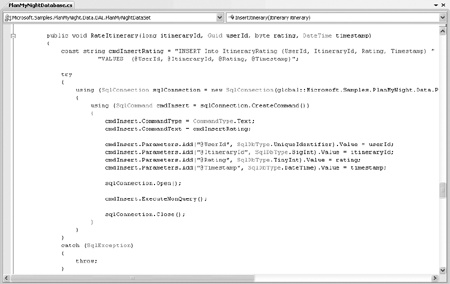
Let’s take a look at how you could create the required data layer in Visual Studio 2008. One approach would have been to write the data layer using ADO.NET DataSet or DataReader directly. (See Figure 8-3.) This solution offers you great flexibility because you have complete control over access to the database. On the other hand, it also has some drawbacks:
You need to know the SQL syntax.
All queries are specialized. A change in requirement or in the tables will force you to update the queries affected by these changes.
You need to map the properties of your entity classes using the column name, which is a tedious and error-prone process.
You have to manage the relations between tables yourself.
Another approach would be to use the DataSet designer available in Visual Studio 2008. Starting from a database with the PMN tables, you could use the TableAdapter Configuration Wizard to import the database tables as shown in Figure 8-4. The generated code offers you a typed DataSet. One of the benefits is type checking at design time, which gives you the advantage of statement completion. There are still some pain points with this approach:
You still need to know the SQL syntax although you have access to the query builder directly from the DataSet designer.
You still need to write specialized SQL queries to match each of the requirements of your data contracts.
You have no control of the generated classes. For example, changing the DataSet to add or remove a query for a table will rebuild the generated TableAdapter classes and might change the index used for a query. This makes it difficult to write predictable code using these generated items.
The generated classes associated with the tables are persistence aware, so you will have to create another set of simple entities and copy the data from one to the other. This means more processing and memory usage.
Another technology available in Visual Studio 2008 was LINQ to SQL (L2S). With the Object Relational Designer for L2S, it was easy to add the required database tables. This approach gives you access to strongly typed objects and to LINQ to create the queries required to access your data, so you do not have to explicitly know the SQL syntax. This approach also has its limits:
LINQ to SQL works only with SQL Server databases.
You have limited control over the created entities, and you cannot easily update them if your database schema changes.
The generated entities are persistence aware.
Note
As of .NET 4.0, Microsoft recommends the Entity Framework as the data access solution for LINQ to relational scenarios.
In the next sections of this chapter, you’ll explore some of the new features of Visual Studio 2010 that will help you create the PMN data layer with less code, give you more control of the generated code, and allow you to easily maintain and expand it.
The ADO.NET Entity Framework (EF) allows you to easily create the data access layer for an application by abstracting the data from the database and exposing a model closer to the business requirements of the application. The EF has been considerably enhanced in the .NET Framework 4 release.
You’ll use the PlanMyNight project as an example of how to build an application using some of the features of the EF. The next two sections demonstrate two different approaches to generating the data model of PMN. In the first one, you let the EF generate the Entity Data Model (EDM) from an existing database. In the second part, you use a Model First approach, where you first create the entities from the EF designer and generate the Data Definition Language (DDL) scripts to create a database that can store your EDM.
Note
See Also The MSDN Data Developer Center also offers a lot of resources about the ADO.NET Entity Framework (http://msdn.microsoft.com/en-us/data/aa937723.aspx) in .NET 4.
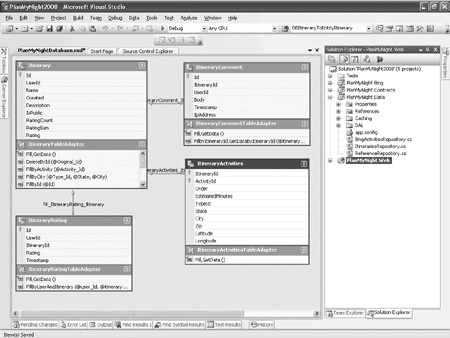
You’ll start with an existing solution that already defines the main projects of the PMN application. If you installed the companion content at the default location, you’ll find the solution at this location: %userprofile%DocumentsMicrosoft PressMoving to Visual Studio 2010Chapter 8CodeExistingDatabase. Double-click the PlanMyNight.sln file.
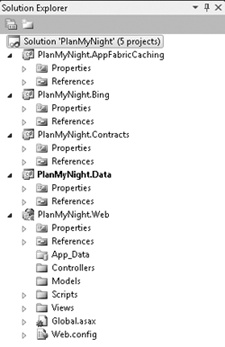
This solution includes all the projects in the following list, as shown in Figure 8-5:
The EF allows you to easily import an existing database. Let’s walk through this process.
The first step is to add an EDM to the PlanMyNight.Data project. Right-click the PlanMyNight.Data project, select Add, and then choose New Item. Select the ADO.NET Entity Data Model item, and change its name to PlanMyNight.edmx, as shown in Figure 8-6.

The first dialog of the Entity Data Model Wizard allows you to choose the model content. You’ll generate the model from an existing database. Select Generate From Database and then click Next.
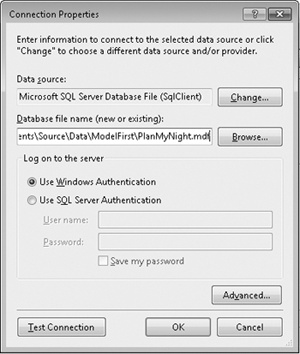
You need to connect to an existing database file. Click New Connection. Select Microsoft SQL Server Database File from the Choose Data Source dialog, and click Continue. Select the %userprofile%DocumentsMicrosoft PressMoving to Visual Studio 2010Chapter 8ExistingDatabasePlanMyNight.WebApp_DataPlanMyNight.mdf file. (See Figure 8-7.)
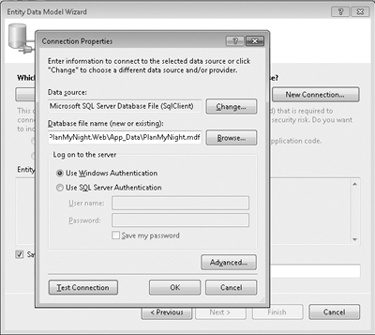
Leave the other fields in the form as is for now and click Next.
Note
You’ll get a warning stating that the local data file is not in the current project. Click No to close the dialog because you do not want to copy the database file to the current project.
From the Choose Your Database Objects dialog, select the Itinerary, ItineraryActivities, ItineraryComment, ItineraryRating, and ZipCode tables and the UserProfile view. Select the RetrieveItinerariesWithinArea stored procedure. Change the Model Namespace value to Entities as shown in Figure 8-8.
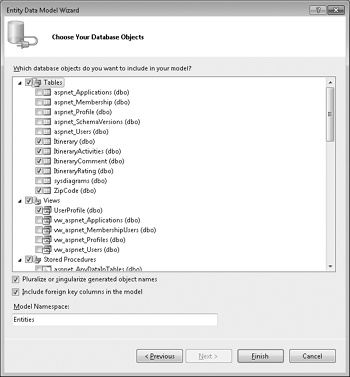
Click Finish to generate your EDM.
You now have a model representing a set of entities matching your database. The wizard has generated all the navigation properties associated with the foreign keys from the database.
The PMN application requires only the navigation property ItineraryActivities from the Itinerary table, so you can go ahead and delete all the other navigation properties. You’ll also need to rename the ItineraryActivities navigation property to Activities. Refer to Figure 8-9 for the updated model.

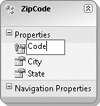
Notice that one of the properties of the ZipCode entity has been generated with the name ZipCode1 because the table itself is already named ZipCode and the name has to be unique. Let’s fix the property name by double-clicking it. Change the name to Code, as shown in Figure 8-10.
Build the solution by pressing Ctrl+Shift+B. When looking at the output window, you’ll notice two messages from the generated EDM. You can discard the first one because the Location column is not required in PMN. The second message reads as follows:
The table/view ‘dbo.UserProfile’ does not have a primary key defined and no valid primary key could be inferred. This table/view has been excluded. To use the entity, you will need to review your schema, add the correct keys, and uncomment it.
When looking at the UserProfile view, you’ll notice it does not explicitly define a primary key even though the UserName column is unique.
You need to modify the EDM manually to fix the UserProfile view mapping so that you can access the UserProfile data from the application.
From the project explorer, right-click the PlanMyNight.edmx file and then select Open With Choose XML (Text) Editor from the Open With dialog as shown in Figure 8-11. Click OK to open the XML file associated with your model.

Note
You’ll get a warning stating that the PlanMyNight.edmx file is already open. Click Yes to close it.
The generated code was commented out by the code-generation tool because there was no primary key defined. To be able to use the UserProfile view from the designer, you need to uncomment the UserProfile entity type and add the Key tag to it. Search for UserProfile in the file. Uncomment the entity type, add a Key tag and set its name to UserName and make the UserName property not nullable. Refer to Example 8-1 to see the updated entity type.
Example 8-1. UserProfile Entity Type XML Definition
<EntityType Name="UserProfile">
  <Key>
    <PropertyRef Name="UserName"/>
  </Key>
  <Property Name="UserName" Type="uniqueidentifier" Nullable="false" />
  <Property Name="FullName" Type="varchar" MaxLength="500" />
  <Property Name="City" Type="varchar" MaxLength="500" />
  <Property Name="State" Type="varchar" MaxLength="500" />
  <Property Name="PreferredActivityTypeId" Type="int" />
</EntityType>
If you close the XML file and try to open the EDM Designer, you’ll get the following error message in the designer: “The Entity Data Model Designer is unable to display the file you requested. You can edit the model using the XML Editor.”
There is a warning in the Error List pane that can give you a little more insight into what this error is all about:
Error 11002: Entity type ‘UserProfile’ has no entity set.
You need to define an entity set for the UserProfile type so that it can map the entity type to the store schema. Open the PlanMyNight.edmx file in the XML editor so that you can define an entity set for UserProfile. At the top of the file, just above the Itinerary entity set, add the XML code shown in Example 8-2.
Example 8-2. UserProfile EntitySet XML Definition
<EntitySet Name="UserProfile" EntityType="Entities.Store.UserProfile"
store:Type="Views" store:Schema="dbo" store:Name="UserProfile">
<DefiningQuery>
SELECT
[UserProfile].[UserName] AS [UserName],
[UserProfile].[FullName] AS [FullName],
[UserProfile].[City] AS [City],
[UserProfile].[State] AS [State],
[UserProfile].[PreferredActivityTypeId] as [PreferredActivityTypeId]
FROM [dbo].[UserProfile] AS [UserProfile]
</DefiningQuery>
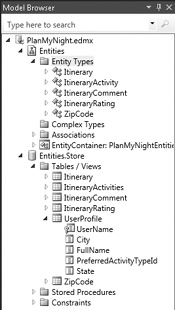
</EntitySet>Save the EDM XML file, and reopen the EDM Designer. Figure 8-12 shows the UserProfile view in the Entities.Store section of the Model Browser.
Tip
You can open the Model Browser from the View menu by clicking Other Windows and selecting the Entity Data Model Browser item.
Now that the view is available in the store metadata, you add the UserProfile entity and map it to the UserProfile view. Right-click in the background of the EDM Designer, select Add, and then choose Entity. You’ll see the dialog shown in Figure 8-13.
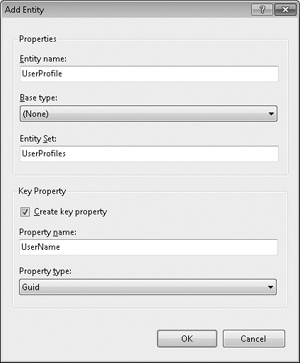
Complete the dialog as shown in Figure 8-13, and click OK to generate the entity.
You need to add the remaining properties: City, State, and PreferredActivityTypeId. To do so, right-click the UserProfile entity, select Add, and then select Scalar Property. After the property is added, set the Type, Max Length, and Unicode field values. Table 8-1 shows the expected values for each of the fields.
Now that you have created the UserProfile entity, you need to map it to the UserProfile view. Right-click the UserProfile entity, and select Table Mapping as shown in Figure 8-14.
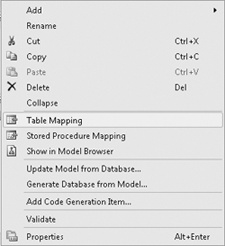
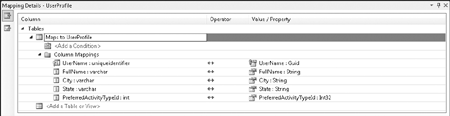
Then select the UserProfile view from the drop-down box as shown in Figure 8-15. Ensure that all the columns are correctly mapped to the entity properties. The UserProfile view of our store is now accessible from the code through the UserProfile entity.
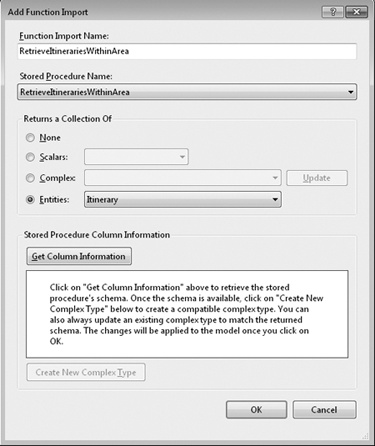
The Entity Data Model Wizard has created an entry in the storage model for the RetrieveItinerariesWithinArea stored procedure you selected in the last step of the wizard. You need to create a corresponding entry to the conceptual model by adding a Function Import entry.
From the Model Browser, open the Stored Procedures folder in the Entities.Store section. Right-click RetrieveItineraryWithinArea, and then select Add Function Import. The Add Function Import dialog appears as shown in Figure 8-16. Specify the return type by selecting Entities and then select the Itinerary item from the drop-down box. Click OK.
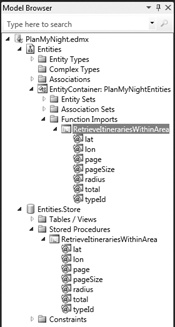
The RetrieveItinerariesWithinArea function import was added to the Model Browser as shown in Figure 8-17.
You can now validate the EDM by right-clicking on the design surface and selecting Validate. There should be no error or warning.
In the prior section, you saw how to use the EF designer to generate the model by importing an existing database. The EF designer in Visual Studio 2010 also supports the ability to generate the Data Definition Language (DDL) file that will allow you to create a database based on your entity model. In this section, you’ll use a new solution to learn how to generate a database script from a model.
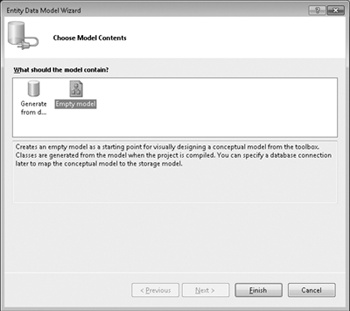
You can start from an empty model by selecting the Empty model option from the Entity Data Model Wizard. (See Figure 8-18.)
Note
To get the wizard, right-click the PlanMyNight.Data project, select Add, and then choose New Item. Select the ADO.NET Entity Data Model item.
Open the PMN solution at %userprofile%DocumentsMicrosoft PressMoving to Visual Studio 2010Chapter 8CodeModelFirst by double-clicking the PlanMyNight.sln file.
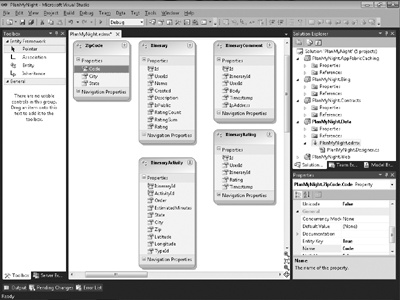
The PlanMyNight.Data project from this solution already contains an EDM file named PlanMyNight.edmx with some entities already created. These entities match the data schema you saw in Figure 8-2.
The Entity Model designer lets you easily add an entity to your data model. Let’s add the missing ZipCode entity to the model. From the toolbox, drag an Entity item into the designer, as shown in Figure 8-19. Rename the entity as ZipCode. Rename the Id property as Code, and change its type to String.
You need to add the City and State properties to the entity. Right-click the ZipCode entity, select Add, and then choose Scalar Property. Ensure that each property has the values shown in Table 8-2.
Table 8-2. ZipCode Entity Properties
Name | Type | Fixed Length | Max Length | Unicode |
|---|---|---|---|---|
Code | String | False | 5 | False |
City | String | False | 150 | False |
State | String | False | 150 | False |
Add the relations between the ItineraryComment and Itinerary entities. Right-click the designer background, select Add, and then choose Association. (See Figure 8-20.)
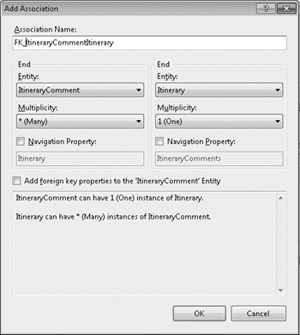
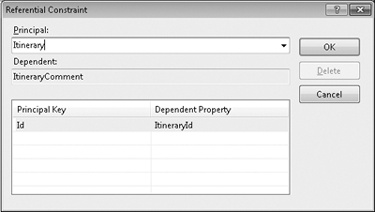
Set the association name to FK_ItineraryCommentItinerary, and then select the entity and the multiplicity for each end, as shown in Figure 8-20. After the association is created, double-click the association line to set the Referential Constraint as shown in Figure 8-21.
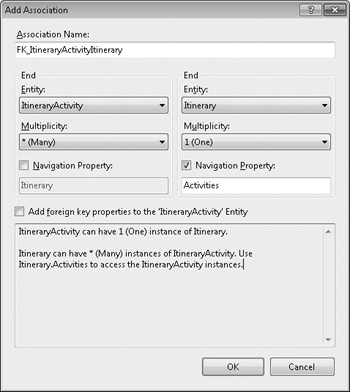
Add the association between the ItineraryRating and Itinerary entities. Right-click the designer background, select Add, and then choose Association. Set the association name to FK_ItineraryItineraryRating and then select the entity and the multiplicity for each end as in the previous step, except set the first end to ItineraryRating. Double-click on the association line, and set the Referential Constraint as shown in Figure 8-21. Note that the Dependent field will read ItineraryRating instead of ItineraryComment. Create a new association between the ItineraryActivity and Itinerary entities. For the FK_ItineraryItineraryActivity association, you want to also create a navigation property and name it Activities, as shown in Figure 8-22. After the association is created, set the Referential Constraint for this association by double-clicking on the association line.
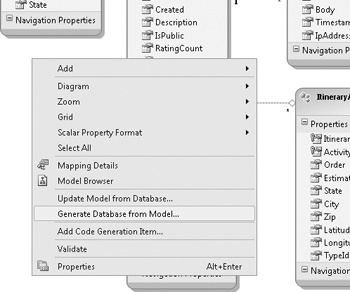
Your data model is now completed but there is no mapping or store associated with it. The EF designer offers the possibility of generating a database script from our model.
Right-click on the designer surface, and choose Generate Database From Model as shown in Figure 8-23.
The Generate Database Wizard requires a data connection. The wizard uses the connection information to translate the model types to the database type and to generate a DDL script targeting this database.
Select New Connection, select Microsoft SQL Server Database File from the Choose Data Source dialog, and click Continue. Select the database file located at %userprofile%DocumentsMicrosoft PressMoving to Visual Studio 2010Chapter 8CodeModelFirstDataPlanMyNight.mdf. (See Figure 8-24.)
After your connection is configured, click Next to get to the final page of the wizard, as shown in Figure 8-25. When you click Finish, the generated T-SQL PlanMyNight.edmx.sql file is added to your project. The DDL script will generate the primary and foreign key constraints for your model.

The EDM is also updated to ensure your newly created store is mapped to the entities. You can now use the generated DDL script to add the tables to the database. Also, you now have a data layer that exposes strongly typed entities that you can use in your application.
Important
Generating the complete PMN database would require adding the remaining tables, stored procedures, and triggers used by the application. Instead of performing all these operations, we will go back to the solution we had at the end of the EF: Importing an Existing Database section.
The EDM Designer uses T4 templates to generate the code for the entities. So far, we have let the designer create the entities using the default templates. You can take a look at the code generated by opening the PlanMyNight.Designer.cs file associated with PlanMyNight.edmx. The generated entities are based on the EntityObject type and decorated with attributes to allow the EF to manage them at run time.
Note
T4 stands for Text Template Transformation Toolkit. T4 support in Visual Studio 2010 allows you to easily create your own templates and generate any type of text file (Web, resource, or source). To learn more about the code generation in Visual Studio 2010, visit Code Generation and Text Templates (http://msdn.microsoft.com/en-us/library/bb126445(VS.100).aspx).
The EF also supports POCO entity types. POCO classes are simple objects with no attributes or base class related to the framework. (Example 8-3, in the next section, shows the POCO class for the ZipCode entity.) The EF uses the names of the types and the properties of these objects to map them to the model at run time.
Let’s re-open the %userprofile%DocumentsMicrosoft PressMoving to Visual Studio 2010Chapter 8CodeExistingDatabasePlanMyNight.sln file.
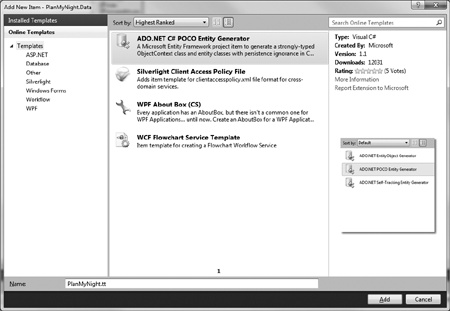
Open the PlanMyNight.edmx file, right-click on the design surface, and choose Add Code Generation Item. This opens a dialog like the one shown in Figure 8-26, where you can select the template you want to use. Select the ADO.NET POCO Entity Generator template, and name it PlanMyNight.tt. Then click the Add button.
Note
You might get a security warning about running this text template. Click OK to close the dialog because the source for this template is trusted.
Two files, PlanMyNight.tt and PlanMyNight.Context.tt, have been added to your project, as shown in Figure 8-27. These files replace the default code-generation template, and the code is no longer generated in the PlanMyNight.Designer.cs file.
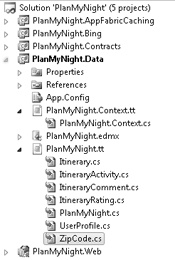
The PlanMyNight.tt template produces a class file for each entity in the model. Example 8-3 shows the POCO version of the ZipCode class.
The other file, PlanMyNight.Context.cs, generates the ObjectContext object for the PlanMyNight.edmx model. This is the object you’ll use to interact with the database.
We have designed the PMN application architecture to ensure that the presentation layer was persistence ignorant by moving the contracts and entity classes to an assembly that has no reference to the storage.
The ADO.NET POCO templates split the generation of the entity classes into a separate template, allowing you to easily move these entities to a different project.
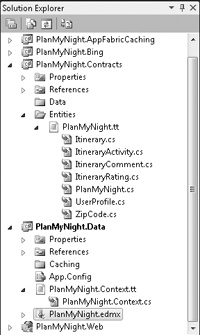
You are going to move the PlanMyNight.tt file to the PlanMyNight.Contracts project. Right-click the PlanMyNight.tt file, and select Cut. Right-click the Entities folder in the PlanMyNight.Contracts project, and select Paste. The result is shown in Figure 8-28.
The PlanMyNight.tt template relies on the metadata from the EDM model to generate the entity type’s code. You need to fix the relative path used by the template to access the EDMX file.
Open the PlanMyNight.tt template and locate the following line:
string inputFile = @"PlanMyNight.edmx";
Fix the file location so that it points to the PlanMyNight.edmx file in the PlanMyNight.Data project:
string inputFile = @"....PlanMyNight.DataPlanMyNight.edmx";
The entity classes are regenerated when you save the template.
You also need to update the PlanMyNight.Context.tt template in the PlanMyNight.Contracts project because the entity classes are now in the Microsoft.Samples.PlanMyNight.Entities namespace instead of the Microsoft.Samples.PlanMyNight.Data namespace. Open the PlanMyNight.Context.tt file, and update the using section to include the new namespace:
using System;
using System.Data.Objects;
using System.Data.EntityClient;
using Microsoft.Samples.PlanMyNight.Entities;
Build the solution by pressing Ctrl+Shift+B. The project should now compile successfully.
Now that you have created the generic code layer to interact with your SQL database, you are ready to start implementing the functionalities specific to the PMN application. In the upcoming sections, you’ll walk through this process, briefly look at getting the data from the Bing Maps services, and get a quick introduction to the Microsoft Windows Server AppFabric Caching feature used in PMN.
There is a lot of plumbing pieces of code required to get this all together. To simplify the process, you’ll use an updated solution where the contracts, entities, and most of the connecting pieces to the Bing Maps services have been coded. The solution will also include the PlanMyNight.Data.Test project to help you validate the code from the PlanMyNight.Data project.
Note
Testing in Visual Studio 2010 will be covered in Chapter 10.
At the beginning of this chapter, we decided to group the operations on the Itinerary entity in the IItinerariesRepository repository interface. Some of these operations are
Let’s take a look at the corresponding methods in the IItinerariesRepository interface:
Open the PMN solution at %userprofile%DocumentsMicrosoft PressMoving to Visual Studio 2010Chapter 8CodeFinal by double-clicking the PlanMyNight.sln file.
Select the PlanMyNight.Data project, and open the ItinerariesRepository.cs file. This is the IItinerariesRepository interface implementation. Using the PlanMyNightEntities Object Context you generated earlier, you can write LINQ queries against your model, and the EF will translate these queries to native T-SQL that will be executed against the database.
Navigate to the SearchByActivity function definition. This method must return a set of itineraries where the IsPublic flag is set to true and where one of their activities has the same activityId that was passed in the argument to the function. You also need to order the result itinerary list by the rating field.
Using standard LINQ operators, you can implement SearchByActivity as shown in Example 8-4. Add the highlighted code to the SearchByActivity method body.
Example 8-4. SearchByActivity Implementation
public PagingResult<Itinerary> SearchByActivity(string activityId, int pageSize, int
pageNumber)
{
  using (var ctx = new PlanMyNightEntities())
  {
    ctx.ContextOptions.ProxyCreationEnabled = false;

    var query = from itinerary in ctx.Itineraries.Include("Activities")
                where itinerary.Activities.Any(t => t.ActivityId == activityId)
                      && itinerary.IsPublic
                orderby itinerary.Rating
                select itinerary;

    return PageResults(query, pageNumber, pageSize);
  }
}
Note
The resulting paging is implemented in the PageResults method:
private static PagingResult<Itinerary> PageResults(IQueryable<Itinerary> query, int
page, int pageSize)
{
  int rowCount = rowCount = query.Count();
  if (pageSize > 0)
  {
    query = query.Skip((page - 1) * pageSize)
                             .Take(pageSize);
  }
  var result = new PagingResult<Itinerary>(query.ToArray())
  {
    PageSize = pageSize,
    CurrentPage = page,
    TotalItems = rowCount
  };
  return result;
}
IQueryable<Itinerary> is passed to this function so that it can add the paging to the base query composition. Passing IQueryable instead of IEnumerable ensures that the T-SQL created for the query against the repository will be generated only when query.ToArray is called.
The SearchByZipCode function method is similar to the SearchByActivity method, but it also adds a filter on the Zip Code of the activity. Here again, LINQ support makes it easy to implement, as shown in Example 8-5. Add the highlighted code to the SearchByZipCode method body.
Example 8-5. SearchByZipCode Implementation
public PagingResult<Itinerary> SearchByZipCode(int activityTypeId, string zip, int
pageSize, int pageNumber)
{
  using (var ctx = new PlanMyNightEntities())
  {
    ctx.ContextOptions.ProxyCreationEnabled = false;

    var query = from itinerary in ctx.Itineraries.Include("Activities")
                where itinerary.Activities.Any(t => t.TypeId == activityTypeId &&
t.Zip == zip)
                      && itinerary.IsPublic
                 orderby itinerary.Rating
                 select itinerary;

     return PageResults(query, pageNumber, pageSize);
  }
}
The SearchByRadius function calls the RetrieveItinerariesWithinArea import function that was mapped to a stored procedure. It then loads the activities for each itinerary found. You can copy the highlighted code in Example 8-6 to the SearchByRadius method body in the ItinerariesRepository.cs file.
Example 8-6. SearchByRadius Implementation
public PagingResult<Itinerary> SearchByRadius(int activityTypeId,
    double longitude, double latitude, double radius,
    int pageSize, int pageNumber)
{
  using (var ctx = new PlanMyNightEntities())
  {
    ctx.ContextOptions.ProxyCreationEnabled = false;

    // Stored Procedure with output parameter
    var totalOutput = new ObjectParameter("total", typeof(int));
    var items = ctx.RetrieveItinerariesWithinArea(activityTypeId, latitude, longitude,
radius, pageSize, pageNumber, totalOutput).ToArray();

    foreach (var item in items)
    {
      item.Activities.ToList().AddRange(this.Retrieve(item.Id).Activities);
    }

    int total = totalOutput.Value == DBNull.Value ? 0 : (int)totalOutput.Value;

    return new PagingResult<Itinerary>(items)
    {
      TotalItems = total,
      PageSize = pageSize,
      CurrentPage = pageNumber
    };
  }
}
The Add method allows you to add Itinerary to the data store. Implementing this functionality becomes trivial because your contract and context object use the same entity object. Copy and paste the highlighted code in Example 8-7 to the Add method body.
Example 8-7. Add Implementation
public void Add(Itinerary itinerary)
{
  using (var ctx = new PlanMyNightEntities())
  {
    ctx.Itineraries.AddObject(itinerary);
    ctx.SaveChanges();
  }
}
There you have it! You have completed the ItinerariesRepository implementation using the context object generated using the EF designer. Run all the tests in the solution by pressing Ctrl+R, A. The tests related to the ItinerariesRepository implementation should all succeed.
With the advances in multicore computing, it is becoming more and more important for developers to be able to write parallel applications. Visual Studio 2010 and the .NET Framework 4.0 provide new ways to express concurrency in applications. The Task Parallel Library (TPL) is now part of the Base Class Library (BCL) for the .NET Framework. This means that every .NET application can now access the TPL without adding any assembly reference.
PMN stores only the Bing Activity ID for each ItineraryActivity to the database. When it’s time to retrieve the entire Bing Activity object, a function that iterates through each of the ItineraryActivity instances for the current Itinerary is used to populate the Bing Activity entity from the Bing Maps Web services.
One way of performing this operation is to sequentially call the service for each activity in the Itinerary as shown in Example 8-8. This function waits for each call to RetrieveActivity to complete before making another call, which has the effect of making its execution time linear.
Example 8-8. Activity Sequential Retrieval
public void PopulateItineraryActivities(Itinerary itinerary)
{
  foreach (var item in itinerary.Activities.Where(i => i.Activity == null))
  {
    item.Activity = this.RetrieveActivity(item.ActivityId);
  }
}
In the past, if you wanted to parallelize this task, you had to use threads and then hand off work to them. With the TPL, all you have to do now is use a Parallel.ForEach that will take care of the threading for you as seen in Example 8-9.
Example 8-9. Activity Parallel Retrieval
public void PopulateItineraryActivities(Itinerary itinerary)
{
  Parallel.ForEach(itinerary.Activities.Where(i => i.Activity == null),
    item =>
    {
      item.Activity = this.RetrieveActivity(item.ActivityId);
    });
}
Note
See Also The .NET Framework 4.0 now includes the Parallel LINQ libraries (in System.Core.dll). PLINQ introduces the .AsParallel extension to perform parallel operations in LINQ queries. You can also easily enforce the treatment of a data source as if it was ordered by using the .AsOrdered extensions. Some new thread-safe collections have also been added in the System.Collections.Concurrent namespace. You can learn more about these new features from Parallel Computing on MSDN (http://msdn.microsoft.com/en-us/concurrency/default.aspx).
PMN is a data-driven application that gets its data from the application database and the Bing Maps Web services. One of the challenges you might face when building a Web application is managing the needs of a large number of users, including performance and response time. The operations that use the data store and the services used to search for activities can increase the usage of server resources dramatically for items that are shared across many users. For example, many users have access to the public itineraries, so displaying these will generate numerous calls to the database for the same items. Implementing caching at the Web tier will help reduce usage of the resources at the data store and help mitigate latency for recurring searches to the Bing Maps Web services. Figure 8-29 shows the architecture for an application implementing a caching solution at the front-end server.
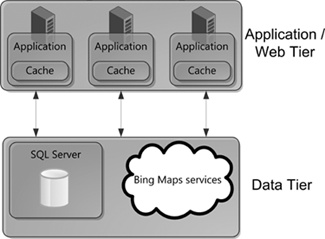
Using this approach reduces the pressure on the data layer, but the caching is still coupled to a specific server serving the request. Each Web tier server will have its own cache, but you can still end up with an uneven distribution of the processing to these servers.
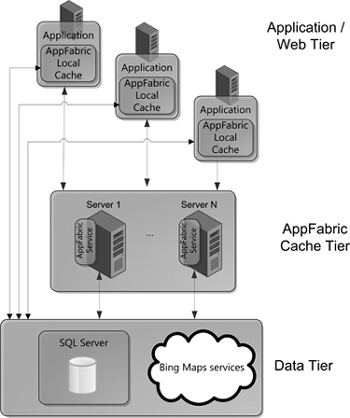
Windows Server AppFabric caching offers a distributed, in-memory cache platform. The AppFabric client library allows the application to access the cache as a unified view event if the cache is distributed across multiple computers, as shown in Figure 8-30. The API provides simple get and set methods to retrieve and store any serializable common language runtime (CLR) objects easily. The AppFabric cache allows you to add a cache computer on demand, thus making it possible to scale in a manner that is transparent to the client. Another benefit is that the cache can also share copies of the data across the cluster, thereby protecting data against failure.
Note
See Also Windows Server AppFabric caching is available as a set of extensions to the .NET Framework 4.0. For more information about how to get, install, and configure Windows Server AppFabric, please visit Windows Server AppFabric (http://msdn.microsoft.com/en-us/windowsserver/ee695849.aspx).
Note
See Also PMN can be configured to use either ASP.NET caching or Windows Server AppFabric caching. A complete walkthrough describing how to add Windows Server AppFabric caching to PMN is available here: PMN: Adding Caching using Velocity (http://channel9.msdn.com/learn/courses/VS2010/ASPNET/EnhancingAspNetMvcPlanMyNight/Exercise-1-Adding-Caching-using-Velocity/).
In this chapter, you used a few of the new Visual Studio 2010 features to structure the data layer of the Plan My Night application using the Entity Framework version 4.0 to access a database. You also were introduced to automated entity generation using the ADO.NET Entity Framework POCO templates and to the Windows Server AppFabric caching extensions.
In the next chapter, you will explore how the ASP.NET MVC framework and the Managed Extensibility Framework can help you build great Web applications.