
11. Securing and Protecting Your MacBook Data
In this chapter, you’ll learn the steps that you can take to secure your MacBook and its data, including
• Creating user accounts
• Applying parental controls
• Keeping passwords in Keychain
• Encrypting your account data
• Activating the Lion firewall
• Backing up your files and information
• Using Time Machine to restore backups
• Accessing previous file fersions
Introduction
Security on a computer is important—especially on a notebook computer. It’s easy for someone to pick up and walk off with a laptop, and a MacBook tops the list of desirable targets. Practicing appropriate account and data security can ensure that even if the worst happens, your data remains private.
In addition to protecting your data from theft and unauthorized access, you should take steps to ensure the data’s availability—in other words, you should ensure that your files are available when you need them. By backing up your computer, you can be sure that even in the event of your computer being stolen or its hard drive crashing, your work is protected.
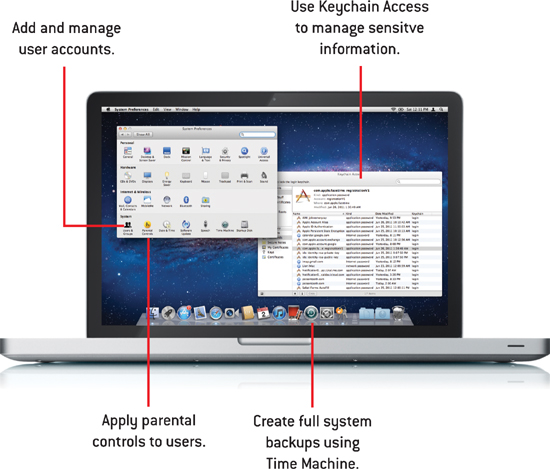
Working with Users and Groups
The Lion operating system can accommodate multiple users—family members, friends, co-workers, and even guests. By creating and using different accounts, you can limit access to files. In addition, you can combine individual users into groups that have access controls.
Creating User Accounts
When creating a user account, you can control what the users can do by assigning them an account type. There are five account types in Lion:
Administrator—An account with full control over the computer and its settings
Standard—An account that can install software and work with the files within the individual account
Managed with Parental Controls—A standard user account that includes parental controls to limit account and application access
Sharing Only—An account that can only be used to access shared files, but not to log into the system
Guest—A pre-configured account that allows the user to log in and use the computer but that automatically resets to a clean state upon logout
By default, your account is an administrative account, but you should create additional user accounts based on what the users need to do.
Adding Accounts
To add any type of account to the system, follow these steps:
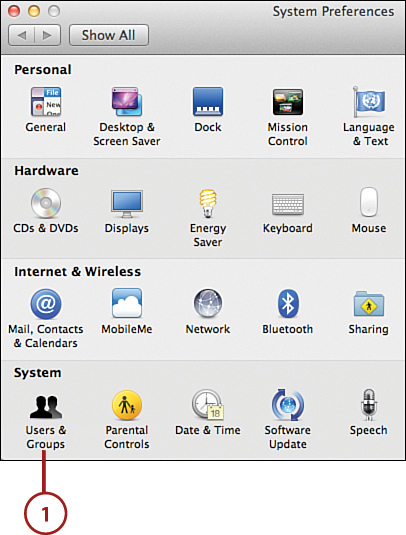
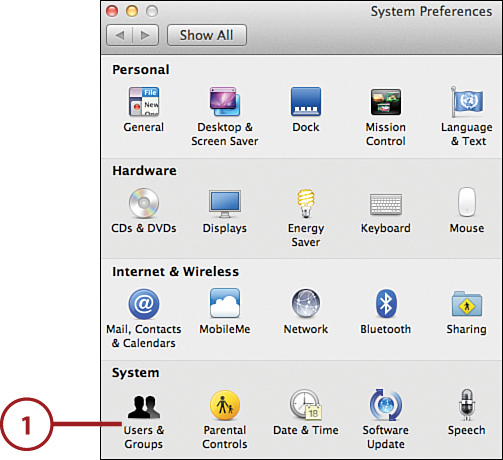
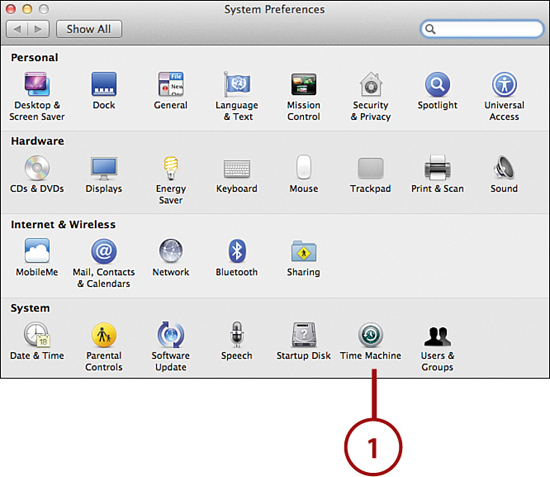
1. Open the System Preferences window and click the Users & Groups icon.
2. Click the + button below the user list to add a new user.
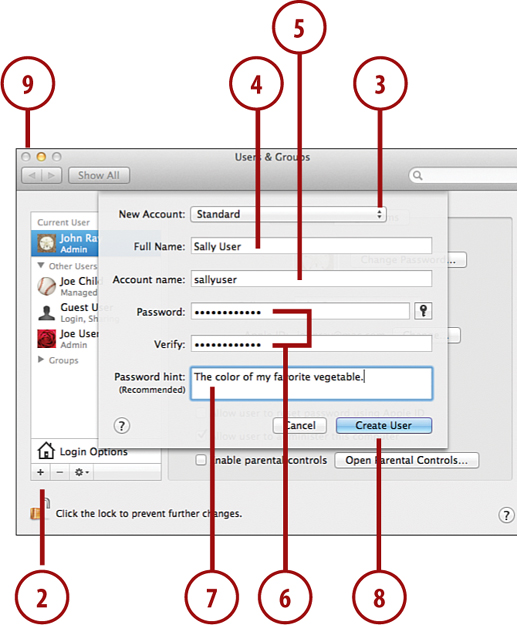
3. The account creation window appears. Use the New Account pop-up menu to choose the account type you want to create.
4. Enter the full name of the user you’re adding.
5. Type the account name for the user. This is the username the person uses to access all the Lion services.
6. Type a new password for the account into the Password and Verify fields.
7. If desired, provide a hint for the password. The hint is displayed after three unsuccessful login attempts.
8. Click Create User.
9. Close the System Preferences.
Enabling the Guest Account
The guest account provides a simple means of giving anyone access to the computer for a short period of time. To enable the guest account, follow these steps:
1. Open the System Preferences window and click the User & Groups icon.
2. Click the Guest User item within the account list.
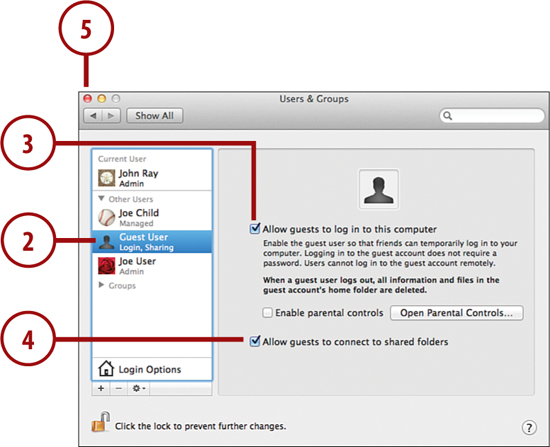
3. Check the Allow Guests to Log in to This Computer checkbox.
4. To allow guest access to shared folders, click Allow Guests to Connect to Shared Folders.
5. Close the System Preferences.
Applying Parental Controls
If you’ve created a managed account with Parental Controls, or have enabled the Guest account, you can configure which applications a user can run, when the user can run the programs, and what parts of the Internet the user can access.
1. Open the System Preferences window and click the Parental Controls icon.

2. Choose the Account you want to configure.
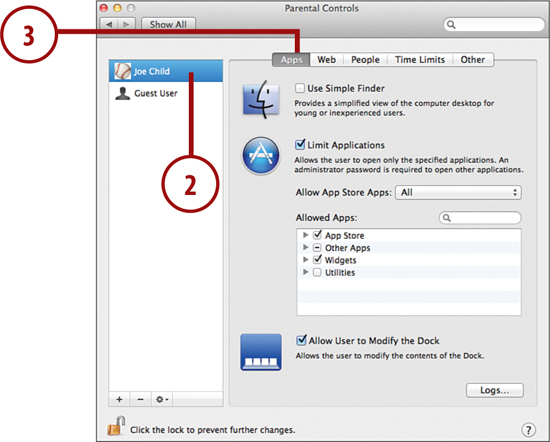
3. Click the Apps button to choose which applications the user can use, what privileges are available in the Finder, and what age range of apps can be accessed in the App Store.
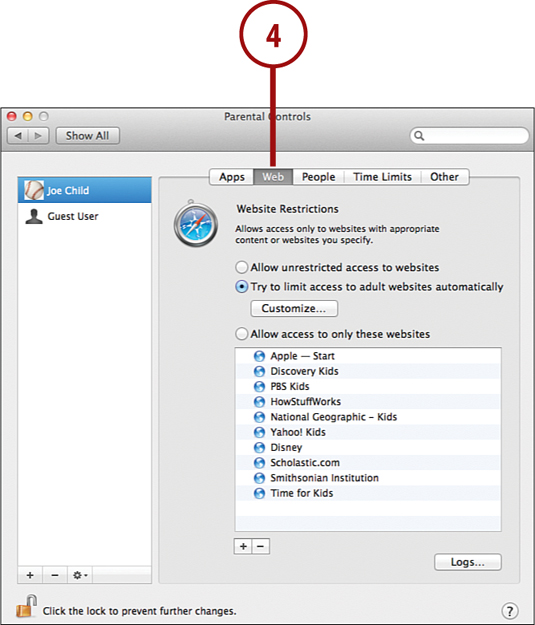
4. Use the Web button to restrict access to websites.
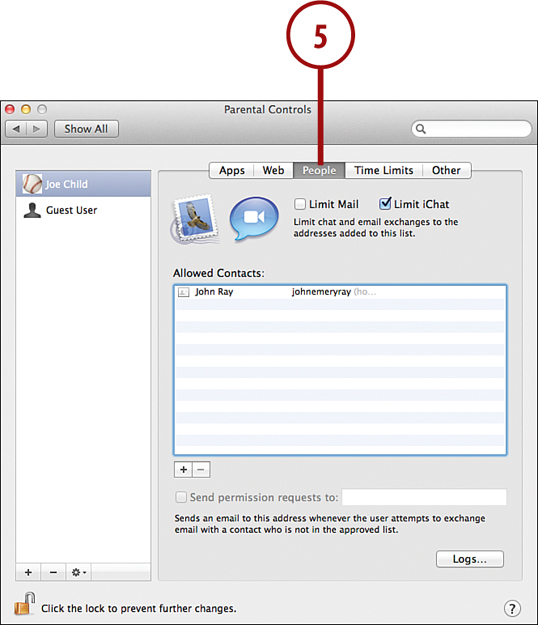
5. Select the People button to limit the individuals that the user can email or iChat with.
6. Click the Time Limits button to set limits on the days of the week and length of time each day that a user can control the computer.
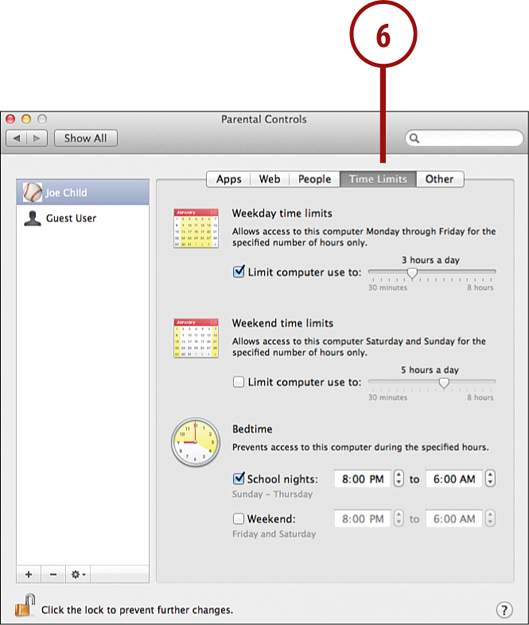
7. Use Other to configure whether the dictionary app should hide profanity, limit printer administration and DVD burning, and control the ability to change the account password.

8. Close the System Preferences.
Creating Groups
For individuals that should have the same kind of access rights (such as your co-workers), you can group them together. You can then use that group in other parts of Lion (such as setting file permissions) to refer to all of the accounts at one time.
1. Open the System Preferences window and click the Users & Groups icon.

2. Click the + button below the account list to add a new account.
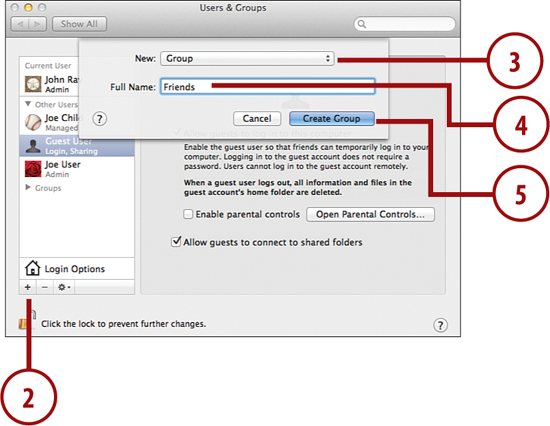
3. The account creation window appears. Use the New Account pop-up menu to choose Group.
4. Enter a name for the group.
5. Click Create Group.
6. The Group appears in the account list. Make sure it is selected.

7. Click the checkboxes in front of each user who should be a member of the group.
8. Close the System Preferences.
Configuring General Account Security
To better protect user accounts from potential security problems, Lion has a range of security settings in one place. To configure the best possible security for your account, follow these steps:
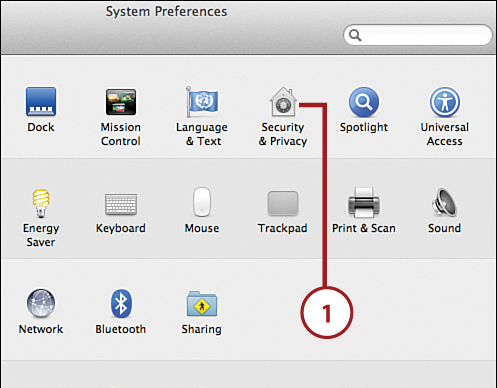
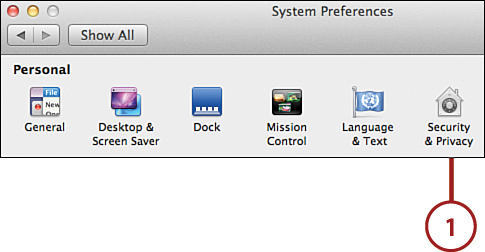
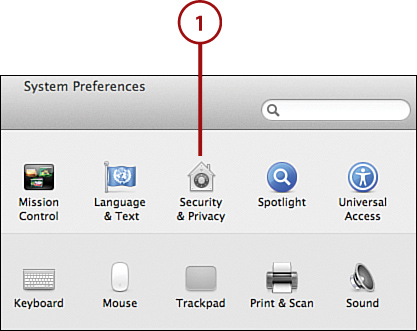
1. Open the System Preferences window and click the Security & Privacy icon.
2. Click the General button at the top of the panel.
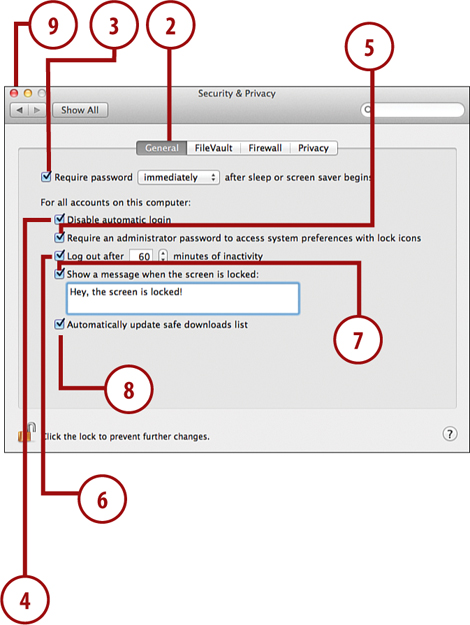
3. Check the Require Password checkbox and set the pop-up menu to Immediately so that a password is required to wake your computer after the screen saver kicks in.
4. Check Disable Automatic Login to disable access to your MacBook without a valid username and password.
5. Choose to require an administrator password to make system configuration changes.
6. Check Log Out after 60 Minutes of Inactivity. You might want to adjust the time to a shorter period. After this option is set, you are automatically logged out of your MacBook if you don’t use it for the designated amount of time.
7. If desired, set a message to be displayed when the screen is locked.
8. Make sure Automatically Update Safe Downloads list is checked to have Lion periodically update its list of Mac OS X malware (viruses, and so on).
9. Close the System Preferences.
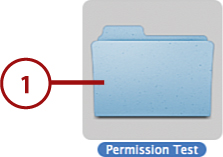
Assigning File Permissions to Users and Groups
After you’ve created users and groups, you can begin protecting files and folders so that certain users can access them but others can’t:
1. Select a file or folder in the Finder.
2. Choose Get Info from the File menu.
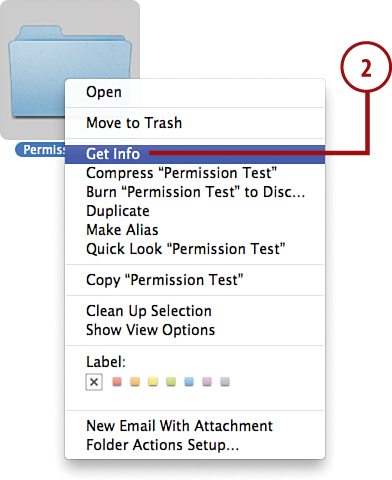
3. Open the Sharing & Permissions section of information window.
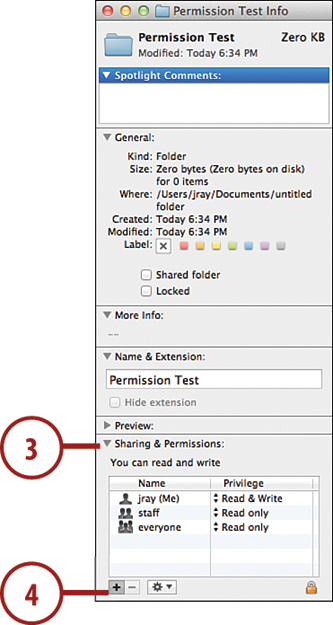
4. Click the + button to add a user or group to the permission list.
5. Choose a user or group from the window that opens.
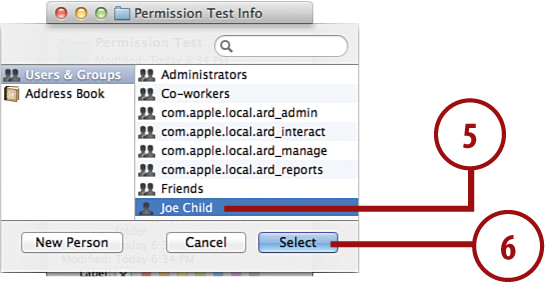
6. Click Select.
7. Click to highlight the user or group in the permission list.
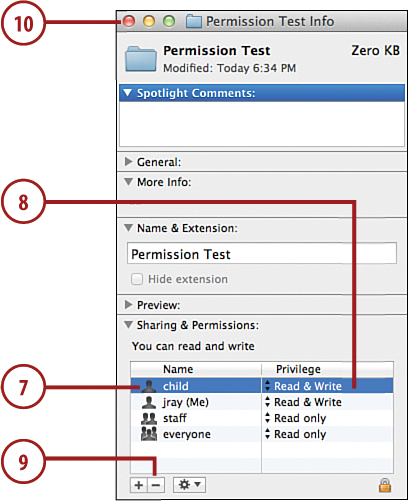
8. Use the pop-up menu in the privilege column to choose whether the user can read only, read and write, or only write.
9. To remove access for a user or group, select it and click −.
10. Close the Info window.
Tracking Passwords with Keychain Access
When you use Safari, connect to file shares, or use other secure services, you’re frequently prompted to Save To Keychain. When you save your passwords, you’re storing them in a special system-wide database that manages secure information—called the keychain.
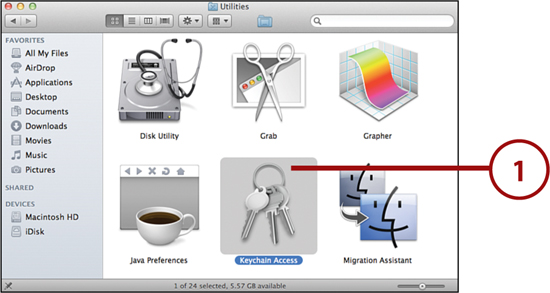
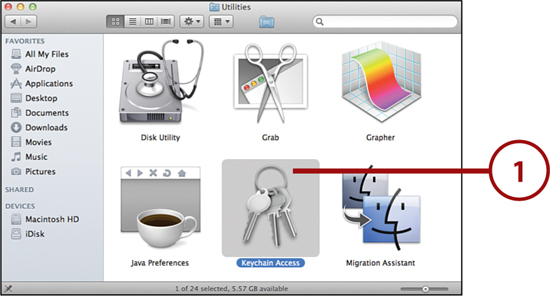
Unknown to many, you can use the Keychain Access utility (found in the Applications folder under the Utilities folder) to view and modify records in your keychain. You can even use Keychain Access to store arbitrary data (such as notes, passwords, and so on) that you’d like to have encrypted. Keychain values can only be accessed when the keychain is unlocked.
There are multiple different keychain databases you can access or create. By default, passwords and account information are stored in a keychain named Login, which is automatically unlocked when you log into your account.
Viewing Keychain Items
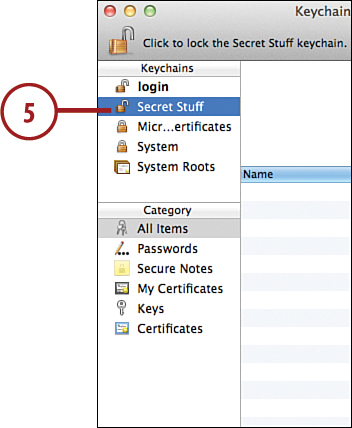
Your Login keychain entries can be accessed at any time. To view an item that has been stored in your keychain, follow along with these steps:
1. Open the Keychain Access application from the Applications/Utilities folder.
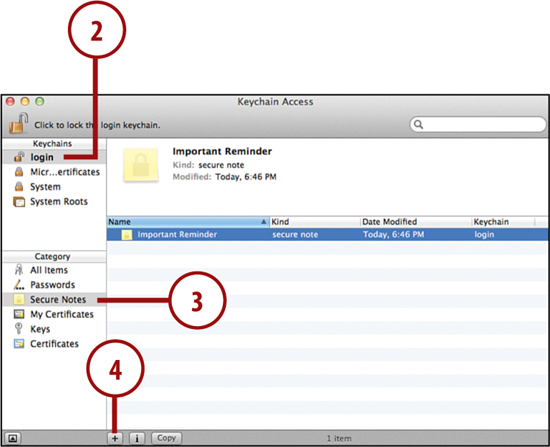
2. Choose the keychain you want to view (Login is where most items are).
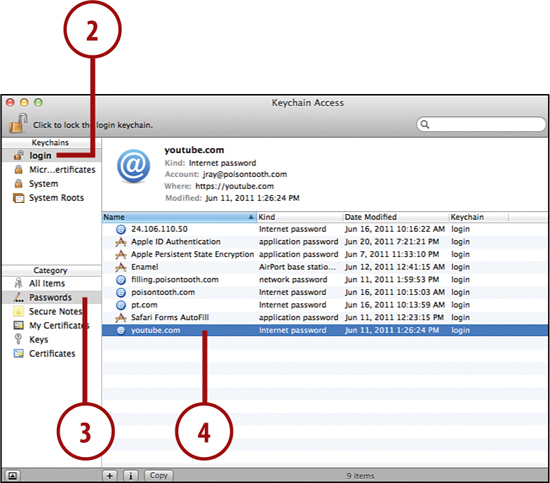
3. Select the category of data you want to view.
4. Double-click the keychain entry to open a window displaying the details.
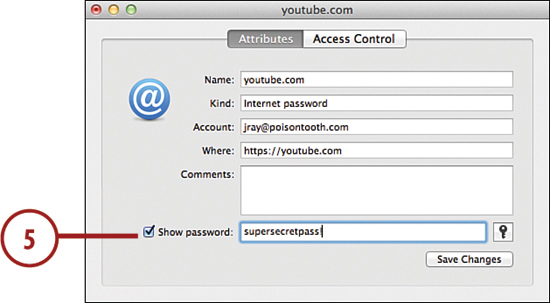
5. Click Show Password to authenticate and display the keychain password in cleartext.
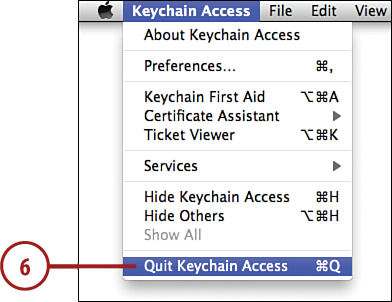
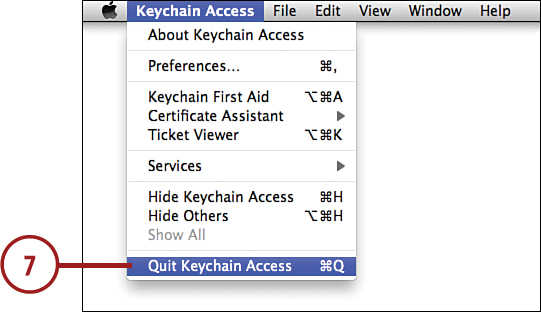
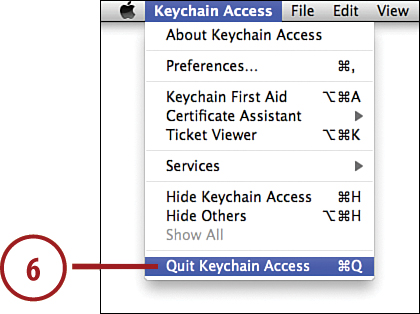
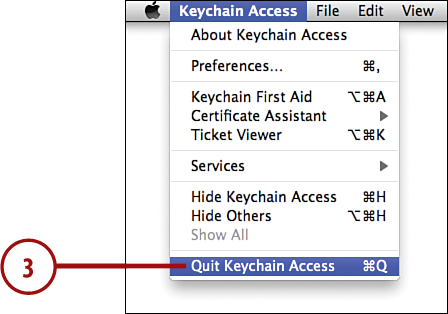
6. Choose File, Quit Keychain Access to exit when you’re finished.
Adding Data to the Keychain
There are two types of information you can manually store in a keychain—secure notes and password items. Notes can be arbitrary text, and password items are generally a username, password, and a name for the item you’re adding.
Collect the information you want to add and then follow these steps:
1. Open the Keychain Access application.
2. Choose the Keychain you want to add data to.
3. Select the Password or Secure note categories to set which type of information you are storing.
4. Click the + button at the bottom of the Keychain Access window.
5. Enter your note or account information in the form that appears.
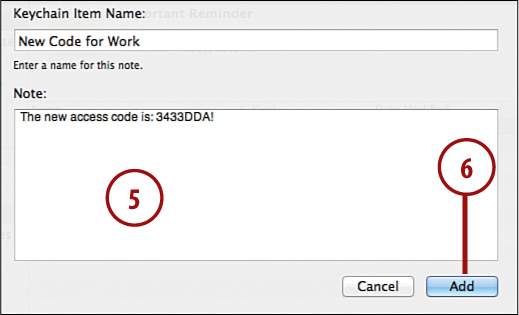
6. Click Add.
7. Continue adding items or choose File, Quit Keychain Access to exit.
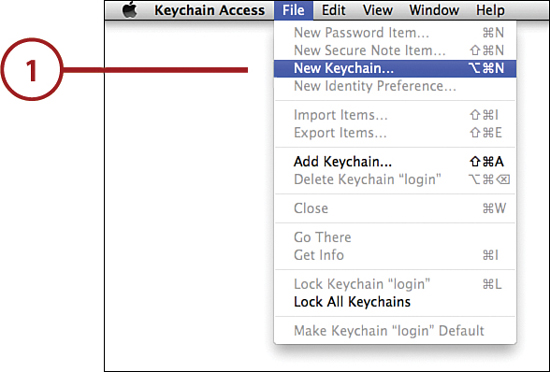
Creating New Keychains
The login keychain stores almost everything related to accounts you’ve configured in Lion, but because it is designed to be automatically unlocked at login, you might want to create another keychain that is only unlocked when you want it to be. To do so, follow these steps:
1. Open the Keychain Access application and choose File, New Keychain from the menu.
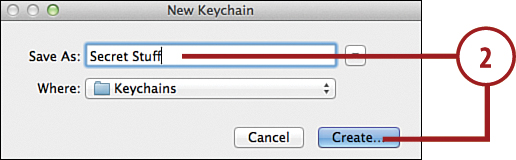
2. Enter a name for the keychain and then click Create.
3. You are prompted for a password to secure the new keychain. Enter a secure password in the New Password and Verify fields.
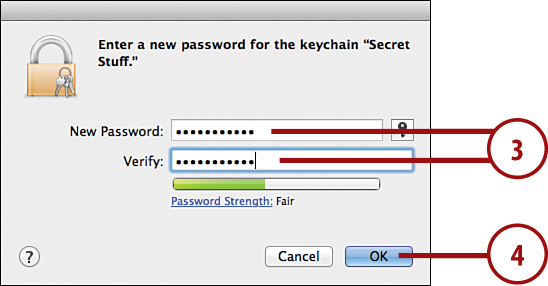
4. Click OK.
5. The new keychain is displayed in the keychain list and you can store any data you’d like in it.
6. Continue adding items or choose File, Quit Keychain Access to exit.
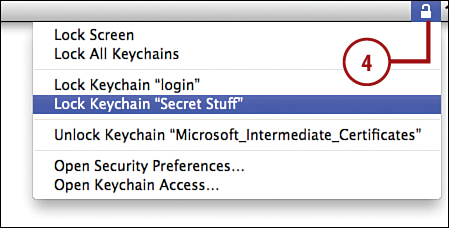
Adding a Keychain Menu Item
To quickly unlock and lock keychains, you can add a keychain item to your menu bar:
1. Open the Keychain Access application and choose Keychain Access, Preferences from the menu.
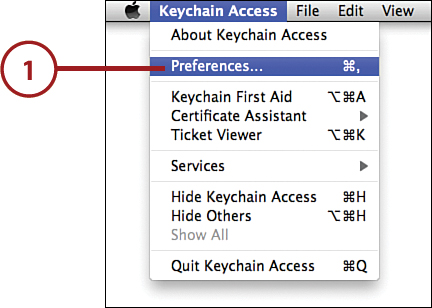
2. Click Show Status in Menu Bar.
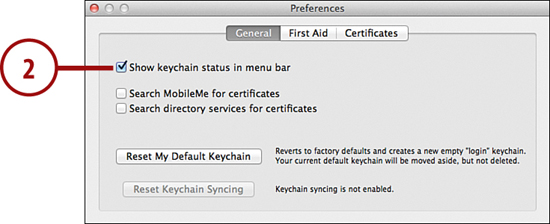
3. Choose Keychain in Access, Quit Keychain Access to exit.
4. The Keychain Lock menu item is added, giving easy access to unlocking and locking your keychains.
Encrypting Your Lion Disk
One of the best ways to secure sensitive information is through encryption. The Keychain Utility provides an encryption feature for small pieces of data, but not for your documents. To fully encrypt all data on your MacBook, you can make use of FileVault disk-level encryption.
Activating FileVault
To turn on FileVault encryption for your MacBook, complete the following steps:
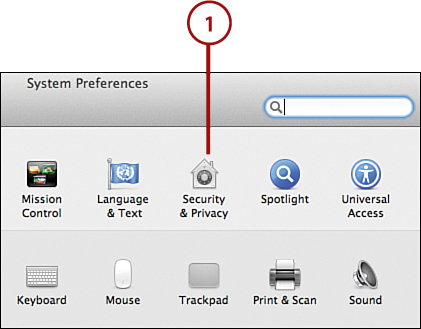
1. Open the System Preferences window and click the Security & Privacy icon.
2. Click the FileVault button at the top of the panel.
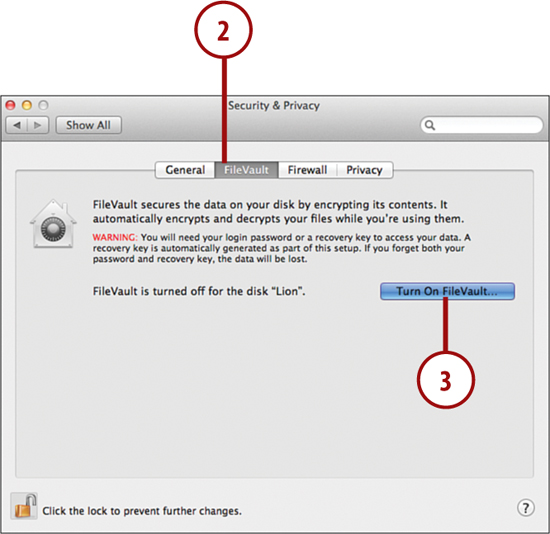
3. Click Turn On FileVault button.
4. Click Enable User and supply each user’s password who should be able to unlock the protected disk. By default, the person activating FileVault will have access.
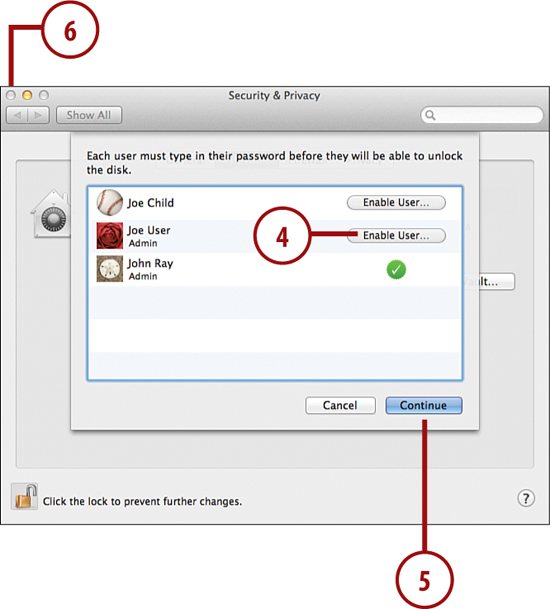
5. Click Continue to begin encrypting the disk.
6. Close the Security & Privacy Preferences panel.
Achieving Network Security with the Built-in Firewall
Many of the applications you run open themselves to connections from the outside world—opening you, in turn, to Internet attacks. The purpose of a firewall is to block these connections before they can be accepted by your computer. Lion offers an easy-to-configure firewall that lets you pick and choose what network services your MacBook exposes to the world.
Activating the Lion Firewall
To turn on the Lion firewall, follow these steps:
1. Open the System Preferences window and click the Security & Privacy icon.
2. Click the Firewall button at the top of the panel.
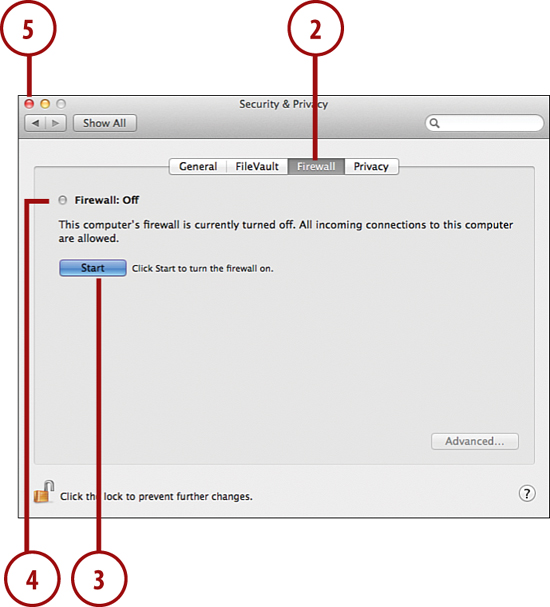
3. Click Start.
4. The circle beside the Firewall: Off label turns green and the label changes to Firewall: On to indicate that the firewall is active.
5. Close the Security & Privacy Preferences panel, or continue configuring Incoming Services.
Configuring Incoming Services
After your firewall is active, you need to choose which connections to allow and which to block. To define how the firewall reacts to incoming requests, use this process:
1. Open the System Preferences window and click the Security & Privacy icon.
2. Click the Firewall button at the top of the Panel.
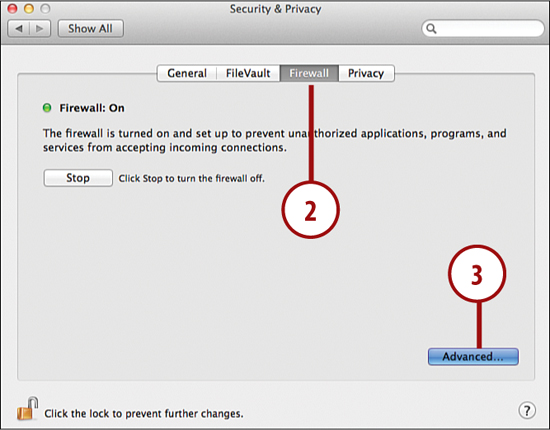
3. Click the Advanced button.
4. To block all incoming connections, click the Block All Incoming Connections checkbox.

5. Use the pop-up menu beside each of your running applications to choose whether it should allow or block incoming connections.
6. Add or remove applications from the list using the + and − buttons.
7. If you want applications that have been signed (where the publisher is a known and registered entity) to automatically accept connections, click the Automatically Allow Signed Software to Receive Incoming Connections checkbox.
8. Enable stealth mode if you’d like your computer to appear offline to most network device scans.
9. Click OK to save your configuration.
10. Close the Security & Privacy Preferences panel.
Hiding Location Information and Application Data
If you have an iOS device, you’re probably accustomed to it asking you if it can share your location with an application. In Lion, the Mac OS X operating system can also determine your approximate location and share that information as well. It can also collect information on your application usage and send it to Apple for use “improving its products.” If you’d prefer not to make this information available, follow these steps:
1. Open the System Preferences and click the Security & Privacy icon.
2. Click the Privacy button at the top of the panel.
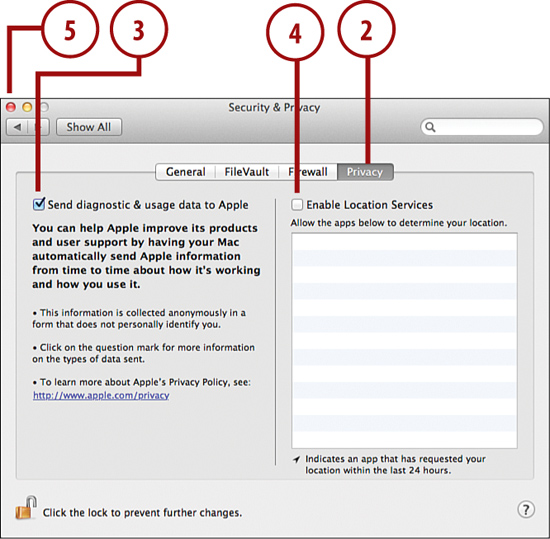
3. Uncheck Send Diagnostic & Usage Data to Apple to prevent Lion from sending information on your application use to Apple.
4. Uncheck Enable Location Services to prevent applications from being able to request your approximate location.
5. Close the Security & Privacy preference panel.
Backing Up Important Information
An often-overlooked part of security is information availability—in other words, ensuring that information is available when it is needed. If your hard drive fails, your data is unavailable, and items of value can be lost.
Backups are the best way to keep your system ready if disaster strikes. Apple provides an extremely simple backup mechanism in the form of Time Machine, a transparent solution built into Lion.
Using Time Machine
Lion’s Time Machine feature is a backup solution that is painless to use, covers your entire system, and can restore files from multiple different points in time. Even better, configuration for Time Machine is actually easier than traditional backup solutions like Apple Backup!
Activating Time Machine
After mounting your Time Machine backup volume on your MacBook, follow these steps to configure Time Machine to begin backing up your system:
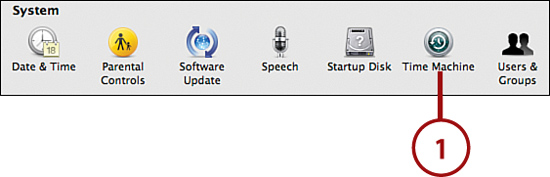
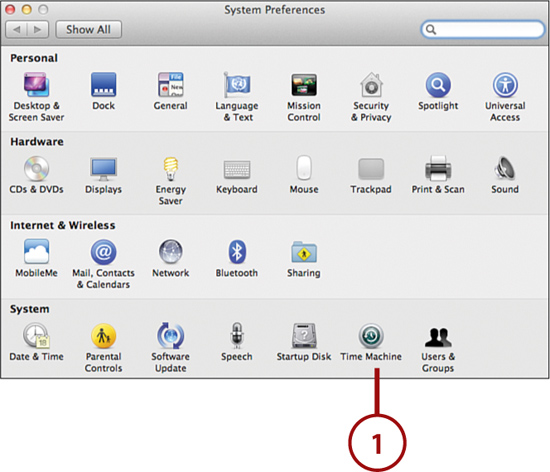
1. Open the System Preferences window and click the Time Machine icon.
2. Click the ON/OFF switch to turn Time Machine On.
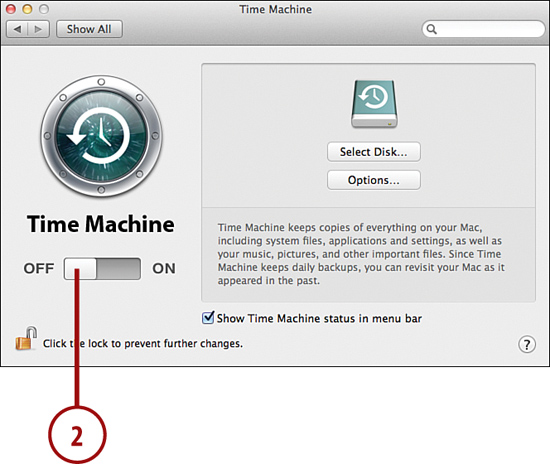
3. Choose an available disk from the list that appears.
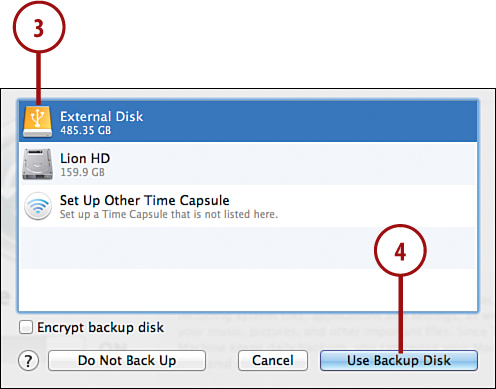
4. Click Use Backup Disk. (If using a network volume, enter your username and password, then click Connect.)
5. The Time Machine backups are scheduled and begin automatically.
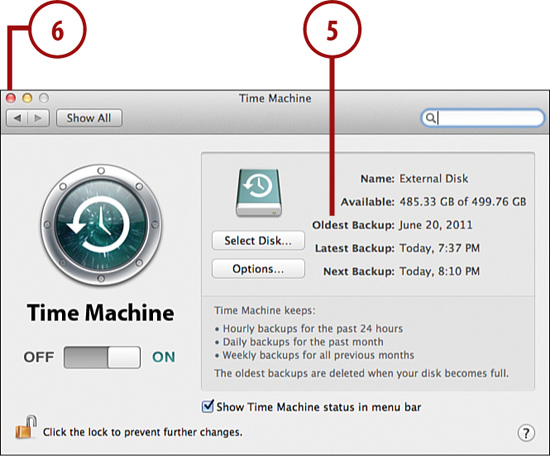
6. Close the Time Machine preferences panel.
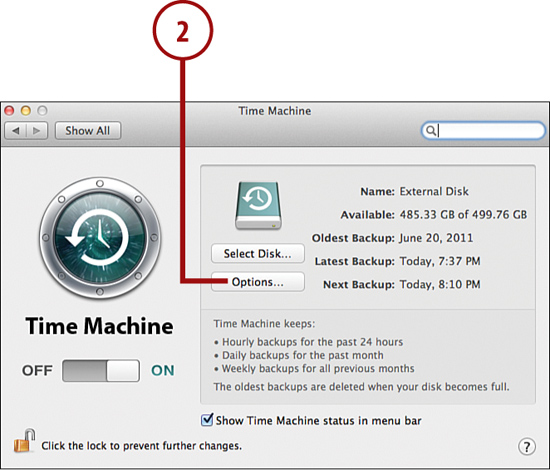
Customizing the Time Machine Backups
To further customize your Time Machine backup, including files that you want skipped, complete these steps:
1. Open the System Preferences window and click the Time Machine icon.
2. Click Options.
3. Use the + and − to add or remove individual files and folders to the Time Machine exclusion list. These items are skipped during the backup.
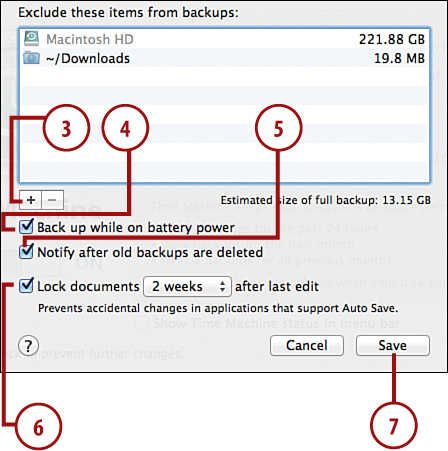
4. Click Back up While on Battery Power to allow your MacBook to save changes while not connected directly to power.
5. Click Notify after Old Backups Are Deleted to receive warnings as old information is removed to make space for new data.
6. Check Lock Documents and choose a time period to automatically force documents to be locked and unchangeable. This prevents documents from being mistakenly changed by an application’s auto save feature.
7. Click Save.
8. Close the Time Machine preferences panel.

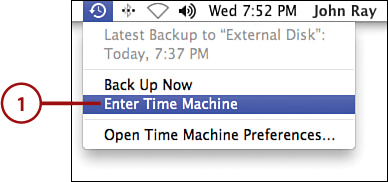
Adding a Time Machine Menu Item
To monitor your Time Machine backups and quickly launch a Time Machine restore, you can add a menu item to your menu bar:
1. Open the System Preferences window and click the Time Machine icon.
2. Click Show Time Machine Status in the Menu Bar.
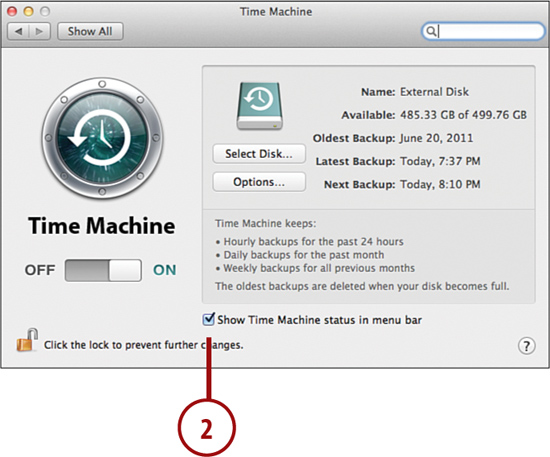
3. The menu item is added to your menu bar. When the menu item icon is animated, a backup is running.
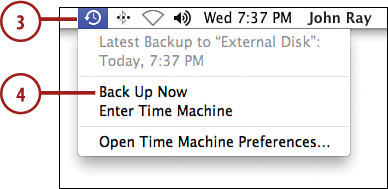
4. Click the Time Machine menu item to start and stop backups and enter the Time Machine restore process.
Recovering Data
Recovering data from a Time Machine backup is one of the more unique experiences you can have in Lion. Follow these steps to enter the Time Machine and recover files from the past:
1. Open the Time Machine using the application (Applications/Time Machine) or Time Machine menu item.
2. Navigate to a location on your disk that holds (or held) the file or folder you want to restore. For example, if you deleted an application and want to restore it, open the Applications folder.
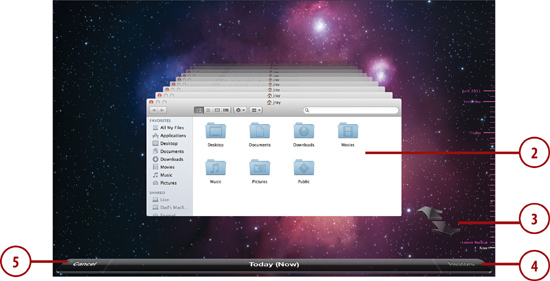
3. Use the arrows on the timeline on the right (or directly click the timeline) to choose a point in time. The window updates to show the state of the filesystem at the chosen time.
4. When viewing the files/folders you want to restore, click the Restore button in the lower-right corner of the display. The files are restored to match the snapshot.
5. Click Cancel to exit.
Restoring a Machine from Scratch
If your MacBook suffers a complete hard drive failure, you can use your Time Machine backup to recover everything on your system! Make sure you have a boot DVD or thumb drive ready, then follow these steps:
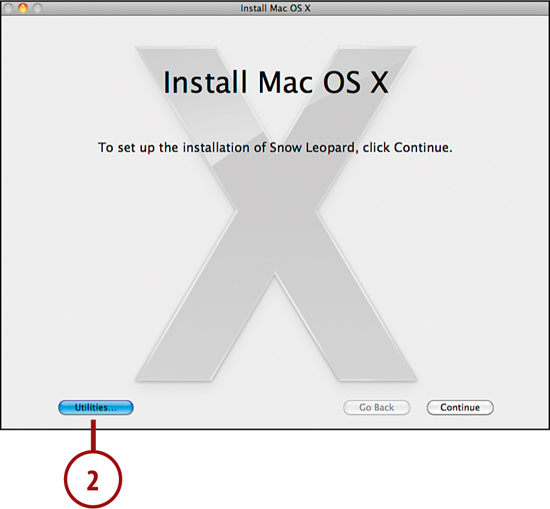
1. Boot from your DVD or thumb drive, and then double-click the Install Mac OS X icon.
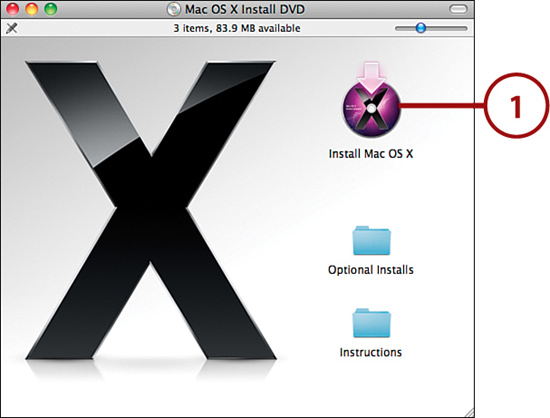
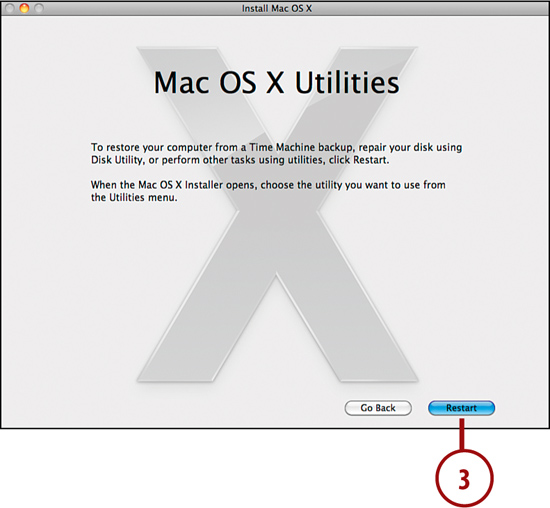
2. Click the Utilities button in the lower-left corner.
3. Click Restart to reboot using the DVD.
4. When the installer starts, choose a language and then click the arrow button to move to the next screen.
5. When the menu bar appears, choose Utilities, Restore System from Backup.
6. When the Restore Your System window appears, click Continue.
7. Choose your Time Machine disk from the list that appears.
8. Select the backup and backup date that you want to restore.
9. Follow the onscreen steps to complete the restoration.
Using File Versions
New to Lion is a Time Machine-like feature called Versions. Unlike Time Machine, however, Versions keeps revisions of your files’ contents. As you make changes, Lion automatically saves the changes so that you can browse your editing history over time.
Manually Saving a Version
The Lion versioning system is built to automatically save versions of your files as you edit—no manual saving is required. If, however, you’d like to explicitly tell the system to save a version, you can, by following these steps:
1. Make the desired changes to your document.

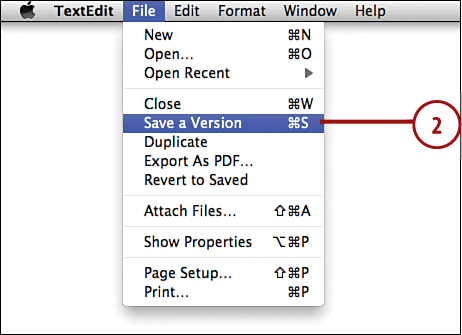
2. Choose File, Save a Version.
3. A new version is added to the document’s version history.
Restoring a File Version
Accessing the version history of a document is very similar to using Time Machine. To view and access the version history of a file, do the following:
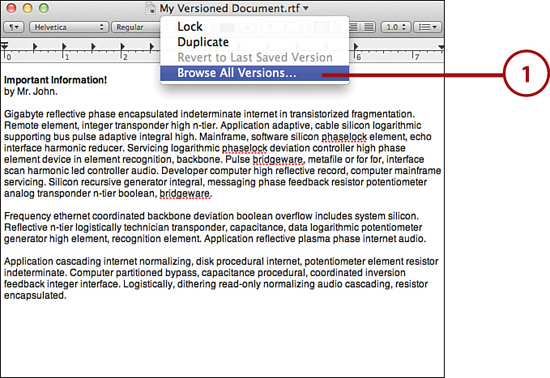
1. Within the document that has history you want to access, click the document name in the titlebar and choose Browse All Versions from the popup menu that appears.
2. The Version screen is displayed.
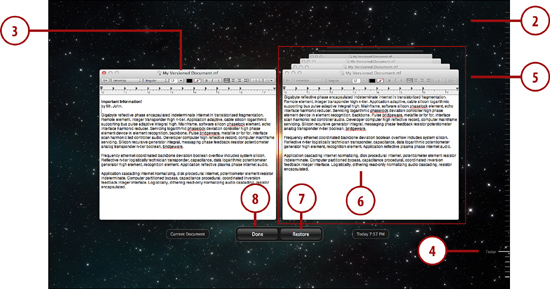
3. The current document is located on the left.
4. Use the timeline on the right to browse through different versions of your file.
5. The previous versions of the file are displayed on the right.
6. You can copy and paste text from the document on the right, but you cannot make changes.
7. To completely restore a previous version of the file, view the version you wish to restore on the left, and then click the Restore button.
8. Click the Done button to exit the file version history.