
8. Working with Date, Time, and Calendar
In this chapter, you learn how to set the time, use the Clock application, and use the Calendar application. Topics include the following:
• Synchronizing to the correct time
• Working with the Clock application
• Setting alarms
• Working with the Calendar
Your Motorola Atrix has a simple alarm clock application that you can further enhance with the use of the optional HD Multimedia Dock. The Calendar application synchronizes to your Google Calendars and enables you to create meetings while on the road and to always know where your next meeting is.
Setting the Date and Time
Before you start working with the Alarm & Timer, HD Multimedia Dock, and Calendar applications, you need to make sure that your Motorola Atrix has the correct date and time.
1. From the Home screen, touch the Menu button, and touch Settings.

2. Scroll down and touch Date & Time.
3. Touch Automatic to enable or disable synchronizing time and date with the wireless carrier. It is best to leave this enabled as it automatically sets date, time, and time zone based on your current location.
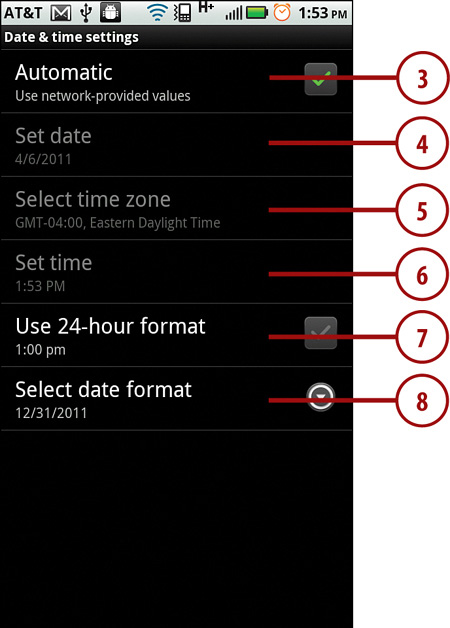
4. Touch Set Date to set the date if you choose to disable network synchronization.
5. Touch Select Time Zone to set the time zone if you choose to disable network synchronization.
6. Touch Set Time to set the time if you choose to disable network synchronization.
7. Touch Use 24-hour Format to enable or disable the use of 24-hour time format. This makes your Motorola Atrix represent time without AM or PM. For example, 1:00PM becomes 13:00.
8. Touch Select Date Format to change the way in which the date is represented. For example, in the U.S., we normally write the date with the month first (12/31/2011). You can make your Motorola Atrix display the date with day first (31/12/2011), or completely reversed so it displays as 2011/12/31.
The Alarm & Timer Application
The Alarm & Timer application is designed to be used as a simple bedside alarm clock.
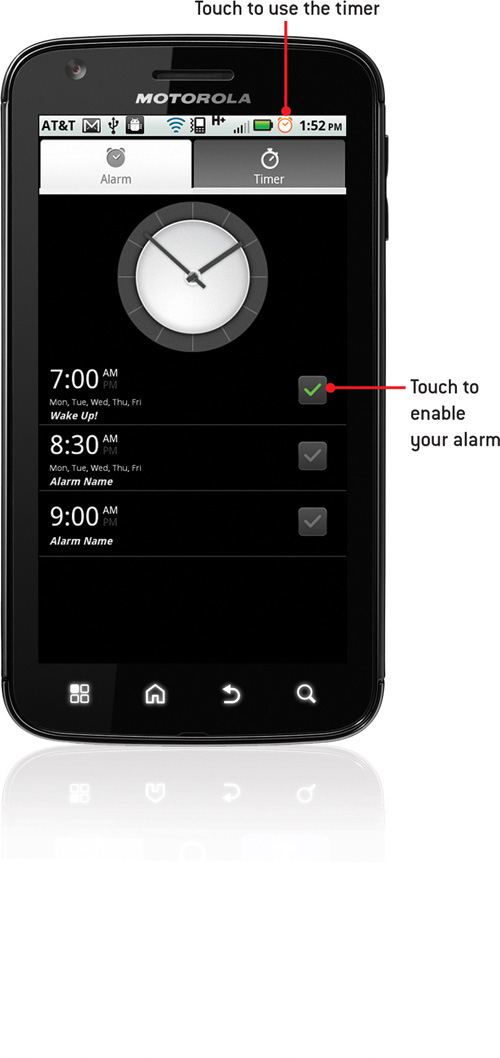
Navigating the Alarm & Timer Application
The Alarm & Timer application provides a simple clock face, alarm feature, and timer function.
1. Touch the Alarm & Timer icon.
2. Touch the clock face to change the look of the clock.
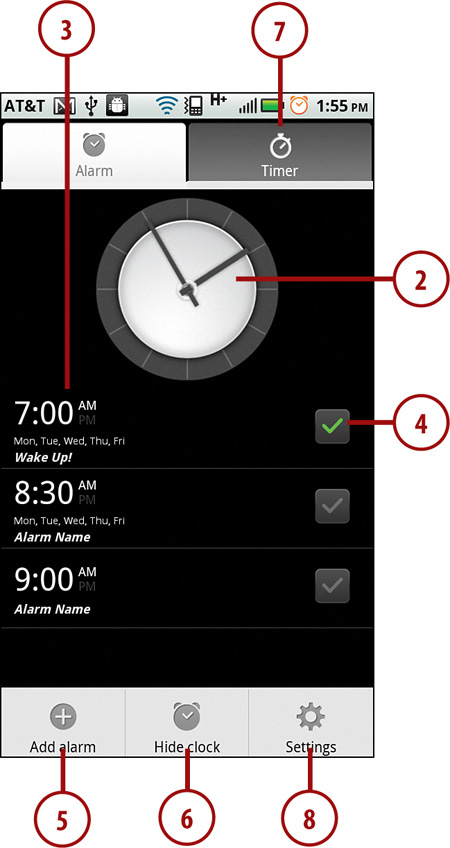
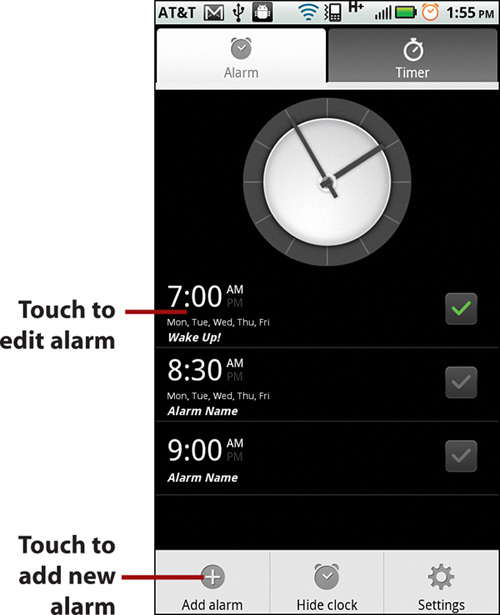
3. Touch an alarm in the list to edit it.
4. Touch a checkmark for an alarm to enable or disable it.
5. Touch Add Alarm to add a new alarm.
6. Touch Hide Clock to hide the clock.
7. Touch the Timer tab to use the timer.
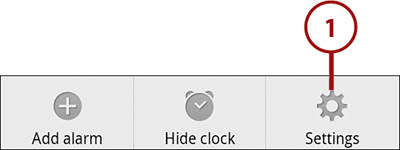
8. Touch Settings to change the settings for the application.
Managing Alarms
The Alarm & Timer application enables you to set multiple alarms. These can be one-time alarms or recurring alarms. Even if you exit the application, the alarms you set still trigger.
Overall Alarm Settings
The Alarm & Timer settings enables you to control how all alarms are handled.
1. Touch the Menu button and touch Settings.
2. Touch Alarm in Silent Mode to enable the alarm so that it plays even when your Atrix is in silent mode. Touch again to disable this feature.

3. Touch Alarm Volume to set the volume of the alarm.
4. Touch Snooze Duration to set the duration of snooze.
5. Touch Side Button Behavior to set how the side buttons behave if you press any of them when the alarm sounds. Your choices are Snooze and Dismiss.
Adding and Editing an Alarm
Whether you are adding a new alarm or editing an existing one, the steps are the same.
1. Touch Add Alarm or touch a specific alarm to make changes.
2. Touch Turn on Alarm to enable the alarm. Touch it again to disable the alarm.
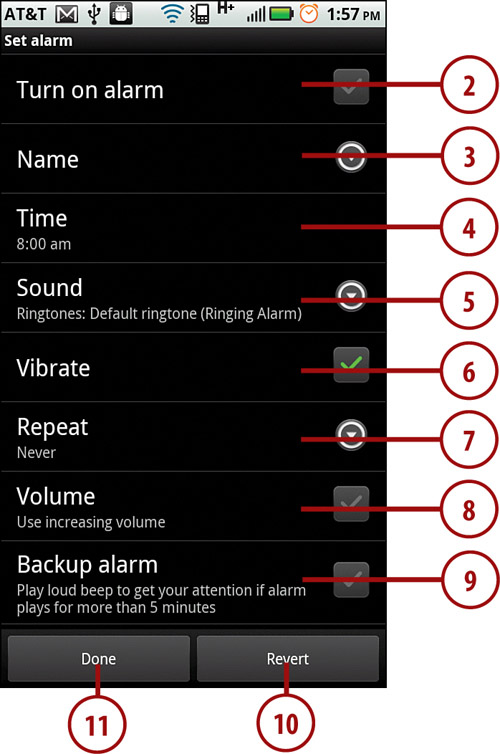
3. Touch Name to set the name of the alarm.
4. Touch Time to set the time the alarm must trigger.
5. Touch Sound to choose the ringtone that plays when the alarm triggers.
6. Touch Vibrate to choose whether your Atrix also vibrates while the alarm is playing.
7. Touch Repeat to set whether the alarm recurs. You can specify on which days of the week the alarm triggers. This is useful for setting an alarm that only wakes you up during the week but not on a weekend.
8. Touch Volume to choose whether the volume of the alarm increases until you wake up.
9. Touch Backup Alarm to trigger a backup alarm to play if you do not wake up after the first alarm has been playing for five minutes.
10. Touch Revert to cancel any changes you have made to the alarm.
11. Touch Done to save the alarm settings.
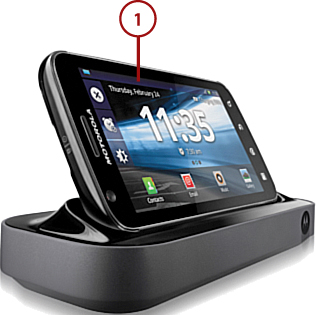
The HD Multimedia Docks
The HD Multimedia Dock is an optional accessory for your Motorola Atrix. When your Atrix is in this dock, a hidden application launches that acts more like a bedside clock than the Alarm & Timer application.
Using the Dock Application
When you plug your Atrix into the HD Multimedia Dock, a hidden application launches. Here is how to use it as a bedside clock or multimedia station.
1. Insert your Atrix into the dock.
2. Swipe left and right to see more Dock Widgets and Application shortcuts.
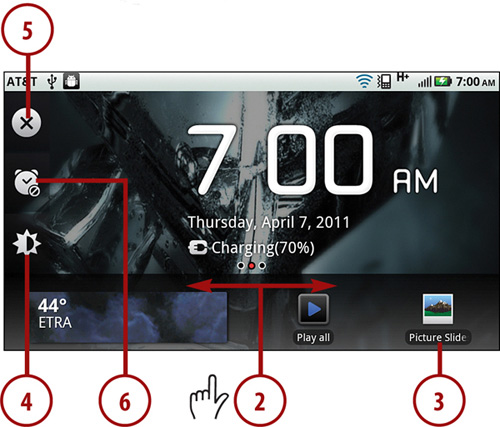
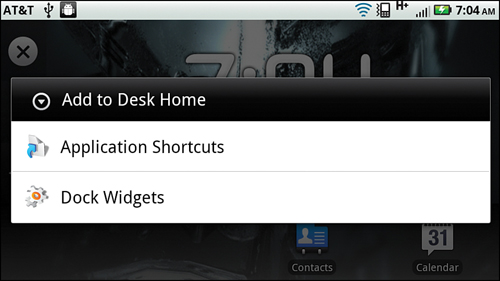
3. Touch a Dock Widget or Application to launch it.
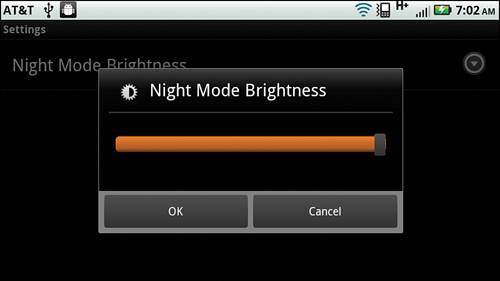
4. Touch to select Night Mode and dim the screen. Touch again to return it to its original brightness.
5. Touch to close the bedside dock application.
6. Touch to launch the Alarm & Timer application.
Using the Calendar Application
The Calendar application enables you to synchronize your corporate calendar and all your Google Calendars under your primary Google account to your Motorola Atrix. You can accept appointments and create and modify appointments right on your phone. Any changes are automatically synchronized wirelessly back to your corporate calendar or Google.
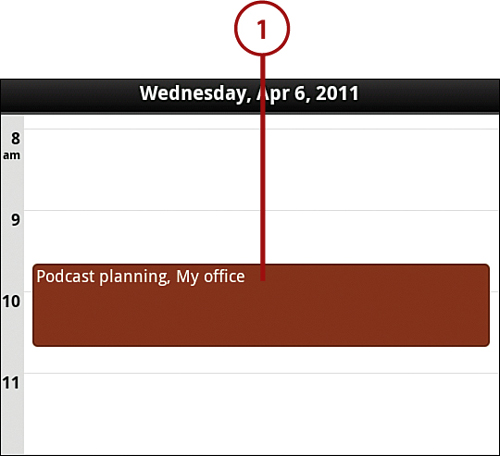
The Calendar Main Screen
The main screen of the calendar shows either a one-day, one-week, or one-month view of your appointments.
1. Launch the Calendar application.
2. Touch a day’s box to view information for that particular day.
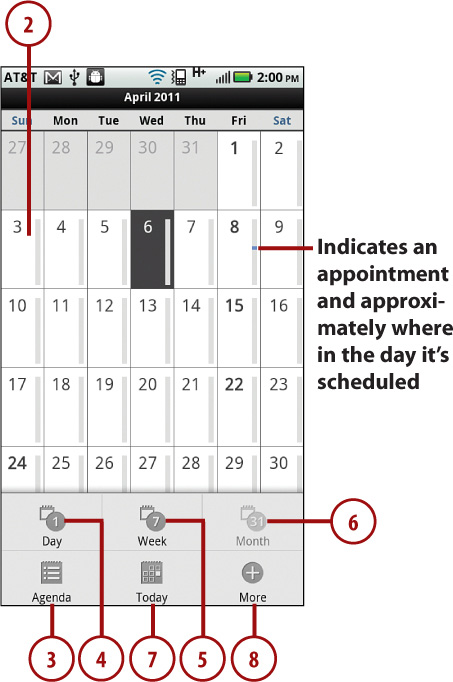
3. Touch Agenda to view the a list of events scheduled for that day.
4. Touch Day to view the calendar one day at a time.
5. Touch Week to view the calendar one week at a time.
6. Touch Month to view the calendar one month at a time.
7. Touch Today to view information on today’s calendar.
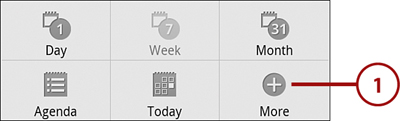
8. Touch More to add a new appointment and to see more options, including calendar settings and choosing which calendars are displayed.
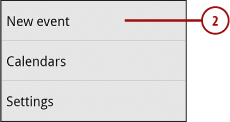
Adding a New Event
While you’re on the road, you can add a new appointment or event, and even invite people to it. Events you add synchronize to your Google or Corporate Calendars in real time.
1. Touch the Menu button and touch More.

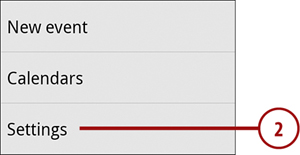
2. Touch New Event.
3. Touch the Calendar drop-down to select which calendar the appointment should be created in.
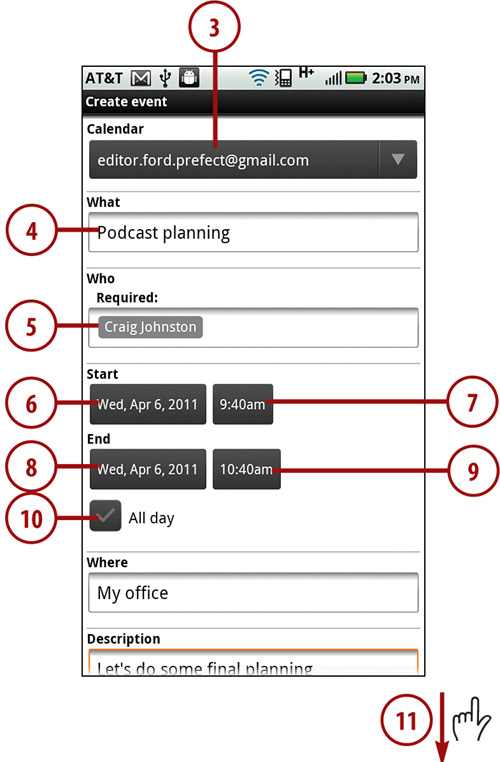
4. Touch the What text field to enter the subject for the appointment.
5. Touch the Who field to enter the meeting attendees by name or email address.
6. Touch to choose the start date of the appointment.
7. Touch to choose the start time of the appointment.
8. Touch to choose the end date of the appointment.
9. Touch to choose the end time of the appointment.
10. Touch to designate this appointment as an all-day event.
11. Scroll down for more options.
12. Touch the Where field to enter the location of the meeting. This can be a full street address that the recipients can click to see the location in Google Maps.
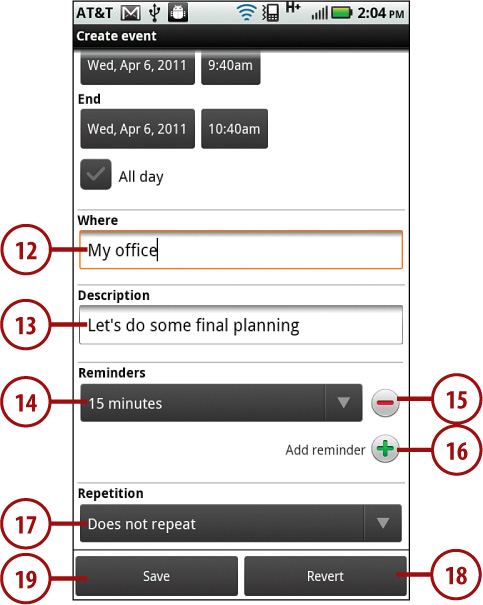
13. Touch the Description field to enter the meeting description. This can contain any web meeting links or phone bridge numbers and codes.
14. Set how many minutes before the event the reminder should trigger.
15. Touch the red minus sign button next to a reminder to remove that reminder.
16. Touch the green plus sign to add an additional reminder. Additional reminders can be useful to remind yourself or others more than once of an upcoming appointment. For example, you might want to have a reminder the day before an event and a second reminder 30 minutes before the event. You can set up to five reminders in total.
17. Touch the Repetition drop-down menu to select whether this meeting is a recurring meeting and to set when it repeats and how often.
18. Touch Revert to reset the meeting to its original settings.
19. Touch Save to save the meeting and send any meeting requests to attendees.
Editing or Deleting an Event
You can always edit a meeting that you have created or previously accepted. You can also delete meetings that you created or that you have been invited to.
1. Touch a meeting to open it.
2. Touch Show Attendee Details to show all meeting attendees and whether they are attending. This is available to you only if you created the meeting.

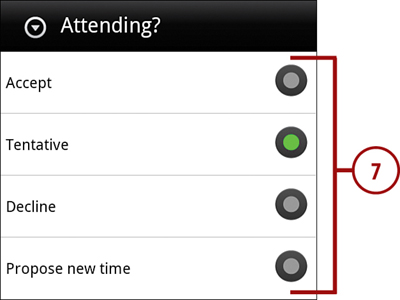
3. Touch the Attending? drop-down menu to change your meeting response.
4. Touch the Reminders drop-down menu to change the meeting reminder time.
5. Touch a red minus sign to delete a reminder.
6. Touch the green plus sign to add a reminder.
7. Touch Delete Event to delete the meeting.
8. Touch Edit Event to edit the meeting if you created it or have permissions from the creator to edit it.
9. Touch Forward to forward the meeting invitation to someone. This only works with meetings created using your Corporate Sync calendar.
Responding to a Meeting Request
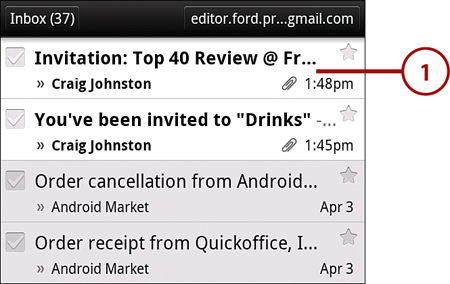
When someone invites you to a meeting, you are notified in the status bar. In the case of Google calendars, you are also notified via a calendar invite in your Gmail inbox.
Responding to a Google Meeting Request
Google Calendars (or Gmail calendars) are not as tightly integrated with your Atrix as you might like. When you are invited to a new meeting, you receive a new meeting invitation in your Gmail inbox. Here is how to respond.
1. Open your Gmail inbox and touch a meeting to open the meeting invitation.
2. Touch a link to indicate your response.
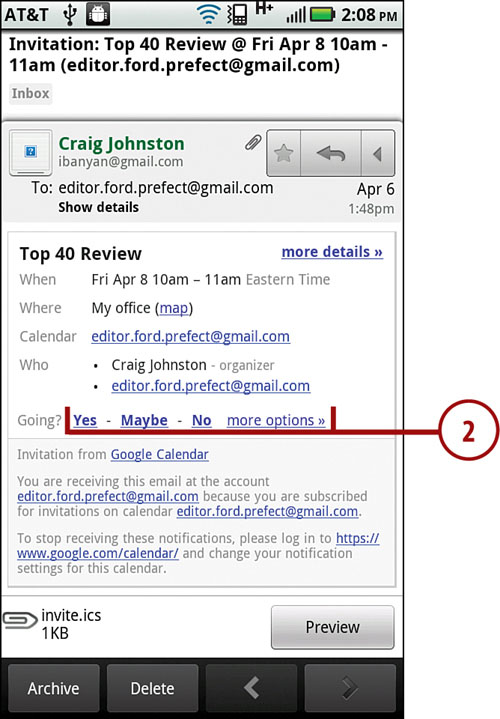
3. Touch Calendar to use the Calendar application for all Google calendar responses.
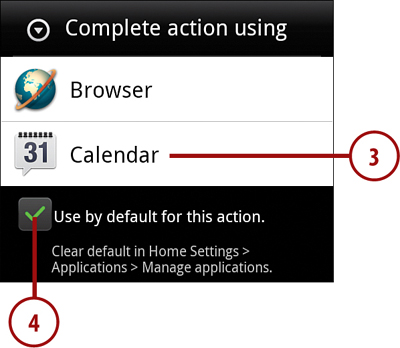
4. Touch the Use by Default for This Action checkbox to make your choice permanent.
5. Touch the Attending? drop-down menu to change your meeting response.
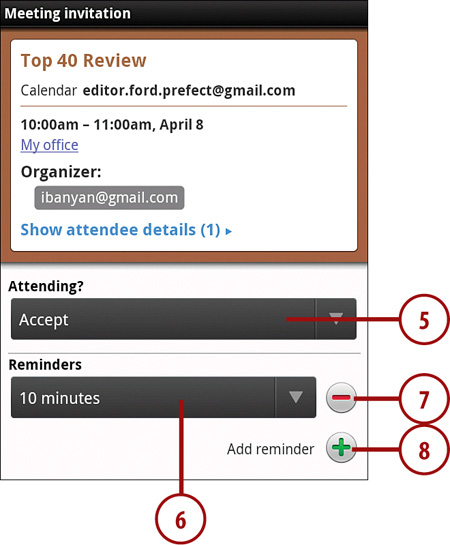
6. Touch the Reminders drop-down menu to change the reminder.
7. Touch the red minus sign to delete a reminder.
8. Touch the green plus sign to add a reminder.
9. Touch the Back button to save your response.
Responding to a Corporate Meeting Request
Corporate Sync (Microsoft Exchange) calendar support is much more integrated into the Atrix than the Google option. Here is how to respond to a corporate meeting request.
1. Pull down the status bar and touch the new meeting request.
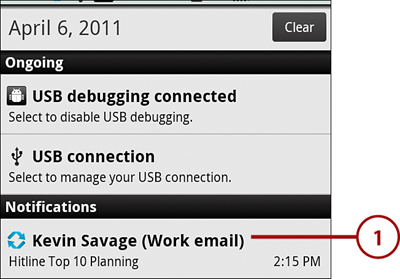
2. Touch View Meeting to see the meeting request.

3. Touch the Reminders drop-down menu to change the reminder.
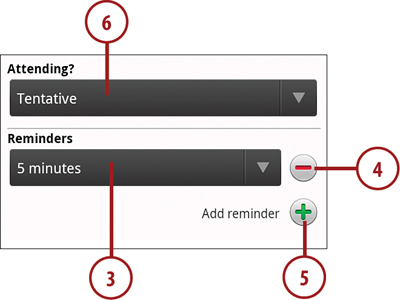
4. Touch the red minus sign to delete a reminder.
5. Touch the green plus sign to add a reminder.
6. Touch the Attending? drop-down menu to choose your response. The default response is always Tentative.
7. Choose your meeting response.
8. Choose how to proceed with your meeting response.

9. Touch OK to send the response.
Calendar Settings
You can adjust how the Calendar application behaves and select which calendars you want to synchronize to your Motorola Atrix.
1. From the Calendar main screen, touch the Menu button and touch More.
2. Touch Settings.
3. Touch Hide Declined Events to hide or make visible events that you have declined. You might want to leave them visible in case you change your mind about attending.
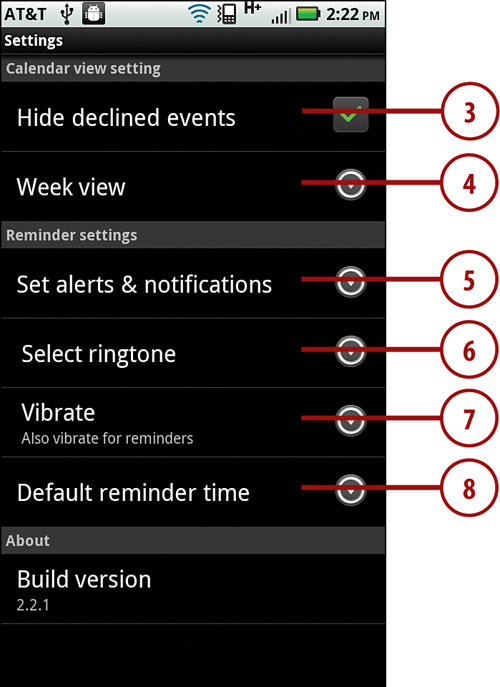
4. Touch Week View to select how the Week view is displayed. You can choose to show only the work week or the full seven-day week.
5. Touch Set Alerts & Notifications to set how you are alerted when an event reminder triggers. Your choices are Alert, Status Bar Notification, and Off.
6. Touch Select Ringtone to choose the ringtone that plays when an event reminder triggers.
7. Touch Vibrate to enable or disable vibration in addition to a visual or audio alert when an event reminder triggers.
8. Touch Default Reminder Time to set the default number of minutes a reminder appears before an event.