9. Advanced Editing
This chapter introduces you to the advanced Adjustment tools for editing your photographs. These tools include the histogram and all the sliders that let you make granular changes to your pictures. The chapter also shows you some cool Photos tricks that help you in the editing process.
![]() Becoming familiar with the tools
Becoming familiar with the tools
![]() Using the basic adjustment tools
Using the basic adjustment tools
![]() Understanding the Histogram
Understanding the Histogram
![]() Using more advanced adjustments
Using more advanced adjustments
![]() Editing tricks
Editing tricks
The great thing about Photos is that its has simple editing tools for those that want to make quick changes to their pictures, but it also offers more advanced editing tools for those who want to manually fine-tune their images. If you’re in the latter group, all the advanced tools you need are in the Adjustment pane. The Adjustment pane offers the histogram and a multitude of sliders that enable you to tweak your photos on a granular level.
Getting to Know the Adjustment Tools
Before you can use Photos’ advanced Adjustment tools you first need to know where to find them and what tools are available. There are ten adjustment tools available, but each tool also features a variety of subtools that enable you to get very specific with your adjustments.
Access the Tools
The Adjustment tools are easy enough to access, as they reside in the same toolbar with all the basic editing tools Photos offers.
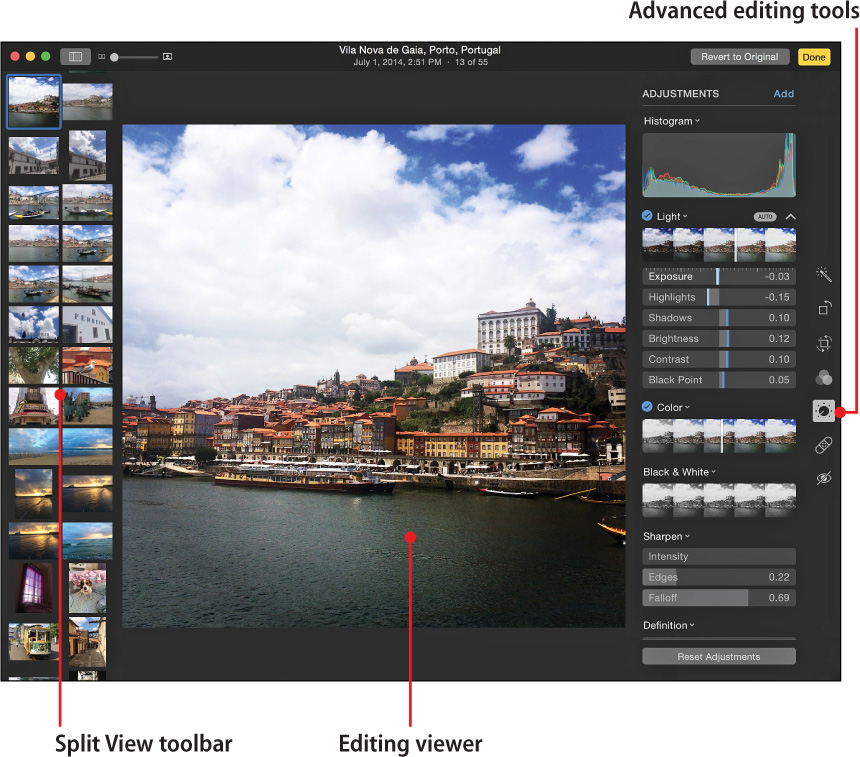
1. Double-click a photo you want to edit.
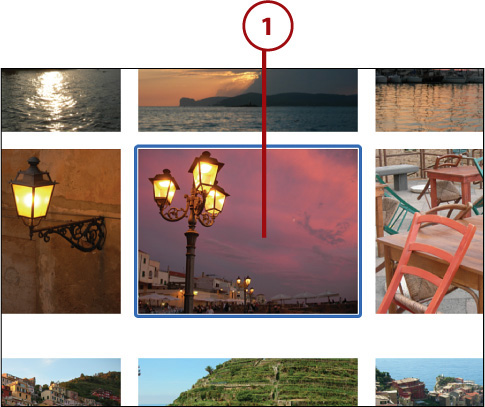
2. Click the Edit button.
3. Click the Adjust button in the toolbar. Alternatively, press the A key to access the Adjustment tools with a keyboard shortcut.

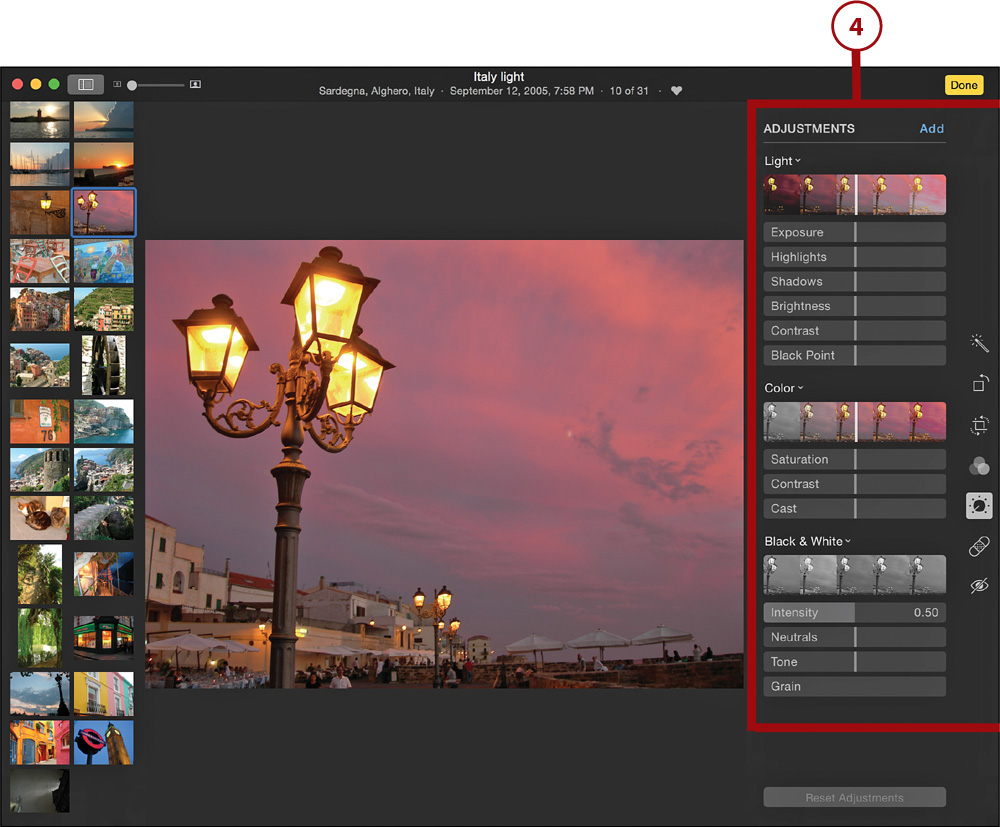
4. The Adjustment pane opens.
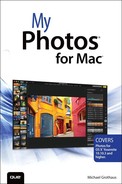
Anatomy of an Adjustments Tool
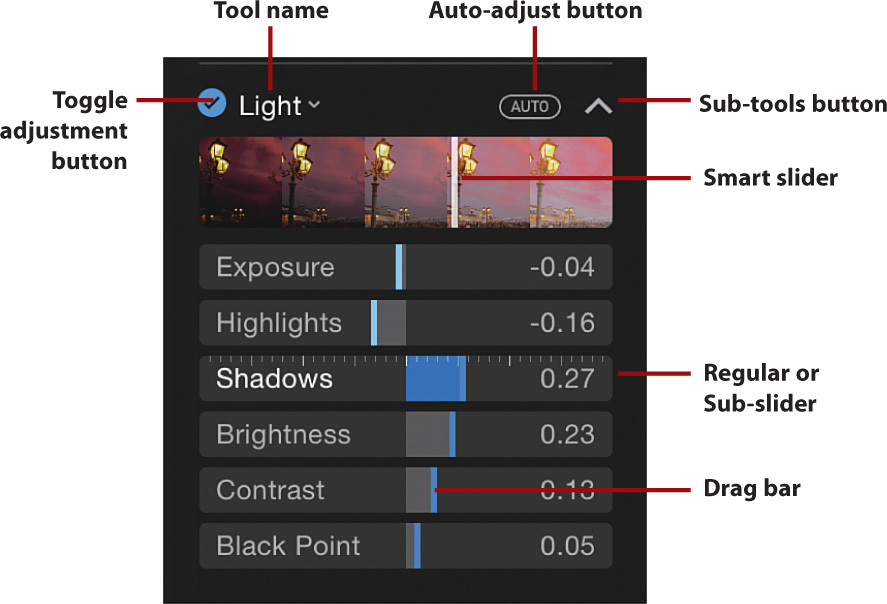
With all the tools and subtools that are available, some people feel overwhelmed just looking at the Adjustments pane. But there’s no need to feel stressed. The tools are manageable after you understand how the Adjustments pane is laid out.
• Tool name: This is the name of the adjustment tool. Click the name to have the option to reset its adjustments or remove the tool from view.
• Auto-adjust button: Click this button to make Photos analyze your image and apply automatic adjustments.
• Subtools button: Click this button to collapse or expand the subtools for the current tool.
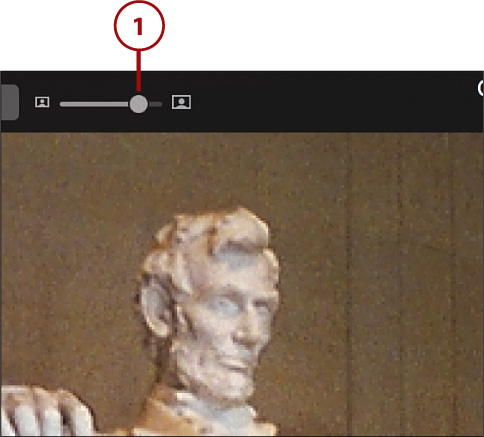
• Smart slider: Most of the adjustment tools take the form of sliders, but the Light, Color, and Black & White tools feature Smart sliders. A Smart slider displays thembnails of the image you are editing at various levels of adjustment. Drag the bar in the smart slider along the image thumbnails to automatically adjust the image you are editing and make it appear as it does in that part of the thumbnail.
What Makes a Slider Smart?
As you drag the bar along a Smart slider to adjust the image, all the regular sliders below it automatically adjust with it, and they don’t necessarily move in the same direction. In other words, Photos is smart enough that it knows which individual elements it needs to tweak in which direction to get you the image shown in the selected thumbnail.
• Regular slider: Many tools also feature regular sliders (which can also be called sub-sliders when they are contained within a Smart slider). Use regular sliders to tweak just one specific parameter of the selected tool.
• Drag bar: Click and drag the blue bar across the slider to change the setting’s parameters.
• Toogle adjustment button: As soon as you’ve made even the slightest adjustment using one of the tools, a blue check mark appears next to that tool. Click the check mark to toggle the adjustment on or off.
Customizing the Adjustments Pane
You can customize the Adjustments pane to your liking by expanding or contracting adjustment tools, showing or hiding them, and saving your Adjustment pane’s layout.
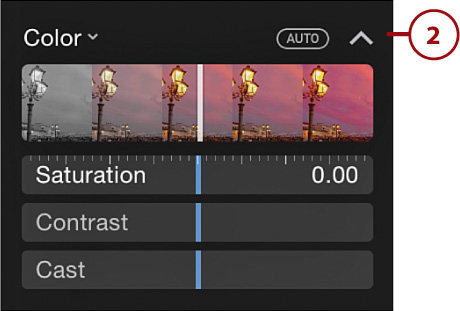
Expand or Contract an Adjustment Tool
1. Move your cursor over the adjustment tool and click the arrow to expand its subtools.
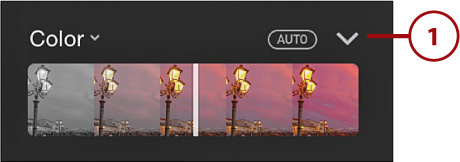
2. Click the arrow again to contract the subtools.
Show an Adjustment Tool
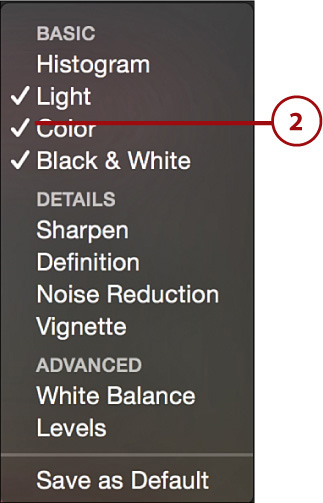
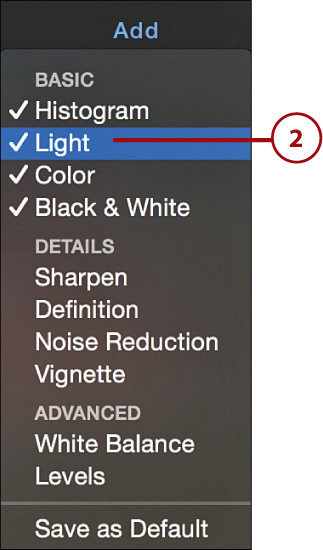
1. Click the Add button. You see a pop-up menu of available tools.
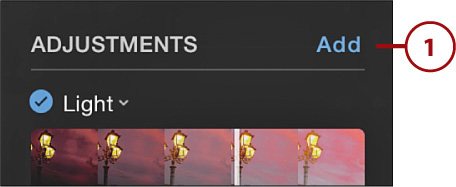
2. Currently visible tools have a check mark by their names. Hidden tools do not have a check mark.
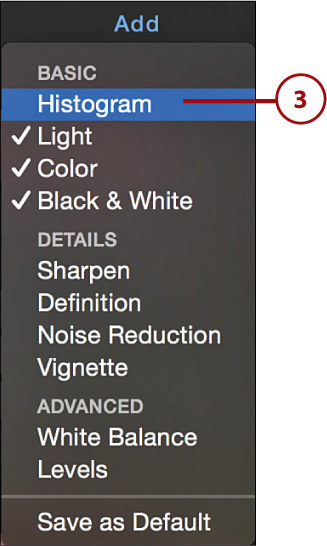
3. Click the name of the tool you’d like to show.
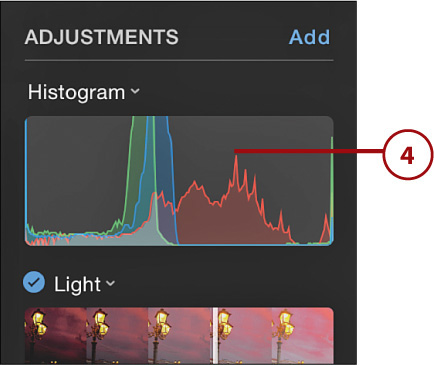
4. That tool now appears in the Adjustment pane.
Hide an Adjustment Tool
1. Click the Add button. You see a pop-up menu of available tools.

2. Click the name of the tool you’d like to hide. That tool now disappears from the Adjustment pane.
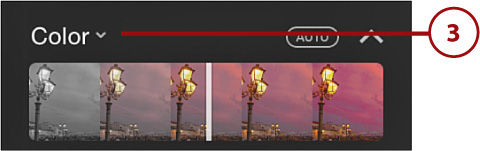
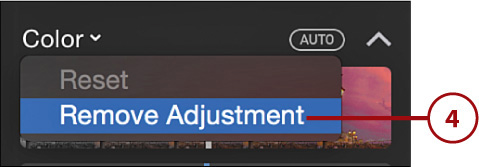
3. Alternatively, click the name of the adjustment tool in the Adjustments pane to see a drop-down menu of options.
4. Click Remove Adjustment. That tool disappears from the Adjustment pane.
Save Your Adjustment Pane Layout
After you’ve arranged the Adjustments pane to your liking, you can save the layout.
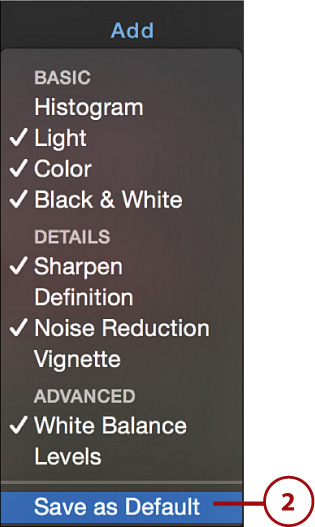
1. Click the Add button.

2. Click Save as Default. Now every time you open the Adjustments pane only the tools you’ve selected to show will appear.
Using the Basic Adjustment Tools
Photos organizes the adjustment tools into three categories: Basic, Details, and Advanced. This section covers the Basic adjustment tools, which include Histogram, Light, Color, and Black & White.
Why are these tools “basic?” Simply put, they are the most standard adjustment tools people use, which is why the Basic tools were given Smart sliders and the other tools were not. Tools in the Details and Advanced sections contain more niche controls that most hobbyists have no need for.
Reading the Histogram
The first Basic tool is the histogram; it’s so basic that you can’t actually manipulate it in any way. If you know how to read it, though, it can give you an excellent overview of what, if anything, needs adjusting in your image.
A histogram is a graphic representation of the distribution of tones, or light levels, for the three color channels (red, blue, and green) in an image. Black or dark tones are shown in the left of the histogram; midtones are shown in the middle; and white or light tones are shown in the right. The histogram graph itself looks like red, blue, and green mountain ranges overlayed on one another.

Looking at a histogram can instantly tell you whether your photo has good exposure or if it is underexposed or overexposed. Underexposed photos appear darker than they should be, and on the histogram chart the mountains are bunched toward the left. Overexposed photos appear lighter, or more “blown-out,” than they should be, and on the histogram chart the mountains are bunched toward the right. Remember though, that under- and overexposed photos aren’t necessarily bad. Like many things with photography, “good” exposure is somewhat subjective. Maybe you like your photos darker or lighter. Just because a photo is under- or overexposed doesn’t mean you have to correct it.
The figure shows you can see what the histograms look like for a photograph with “good” exposure and also photographs that are underexposed and overexposed.
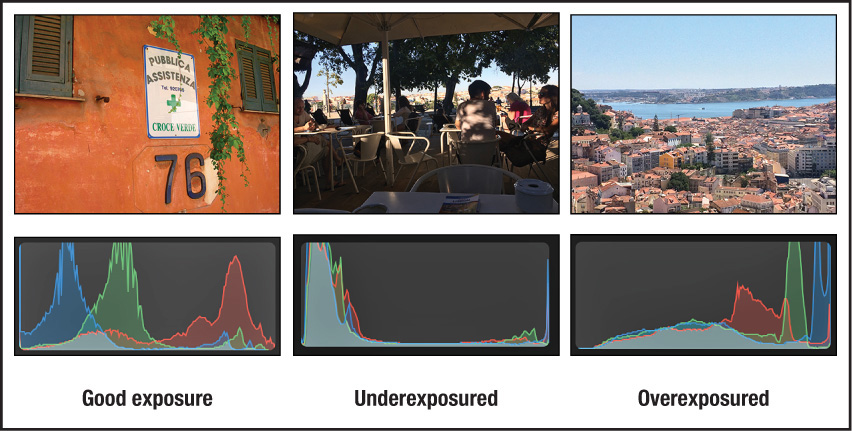
As you can see in the photo on the left, the red, blue, and green colors are spread fairly evenly throughout the histogram. This signifies that the photo has relatively good exposure. In the middle picture, the photograph was taken in heavy shadow, and it’s quite dark. Without even looking at the photo, you could tell it was underexposed just by checking out its histogram; all the colors in the chart are bunched up toward the left, or black, side. In the photo on the right, the colors in the chart are bunched more to the right, or white side, of the histogram, indicating that the photo is overexposed.
For information on how to directly manipulate the levels in the histogram, read the “Adjust Levels” section later in this chapter.
Use the Light Adjustment Tool
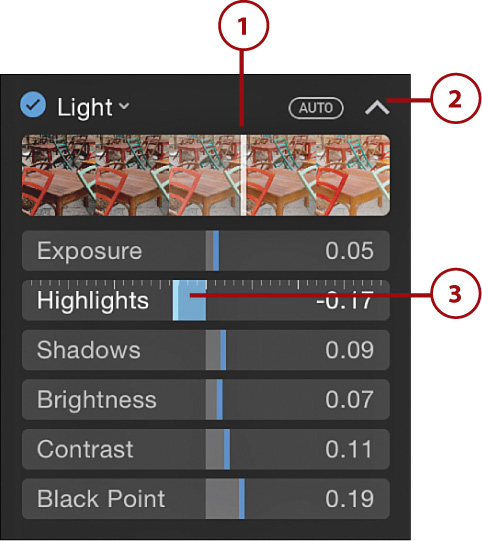
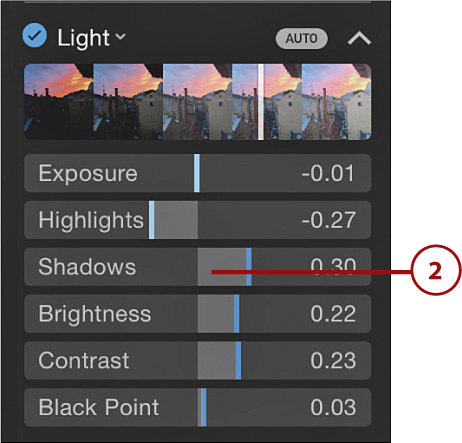
The Light tool consists of one Smart slider and six sub-sliders. When you adjust the Light tool’s Smart slider, Photos makes some advanced calculations that automatically adjust the sub-sliders to give your image the best possible look. Alternatively, you can tweak the Light tool’s individual sub-sliders.
1. Drag the white slider bar along the Light tool’s Smart slider to adjust the photograph’s light levels.
2. Alternatively, click the expand arrow to show the Light tool’s sub-sliders if you want to have more granular control over the light levels.
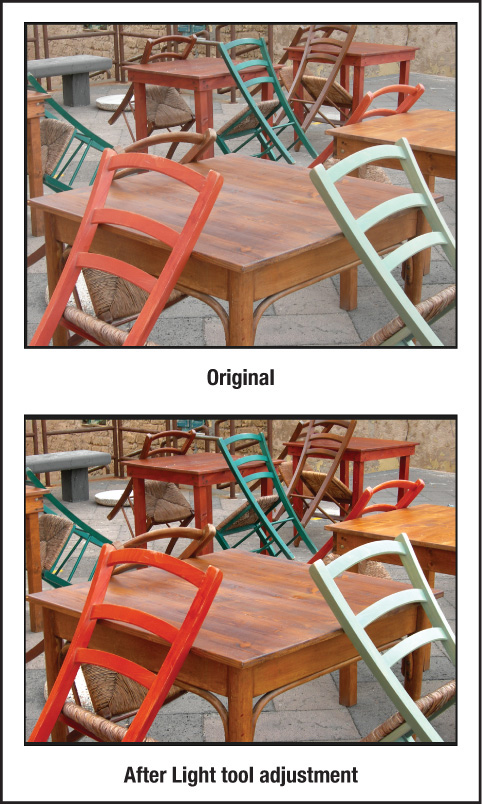
3. Adjust each sub-slider parameter to achieve the desired effect. The figure shows a photo that I adjusted using the Light tool.
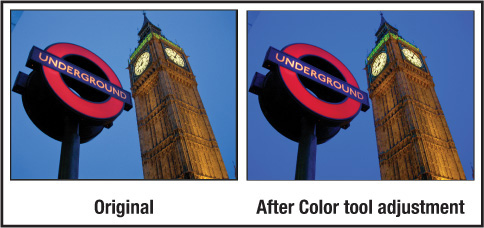
Make Color Adjustments
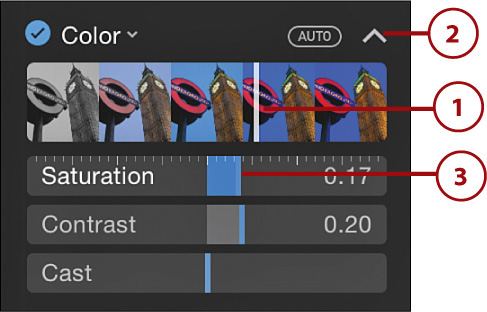
The Color tool consists of one Smart slider and three sub-sliders. When you adjust the Color tool’s Smart slider, Photos makes some advanced calculations that automatically adjust the sub-sliders below it to give your image the best possible colors. Alternatively, you tweak the Color tool’s individual sub-sliders.
1. Drag the white slider bar along the Color tool’s smart slider to adjust the photograph’s color levels.
2. Alternatively, click the expand arrow to show the Color tool’s sub-sliders if you want to have more granular control over the color levels.
3. Adjust each sub-slider parameter to achieve the desired effect. The figure shows a photo I adjusted using the Color tool.
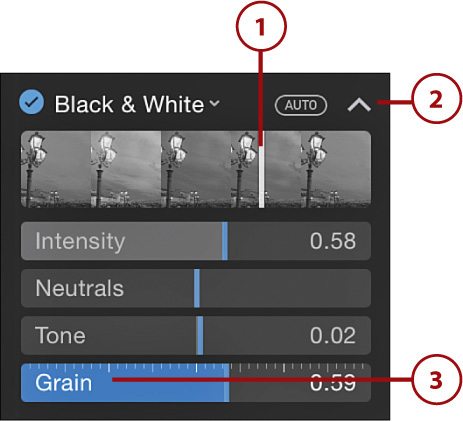
Adjust Black & White
When you adjust the Black & White tool’s Smart slider, Photos makes some advanced calculations that automatically adjust the sub-sliders to give your image the best possible black-and-white look. Alternatively, you can tweak the Black & White tool’s individual sub-sliders.
1. Drag the white slider bar along the Black & White tool’s Smart slider to adjust the photograph’s black-and-white levels to your liking.
2. Click the expand arrow to show the Black & White tool’s sub-sliders if you want to have more granular control.
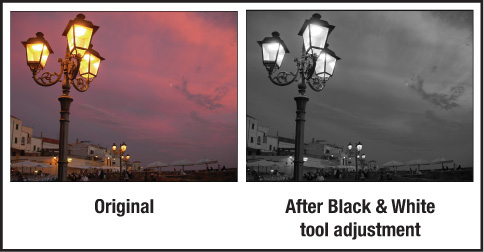
3. Adjust each sub-slider parameter to achieve the desired effect. The figure shows a photo I adjusted using the Black & White tool.
Using the Details Adjustment Tools
The second set of adjustment tools in the Adjustment pane are called the Details tools. Use these tools to bring out the fine details in your photographs or add a whole new level of detail entirely. The Details tools include Sharpen, Definition, Noise Reduction, and Vignette.
No Smart Sliders
None of the Details tools offer a Smart slider. If you want to get the most out of each tool, you need to individually tweak the regular sliders.
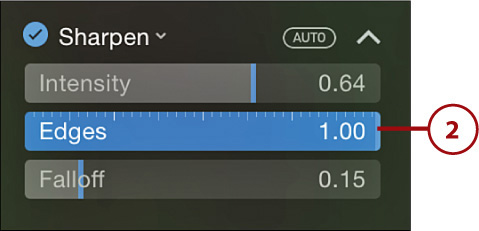
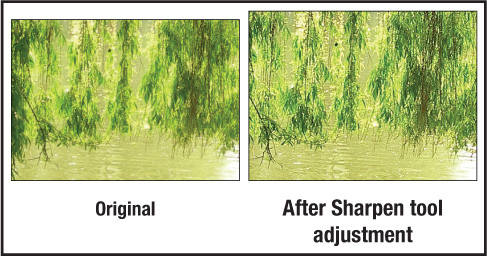
Sharpen a Photo
1. Zoom into the edge of an object in the image you want to sharpen. This could be leaves on a tree or the edges of a flag blowing in the wind.
2. Drag the slider bar along each of the Sharpen tool’s three sliders to adjust the photograph’s svharpening levels. The figure shows a photo I adjusted with the Sharpen tool.
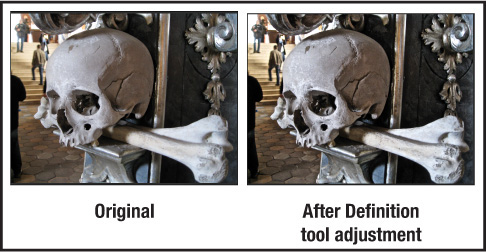
Adjust Definition
The Definition tool only has a single slider, labeled Amount. This tool enables you to chisel away soft lines in your photographs to make impressions stand out. Use this tool instead of the Light tool’s Contrast slider to define lines and objects in your image without adjusting the overall contrast.
1. Zoom in on an image so you can see the minute changes in real-time as you drag the Amount slider.

2. Drag the Amount slider bar to adjust the photograph’s definition levels. The figure shows a photo I adjusted using the Definition tool.

Reduce Noise
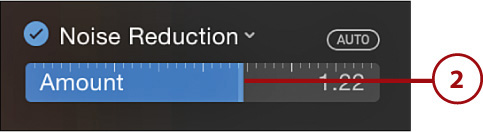
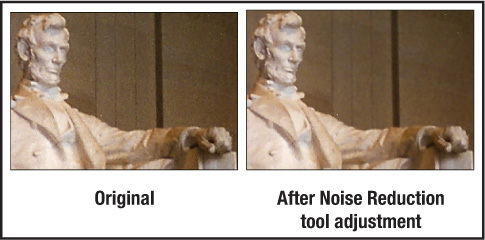
If you’ve ever taken a photograph outside at night, you’ve seen noise in your images. Noise is distortion. It’s the little blips and specs that show up on your digital photos and appear almost as if they were dust or colored confetti. You can use the Noise Reduction tools’ Amount slider to minimize those specs of digital dust.
1. Zoom in on an image to areas where you see noise.
2. Drag the Amount slider bar to adjust the photograph’s noise levels to your liking. The figure shows a photo I adjusted with the Noise Reduction tool.
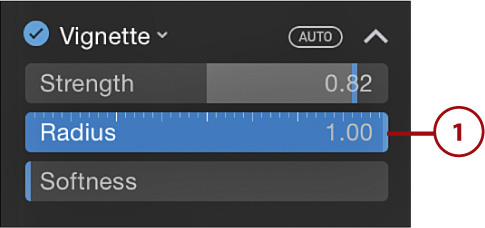
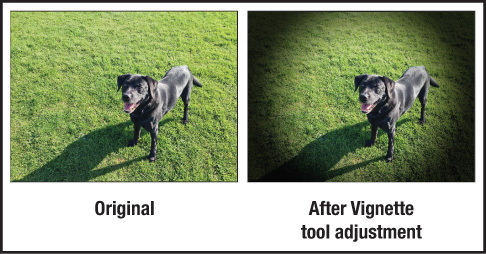
Apply a Vignette
1. Drag each of the Vignette tool’s three sliders until you achive a look to your liking. You need not drag all three. You can apply a vingette using only one slider. The figure shows a photo to which I applied a vignette.
Using the Advanced Adjustment Tools
The final set of adjustment tools in the Adjustment pane are the Advanced Adjustment tools, including the White Balance and Levels tools. These are tools primarily used only by professionals.
Adjust White Balance
1. Click the drop-down menu under the White Balance tool.
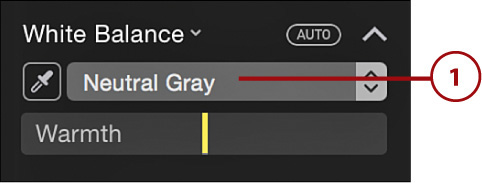
2. Select your White Blance type. Your choices are Natural Gray, Skin Tone, or Temperture/Tint.
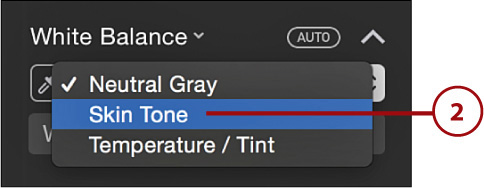
Make your selection based upon what you want the image’s white balance to be balanced from. If the whites of a cloud are off in your image, select Natural Gray. If the skin tone of a person in your image is off, select Skin Tone. If the overall whites in your image are too blue or too orange, select Temperature/Tint.
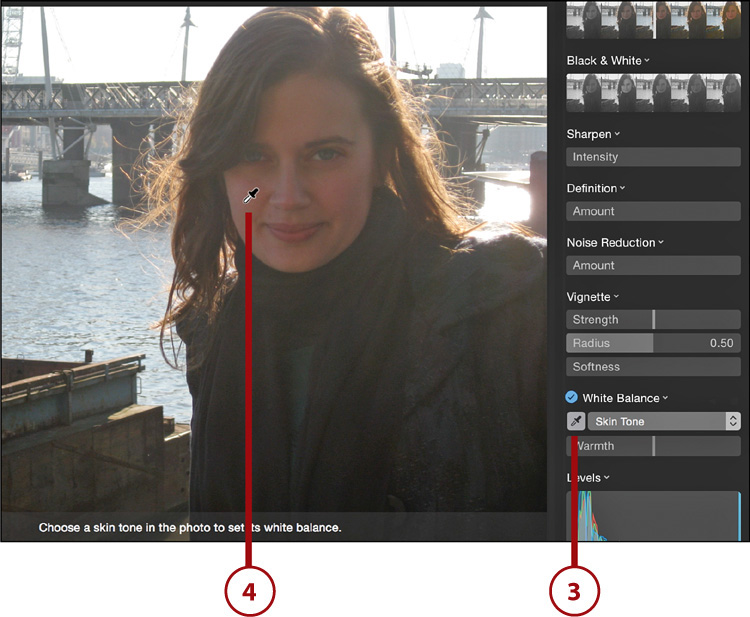
3. Click the eye-dropper tool.
4. Move the eye-dropper over a part of the image that you want to alter. Click that area of the image and its colors will be balanced.
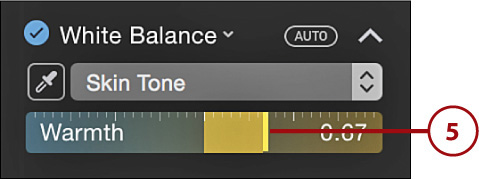
5. (Optional) With Natural Gray or Skin Tone selected from the drop-down menu, if you want to adjust the color cast of a photograph manually, you can use the Warmth slider. Drag the slider to the right to increase its warmth or drag it to the left to make the images cooler.
6. (Optional) With Temperture/Tint selected from the drop-down menu, if you want to adjust the temperature or tint of a photograph manually, you can use the temperture or tint sliders. Drag the temperature slider to the right to increase its temperature or drag it left to decrease it. Drag the tint slider to the right to increase the reds in the image or drag it to the left to increase the greens in the image.
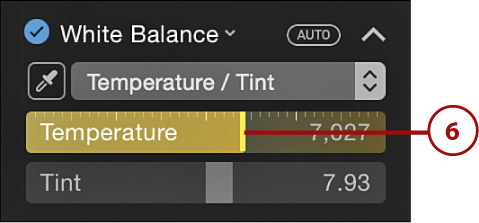
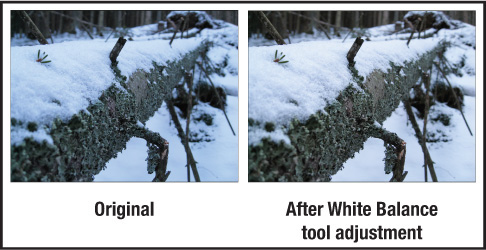
In the figure, the snow had a blue hue. I used the eyedropper tool to select a white point on the snow in the photograph. This told Photos to color balance the photo to neutral based on that white point. The result is whiter, more natural snow.
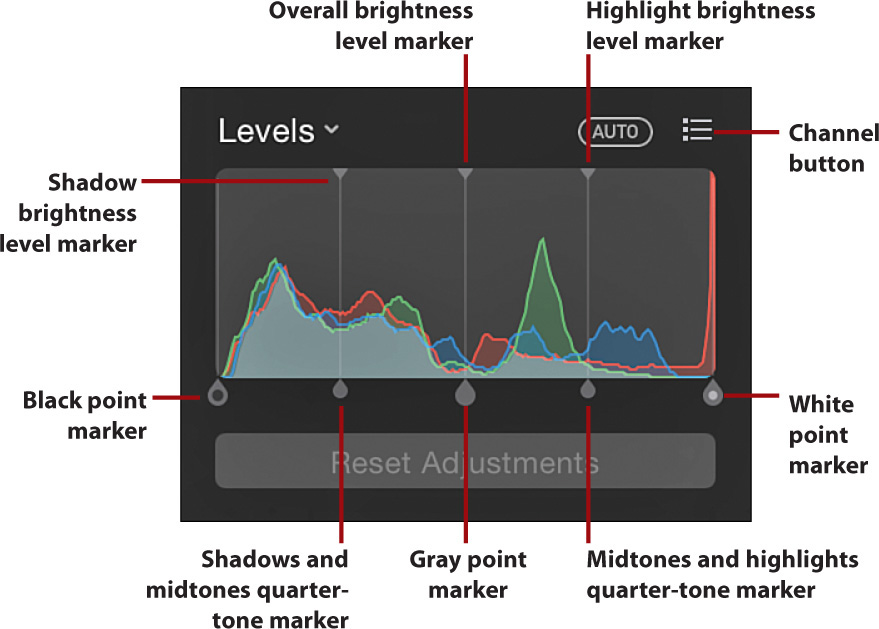
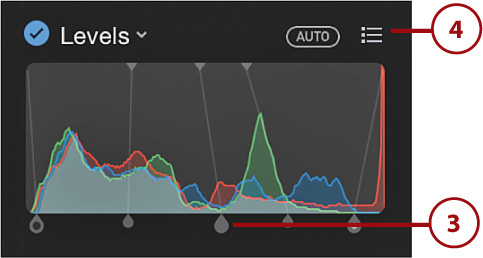
Adjust Levels
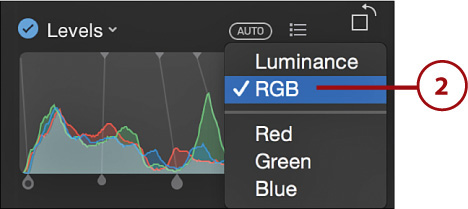
1. Click the channel selection button.

2. Select the channel you want to adjust.
3. Drag the tonal markers to adjust the image as you see fit.
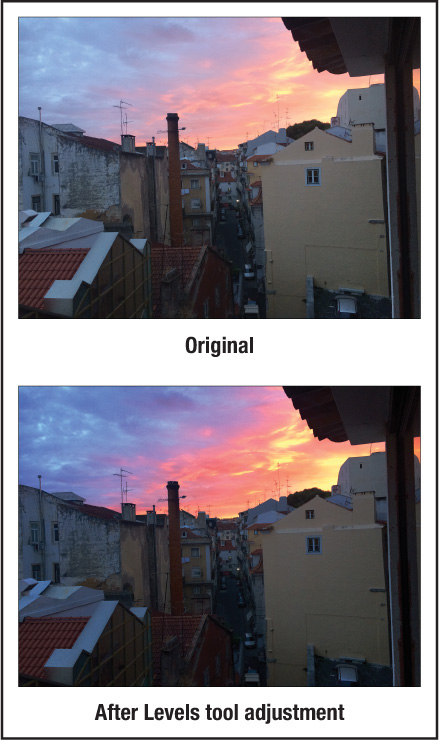
4. (Optional) Return to the channel selection button and select another channel to adjust. The figure shows a photograph I adjusted with the Levels tool.
Practice Makes Perfect
Remember, using the Levels tool takes a lot of practice. The more you play with the sliders, the better you’ll get at manually adjusting the tones in your photographs. Also remember that you don’t need to use the levels tool at all if you don’t want to do so. You can adjust all the tones in your photograph by simply clicking the Enhance button mentioned in Chapter 8, “Editing Basics,” or using the other tools talked about in this chapter. Manually adjusting the Levels sliders gives you greater control, but most Photos users will probably find the Enhance button is more than enough for them.
Managing Adjustments
There are a number of cool tricks to use with the Adjustment tools. Many of these tricks are very simple, but they go a long way toward helping you edit your photos more quickly and easily.
Adjust a Slider Numerically
Any regular slider allows you to adjust its drag bar without dragging it at all. Instead, you can enter a numerical value that the slider automatically adjusts to.
1. Hover your mouse over a regular slider so its numerical value appears.
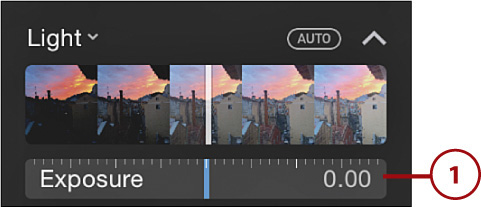
2. Move your mouse over the numerical value until the mouse cursor becomes a text entry cursor.
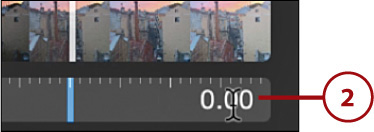
3. Double-click the number to put your cursor in the text field.
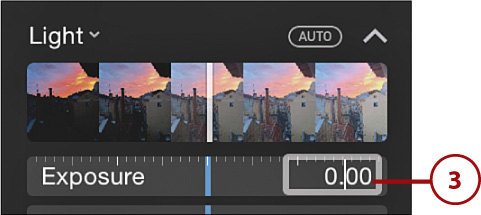
4. Type in the value you would like to adjust the slider to and press the Enter key.

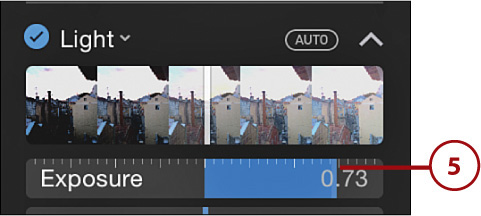
5. The slider immediately adjusts to that specific value.
Automatically Apply an Adjustment
Throughout this chapter you’ve leanred how to manually use the Adjustment tools, but each adjustment tool enables you to choose the best adjustments for your image automatically.
1. Hover your mouse over the tool you want to use. The Auto button displays.
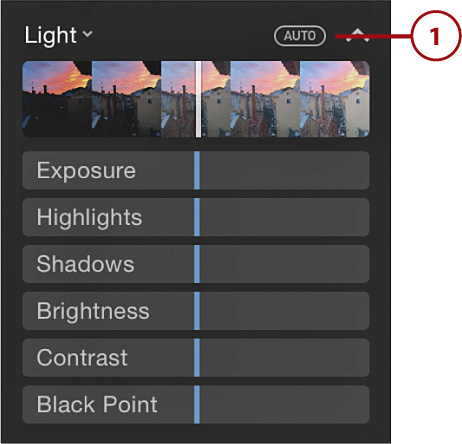
2. Click the Auto button and Photos instantly analyzes your image to determine the best adjustments for the tool to apply.
Toggle Adjustments On or Off
After you make an adjustment with a specific tool, Photos enables you to toggle that adjustment on or off. This is helpful to see what your image looks like with and without the adjustments.
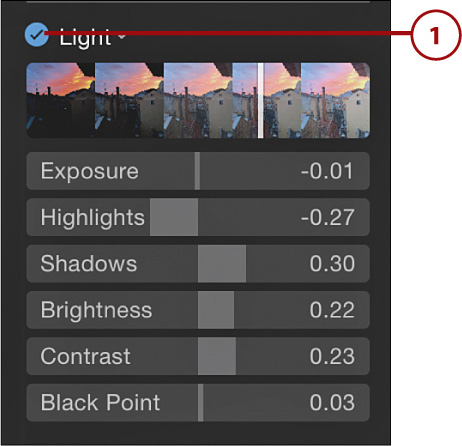
1. After you’ve made an adjustment, a blue check mark displays next to the name of the tool to signify an adjustment has been made. Click the blue check mark to toggle the adjustment off. In the photo, any adjustments disappear.
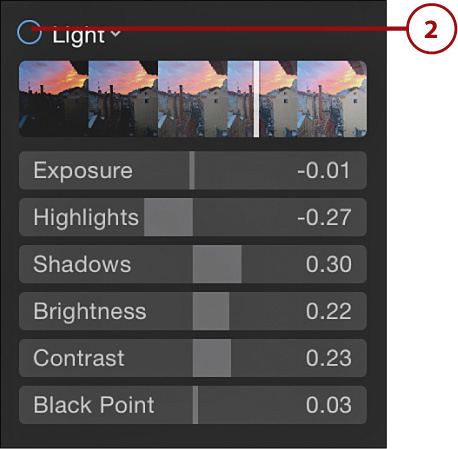
2. Reapply the previous adjustment by clicking the button, which is now outlined with a blue circle. The previous adjustments using the tool are immediately reapplied to the photograph.
Reset a Single Adjustment
If you’ve made adjustments using a particualr tool and no longer want to keep them, you can discard the adjustments by resetting the tool.
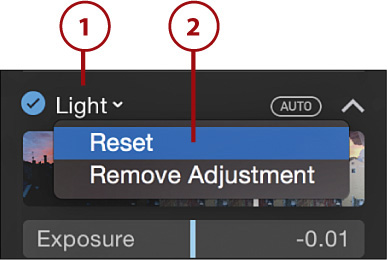
1. Click the name of the adjustment. A pop-up menu appears.
2. Click Reset to permanently undo any adjustments using the tool and reset the tool’s parameters to default.
Reset All Adjustments
You can easily discard all adjustments, even if you’ve made them using different adjustment tools.
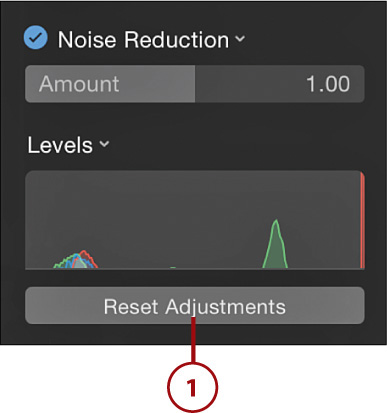
1. Click the Reset Adjustments button at the bottom of the Adjustments pane and every single adjustment you made to that photograph is removed.
Revert to Original
You can also click the Revert to Original button in the upper-right corner of the Edit window to not only remove any edits made with the adjustment tools but also to remove any edits you’ve made with the basic editing tools.
Cool Editing Tips
Photos has a number of cool little features that makes editing easier, such as copying and pasting adjustments between photos, duplicating photos, and keyboard shortcuts.
Copy and Paste Adjustments from One Photo to Another
Let’s say you’ve spent half an hour using the Adjust tools correcting a photo to make the colors and exposures just perfect, and you want to apply those same changes to other similar photos (such as multiple shots of the same beach taken at the same time). You can easily copy and paste adjustments from one photo to another.
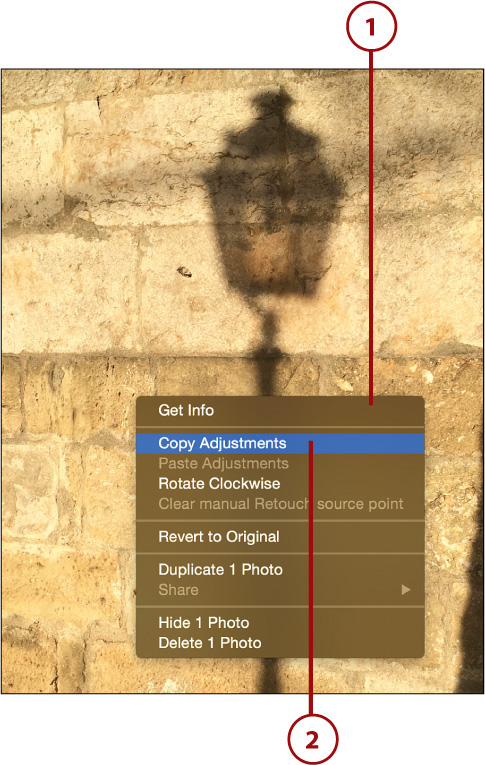
1. After you’ve adjusted a photo, right-click the photo to see its contextual menu.
2. Click Copy Adjustments.
Use the Split View Toolbar
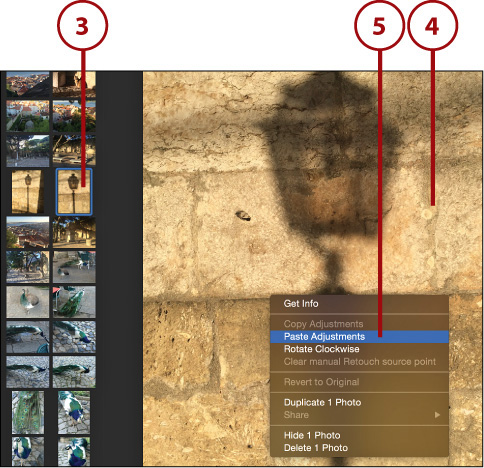
Usually the easiest way to select a similar photo is by using the Split View toolbar. The Split View Toolbar is easiest because usually similar photos are next to each other because that’s the way you took them, sequentially, with your camera.
3. Select another photo that is similar to the one you have adjusted and that you want to apply the same adjustments to.
4. Right-click the photo to bring up its contextual menu.
5. Click Paste Adjustments and all your adjustments are applied from the first photo to the second. You can then continue tweaking the adjustments on the second photo.
Duplicate Photos
Editing your photos is awesome, but sometimes you want to keep the original copy and have a separate, edited copy as well. You do this by using the Duplicate Photo command.
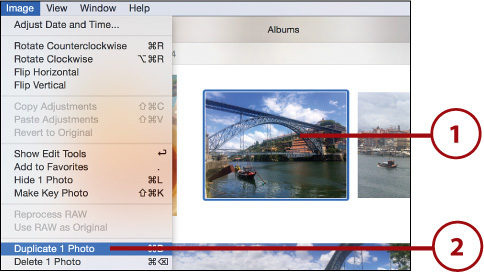
1. Select the photo you want to duplicate. Generally it’s a good idea to duplicate it before you’ve started any edits.
2. Select Image, Duplicate or press Command+D. Alternatively, you can right-click a photo and choose Duplicate Photo from the contextual menu.
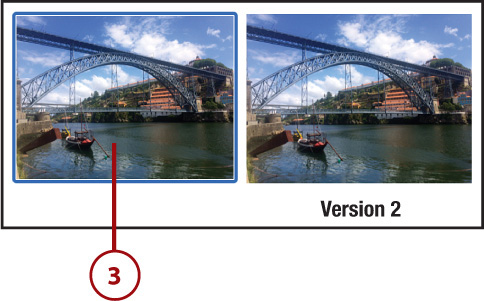
3. The duplicated photo appears next to the original photo in the album you duplicated it in. Version 2 is added to its title.
Reviewing Your Original Photograph
Sometimes when editing a photograph, you wonder just how far you’ve come. What does it look like now compared to how it first looked? You can click the Revert to Original button to see the differences, but then you lose all your edits. You can also duplicate the original photograph, but you have to do that before you start editing it. Even if you did duplicate it beforehand, you would have to navigate to the duplicate photo in your Photos Library to look at the differences.
Thankfully, Apple added an easy option for reviewing the original photo. With the press of a single button you can quickly see how the photo you are editing originally looked:
1. With the edited photograph on screen, press the M key at any time to see what the original photo looked like.
2. Release the M key to return to viewing the edited photo.
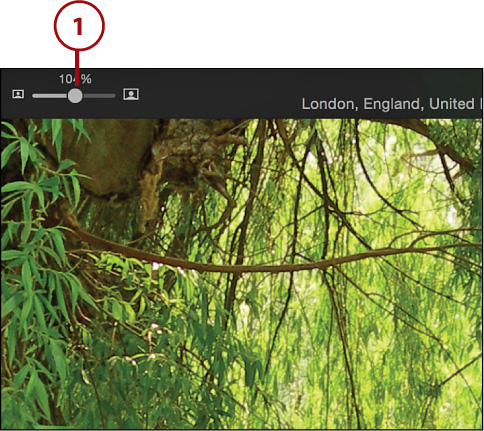
Zooming Tricks Using the Keyboard
Zooming can be helpful for seeing the fine detail in a photo you are editing. Photos has a zoom slider built into the Photos toolbar, but you can also use a keyboard shortcut. Press the Z key on your keyboard to quickly zoom into and out of a photograph while editing it. This keyboard shortcut performs differently depending on whether your cursor is on the photo or you have moved it to another part of your screen so it is not over your photograph:
• When the cursor is not over your photo, press the Z key on your keyboard to zoom into the center of the photo and view it at 100 percent. Press the Z key again to fit the entire picture back into Photos viewer.
• Move the cursor to the spot on your photo that you want to zoom in on and press the Z key on your keyboard to zoom into the exact spot your cursor is on in the photo and view it at 100 percent. Press the Z key again to fit the entire picture back into Photos viewer.