10. Viewing and Editing Your Videos
This chapter shows you how to view and edit the videos in your Photos Library.
![]() Viewing regular and slow motion videos
Viewing regular and slow motion videos
![]() Create a picture from a video frame
Create a picture from a video frame
![]() Export your videos
Export your videos
Given that virtually every digital camera—from dedicated, professional-level DSLR’s to the cameras found in every iPhone—can record video as well as take pictures, it’s little wonder Apple decided to design the Photos app to handle digital video as well as digital photos.
For all intents and purposes, Photos treats your digital pictures and digital video the same. With the exception of the chapters on editing, virtually every other thing you’ve learned about importing, organizing, and sharing your pictures in this book also applies to all the videos in your Photos Library.
Still, there are some differences in how you view and edit videos in Photos, and this chapter takes a look at everything Photos helps do with your videos.
Locating and Organizing Your Videos
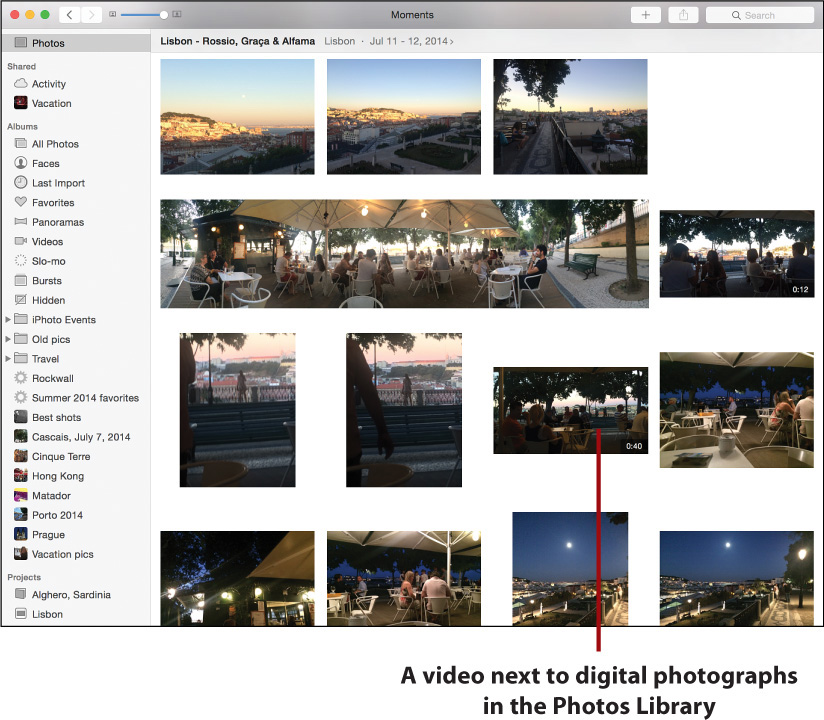
When it comes to importing, organizing, and locating your videos in Photos, the app treats them no differently than it does digital still pictures. Videos are imported along with your digital pictures when you plug your camera into your Mac or via your iCloud Photo Library. Once imported, your videos are side by side with the digital pictures in your Years, Collections, and Moments groupings. You can sort videos into the same regular and Smart albums as your digital pictures, and you can even share them via most of the same methods Photos allows for your digital images.
Photos does provide two dedicated preconfigured albums that are only for videos:
• Videos: This is a special preconfigured album where your videos are automatically sorted.
• Slo-mo: The iPhone 5s and higher can record 120 frames-per-second slow-motion video. Any slow-motion videos in your Photos library show up in this special preconfigured album. Slo-mo videos also appear in the regular Videos preconfigured album as well.

Playing Your Videos
Photos makes viewing any video easy. Go to the Videos or Slo-mo preconfigured albums to quickly search through all the videos in your Library, or simply navigate through any other album or any Years, Collections, or Moments grouping to find your videos.
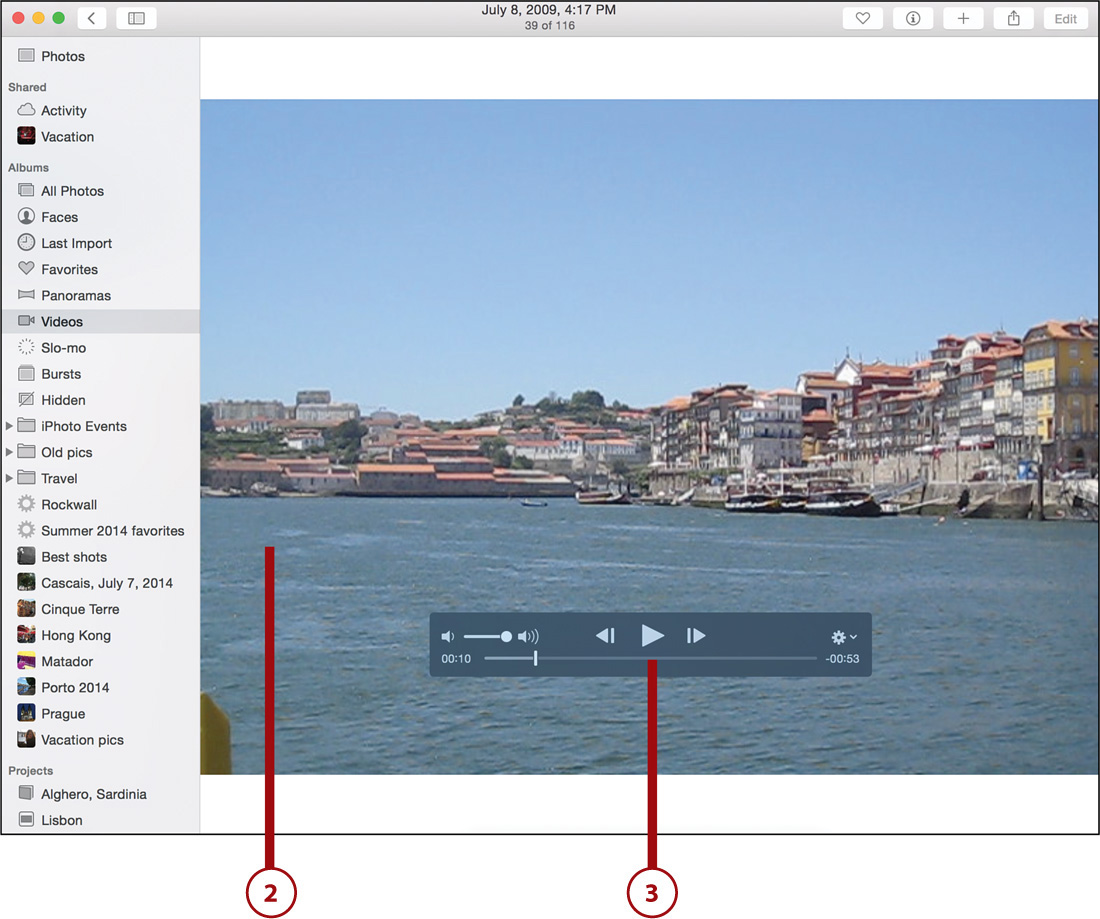
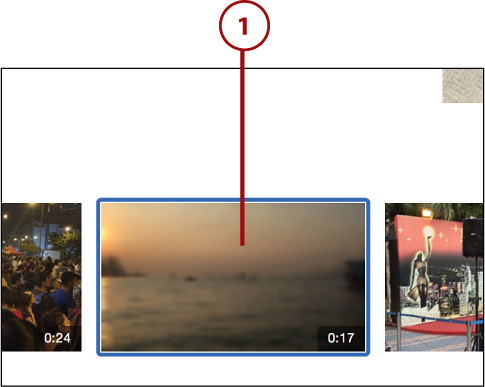
View a Video
1. Double-click the video in the album, Year, Collection, or Moment.

2. The video opens in the viewer window.
3. Move the mouse over the video to see the video playback bar. Click the Play button.
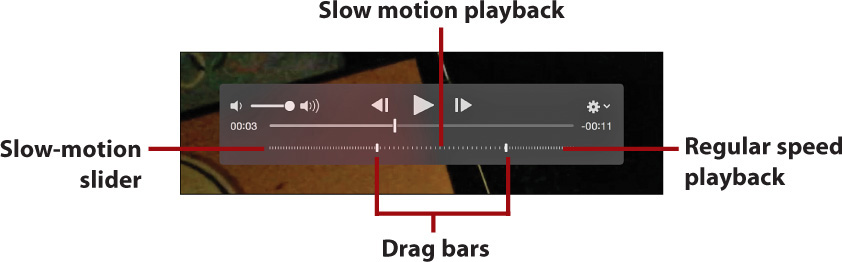
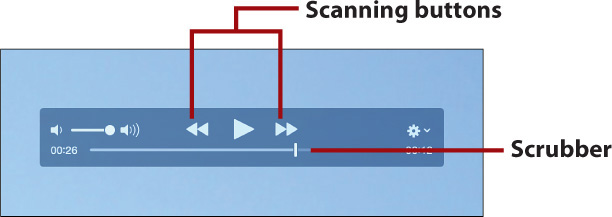
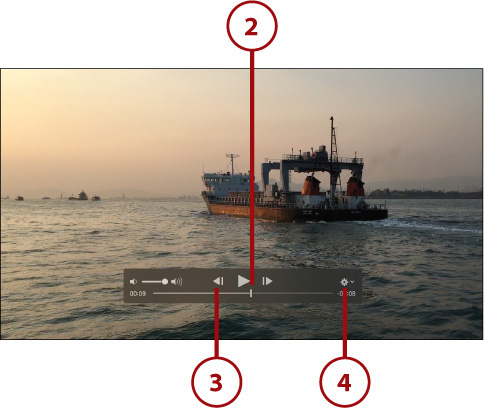
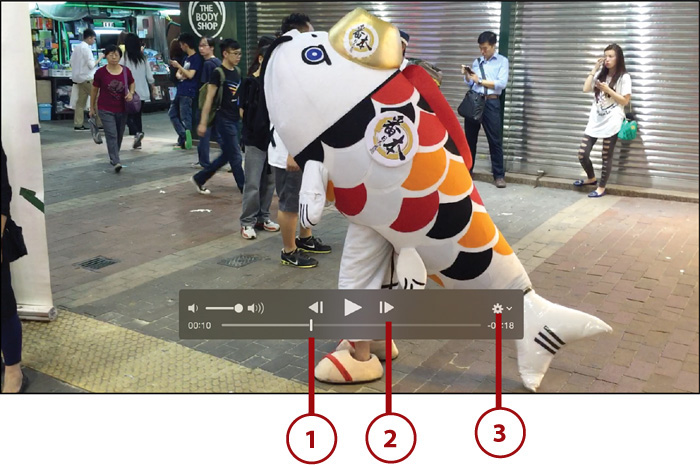
Anatomy of the Video Playback Bar
The video playback toolbar contains virtually all the controls that you use to interact with your video.
• Volume control: Adjust the video’s playback volume. Drag the slider to adjust the volume incrimentally. Click the left speaker icon to mute the video or the right speaker icon to increase its volume to maximum.
• Frame stepping buttons: Click a button to reverse or advance the video one frame at a time.
• Play/Pause button: Click this button to play your video. Click it again to pause it.
• Settings button: Click this button to access some more advanced video features (see the last bullet for more information).
• Scrubber: Drag the vertical bar to scrub through your video to a new point in it. On either end of the scrubber bar you see how much time has elapsed in the video based on the bar’s location and how much time is left.
• Scanning buttons: Click the Settings button and select Show Scanning Buttons from the pop-up menu to make the scanning buttons display. These are your traditional rewind and fast-forward buttons. Click either button to rewind or fast forward at 2x speed, click it again to jump to 5x speed, then 10x, 30x, and 60x speed. After you reach 60x speed, click the button again to rewind or fast forward at 2x speed.

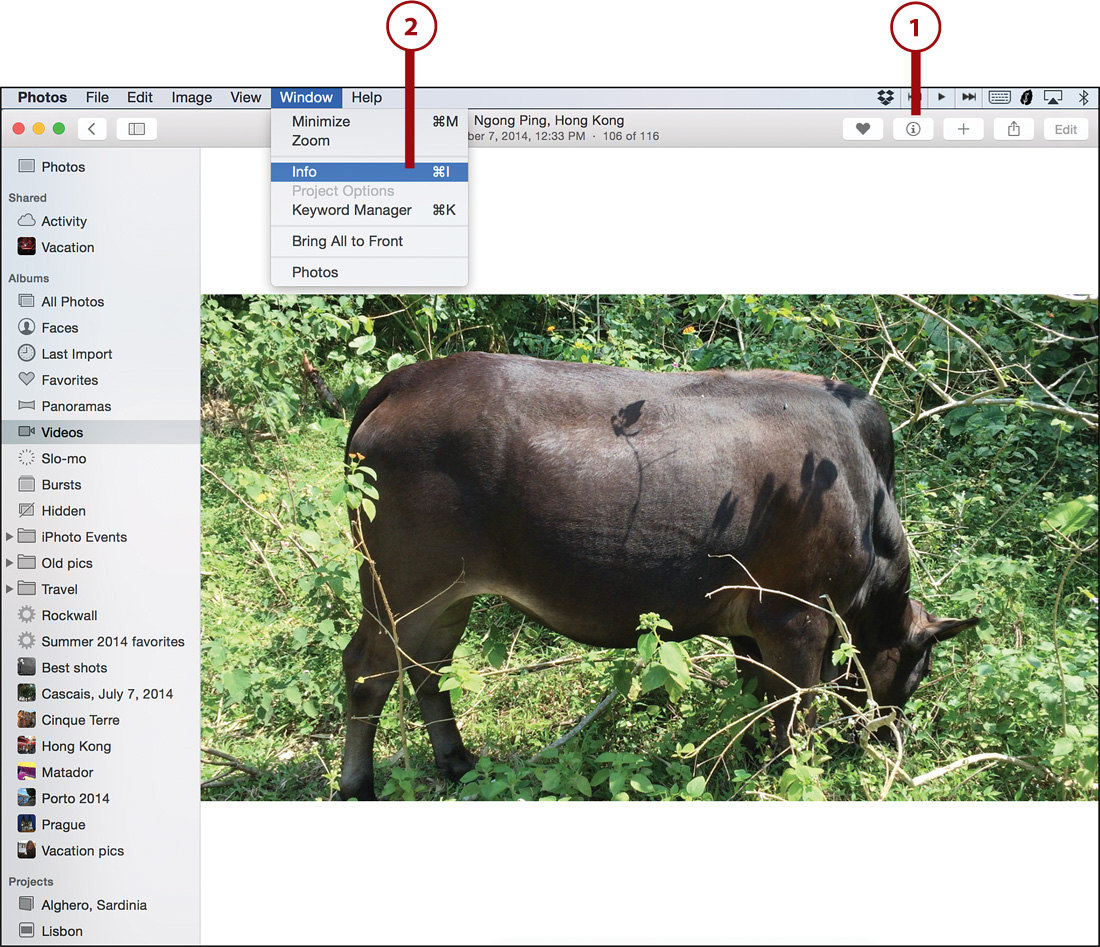
Understanding Video Metadata
Just as with photographs, videos in the Photos app have their own Info window as well, which shows all the known metadata about the selected video, including its filename, title, data and time recorded, description, keywords, and location.
1. Click the dedicated Info window button to display the Info window.
2. Alternatively, select Window, Info to open the Info window or use the keyboard shortcut Command+I.
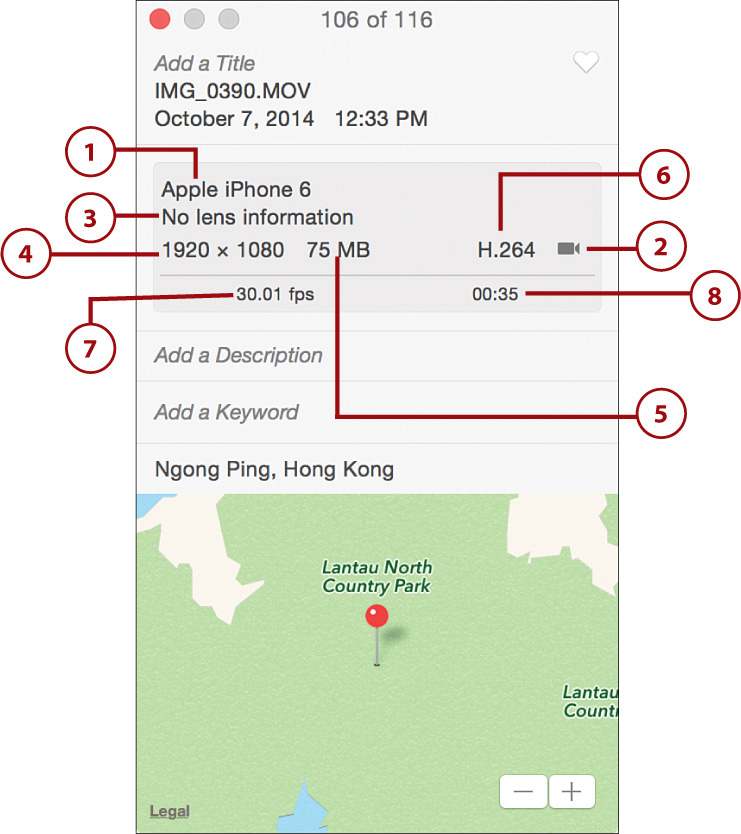
>>>Go Further: Detail in the Video Info Window
1. Camera name: The name of the camera you took the selected video with. In this case, it was an Apple iPhone 6.
2. Video type: Indicates whether the file is a regular video or a slow-motion video. In this case, it’s a regular video. A dotted circle icon indicates a slow-motion video.
3. Lens information: Information about the camera lens, if avilable.
4. Resolution: The resolution of the video. The selected photo is 1920 × 1080—in other words 1080p video.
5. File size: The size of the video. It’s 75MB in this case.
6. File type: The file type of the photo. It’s H.264 in this case. Other common formats are MOV, Motion JPEG, and AVI.
7. Frames per second: The frames per second, or FPS, at which the video was shot. In this case it was 30.01 frames per second. Genrally frame rates above 120 signify slow-motion video.
8. Video length: The total time of the video clip. In this case the video is 0 minutes and 35 seconds long.
Working with Videos
Although Photos is in no way meant to be a video-editing program, it does enable you to work with your videos in limited ways, including making basic edits to a video and turning individual frames in your video into still images.
Set a Video’s Poster Frame
Every type of file in Photos, whether it is a picture or video, is represented by a thumbnail image in Photos’ library. The opening frame of the video is the default thumbnail for videos, but you can set a specific thumbnail image—or Poster Frame—to something that better represents the content of the entire video.
1. Select the video for which you want to change the thumbnail.
2. Drag the verticle bar on the scrubber until you come to a place in the video that would make a good Poster Frame.
3. (Optional) Click the Frame stepping buttons to advance to the perfect frame if you need to fine-tune the selection.
4. Click the Settings button.
5. Select Set Poster Frame.
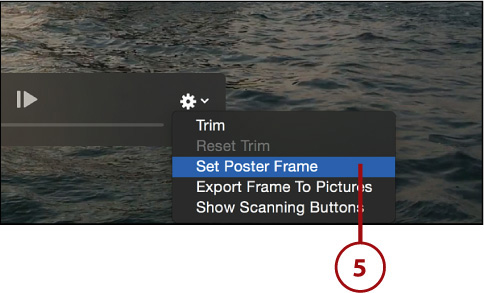
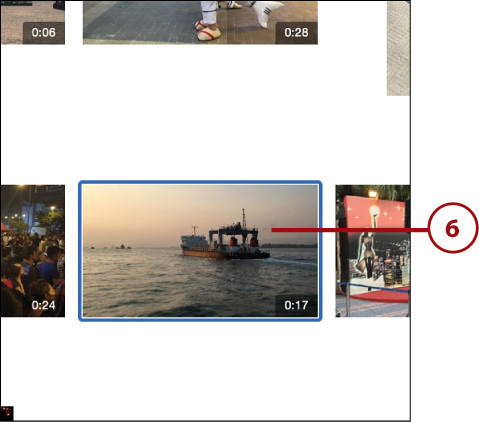
6. Navigate back to that video in your Photos Library to see it has its new Poster Frame set as the thumbnail.
Create a Still Image from a Video
Although most digital cameras and smartphones allow you to shoot in a variety of video resolutions, including HD-quality 720p and 1080p video, those resoutions still pale in comparison to the resolutions of the photographs from the same cameras. But sometimes you might have recorded an amazing shot on video that you want to have as a digital still image. You can use Photos to export any frame of a video as a digital still picture.
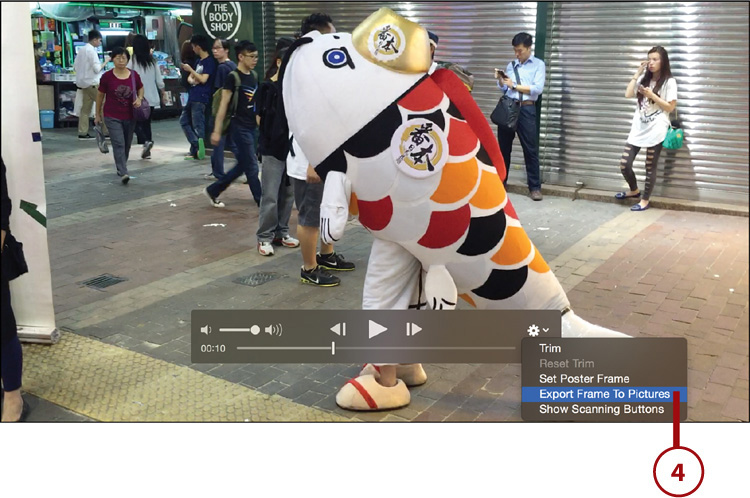
1. With the video open in Photos, drag the vertical bar on the scrubber until you come to the frame in the video that you want to export as a picture.
2. (Optional) Click the frame stepping buttons to fine-tune the frame selection.
3. Click the Settings button.
4. Click Export Frame to Pictures.
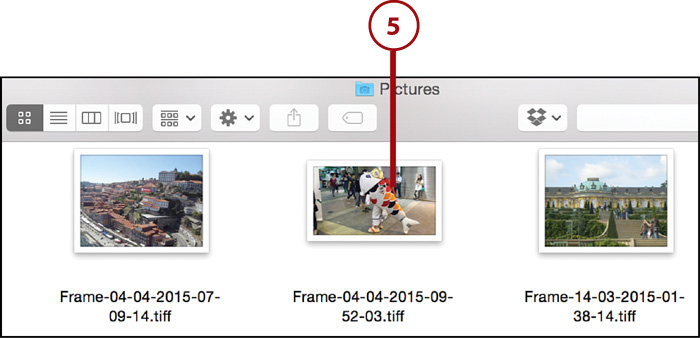
5. The still image is saved in the Pictures folder in the Finder on your Mac rather than being saved into your Photos Library. Navigate to the Pictures folder on your Mac (which you find in Mac HD/Users/[User name]/Pictures) and look for the filename beginning “Frame-[Export date].” In the example the image is named “Frame-04-04-2015-09-52-03.tiff.”
After you’ve exported a frame as an image, you can drag it into your Photos Library or use it as you would any other image on your Mac.
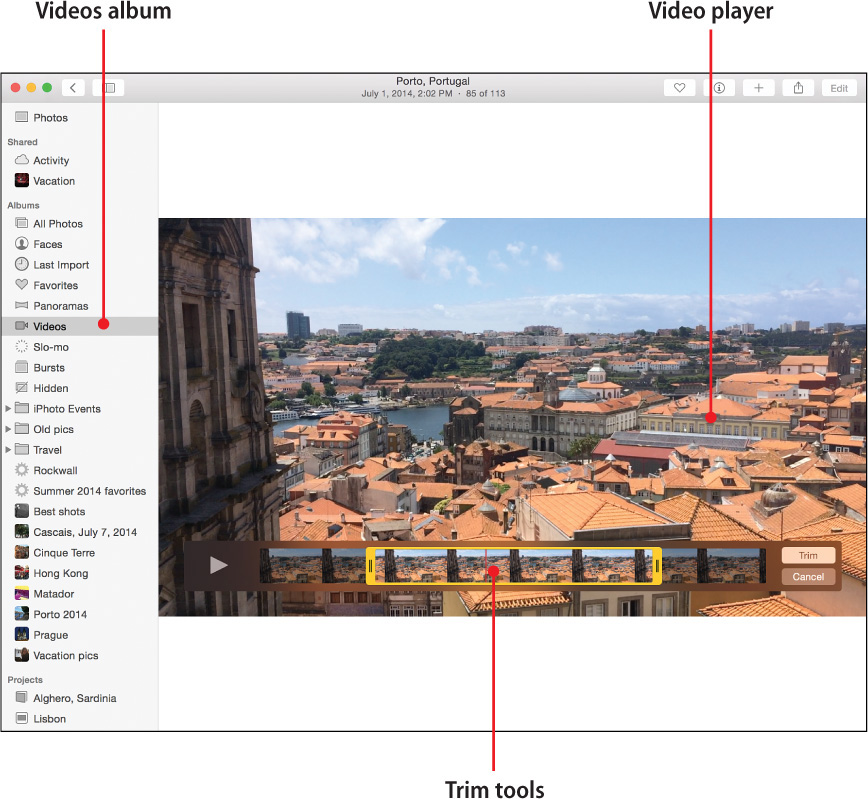
Editing Your Videos
I want to be very clear: Photos is not a good video-editing tool, but you can use it to trim the beginning or end of your video.
Better Choices for Video Editing
If you want a good video-editing tool, check out iMovie, which comes free on every Mac, or Final Cut Pro, which is what the people in Hollywood use to edit films.
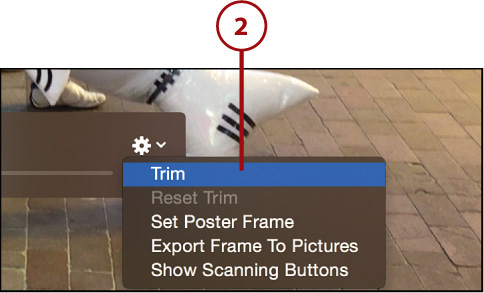
1. With the video open in Photos, click the Settings button.
2. Click Trim from the drop-down menu.
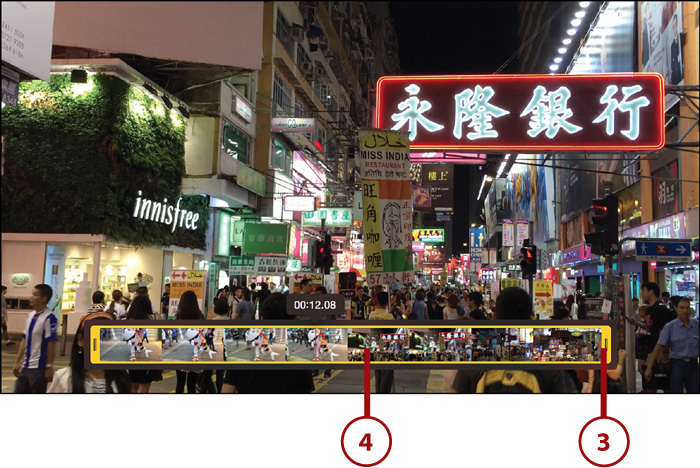
3. Yellow trim controls appear around the video thumbnail timeline.
4. Drag the red bar to scrub through your video to decide which bits you want to keep.
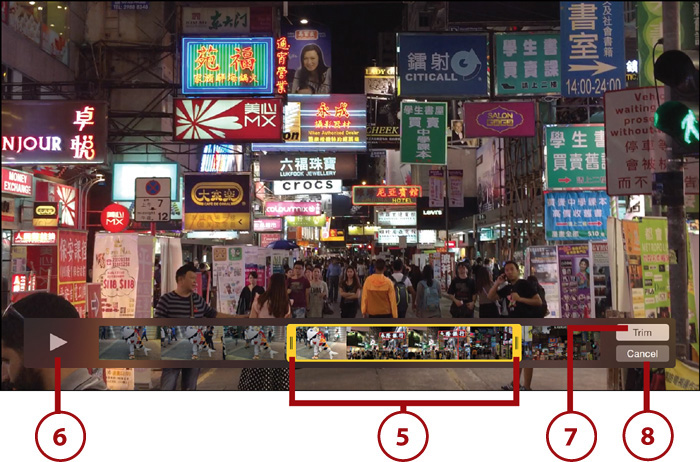
5. Drag the yellow trim grips from the beginning and end of the timeline and move them toward the middle. The video within the yellow trim borders will be kept. Any video outside of the yellow trim borders will be cut.
6. Click the Play button to playback only the video in the trim borders to see how it plays. You can adjust the trim borders if you decide you have cut too much.
7. Click the Trim button when you’re satisfied with your cuts.
8. Click the Cancel button.
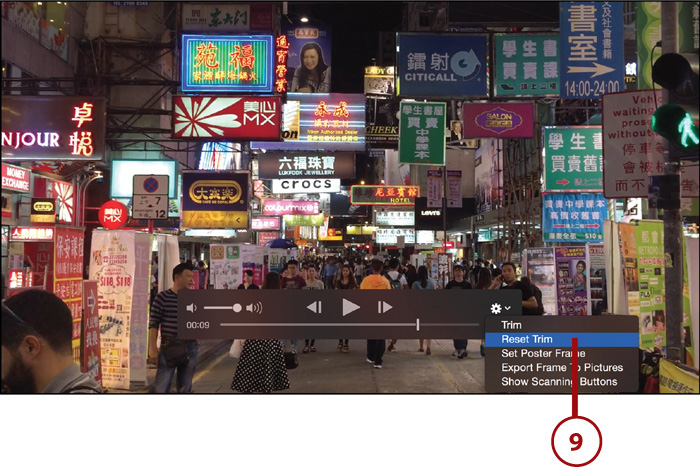
9. After you’ve trimmed a clip you can click the Settings button on that clip’s playback bar and then click Reset Trim to revert to the original, untrimmed video.
You Can Always Go Back
Don’t worry about accidentally trimming too much off your video. Just as Photos is a nondestructive image editor, it’s also a nondestructive video editor. That means no matter whether you trimmed a video months ago or minutes ago, you can return to it in Photos and select Reset Trim from the Settings button in the video’s playback bar. The video is restored to its original length. Alternatively, if you want to have both the original video and a trimmed version in your Photos Library, right-click the video before you trim it. From the contextual menu, select Duplicate Video to create an exact copy of the video that you can trim while keeping the original copy intact.
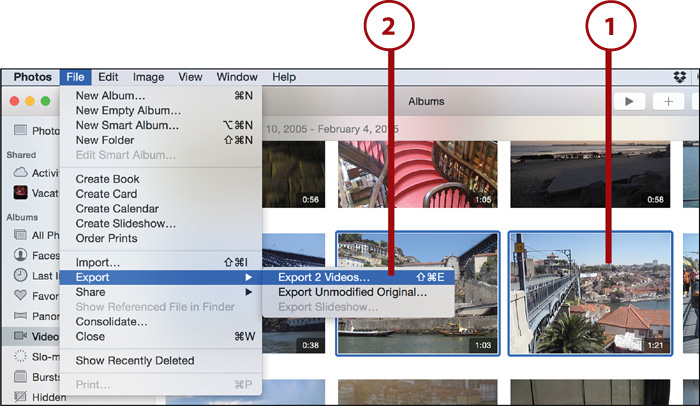
Exporting Your Videos
Photos is a great solution for organizing video for casual users who record quick video clips, and with the ability to trim video, Photos isn’t a half-bad solution for those that just want to make quick edits. But perhaps you’re the type of person who wants to do more with the video you’ve recorded and imported into Photos’ library. In that case you’re going to need to export your videos from Photos and import them into a more advanced video-editing app.
1. Select a video or videos you want to export in your Photos Library.
2. Select File, Export, Export Videos.
Picking a Quality Level
Though you may be tempted to use the highest resolution possible (4k) for exporting your videos, know that doing so won’t make any videos shot below that resolution look any better. Your best bet is to export the video at the resolution at which you shot it (which you can find out from the Info window with the video selected).
3. Select the level of quality at which you want to export your videos. This can be 480p, 720p, 1080p, or 4K.
4. Choose which metadata you want to include embedded in the file of the exported video. Your choices are Title, Keywords, and Descriptions and the GPS location information.
5. Choose what filename you want to use for the video from the drop-down menu. Your choices are to use the video’s title; the filename; the album name the video appears in along with a number; or a sequential name, which you then choose to add a prefix to if you like.
6. If you are exporting a lot of videos you may want to export them in a folder. In that case, choose Moment name in the Subfolder Format drop-down menu.
7. Click Export.

8. Select an export location in the Finder window.
9. Click Export.