12. Playing Music and Video
In this chapter, you find out how to get the most out of the media and entertainment capabilities of the Galaxy Tab 4. Topics in this chapter include the following:
![]() Purchasing music, movies, and TV shows
Purchasing music, movies, and TV shows
Your Galaxy Tab 4 is a digital media player packed with entertainment possibilities as well as a camcorder capable of recording 1080p HD video. You can play music, movies, TV shows, podcasts, audiobooks, and videos; read eBooks; view photos; and access YouTube. Your Tab 4 is preloaded with a variety of apps for purchasing and downloading media.
Downloading Movies and TV Shows
The Google Play Store makes it easy for you to browse, purchase, and download the latest music, movies, and popular TV shows to your Galaxy Tab 4. If you want to find movies and television shows within the Google Play Store more quickly than shopping in the Play Store itself, try using the preinstalled Play Movies & TV app.
The Play Movies & TV app enables you to shop for movies and television shows, pay for a movie or show if necessary, download the movie or show, and then watch the movie or show within the app. In this example, you find out how to download a free television featurette.

2. Tap Play Movies & TV.

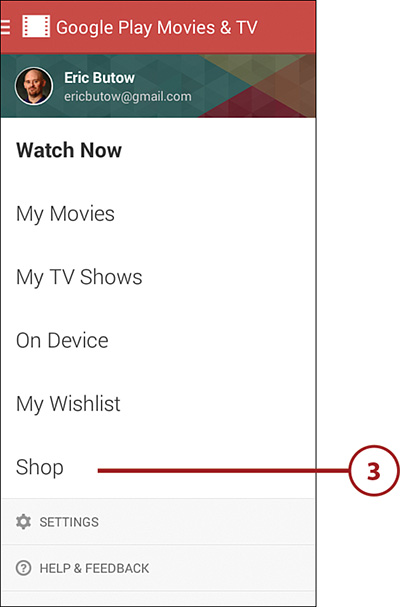
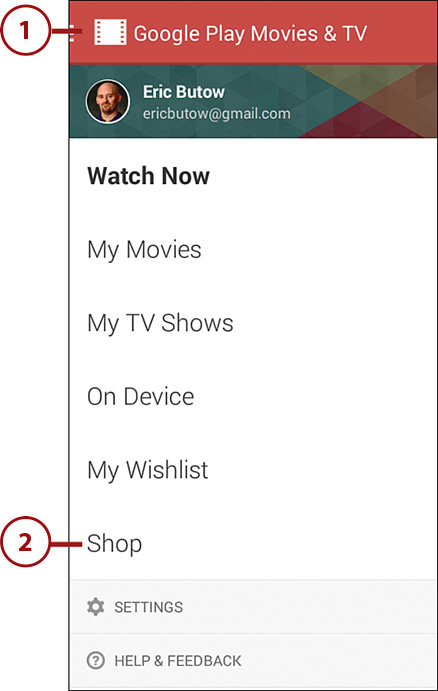
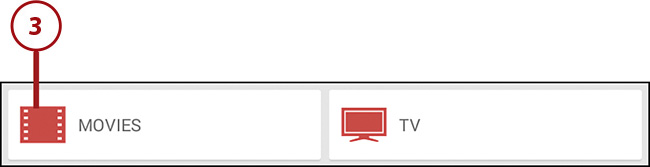
3. Tap Shop in the menu. The Movies page displays.
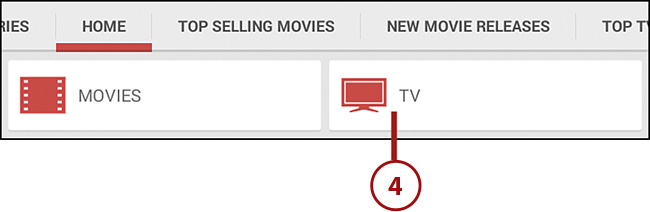
4. Tap TV to view TV shows. In this example, I download one of the free TV show featurettes.
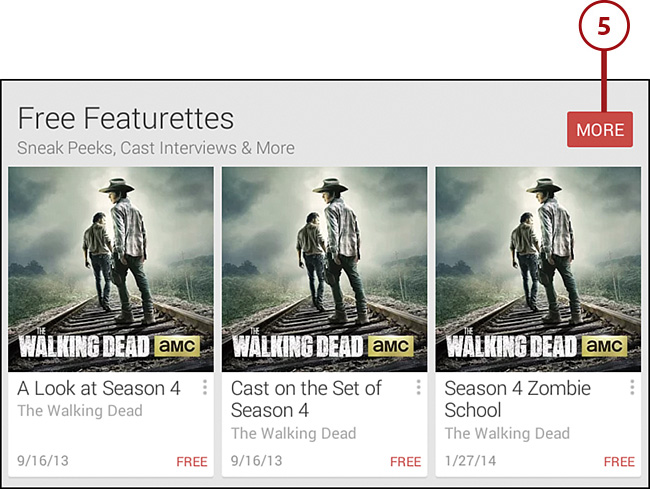
5. Swipe down the TV page until you see the Free Featurettes section. Tap More.
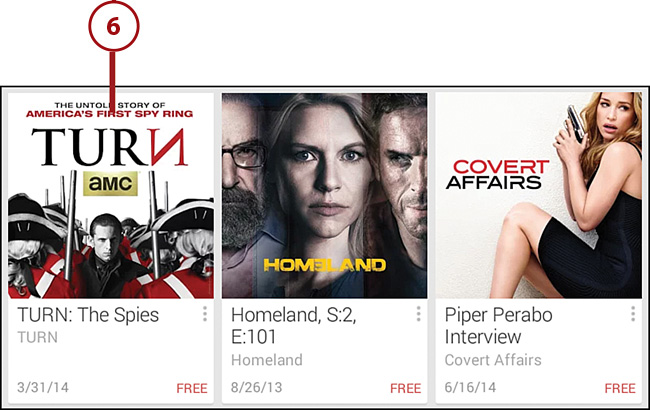
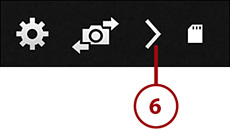
6. Swipe down the page until you see the tile that contains the featurette you want to download and then tap the tile.
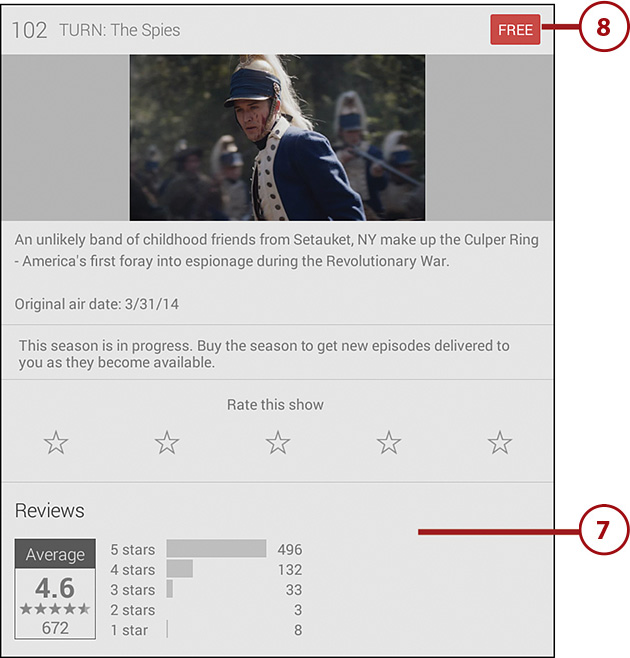
7. In the middle of the page, information about the selected featurette appears below the title including an image, summary, and reviews from other Play Store users who have watched the video. Swipe down the page to read more reviews.
8. Tap Free to the right of the featurette title.
9. The video begins to play in horizontal screen orientation.
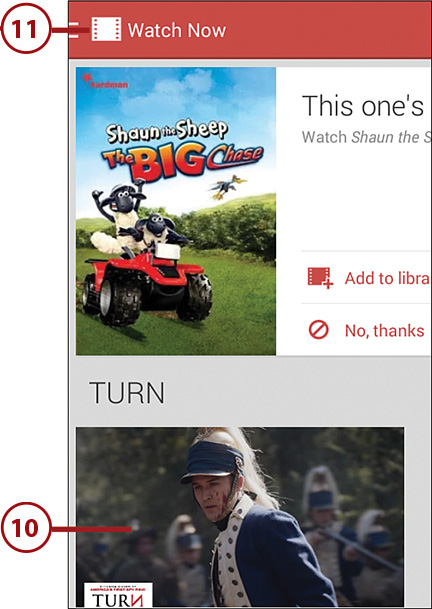
10. When you finish viewing the featurette, tap the Back touch button. View the featurette again by tapping the tile.
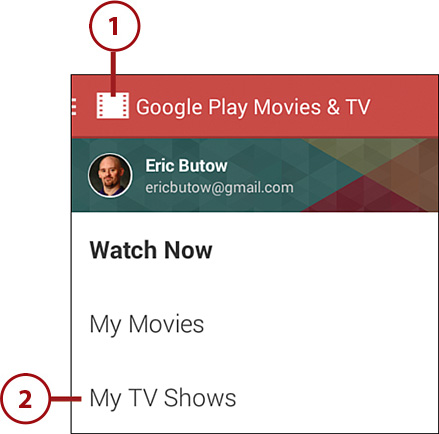
11. Return to the My TV Shows screen by tapping the Movies & TV icon in the menu bar.
Play the TV Show
The TV show you downloaded appears within the My TV Shows section so you can play it whenever you want.
1. On the Movies & TV app home screen, open the menu by tapping the Movies & TV icon in the menu bar. (Skip this step if the menu is open already.)
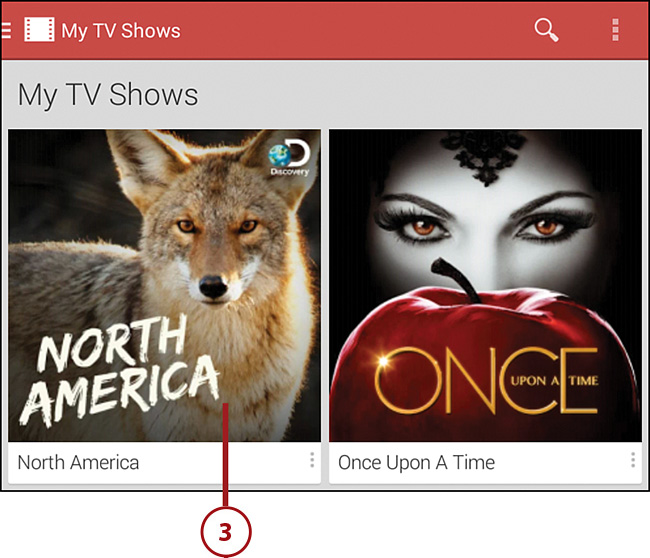
2. Tap My TV Shows. The shows you downloaded appear in each category; the most recent videos you downloaded appear at the top of the screen.
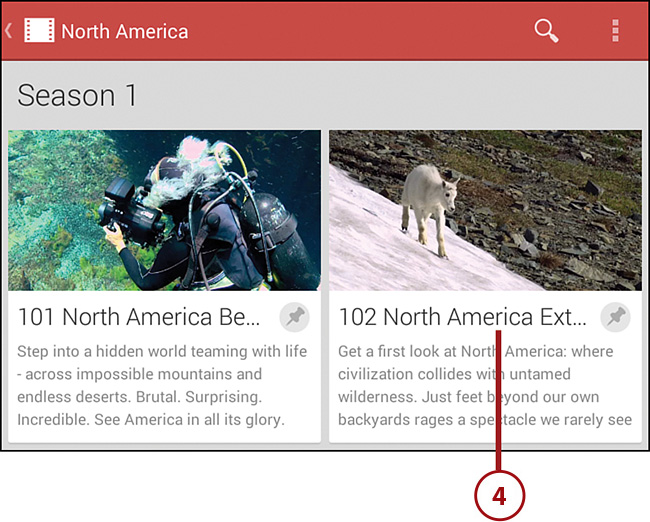
3. Tap a tile to view more information about each video within the section.
4. Tap a tile to begin playing the video in horizontal screen orientation.
Shop for a Movie
It’s easy to shop for movies that you can buy and keep on your Tab 4 so you can watch movies anytime you want.
1. On the Movies & TV app home screen, open the menu by tapping the Movies & TV icon in the menu bar. (Skip this step if the menu is open already.)
2. Tap Shop.
3. Tap Movies.
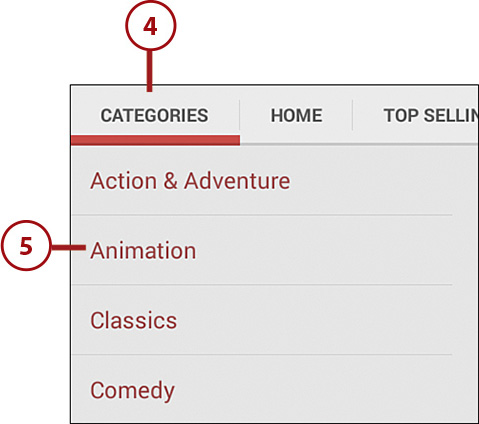
4. Tap Categories.
5. Tap the category you’re interested in.
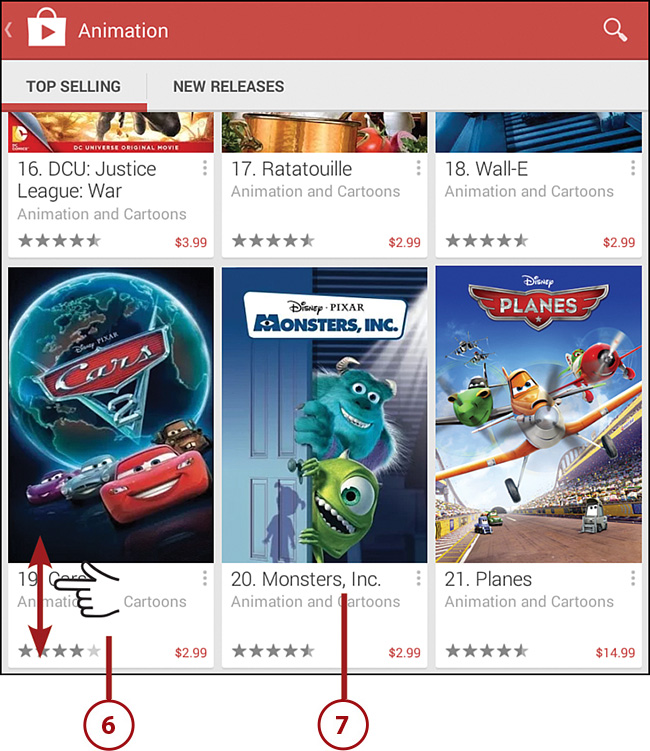
6. Swipe up and down in the page to view all the Top Selling movies in the category you selected. You can view new releases in the category by tapping New Releases.
7. Tap the tile with the movie you want more information about.
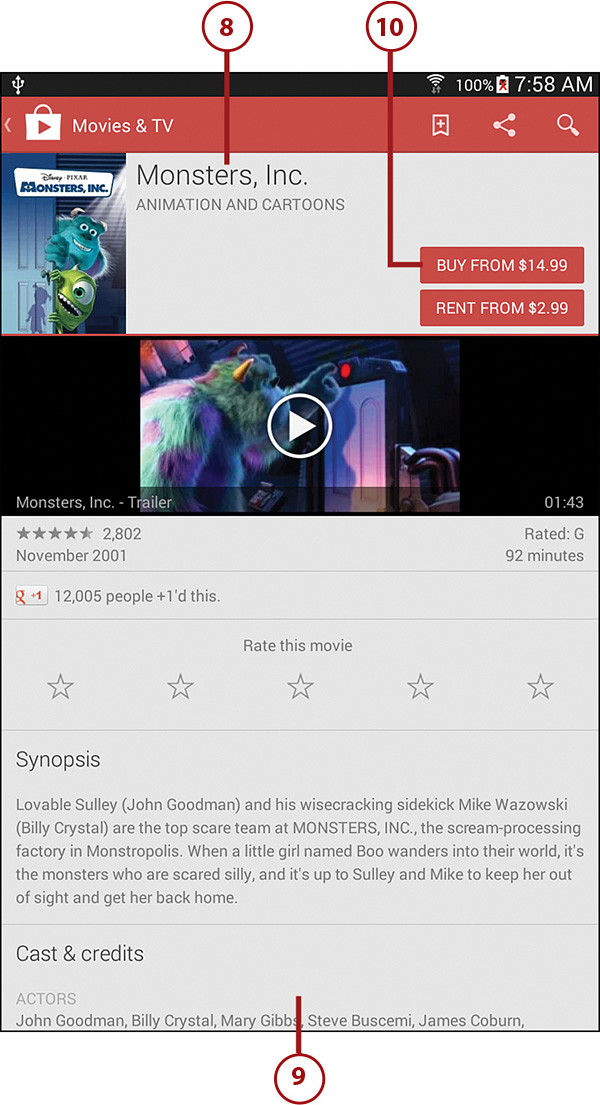
8. The name of the movie, the category, and buttons to either rent or buy the movie at the stated price appear at the top of the screen.
9. Swipe up and down the information area to view the video trailer, rate and review the movie, view user reviews, read the synopsis, cast, and credits, and get rental period information.
10. Tap the Buy From button to purchase the movie and download it to your Galaxy Tab 4 so that you can watch it whenever.
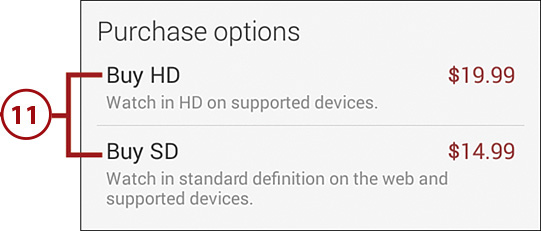
11. Tap one of the Buy options.
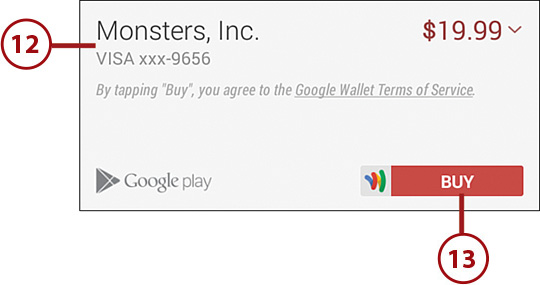
12. The Buy window shows you the credit card that you have on file with Google Play, which you need in order to buy a movie or TV show (even free ones) from the Play Store. If you don’t have a card on file, Google Play takes you through the steps to register your credit card.
13. Buy the movie by tapping Buy. Google Play charges the card you have on file and downloads the movie to your Tab 4 so you can view the movie.
Playing Videos
There are two ways to view movies, TV shows, and other videos on your Galaxy Tab 4. One is to watch in the Play Movies & TV app. The other is the Video app that makes it easy for you to browse and play your downloaded and recorded videos.
Play Movies and TV Shows in the Play Movies & TV App
1. Tap the Apps icon on the Home screen.

2. Tap Play Movies & TV.

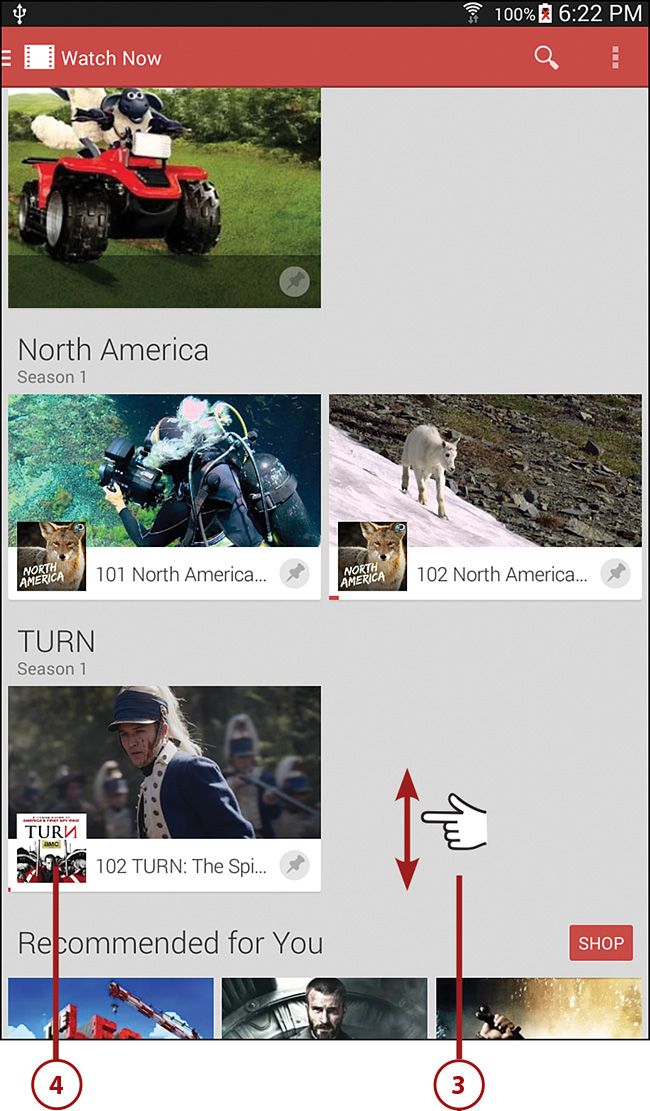
3. Swipe up and down in the Watch Now screen to view movies and TV shows you downloaded as well as get recommendations for movies and TV shows from Google Play.
4. Open and watch the video by tapping the movie or TV episode tile.
Play Videos in the Video Player App
1. Tap the Apps icon on the Home screen.

2. Tap Video.
3. By default the Video Player screen displays videos in Thumbnails view. That is, the video plays in a small area of the screen.
4. Change the screen view by tapping the List icon, which shows a list of video files on your Tab 4.
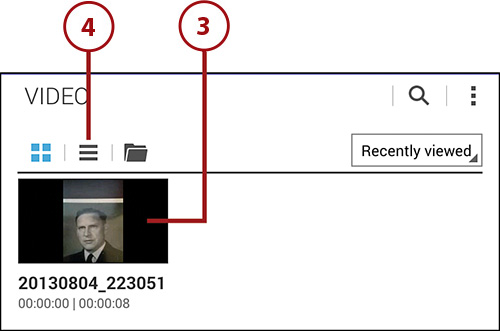
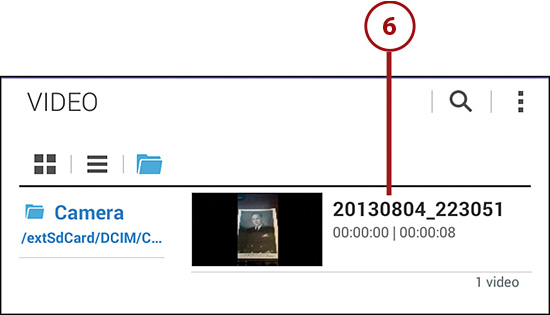
5. View your video files and the folder that contains those files by tapping the Folders icon.
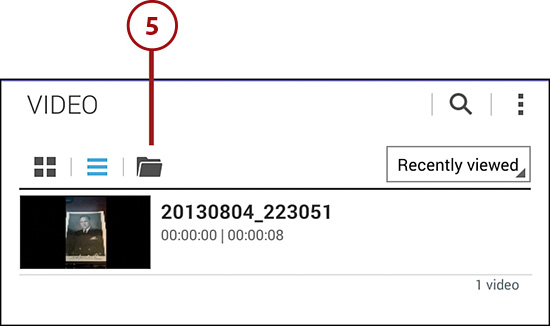
6. Tap a video in the list to begin playing it.
7. After the video has started, tap in the middle of the screen to bring up the playback controls.
8. Adjust the volume of the video by tapping your finger on the Volume icon and then sliding your finger on the Volume slider.
9. Tap the AllShare icon to select the device with which you want to share the video through the AllShare Play service.
10. Tap the Screen View icon to change the display mode to full screen or to return to the normal view.
11. Tap the List icon to view a list of other videos in a window at a bottom of the screen while the video you’re currently viewing continues to play at the top of the screen.
12. Tap the Viewfinder icon to change the size of the video between normal and full screen views.
13. Drag your finger across the Movie Timeline to advance through the video or jump to a new location. You can also tap the timeline in a new location to jump to that location.
14. The Play button, located in the Playback controls, turns into a Pause button as the video plays. Tap the Pause button to pause the video.
15. Tap the Rewind or Fast Forward buttons to move to the beginning or end of the video, respectively.
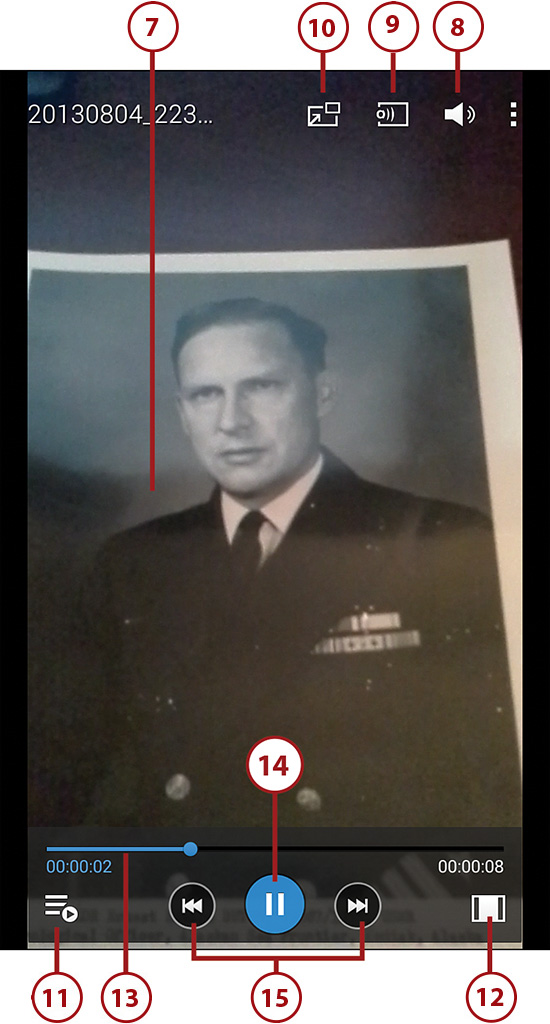
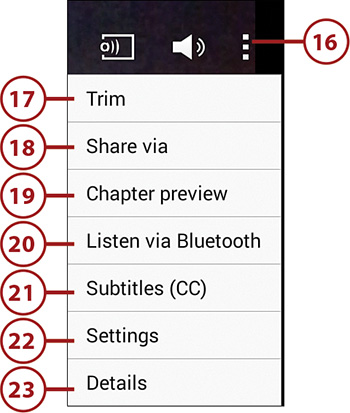
17. Tap to edit the beginning and end of a video by performing a trim.
18. Tap Share Via to share the video using ChatON, Dropbox, Google+, Google Drive, Bluetooth, Wi-Fi Direct, YouTube, Picasa, Photos, Gmail, or Email.
19. Tap to view each slide within the video.
20. Tap to share the video with other devices via Bluetooth.
21. Tap to set the app to view closed-captioned subtitles on the screen as you view the video.
22. Tap to configure video settings such as play speed, subtitles, and brightness levels.
23. Tap to view details of the video such as Name, Size, Resolution, Format, and Last Modified.
Viewing YouTube Videos
The high-resolution screen of the Galaxy Tab 4, along with its portability and built-in video camera, makes it great for viewing and sharing videos online. The preinstalled YouTube widget gives you the capability to browse and view videos posted by users from around the world. You can also upload videos as soon as you shoot them with your Tab 4.
1. Tap the Apps icon on the Home screen.

2. Move to the second page in the Apps screen by swiping from right to left on the screen.
3. Tap YouTube.

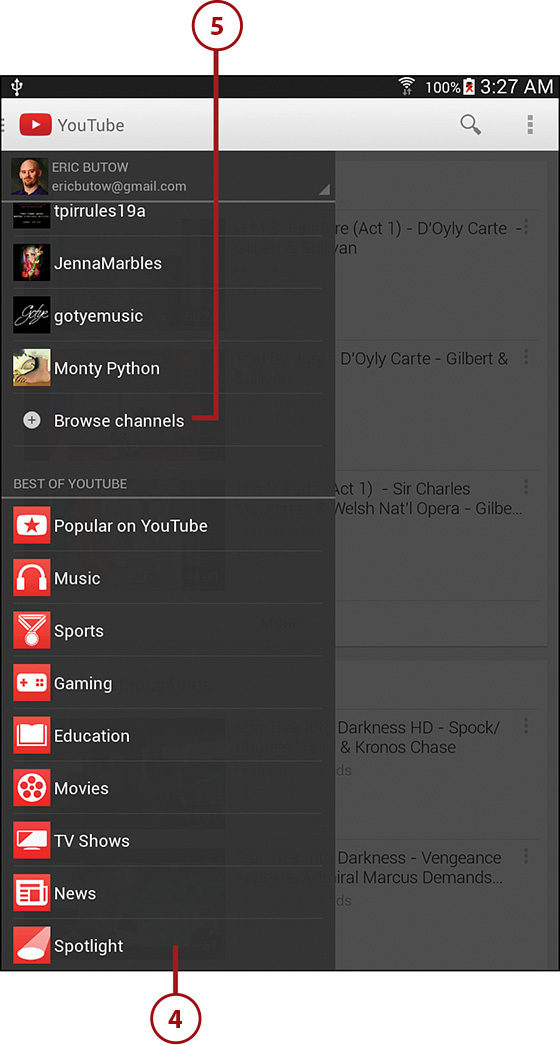
4. A list of your channels appears on the left side of the screen that overlaps a list of videos on the screen. In this example, the list of videos is within the selected What to Watch channel.
5. Swipe down the list and then tap Browse Channels to view channels YouTube recommends for you.
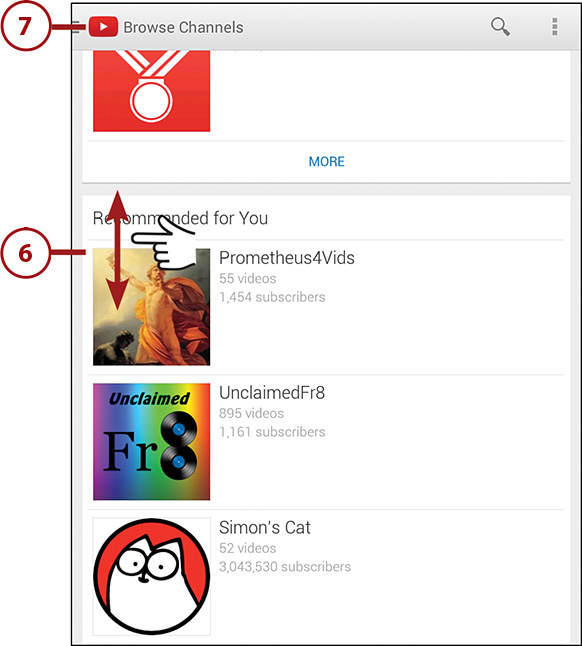
6. View channels by swiping up and down the screen. You can see videos and more information about the artist channel by tapping the channel tile.
7. Return to the YouTube home screen by tapping the YouTube icon in the menu bar.
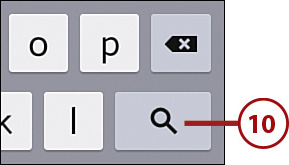
8. Tap the Search icon to search for a YouTube video.
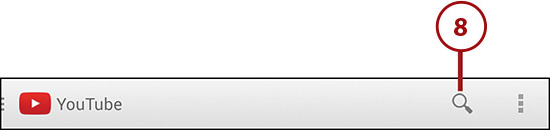
9. Type the search terms in the Search YouTube field.

10. When you’re finished typing, tap the Search button in the keyboard. The results appear on a separate Search page.
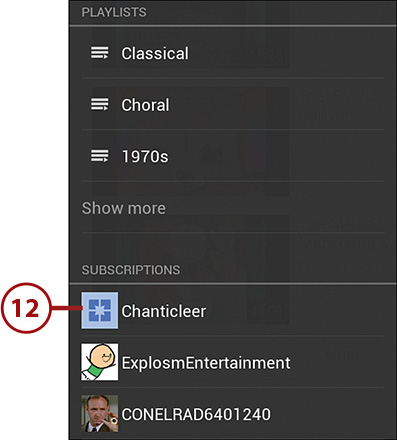
11. Hold your finger on the right side of the screen and swipe to the left to view all videos in your selected subscription channel.
12. View videos within a subscription channel by tapping the channel name in the Subscriptions list.
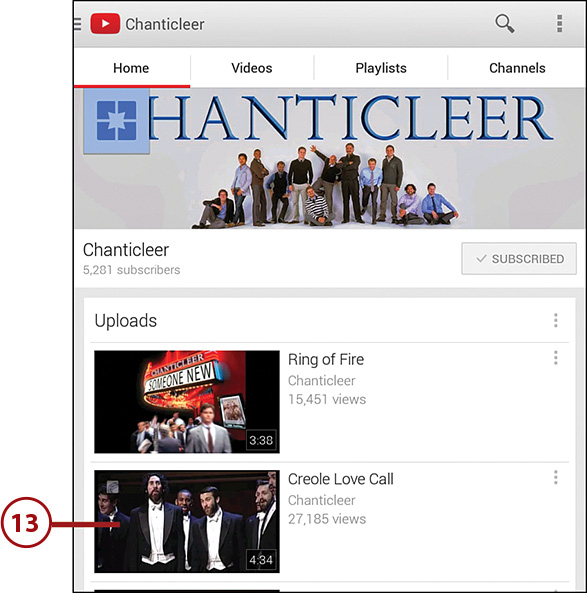
13. Tap a video tile to play the video on the screen.
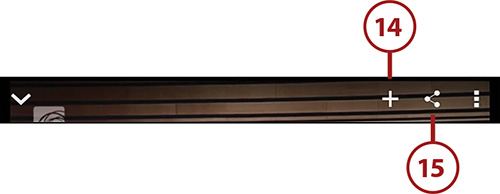
14. Tap the Bookmark icon to bookmark a video, add to Favorites, and create a new playlist.
15. Tap the Share icon to share a link to the current video via Wi-Fi Direct, ChatON, Google+, Google Hangouts, Google Drive, Bluetooth, Dropbox, Flipboard, to the clipboard, a memo, Gmail, or email.
16. Tap the Menu icon so you can turn closed captioning on and off, change the video quality, and flag the video for inappropriate content so Google can review it.
17. Tap to pause and play the current video.
18. Drag the button in the timeline slider to move through the current video.
19. The video description appears below the video.
20. Tap to visit the channel of the user who posted this video.
21. Swipe up and down in the page to read more about the artists, view similar videos and artists, read comments about this video from other users, and create a response of your own.
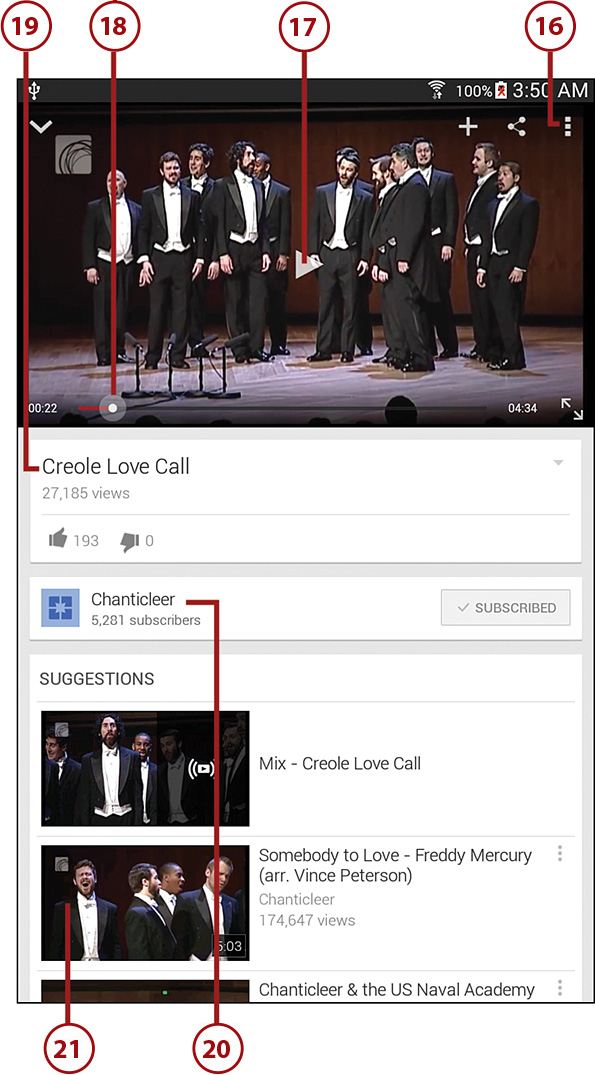
22. Return to the channel screen by tapping the Back touch button.
23. The video continues to play in the window in the lower-right corner of the screen. View the video screen by tapping and holding in the window and then flicking upward. Close the video screen by tapping and holding in the window and then flicking to the right.
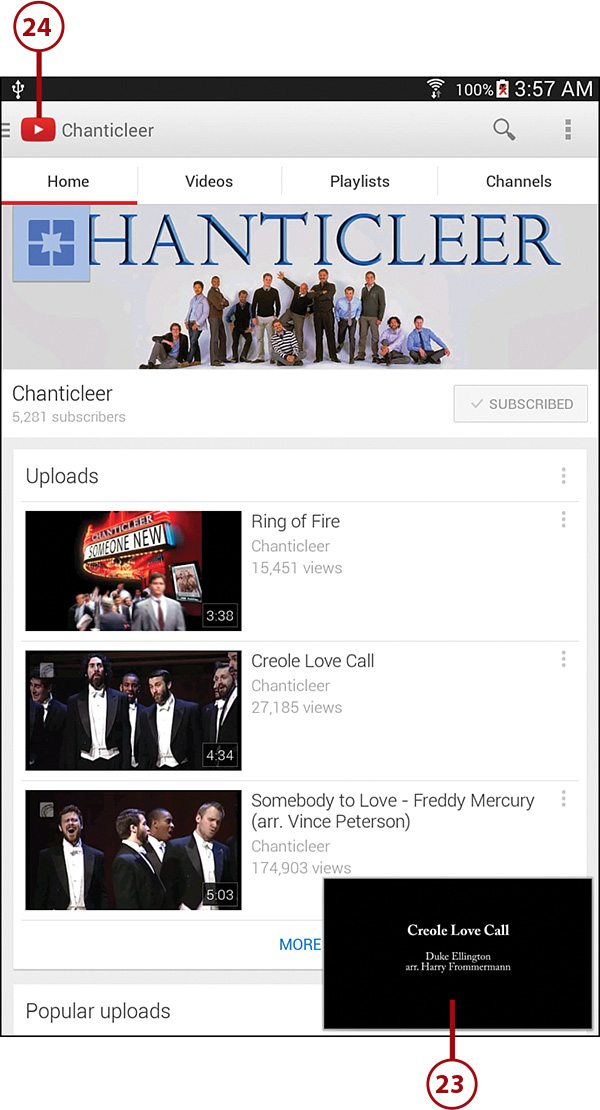
24. Return to the main YouTube screen by tapping the YouTube icon in the menu bar.
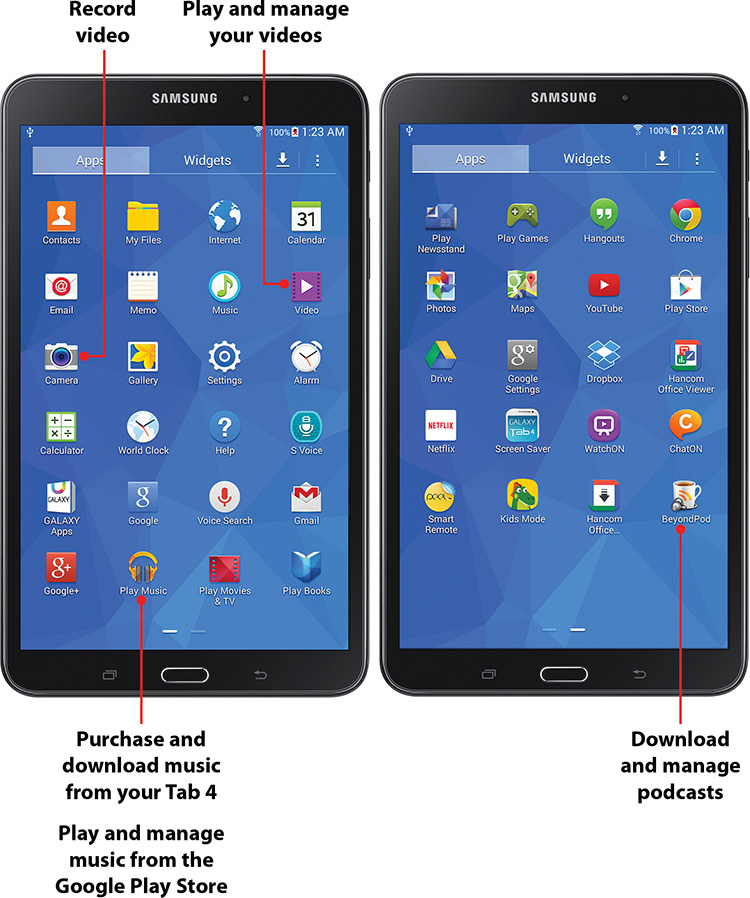
Recording Video
Your Galaxy Tab 4 is capable of recording 1080p HD video with its main 3-megapixel camera located on the rear of the device. The Galaxy Tab 4 is also equipped with some very helpful features commonly found on dedicated camcorders, including white balance, a video light, manual exposure, and effects.
1. On the Home screen, swipe from right to left and then tap Camera on the second page of the Home screen. The Camera app opens in horizontal screen orientation. If you see a window asking you to change the storage location to the SD card, tap the OK button.
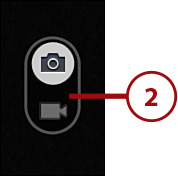
2. Switch to video mode by swiping the button from the photo icon to the video icon.
3. Start recording by tapping the Record button, which has a red circle in the center.
4. Pause recording by tapping the Pause button. After you tap the Pause button, the button changes and shows a red circle in the center. Resume recording by tapping the button with the red circle in the center.
5. Stop recording by tapping the Stop button.

6. Tap the right arrow icon in the Quick Settings list to customize Video settings.
7. Tap Edit Quick Settings to customize the first five shortcuts to camera settings in the Settings menu: Timer, Brightness, Recording Mode, Share, and Viewfinder Ratio. The Viewfinder Ratio feature changes the display proportion of the video on the screen between 16:9 (the default) and 4:3, but does not change the size or proportion of the video itself.

8. You can swap out these settings with others that appear when you tap and hold a shortcut icon for a second or two. After you release your finger, the list of settings appears in the window underneath the five setting shortcut icons. Just drag a new setting on top of an old one to replace it.
9. Tap the Back touch button after you’ve finished replacing your Quick Settings icons.
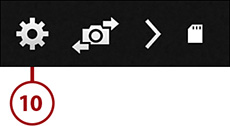
10. Tap the Settings icon.
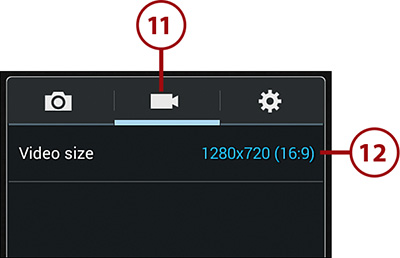
12. Tap Video Size to set a size for the images you capture.
13. Tap the Settings icon.
14. Tap to choose an automatic white balance for the camera. The white balance features help accurately reproduce colors when you are recording in various lighting situations so that neutral colors, such as white and gray, are truly neutral and all colors are rendered without undesired color casts. Scroll further down the menu to reveal more options.
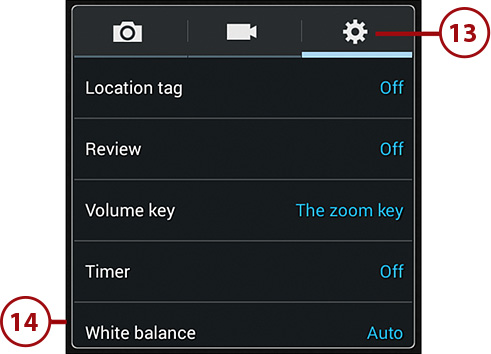
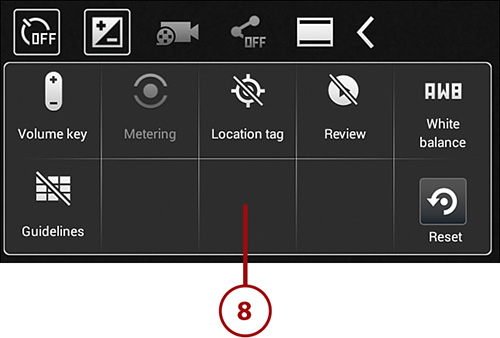
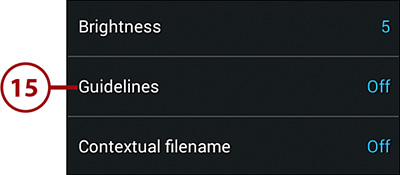
15. Tap to enable or disable an onscreen grid that can help you with composition of the video. Scroll down to the bottom of the list of options.
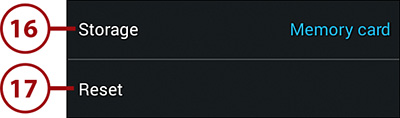
16. Tap Storage to determine whether the videos you capture are stored on an optional memory card or on your Tab.
17. Tap Reset to return the Video settings to the default settings.
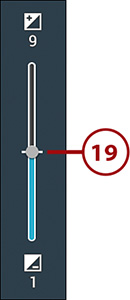
18. An image that is too light or too dark degrades the appearance of your videos. To take full advantage of the camera feature of the Galaxy Tab, you must adjust the brightness for various bright or dark lighting conditions. Swipe up in the list and then tap Brightness.
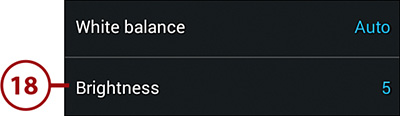
19. Drag the brightness level up to achieve a proper brightness level in a low-light shooting environment, or drag it down for a very bright shooting environment. After you set the brightness level, the slider bar disappears after a few seconds.
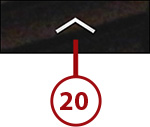
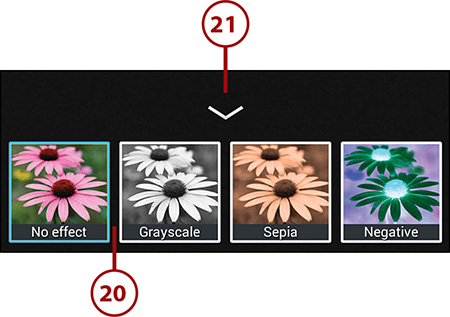
20. Tap the up arrow icon at the bottom of the screen to add camera effects to your videos as you capture them. Your choices are Grayscale, Sepia, and Negative.
21. Tap the down arrow icon to close the Effects area.
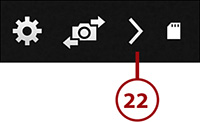
22. Tap the right arrow icon.
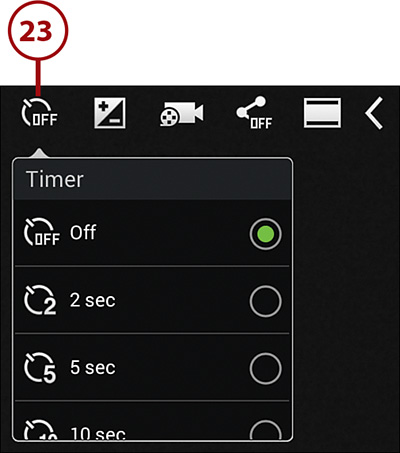
23. Tap the Timer icon to designate how long the Tab should wait before the camera starts to record. This is great for allowing time for you to set up the shot and then place yourself in the frame.
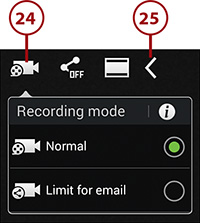
24. Tap the Recording mode icon to optimize your video for being sent as an email attachment and limit the size of the video you record to 50 megabytes.
25. Tap the left arrow icon.
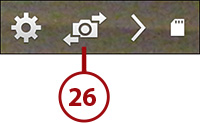
26. Tap to switch between the rear-facing and front-facing cameras.
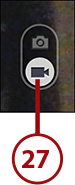
27. Tap the Video button to begin recording. When you finish, tap the Stop button.
28. The video you just recorded appears in the Image Viewer in the lower left of the window. Tap the Image Viewer to review the recorded video in the Gallery app.

Purchasing Music
The Galaxy Tab 4 includes the preinstalled Google Play Music app for finding, previewing, purchasing, downloading, and playing music to your Tab 4. This app isn’t the only one you can use, however—there are plenty of other music apps available for download in the Google Play Store.
1. Tap the Apps icon on the Home screen.

2. Tap Play Music.
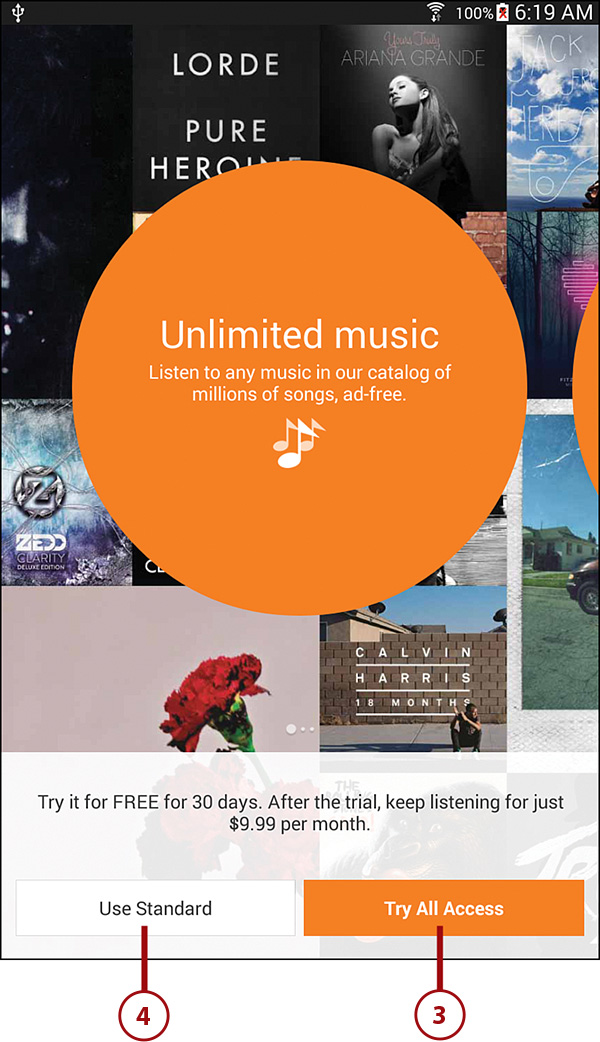
3. Tap Try All Access to play any song in the Google Play music catalog free for 30 days. After the 30-day trial period, you can choose to purchase a membership for $9.99 per month.
4. For now, tap Use Standard to continue.
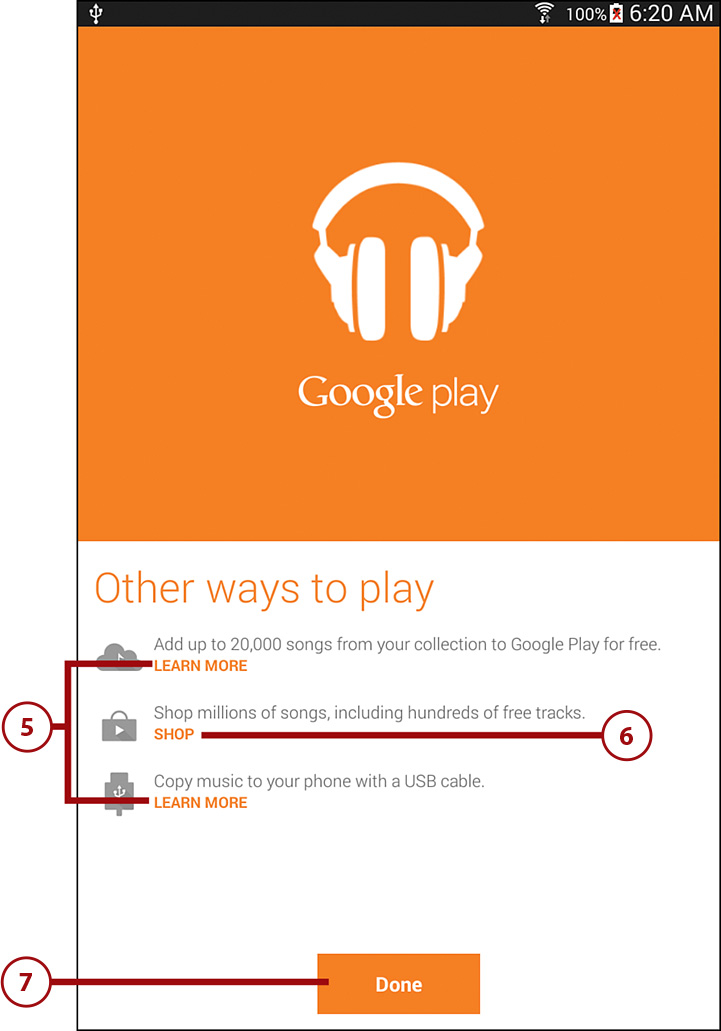
5. Tap Learn More to discover more about adding songs and copying music to your phone.
6. Tap Shop if you want to shop for tracks.
7. For now, tap Done.
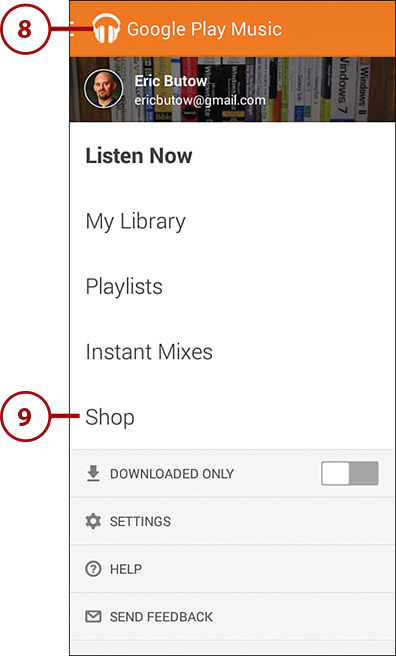
8. Tap the Google Play Music icon in the menu bar.
9. Tap Shop in the list.
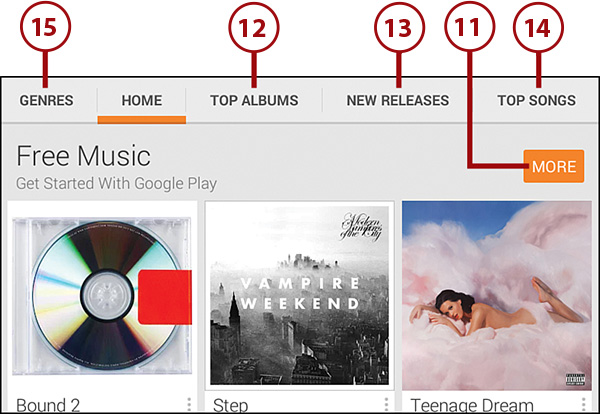
10. The Music screen shows the latest free music and exclusive videos. Swipe up and down the screen to view more featured songs and albums in a variety of categories.

11. Tap More to view more songs and albums in the category.
12. Tap Top Albums to view the best-selling albums in Google Play.
13. Tap New Releases to view the newest albums in Google Play.
14. Tap Top Songs to view the best-selling songs in Google Play.
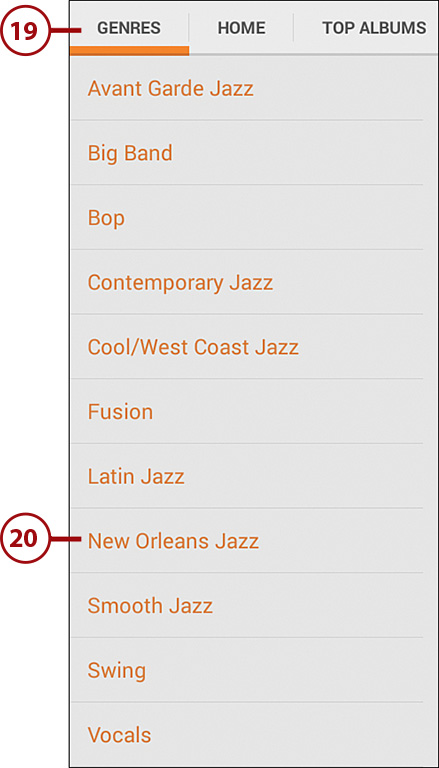
15. Tap Genres to view categories of music you can choose from.
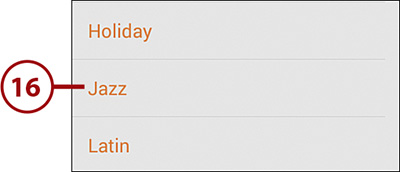
16. View all the genres by swiping up and down in the list. When you find a genre you want, tap the genre name in the list.
17. Swipe up and down the screen to view different sections of the genre page.
18. Tap a category to view new releases and recommendations in the genre.
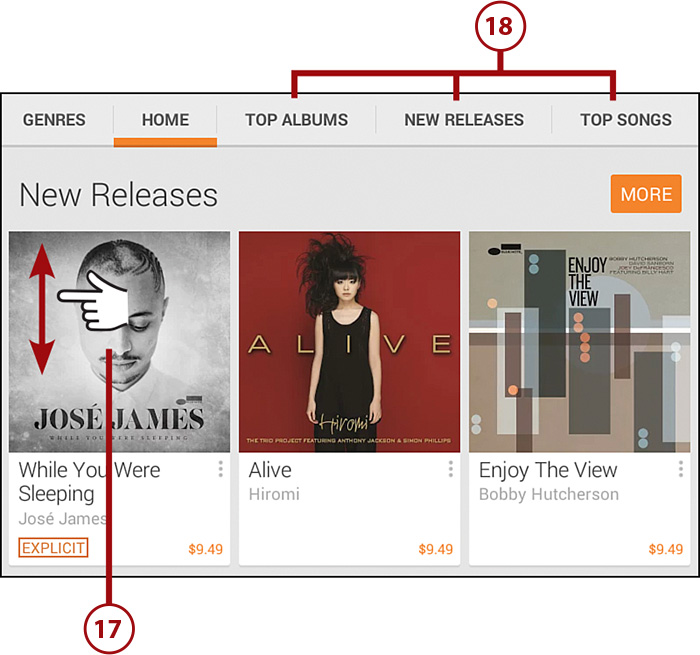
19. Tap Genres to view a list of subgenres within the main genre.
20. Tap a subgenre in the list.
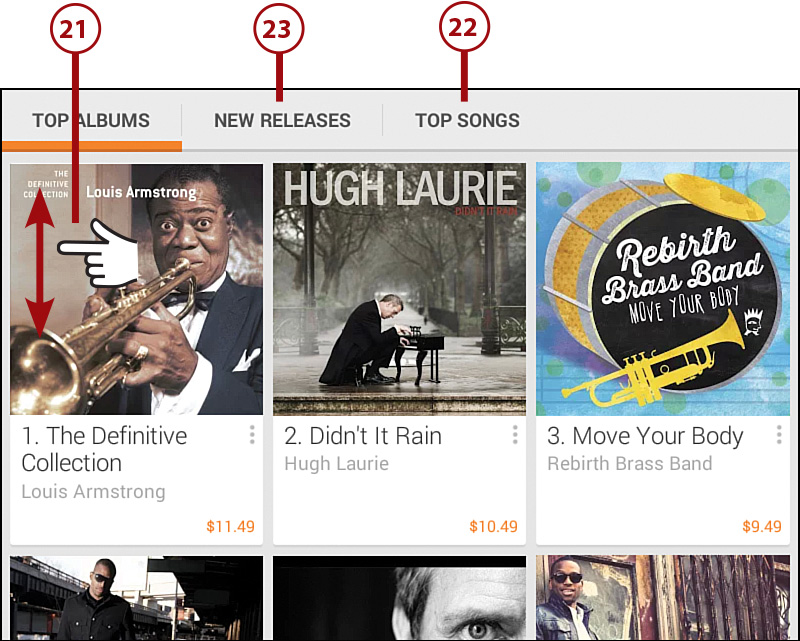
21. Top-selling albums in that subgenre appears on the screen. Scroll up and down the screen to view all the top albums.
22. Tap Top Songs to view the best-selling songs in the subgenre.
23. Tap New Releases to view newly released songs and albums within that subgenre.
24. Tap the Back touch button to return to the genre page.
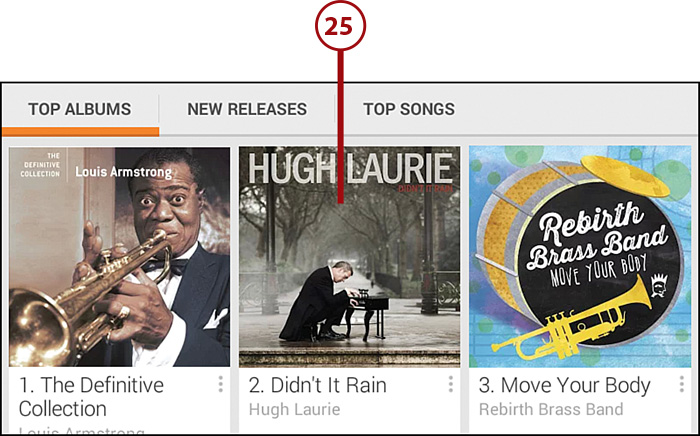
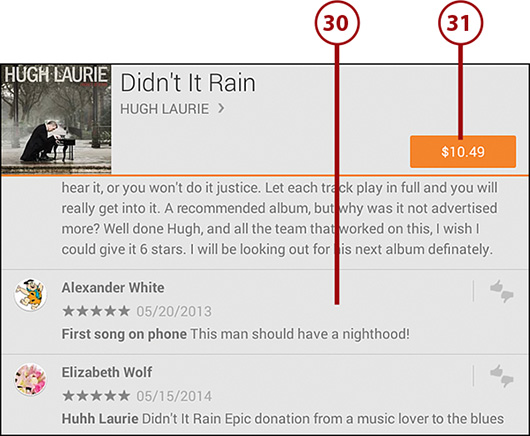
25. Tap the album or song tile on the screen to view more information.
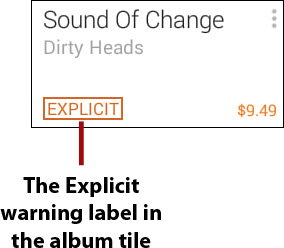
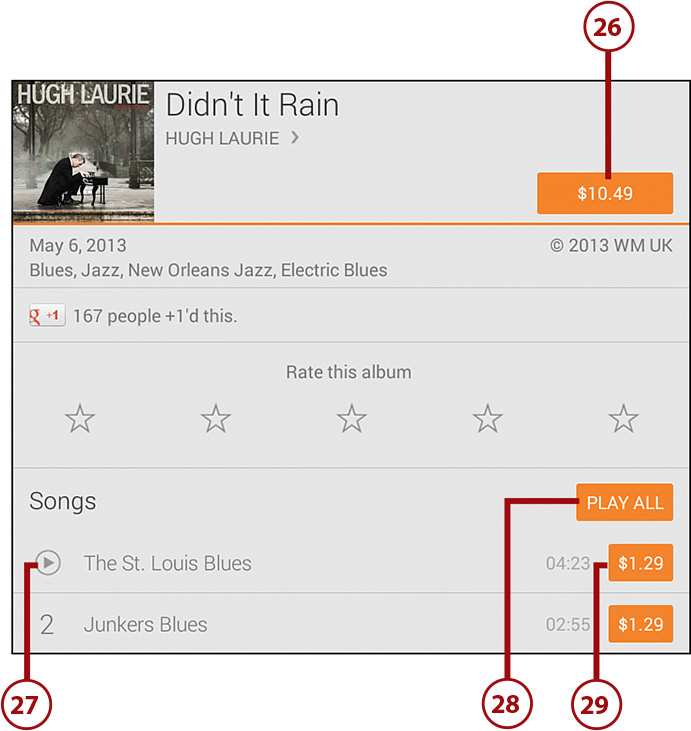
26. The title and album cover appear at the top of the screen. You can purchase the entire album by tapping the purchase button that contains the album price.
27. Tap a song name to play a 90-second snippet of that song.
28. Tap Play All to play all the snippets in the album.
29. Purchase a song on the album by tapping the purchase button that contains the price of that specific song.
30. Swipe from bottom to top on the page to view the remaining songs and reviews from other Google Play users who downloaded the songs or album, see more albums by the artist, and also view similar artists.
31. Purchase the album by tapping the purchase button at the top of the screen.
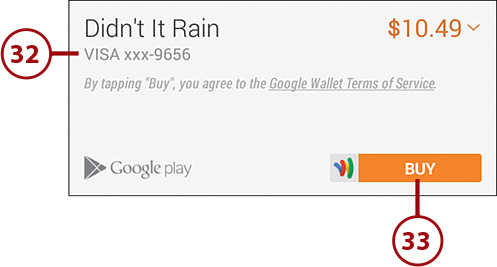
32. The Google Play window appears with the price of the album and the credit card Google Play will use to process the transaction.
33. Tap Buy to purchase the album.
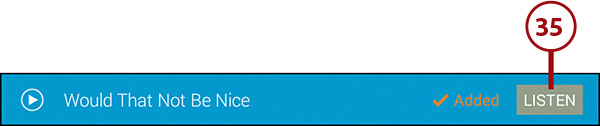
34. After you purchase a song, a Shopping bag with a check mark tells you that you have downloaded the song to your Tab 4 successfully.
35. Tap the Listen button to the right of the song you’ve purchased to listen to the song.
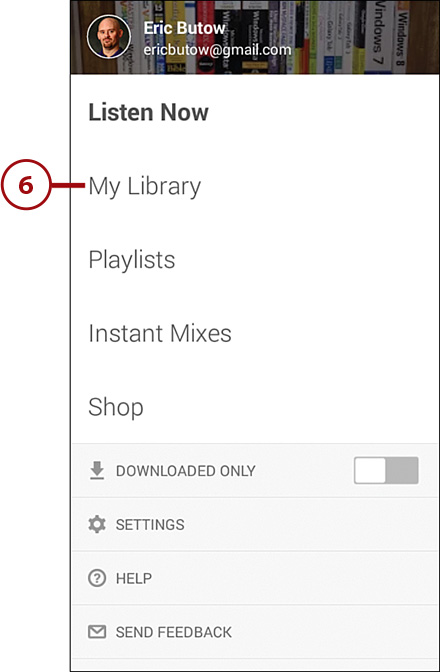
Playing Songs
In the Music app, you can play songs you added to your play queue within the app. You can also listen to music you downloaded from the Google Play Store within the Music app.
The Music app on your Galaxy Tab 4 was designed to make it easy for you to browse and play your music collection downloaded onto your Tab 4. A great set of headphones can enhance the enjoyment of your favorite music. The ability to browse your music library and understanding your playback options are a big step toward getting the most out of your many entertainment possibilities on the Tab 4.
Play Music in the Music App
1. Tap the Apps icon on the Home screen.

2. Tap Music.
3. Tap Recently Added in the list.
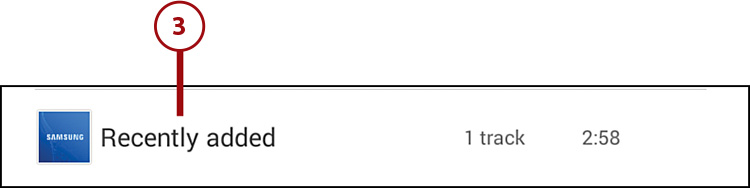
4. The most recent song you listened to appears at the top of the Recently Added list. Swipe up and down in the screen to see other songs in the list.
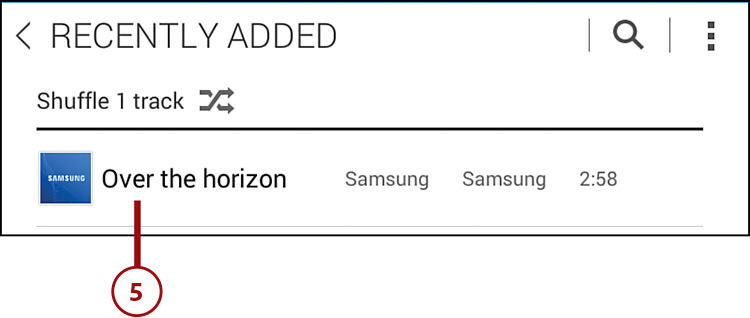
5. Tap a song in the list to listen to that song in the Music app.
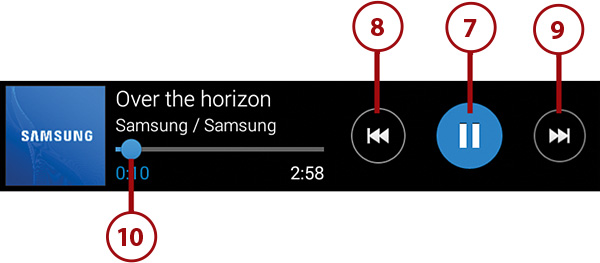
6. The song plays automatically and the playback controls appear in a window at the bottom of the screen.
7. Tap the Pause button to pause playback.
8. Tap the Rewind icon to begin playing at the beginning of the song.
9. Tap the Fast Forward icon to move to the end of the song.
10. Tap and hold your finger on the button in the timeline to move to different points in the song.
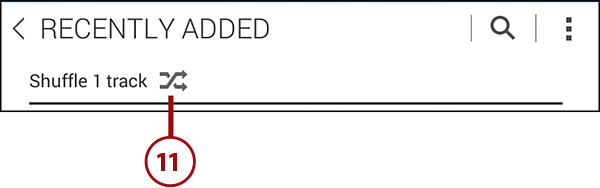
11. Tap Shuffle to have the Music Hub player play songs in your Play Queue at random.
12. Tap the Back touch button to go back to the Player screen.
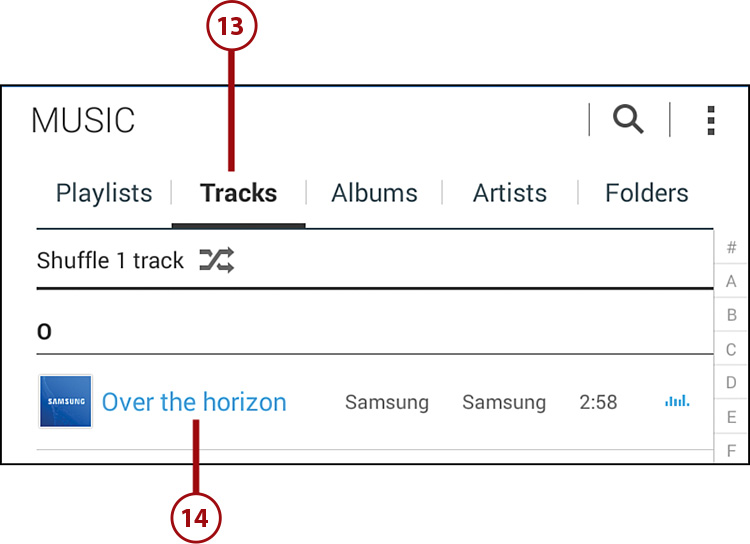
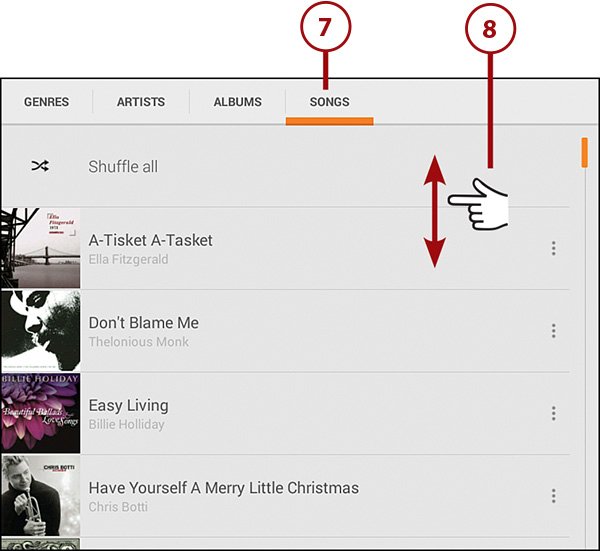
13. Tap Tracks to view all the tracks you can play in the Music app.
14. Tap and hold your finger on the selected track in the list to view more options in the song options window.
15. Tap to set the song as your alarm tone when you receive a notification.
16. Tap to add the song to a playlist, which you’ll learn more about later in this chapter.
17. Tap to add the song to your Favorites list.
18. Tap to delete the song from the Music app.
19. Tap to get details about the song including the song length, genre, and format.
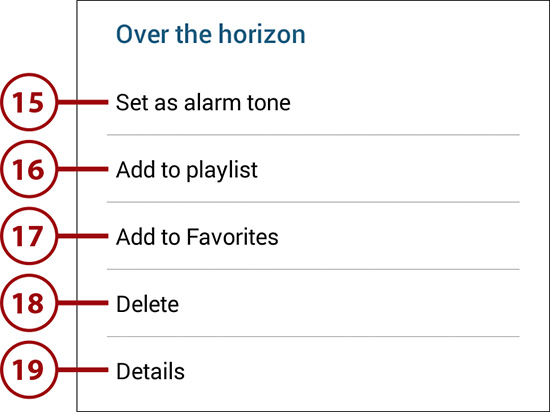
20. Close the song options window by tapping the Back touch button.
Playing Music in the Google Play Music App
1. Tap the Apps icon on the Home screen.

2. Tap Play Music.
3. Tap the Use Standard button in the introductory screen as you did earlier in this chapter.
4. Tap the Done button in the Other Ways to Play screen as you did earlier in this chapter.
5. Tap the Google Play Music icon in the menu bar as discussed earlier in this chapter.
7. Tap Songs.
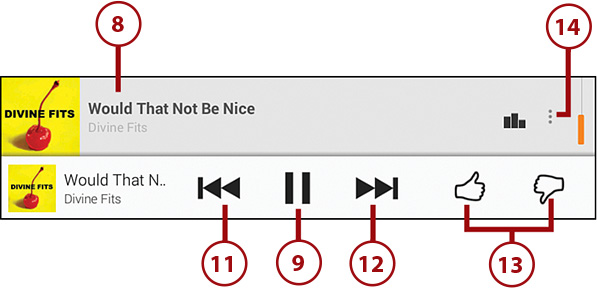
8. Swipe up and down the list of songs in the album (if necessary) and then tap on the song title in the list.
9. Tap the Pause button while you’re playing the song to pause playback.
10. Tap the Play button to resume playing the song.
11. Tap the Rewind icon to begin playing at the beginning of the song.
12. Tap the Fast Forward icon to move to the end of the song.
13. Rate the song so other Google Play users can view it by tapping the thumbs up (good) or thumbs down (bad) icons.
14. View more song options by tapping the Menu icon to the right of the song title in the list.
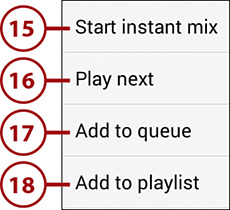
15. Have the Play Music app play all songs in the list randomly by tapping Start Instant Mix.
16. Play the next song in the list by tapping Play Next.
17. Download the song to your Galaxy Tab 4 by tapping Add to Queue.
18. Add the song to a new playlist by tapping Add to Playlist.
19. Within the Add to Playlist window, tap a playlist to add the song to a playlist.
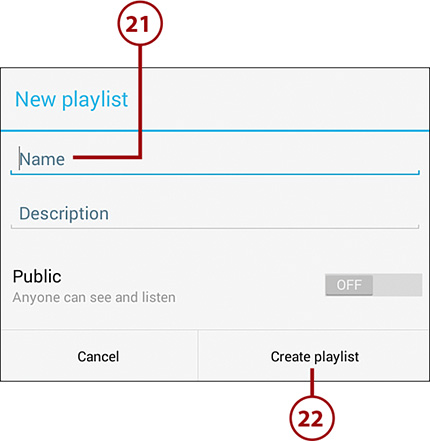
20. Tap New Playlist to add the song to a new playlist.
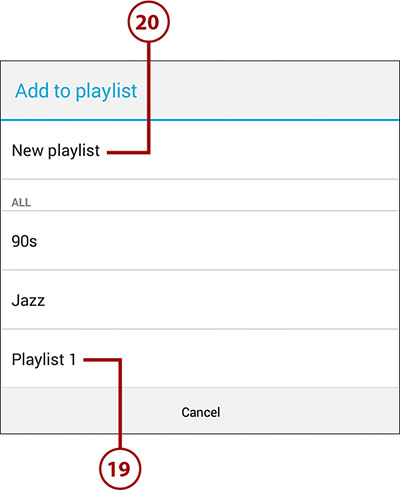
21. Type the playlist name in the New Playlist window.
22. Tap Create Playlist. A pop-up box appears at the bottom of the screen that informs you that Play Music added the song to your playlist. Open the song options menu again by tapping the Menu icon to the right of the song title.
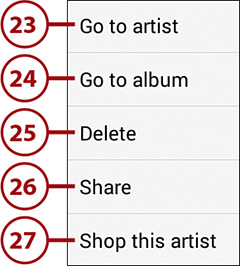
23. View all the artist’s albums that you’ve added to your library by tapping Go to Artist.
24. View the album you’ve added to your library by tapping Go to Album.
25. Tap Delete to delete the song from your Galaxy Tab 4 and from your playlist within the Play Music app.
26. Tap Share to share the music file with other Google+ users in a Google+ post.
27. Tap Shop This Artist to shop for more music from the artist in the Google Play Store.
28. Tap the Back touch button to return to the main Play Music screen.
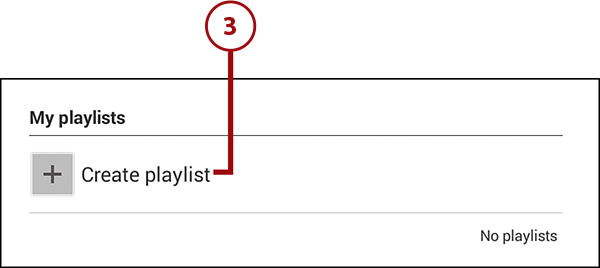
Creating Your Own Playlists
Playlists are a great way to create a compilation of your favorite songs for playback in the Music app. Use playlists as an opportunity to organize the best songs from your favorite artists, acoustic selections, party music, classic rock, orchestral masterpieces, relaxation tracks, and more.
1. Tap the Apps icon on the Home screen.

2. Tap Music.
3. Tap Create Playlist.
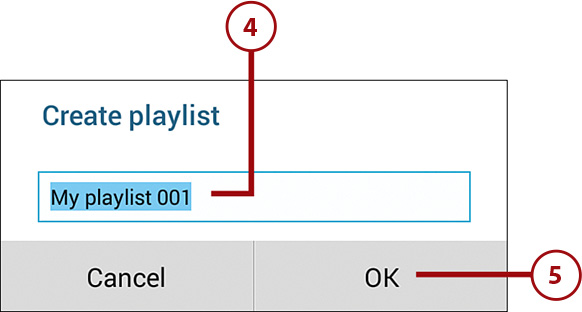
4. Type the name for your new playlist.
5. Tap OK.
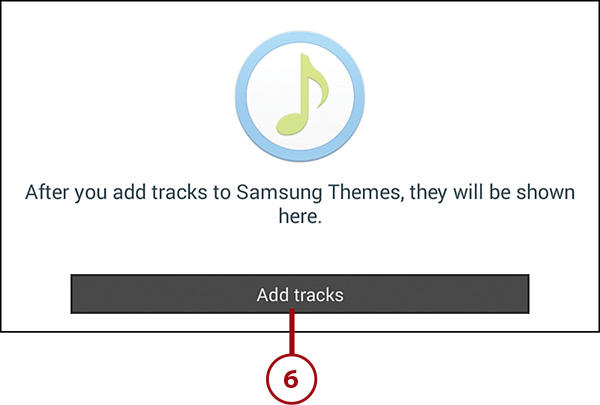
6. Tap Add Tracks.
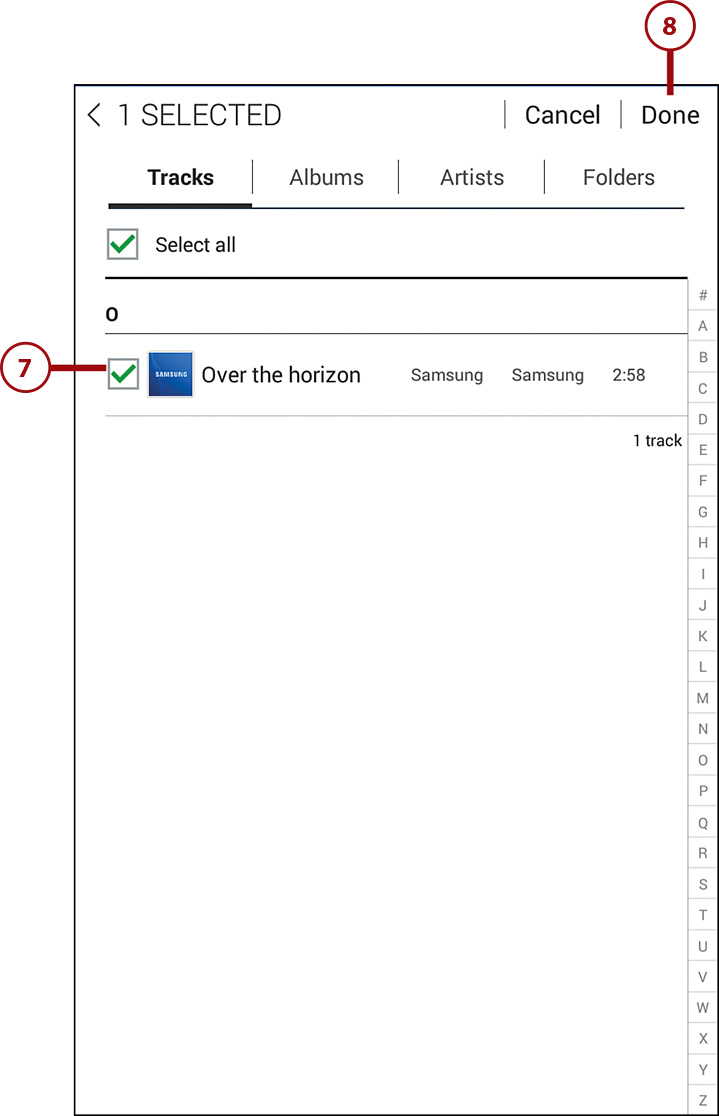
7. Tap the songs that you want to appear in the playlist. After you tap a song, a green check mark appears in the check box to the left of the song name. Tap the song title again to clear the check box and delete the song from the playlist.
8. Tap Done when you are finished creating the playlist. Alternatively, tap Cancel to cancel the new playlist.
Adding a Podcast App
One popular podcast manager is BeyondPod for Tablets, and the lite version of it is free. The lite version has all of the features of the Pro version except scheduling of updates is disabled, you can update only one feed at a time, and you can download only one podcast at a time.
During the first 7 days after installation you can use the full version of BeyondPod at no charge. If you decide you want all the bells and whistles BeyondPod has to offer, you can purchase an unlock key for $6.99. If not, you can continue to use the free lite version indefinitely.
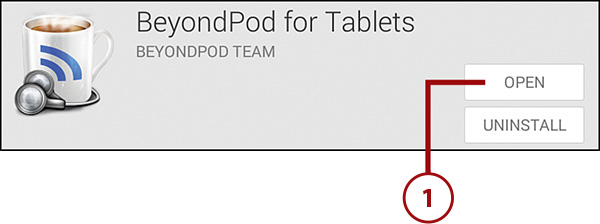
1. Find the BeyondPod for Tablets app in the Google Play Store and install it. (Read Chapter 16, “Finding and Managing Apps,” for more information on getting apps from the Google Play Store.) After you have installed the app, tap Open to launch the app.
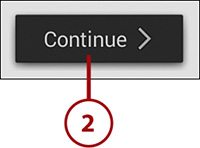
2. Tap Continue in the Welcome screen.
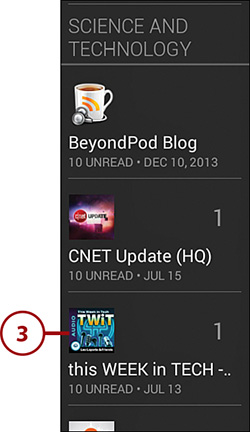
3. Scroll up and down the feeds list on the left side of the BeyondPod home screen; tap a podcast to view the episodes.
4. Slide up and down the list of episodes on the right side of the screen. View episode notes in the episode screen by tapping on the episode title or summary description.
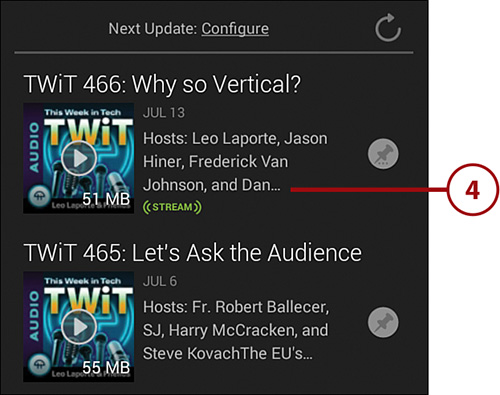
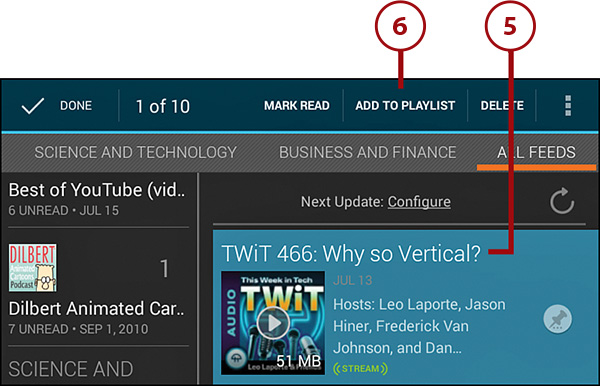
5. Tap and hold on the episode title to open the menu bar at the top of the screen so you can perform more tasks.
6. Tap Add to Playlist to add the episode to your playlist.
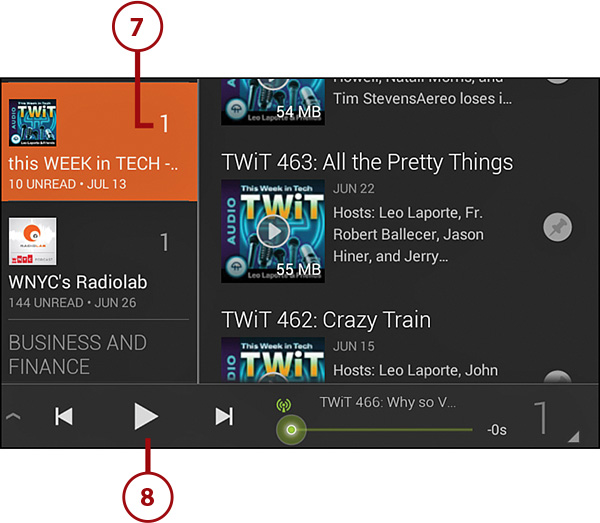
7. The number of episodes in your playlist appears in the upper-right corner of the podcast tile in the feeds list. View all episodes in your playlist for that feed by tapping on the playlist number.
8. Tap the Play icon to play the episode.
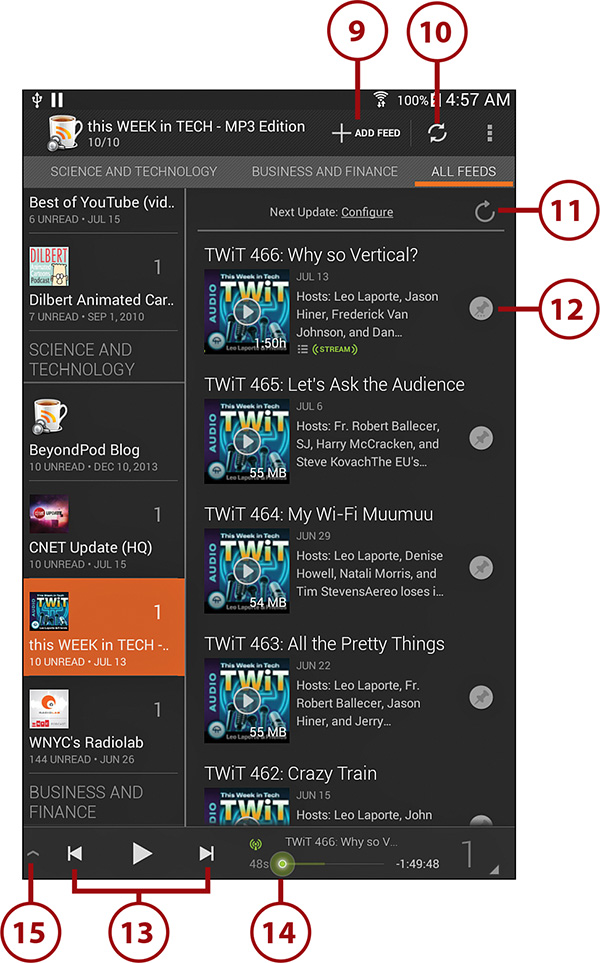
9. Tap to browse popular feeds and add a new feed in the Add Feed page.
10. Tap to refresh all feeds on the page.
11. Tap to refresh the current feed on the page.
12. Tap the pushpin icon to download the episode to your Tab 4.
13. Use the playback controls to pause or jump forward or backward in the video.
14. Use the slider to shuttle through the video. When the video ends, BeyondPod begins to play the next episode in the playlist, if any.
15. View more podcast information and controls by tapping the up arrow icon.
16. Change the playback speed by tapping 1x to change the speed. Note that you can’t change the speed of streamed podcasts, which are podcasts that play while the podcast app receives the rest of the podcast.
17. Turn on sleep mode to pause the playback automatically after a certain period of time by tapping Sleep and then tapping the amount of time you want to play the podcast before it stops playing.

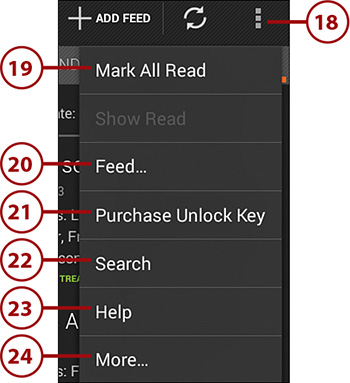
18. View a menu with more options by tapping the Menu icon.
19. Tap Mark All Read to mark all episodes in the feed as read.
20. Tap Feed to update the feed, edit feed settings, or delete the feed.
21. Tap Purchase Unlock Key to get the unlock key for the full version of BeyondPod for Tablets.
22. Tap Search to search for a feed in the BeyondPod database.
23. Tap Help to find answers to your questions and get more support from BeyondPod.
24. Tap More to change BeyondPod settings, manage feed categories, view the app update log, export feeds to a file, suggest a new feature to the BeyondPod team, and get information about BeyondPod.