16. Finding and Managing Apps
In this chapter, you discover how to expand the capabilities of the Galaxy Tab 4 by finding and installing new apps from both Samsung and Google. You also learn how to access apps from the Home screen, open multiple apps on the screen, and access safe content for your children. What’s more, this chapter tells you how to browse and make purchases in the Google Play Store and organize application icons on your Galaxy Tab. Topics covered in this chapter include:
![]() Searching for Android applications
Searching for Android applications
![]() Purchasing Android applications
Purchasing Android applications
![]() Arranging app icons on your Galaxy Tab 4
Arranging app icons on your Galaxy Tab 4
![]() Adding and removing Home pages
Adding and removing Home pages
![]() Accessing Google apps from the main Home screen
Accessing Google apps from the main Home screen
![]() Opening multiple apps on the screen
Opening multiple apps on the screen
![]() Using the Kids Mode app to find safe content
Using the Kids Mode app to find safe content
![]() Adding a dictionary and thesaurus
Adding a dictionary and thesaurus
![]() Adding an RSS reader
Adding an RSS reader
![]() Using the Note Everything app
Using the Note Everything app
The Galaxy Tab 4 is not just about superior hardware craftsmanship. Your Tab’s true strength lies in the incredible software that is developed for it. The Galaxy Tab 4 comes with some truly amazing, preinstalled apps right out of the box, but you can expand its capabilities even further by downloading new apps from the Google Play Store. You can choose from thousands of innovative apps, ranging from games to productivity apps. The number of apps optimized for use on your Tab is growing rapidly.
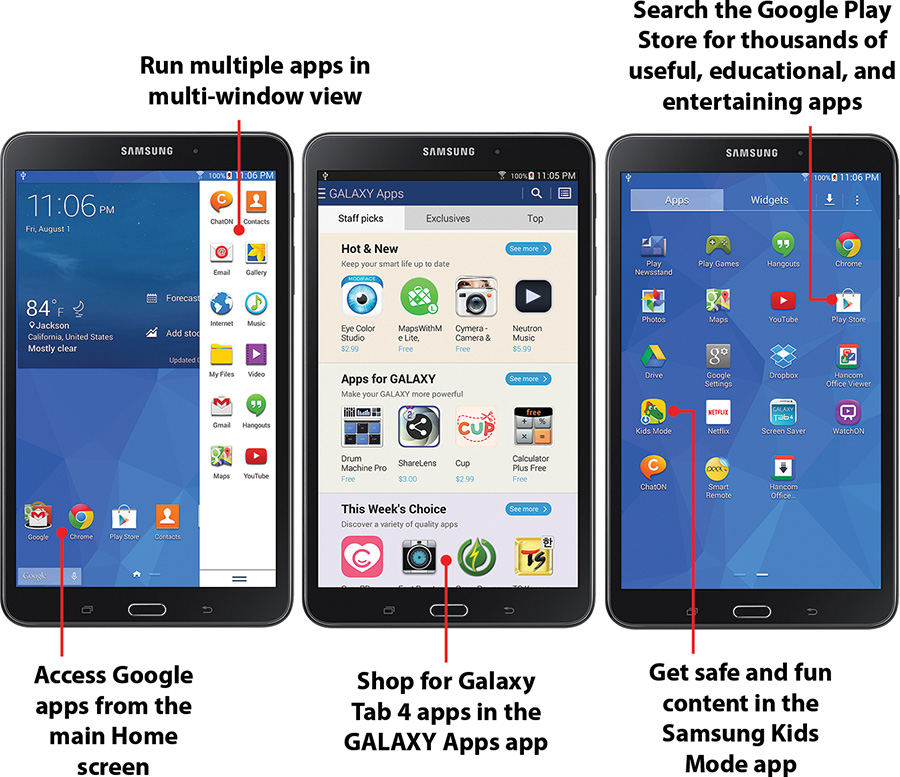
Android 4.4, also known by its nickname KitKat, also allows you to access all your Google apps from the first page on the Home screen. KitKat also includes the capability to open multiple apps in one screen so you can switch between open apps easily. What’s more, the Tab 4 comes with an app called Kids Mode that makes it easy for you to find suitable content for your children.
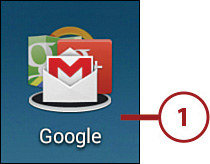
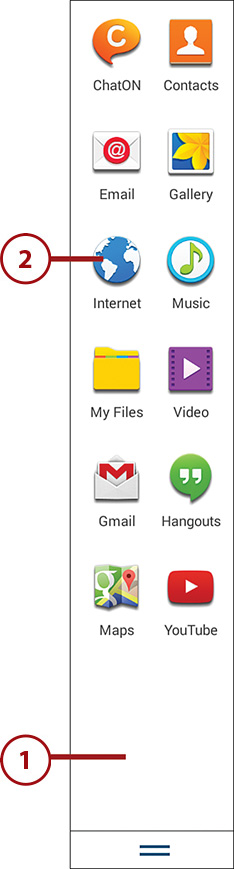
Accessing Google Apps from the Home Screen
The Google icon appears on the main Home screen so you can access any Google app installed on your Tab 4 within a small pop-up window that appears on the screen. You can also remove any Google app icons within the pop-up window as you would with any other app on a Home screen.
1. Tap the Google app on the main Home screen.
2. Open a Google app by tapping on the app within the pop-up window.
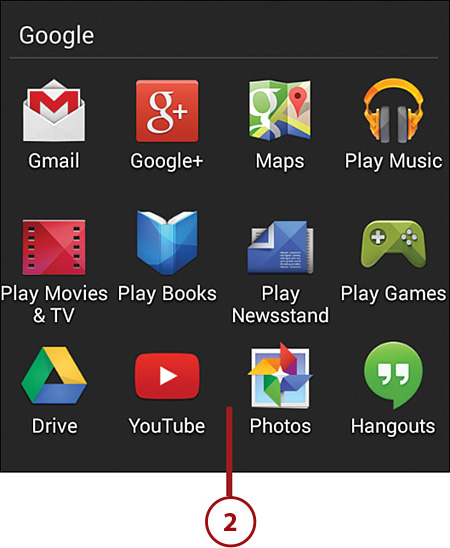
3. Move a Google app icon to a different location within the window by tapping and holding on the icon and then dragging the icon to a new location within the window. The other icons in the window rearrange to accommodate your selected icon’s new position.
4. Remove a Google app from the pop-up window by tapping and holding on the icon and then dragging the icon to the Remove icon in the menu bar at the top of the screen.
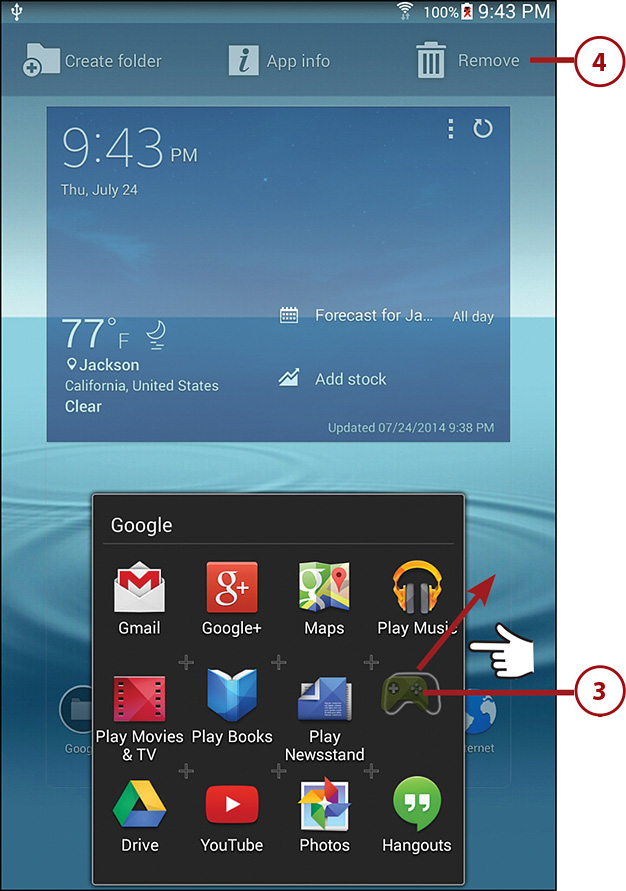
5. Close the pop-up window by tapping the Back touch button.
Opening Multiple Apps in Multi-Window View
By default, multi-window view is turned on so you can view two open apps at one time on the Tab 4 screen. You can also set up multi-window view in the Settings window so that you can view content in multiple windows when you open files within the My Files or Video apps and when you open attachments from email messages.
After you set up multi-window view, you can only open apps in multi-window view from within the app tray, which you can access from any screen.
1. Tap the Apps icon on the Home screen.

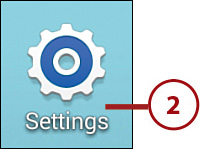
2. Tap Settings.
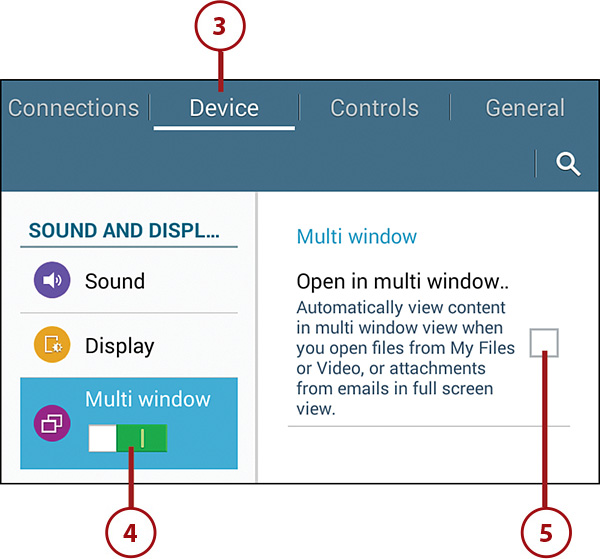
3. Tap Device in the menu bar.
4. Tap Multi Window. If the Multi Window slider bar is set to Off (a gray O button), turn the feature on by sliding the button to the right; the button changes to a green I button.
5. Tap the Open in Multi Window check box to view content in multiple windows when you open files in the My Files or Video apps and when you view email attachments in full screen mode.
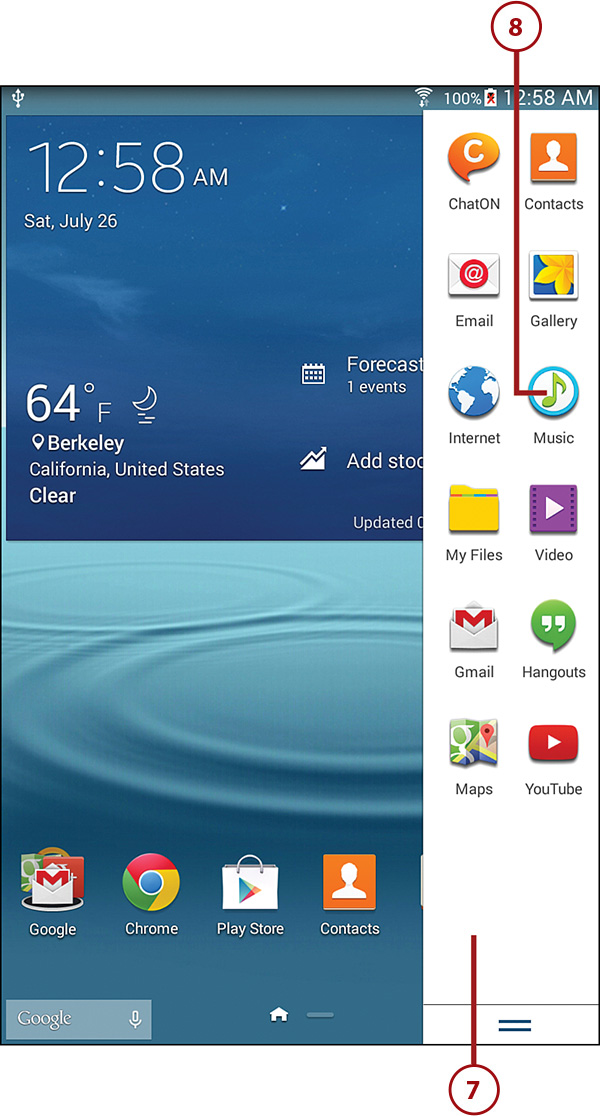
6. Return to the Home screen by pressing the Home button.
7. Tap and hold your finger on the right edge of the screen and then swipe from right to left. The app tray appears on the right side of the screen.
8. Open an app by tapping the app icon. If you don’t tap an app icon within a few seconds, the app tray disappears.
Manage Multiple Windows on the Screen
1. Open the app tray on the Home screen as described earlier in this chapter.
2. Tap Internet.
3. The Internet screen appears and displays the Samsung Galaxy Tab registration website by default.
4. Open the app tray and then tap Gmail.
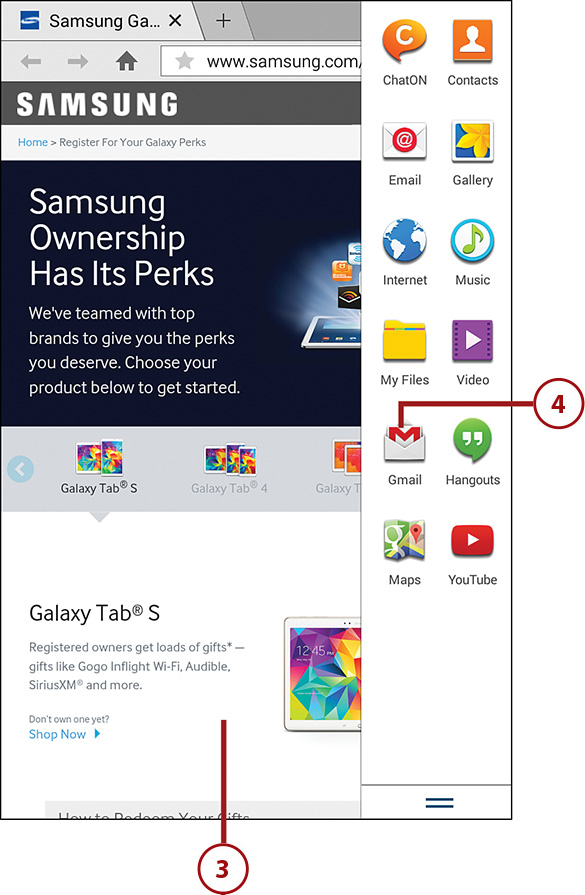
5. The Gmail app window appears on the bottom two-thirds of the screen. It’s surrounded by a blue line and has a blue control button at the top center of the window.
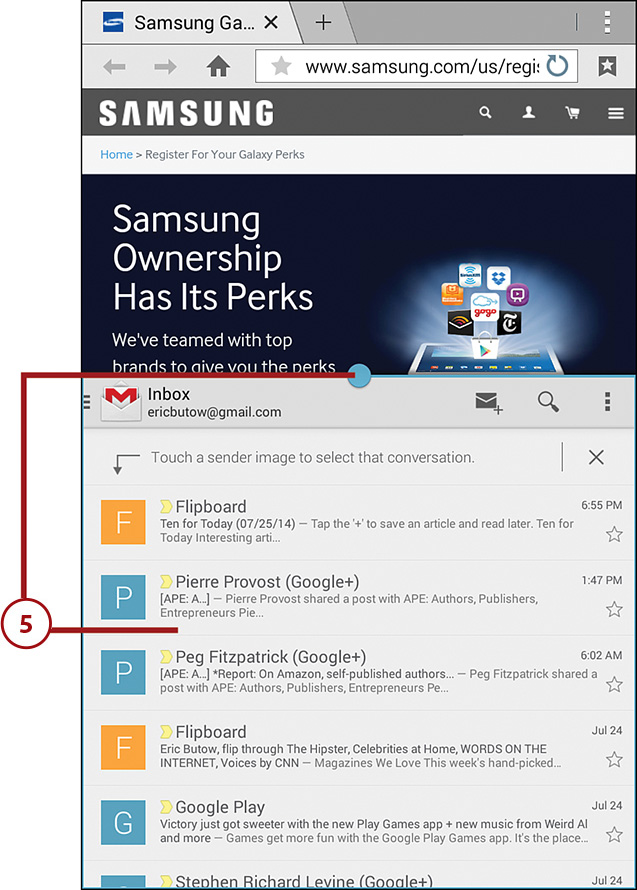
6. Resize the Gmail app window by tapping and holding on the blue control button and then swiping up and down in the screen to increase or decrease the window size, respectively. When you’ve moved the blue control button to your desired window height, release your finger. The Tab 4 resizes the app to the desired size.
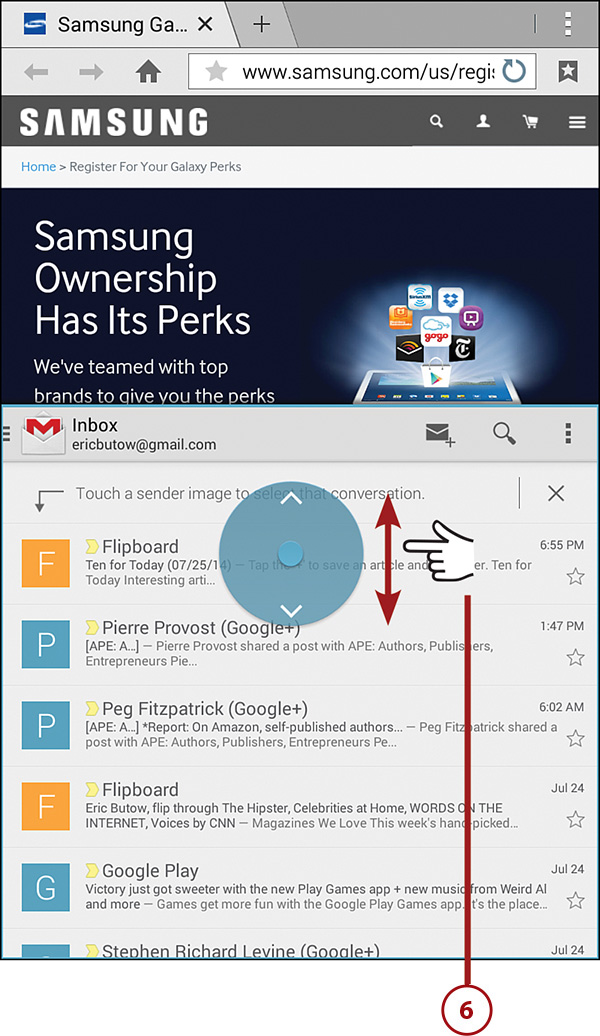
7. Open viewing option buttons by tapping the blue control button. A series of four buttons appears in a semicircular pattern below the blue button. Note that if you don’t tap one of these four buttons within three seconds, the buttons disappear.
8. Tap to move the Gmail app to the top of the screen and the Internet app to the bottom. After the Gmail app window moves to the top of the screen, the blue control button appears at the bottom center of the window.
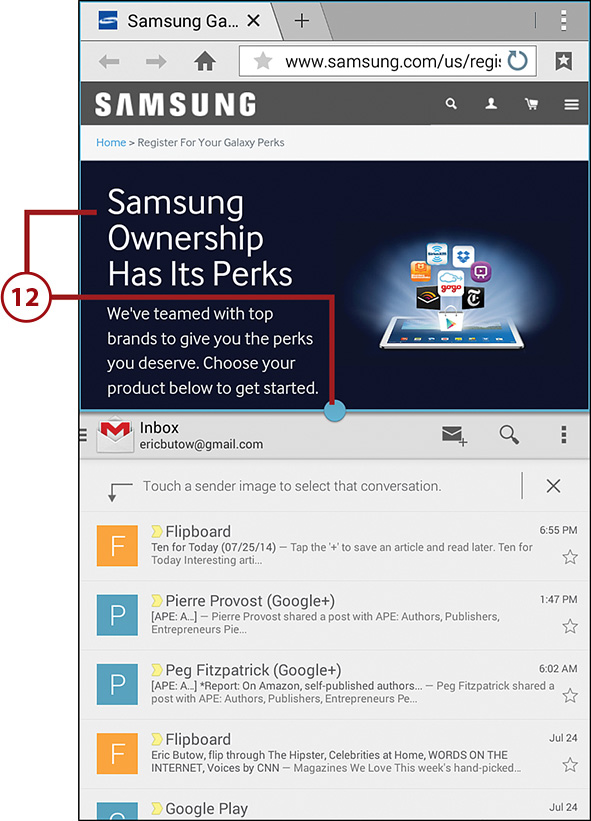
9. Tap to drag and drop a paragraph of text or a screenshot image from the Gmail app window into the Internet app window. Tap and hold on the image or text paragraph in the Gmail app window and then drag it into the Internet app window. After you drag the text or image, the Internet app window is highlighted; tap the Gmail app window to continue with Step 10.
10. Tap to view the Gmail app on the entire screen and close multi-window view. You can only view the Internet window again by tapping the Recent touch button and then tapping the Internet screen image in the Recent Apps window; the Internet app also appears on the entire screen.
11. Tap to close the Gmail window.
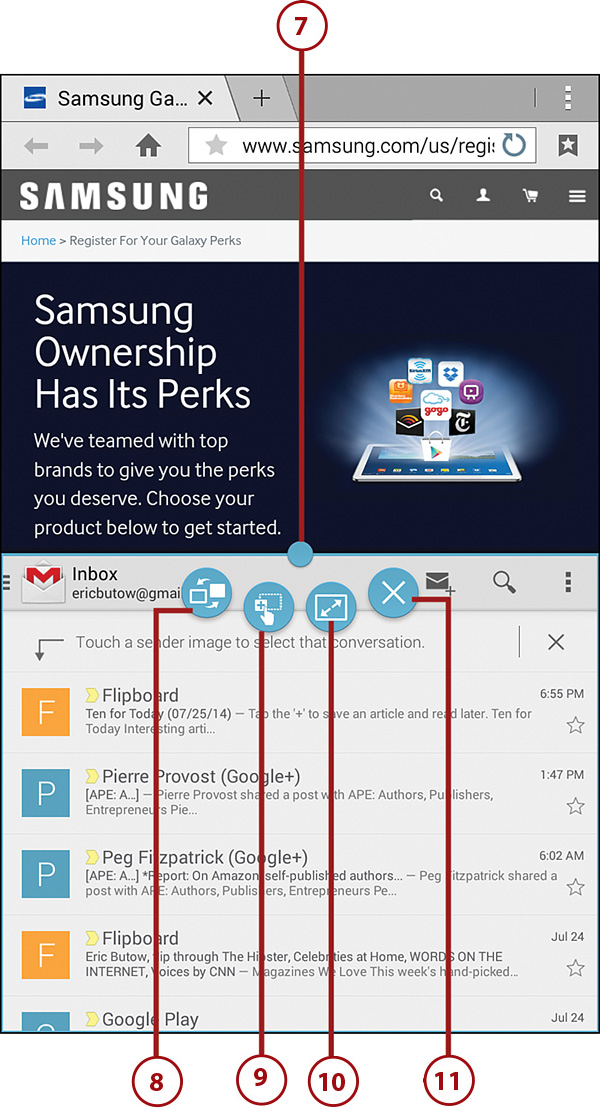
12. Tap the Internet app window to select it; the Internet app window is highlighted with a blue border and the blue control button appears at the bottom center of the window. Tap the button to perform tasks discussed in Steps 6 through 10.
Edit Apps in the App Tray
The app tray shows 12 apps by default, but you can change the apps that you can access in the tray.
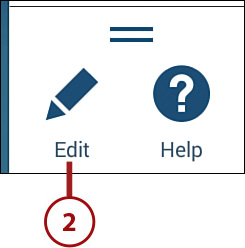
1. Open the app tray on the Home screen as you learned to do earlier in this chapter. Tap the Edit button at the bottom of the tray.

2. Tap Edit.
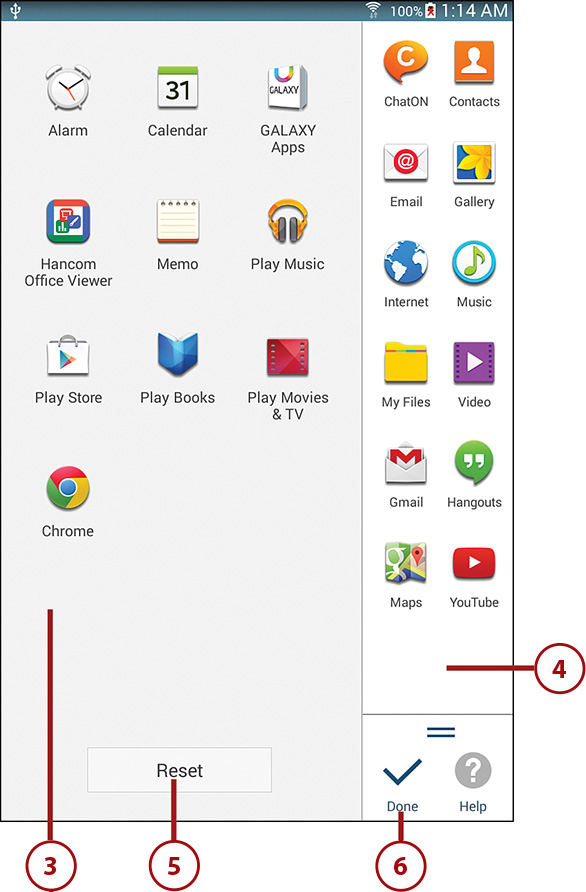
3. Remove apps from the app tray at the right side of the screen by tapping and holding on the app icon and then dragging the icon to the icon holding area on the left side of the screen.
4. Add an app to the tray by tapping and holding the icon in the icon holding area and then dragging the icon to the app tray. If you move an icon next to or between two icons, the other icons in the tray rearrange themselves to accommodate the new icon. You can add an icon after the last icon row by dragging the icon below the last icon row.
5. If you change your mind about editing the app tray, you can reset the app tray layout to its default setting by tapping Reset.
6. When you finish making changes to the app tray, tap Done. The app holding area disappears and the app tray appears with your changes on the right side of the screen. After a few seconds of no activity, the app tray disappears.
Finding Apps from Samsung
The Tab 4 includes the Kids Mode installation app. After you install the full Kids Mode app you can restrict content for your children and have peace of mind as your kids explore with your Tab.
Samsung also includes the GALAXY Apps app that lets you shop for Android apps optimized for your Tab 4. A great way to become acquainted with GALAXY Apps is just to start browsing. Many reviews of apps and games are available, so you can make an intelligent choice before downloading.
Set Up the Kids Mode App
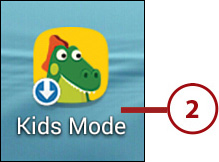
1. Tap the Apps icon on the Home screen.

2. Swipe to the second page of the Apps screen and then tap Kids Mode.
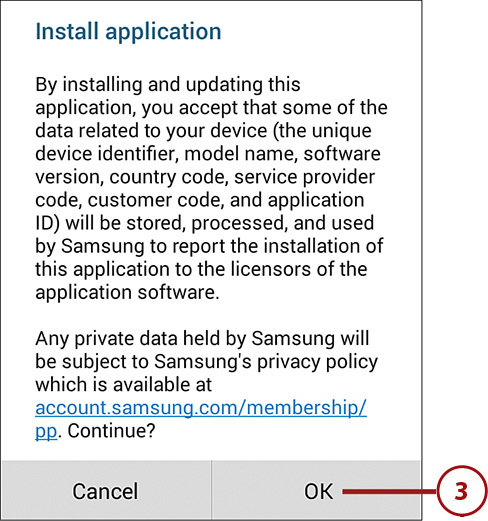
3. In the Install Application window, tap OK.
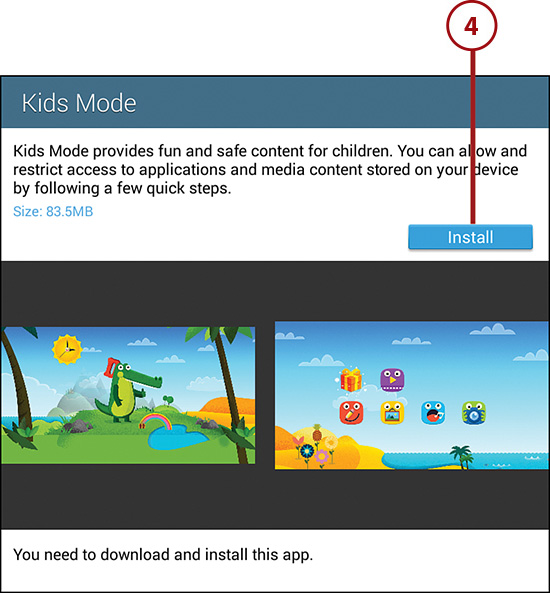
4. Install the complete Kids Mode app by tapping Install.
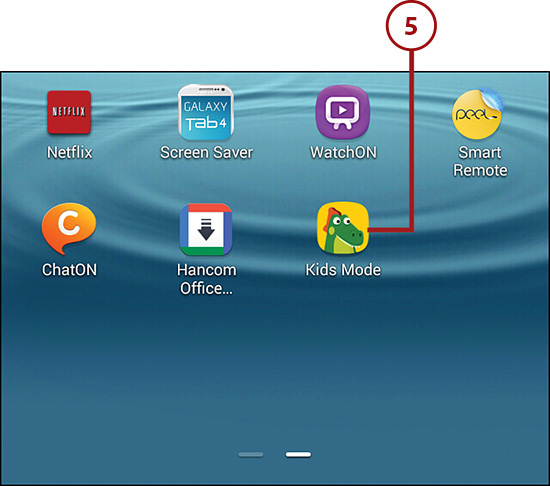
5. After the Tab 4 installs the app, the second page of the Apps screen appears again; tap Kids Mode.
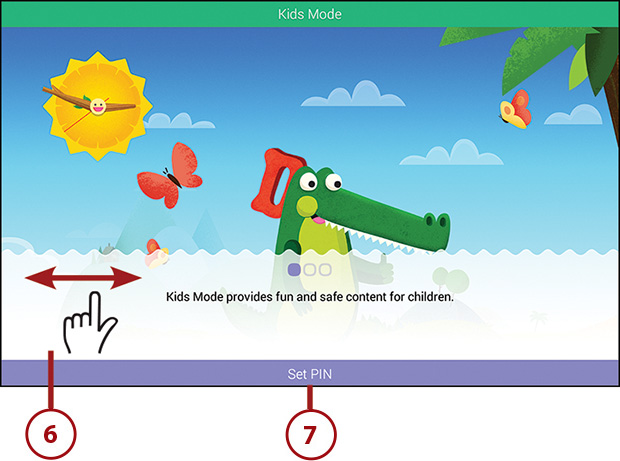
6. Swipe back and forth on the screen to get more information about the Kids Mode app.
7. Set the PIN for the app by tapping Set PIN. When you enter the PIN, you can set parental controls as well as close Kids Mode so you can return to normal usage.
8. Tap a four-digit PIN in the keypad.
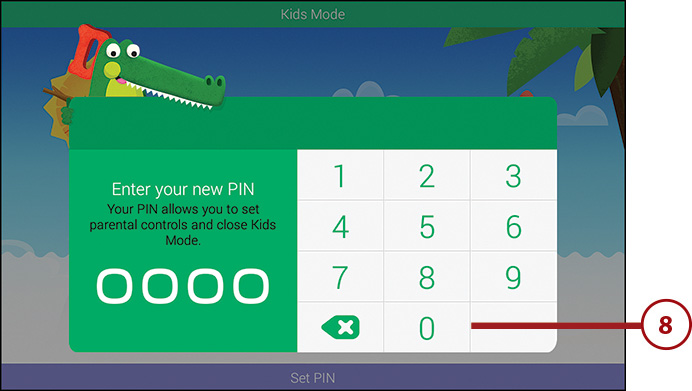
9. Confirm the PIN by tapping it again in the keypad.
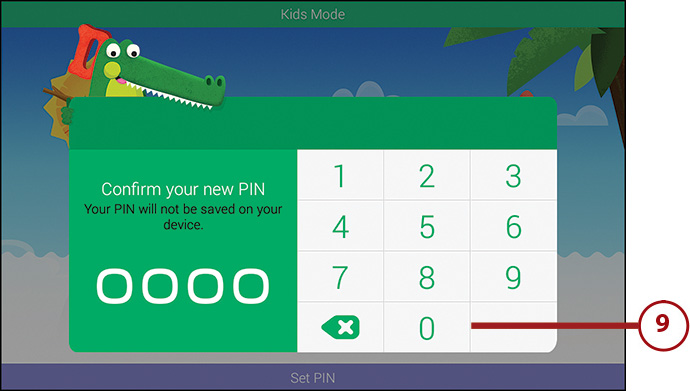
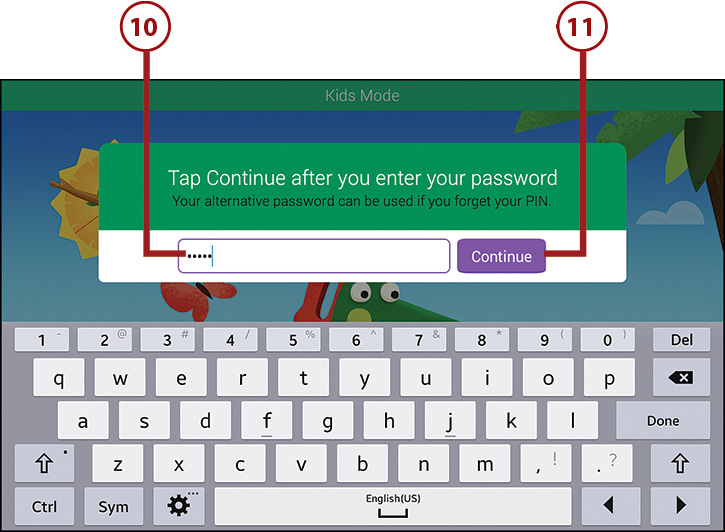
10. Type a password you can use in case you forget your PIN. The password must have at least four characters.
11. Tap Continue.
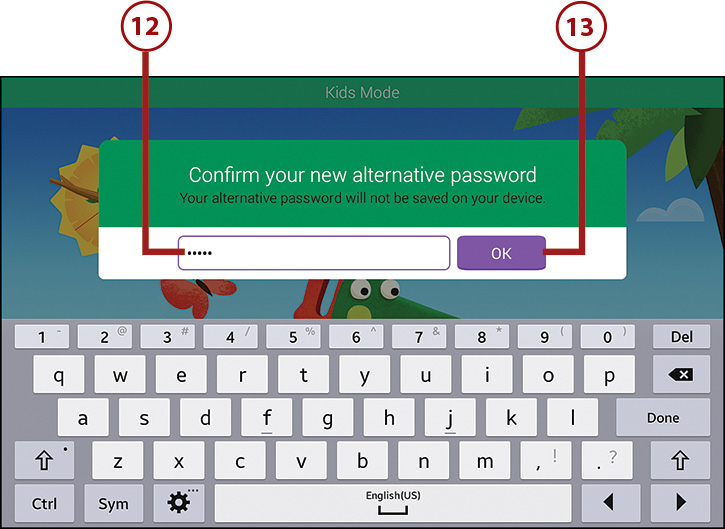
12. Confirm the password by typing it in again.
13. Tap OK.
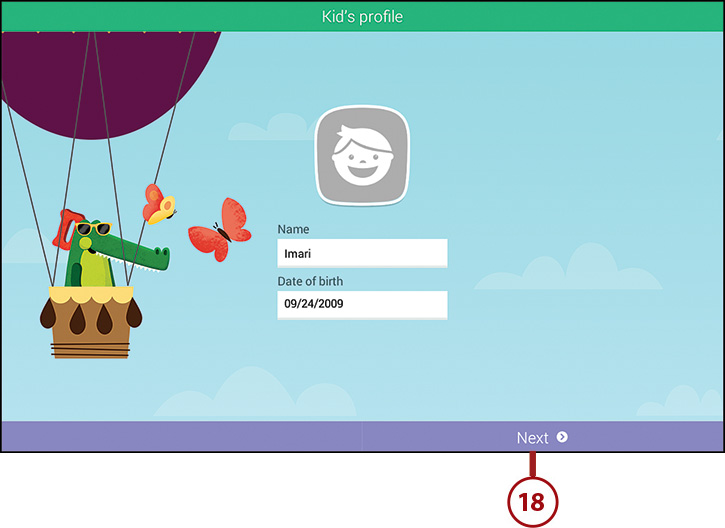
14. Create the kid’s profile by typing the name of the child in the Name field.
15. Tap Next in the keyboard.

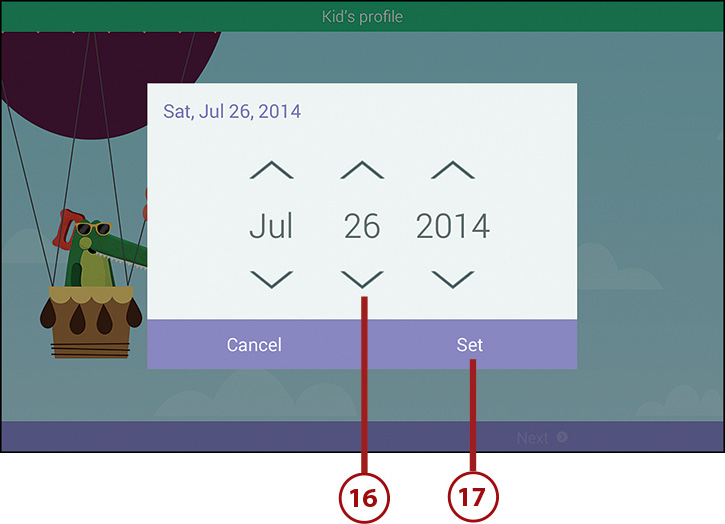
16. Enter the child’s birthdate by tapping the up and down arrows above and below the month, date, and year.
17. Tap Set.
18. Tap Next.
19. Tap Accept in the Disclaimer window.
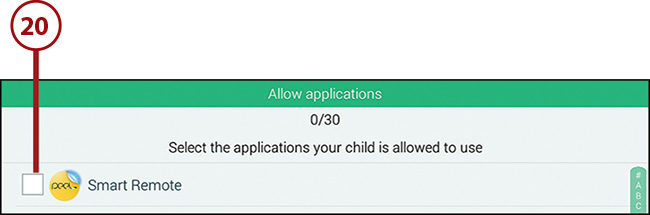
20. Tap the check box(es) next to the apps the child can use. The Kids Mode app determines how many apps the child can use by the child’s age. In this example, tap the check box next to Peel Smart Remote.
21. After you tap the check box, tap Next at the bottom of the window.
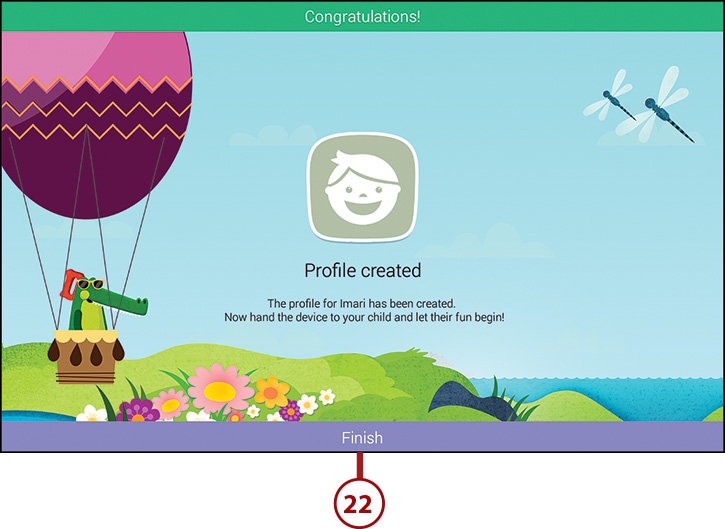
23. Tap the Close icon; you can hand the Tab 4 to your child to let him or her play with the device.
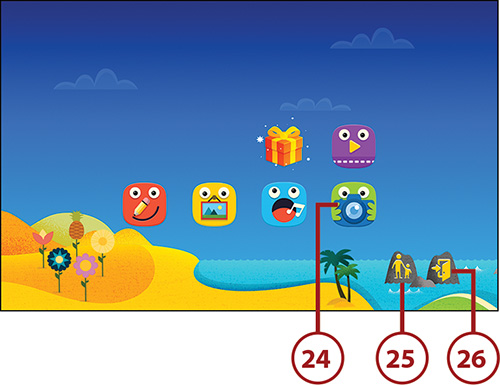
24. Your child can play with apps in the main Kids Mode screen by tapping the appropriate icon on the screen. For example, the child can take pictures on the Tab 4 by tapping the green camera icon. Your kids can also swipe back and forth on the screen to view more animations and features.
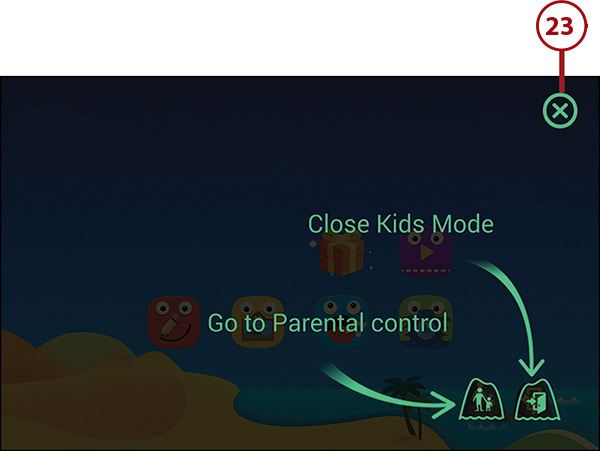
25. Access the Parental Control screen by tapping the Parental Control icon and then typing your PIN in the keypad that appears on the screen.
26. Close Kids Mode by tapping the Exit icon and then typing your PIN in the keypad that appears on the screen. The next time you start the Kids Mode app, you see the main Kids Mode screen.

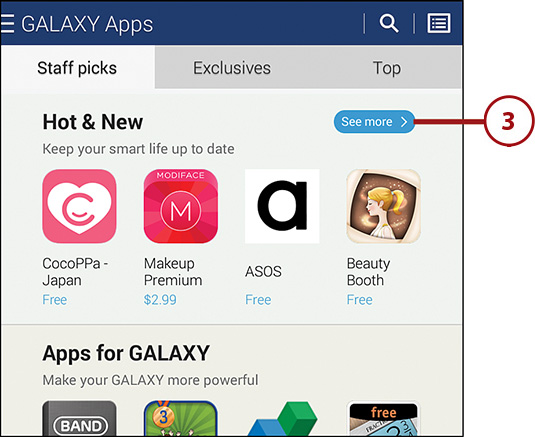
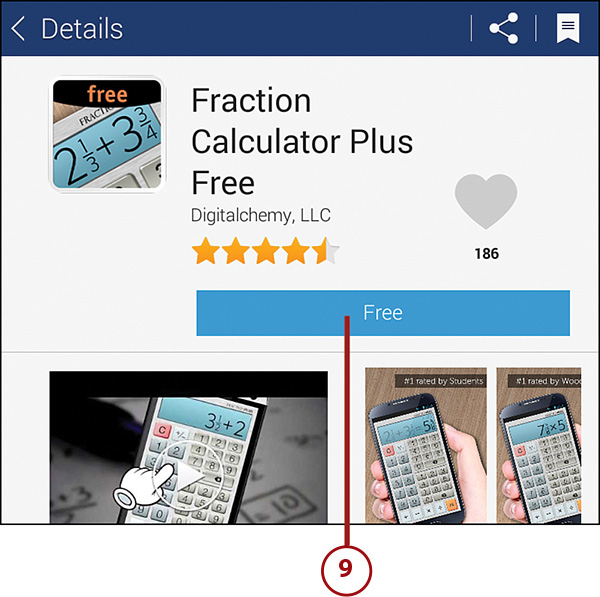
2. Tap GALAXY Apps.
3. A page of featured apps displays. Scroll up and down the page to review groups of apps as well as individual apps. You can view more apps in a group by tapping See More.
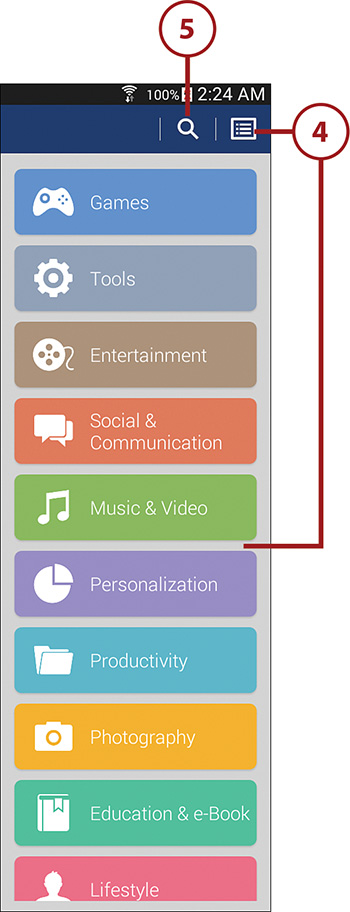
4. Tap the Category icon in the menu bar, swipe up and down the category list if necessary to view all the categories, and then tap a category to browse the list of results for that category.
5. If you know the name of the app, book, magazine, or movie you want, tap the Search icon to specify a search term.
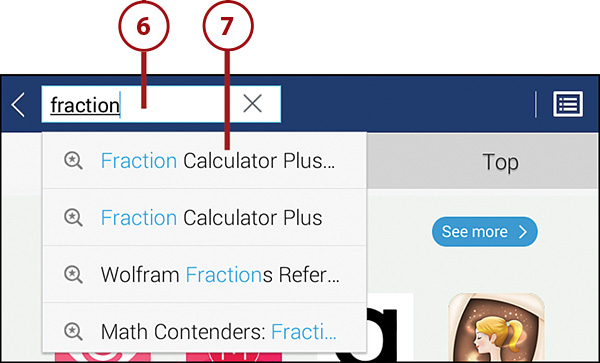
6. Type a search term into the Search field. Possible matches for your search appear in the list below the field.
7. Tap the app in the list if the product you want is listed as an option.
8. Swipe up and down the list of apps in the Results page and then tap the title of the app you want more information about.
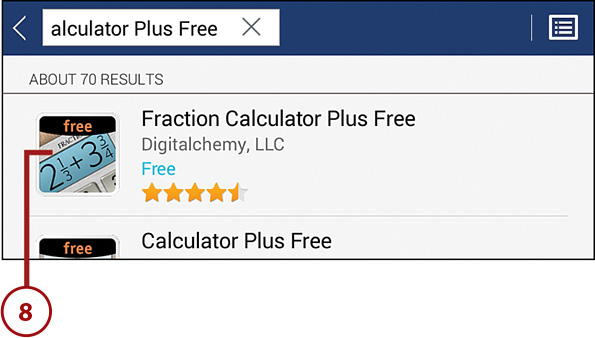
9. Read more about the product. You can purchase—or download, if the app is free—the app on the description page. In this example, install Fraction Calculator Plus Free by tapping Free.
Getting Apps in the Google Play Store
The Google Play Store makes it easy for you to browse apps and games that you can download to your Galaxy Tab 4. If this is your first time shopping in the Google Play Store, you will find the interface quite intuitive. A great way to become acquainted with the Google Play Store is just to start browsing. Many reviews of apps and games are available, so you can make an intelligent choice before downloading. A Google, Bing, or Yahoo! search for “Best Android apps for Galaxy Tab 4” can help you identify the most popular apps. Tab 4 users from around the world are writing articles about their experiences with apps that you might find useful. After you download and try out an app, consider giving your feedback so that new Tab 4 users can learn from you.
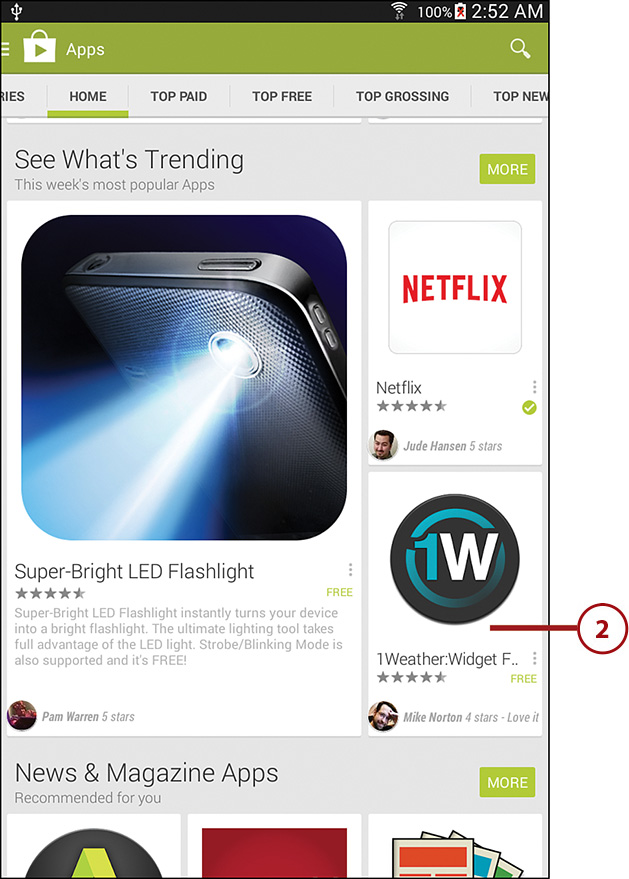
Search for Android Applications
To access the Google Play Store for the first time, you must use your Google account to sign into the Google Play Store. After you launch the Google Play Store app, there are several ways for you to search apps from the home page. The home page search options change position on the page, depending on which orientation you hold your Tab 4: vertical or horizontal.
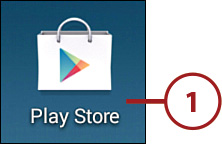
1. Tap Play Store on the Home screen.
2. Tap Accept if you see the Google Play Store Terms of Service.
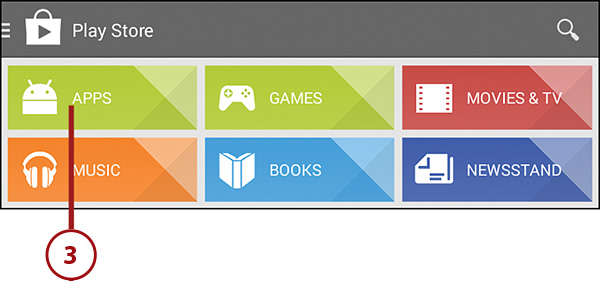
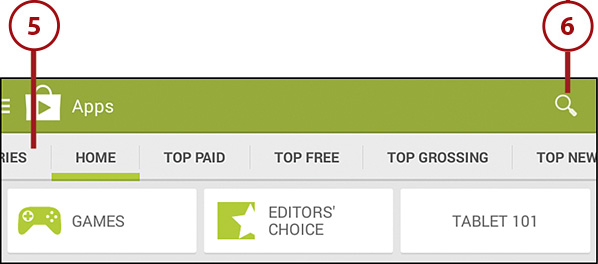
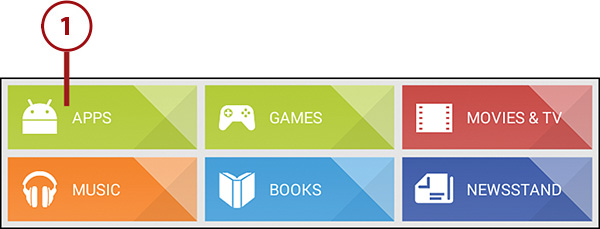
3. Tap Apps on the Google Play Store home page. A page of featured apps displays.
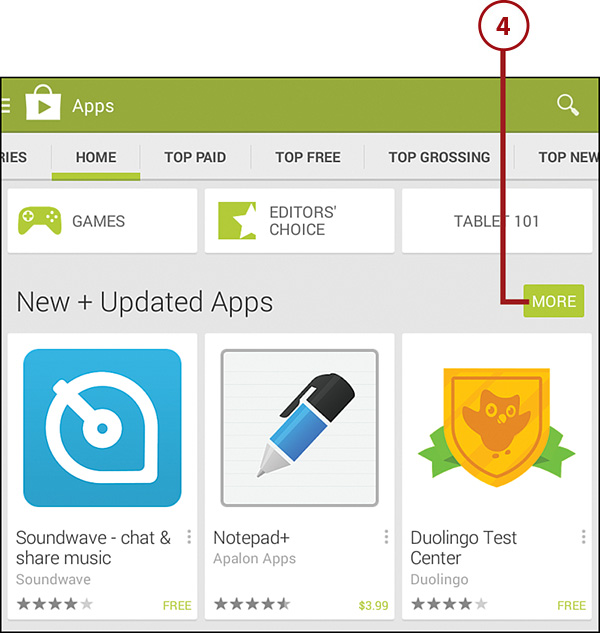
4. Scroll up and down the page to review groups of apps as well as individual apps. You can view more apps in a group by tapping More.
5. Tap a category to browse the list of results for that category.
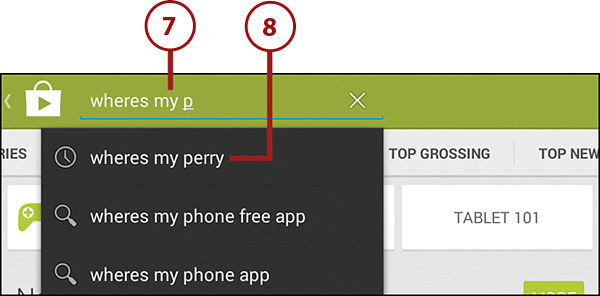
6. If you know the name of the app, book, magazine, or movie you want, tap the Search icon to specify a search term.
7. Type a search term into the Search Google Play field. Possible matches for your search appear in the list below the search field.
8. Tap the app in the list if the product you want is listed as an option.
9. Swipe up and down the list of apps in the Results page and then tap the title of the app you want more information about.
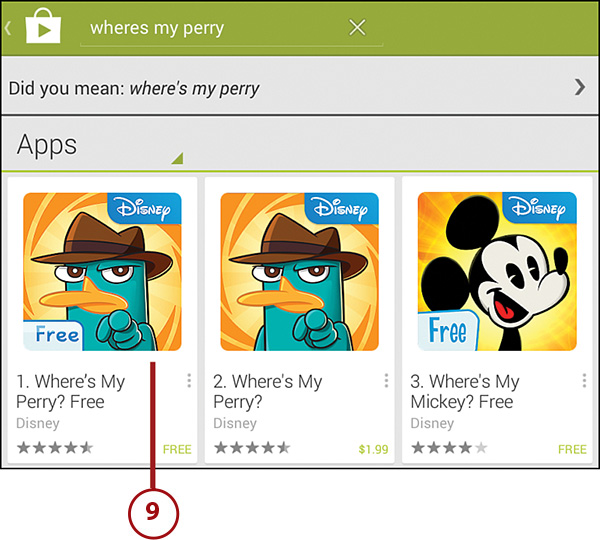
10. Read more about the product. You can purchase—or download, if the app is free—the app on the description page. In this example, install Where’s My Perry? Free by tapping Install.

Find Great Apps
There are thousands of apps that you can download to your Galaxy Tab 4, so use your storage space wisely by finding the great ones. Finding the best apps might be the biggest challenge of all as you wade through your many options. This task gives you some tips on how to locate the highest-performing apps.
1. Tap Apps in the Google Play Store app.
2. Take a look at the featured apps on the Play Store home page. Keep in mind that large companies, usually with well-established names, tend to dominate the featured list. Lesser-known developers are also producing outstanding apps, so look deeper.
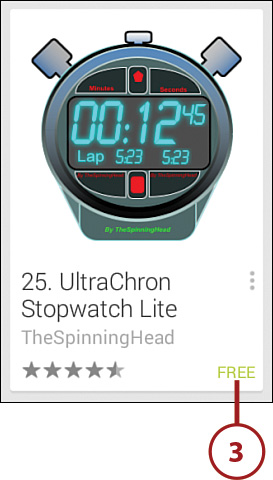
3. Some apps have trial versions you can test drive before purchasing. Look for Lite or Free versions of applications to test before you buy.
4. Tap an app in the Apps list that you want to learn more about.
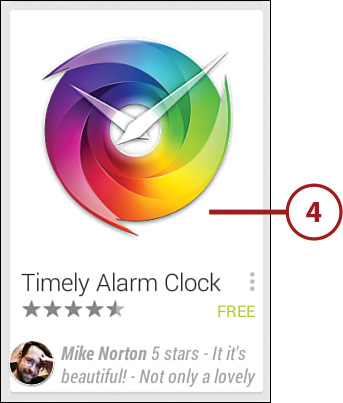
5. Scroll down to check out customer reviews for products, but don’t trust everything you read. Some reviews might not be in-depth or unbiased, and therefore they are less helpful.
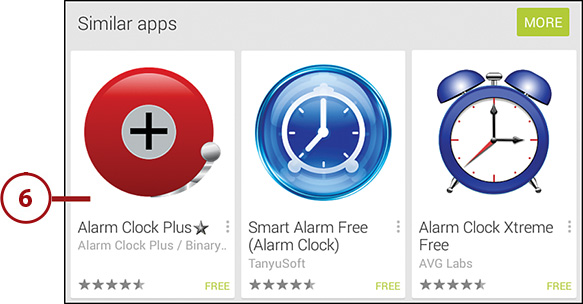
6. Scroll to the bottom of the page and take a look at the Similar Apps list. You see apps that are similar along with their ratings next to them. You might find a higher-rated app that you want to look into.
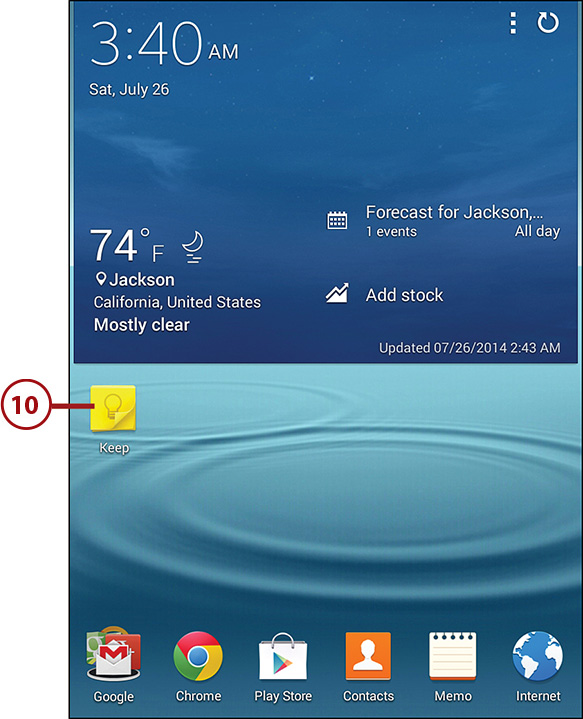
Purchase Android Applications
Software developers from around the world have developed thousands of apps for you to take advantage of with your Galaxy Tab 4. You can choose from many free apps in the Google Play Store, and you can also purchase a variety of more sophisticated apps for a fee. The process for downloading free apps and paid apps is similar, but you need to designate a payment method to make purchases.
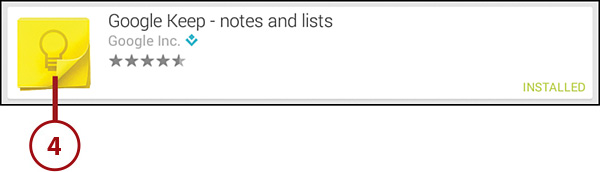
1. Tap Play Store on the Home screen.
2. Locate and then tap the app that you want to download. The product description page opens.
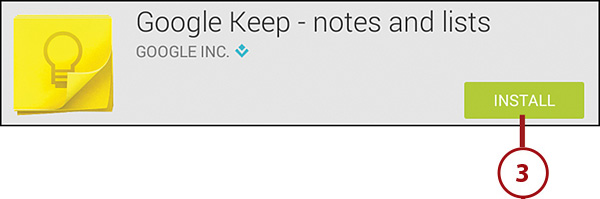
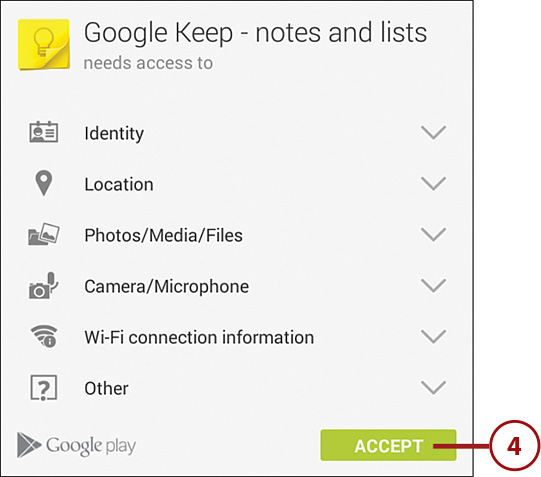
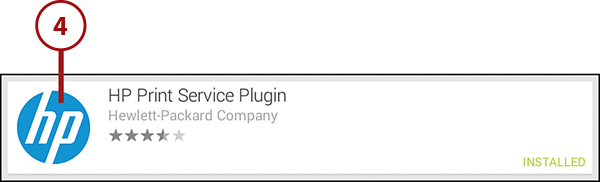
3. Tap the price of the app to see the permissions for this app. If this app is free, as in this example with Google Keep, tap the Install button. A page that lists the permissions the app is requesting opens.
4. Tap Accept to begin installing the app.
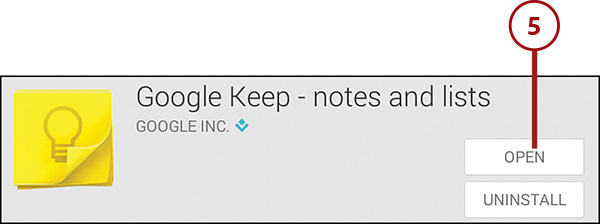
5. Tap Open to launch the application.
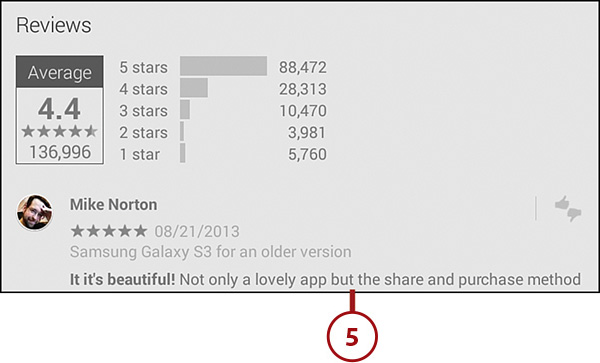
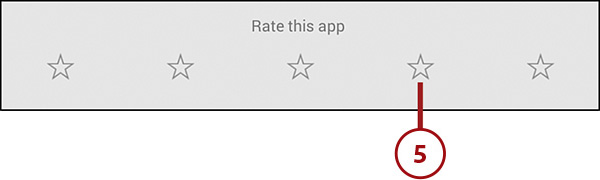
Rate Applications
Rating content you have purchased on Google Play Store helps others make educated decisions about their purchases. The Google Play Store uses a five-star rating system to rate all content. Much of the content on the Google Play Store features reviews that you can read to see how others like the product.
1. Tap Play Store on the Home screen.
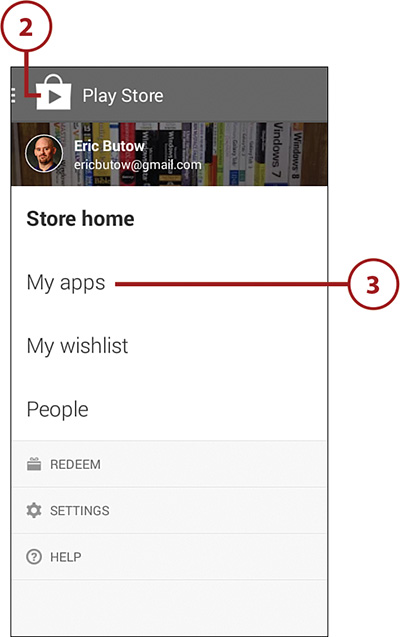
2. Tap the Google Play Store icon.
3. Tap My Apps.
4. Tap the app that you want to rate.
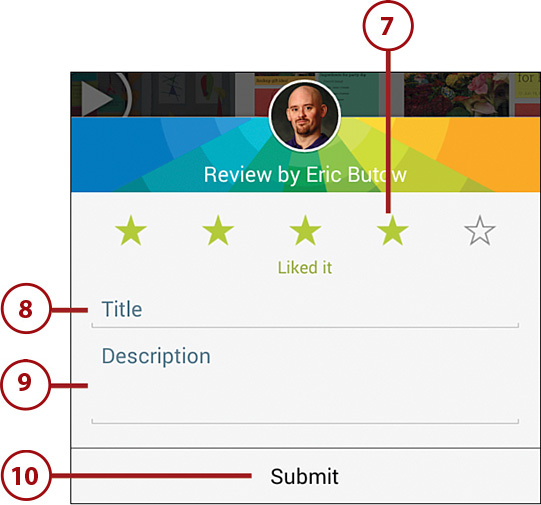
5. Tap a rating star on a scale from one to five. For example, if you tap the second star from the right the first four stars from left to right are highlighted in blue, which signifies that you give the app four stars on a five-star scale.
6. Tap OK if you see a window with information about Google Play reviews using Google+.
7. Tap the rating star again as you did in Step 5.
8. Enter a title for your review in the Title field.
9. Enter your comments in the Description field.
10. Tap Submit.
Get Help with Apps
Many new apps are being added to the Google Play Store daily from well-known companies, small companies, and individual developers. Bugs and other problems are likely to arise in such a fast-moving market. There are ways for you to contact developers so that you can ask questions.
1. Tap Play Store on the Home screen.
2. Tap the Google Play Store icon.
3. Tap My Apps.

4. Tap the app for which you need help.
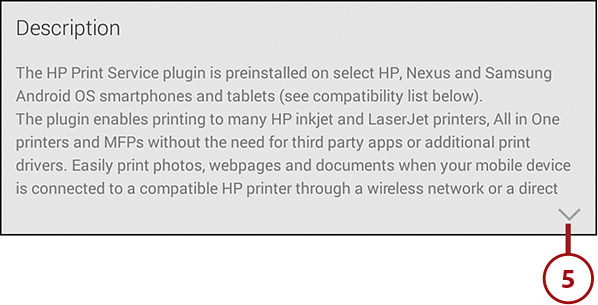
5. Tap the down arrow icon to view the entire description.
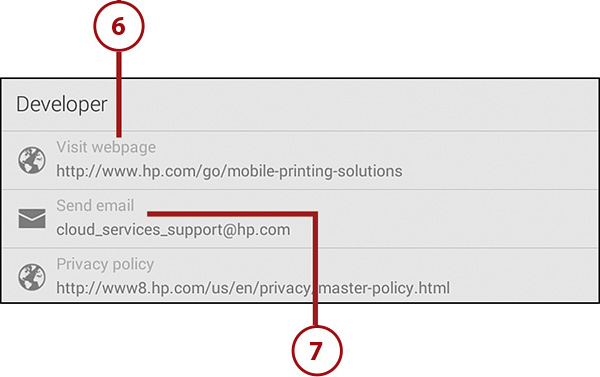
6. Scroll down and then tap Visit Webpage in the Developer section to visit the developer’s site and search for information.
7. Tap Send Email to compose an email message asking your question(s).
Managing Apps Through Your Home Pages
You begin many of your activities on the Home screen of the Galaxy Tab 4. As you purchase new apps, the number of icons in your Applications menu multiplies, which might prompt you to rearrange them according to the ones you use the most. You can manage your apps through your home pages by creating new home pages, deleting existing home pages, and grouping and arranging apps as you see fit on respective pages.
By default, when you download an application from Google Play Store, a shortcut is placed in the Applications menu, which is accessible from any Home screen. You can easily move shortcuts from the Applications menu to a Home screen and then rearrange them.
1. Tap the Apps icon on the Home screen.

2. Swipe from right to left on the screen to view the app you added on the second page of the Apps screen.
3. Locate the application shortcut, or widget, that you want to use, and then press and hold your finger on it. An overlay of the main Home screen appears on the page and overlays of both Home pages display below the main Home screen overlay.
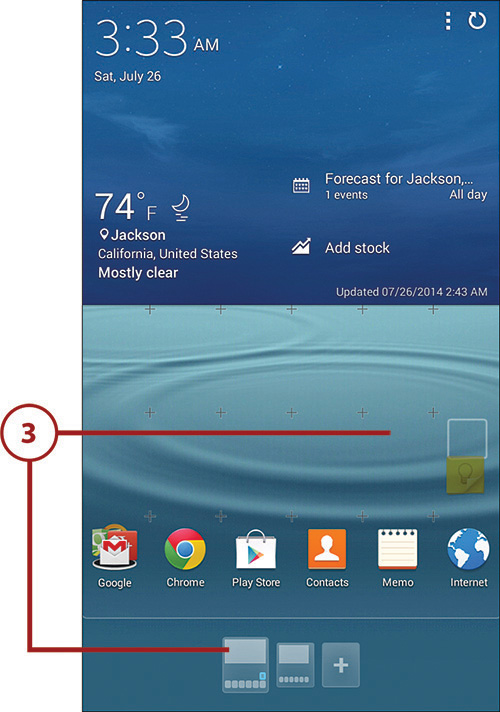
4. Move the shortcut to the desired Home screen overlay. Your selected Home screen appears as an overlay on the screen.
5. Move the shortcut to your desired location on the Home screen.
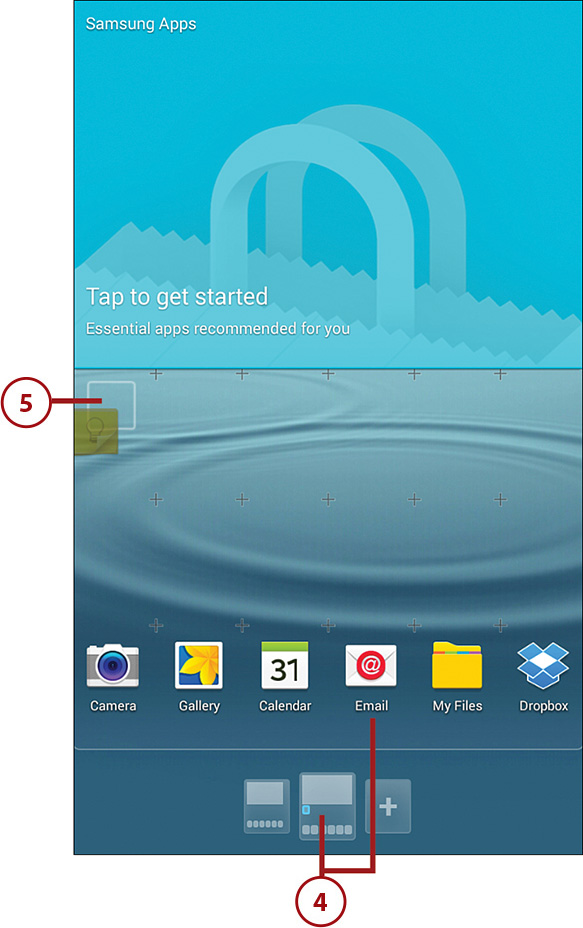
6. Release your finger. The shortcut is placed on the Home screen.
7. Repeat Steps 2 and 3 to move more App shortcuts from the Applications menu to the Home screen.
8. By default, your Galaxy Tab has three Home screens. Press your finger on a shortcut on a Home screen (in this example, Home screen 2) that you would like to move to another Home screen.

9. Drag the icon with your finger to the edge of the screen to move to another Home screen (in this example, Home screen 2).
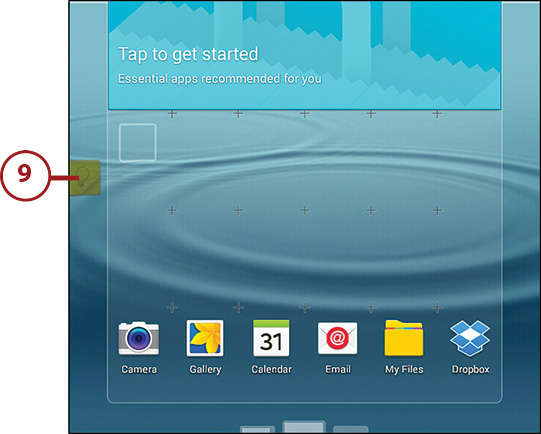
10. Remove your finger from the shortcut when you reach the spot where you would like to leave the shortcut.
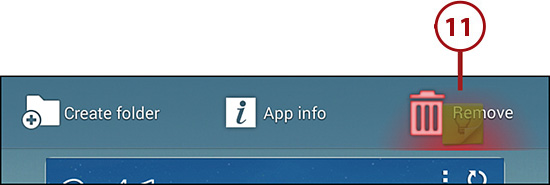
11. When you hold your finger on a shortcut and after it pulsates once, the Remove icon (a trashcan) appears in the top-right of the screen. Drag a shortcut to the Remove icon to remove it from a Home screen.
Adding Useful Apps
The true power of the tablet revolution lies not only in the simplification of computing, but also personalization. Apps enable you to optimize your Galaxy Tab for your unique lifestyle. Your Galaxy Tab 4 can be a virtual dictionary or thesaurus. Add an RSS reader and transform your Tab into a news-gathering device so that you are always up to date on current news and events. Many practical apps on the market enhance the capabilities of your Galaxy Tab 4, freeing you from having to purchase and carry a second device such as a digital audio recorder or scanner. There are too many options to list them all here, but let’s explore a few practical apps that you might want to consider.
Use the Merriam-Webster Dictionary App
Adding a simple dictionary app to your Galaxy Tab 4 is a very handy and practical solution for having to lug around an actual paper reference book.
The Merriam-Webster Dictionary app is free on the Google Play Store and delivers content that is trusted. The following steps presume you have already downloaded the Merriam-Webster Dictionary app from the Google Play Store.
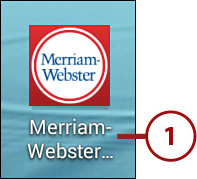
1. Tap the Merriam-Webster app on the Home screen.
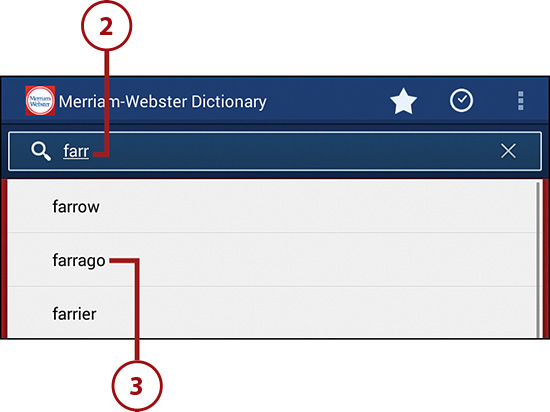
2. Tap in the Search field and enter a word to look up. Search suggestions appear in the list beneath the field.
3. Tap the correct word in the list. The definition(s) for the entry appear.
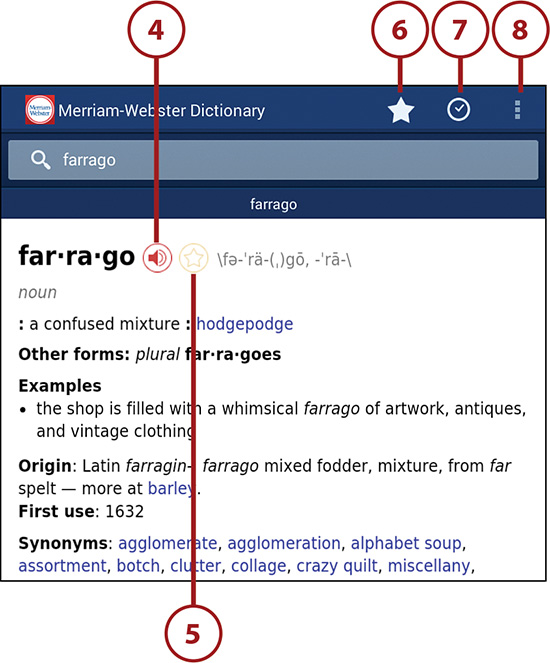
4. You can tap the speaker icon to hear the pronunciation of the word.
5. Tap the star to add this word to your Favorites.
6. Tap to view all words you have marked as Favorites.
7. Tap to view a list of recently searched words.
8. Tap to open the app menu.
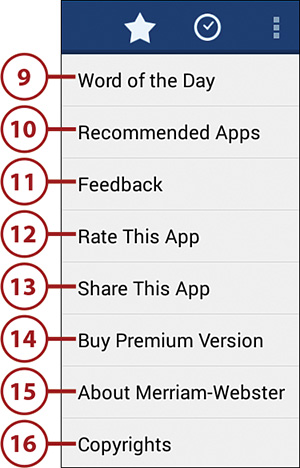
9. You can learn a new word every day. Tap to view the word of the day.
10. Tap to get a list of apps recommended to you by Merriam-Webster, such as the Britannica Encyclopedia.
11. Tap to provide Feedback to the developers of this app.
12. Tap to rate this app in the Play Store.
13. Tap to share information about this app in an email message, on social networks, on cloud storage services, in other apps such as Memo, or to other devices.
14. Tap to learn about and purchase the premium version of the app in the Play Store.
15. Tap to get information about Merriam-Webster.
16. Tap to get copyright information for the app.
Use the LinkedIn Pulse RSS Reader
If part of your daily routine includes reading news websites and blogs, adding an RSS reader can help you manage your news sources from one app in the form of feeds instead of visiting multiple websites. LinkedIn Pulse is a free RSS feed reader that you can download from the Google Play Store; it enables you to acquire and manage multiple news feeds as an interactive mosaic. The following steps presume you have already downloaded the LinkedIn Pulse app from the Google Play Store.
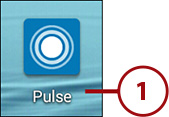
1. Tap Pulse on the Home screen.
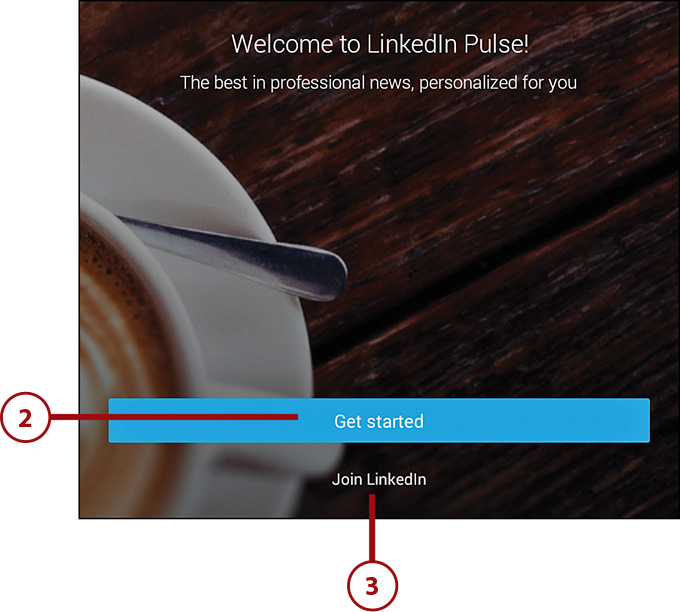
2. Tap Get Started.
3. If you don’t have a LinkedIn account, tap Join LinkedIn. This example presumes you already have a LinkedIn account.
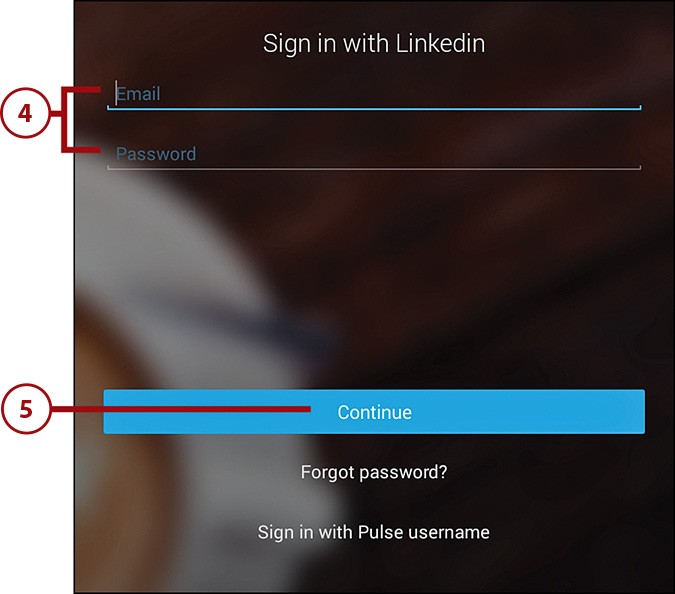
4. Type your LinkedIn username and password in the Email and Password fields.
5. Tap Continue.
6. Pulse is loaded with predefined news feed channels to get you started. Each tiles represents an individual feed channel. Flick down on the screen to view the rest of the channels.
7. Tap to choose a new feed to add to the page.
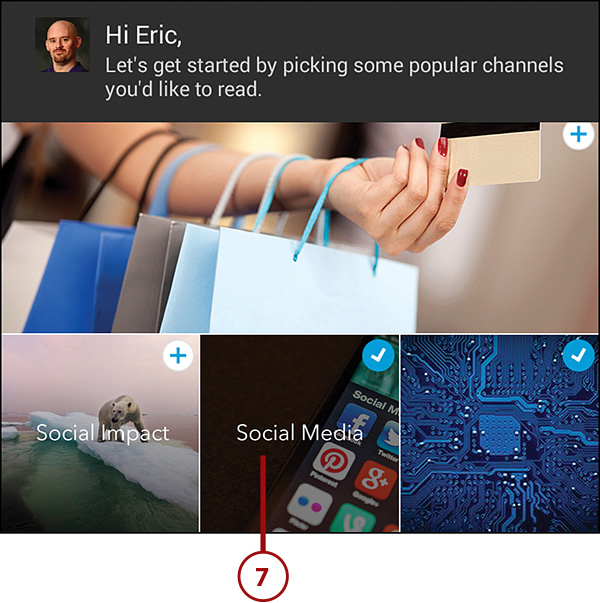
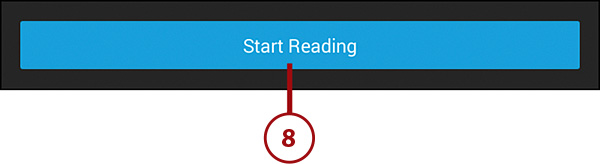
8. After you tap the topic(s) you want, tap Start Reading.
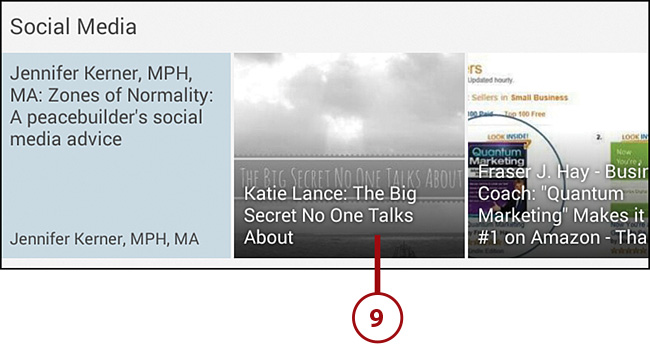
9. Tap a news story to open it. The story opens.
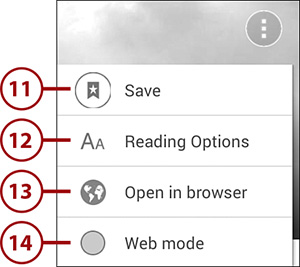
10. Open a menu to change your viewing options by tapping the Menu icon.
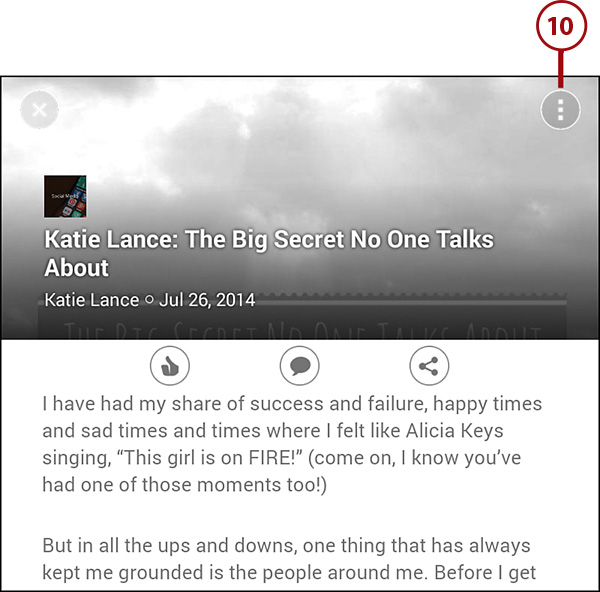
11. Tap to save the article as a favorite.
12. Tap to select a new font size and style for the article text as well as the brightness level for the page.
13. Tap to open the article in the Internet or Chrome browser.
14. Tap to open the article on the main website where the article is found.
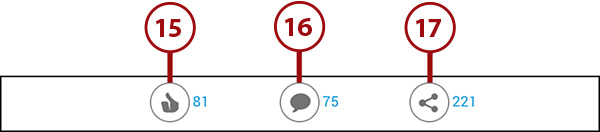
15. Tap to like the article and share that with the website that contains the article and on your LinkedIn profile. The number of likes already posted appears to the right of the icon.
16. Tap to comment on the article and share that with the website that contains the article and on your LinkedIn profile. The number of comments already posted appears to the right of the icon.
17. Tap to share the article on Linked, Facebook, Twitter, and/or Google+; you can also share the article with other apps including email, Gmail, ChatON, and Dropbox. The number of times the article has been shared appears to the right of the icon.
18. Tap the Close button in the upper-left corner of the screen to return to the category news feed page.
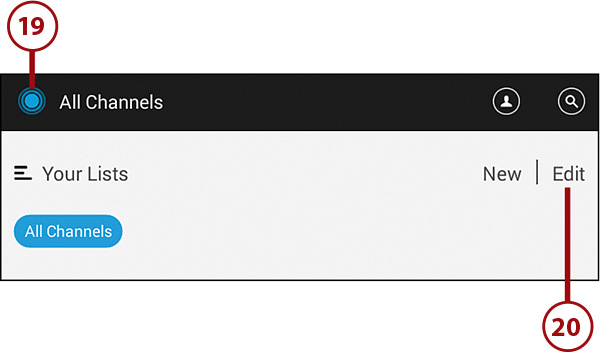
19. Tap the Pulse icon in the menu bar.
20. Tap Edit.
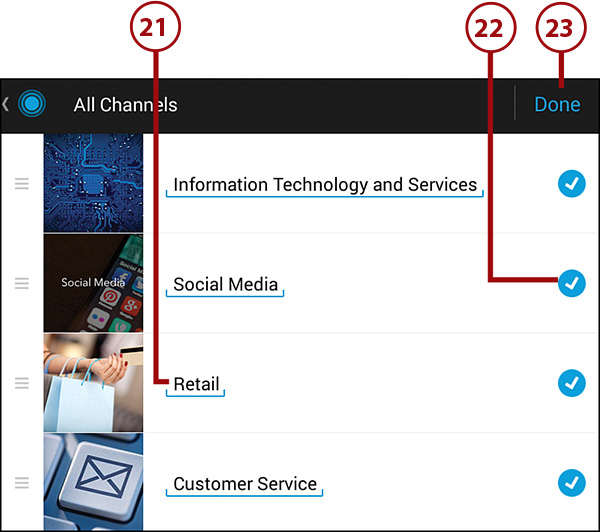
21. Press your finger to the name of a news feed and drag it to reorder feeds.
22. Remove a feed from your list by tapping the check mark icon and then tapping Remove in the window.
23. Tap Done when you finish editing your feeds list.
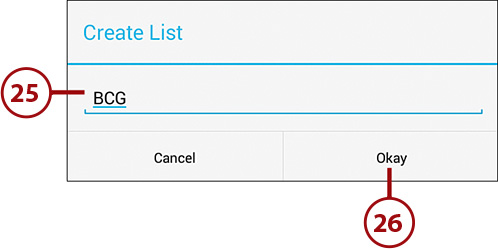
24. You can add a new content list category into which you can place feeds by tapping the Pulse icon in the menu bar and then tapping New.
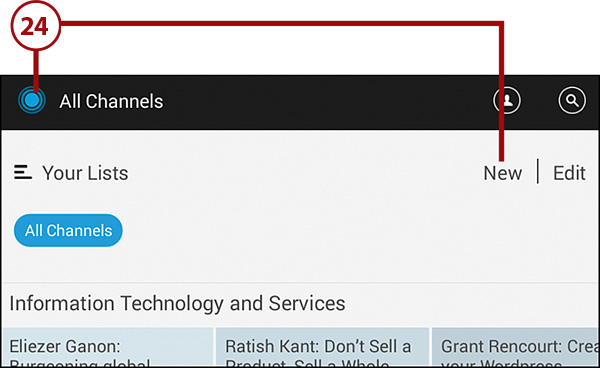
25. Type the new list category name in the Create List field.
26. Tap Okay.
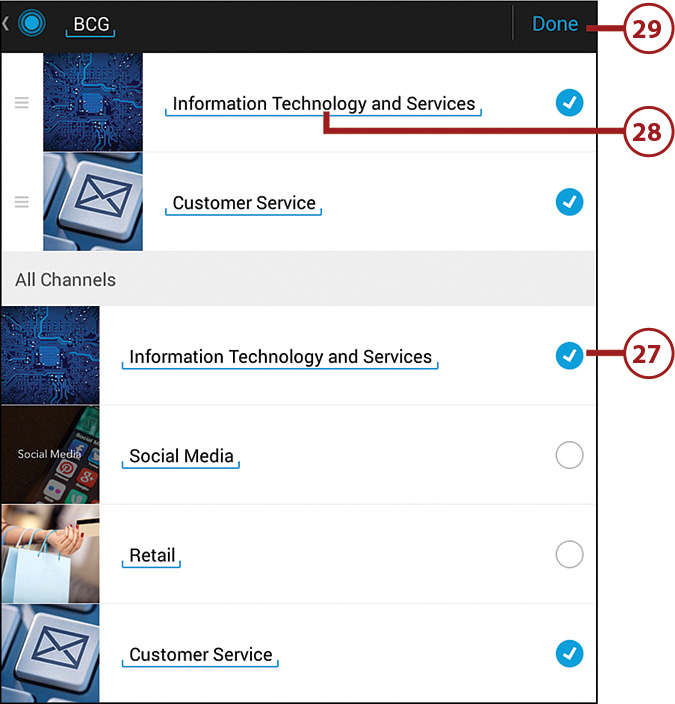
27. Search the feed you want to add in the category and then tap the button to the right of the feed name you want to add.
28. The feeds you add appear above the All Channels list.
29. Tap Done when you finish editing your feeds list.
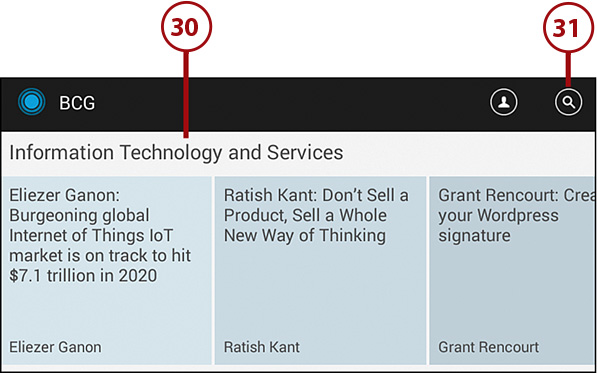
30. Your new list appears on the screen.
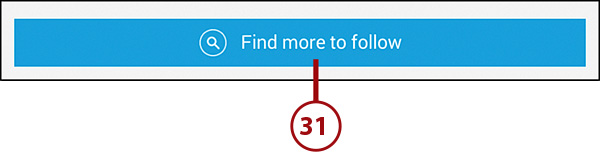
31. Add more categories to the list by tapping either the Search icon in the menu bar or the Find More to Follow button at the bottom of the feed list.
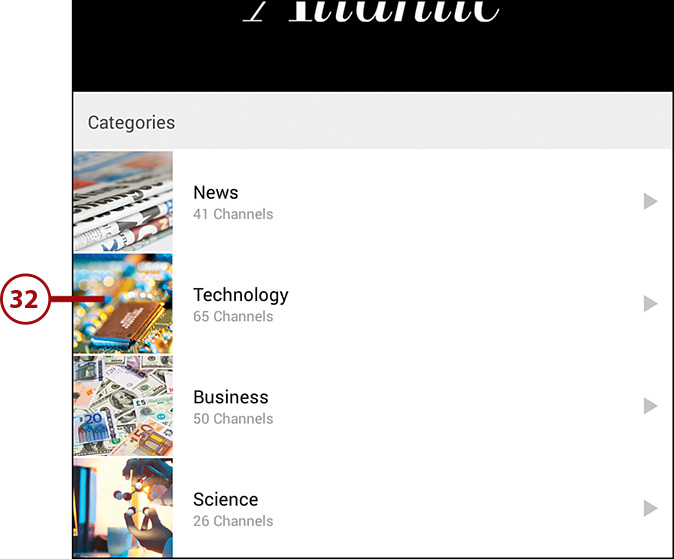
32. Search new categories and then tap the feed you want to add in the What’s New section or the category name in the Categories section. This example uses the Technology category.
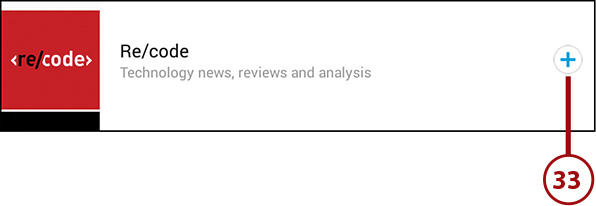
33. Search the feed you want to add in the category and then tap the plus icon to the right of the feed name you want to add.
34. Tap the Back touch button twice to return to the feeds page.
35. The feed you added appears at the top of the list.
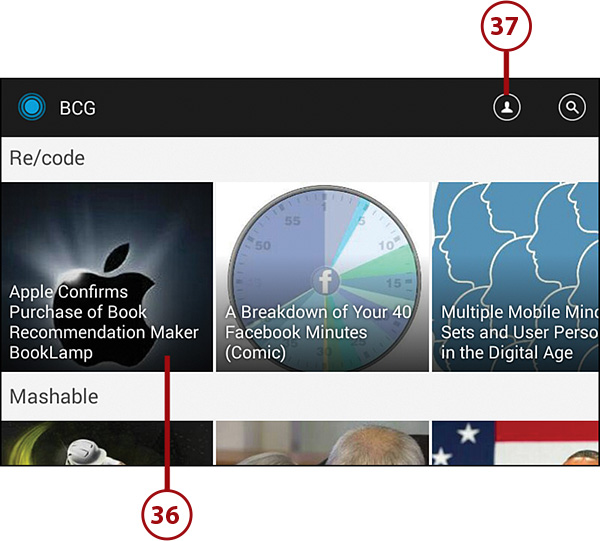
36. View an article in the new feed by tapping the tile.
37. Tap to view your profile, change your profile settings, and view a list of your saved stories.
Use Note Everything
A digital voice recorder can be a priceless tool if you ever need to record some notes for yourself. Or have you ever wished you had the capability to scan barcodes on a product so that you could store the information?
Note Everything is a free app that can do all of this and more, including taking handwritten notes and tucking information away neatly in folders. This section presumes you have already downloaded the Note Everything app from the Google Play Store.
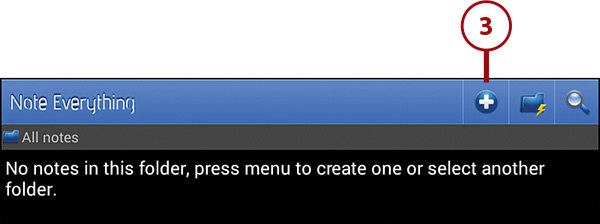
1. Tap Note Everything on the Home screen.

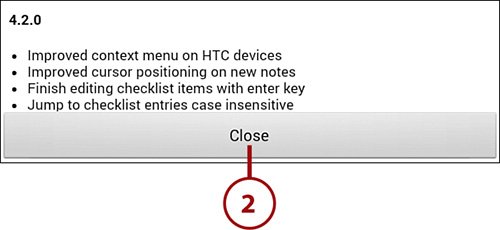
2. Tap Close in the What’s New screen.
3. Tap to add a new note.
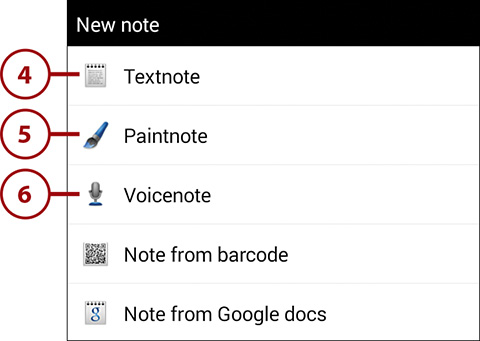
4. Tap Textnote to leave a note using the keyboard. This is similar to how the preinstalled Memo widget works on your Tab, but you might find it more beneficial to have all your notes in one location.
5. Tap Paintnote to leave a note using your finger as a pen. You can tap the Menu button on your Galaxy Tab and change the color of ink, erase marks, change stroke width, clear colors, work full screen, and more. This is a great option for jotting down a quick visual note.
6. Tap Voicenote to record voice memos. Each recording is stored as an individual file that you can play back on your Galaxy Tab.
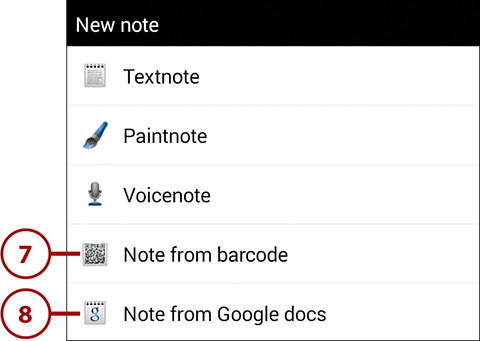
7. Tap Note from Barcode to use your Galaxy Tab 4 camera to read barcodes and note the barcode for later reference. This option requires you to install another free app named Barcode Scanner for it to work. The installation process is streamlined within the Note Everything app and takes only a few moments.
8. Tap Note from Google Docs to import and export text notes from Google Docs. This option requires you to install another free app named Note Everything (NE) GDocs. These two apps can work seamlessly together or independently.
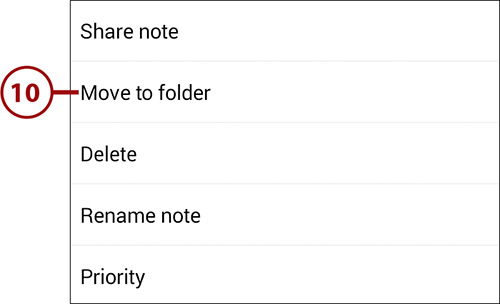
9. After you write a note, tap the Back touch button. The note is placed in the main (root) menu. Tap and hold your finger on any note that you would like to move to a different folder, and a pop-up menu appears.
10. Tap Move to Folder.
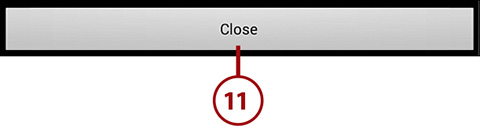
11. Tap Close after you read the help screen. Help screens appear when you access a function for the first time.
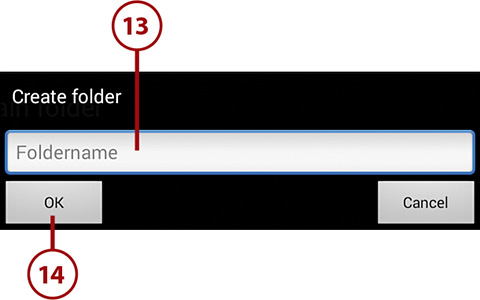
12. Tap to create a folder.
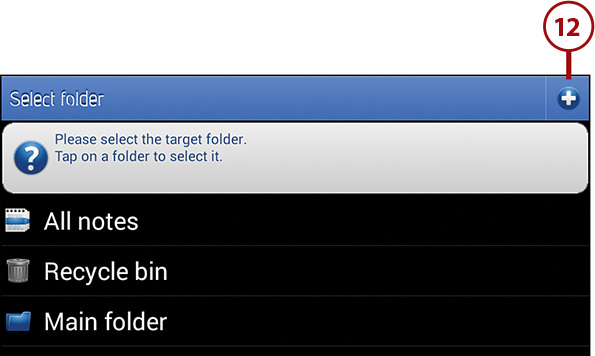
13. Type the name in the Foldername field.
14. Tap OK to move the note to the new folder.