
14. Fine-Tuning Your Professional Profile on LinkedIn

In this chapter, you learn how to create an effective profile for professional networking on the LinkedIn social network.
LinkedIn is different from Facebook and most other social media, in that it has a distinct focus on business. Businesses use LinkedIn to find potential employees; job hunters use LinkedIn to look for potential employers; and business professionals use LinkedIn to keep in touch with others in their professions.
Even if you’re not currently in the job market, LinkedIn is a great way to network with other people in your industry, and to keep tabs on what former co-workers are up to. It’s very much a business networking site, using social networking functionality.
Signing Up and Logging In
Basic LinkedIn membership is free; anyone can join. LinkedIn also offers a variety of Premium memberships, from $29.99 to $99.95 per month, designed specifically for serious job hunters, business networkers, and sales professionals. For most people, however, the free membership is the way to go.
Although LinkedIn has a mobile app (available for both Android and Apple devices), most businesspeople access the LinkedIn website via their desktop or laptop computers. Although this chapter focuses on the LinkedIn website, know that you can do most all of these operations in the LinkedIn app.
Create a New Account
When you create your LinkedIn account, you’re prompted to enter some basic information, including your job status. You need to do this to create your account, but you can come back later to edit this or enter additional information.
![]() In your web browser, go to www.linkedin.com and enter your first name and last name into the respective boxes.
In your web browser, go to www.linkedin.com and enter your first name and last name into the respective boxes.
![]() Enter your email address into the Email box.
Enter your email address into the Email box.
![]() Enter your desired password into the Password box.
Enter your desired password into the Password box.
![]() Click the Join Now button.
Click the Join Now button.

![]() Pull down the Country list and select your country, if you’re not in the United States.
Pull down the Country list and select your country, if you’re not in the United States.
![]() Enter your ZIP Code into the Zip Code box.
Enter your ZIP Code into the Zip Code box.
![]() Click Next.
Click Next.

![]() If you’re a student (which you probably aren’t), select Yes for the Are You a Student? option.
If you’re a student (which you probably aren’t), select Yes for the Are You a Student? option.
![]() Enter your current job title into the Job Title box.
Enter your current job title into the Job Title box.
![]() Enter the name of your employer into the Company box.
Enter the name of your employer into the Company box.
![]() If the box expands, pull down the Industry list and select the industry that you’re in.
If the box expands, pull down the Industry list and select the industry that you’re in.
![]() Click Next.
Click Next.

![]() LinkedIn asks how you want to use the site. Make a selection from the options given, or select Not Sure Yet. I’m Open!
LinkedIn asks how you want to use the site. Make a selection from the options given, or select Not Sure Yet. I’m Open!

![]() You are prompted to verify your email address. You receive a code via email; enter that code, click Verify, and follow the onscreen directions to complete your membership.
You are prompted to verify your email address. You receive a code via email; enter that code, click Verify, and follow the onscreen directions to complete your membership.

Sign In to Your Account
Once you’ve created your LinkedIn account, signing in is a quick and easy process.
![]() In your web browser, go to www.linkedin.com and enter your email address into the Email box at the top of the page.
In your web browser, go to www.linkedin.com and enter your email address into the Email box at the top of the page.
![]() Enter your password into the Password box at the top of the page.
Enter your password into the Password box at the top of the page.
![]() Click Sign In.
Click Sign In.

![]() You see the LinkedIn home page. Status updates from your connections are displayed in the middle of the page. Scroll down to read more.
You see the LinkedIn home page. Status updates from your connections are displayed in the middle of the page. Scroll down to read more.

Creating an Effective Profile
Every LinkedIn member has his or own personal profile page. This profile page is what other LinkedIn users see when they search for you on the site; it’s where you make your initial impression to the people you want to make contact with—including potential employers.
Your LinkedIn profile is kind of like a mini-resume, containing important personal and professional information. It’s also fully customizable; you can select which content others see.
Your profile page can include any or all of the following sections:
• Intro: This opening section is an overview of your personal information, including name, location, current title, past positions, and education. It functions as an online business card—a quick glance at your experience and qualifications.
• Contact and Personal Info: Includes links to your personal website or blog, your public email address and phone number, and other contact information.
• Activity: Displays your most recent activity on the LinkedIn site.
• Experience: A listing of your current and previous employment positions, as well as your educational and volunteer experiences, sorted in reverse chronological order.
• Featured Skills & Endorsements: Specific professional skills you possess, as well as endorsements from other users.
• Recommendations: Any recommendations you’ve received or given to others.
• Interests: Companies and groups that you are following.
• Accomplishments: Professional degrees, courses attended, and the like.
Edit Your Intro
Because your profile page serves as your de facto resume on the LinkedIn site, you want to control the information you display to others. The first thing visitors to your profile page see is the Intro section, so that’s what you should edit first.
![]() On the LinkedIn menu bar, click the profile picture or icon and select View Profile. This displays your profile page.
On the LinkedIn menu bar, click the profile picture or icon and select View Profile. This displays your profile page.

![]() The Intro section is at the top of the page and contains any information you entered when you signed up for your LinkedIn account. Click the Edit (pencil) icon to display the Edit Intro pop-up.
The Intro section is at the top of the page and contains any information you entered when you signed up for your LinkedIn account. Click the Edit (pencil) icon to display the Edit Intro pop-up.

![]() Add or edit the desired information. Your Intro can include your first and last name, headline, current position, education (typically college attended), country, ZIP Code, locations within your area (other cities or towns in a metro), industry, and summary of your work experience.
Add or edit the desired information. Your Intro can include your first and last name, headline, current position, education (typically college attended), country, ZIP Code, locations within your area (other cities or towns in a metro), industry, and summary of your work experience.
![]() Click the Add New Education or Add New Position links to add new education or work information.
Click the Add New Education or Add New Position links to add new education or work information.
![]() Click the Save button.
Click the Save button.

Write Well
Write your summary in complete sentences using proper grammar and punctuation. Appearances matter to future employers!
![]() To edit the information in any other existing section, click the Edit (pencil) button for that section and make the necessary changes.
To edit the information in any other existing section, click the Edit (pencil) button for that section and make the necessary changes.
![]() To add a new section to your profile, click Add New Profile Section and then click the + icon for the type of information you want to add: Background (work experience, education, and volunteer experience), Skills, or Accomplishments (publications, certifications, courses, projects, honors and awards, patents, test scores, languages, or organizations).
To add a new section to your profile, click Add New Profile Section and then click the + icon for the type of information you want to add: Background (work experience, education, and volunteer experience), Skills, or Accomplishments (publications, certifications, courses, projects, honors and awards, patents, test scores, languages, or organizations).

![]() Enter the appropriate information for the item you’re adding and then click Save.
Enter the appropriate information for the item you’re adding and then click Save.

![]() Edit your contact information by clicking the Edit (pencil) icon in the Contact and Personal Info section.
Edit your contact information by clicking the Edit (pencil) icon in the Contact and Personal Info section.

![]() Enter or edit the contact information you want to publicly display. You can choose to display your website or blog URL, phone number, home address, email address, birthday, and more. (Display less personal info to enhance your security online.)
Enter or edit the contact information you want to publicly display. You can choose to display your website or blog URL, phone number, home address, email address, birthday, and more. (Display less personal info to enhance your security online.)
![]() Click Save.
Click Save.

Add a Profile Picture
Profiles with pictures get much more attention than those without. You can easily add a personal picture to your LinkedIn profile.
![]() On your profile page, click the camera icon to open the Open dialog box. (If you’ve already added a photo, you can change it by clicking the photo.)
On your profile page, click the camera icon to open the Open dialog box. (If you’ve already added a photo, you can change it by clicking the photo.)

![]() Select the photo you want to use.
Select the photo you want to use.
![]() Click the Open button.
Click the Open button.

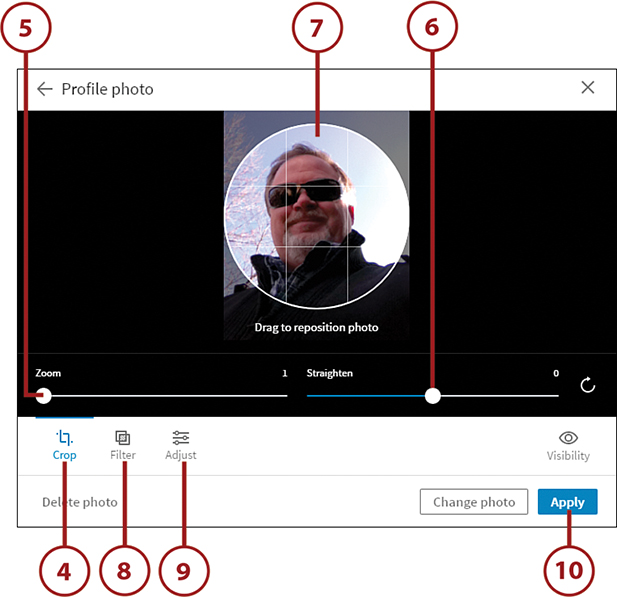
![]() You see a preview of your picture as it will appear on the LinkedIn site. Click Crop (activated by default) to edit your picture.
You see a preview of your picture as it will appear on the LinkedIn site. Click Crop (activated by default) to edit your picture.
![]() Use the Zoom control to resize your picture.
Use the Zoom control to resize your picture.
![]() Use the Straighten control to rotate your picture as necessary.
Use the Straighten control to rotate your picture as necessary.
![]() Use your mouse to drag the picture to better fit within the circle, if necessary.
Use your mouse to drag the picture to better fit within the circle, if necessary.
![]() Click Filter to apply photographic filters to your picture.
Click Filter to apply photographic filters to your picture.
![]() Click Adjust to adjust your picture’s brightness, contrast, or saturation, or to apply a vignette effect.
Click Adjust to adjust your picture’s brightness, contrast, or saturation, or to apply a vignette effect.
![]() Click the Apply button. Your photo is uploaded and inserted into your profile.
Click the Apply button. Your photo is uploaded and inserted into your profile.
![]() You see the Edit Intro panel with your new picture in place.
You see the Edit Intro panel with your new picture in place.
![]() Click Save to save this change to your profile.
Click Save to save this change to your profile.
