
2. Getting Better Sound

In this chapter, you learn how to get the best possible sound when you’re watching TV.
![]() Reading What You Hear with Closed Captions
Reading What You Hear with Closed Captions
![]() Getting Better Sound from Headphones
Getting Better Sound from Headphones
![]() Enhancing TV Audio with a Sound Bar
Enhancing TV Audio with a Sound Bar
![]() Understanding Surround Sound
Understanding Surround Sound
![]() Assembling a Surround Sound System
Assembling a Surround Sound System
![]() Choosing the Right Options for You
Choosing the Right Options for You
Your flat-screen TV includes two or more built-in speakers. They might sound okay to you, especially when you’re listening to a news channel or late-night talk show. But those built-in speakers might be inadequate when you’re listening to a concert or watching an explosion-filled action movie. You might even have trouble discerning normal dialogue from those tiny built-in speakers.
What can you do if the sound on your new TV isn’t as good as its high-definition picture? Fortunately, you have several options—some of which sound really impressive.
Reading What You Hear with Closed Captions
If your room is especially noisy or if you’re a little hard of hearing, it may be difficult to make out what people are saying in a television program. Sometimes the only way you can understand what’s being said onscreen is to turn on a show’s closed captions and read the dialogue. It’s a common solution; my wife and I use closed captions all the time, especially for shows where the characters tend to mumble or speak very quickly.
In most instances, you turn on closed captioning from your programming source. This means finding the closed captions setting on your cable or satellite box, streaming media player, or Blu-ray player. Some devices have a “captions” button right on the remote; others force you to hunt through the menu system until you find the right setting.
For example, if you’re using a Roku streaming media player, you can activate captions for all installed apps (channels), or within a given app for that particular channel. To turn on universal captions, go to Settings, Accessibility, Captions Mode and select On Always. To turn on or off captions for a specific app/channel, press the Options (*) button on the Roku remote and then select the caption track you want.

If you’re watching TV from a set-top cable box, press the Menu button on your cable remote control and navigate to settings or setup screen. From there you can find the captions or closed captioning option, and turn it on.
However you do it, closed captioning is a boon for those of us who are a little hard of hearing or have to listen in noisy rooms. Closed captions are also great when you need to mute the sound but still want to watch your favorite program; you can read what’s happening without having to hear it!
Getting Better Sound from Headphones
Another low-cost solution when you have trouble hearing what’s on your TV is to invest in a set of wired or wireless headphones. A good set of headphones lets you adjust the sound you hear to your taste. You can also use headphones to listen to your favorite programs at night without disturbing others in your home. Just put on your headphones, mute the normal TV sound, and you’re watching and listening in your own private world.
Although you can plug any set of earbuds or headphones in the audio jack on the front of most TV sets, a better approach for most living rooms is to invest in a set of wireless headphones. These units let you connect a wireless transmitter to your TV’s audio jack so you can listen to your headphones via Bluetooth or RF technology—no wires necessary. Most of these units have their own volume controls; you can control your personal volume level without adjusting the sound on your TV.
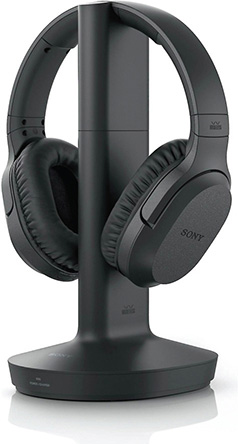
There are a variety of wireless headphones for TV use available for less than $100 USD, with higher-quality models running up to $400 USD or more. Look for a reputable brand and, if you can, try them out before you buy them. You want headphones that are comfortable when you’re wearing them for long periods of time and that deliver the sound you need.
Enhancing TV Audio with a Sound Bar
When you want to improve your TV sound substantially, you can replace your set’s internal speakers with a set of external speakers, in the form of a freestanding sound bar. A sound bar is simply an array of two or more speakers in a single enclosure. You position the sound bar underneath or in front of your TV screen. The additional speakers replace your TV’s built-in speakers, and provide much better sound for music, movies, and dialogue.
How Sound Bars Work
The lowest-priced sound bars include just two speakers—left and right. Higher-priced models include four or more speakers. Almost all sound bars are “active” speakers, meaning they have their own built-in amplifiers, typically more powerful than the amp that drives your TV’s built-in speakers.
The sound bar itself is a short and wide enclosure, anywhere from 1’ to 5’ wide. If your TV is wall-mounted, you can mount the sound bar directly underneath the screen on your wall. If your TV is on a table-top stand, you typically position the sound bar in front of the stand, underneath and in front of the TV screen.

(Photo courtesy Harman International Industries, www.harmankardon.com.)
All sound bars reproduce stereo sound, so you’ll hear a program’s right and left channels more clearly and distinctly than from your TV’s speakers. Many sound bars also include a discrete center channel speaker, typically used for dialogue; this will help you hear voices more clearly than you would otherwise.
Some sound bars attempt to simulate surround sound. (I talk more about surround sound later in this chapter.) These sound bars use various audio techniques to trick your ears into thinking you’re hearing sound coming from beside and behind you—even though the sound bar itself is very clearly positioned in front of you. Depending on the sound bar, this simulated surround sound might sound a little fake, or it might be surprisingly effective. If you want surround sound from a sound bar, it’s worth your time to audition it at a dealer before you buy.
For more authentic surround sound, look for a sound bar with additional surround speakers. These auxiliary speakers are typically wireless, connecting via Bluetooth technology to the main sound bar.
Although most sound bars sound considerably better than your TV’s internal speakers, the speakers in a sound bar are still somewhat small and might have trouble reproducing deep bass tones. That is, they might still sound tinny, especially when you listen to music or movies with lots of rumbling and explosions.
For this reason, many sound bars come with a separate speaker, called a subwoofer for those bass notes. The subwoofer is a bigger speaker than those in the sound bar itself, and it does a better job with those low tones. Because the sound of a subwoofer is so low it’s nondirectional, which means you can place it anywhere convenient in your room. Just remember that a subwoofer contains its own power amplifier, and you must connect it to a power source to work. Most subwoofers in these systems connect to the sound bar wirelessly, via Bluetooth.
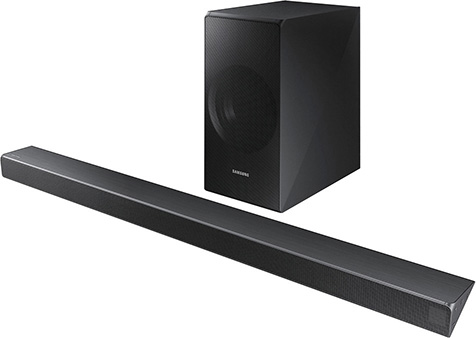
(Photo courtesy Samsung, www.samsung.com.)
When shopping for a sound bar, you’ll find the number of channels it reproduces is indicated by a number, like 2.1, 3.1, or 5.1.2. The first numeral in this designation alignment tells you how many channels of audio the sound bar reproduces. The “2” in 2.1 means two channels, and the “3” in 3.1 means three channels. A two-channel sound bar reproduces two front channels: left and right. A threechannel sound bar reproduces three front channels: left, right, and center. (The center channel is typically for dialogue.) A five-channel sound bar reproduces the front three channels along with left and right surround (side) channels. A sevenchannel sound bar adds right and left rear channels to the front and surround channels.
The second numeral in the designation tells you whether the sound bar includes a separate subwoofer for low bass tones. If it does, you’ll see the number “1,” as in 5.1. If it doesn’t, you’ll see a “0,” as in 2.0.
If a sound bar’s numeric designation includes a third number (not all do), such as 5.1.2, the third number indicates the number of Dolby Atmos channels, which add “height” to the bar’s sound. I discuss Dolby Atmos in the “Understanding Surround Sound” section, later in this chapter.
There are lots of different sound bar models available from lots of different manufacturers, including Bose, JBL, LG, Samsung, Sonos, Vizio, and Yamaha. Prices run from less than $100 USD to more than $1,000 USD. The more expensive models typically feature more speakers in the bar (up to a dozen or more!), bigger speakers (especially for the subwoofer), and more powerful amplifiers. In general, the more money you spend, the better quality sound you’ll hear.
Amplifier Power
Amplifier power is measured in number of watts (W). For example, a 300W amp is more powerful than a 100W amp. Power is sometimes rated on a per-channel basis, as in 40W/channel, or with all channels added together (four channels at 40W/channel equal 160W total system power).
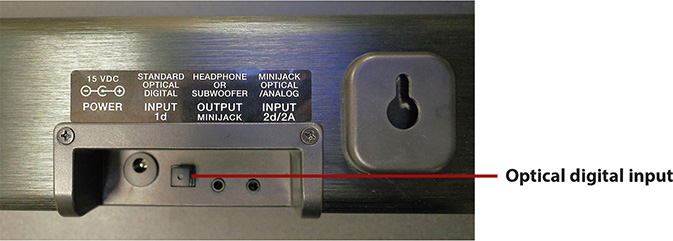
Connect a Sound Bar to Your TV
Connecting a sound bar is as simple as running a cable from the audio output on your TV to the input jack on the back of the sound bar. In most cases you do this with a thin and flexible optical digital audio cable. (Most sound bars include an optical digital audio cable; if not, you can purchase one for less than $10 USD at any store that sells electronics equipment.) It’s a quick and simple operation.
Some sound bars let you connect external devices, such as a cable/satellite box or streaming media player, directly to the sound bar itself, instead of to your TV. This lets you use the sound bar’s remote to control switching between components. If you want to go this route (and you don’t have to, if you’re happy switching inputs from your TV), simply connect the HDMI cables from each device to the appropriate HDMI inputs on your sound bar. You then connect an HDMI cable from your sound bar to an HDMI input on your TV.
Turn Off Your TV’s Internal Speakers
Because the sound bar has much better-sounding audio than your TV’s built-in speakers, you want to turn off those internal speakers when using your sound bar. You do this from your TV’s setup menu; it’s a little different on each set, but the following general instructions apply.
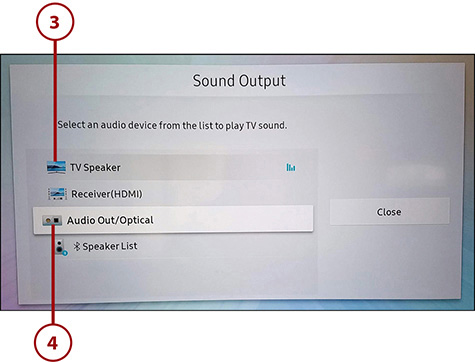
![]() Open your TV’s setup menu and navigate to the Audio or Sound section.
Open your TV’s setup menu and navigate to the Audio or Sound section.
![]() Select the sound output option.
Select the sound output option.
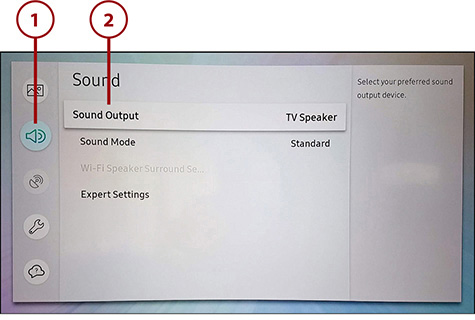
![]() Turn off your TV’s internal speaker. Or......
Turn off your TV’s internal speaker. Or......
![]() Select the external speaker setting. (On some sets, you can choose which external output you want to use—digital audio or HDMI.)
Select the external speaker setting. (On some sets, you can choose which external output you want to use—digital audio or HDMI.)
Understanding Surround Sound
Your TV’s internal speakers might be fine if you’re listening to simple right/left stereo soundtracks, but most of today’s HD programming—both movies and TV shows—uses more audio channels than that. We’re living in a world where soundtracks are designed to envelop the viewer from the front, both sides, behind, and even above the TV screen.
Virtually all movies and TV shows made over the past several decades use surround sound, which places the soundtrack all around the listener. Dialogue comes from the front of the room, special effects come from behind, and music fills the entire listening space. This is especially noticeable in special effects”laden action/adventure films; because your television has only front speakers, you need something more to experience these soundtracks as they’re meant to be heard.
To experience the full immersive surround sound experience, you need to move beyond your TV’s built-in speakers and even beyond sound bars to a full-fledged surround sound system. But before you make that leap, it helps to understand just what surround sound means.
Counting Surround Channels
Surround sound for home video has been around in one form or another for more than 30 years. There are various surround sound formats available today, differing mainly in the number of audio channels available.
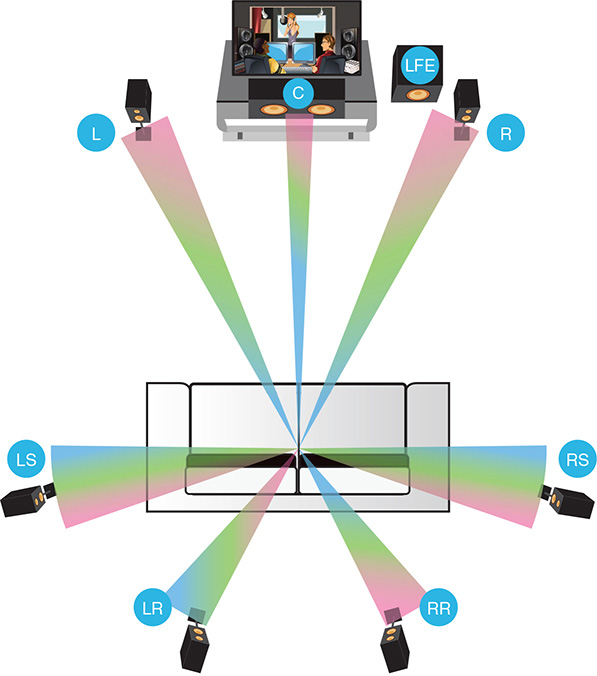
The most basic surround format, and the one used in most HDTV broadcasts, is designated as 5.1 surround. The “5” in this format means that it can reproduce up to five main channels of audio—front left, front center (typically located just above or below the television screen), right center, left surround, and right surround. Many listeners mistakenly place their surround speakers at the rear of the room, but these speakers are designed to literally surround the listener by being placed to the sides of the primary listening location, level with or just slightly above your ears.

Different Channels for Different Purposes
In most instances, the center channel in a surround sound system is used primarily for dialogue, where characters are typically speaking from the center of the screen. The front left and right speakers are used for music and off-center dialogue, whereas the surround and rear channels are used for sound effects and reverberation.
The “.1” part of the equation is a separate low-frequency effects (LFE) channel that reproduces the very lowest bass information. This channel is fed to a powered subwoofer, which can be located anywhere within your listening space.
More Subs
Some surround sound systems include more than one subwoofer. This is indicated by a larger number after the “dot;” for example, a 5.2 system would include five primary audio channels and two LFE (subwoofer) channels.
Next up is 7.1 channel surround. In this setup, the sixth and seventh channels are true rear channels; these speakers should be located directly behind the listener. In a 7.1-channel system, you end up with speakers in front of you (left, center, right), speakers beside you (left and right surround), and speakers behind you (left and right rear). With this sort of setup, you’re literally surrounded by sound; you’re put in the middle of a movie soundtrack, with gunshots, explosions, and other special effects whizzing past your head, all around the room. (The surround and rear channels typically don’t carry dialogue—just effects and, in some cases, music.)
Choosing the Right Surround Format
The number of channels isn’t the only factor that distinguishes one surround format from another.
The most popular format in use today is Dolby Digital. This format delivers 5.1 channels of sound in a discrete fashion, meaning the individual channels are encoded and decoded separately. As the name implies, Dolby Digital sound is all digital, from start to end. Similar to Dolby Digital is the competing DTS format, which also offers 5.1 discrete channels of digital sound. The official HDTV broadcast standard mandates Dolby Digital sound; it’s also used in most DVDs and online streaming services.
Older Formats
Before the creation of discrete digital surround sound technology, older surround formats (such as Dolby Pro Logic and DTS Neo:6) didn’t keep all the channels separate. Instead, they mixed the surround channels into the front channels during the encoding process; the resulting surround sound (called matrixed sound), when decoded, wasn’t as distinct as with the newer discrete technologies. (The newer, discrete, surround formats do a noticeably better job of keeping each channel separate and simply sound clearer.) These older surround formats are used in some older programming available on broadcast/cable TV, DVDs, and streaming video services.
The Dolby Digital Plus and DTS-HD formats add two discrete rear channels to the mix, for 7.1-channel sound. You’ll find these surround formats used in the Blu-ray disc format. Also used in Blu-ray discs are the Dolby TrueHD and DTS-HD Master Audio formats. These are also 7.1-channel formats, but with higher-quality lossless audio.
That’s a lot of different formats to keep track of; fortunately, today’s surround sound receivers automatically recognize and decode whichever format is selected from the source. While you might be able to manually select from different surround formats, your receiver automatically plays either the default format or whichever other format you select, from either Dolby or DTS. Just make sure you have the right number of speakers connected, and you can enjoy all the wonders that surround sound provides.
Dolby and DTS
Two technology companies compete in the home surround sound market. The market leader is Dolby Laboratories (www.dolby.com), with Dolby Digital, Dolby Atmos, and other technologies. Dolby competes with Digital Theater Systems (www.dts.com), with its similar DTS, DTS:X, and other technologies. Although some audiophiles might be able to tell the difference between competing Dolby and DTS formats, for all practical purposes they deliver similar results.
Adding “Height” with Dolby Atmos
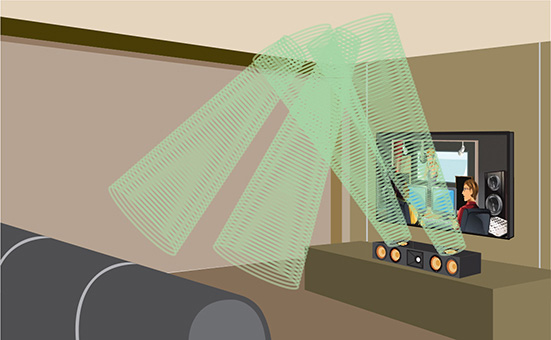
The latest improvement in surround sound technology adds height to the normally “flat” audio experience. That added height essentially envelops you in three-dimensional sound, placing individual objects in precise locations within the sound field. For example, with this kind of system you can hear a helicopter flying overhead, instead of just moving from front to back or side to side.
The leading three-dimensional surround technology is Dolby Atmos, from Dolby Laboratories. Dolby Atmos starts with a standard 5.1- or 7.1-channel surround sound setup (that is, five or seven channels plus a subwoofer), but augments the normal front-left and -right speakers with elevation speakers that fire upward. These upward-firing speakers bounce sound off your ceiling and into the rest of the room, providing the extra height for the sound. (You can also use dedicated downward-firing speakers, which you position high on your walls or in your ceiling.)
A Dolby Atmos system is designated with a third digit after the second “dot;” the last digit indicates the number of height channels. For example, a 5.1-channel system with two front elevation speakers is designated as 5.1.2; a 7.1-channel system with two front and two rear elevation speakers is designated as 7.1.4.
You can also find sound bars that incorporate Dolby Atmos technology. These sound bars add upward-firing speakers to the normal front-firing array, bouncing the two elevation channels off the ceiling.
Dolby Atmos is the most popular three-dimensional surround technology, but competing company DTS offers a similar system in its DTS:X technology. Like Dolby Atmos, DTS:X works with either upward-firing speakers or separate wall- or ceiling-mounted elevation speakers.

As Dolby Atmos and DTS:X are relatively new technologies, there isn’t a lot of content yet available that incorporates these extra height channels, although that will change over time. Some Blu-ray discs are available with Dolby Atmos soundtracks, and Netflix and Vudu both offer a limited selection of Dolby Atmos”compatible programming. Don’t expect to find Dolby Atmos or DTS:X sound on normal broadcast TV, however.
Assembling a Surround Sound System
When you want to hear surround sound, you have to go beyond the two front speakers built into your flat-screen TV. Some sound bars attempt to simulate surround sound by using audio tricks to bounce sound from their front-mounted speakers off your room’s side and rear walls; although the result is sometimes surprisingly effective, it’s not true surround sound. For that you need separate speakers for each channel, positioned properly throughout your viewing room.
Choosing the Best Surround Sound Speakers
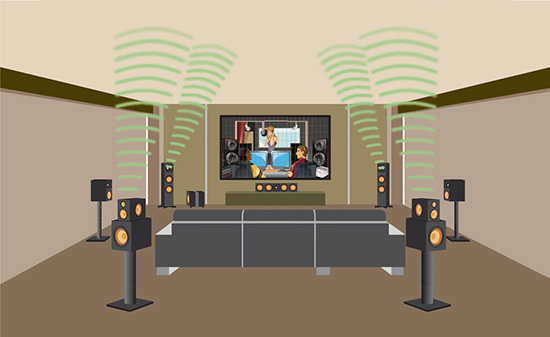
How many speakers you need depends on the type of surround sound system you want. For a 5.1-channel system (which is the bare minimum for true surround sound), you need the following:
Two front speakers, positioned to the left and right of your TV screen at the front of the room.
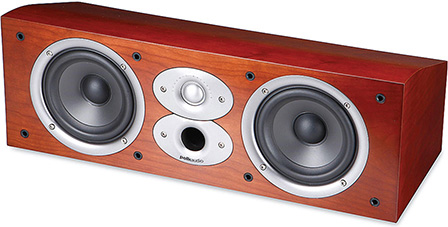
One center speaker, positioned below your TV screen at the front of the room.
Two surround speakers, positioned on the left and right walls of your room, beside the main viewing position.
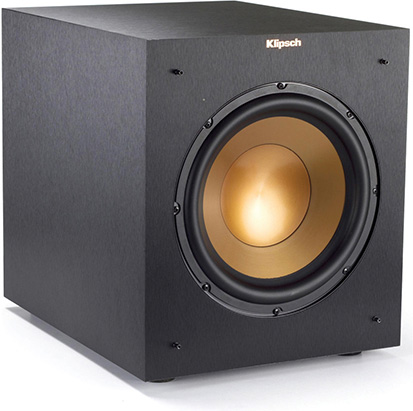
One subwoofer, positioned anywhere in the room. (For easier installation, most people position their subs near the front of the room, typically in a corner.)
Note that all these speakers except the subwoofer are “passive” speakers, meaning they don’t include their own amplification; they get their power through the speaker wire you connect to an audio/video receiver. (The receiver contains the amplifier that powers the speakers.) Subwoofers, however, are powered speakers, meaning they contain their own amplifiers that must be connected to a power source. (For practical purposes, that means you need to plug a subwoofer into a power outlet in addition to connecting it to your A/V receiver.)
Ideally, the five speakers are similar in their aural characteristics. (That means they sound similar.) However, the surround speakers can be a little smaller than the front speakers because they’re carrying less of the “weight” of most soundtracks. (Most programming places the bulk of the sound up front.) The center speaker might also be a little larger than the front left and right speakers because that’s where the majority of the dialogue comes from.
If you want a more immersive experience, you can add two more rear speakers, positioned literally behind the primary viewing position. These speakers should be at about the same height as the surround speakers; in most systems, the surround and rear speakers are of the same model for continuity of sound.
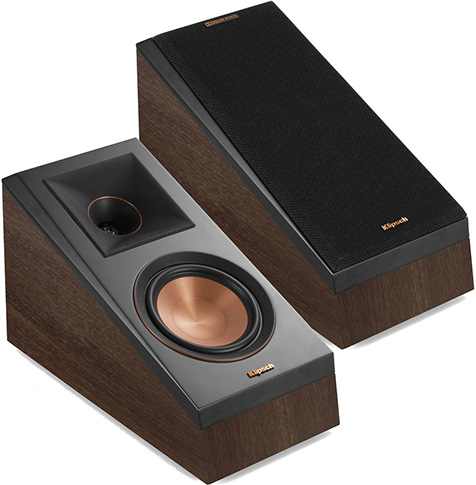
If you want to go with a Dolby Atmos or DTS:X system, you’ll want your front-left and front-right speakers to include upward-firing speakers in addition to the normal front-firing speakers; you might also want to go with upward-firing speakers in your rear speaker enclosures. In lieu of upward-firing speakers built into the normal speaker enclosures, many manufacturers offer speaker “toppers” that sit on top of your existing speakers and fire upward for the elevation effects. You can also use dedicated elevation speakers mounted or built into your front/rear walls or ceiling.
Although some speakers can sit on shelves or even on the floor, you might want to mount your speakers, either in stands or on (or in) your walls. (Or, in the case of ceiling-mounted elevation speakers, in your ceiling.) You also need to run speaker wire from each speaker to your audio/video receiver, which will typically be at the front of your room.
What does all this cost? It depends on how much you want to spend.
Many speaker manufacturers—including Bose, Definite Technology, Klipsch, and Polk Audio—offer special surround sound speaker packages with all the speakers you need for 5.1- or 7.1-channel sound included. These packages run from around $400 USD to more than $2,000 USD.
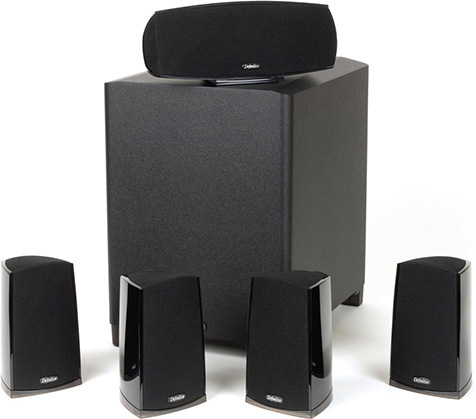
(Photo courtesy Definitive Technology, www.definitivetechnology.com.)
You also can choose to assemble the speakers you need individually. In this instance, the sky is the limit, depending on whether you want floor standing, bookshelf, or wall-mounted models. Individual front/surround/rear speakers start at less than $100 USD each and go up into the multiple thousands; subwoofers start at less than $150 USD and go up to $500 USD or more.
You can find surround sound speakers at your local electronics or big-box store, or at online retailers such as Amazon or Crutchfield. Make sure you buy enough speaker wire to run around your entire room, too!
Incorporating an Audio/Video Receiver
You can’t just connect all these speakers to your TV; it doesn’t have a built-in amplifier to drive external speakers. Instead, you need an audio/video receiver, which not only drives your speakers but also functions as the control center of your entire system.
Most A/V receivers let you connect all your audio and video components, and then switch between inputs with a single remote control. Connect your cable or satellite box, streaming media player, Blu-ray player, game console, and more to the inputs of your A/V receiver, then connect the output of the A/V receiver to your TV and external speakers. Whatever you select on the receiver’s remote appears on the television screen.

The A/V receiver also serves as the main processor/amplifier for your system’s audio. Surround sound sources are fed into the receiver, which decodes the surround sound signal using the appropriate technology. Select a source with surround sound content and your A/V receiver creates room-filling sound.
When selecting an A/V receiver, you want to look at the number of inputs and outputs, the types of surround sound technologies supported, how powerful the amplifier is, and how easy it is to use. I discuss each factor separately.
Most video and audio sources today connect via HDMI, and your A/V receiver should offer enough HDMI inputs to handle all the devices you want to connect. The receiver should also have at least one optical digital audio input, so you can run the audio output from your TV into the receiver and hear your TV’s sound through your entire system. Look for at least one HDMI output, as well, to send the video signal from all your devices through to your TV.
As to what surround technologies are supported, most A/V receivers today handle all the major Dolby and DTS formats. You might have to pay a little extra to get a receiver that supports the newer Dolby Atmos or DTS:X formats, however.
In terms of amplifier power, the more you have, the better—within limits. A more powerful amplifier not only produces louder sound but also cleaner and clearer sound; that’s because it doesn’t have to push its limits when you’re playing loud content. Don’t sweat 10”20 watt per channel differences between models because the difference won’t likely be noticeable. Bigger differences, however, matter more.
Finally, consider how you control the receiver because that’s likely to be how you control your entire system. Look for a remote control unit that feels comfortable in your hand and is easy for others to figure out and use. Also look for a universal or learning remote that you can program to control all the components in your home theater system.
How much will you pay for a good A/V receiver? As with speakers, there’s a wide range of models available at an equally wide range of prices. You can find basic models with 5.2-channel sound, less than 100 watts/channel amplification, and four HDMI inputs for $200 to $300 USD. When you get into the $500 USD range, you’ll find models with 7.2-channel sound, more power amplification, and more HDMI inputs and outputs; some models in the higher-end of this range also feature Dolby Atmos and DTS:X processing. Ramp your budget up into the $1,000 USD range (and beyond), and you get top-of-the line performance, compatibility with just about every surround sound format available, enough power to handle the most explosive soundtracks, multiple-room audio and video, a plethora of inputs and outputs of all shapes and sizes, and really fancy universal remotes and onscreen displays. Set your budget and choose the model that best suits your needs.
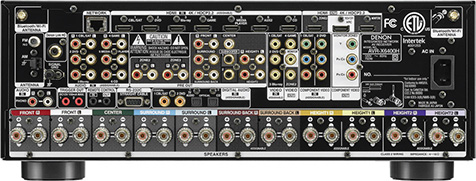
(Photo courtesy Onkyo USA, www.onkyousa.com.)
Choosing the Right Options for You
As you can see, there are many different options when it comes to improving your TV sound. Let’s look at which options might be best for your individual situation:
If you’re satisfied with the sound from your TV and don’t watch a lot of action movies or concerts, don’t do anything—just use your set’s built-in speakers.
If you have trouble discerning dialog on certain shows, turn on your source’s closed captioning.
If you want to improve the sound for your listening experience without affecting anyone else watching—or if you want to watch TV while others want silence—invest in a set of wireless headphones.
If you want to improve the overall sound of your system without investing a lot of time and money, add a soundbar underneath your TV.
If you want to experience the full effect of surround sound movies and shows—and have the budget to do so—invest in a complete surround sound audio/video system.
As to the last option, consider whether you want a prepackaged system (typically cheaper and easier to assemble) or one that you purchase as separate components (sounds better but costs more, and is more complicated). Finally, if you want the latest and the greatest in fully immersive sound, make sure your system includes Dolby Atmos or DTS:X sound, with additional speakers to add “height” to the sound. (That costs more, too.)