CHAPTER 1
BAKING BOTANICALLY
I’d like to explain baking botanically to you by first setting the scene as to where this fits in within the three existing methods of baking by using fermentation to leaven, followed by some information on fermentation itself, and finally detailing the actual botanical fermentation process. The three main categories for making yeast-raised products are bulk fermentation, prefermentation, and sourdough. I classify baking botanically as a fourth category.

AN OVERVIEW OF THE FOUR KEY BREADMAKING METHODS
1 BULK FERMENTATION
I define bulk fermentation as the “entry level” of breadmaking. Most standard baking recipes use this method, and it is the method employed within a bread machine. After a dough is formed, it is left for a period to mature. This stage is called bulk fermentation, although in many recipes, it is often referred to as the first proof or first rise. Fresh or dried yeast is used to raise the dough, and the resulting baked bread is generally completed within three to four hours. However, this process is not long enough to generate any significant natural fermentation flavor or aroma in the baked bread. In this book, bulk fermentation refers to the initial rise after the dough has been thoroughly mixed and set aside for a recommended period of time.
2 PREFERMENTATION
Once you are comfortable making bread at home using the bulk fermentation method, you can begin using the prefermentation method to step up the quality. This method requires an additional dough or batter (preferment) to be added to the recipe (e.g., flour, salt, yeast, and water) before mixing the required dough or batter. This preferment is prepared up to 24 hours prior to its inclusion within the final dough. During this time, it generates a strong fermentation flavor and aroma, and, when added as an ingredient within a fresh dough, it imparts these qualities to the finished baked bread.
There are three main types of preferment: pâte fermentée, biga, and poolish. Pâte fermentée and biga are both doughs. Pâte fermentée is a portion of a recipe that is reserved to use for the next bake, and a biga is a dough specifically made the day before to be added to the next day’s recipe. Poolish is also prepared separately the day before, but it contains a higher percentage of liquid and is more like a batter. A prefermentation can also influence dough characteristics. For example, a poolish imparts extensibility, or strength, to the dough that it is used in, which is beneficial when stretching and shaping French baguettes.
3 SOURDOUGH
In my breadmaking courses, I recommend that a thorough understanding of cereal fermentation and breadmaking is attained before attempting to make a sourdough. It’s not that sourdough is extremely complicated, but it does require more knowledgeable attention and craft skills to obtain the best results. As is often said, “Don’t jump in the deep end before you can swim.”
Sourdough is made using a sour culture to leaven the dough. Made from just flour and water, this creamy paste is left to colonize with “friendly” microbes. A mature sour culture will contain wild yeast and bacteria that produce the carbon dioxide gas to raise the dough and create unique flavors and aromas in the baked loaf. Once stable, this sour culture will last indefinitely—that is, if the correct conditions are maintained (regular feeding and stable temperature).
The sourdough breadmaking process is much slower than using commercial yeast. This allows for rich, strong flavors and aromas to develop. Other benefits from this long fermentation include making a more wholesome and digestible bread and allowing more of the nutrients present in the flour to be absorbed in the body.
As with the sourdough method of baking, botanical baking is a truly gratifying way to bake. The greater your breadmaking understanding and experiences are, the more you will appreciate just how remarkable botanical baking can be. Botanical baking will provide similar benefits to long fermented breads but with a cleaner and fresher taste.
Let’s start with a brief explanation of the method and terminology you will be using in my botanical recipes. More detailed instructions on preparing and starting your botanical fermentations are provided in the section “A Step-by-Step Guide to Starting Your Botanical Fermentation.”
Fruit, vegetables, plants, or flowers are placed in a fermenting jar, submerged in water, and left to naturally ferment for a few days to a few weeks (depending on which ingredient is used). Wild yeasts thriving in this newly fermented water (which I will now call botanical water) will raise the dough, albeit more slowly than when using fresh or dried yeast. A botanical culture is also made by mixing some of the active botanical water with flour (as for a sour culture, but not left long enough to become sour). This botanical culture will be used to test whether the botanical water is sufficiently active to make bread, plus it provides more active fermentation to raise the dough in which it is used.
All botanical recipes are based around four key ingredients:
Bread flour
Salt
Botanical culture
Botanical water
AN OVERVIEW OF FERMENTATION AND ITS HEALTH BENEFITS
The organisms that are responsible for fermentation are found wild in the atmosphere. Food will naturally ferment in an uncontrolled way, resulting in spoiled and inedible products (like apples that have fallen from a tree). If we can control the environment in which this fermentation takes place, we will encourage wild yeasts and friendly bacteria to thrive, leading to foods with enhanced flavors and added health benefits. This process is also a natural way to preserve foods for when not in season. This method of preserving foods has been carried out for thousands of years, but in more recent times, the craft skills necessary to preserve food have been neglected due to modern mass-production methods used to fill supermarket shelves. Fortunately, times are changing with more diskerning people realizing the lost benefits from this traditional method and the burgeoning home cooks, home bakers, and small cottage industries who champion these underutilized skills.
In this book, I focus only on starting the fermentation process and then using the fermented botanical water to raise the dough, rather than using fresh or dried yeast. Therefore, I will not go into detail about preserving foods, as there are many other books specific to this subject.
It may seem daunting, even scary, when you start off your first botanical fermentation, growing wild yeast and bacteria in a jar. Please don’t be afraid. It is very easy to ferment, and if you respect storage temperatures and allow time to ferment, nothing will go wrong. Fortunately, our bodies are built with a food safety detector—our noses! If it smells bad, we instinctively know something is not quite right. If this is the case or you are just not sure, then throw it away. You have lost nothing significant, so just start again.
When baking leavened goods, we are fermenting cereals: predominantly, wheat and rye flours. Unfortunately, these cereals are rich in a phytates. These phytates are often referred to as anti-nutrients, due to the fact that they reduce the body’s absorption of nutrients from the food in which they are present. Luckily, fermentation counteracts phytates and increases bioavailability. The longer the fermentation time, the less impact the phytates will have, and therefore, more nutrients will become available to our bodies. With sourdough, the reduction in pH caused by the lactic acid bacteria degrades the phytates, allowing more nutrients to become available. Other factors will influence the absorption of nutrients by our body, but this component is most relevant to our botanical baking.
Once you recognize the effect that fermentation has on phytates, it is easy to hypothesize that using additives and high levels of yeast to make bread in less than ninety minutes offers reduced nutritional value when compared to breads that have been fermented for long periods of time, like sourdough and botanical breads.
Probiotics are live strains of bacteria that, if present in the gut, aid digestion. These can be introduced through eating live yogurt or uncooked bacteria-fermented foods and drinks, such as sauerkraut, kimchi, or kombucha.
Prebiotics are substances that are found in certain types of carbohydrates (mostly fiber) that humans can’t digest. The beneficial bacteria (probiotics) in your gut eat this fiber and flourish, aiding digestion. This may be why long-fermented, fiber-rich breads are found to be more digestible than modern, quickly made breads that are low in fiber.
Over the years, I’ve met so many customers at my bakery who have commented on their inability to tolerate mass-produced highly processed breads, yet they enjoy my breads without any signs of bloating or diskomfort. That is not a scientific study, but simply reality.

A STEP-BY-STEP GUIDE TO STARTING YOUR BOTANICAL FERMENTATION
In layman’s terms, we are combining any edible fruit, vegetable, plant, or flower with water and leaving it submerged in a jar until it starts fermenting (normally for three to twenty-one days). Once fermented, the active water is used to leaven bread, buns, or laminated (layered) pastries.

1 CHOOSING YOUR INGREDIENTS TO FERMENT
Whether following the recipes in this book or selecting your own ingredients to ferment, you must first make sure they are edible; they can be past their prime, but there should be no mold or any signs of decay, such as a foul smell. If deciding on unusual ingredients to ferment, please make sure they are fit for human consumption and be aware that some harmless-looking plants and flowers are extremely poisonous. I have included a list of edible and poisonous flowers in this book (see the appendix). However, this list is not comprehensive, and you should make your own investigation as to the food safety regarding your choice of ingredient to ferment.
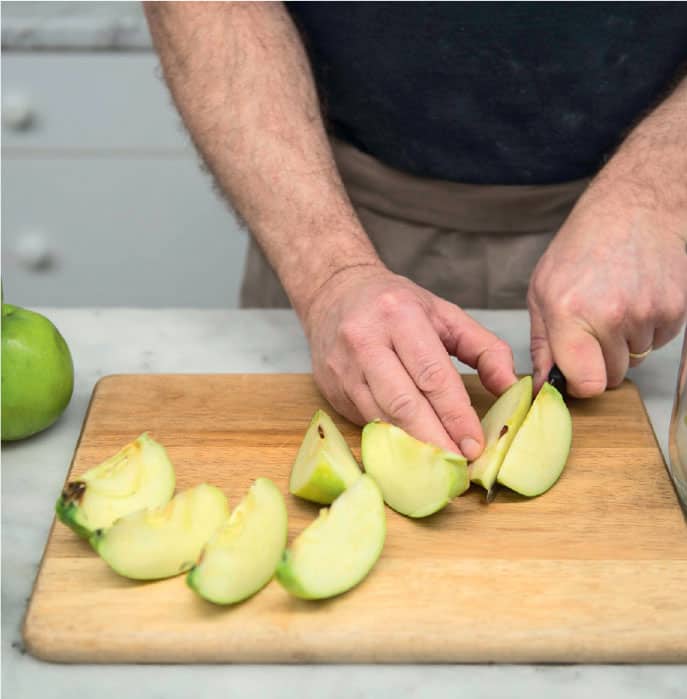
If you have never tried fermenting before, then I suggest that you start with apples because they are quick to ferment and can be used in many recipes. Once you get the hang of fermenting apples, you will find fermenting other ingredients to be relatively straightforward.
Ideally, use your own homegrown produce; otherwise, search out organically grown ingredients and avoid any that have been exposed to pesticides during their growth.
Fruits generally start to ferment sooner than most vegetables, plants, or flowers due to their higher sugar content. If choosing ingredients that need some help to start fermenting, such as elderflower, instead of adding sugar in the form of honey, you could add a complementary fruit. For example, elderflower and lemon would make an ideal combination. The elderflower will supply some yeast, while the lemon will supply plenty of sugar.
After fermenting many different types of fruits, vegetables, plants, and flowers, you will probably establish a few go-to ingredients. Mine are watercress, fig and fennel, and potato and carrot.
Lightly wash your chosen ingredients to remove any soil or small insects. Yeast will be on the outer surface of your ingredients, so don’t “over-clean” the ingredients. Chop the ingredients into small pieces; for example, an average-size apple should be divided into eight pieces. Cutting exposes more of the ingredient, which in turn makes the water more flavorful and releases food for the yeasts that fuel the fermentation process.

3 FILLING YOUR FERMENTATION JAR
Place the ingredients into your clean fermentation jar and fill with water, close to the top. Use a weight to submerge the ingredients just below the surface of the water to help prevent mold growth. Close the lid tightly and leave to ferment (normally, for three to twenty-one days).
A commonly used ratio for botanical fermentation is as follows:
2 parts water :1 part botanical ingredient(s)
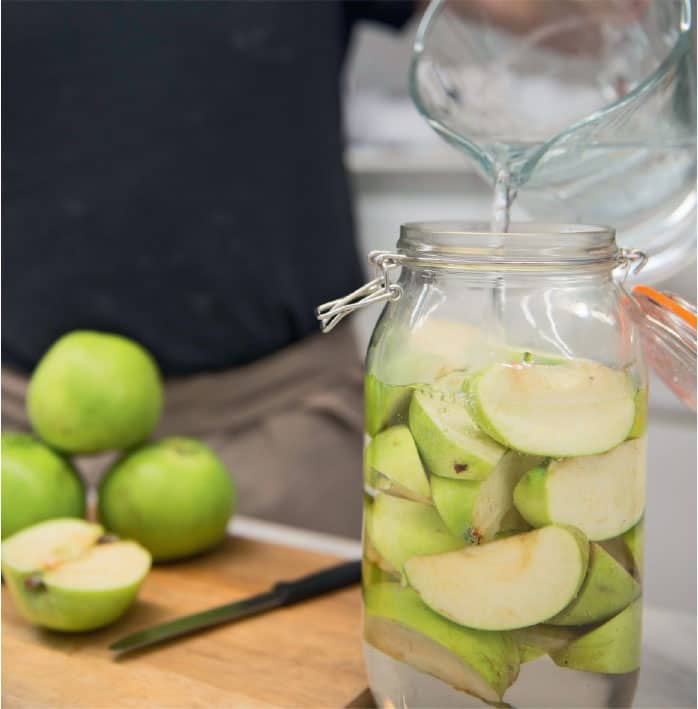
This ratio can vary according to the ingredients used; for example, flower petals are very light in weight and will require more water to be added than an item such as potatoes that are dense and heavy. The most important point to remember is to use plenty of your chosen ingredient, but to make sure to leave room in the jar for an adequate amount of water, not only to completely immerse the ingredient, but also to ensure that there will be enough liquid to be used in your recipe.
When using an ingredient that is low in sugar content, such as flower petals, add 5 percent, based on botanical ingredient weight, of organic honey to the jar at the beginning. You may need to add more after a few days if there is no activity. Once you become accustomed to baking botanically, you will be able to judge how much honey to add based on your experience.
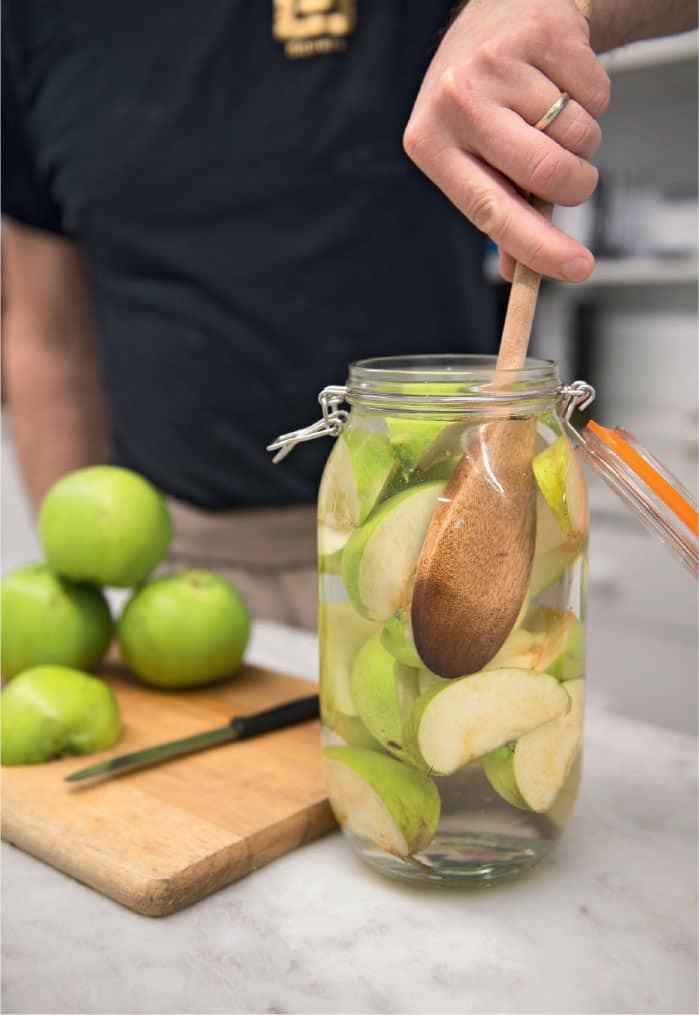
4 DAILY MAINTENANCE DURING FERMENTATION
Twice a day, stir the contents in the jar with a clean spoon. This helps release excessive gas buildup, keeps mold at bay, evens out the fermentation temperature, and stimulates the yeasts and bacteria. Also, check the temperature inside the jar daily. I like to keep it between 59°F and 68°F (15°C and 20°C). When the temperature is too low, yeast activity is slow; when the temperature is too high, mold will form on the top surface and the fermentation turns sour. If your fermentation turns sour, diskard it and start again.
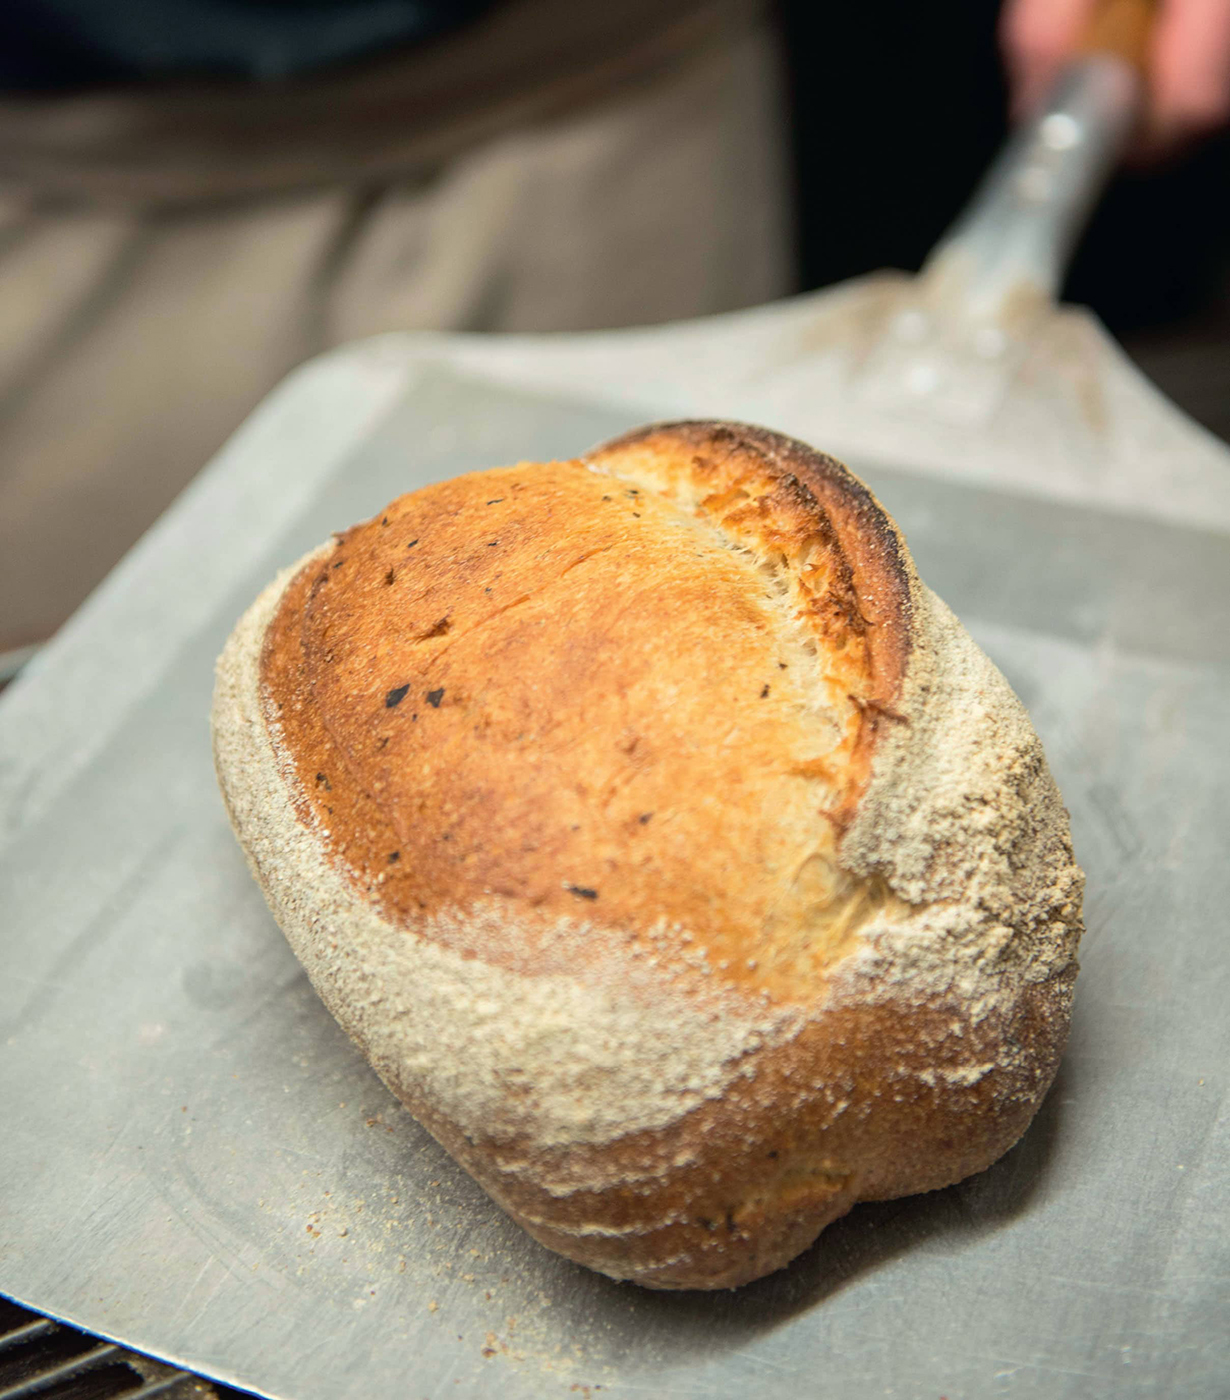
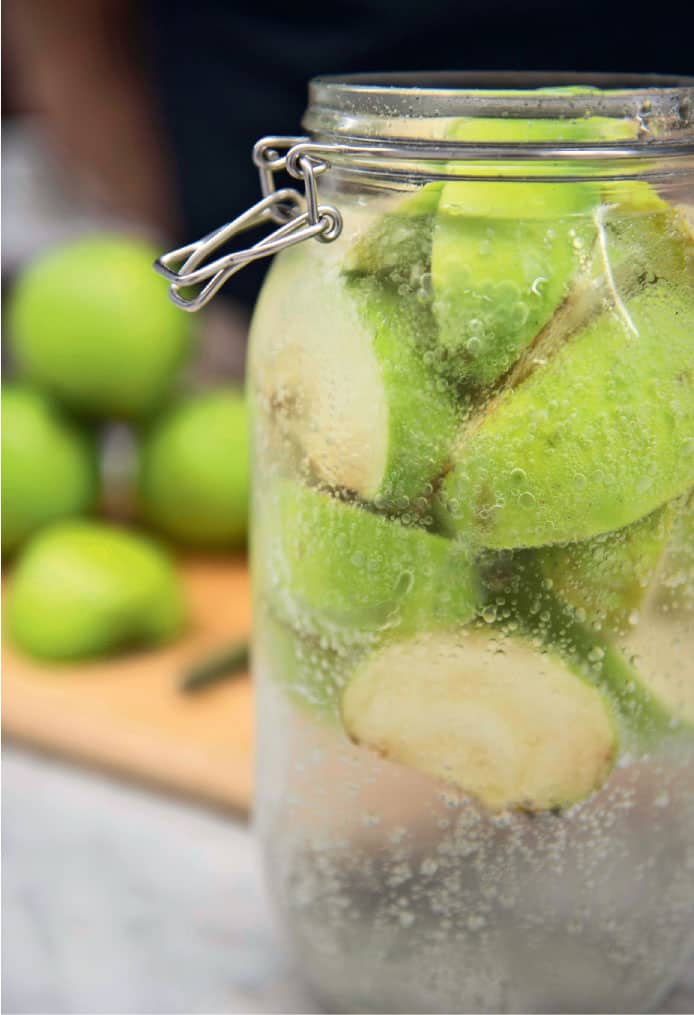
You will notice bubbles appearing at the top of the liquid, and when you open the jar, you may possibly hear it sound like a glass of fizzy soda pop. When you hear this sound, you have now produced a jar of botanical water. This water will be used—in full or partially—as a replacement for potable water within the recipes in this book. It is also used to make a botanical culture, which is explained in the next step.
Be aware that if your fermentation is active and left unattended for a few days, your container could explode! Releasing the pressure inside, also called “burping” the container, will prevent any unwanted mess. This is a common problem when using containers with tight-fitting lids. I use Kilner-style jars with clip tops (clamp-down lids) as they “breathe” a little, preventing excessive pressure buildup.
5 HOW TO TEST IF YOUR BOTANICAL FERMENTATION IS READY FOR BAKING
By mixing equal quantities of botanical water and flour together, a botanical culture is made. A few hours after mixing, you should see the mixture growing and bubbling at the surface. This botanical culture is first used to check the activity of your botanical water, and then it is used again as an ingredient in each recipe for extra leavening.
HOW TO MAKE THE BOTANICAL CULTURE:
I recommend using a small 1 liter to 2 liter (2 pints to 1 quart) round lidded plastic container to mix and store your botanical culture.
To begin: Mix together 50 g (2 ounces) of flour (wheat or rye) with 50 g (2 ounces) of botanical water so they form a paste in your container, and close the lid. You now have 100 g (31/2 ounces) total weight of botanical culture. Leave it to cool somewhere for 12 hours.
1st feed: After 12 hours of fermentation, add another 50 g (2 ounces) of flour and 50 g (2 ounces) of botanical water and stir to a smooth paste. You now have 200 g (7 ounces) in total weight of botanical culture. Leave it somewhere cool for another 12 hours.
2nd feed: After 12 hours of fermentation, add 100 g (31/2 ounces) of flour and 100 g (31/2 ounces) of botanical water and stir to a smooth paste. You now have 400 g (14 ounces) total weight of botanical culture. Leave it at room temperature to ferment for approximately 4 to 6 hours to double in size before using it in a dough recipe.
This example makes 400 g (14 ounces) of botanical culture. Using simple math, you can adjust the weight of flour and botanical water used in the initial paste to produce a second feed total weight of your choice.

6 READY FOR BAKING
Once you have active botanical water and botanical culture, you are ready to botanically bake. I recommend using these as soon as possible to obtain maximum fermentation and the cleanest flavor and aroma in your bakes.
7 HOW TO KEEP YOUR BOTANICAL FERMENTATION FRESH
Once active, your botanical water will be suitable to make breads for a couple of weeks. After that time, the botanical water will gradually reduce in activity (become less bubbly). If that happens, I recommend adding some honey, which quickly rejuvenates the combination and adds a few more days’ usage.
I have found using a wine fridge is ideal for longer storage of active fermenting jars as the temperature inside can be set for approximately 61°F to 64°F (16°C to 18°C). When you want to use this botanical ferment, you can bring it back to room temperature for a couple of days to increase its activity.
Alternatively, if you store your active fermenting jar in the refrigerator at 36°F (2°C), it will stay fresh for even longer. Again, the jar needs to be brought back to room temperature for it to be fully active. Also, this ferment may well benefit from a spoonful of honey or by adding more of the ingredient that is being fermented.
Another way you can keep the same ferment longer is to replace the entire fermented ingredients with a fresh quantity, but to reuse the old fermented water. A day or two later, it will be fizzing and smelling fresh.
Aim to keep your ferments for around three weeks as it is so quick and easy to make a fresh batch. To ensure you never run out, start a fresh batch three to seven days before you intend to dispose of your existing botanical ferment.
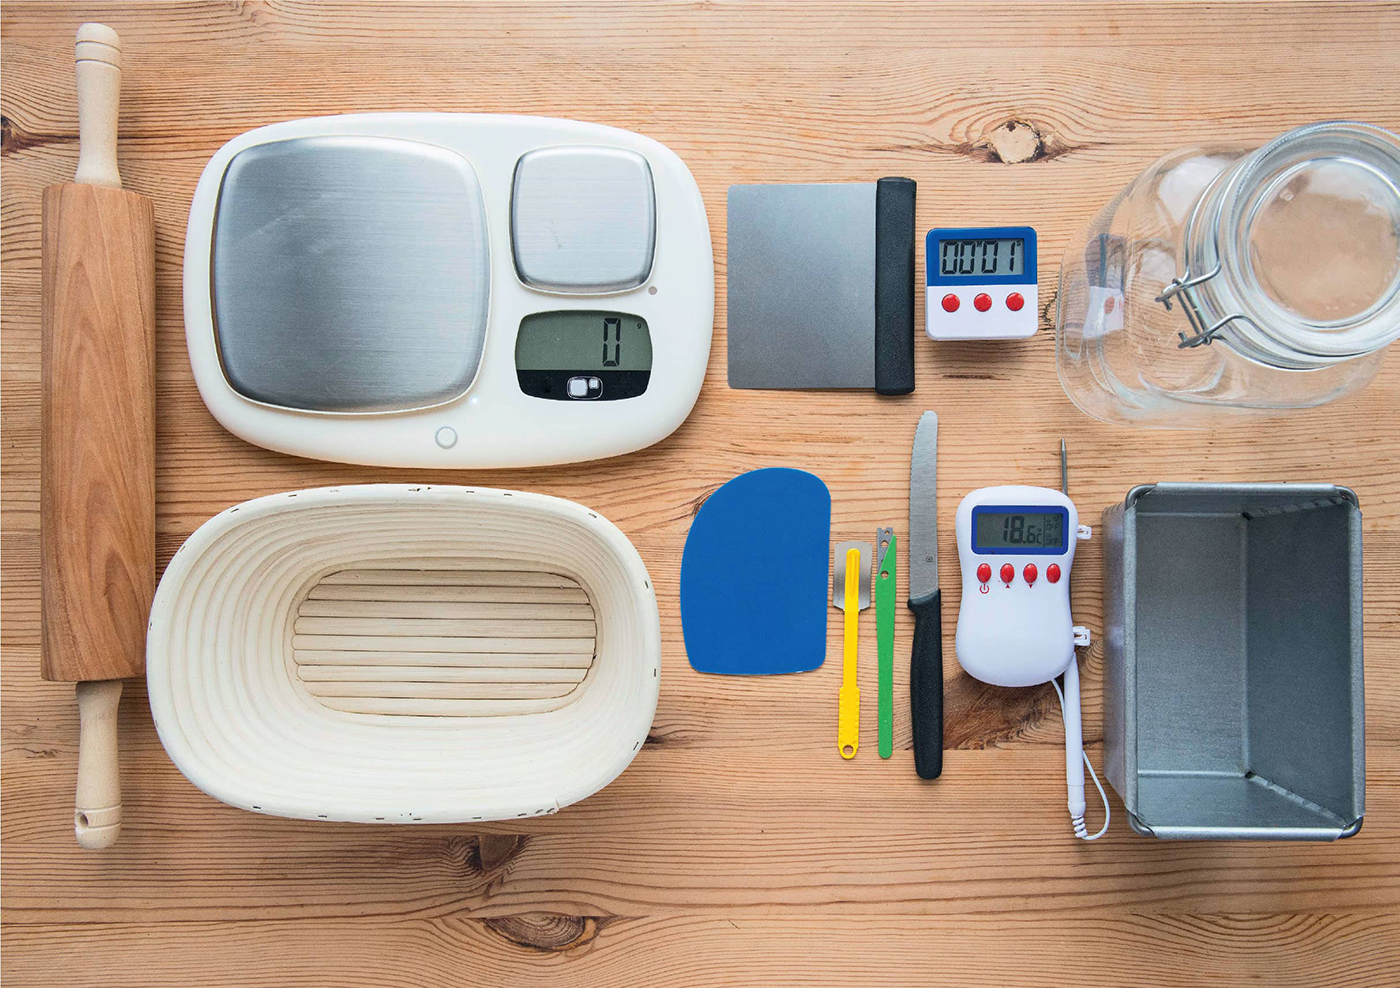
IMPORTANT EQUIPMENT FOR FERMENTING AND BAKING BOTANICALLY
If you already bake bread, then you may not need much more equipment to bake botanically. Ideally, your home baker’s tool box would contain all the necessary equipment, such as a stand mixer with dough hook (or your hands!), plastic weighing and mixing bowls, digital weighing scales (in grams), bench and bowl scrapers, food-grade lidded plastic containers for proving, proving baskets, timers, tea towels, baking paper, heavy baking trays, baking stone, lame, serrated tomato knife, baker’s peel (pizza peel), and of course, a good baking oven. Other equipment you will need specifically for the botanical fermentation include the following:
FERMENTING JAR
The most important piece of extra equipment you will need is fermenting jar. I recommend a Kilner or Mason jar to start. It is possible to use a 2 liter (2 quart) plastic soda bottle with a screw cap. I find these a bit difficult to fill, whereas the jars are much easier due to their wider openings. Some jars, generally the larger ones, are available with a dispensing tap close to the bottom. This is useful as any sediment is left behind when the fermenting water is dispensed. You will need to release the top lid before opening the tap; otherwise, the liquid will not flow out. Note that if you have a lot of sediment and seeds at the bottom of the jar, these will annoyingly block the dispensing tap when trying to release some botanical water.
Some jars have a weight that fits neatly inside to keep the ingredients submerged. This helps prevent mold from forming on any part of the ingredient protruding from the water.
You can make your own weight by using a small saucer that fits snuggly inside your fermenting jar and setting a small weight on top of the plate. You normally can find something in your cupboard that will suffice, such as a small ceramic or glass ramekin, but make sure to avoid metals as these may react in the water.

THERMOMETER
This tool is important for maintaining your fermenting jars within an optimum environment. Store your jars in a cool location away from direct sunlight. I recommend storing them at 64°F to 71.5°F (18°C to 22°C) to achieve a steady, more controllable buildup of fermentation.
A digital thermometer is ideal for regular checking. Stir the contents of the jar while checking the temperature to even out any variations inside the jar; stirring also can increase the activity of the fermentation.
You can apply a stick-on thermometer (as used on aquariums) to the fermenting jar. Using one of these, you will be able to see what the current temperature is at a glance.
When your botanical water is ready to use, you will need to pour the water from the top through a strainer, unless you have a dispensing tap. I would recommend using a fine-mesh strainer to trap any pits, seeds, or sediment.
THE IMPORTANCE OF HYGIENE
For a successful botanical fermentation, it is important you start with clean equipment and that you work in a hygienic manner. This will ensure that your botanical fermentation starts off in a sterile environment, which will help guarantee fruitful results.
Clean all equipment, including the fermenting jar, in hot soapy water and then thoroughly rinse in very hot water and let air-dry.
When preparing your ingredients for fermenting, wash off any dirt and bugs. Be mindful that you do not want to “over-clean” your ingredients as you will remove all the yeasts from the surface. Use clean, sanitized hands or wear disposable gloves when cutting ingredients. Use a clean, dry cutting board and a sterile knife.
Fermenting botanical ingredients and sour cultures attracts fruit flies. I’m at a loss as to where they appear from; they just turn up uninvited. My advice is to keep the outside of your jars clean, especially around the lid.
There are different methods for keeping fruit flies at bay. You can buy fruit fly traps at the store or make them yourself. To do so, place some of your fermenting liquid in a small cup and add a few drops of dishwashing liquid. The dishwashing liquid will reduce the surface tension of the water, so when the flies are attracted to the smell of your ferment, they will drown in the water. This method works to catch some but not all of them. A few may still annoyingly hover around your fermenting jar!
I recommend setting up something to catch the flies before they start to appear. This will help prevent an unwelcome accumulation of them. Please note it is generally not a sign of poor hygiene when they appear. I personally think these little creatures have great taste, as they absolutely love my Belgian chocolate ganache!

KEY INGREDIENTS FOR BAKING BOTANICALLY
There are minimal required ingredients for botanical breadmaking, but each ingredient plays a vital role in the process. Therefore, it is important to source top-quality ingredients and weigh them precisely.
FLOUR
This is the main bulk ingredient and provides the structure of baked bread. Around 60 percent of a standard loaf will be made up of flour.
Flour provides the gluten network required to hold on to the carbon dioxide gas produced by the yeast, which enables dough to inflate. Try to imagine millions of tiny balloons inside your dough expanding from the pressure of the gas building up.
Flour provides strength to your dough, which maximizes the tolerance required for the shaping, proving, cutting, and baking stages.
SALT
Salt imparts flavor to your bread.
Only a small amount of salt is used (normally 1.5 to 2 percent of total flour weight). Precise weighing is vital to obtain the correct amount because salt kills yeast. When dispersed within a dough, salt controls yeast activity by preventing it from becoming too wild. Over-weighing salt will hinder the yeast from producing carbon dioxide gas, preventing the dough from rising. Conversely, under-weighing salt will produce a “wildly” fermenting soft and sticky dough with no tolerance for the remaining process.
Salt strengthens the dough to provide increased tolerance required during the shaping, proving, cutting, and baking periods.
The botanical water, or water from our ferment, is mixed with flour and salt to form the dough for botanical bread, buns, and pastries. It provides necessary yeasts and bacteria for fermentation within the dough. It also imparts flavor and aroma to the baked bread. The strength of these qualities is determined by the type of ingredients fermented and the quantity of the botanical water used in the dough.
The amount of total botanical water used in a recipe will influence the rate of fermentation. As a guide, if you are fermenting ingredients low in sugars, such as flower petals, then all water in the recipe should be botanical. When ingredients high in sugar, such as tomatoes, are fermented, a more powerful botanical water is achieved and therefore less is called for in the recipe. Tap water is used to replace the amount removed. Reducing the amount of botanical water will also decrease the flavor intensity. Once accustomed to working with botanical ferments, you will be able to judge how much of the recipe water should be botanical and how much should be tap water.
BOTANICAL CULTURE
The botanical culture is a paste made from equal quantities of flour and botanical water (similar in consistency to a 100 percent hydration sour culture). It is used as a quality-control check, to establish if the botanical water has enough activity to leaven a dough. The botanical culture provides extra yeasts and bacteria for dough fermentation and imparts additional flavor and aroma to the baked bread, buns, and pastries.
OTHER INGREDIENTS USED IN BREADS
Additional ingredients can be added to improve shelf life, to add texture and flavor, and to enhance the visual appearance.
Fats such as white vegetable shortening, oil, and butter are added to provide softness to the bread—especially buns—which helps keep the products tender for longer periods.
Dried fruits, nuts, and seeds are added for texture and taste and are perfect for complementing the flavor of the chosen botanical ferment. They also add visual attractiveness, especially when you cut through a baked loaf.
EXTRA INGREDIENTS FOR BOTANICAL SWEET BUNS
When making sweet fermented buns, the cooking method and core of the recipe are still rooted in basic bread ingredients: flour, salt, yeast, and water. Other ingredients, mainly eggs, butter (or other fats), sugar, and milk are then added, some at relatively high levels, to transform the mixture into sweet and tender products.
VARIETIES OF BREADMAKING FLOURS
If you consider that roughly two-thirds of a loaf of bread will be flour, you’ll see it is vital that the flour is fit for its purpose.
Using the correct breadmaking flour will provide the required strength and tolerance to the dough made from it. The gluten network developed in the dough from kneading will hold on to the carbon dioxide gas produced by the yeast, trapping the air bubbles within. As the resultant dough expands and then bakes, the internal structure sets to an edible crumb encased within a rich, flavorful, caramelized crust.
There are many flour types and strengths available, and all of them have their breadmaking suitability influenced by the strain of wheat and the environmental conditions during the growth of the wheat.
I recommend you use strong breadmaking flours for the recipes in this book. However, my “strong” flour will inevitably differ from the flour you may purchase. Therefore, whenever you try a recipe from this book, or any other source, you may need to “tweak” it slightly. Most of the tweaking will be the adjustment of water content or possibly an extra reshaping during bulk fermentation to build more strength to the dough. These adjustments may not be huge, but if you are pleased with the final result, it is worthwhile to note the difference in the ratios for the next time you use the same flour.
Much of the wheat flour we use today is classified as modern wheat. For years, these strains of wheat have been manipulated by man for many reasons, including improving their breadmaking suitability, producing higher yields, reducing cost, and making them pest- and climate-resistant. Modern wheat has also been blamed by some for the rising claims of wheat intolerance. This has led to the increased use of ancient wheats and grains, as these are unadulterated and offer more flavor, fiber, vitamins, and minerals. Ingredients like amaranth, buckwheat, einkorn, farro, freekeh, khorasan (kamut), millet, quinoa, sorghum, spelt, and teff are commonplace in breadmaking.
It is common practice to blend the ancient grains with a wheat flour, as the ancient grains are usually less suited for breadmaking; some of them contain no gluten at all. You can replace the wheat flour with your choice of ancient grain, weight-for-weight, in most bread recipes. I recommend starting at lower levels of 10 to 20 percent of the grain weight and note any changes to the water absorption, dough handling, and dough tolerance. Make any necessary adjustments for the next bake and increase the level if you feel comfortable.
WHY THE AUTOLYSE TECHNIQUE IS USED IN BREADMAKING
The autolyse technique is the practice of presoaking flour and water for a period of time before adding the salt and mixing until the dough is fully developed. Benefits include the following:
The added time allows the flour to absorb more water without competition from the salt.
There is improved gluten formation due to the increased water absorption.
This method increases extensibility to the dough, which improves dough handling and allows for increased expansion in the oven.
It allows for the development of maximum gluten from weaker flours and higher hydration doughs.
It reduces the mixing time and effort required to fully develop a dough.
If your recipe does not call for a period of autolyse, you can still incorporate this technique.
To begin the autolyse process, stir together the flour and water portions of a bread recipe—keeping back 50 g (2 ounces) of water to use to dissolve the salt—and allow this mixture to stand for 30 to 60 minutes; it sometimes can take longer, especially if you are using a stone-ground whole wheat flour that benefits from a longer autolyse time. After this period of autolyse, add the salted water and any remaining ingredients and mix until a developed dough forms. The remaining process stays the same.
The botanical culture and botanical water will be part of the autolyze process.
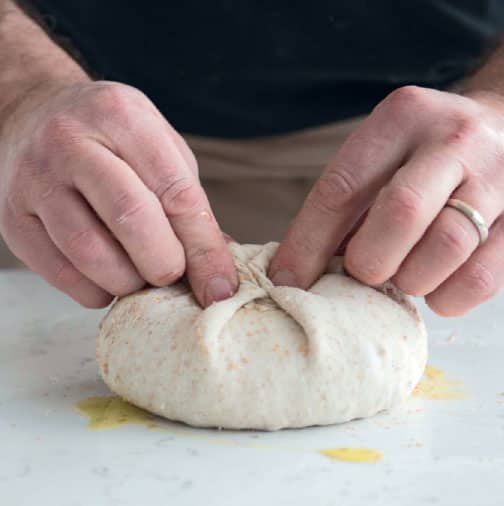
Some recipes in this book will give you the option to use increased water levels to produce higher hydration doughs. When using these higher-hydration dough recipes, I recommend you incorporate a period of autolyse. During the subsequent bulk fermentation period, you may need to give extra reshaping or use the slap-and-fold method (see here) to build more strength in the dough, as wetter doughs are slacker. Dough that is normally proved on trays will need to be proved in bannetons (proving baskets) instead to prevent spreading. The proved dough pieces will benefit from a period of retarding, enabling you to successfully turn them out of the bannetons and score them prior to baking.
I would only recommend making high-hydration doughs once you have a sound understanding of breadmaking theory and have attained good craft skills.
BOTANICAL BAKING ALLOWS FOR EXPERIMENTATION
Once you have mastered making botanical fermentations and subsequently made delicious bakes from them, you should have the confidence and experience to experiment. Botanical baking allows you to create wonderful combinations of flavors and aromas in your bakes. All you need to do is pick the recipe in this book that makes a style of bread you enjoy and then change the ingredients that are used to start the botanical fermentation.
You can plan and create your own flavor combinations by thinking about what currently is or soon will be in season. Or consider ingredients you would like to try to ferment to develop flavor combinations special to you.
It is rewarding to ferment your own homegrown produce or to use ingredients grown by family and friends. I’m sure they would be thrilled to see their homegrown produce transformed into some wonderfully baked breads, buns, or pastries. Botanical baking is a great enrichment to a self-sufficient lifestyle. You may even find yourself growing things in your garden specifically to include in your daily loaf!
Consider additions to the dough such as herbs, spices, seeds, dried fruits, nuts, or cheeses, all of which can be added to impart complementary flavors, visual intrigue, and textural differences.