
All programmers
are
familliar with code commenting. The
Java language supports C-style code commenting (/*
and */ for multiline comments and
// for single-line comments) plus an additional
commenting style called “doc
comments.” A doc comment in a Java source file
begins with /** (note the double asteriks) and
ends with */. These comments are viewed as regular
comments by the compiler, but the javadoc tool can be used to parse
them and produce an HTML document known as a Javadoc.
Because doc comments are used to produce HTML they can contain HTML
markup tags. Typically these are HTML formatting tags such as
<B> and <I>. There
are also several special non-HTML tags that can be used. For more
information on the javadoc tool and the Javadoc tags see The Javadoc
Tools Homepage (http://java.sun.com/j2se/javadoc/).
The javadoc tool has been fully integrated into the NetBeans IDE. Developers can search and browse Javadoc libraries (JAR files or folders containing Javadoc HTML files), get context-sensitive Javadocs, add and verify Javadoc tags to their code, and create Javadocs from their source code using the IDE’s Javadoc features.
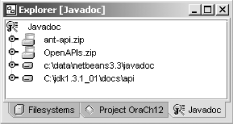
Before you can search and browse Javadocs, they must be mounted in the Javadoc repository. NetBeans maintains a separate repository for each project you create. The repository contains folders and JAR files that contain Javadocs in HTML format. To see a list of folders and JARs currently loaded in the repository, click on the Javadoc tab in the explorer. Figure 10-1 shows the Javadoc repository.
You can add Javadocs to the repository by mounting the root folder or JAR file. Only folders and JAR files that contain a valid Javadoc file structure are allowed to be mounted in the repository. A valid Javadoc file structure is one that contains one of the following files in its root directory:
index-files
api/index-files
index-all.html
api/index-all.html
Once you have mounted a valid Javadoc folder or archive, its contents become immediately available for searching and browsing. Typically, there will be an index.HTML file in the root of each mounted Javadoc in the repository. Double-clicking on this file allows you to browse the Javadocs just as you would with a web browser.
The Javadoc Search Tool allows users to search and view Javadocs in HTML format. Figure 10-2 shows the Javadoc Search Tool in the IDE. To launch the tool from the IDE select Javadoc Index Search from the View menu, or hit Alt-F1. The buttons seen in the tool are listed and described in Table 10-1.
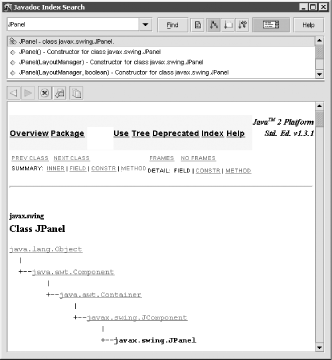
Table 10-1. Javadoc Search Tool buttons
|
Button name |
Button image |
Description |
|---|---|---|
|
Show Source |
|
Shows the source code for the current Javadoc comments if the source can be found in one of the mounted filesystems. |
|
Sort Alphabetically |
|
Sorts the Javadoc search results in descending alphabetical order. |
|
Sort by Packages |
|
Groups the Javadoc search results based on package names and then sorts the results in descending alphabetical order. |
|
Sort by Type |
|
Sorts the Javadoc search results based on their types (i.e., Class, Interface, Exception, Method, Field). |
|
Toggle HTML |
|
Toggles the HTML view of the search tool. |
|
Back |
|
Goes to the last page visited in the browser. |
|
Forward |
|
Goes forward to the next page visited by the browser. |
|
Next |
|
Stops the browser from completing loading of the current page. |
|
Reload |
|
Reloads the current page in the browser. |
|
History |
|
Shows a history of pages (with hyperlinks) viewed with the browser over a period of time. Pages in the history can be loaded in the browser again by clicking on their hyperlink. |
The search tool is divided into three panes (these panes may be arranged differently in your distribution). The top section is used to enter a Javadoc query string. The query string need not be complete but must at least match the begining of a class, interface, exception, method, or field in the Javadoc repository. After entering the string and clicking on the Find button, the left pane of the tool is populated with a list of results matching the query. If no entry is found for the query, the message “No Documentation Found” is shown. If this occurs, you should check your spelling and make sure that you have all the necessary Javadoc archives mounted in the Javadoc repository (covered in the next section). Each entry in the list is associated with Javadoc comments that can be viewed in HTML format. The list can be sorted alphabetically or by type and can also be grouped by package names using the buttons found in the top section of the tool. Clicking on an entry in the list causes the right section of the tool to be populated with its Javadocs in HTML format. This pane acts as an HTML browser, so hyperlinks in the Javadocs can be further explored in this view. Double-clicking on an item in the left section launches a Web Browser to show the Javadocs for that item.
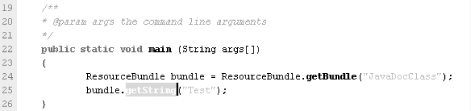
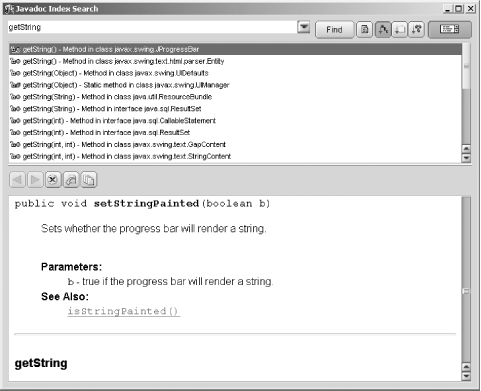
The search tool can also be launched from the editor to perform a
context-sensitive search. The context of the search will be the
currently selected text or the current word on which the cursor is
positioned. For example, to perform a context-sensitive Javadoc
search for a method named getString you would
select the word “getString” in the
text editor and then hit Alt-F1. The search tool will be launched
with getString as the query string and the results of the query
showing in the list in the left section of the
tool’s window. This process is illustrated in
Figure 10-3 and Figure 10-4. The same effect is achieved by right-clicking
on a word in the Source Editor and
selecting Tools
→
Show
Javadoc from the context
menu.
After using the Javadoc search tool and seeing how simple it is to add archives to the IDE’s repository, you’ll probably realize how convenient it would be to generate Javadocs for your own source code and distribute them to your cohorts to mount, query, and browse in their NetBeans environment. Before you go on to document generation heaven, however, you should make sure that your comments, specifically your Javadoc tags, are correct and according to standards. This can be a tedious task and is probably why many developers are not enthusiastic about producing Javadocs for their code. The NetBeans IDE comes to the rescue here with a saavy tool, the Javadoc Auto Commenting Tool, that allows you to easily create, edit, and manage Javadocs by focusing explicitly on the related comments.
You may use the Auto Comment Tool at any point during development. It is also useful for nondevelopers; for example, an editor may use the tool to correct spelling and add formatting without contaminating the source code. The Auto Commenting Tool is shown in Figure 10-5.
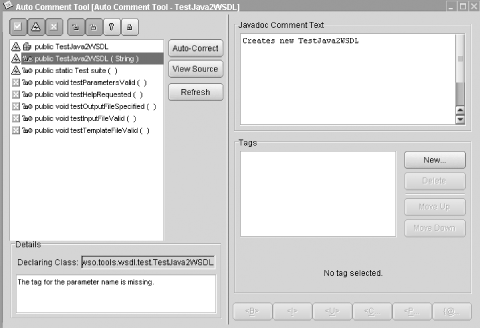
To launch the Auto Commenting Tool, open the Java source file in the editor, right-click on the opened file and select Tools → Auto Comment. You should now see a dialog box similar to the one shown in Figure 10-5. The tool lists all the classes, methods, and fields in the the Java file and allows you to view and correct the Javadoc comments. The tool also points out which of these elements have well-formed Javadoc comments and which do not. A class, method, or field element has a well-formed Javadoc comment if there are Javadoc tags for each part of the element as is necessary. For example, examine the following method:
/**
*
* This method prints a hello message
*/
public void sayHello(String sayHelloTo)
{
    ...
}
Although the fragment contains an informative comment, it does not have a well-formed Javadoc comment because the tag for documenting the sayHelloTo parameter is missing. The well-formed version of this method is
/**
*
* This method prints a hello message
*
*@param sayHelloTo The method will print a hello message using this
parameter as the name.  Ex. "Hello Bob" if set to Bob.
*/
public void sayHello(String sayHelloTo)
{
    ...
}The Auto Comment Tool shows you which classes, methods, and fields are not well- formed and can even autocorrect the problem for you. You can control which of these elements needs correcting or viewing by using one of the seven filtering buttons provided by the tool. Each button is represented by an icon that indicates whether the Javadoc comments are correct or erroneous, or the element visibility (public, private, protected). Table 10-2 shows the filtering buttons.
Table 10-2. Method filtering buttons
|
Button |
Description |
|---|---|
|
|
Displays all classes, methods, and fields that contain compliant (well-formed) Javadoc comments. |
|
|
Displays all classes, methods, and fields that have partial or erroneous Javadoc Comments. The tool can autofix some of these Javadoc errors by making assumptions based on the format of the methods. For example, parameter tags may be added for a method with parameters, but for a void method that returns nothing, it throws no exceptions and has no parameters. No assumptions can be made as to what Javadoc tags, if any, are needed, and so these cannot be autofixed. Simply adding arbitrary text to the comments can fix such problems. |
|
|
Displays all classes, methods, and fields that have no Javadoc comments. The tool can autofix some of these Javadoc errors by making assumptions based on the format of the methods. |
|
|
Displays all public classes, methods, and fields. |
|
|
Displays all protected classes, methods, and fields. |
|
|
Displays all package level classes, methods, and fields. |
|
|
Displays all private classes, methods, and fields. |
Now that you’ve filtered the classes, methods, and fields that you would like to have Javadocs generated for, you’ll want to make corrections as suggested by the Auto Comment Tool. Correcting Javadocs typically involves adding comment text and Javadoc tags. When you press the filtering buttons, a list of filtered items gets displayed. Selecting any of the filtered items displays the related comment text and tags. The Details section of the tool’s dialog box informs you of any Javadoc errors associated with the selected item. Based on the errors reported here, you can make the corrections by modifying text in the Javadoc Comment Text and the Tags sections.
Typing text in the Javadoc Comment Text section will update an element’s Javadoc comments. You will typically write any informative blurb here that describes the class, method, or field to a perusing developer. This is also a good place for an editor to make grammatical and typographical corrections. You can add HTML tags to your text for formatting purposes. The tool includes six HTML formatting buttons that add tags to your text. These buttons are located just beneath the Tags section. Any formatting that is applied to your text will be seen in the HTML after it is generated by a Javadoc generation tool.
The Details section will inform you of any tags that may be missing from the currently selected item. You can modify an item’s tags by using the buttons provided in the Tags section. For example, examine the following method signature:
public float getCurrentTemperature(boolean celsius) throws ThermometerException
After adding some documentation in the Javadoc Comment Text section, you would click the New button in the Tags section, select the radio box named @param, and click the OK button. You should see a combo box and a text box appear. Select the celsius parameter from the drop-down box, and type in a description of the parameter in the text box. You also have to add tags for the return value and the Exception. The steps for adding these are quite similar. For the return value you need to select the @return radio box, and for the exception you will need to select @throws. Once you’ve completed all editing, you can click the Refresh button to commit the changes and update the filtered item list.
After making corrections in the Auto Comment Tool, you will still need to save the Java source file to permanently commit your changes.
You are now ready to generate your own Javadocs based on source files in your project. The IDE has an embedded, customizeable Documentation Engine that is used for this task. The documentation engine consists of the following customizeable options:
Javadoc Search Types
Javadoc Executors
Doclets
These options are described in the following sections. To select the customized properties, you can set them as the default values for the Documentation Engine by selecting Code Documentation → Documentation from the Options dialog and selecting your Default Search Engine and Executor from the drop-down lists provided (doclets are selected in the property sheets for Javadoc Executors).
You may chose to generate Javadocs for a single class or for an entire package. If you choose to perform generation on a package and would like the process to be recursive, you must be sure to have the recursive property set to true on the Javadoc Executor option that the Documentation Engine is using (see Table 10-3). To begin generation, right-click on the folder (package) or file (in Explorer or in an opened editor) and select Tools → Generate Javadoc from the context menu. If generation is successful, you will be prompted to view the docs in an HTML browser. Click the Yes button to review your Javadocs.
NetBeans provides a mechanism for you to search internationalized Javadocs using Javadoc Search Types. Currently the IDE ships with a Javadoc Search Type for the Japanese locale in addition to the default English. By selecting this search type, you can browse Javadoc HTML documents generated for the Japanese locale. In the near future other locales may become available and can be added to your installation via the NetBeans Update Center.
A Javadoc Executor is an Execution Service that processes source files in the IDE to produce Javadoc files. Like Java source file Execution Services, there is an External and Internal Execution Service for Javadocs. The External Service can be used to call a javadoc tool other than the one in the JVM used by the IDE (this is used by the Internal Service). Both executors are configurable in the Options dialog (Tools → Options → Code Documentation). Table 10-3 explains the properties for the External Javadoc Executor.
Table 10-3. External Javadoc Executor
|
Property |
Description |
|---|---|
|
1.1 styleDoclets |
If this property is set to true, the executor will generate Javadocs in the JDK 1.1 style. |
|
Doclets |
This property specifies the doclet to use to format and generate the HTML page(s). Doclets are explained in the next section. |
|
Encoding |
This property specifies the character encoding for generation. For more information on character encoding support, see http://java.sun.com/j2se/1.3/docs/guide/intl/encoding.doc.html. |
|
Extdirs |
This property specifies additional directories that the executor will use to find source files or classes for Javadoc generation. |
|
External Executor Engine |
This property allows you to configure the external process (usually the javadoc tool) that will be used to generate Javadoc for your source files. See Chapter 6 for information on configuring external processes. |
|
Locale |
This property allows you to set the locale to use during document generation. The locale consists of a lowercase language code and an uppercase country code. For example, en_US is used for English language in the United States. For valid language and country codes see http://www-old.ics.uci.edu/pub/ietf/http/related/iso639.txt (language codes) and http://userpage.chemie.fu-berlin.de/diverse/doc/ISO_3166.html (country codes). |
|
Members |
This property specifies which class members should appear in the generated documentation. The choices for this property are Java’s visibility modifiers (public, package, protected, private). The choices work opposite to their meanings. For example, private will cause all class members to appear in the generated documentation, and public will only show members declared as public. The default is protected, which allows access to members declared as public, protected, or package. |
|
Overview |
This property specifies the name of the overview file (usually overview.html) used for the Javadoc Overview page. |
|
Recursive |
If this property is set to true, the generation engine will recurse through all the directories and generate Javadocs for all the source files found. |
|
Verbose |
If this property is set to true, the executor will output more detailed messages during the generation process. |
When you choose to generate Javadocs for a given source file or package, a Javadoc executor is invoked that generates Javadoc HTML files in the specified directory. The executor will format the HTML files based on the preconfigured doclet that is specified in the Doclets property. Additional source files can be added to your generated Javadocs if you specify them in the Extdirs property. Any Java files found in these directories will be processed by the executor and the resulting HTML files copied to the specified output directory.
Doclets are Java programs used to format and add content to the output of the javadoc tool. Java has a doclet API that all doclets must be written against. A doclet basically operates on the Javadoc tags. It can perform specific operations based on a given tag. For example, it will create a hyperlink in the HTML when it encounters the @link tag. By default, the javadoc tool uses a standard doclet. This doclet generates API documentation in HTML format. The doclet API allows you to extend the standard API or write your own doclets for maximum flexibility. Using your own doclet or an extension of the standard one is extremely useful when you want to introduce custom Javadoc tags. When using custom doclets with the javadoc tool, you must specify the classname of the doclet you are using:
javadoc -doclet ora.com.MyDoclet MyClass.java
For more on doclets and the doclet API go to http://java.sun.com/products/jdk/1.2/docs/tooldocs/javadoc/overview.html.
The IDE comes with a standard doclet that has customizeable properties. This doclet is the default for the Internal and External Javadoc Executors. You can create many versions of this doclet, each with its own customized properties. However, you cannot create your own custom doclet. You can create a new doclet (based on the standard doclet) by selecting Code Documentation → Doclets, right-clicking, and selecting New → Standard Doclet from the context menu. The newly created doclet can be configured via its property sheets. These properties are explained in the sections to follow.
Doclet properties can be used to add additional content to each Java page produced in the generation process. Table 10-4 shows doclet properties that can be used to add content to generated Javadocs.
Table 10-4. External Javadoc Executor
|
Property |
Description |
|---|---|
|
Bottom |
This property is used to add HTML text to the bottom of each generated page. You can add HTML markup such as copyright information here and it will appear at the bottom of each Javadoc page. |
|
Doc Title |
This property adds a title to the Overview page for your generated Javadocs. |
|
Footer |
This property is used to add HTML text in the footer area of each HTML file. |
|
Header |
This property is used to add HTML text in the header area of each HTML file. |
|
Window Title |
This property adds a title to the browser window for the generated HTML files. |
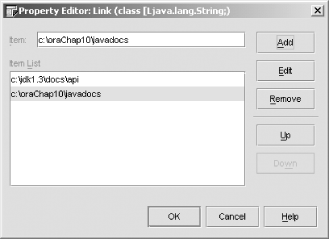
At times you may need to provide a link in the Javadocs of one class to the Javadoc of another using the @link tag. The IDE allows you to specify links to other generated Javadocs by using the doclet’s Link and Link Offline properties. The difference between these properties is that the former requires a path to a directory where a package-list file can be found, and the latter does not require the package-list files to be existent at the time of generation.
To add links to your generation, click on the ellipsis button that appears when editing the Link or Link Offline property in the doclet property sheet. You should see a dialog box similar to the one shown in Figure 10-6. Type in the path to the directory containing the package-list file and use the Add button to add it to the list of links. The Up and Down buttons can be used to move links higher or lower in the search path.
Other properties are available to format the HTML produced by the generation process. The charset property is used to set the ISO character encoding for the HTML file, allowing it to be ported to other platforms. For maximum formatting, you can always specify a stylesheet file that can contain formatting rules for any HTML tag in the generated Javadocs. You specify the location of your stylesheet in the Style Sheet File property of the doclet.
Additional doclet properties are described in Table 10-5.
Table 10-5. Additional doclet properties