
You would think that in writing an IDE the first priority would be an editor—this is a thing that edits files, right? Then you write code for compilation, execution, and so on, and you have an IDE. This is a fine design for a small application. But what happens when you want to, say, integrate source code management with the tool? You find you have to rewrite a lot of your file access code. What about integrating access to databases? You’ll need some way to make connections, browse databases, and so on. And interestingly, you’ll find a lot of the user-interface code you’re writing (select an object representing the database, get some information from it, present it), looks an awful lot like the code you’re writing for browsing files...which looks like the code for managing user settings, and so on. Your codebase is growing rapidly (and getting less maintainable in the process), and a lot of it is code to do very similar things.
The team that created NetBeans went through this, as NetBeans 2.0 evolved. As a result, if you are building an application on top of the NetBeans core, you get to benefit from their experience. You can start writing your application with all the problems they encountered already solved for you.
NetBeans solves problems
like those above through very heavy
use of abstractions. For example, when you interact with a file, you
will be using a FileObject, not an instance of
java.io.File. When you deal with menu items and
toolbar buttons, you will be developing subclasses of
org.openide.util.actions.SystemAction, not
directly interacting with menus and toolbars (though you can create
custom components to use if you need them). The preceding problem is
solved through an abstraction called nodes,
which is explained in more detail later. In general, the NetBeans
platform provides high-level abstractions to handle the common cases
found in development, while allowing the flexibility needed to do
something more low-level if the need arises.
There will be times when you may wonder why things are done the way they are. One of the goals of this part of the book is to familiarize you with the abstractions exposed by the Open APIs and how to use them—to start you thinking in terms of these abstractions and, ideally, using the patterns you encounter in NetBeans to create abstractions that solve your own problems.
The Open APIs are the set of interfaces, defined in
the package
org.openide and its subpackages, and the
specifications (such as for manifest files and XML layers) specified
in the Open APIs Javadoc documentation. The Open APIs define how
modules interface with NetBeans. The Javadoc (and the prose
documentation that accompanies it) is the canonical documentation of
the Open APIs. The NetBeans APIs can be broken down into a number of
sections based on the roles they play, such as:
- Filesystems
Communication with persistent data storage
- Datasystems
Recognition and interpretation of different types of data
- Actions
User-invokable functionality
- Nodes
Useful hierarchical relationships between data or objects and some aspects of how they are presented to the user
- Explorer
Presentation of hierarchical data structures
- Services/Lookup
Locating objects or services provided by modules, which can be used by other modules or invoked by the user. Services are often used for performing complex operations on groups of objects, such as compilation, execution, or searching.
- Window System
Manipulating and configuring windows and visual components of the user interface
Modularity is one of the primary defining design characteristics of NetBeans—the notion that functionality should be discrete and capable of being added and removed painlessly. There is a Modules API, which defines what a module is and how to install and uninstall modules.
Modules can also offer their own APIs so that other modules can use functionality they implement. For example, the XML modules offer basic support for XML documents that can be used by other modules designed to work with specific flavors of XML. For cases like this, there is a way to declare intermodule dependencies. The NetBeans runtime will not allow a module to be installed if it requires another module that is not present; it will not allow a module to be disabled without also disabling those modules dependent on it.
In any large, extensible application, you need a way for components of the system to create objects and for other parts of the system to notice and work with them. Additionally, you need a way to present those objects to a user. Think of the example at the beginning of this chapter in which your database access UI looks a lot like your file management UI, which looks a lot like other parts of your UI. Most data formats are structured and have subcomponents, and it’s useful to be able to both manipulate and present those subcomponents as contained entities belonging to a parent entity. A generic system is needed that can nonetheless provide data-type-specific functionality.
For the first problem, creating and working with arbitrary objects, there is a convenient and understandable paradigm that arises from operating systems: files. Applications running in an operating system create files on disk and then work with them. The operating system provides the low-level services of creating and accessing files and is not interested in the content of user-created files. Modules in NetBeans are fairly analogous to applications in an operating system, and files are the core metaphor used to manage persistent objects created by modules. NetBeans has a concept of a filesystem that, in its basic sense, means a storage area or namespace into which files may be written and from which they can be read. It also has semantics by which a “file” can be a factory for Java objects.
For the second problem, presentation and containment, NetBeans
provides a content-agnostic abstraction, the
node, which is used to handle hierarchical
representation of data and presentation of that data in arbitrary
ways through a user interface. A Node is not a
container for data, so much as a pointer to data. Under the hood,
bridging filesystems and nodes are data
objects, which identify types of data and potentially
aggregate multiple related files into a
single entity.
To understand filesystems in the NetBeans paradigm, you will need to stretch your concept of what a filesystem is. A filesystem in NetBeans is a place where you can hierarchically store and read files. But NetBeans does not require that a filesystem absolutely be files on a disk—only that it behave as if it were. This can be accomplished by implementing a set of interfaces defined in the Filesystems API. A filesystem need only satisfy the contract of conforming to those interfaces; how and where the data is physically stored is irrelevant and transparent to code that acts on the files.
A filesystem is effectively a hierarchical namespace for named entities that contain data or contain entities that contain data. There is a Service Provider Interface (SPI) for extending NetBeans with alternate types of file storage. As a concrete example (which will be important later in this chapter), NetBeans defines and internally uses XML filesystems which are, for all intents and purposes, analogous to physical files on disk. Additionally, there are extensions to support FTP, CVS, and other types of storage, available in separate modules that plug into NetBeans.
Once you have virtualized the concept of a filesystem, there are some
other useful things you can do. If all you need to do to create a
filesystem is to satisfy this contract, why not also have a virtual
filesystem that owns a collection of subfilesystems and presents all
of them in the same virtual namespace? NetBeans provides a concrete
implementation of this in the class
MultiFileSystem, part of the Filesystems API. This
class allows you to construct a single namespace that merges a set of
discrete subfilesystems called layers and acts
as if the contents of all of them live in the same namespace (as
shown in Figure 14-1). If two different layers
contain a folder called /MyFolder/ with
different contents, listing the contents of the
MultiFileSystem’s
/MyFolder/ gets you the contents of both. For
dealing with name collisions (for example, two layers contain
different files with the same name and path),
MultiFileSystem
has a stacking order of layers. In the case of
a conflict, whichever filesystem is on the top of the stack is the
one whose file is returned. Changes written to a
MultiFileSystem are written to one or another
writable layer. There are also semantics for one filesystem to mask a
file that exists in another layer so that it appears not to exist
even though one of the merged filesystems underneath contains it.
Furthermore,
it is possible to insert and remove
layers at runtime.

NetBeans is a Java application;
simply
throwing around lots of files is not terribly useful. Java object
instances, on the other hand, are. So NetBeans defines semantics for
mapping files to Java as object instances. You can create a file with
a name such as com-mycom-MyClass.instance. The
Datasystems API contains a facility (implemented in a class called
InstanceDataObject) to dereference a file with
such a name and return an instance of the named class.
Using this infrastructure, files can be factories for Java objects. This infrastructure serves two primary purposes in NetBeans: First, it allows for modules to register objects with the system (for example, adding beans to the Component Palette or adding menu items to a menu). Second, it allows objects to be registered without the JVM actually loading the class in question unless it is actually needed, thus saving memory.
On top of this infrastructure is a facility called Lookup. Lookup adds a layer of indirection that allows module code to find objects registered via files in special folders (see Example 14.1) without dealing directly with filesystems.
As we just mentioned in the concept of an XML filesystem, the contents of the filesystem are actually represented in an XML document. In a NetBeans XML filesystem, the XML to add a Java class to a filesystem looks like Example 14-1.
Example 14-1. Adding a .instance to the System Filesystem
<filesystem>
  <folder name="Menu">
    <folder name="View">
      <file
       name="org-netbeans-examples-quickpanel-ShowQuickPanelAction.instance"/>
    </folder>
  </folder>
</filesystem>
The effect of the preceding example is that when the system creates
the main menu, it creates an instance of
org.netbeans.examples.quickpanel.ShowQuickPanelAction,
which supplies the icon and display name for the action on the menu,
whose actionPerformed( ) method will be called if
the user
selects the menu item.
Not only does NetBeans use the concept of virtual filesystems for managing user files, it also uses a special virtual filesystem that contains configuration information for NetBeans itself. This is called the system filesystem. Using the convention of .instance files and other similar mechanisms to represent Java objects, NetBeans stores a wide variety of information in the system filesystem. For example, the system filesystem contains a folder called /Menu which contains subfolders with names such as File and Edit. Those subfolders in turn contain .instance files for Java classes which implement the actions that appear in the File and Edit menus. Modules are free to create their own folders in the system filesystem to store data interesting to them or add objects to folders that have defined meanings within NetBeans. One of the reasons for using the system filesystem is that it allows objects to be declared, but their classes are not actually loaded by the JVM until something needs to use them, thus saving memory. The system filesystem is the general registry for publicly accessible data and objects.
One important aspect of a NetBeans virtual filesystem is that it can fire events to notify the rest of the system when something in it changes. NetBeans listens for changes in the system filesystem, and if, for example, something creates a new .instance file in one of the menu folders, that new item will appear on the menu.
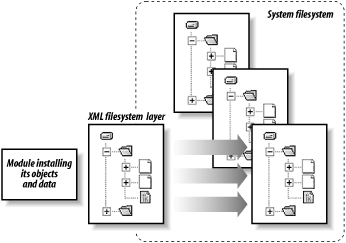
The primary way modules install their functionality into the runtime environment is via files—specifically via virtual files defined in the module’s XML filesystem layer (or module layer). This is a small XML document in the module’s JAR, conforming to the NetBeans filesystems DTD. It is declared in the module’s JAR manifest. Since NetBeans’ infrastructure allows files to actually map to Java class instances, what a module generally installs is class instances, using the .instance file convention just described. The files are put into folders in the system filesystem that have defined meanings to the system or to a module. The XML layer defines a hierarchy of files and folders which may or may not overlap with existing folders in the system filesystem. When a module is loaded, this small XML filesystem is merged with the system filesystem, shown in Figure 14-2.
Often a module needs to install objects that should be available to the runtime (such as action classes that define menu items to appear on the main menu), or to other modules (for example, services such as Java compilation). The system filesystem provides a way to do this that allows loose coupling between the modules and the system—neither the runtime nor other modules need to have been coded to anticipate the presence of these specific objects.
When a module is removed, its XML layer is cleanly extracted from the system filesystem, and the objects, menu items, services and such that it contained simply disappear from the system. For a more detailed overview of the semantics and implementation details, see Chapter 15.
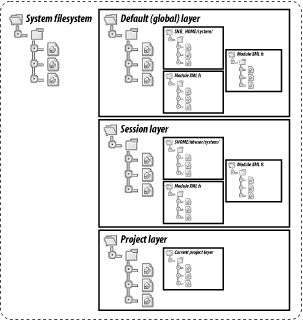
Earlier we mentioned a class called
MultiFileSystem,
which could present a set of filesystems as if they were
one—indeed, we’ve already mentioned that this
is how the merging of XML layers to create the system filesystem is
accomplished. But there is more to it. The system filesystem is
composed of three distinct layers, which determine where settings are
stored.
The system filesystem is composed of three outer layers of
MultiFileSystem as follows:
- Default or Global
This is a
MultiFileSystemthat contains the contents of the system/ subdirectory of the directory in which NetBeans is installed. The contents of this filesystem are merged with any XML filesystems from modules that are bundled with NetBeans. Changes to this layer will propagate to all users using a shared copy of NetBeans.- Session or User
This is the content of the user’s settings directory. On Unix systems this might be the nbuserVERSION/system or nbdev/system subdirectory of the user’s home directory[3] (the folder name is nbdev or nbuser and a version number depending on whether the build is a development build or a stable release). On Windows systems, the runide.exe launcher prompts the user for this directory the first time NetBeans is run.[4] The session layer is where things such as window positions, editor colorings, and the like are stored—settings that are specific to one user and should not be applied globally.
- Project
The project layer contains settings that apply to the current project (which comprises a set of files, window positions, and so forth). It is designed to store settings relating to a given project. At the time of this writing, project support is still evolving toward NetBeans 4.0. The current location of project files is $HOME/nbuserVERSION/Projects/PROJECT_NAME/system/, but this is subject to change once sharable projects are available. As with the Session layer, the directory name may be called nbuser or nbdev, depending on the type of build, followed by the version.
Tip
Note that as of NetBeans 3.4, NetBeans user directories live in a
.netbeans directory off the
user’s home directory, such as
$HOME/.netbeans/
3.4dev>.
For other differences likely to be found in NetBeans 3.4 and later
releases, see Appendix D.
The system filesystem is a
MultiFileSystem
containing other MultiFileSystems, as shown in
Figure 14-3.
To really get a sense of what lives in the system filesystem, you need to actually explore it. By default it is hidden from the Filesystems tab in Explorer. Try the following:
In the main Explorer window, go to the Filesystems tab, right-click the root filesystems node labeled Filesystems to bring up the context menu.
Select Customize from the pop-up menu. A dialog box will appear in which you can choose which filesystems are visible in the Filesystems tab of the Explorer window.
Find the node labeled Default System and click it to select it.
On the adjacent property sheet in the customizer dialog box, find the Hidden property and set it to
False.Close the dialog box and browse the system filesystem by opening folders within it in Explorer (see Figure 14-4).

Tip
When you browse the system filesystem in the Explorer window, the names you see for folders and files are the display names. These can be localized, and are not necessarily the same as their programmatic names. If you want to add an object to the system filesystem, you need to use the programmatic name for the folder in which it should be placed. This programmatic name is easily seen in the property sheet: select the folder and look at the value of the Name property.
The high-level view of NetBeans design is that it is
a tool to edit and otherwise interact
with data objects. An abstraction and Java
class called DataObject exists to represent
objects that contain modifiable data, and to provide ways to modify
that data. DataObjects are part of the Datasystems
API—modules register DataLoaders, which are
responsible for creating DataObjects for files of
a given type. Generally, your code will deal more with
DataObjects that represent files (and provide
structural programmatic access to their content), as opposed to
working directly with files.
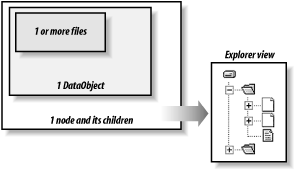
DataObjects provide the additional layer of
indirection between files and Nodes; these objects
identify what type of data a file contains (for example, Java source
code, HTML, text, Java bytecode), and they provide ways to interact
with that file appropriate to its data type. Additionally, a
DataObject may be a wrapper for multiple files,
such as a Java class file and a Java source file, which are in most
cases more usefully treated as a single entity.
Modules install
MIMEResolver
s
and
DataLoader
s.
The MIMEResolvers identify a
file’s MIME type (file format, for example,
text/plain). The MIME type determines what
DataLoader is used to create the
appropriate
DataObject for a given file.
The model behind NetBeans’ design can be summed up as everything is a bean. JavaBeans have properties and methods—you can read or change their properties, and ask them to do things by calling their methods. If you’ve used the NetBeans IDE, you may have noticed that most of the objects you interact with (for example, in the Explorer tree, Debugger window, or Options dialog) have property sheets to manipulate them and actions (methods) that can be called on by right-clicking them to bring up a context menu. This is the bean model in action.
As we mentioned, there is the issue of hierarchy of containment and presentation. The file metaphor solves the first piece of the equation—a common infrastructure for storing both user data files and system and session settings internal to the IDE. A filesystem is hierarchical and employs a tree structure; however, it is not flexible enough for all of the presentation and containment issues a large application is likely to face. There are times when it is desirable to restrict the files or objects that are visible, such as when the user should select a folder but not be able to select files inside folders. It is often useful to present different views of a data object, appropriate to the task the user is performing. There are cases in which you might want to present the same object as being the child of different containers, depending on the task. The semantics of a filesystem are not flexible enough to address all of these issues, and while data objects aggregate files, they are not hierarchical.
What is needed is a generic hierarchical, tree-like containment paradigm that is agnostic as to what kinds of things it is representing, and that doesn’t force any particular constraints on what can and can’t be a parent. An abstraction called nodes solves this problem.
Both user data files and
objects internal to the IDE are most often
represented to the user via Nodes—tree
structures. Nodes are what you see rendered in the
Explorer, Debugger, and Options windows, to name a few places. Almost
every object you interact with in the IDE is something represented by
Nodes, even if the interface to that object is not
a tree-based control. Nodes are similar to
JavaBeans components in that they have properties and methods. Unlike
ordinary JavaBeans components, the properties and methods can change
dynamically at runtime. Also, Nodes can be cut,
copied, and pasted and can support context-sensitive documentation.
A Node is an object that implements the interface
org.openide.nodes.Node. Nodes
provide the following features:
A list of other
Nodes that are its children—which live below it in the hierarchy.One or more sets of properties. Properties are arbitrarily named Java objects that represent attributes of the object (such as a file) that a
Noderepresents. They are instances of the classNode.Property.Nodeproperties are very much like the JavaBeans concept of properties, except that the set of properties can change dynamically at runtime.Other arbitrary Java objects that provide access to the data or object the
Noderepresents are called cookies in the NetBeans paradigm. Code can ask for aNodeinstance if it possesses aCookieof a particular class and then fetch thatCookieand cast it to the requested class.Cookies provide a dynamic multiple inheritance forNodes andDataObjects (DataObjects also possessCookies).Notification of changes in the available cookies, properties, or actions available on a
Node.
In the course of writing your own functionality for NetBeans, you may
need to create Node subclasses or instances. If
the notion of writing a class that explicitly declares
Node.Property objects for each property you want
to expose sounds intimidating, consider using
org.openide.nodes.BeanNode, a
Node subclass that simply wraps any JavaBean class
and presents its properties as Node.Property
objects using introspection. You still have the option of a more
complex implementation if that better serves your needs. Also
available is org.openide.nodes.AbstractNode, an
abstract base class that handles the localized display name and icon
that should be exposed in the user interface. It also gives you
complete flexibility with regard to implementing behavior,
properties, children, and so on, while handling the more common cases
with minimal required coding. The Open APIs contain many such base
classes that can speed development.
An important distinction to remember is that Nodes
are a presentation layer—a
Node is more like a pointer to some other object,
such as a DataObject representing a Java source
file or a JavaBean whose properties are persistent settings the user
may need to configure. A Node does not directly
contain data, but exposes the properties of the underlying object and
provides a way to locate interesting interfaces to interact with the
data the Node represents (such as the logical
structure of a Java file’s source code or an
interface with a method to open that file in the editor). Nodes are
not visual components; as discussed in the next section, NetBeans
also provides a flexible and generic visualization toolkit for
presenting Nodes in the user interface with the
Explorer API.
Having a nonvisual tree structure is not useful without a way to
represent it in a user interface. It is generally considered good
programming practice to separate the presentation of data from the
data, and NetBeans does this. Nodes provide the
underlying structure, and NetBeans provides a toolkit for rendering
Nodes on screen in the Explorer
API. This API accomplishes two things:
Provides visual components that display
Nodes in a variety of ways (trees, lists, menus, combo boxes, and so on)Provides a concept of context—the notion that at any time, some
Nodes will be active (selected), and the user interface should present functionality appropriate to what is active (for example, enabling or disabling compile or save actions in menus according to whether the activeNodecan be compiled or saved)
The visual classes in the Explorer API can be used as they are or subclassed to modify the way data is displayed.
The abstraction of explorer views sits at the
heart of NetBeans’ user interface. Many components
you interact with in NetBeans are explorer views. An explorer view is
a user interface component that is connected to a root
node
and visually renders it (and optionally its child
Nodes). The window called Explorer that you see when you first start
NetBeans is a window containing tabs that show explorer views rooted
on different Nodes.
Many visual components in NetBeans are explorer views of one type or
another—the package chooser in the New wizard, which is where you can choose to
create new files; the list of breakpoints in the debugger window; and
the New menu are only a few
examples. Explorer views are not limited to the tree-style view you
see in the main Explorer
window—the Explorer API supplies a rich set of user interface
components that module authors can use or subclass to display
hierarchies of Nodes as menus, drop-down list
components, lists, and more. Module authors can also create their own
custom explorer view components, but more often it is possible to
simply use the existing view components by creating custom
Nodes.
For another example of the myriad uses of the
Nodes and explorer views, right-click the tabs on
the main window that allow you to switch workspaces. Choose Customize Workspaces from the context menu.
The dialog box that pops up contains an explorer view window showing
the hierarchy of workspaces. In fact, if you were to open Tools
→
Options
→
IDE Configuration
→
Look and Feel, you would notice a node called
Workspaces with the same contents as
the configuration window that just popped up—both are
views
of the
same
underlying Node.
MVC Architecture
The essence of this style of design is a paradigm called Model-View-Controller , which was first developed at Xerox’s Palo Alto Research Center in the late 1970s, and first found its way into programming in the Smalltalk language. If you have worked with Swing components, you have seen a variant of this design style. The idea is that the most flexible design for user interfaces is that what the user interacts with should be made up of three components:
- A model
Encapsulates data or useful functionality or both. An example of this in NetBeans is a
DataObject, which represents files that contain user-modifiable data, for example, source code.- A view
A visual component that presents the contents of the model to the user. An example of this in NetBeans is any of the classes in the
org.openide.explorer.viewpackage, which are visual classes that can display an arbitrary subsection of the nodes hierarchy in one way or another.- A controller
An object through which the view and model communicate. In NetBeans, this corresponds to nodes themselves—they are pointers to model-like objects, not containers for data in and of themselves, and an explorer view presents the underlying model to the user by presenting a hierarchy of nodes.
The result of such a design is that you get a huge amount of flexibility and code reuse. Any of the three components of MVC architecture can be replaced without the others needing to be reworked or redesigned. It is the MVC paradigm that forms the foundation of NetBeans’ architecture, as shown in Figure 14-5.
You can do quite a bit of customization to NetBeans without writing any code. When you open Tools → Options → IDE Configuration → Look and Feel you are presented with a tree view of a set of nodes in a window with an attached property sheet.[5]
If you read the section discussing the system filesystem, you may have already guessed that these nodes literally represent folders, subfolders, and files in the system filesystem. Some of the subnodes in this tree are:
Toolbars
Menu Bar
Actions
Component Palette
If you expand the Menu Bar node, you will find child nodes named for
all of the menus in the IDE—and these then contain child nodes
for each item that appears on that menu. Recalling that
Nodes are like JavaBeans components that can be
cut and pasted, try the following:
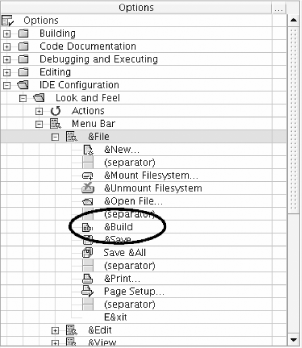
Expand the Menu Bar → Build node. Here you see all of the items that occur on the Build menu in NetBeans.
Right-click the node for the menu item Build to bring up its context menu.
Choose Copy from the menu.
Right-click the node for the File menu to bring up its context menu.
Choose Paste → Copy as Link.
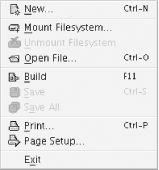
Click the File menu on the main window. Notice that there is now a menu item for Build. To visualize this, take a look at Figure 14-6 and Figure 14-7.
What you’ve done is to add an empty .instance file to the system/Menu/File/ subfolder of your user directory. The $NB_USER/system/ directory comprises the session layer in the system filesystem. Thus the new menu item will remain on the File menu when you run NetBeans in the future, but since the modification is in the user directory, this customization will not be propagated to other users of the same copy of NetBeans. The customization will also remain even if you replace your NetBeans installation with a newer release.
Since NetBeans uses the nodes and bean model consistently throughout its user interface and its underlying infrastructure, you can do a surprising amount of customization without ever writing a line of code. Via the options hierarchy and the system filesystem, it is possible to substantially modify the NetBeans environment (including rendering it unusable, when it comes to the system filesystem—handle with care!).
Let’s try a more useful example—making additional components available on the Component Palette:
In Explorer → Filesystems, right-click a package and choose New → GUI Forms → JPanel. A dialog box will open and ask you for a class name and offer to let you override methods.
Name the class
YellowPaneland click Finish. The Code Editor will open with your class in it, and the Form Editor will also open.In the editor, add the following line to the constructor:
setBackground(java.awt.Color.yellow);
Compile the
YellowPanelclass by clicking Build Compile.Find the node in Explorer → Filesystems for your class. Right-click it and choose Copy from the context menu.
If it’s not already open, open Tools → Options. The contents of the component palette are configured via a node of the tree you see in this dialog box.
Expand the IDE Configuration → Look and Feel → Component Palette → Beans node.
Right-click it and choose Paste → Paste Link.
Create a new form based on a
JFrameby right-clicking a package in Explorer Filesystems and selecting New → GUI Forms → JPanel.Click the Beans tab on the Component Palette.
Once the Form Editor opens, click the icon for
YellowPanelon the component palette. Since we did not create an icon and aBeanInfoclass for it, it will show up with the default icon displaying a question mark. You can be sure of its identity by hovering the mouse over the icon until the tool tip appears.In the Form Editor, click within the
JFrameyou just created to add an instance ofYellowPanelto the form. A yellow area appears—you have just added your own component to the component palette and dropped it on a form.
Tip
To remove YellowPanel from the Component Palette, simply right-click the YellowPanel node you pasted into Tools → Options → IDE Configuration → Look and Feel → Component Palette → Beans and choose Delete from its context menu.
That was a lot of steps! There actually is an easier way to
accomplish the same thing: Right-click your
YellowPanel class and choose Tools
→
Add to Component Palette. If you make a change
to the component we created, such as changing its background color to
blue, you don’t have to delete it from the component
palette and re-add it, although the class name would be
misleading—just recompile it! Using Tools
→
Add to Component
Palette, you will find that in
$USER_DIR/system/Palette/Beans, there is now a
file called
com-mybeans-panels-YellowPanel.instance.
The folder in Options called Actions is where modules that are installed in the IDE add user-performable actions, which can live on menus, toolbars, or both. If you open the Actions node, you will see a large number of nodes for different actions, including some that don’t even appear on a menu or toolbar (like Garbage Collection, which will attempt to invoke the garbage collector for the JVM the IDE is running in).
From here, you can freely copy and paste into the Menus and Toolbars folders to completely customize the menus and toolbars of the IDE. The Actions folder is what NetBeans’ infrastructure for configuring keyboard shortcuts uses to find available actions.
To examine an even less common example, try the following:
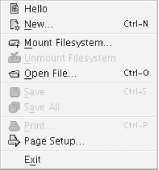
Create a new executable Java class by choosing New → Classes → Main from the context menu of a package in Explorer → Filesystems.
Add the following line to its
main( )method:System.out.println("Hello!");Now compile it.
As in the previous examples, right-click the node for your class in the Explorer window.
Choose Copy from the context menu for your class’s node in the Explorer window.
As you did earlier, paste it into the node for the File menu in the hierarchy under Tools → Options → Paste-As-Link.
Now click the File menu in the main window. Your class now appears in the list of choices (see Figure 14-8). Click the menu item for it.
At this point, if it isn’t already open, the Output
Window will appear, and the text Hello! will
appear in it.
We’ve already mentioned modules a couple of times. What are they? A module is a JAR file—a Java archive containing a set of class and other files that make up the module. What makes it a module is a set of special tags in the JAR manifest that mark it as a module and tell the IDE what to do to install it. If you look in $NB_HOME/modules/, you will find quite a few JAR files. These are all of the modules that came with the IDE. The JAR files making up the modules that are part of a distribution of NetBeans physically reside in the modules/ subdirectory underneath the directory it is installed in ($NB_HOME/modules). NetBeans has a concept of the user directory, which is where user-specific settings are stored. If you download a module using the update center, that module will be stored in the modules/ subdirectory of your user directory—so a module you download won’t suddenly appear to everyone else running that copy of NetBeans.
Tip
It is possible for a module to require being installed globally, but this is not typically true of modules delivered by the NetBeans update center.
There is also the concept of the project directory, where shared settings belonging to multiple developers who are all working on the same project are stored. At the time of this writing, project support is undergoing a major rewrite, and precisely how this will be handled is not yet clear.
A module literally provides additional classes that do something useful. Via its manifest, a module describes how to load these classes and use them in NetBeans. By and large, modules add functionality by adding entries to the system filesystem, just as pasting an element into the Menu Bar subfolder under Tools → Options creates an additional menu item. So, on encountering an unknown JAR file in the modules subdirectory on startup, NetBeans examines its manifest file, and looks for entries such as:
Manifest-Version: 1.0
OpenIDE-Module: org.netbeans.modules.autoupdate/1
OpenIDE-Module-Localizing-Bundle: org/netbeans/modules/autoupdate/
 Bundle.properties
OpenIDE-Module-Layer: org/netbeans/modules/autoupdate/
 resources/mf-layer.xml
OpenIDE-Module-Install: org/netbeans/modules/autoupdate/
 AutoUpdateModule.class
OpenIDE-Module-IDE-Dependencies: IDE/1 > 1.28
OpenIDE-Module-Module-Dependencies: org.netbeans.core/1 > 1.0
OpenIDE-Module-Specification-Version: 1.7
OpenIDE-Module-Implementation-Version: 200111231643

Name: org/netbeans/modules/autoupdate/NbmDataLoader.class
OpenIDE-Module-Class: Loader
to tell it what to do with the contents of this JAR file. For an explanation of the module manifest format, see Chapter 15.
A module actually does not have to have an installer class for the IDE to load it. A module’s manifest can specify an XML layer file packaged inside it (in its JAR file), which declares what objects should be created, and where. Where possible, using layers is the preferred way to have your module install itself.
This is actually quite simple—a module needs to include in its manifest a line such as
OpenIDE-Module-Layer: org/netbeans/modules/autoupdate/resources/mf-layer.xml
The path specified here is a path to the
layer XML file within the module JAR file. NetBeans will extract the
specified XML file when your module is loaded and merge it into the
system filesystem. The syntax of a layer is fairly simple—the
filesystem element contains a set of folder and file elements that
make a small virtual filesystem. A top-level XML element called
filesystem can contain the subelements
folder and file, and
folder elements can then contain additional
folder and file elements.
folder and file elements can
have attributes and also can have either CDATA
sections specifying their content, or have a URL property that points
to what should appear to be the content of the file. The contents of
the
virtual
filesystem, declared in XML, are the module’s
“layer.”
There is no fixed description for what a module can do. Part of the purpose and strength of a tools platform with generic APIs is to leave as much choice as possible up to the module author. Essentially, anything you can do in Java is possible, from building support for Perl with syntax highlighting and GUI design, to adding debuggers, tools for deploying classes to an application server, code profilers, UML tools, jargonizers, a Tetris game, or a full-blown office productivity suite!
So, in summary:
A module is a JAR file.
A module contains Java class files that interact with the IDE through the Open APIs.
A module has a META-INF/MANIFEST.MF file that contains special tags that tell the IDE what to do with the classes in the JAR file.
Modules included in a distribution of NetBeans reside in the modules/ subdirectory of the NetBeans installation.
Modules downloaded by the user live in the modules/ subdirectory of that user’s user directory.
Modules contain XML filesystem layers, which add files to the system filesystem. In many cases these files are factories for Java class instances.
Modules can also be dynamically loaded and unloaded by disabling them in Tools → Options → IDE Configuration → System → Modules. For example, try the following:
Create a GUI form and open it by right-clicking a package in Explorer → Filesystems and choosing New → GUI Forms → JPanel. The Form Editor will open, with its associated component palette, on the GUI Editing workspace.
Open NetBeans’ main configuration window in Tools → Options.
Find and expand the node called Modules.
Locate the node labeled Form Editor and click it to select it.
On the property sheet, set the Enabled property to
False.
Notice that the GUI Editing workspace immediately disappears—and the Form Editor closes. Also notice, you now have two files listed in Explorer—one of them with the extension .form (the form editor stores GUI design data in this XML file and causes it to be hidden in the explorer). If you reenable the module, the Form Editor menu item will reappear in the View menu, and you will once again be able to work with forms.
What has actually happened is that the IDE has unloaded the classes
provided by the module from memory, removed any objects the module
specifies that the IDE should add to the system filesystem via its
manifest, and called the module’s
uninstalled( ) method if the module specified an
installer class in its manifest to perform any additional cleanup.
The result is that the next time NetBeans is started, it will no
longer use the module JAR file.
Deleting module files means that they do not get the chance to clean up after themselves. The result can be exceptions and unpredictable behavior. Also, bear in mind that there are cases of module interdependencies. NetBeans has built-in protection against disabling modules on which other modules have dependencies. Deleting modules short-circuits this protection. Don’t do it! While future versions of NetBeans will have support for physically deleting modules, manually deleting their files is never a good idea.
It’s all well and good to talk about modules in the abstract; however, the following experiment will give you a tangible sense of just how modular the NetBeans IDE is:
Start with a clean, never-run installation of the IDE.
To be sure it won’t use settings from your working copy or install modules you’ve downloaded, create an empty directory, for example, in /tmp/userdir.
After installation, delete the entire contents of $NB_HOME/modules/. Also delete the contents of $NB_HOME/system/Modules/.
Now start the IDE from a command prompt, passing the argument
-userdir /tmp/userdiron the command line, so the empty user directory will be used.
What comes up is an application with almost no features. You get an Explorer window with a tree view of files. Note that you now see both .java and .class files separately in Explorer, whereas, if the Java module were installed, they would be aggregated as a single node. With this instance of NetBeans, you can only cut and paste files—it is a glorified file browser, and little else.
While this is not the most useful way to run the NetBeans IDE, it truly makes the point of just how modular NetBeans is!
Executing anything in the IDE is
accomplished via an abstraction called
Execution services. An execution service takes
an object that can be executed and performs some actions to execute
it. The Java module provides two ways to execute Java
files—internal execution and
external execution. The former loads the class
to be executed right into the same JVM the IDE is running in, and is
quite fast. The latter calls the java executable
on your system and passes the classpath argument
with all of your mounted filesystems. It then parses any text output
from your program and displays it in the Output Window. Additional
external execution services can be created, so you can have a second
execution service for running code on JDK 1.1 for testing applets,
for example.
Internal execution is also a convenient way to interact with the running IDE. Since your code will be running in the same JVM, you can call any static method or constructor of any public class that is part of NetBeans. And the primary entry points to functionality within the IDE are static methods that allow you to locate objects of interest.
Tip
If you are going to interact with the IDE via internal execution, you will need to mount openide.jar from the lib/ directory of your copy of NetBeans in Explorer Filesystems. If you have installed the Open APIs Support module, this is already done for you (it is hidden, but if you right-click the root Filesystems node and choose Customize, you will see it). If it is not mounted, the compiler will not find the classes your code needs to interact with.
To set a class to use internal execution:
Right-click the node for your Java class in Filesystems.
If you don’t have the global properties window open, choose Properties from the context menu. A property sheet will appear.
Click the Execution tab on that property sheet.
Set the Executor property to Internal Execution.
When a class is run with internal execution, all of the internals of the IDE are visible to it, so it is possible to write code that will interact with the IDE.
Note
Internal execution starts faster than external execution, since a new JVM does not have to be started. If you are reading this book, you probably are thinking about writing code that needs to run with internal execution, so it will be sensible to set this as the default. You can do this in Tools → Options → Editing → Java Sources → Default Executor.
At the same time, some things can interfere directly with NetBeans,
such as adding global AWTEventListeners, and there
are other ways for code to misbehave, so it is always safer to use
external execution if you don’t truly need to
interact programmatically with NetBeans. For more on internal and
external execution, refer to Chapter 2.
For a simple example of interacting directly with NetBeans’ runtime via internal execution, let’s try creating a small class which will write to the status bar in the main window. Create the class shown in Example 14-2.
Example 14-2. Writing to the status bar
import org.openide.TopManager;
public class StatusWriter {
  public static void main(String args[ ]) {
    TopManager.getDefault( ).setStatusText("Hello world!");
  }
}
Set the class to use Internal Execution and run it (press F6). You will see the text of the status bar
change to Hello World!
Note
Did you get a missing import error when you compiled the code? If so, openide.jar is not on your classpath (not mounted in Filesystems Settings in the Options window). The Open APIs Support module will mount it for you automatically.
Did you get a bunch of text in the output window that resembled what you see in a console window when you launch NetBeans? If so, then you ran the code with external execution. Set this class to internal execution as just described.
Note that the Open APIs Support module includes a template called “API Test Script,” which will set internal execution by default and includes common imports needed when using the NetBeans Open APIs.
Let us change this code to do something marginally more
useful—change the current workspace in the running IDE. Edit
the class file you created before and replace the line that prints
Hello with the following:
TopManager.getDefault( ).getWindowManager( ).findWorkspace("Debugging").activate( );Recompile your class and execute it. The current set of windows disappears, and you have changed to the Debugging workspace (to get back to the editor, simply click the Editing tab at the bottom of the main IDE window).
As you can see, quite a bit is going on under the hood of NetBeans. For testing and experimentation, basic functionality can be accessed fairly simply using internal execution. NetBeans is a complex piece of software, but it provides well-defined contracts for adding components via the Open APIs. Next we will examine those APIs in detail, so that you can begin to understand how the various pieces that make up an application built on NetBeans interoperate.
[3] On NetBeans 3.4 and later, these directories are placed inside a .netbeans directory in the user’s home directory.
[4] On all systems, the location of this directory can be
overridden on startup by adding the line switch -userdir
some_directory/. NetBeans 3.4
changes the default locations somewhat, but you can always select a
user directory with this switch.
[5] In NetBeans 3.2, this was a large tree of option nodes. In NetBeans 3.3, these are grouped into category folders. If you are using 3.2, ignore the folders we tell you to navigate and look for the settings node we name.