Cisco Best Practice Overview and Guidelines
Trying to apply best practices and guidelines is difficult enough, but trying to do it when you need to worry about how putting in a certain access control list (ACL) affects the components of the configuration of your network or security components is something entirely different. You not only need to be aware of how they operate but also how they interoperate. Cisco provides a handy location where all the whitepapers, discussion groups, and so on are easily located. You can drill down to a specific IOS, and then a specific type configuration within that IOS, say Security and VPN, and from there you can narrow that beam a little more to find what it is specifically you’re looking for, say, Access Control Lists (ACL), for instance.
Following are a few models and some links and tools for configuring your Cisco IOS device, firewall/ASA, or an intrusion prevention system (IPS).
Basic Cisco IOS Best Practices
Two access modes are available for Cisco IOS–based devices: basic and privileged. Both modes should be password protected. When you log in to the device and successfully enter the initial login sequence, the system enters basic mode. You can then enter privileged mode by typing the enable command followed by the password.
Secure Your Passwords
The passwords for basic mode and privileged mode should be different. Another useful tool in protecting your passwords is to use the enable secret command when setting your enable password. It uses an improved encryption algorithm over the enable password command. The enable secret command also provides more security for your configuration files should they be stored remotely on a TFTP server. Best practice is to always use the enable secret version of the enable password because the older version is easily cracked with free online tools. And finally, passwords should never be seen in cleartext when you view any configuration file. The capability of IOS to automatically hide the real passwords when a configuration is displayed is accomplished using the global command service password-encryption:
Switch(config)# service ?
password-encryption Encrypt system passwords
<<<output omitted for brevity>>>
Switch(config)#
The password authentication can take on one of three modes: password, secret, or TACACS+.
Switch(config)# enable ?
last-resort Define enable action if no TACACS servers respond
password Assign the privileged level password
secret Assign the privileged level secret
use-tacacs Use TACACS to check enable passwords
The password and secret commands enable you to set an encrypted password that users must use to enter into privileged mode. Here’s the trick. The difference between enable password versus enable secret is in the encryption algorithm used to encrypt the password. Using the enable password command uses a reversible algorithm, which is necessary to support certain authentication protocols, notably CHAP, which sends the passwords in cleartext. The enable secret command encrypts the passwords using the MD5 algorithm. MD5 is not reversible and is more secure.
Following is an example of the configuration options for the enable secret command:
Switch(config)# enable secret ?
0 Specifies an UNENCRYPTED password will follow
5 Specifies an ENCRYPTED secret will follow
LINE The UNENCRYPTED (cleartext) 'enable' secret
level Set exec level password
Limit Administrative Access
Many times you might want to assign particular members of your staff a subset of the privileged enable commands. Cisco has provided for this eventuality by enabling 16 various privilege levels (0–15). Level 1 is basic mode, and level 15 is the current privileged mode.
Limit Line Access Controls
At a minimum, users should be authenticated before gaining device access. Use consistent authentication mechanisms if possible to simplify keeping track of passwords.
Various line access options are available, such as console, aux, and vty. The console port is useful in initial configuration and in cases where the network is down. Use the aux, or auxiliary, ports for modem support and asynchronous connections. The vty are usually reserved for remote console access where administrators can Telnet into a device to access and do their daily jobs as if they were physically connected via the console port.
The line access should be controlled by authentication with a username and an encrypted password. For authentication, you can use a local login account or a TACACS+ server. To set the login authentication type for the device, see the following example.
TACACS+ is a Cisco proprietary protocol that provides access control for routers, network access servers, and other networked devices. RADIUS is an alternative solution used in many organizations. However, unlike RADIUS, TACACS+ provides separate authentication, authorization, and accounting services for each networked device, whereas RADIUS combines authentication and authorization in a user profile. Another major difference between the two authentication services is TACACS+ uses TCP, whereas RADIUS uses UDP.
Switch(config-line)# login ?
local Local password checking
tacacs Use tacacs server for password checking
<cr>
The local keyword denotes using the local database for authentication. We do not recommend using a local database on each router or switch in your environment. This is an administrative challenge if you have more than two devices, especially if you are using a local database on your router for VPN authentication for your external clients. It is best to use one centrally managed database server such as a TACACS+.
For the aux and vty ports, it is our recommendation that you limit them to a local login or disable them entirely. Following is a sample line access configuration in which the console access is secured using a simple password but access to the vty and aux ports is secured using a local database of users:
!
line con 0
password 7 047E050200335C465817
line aux 0
login local
line vty 0 4
login local
Limit Access to Inbound and Outbound Telnet (aka vty Port)
You can limit access to inbound and outbound Telnet connections on vty ports by putting in access lists that permit or deny access from, or to, only specific networks or host devices. A more detailed description of access lists can be found in Chapter 7, “Firewalls.” Following is an example of an access list applied to a vty port:
access-list 5 permit 130.109.6.0 0.0.0.255
!
line con 0
password fastrouter
line vty 0 15
access-class 5 in
login local
!
end
Another way to handle interactive access is to completely prevent it by using the configuration command no exec on any asynchronous line. This command enables only an outgoing connection for a line. When an outside user attempts to connect via Telnet to a line with the no exec command configured, the user gets no response. You can also establish which protocols can be used to connect to a specific line by using the transport input line configuration command; for example, SSH and Telnet or just one:
!
line con 0
password fastrouter
line vty 0 15
login local
no exec
transport input ssh
!
end
Establish Session Timeouts
The default timeout period for unattended console or vty connections is 10 minutes. This can be modified—and should be modified—with the exec-timeout command (as shown in the following, where I’ve established a timeout of 2 minutes and 30 seconds for the console port and vty lines).
!
line con 0
exec-timeout 2 30
line vty 0 15
access-class 5 in
exec-timeout 2 30
login local
transport input ssh
!
end
Make Room Redundancy
If you have critical network segments, the Cisco devices supporting these segments should be configured with Hot Standby Router Protocol (HSRP). What HSRP does is provide high network availability (HA) by routing IP traffic from hosts without relying on the availability of a single router.
Basically, you take two routers and configure them such that there is a virtual MAC address and an IP address that is shared among the routers running HSRP. One is selected as the primary, or active, router. The active router receives and routes packets destined for the group’s MAC address. HSRP detects when the active router fails, at which point the secondary, or backup, router assumes control of the group’s MAC address and IP address. The backup becomes active, and if another router is in the group, it becomes the standby.
HSRP is configured in the interface configuration mode. Go to www.cisco.com/en/US/docs/internetworking/case/studies/cs009.html to see a good whitepaper on configuring HSRP for fault-tolerant IP routing.
Protect Yourself from Common Attacks
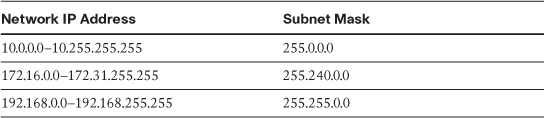
Whenever possible, put into place filters to ensure only valid network addresses are permitted past the routers. All corporate infrastructure routers should have filters in place to disallow any obviously malicious traffic. For example, any edge router should deny traffic whose source address is one of the RFC reserved addresses listed in Table 4-1.
Table 4-1 RFC Reserved Address Space
You can do some forensics on your routers to find where the attacks originate by using the logging feature of the access-list command. It is enabled by adding log-input to an access list entry, for example.
Router(config)# access-list 100 permit ip any any log-input
The result is an output that looks similar to the following example:
%SEC-6-IPACCESSLOGP: list 100 permitted udp 130.109.35.3(53)
(Gigabit0/1) -> 130.109.69.45 (5775), 1 packet
%SEC-6-IPACCESSLOGP: list 100 permitted icmp 130.109.35.3(53)
(Gigabit0/1) -> 130.109.69.45 (0/0), 1 packet
Another common attack is a TCP/SYN attack or a flooding attack. A TCP/SYN attack occurs when a large number of TCP/SYN packets are sent to a server. These packets have a source destination that is spoofed and not in use. When the server receives these packets, it responds to them using a SYN-ACK. However, because the source IP does not exist, the TCP handshake is never completed. This forces the server into a wait mode because it sits and waits for the ACK from the nonexistent sending device. To sit in this wait mode, the server allocates resources to record the information it received in the SYN packet and sent out in the SYN-ACK. This waiting results in half-open TCP requests. The TCP connection queue determines how many half-open requests your server can manage. After the queue is filled, the server can no longer accept any other packets, and legitimate users are denied the services offered by the server.
So, how can you protect your servers from this maliciousness? Use the ip tcp intercept command. This command keeps track of the following:
• Number of session requests in the last minute
• Number of incomplete sessions
• Time until final acknowledgment
A great guide for configuring TCP intercept and preventing denial-of-service attacks can be found at www.cisco.com/en/US/docs/ios/sec_data_plane/configuration/guide/sec_cfg_tcp_intercpt.html.
Firewall/ASAs
Firewall/ASAs are a key component when you talk about securing your corporate network infrastructure. This section on firewall/ASAs reviews basic firewall/ASA best practices for the core components of your network security architecture: identity, integrity, confidentiality, availability, and audit.
The Cisco ASA enables you to establish stateful firewall/ASA protection and secure VPN access with a single device. PIX Firewall/ASA provides a scalable security solution with failover support available for selected models to provide maximum reliability. ASA uses a specialized operating system that is more secure and easier to maintain than software ASAs found on the higher-end routers that use a general-purpose IOS, which are subject to frequent threats and attacks.
This section covers some basic industry best practices, including examples. At the conclusion of the section, we’ve provided links to configuration guides from the Cisco website.
Encrypt Your Privileged User Account
When you enter the password into the configuration, it is encrypted using an MD5 algorithm. The following example shows how to enter the Cisco ASA enable password encrypted:
enable password getsmarter
show enable password
enable password fecGHTsjguFGH encrypted
If you use the encrypted command during configuration, you are telling the ASA that the word preceding encrypted is already encrypted, as demonstrated in the following example:
enable password getsmarter encrypted
show enable password
enable password getsmarter encrypted
Do you see the difference? And understand why the former is the recommendation of these authors?
Second, ensure you change your default passwords before any network infrastructure device is put into place.
Consider one final thing concerning basic authentication on your Cisco ASA. Like many Cisco devices, you can access the Cisco ASA via the web-based configuration tool: the Cisco ASDM. Secure who can access your firewall/ASA via HTTP by using the following commands on your ASA:
http ip_address [netmask]
passwd password
This command enables you to specify a host address users can use to connect to the Cisco ASA web browser after you enable the Cisco ASDM.
Limit Access Control
Similar to other Cisco devices, there are various ways to interact with the Cisco ASA, such as a console or Telnet. You want to ensure that if you are allowing these connections, you do it correctly. By using AAA authentication, you can ensure you are using either TACACS+ or a RADIUS server.
The command follows:
aaa authentication [any/telnet] console tacacs+|radius
By using the any keyword, you are telling the ASA that any connection must be authenticated (console or telnet). If you use the telnet keyword, only Telnet connections to the ASA will be authenticated.
Note
Access to the console is available only from the inside (facing toward your organization’s internal network) interface.
The telnet command enables you to decide who can access the ASA via the Telnet protocol. You can have up to five simultaneous connections to the ASA via Telnet. To establish a password for Telnet access, you must configure the passwd command as demonstrated earlier.
For more information on using AAA on your ASA, look no further than www.cisco.com/en/US/docs/security/pix/pix63/configuration/guide/mngacl.html#wp1090040.
Make Room for Redundant Systems
Typically the firewall/ASA is a major component to your organization’s security and well-being. You do not need this device to be a single point of failure. To ensure this doesn’t happen, Cisco suggests that you have a redundant firewall/ASA and use the failover command to ensure fast, dynamic recovery if there is an outage of the primary firewall/ASA.
The following link provides you with a good failover configuration example for configuring failover on your ASA device. There is even an option for interface high availability: www.cisco.com/en/US/products/hw/vpndevc/ps2030/products_configuration_example09186a00807dac5f.shtml.
Note
The failover functionality is supported only between identical ASA models running the same software version and having identical hardware.
General Best Practices
The following list is a set of best practices, in no particular order, that you should consider to ensure that your ASA is configured for optimal performance and effectiveness:
• Deny all traffic by default, and enable only needed services.
• Disable or uninstall any unnecessary inspections and features on the ASA that are not specifically required.
• Limit the number of applications that run on the firewall/ASA to let the firewall/ASA do what it’s best at doing. Consider running antivirus, content filtering, VPN, DHCP, and authentication software on other dedicated systems behind the firewall/ASA unless you get a dedicated expansion module to offload those tasks to.
These listed best practices are not the end-all, be-all in configuring your firewall/ASA or ASA device.
Configuration Guides
You can find a good resource for correctly configuring your ASA at www.cisco.com/cisco/web/solutions/small_business/products/security/ASA_5500_series/index.html.
Intrusion Prevention System (IPS) for IOS
First-time users should read through the “Getting Started Guide,” which you can find at www.cisco.com/en/US/prod/collateral/iosswrel/ps6537/ps6586/ps6634/prod_white_paper0900aecd805c4ea8.html.
This is a must-read because there can be many unintended consequences if an IPS is misconfigured. Do not try to configure the IPS subsystem on your IOS router or ASA without first reading the overview on how it all fits together.
After you finish reading through the getting started guide, make sure you heed the following Cisco best practices.
1. Always remember to retire all signatures first:
router(config)# ip ips signature-category
router(config-ips-category)# category all
router(config-ips-category-action)# retired true
router(config-ips-category-action)# end
Do you want to accept these changes? [confirm]
2. Never unretire the “all” signature category.
3. For routers with 128 MB memory, start with the IOS IPS basic category.
4. For routers with 256 MB or more memory, start with the IOS IPS advanced category.
5. Use CCP/CSM to customize the signature set by unretiring/retiring a few signatures at a time according to your network needs.
6. Pay attention to the free memory every time after you unretire/retire signatures. When router free memory drops below 10 percent of the total installed memory, stop unretiring signatures. Adding more memory does not necessarily significantly increase the number of signatures that can be loaded.
7. You must unretire and enable a signature to have it loaded and take configured actions when triggered. Enabling it does not load a signature if using IOS IPS in a network with a lot of out-of-order packets.
Note
To gain the IPS feature set, you must use 12.4(9)T2 or 12.4(11)T or later T-Train releases. You cannot use Mainline image. If you use a firewall/ASA, you must use an IOS that supports the Classic IOS Firewall/ASA configuration; using a Zone-Based Firewall/ASA will not work with out-of-order packets.
This is just a brief overview of best practices for implementing an IOS-based IPS.