Tips for Brown Printing on Fabric


Figures 8.1 and 8.2 Attributed to William Henry Fox Talbot and Nicolaas Henneman, Panorama of William Henry Fox Talbot’s Reading Establishment, salted paper prints from paper negatives, Left image: 18.6 × 22.4 cm (7 ![]() × 8
× 8 ![]() in.), Right image: 18.1 × 22 cm (7 ⅛ × 8 1
in.), Right image: 18.1 × 22 cm (7 ⅛ × 8 1![]() in.), Overall sheet: 19.9 × 49.1 cm (7/
in.), Overall sheet: 19.9 × 49.1 cm (7/![]() × 19
× 19 ![]() in.), 1846. Gilman Collection, Gift of The Howard Gilman Foundation 2005. Courtesy The Metropolitan Museum of Art, New York.
in.), 1846. Gilman Collection, Gift of The Howard Gilman Foundation 2005. Courtesy The Metropolitan Museum of Art, New York.
Talbot was buttressed by the dedication of Henneman, his former valet, in the creation of the first commercial photo-printing company, actually set up by Henneman. The two pictures above advertise the capabilities of the studio, which apparently was not actually called The Reading Establishment and was not owned by Talbot: copying paintings, photographic portraiture, contact printing negatives into positives, and (Henneman) photographing sculpture. Talbot is in the middle removing the lens cap from a large-format camera because there were no shutters on cameras at that time. (He was one of the inventors of cameras as we know them.) The process he probably is using, which he devised a few years before in, 1841, is calotype, also known as Talbotype: “Fine-quality writing paper was sensitized with potassium iodide and silver nitrate solutions and exposed in the camera, typically from ten to sixty seconds in sunlight. The negative was then developed in a solution of gallic acid and silver nitrate and fixed. The paper was generally waxed after processing to make it translucent [author’s note: an idea you can use, too!] and was printed in sunlight onto salted paper [author’s note: to make the positive print]”.1 See Chapter 9 to learn how to make a salt print.
Notice the chair and armrest for the sitter, provided so that he would not move during the long exposure (but short for its era), and see that behind Talbot there are printing frames, similar to what we now use. The man on the far right might be in charge of a focusing device.
I have thought it almost comical, in a way, that repeatable photographs should have begun in England, where the weather is not known to be especially sunny all year. And so, I would imagine that the glass structure, like a greenhouse, behind the sitter, was used not only to coat paper, but also to accommodate rainy and cold days, while letting in the most light possible. I am also fascinated by the fact that Talbot’s home, Lacock Abbey, which he often photographed, is not far from Stonehenge. Yet Talbot, who was a sophisticated amateur archeologist, seems not to have ventured there with his camera, although he did take pictures in France and Spain.
Van Dyke brown printing, this chapter’s subject, is related to salt printing (Chapter 9), the basis for which was invented in 1842 by Sir John Herschel, mathematician, astronomer, chemist, inventor, botanist, and experimental photographer. It utilizes the transformation of ferric (indicates an iron component) ammonium citrate into the ferrous (another word that points to iron) state, which then could be combined with silver and other metals. In addition, salt prints, calotypes, and Van Dyke brown prints employ silver nitrate as one of their light-sensitive components.
A brown print can be made on paper, leather, or fabric and can yield permanent images rich in detail with subtle separations in the middle tones and shadow, ranging from pale to deep Van Dyke brown. A photographic negative, when placed in contact with the silver-based emulsion, produces a positive picture after relatively short exposure to daylight or ultraviolet light. The longer the exposure, the darker the tone of the print. A brown print also reacts positively to such toners as polytoner, gold, selenium sepia, copper, and blue (see Chapter 3, Toning) to produce glistening browns, purples, pinks, and blues. Brown printing, which is costlier than cyanotype due to the price of silver nitrate, one of its component chemicals, can be combined with some other techniques describe in this book—I often mix a layer of brown with a different layer of cyanotype—and with traditional artists’ materials such as paint and pastels. Gum (Chapter 10) over an underexposed, pale brown print can be effective, too.
William Henry Fox Talbot, basing his experiments on the work of earlier pioneers in photography, is considered the originator of photographic printmaking2 on paper.
In 1834 Talbot had made semi-permanent negative photographs on paper soaked in silver chloride and fixed in salt solutions, then he made positives by contact printing the images onto another sheet of paper treated in the same way. He kept this discovery secret until he heard about Daguerre, across the English Channel, announcing his direct positive process on metal. Talbot’s 1839 public proclamation of the “process by which natural objects may be made to delineate themselves without the aid of the artist’s pencil” (Talbot’s words), i.e., salt printing (Chapter 9) and, later, patented as the Talbotype, is, as previously mentioned, related to Van Dyke brown printing. Talbot devoted himself to photography and struggled with the art for years. He worked hard to perfect his process so that by 1840, he patented—which kept it from being widely used—the calotype process in hopes that it would rival the Daguerreotype for short exposures and rendering detail in portraiture. Talbot made the images permanent by fixing them in a bath of sodium thiosulfate (still a component in today’s fixer), suggested by my hero, Sir John Hershel, inventor of the cyanotype process (see Chapter 7) and credited with coining words such as “snapshot,” “positive,” and “negative.” Many historians consider Talbot the creator of modern photography because he formulated a technique that allowed the practitioner to make one negative and print it as repeatable, rather than one-of-a-kind, positives on paper. He eventually discovered how to strengthen these prints chemically from indistinct images to clear and subtle renderings. Very soon after, photographers used his process to travel the colonized world, taking pictures of remote places and people. I try to imagine having seen only painted and drawn renditions of faraway locations, then witnessing my first photograph of the Pyramids! It must have been an extraordinary experience with profound repercussions, perhaps akin to watching television for the first time in the 1950s or using a computer for the first time in the 1980s.
In addition, Fox Talbot patented a photo-engraving method and is also credited with the idea of breaking up a black-and-white image into small dots for reproduction on a lithography plate, which is physically the basis for halftone offset printing and visually, dots per square inch in digital imaging. He may have been frustrated that his “photogenic” prints had faded (the earliest prints were only partially stabilized with salt, and he did not know to thoroughly wash out the sodium thiosulfate, then known as hyposulphite of soda fixer that he eventually used, at the advice of Sir John Herschel), so his photolithography method employed more stable printer’s ink. Talbot’s Reading Establishment, pictured at the start of this chapter, was the first commercial photo studio in the world and bears witness to his success at building a camera and inserting a lens in it.
In 2006, Talbot’s family gave his photos, notebooks, manuscripts, and correspondence with other key scientists to the British Library. In addition, his home, Lacock Abbey, is open to the public.
Silver nitrate in crystal or solution form is destructive to the skin, mucous membranes, and eyes, so wear neoprene glove, safety goggles, and mask, and handle the chemical with care. It is poisonous and can cause burns and blisters; in case of skin contact, flush the area with water, followed by soap and water. If it gets in the eyes or mouth, flush with water, then seek medical attention immediately.
Do not inhale silver nitrate dust, which can cause sore throat, labored breathing, confusion, nausea, and even unconsciousness. Wear a mask with a dust filter both when mixing and when hair-drying Van Dyke brown emulsion.
If you do get brown stains on your skin, wash the areas, then let them wear off. Silver nitrate can supply oxygen to a fire. Clean up spilled silver nitrate with water and dispose of excess down a drain, not in a wastepaper basket and not directly into an aquatic environment because it is dangerous for marine organisms. Or, cover the spill with dry sand or dry ground vermiculite, which you enclose tightly in a container for proper disposal.
Tartaric acid is moderately hazardous if inhaled or touched. Wear protective gloves and mask.
Oxalic acid can be harmful. See page 232 for hazards and prevention.
Direct contact with ferric ammonium citrate can irritate the nose, throat, lungs, and skin. Remove contact lenses if worn, flush the irritated area with water, and wash contaminated skin with soap and water. Wear protective gloves and mask.
Never mix ammonia products with bleach, since the combination produces lethal fumes.
Most fire departments want to know the location and types of chemicals stored in your home. I keep many of mine in a fireproof cabinet.
Never ingest chemicals, eat, or smoke (but then, why smoke?) in your work area.
Clearly label bottles and keep them out of the reach of children and pets. Brown print solution can be fatal if swallowed and can severely damage the eyes if splashed into them.
Dispose of excess chemicals by washing them with large volumes of water down a drain connected to a decent sewage treatment system.
Old fixer, aka “hypo” solution, can produce highly toxic sulfur dioxide gas, so discard fixer that no longer is clear in color. With the right fixture, you can also reclaim the silver in fixer. In addition, repeated exposure to sodium thiosulfate or powdered fixer can cause eye irritation and skin dermatitis; wear protective gear when using it.
Do not store chemicals near food and keep them away from children or pets.
Once mixed, the solution should remain stable for at least one year at room temperature in an opaque bottle.
1. Brown print solution, containing silver nitrate and ferric salts, is mixed and coated onto paper or fabric, and dried in subdued light.
2. An enlarged negative or object is placed on top of the coated surface. Ultraviolet light shines through clearer parts of the negative or around the object and hits the coating, reducing some of the ferric salts to the ferrous state.
3. The negative is removed, and the exposed paper or fabric is washed in water, where the ferrous salts reduce the silver nitrate to metallic silver, visible as a brown image. The print is fixed in a chemical bath and washed again to produce a Van Dyke brown print that is the reverse of, for instance, the negative.
More detailed descriptions of materials are given in Chapter 4, Creating the Photo-Printmaking Studio and Chapter 7, Cyanotypes.
1. Applicators. A labeled soft house painting brush, hake brush, and Blanchard brush (page 91) are useful tools for coating the solution. You can dip paper into the emulsion by pouring a small amount in a glass of porcelain baking ban, which you tilt at a 45° angle. If you use an applicator with metal parts, keep the metal out of the solution, or coat it with clear nail polish. Make sure you do not take up too much emulsion with the brush, because a soaking, rather than a thin coating, can puddle in spots and take seemingly forever to expose.
Wash and carefully dry brushes between each coating procedure; contaminated brushes can produce imperfections in the print. If you leave a brush with emulsion in light, for instance, the liquid still on the bristles can be exposed, thus tainting the next coating with dark streaks. Make sure the brush is almost completely dry before you use it again, or the wash water will dilute the chemistry. Carefully wash the brush after a studio session, and do not use it with other processes.
The glass coating rod, mentioned on page 268, saves on chemistry and can yield an almost machine-like layer on smooth paper; it can be used with other processes if it is carefully cleaned. Or, spray emulsion on with an atomizer or air brush while wearing proper protective gear.
2. Chemicals. Please note: I have measured all these chemicals on a gram scale, then translated them into common measurements. You will need 1 oz. (30 g) silver nitrate crystal, ½ cup (90 g) ferric ammonium citrate green anhydrous, and 1 tablespoon (15 g) tartaric acid to make approximately 32 oz. (946.3 ml) working Van Dyke solution; all are special-order items from one of the merchants listed in Supply Sources. Fixer (hypo) is available at photography stores, but do not use rapid fixer because it seems to bleach a brown print. I buy 250 g (8 oz. or 1 cup) at a time of crystal sodium thiosulfate, which I prepare by thoroughly dissolving 1 oz. (30 grams) to 32 oz. (946.3 ml) water and mix afresh after processing six 8 × 10 in. (20.32 × 25.4 cm). Jesseca Ferguson, who co-authored the section of this book on pinhole photography (see page 110), suggested that I try a generous 1 tablespoon (20 g) sodium sulfite and 1,000 ml water as a clearing bath, and I remember that the old Polaroid black and white film employed the same method to clear its self-developing negatives. The much more toxic hypo eliminator is unnecessary. Or, to reduce wash time, I use hypo clear, available at photography stores and mixed at one-half the manufacturer’s directions for double weight photos. Save chemicals in tightly capped bottles in a cool, dry place.
Bostick & Sullivan (see Supply Sources) makes premixed, liquid brown print solution, which I now use, after decades of mixing from scratch, because I would rather spend the extra money and not risk my well-being from possibly breathing in unhealthy particles. Photographer’s’ Formulary (see Supply Sources) packages a more economical kit with all the pre-measured components, and it is helpful in case you want to try this method without investing in quantities of chemicals of if you need to make only a few prints. Fotospeed makes the closely related Argytotype process kit that can be purchased world-wide; it comes with instructions, sensitizer and fixer, good quality paper, digital contact film, coating rod, gloves, and syringe.
Some printers use no more than one or two drops of 10 percent potassium dichromate—that would be 2 teaspoons (8 ml) dichromate—to 9.5 oz. (100 ml) distilled water for the stock solution—in the first wash of 1 pt. (473 ml) distilled water for rendering more contrast. The dichromate solution also can help clear highlights if you have used emulsion that has started to go bad and appears a pale brown, rather than pale yellow, when still wet and coated. Dichromate or bichromate is a carcinogen; it must be carefully handled with gloves, goggle, and respirator. In addition, it is terribly toxic for the environment, so I try to stay away from dichromate, and its effect is limited anyway. Making proper negatives (Chapter 6) is the answer. Liam Lawless, a great experimenter with formulae, recommends substituting 3–6 g ferric citrate for the same amount of ferric ammonium citrate. Mix it into hot water, then allow it to cool before adding it to the Van Dyke solution to see a noticeable difference in contrast.
If you use a hose and tap water, you may find that the excess emulsion is not washing out. Carmen Lizardo, a contributor to the classic “Post Factory Photography,” recommends a pinch of citric acid or lemon juice to the first bath so that you change the water from alkaline to slightly acidic. In addition, gold toning (Item 18, below) can help with longevity of a Van Dyke brown print.
3. Distilled water. Sometimes you can get by with tap water for making the brown print solution, but the use of distilled water prevents the frustration of possibly mixing bad solution. A dish tub filled with hot tap water can be used to warm up the distilled water (see Item 4, below).
4. Four nonmetallic trays or tubs. You will need labeled photo trays—I find ones without ridges are better for evenly distributing liquid on the print’s surface if you gently rock the tray—or dish tubs larger than the print when you first wash the exposed paper, fix the image, remove the fixer, and do the final wash of the image. You may need more trays if you will gold-tone the Van Dyke. One tray or deeper tub can double as a container for hot water to heat up the distilled water while making the stock solution.
5. Hair dryer, fan, clothesline, and pins. The emulsion has to be completely dry, because if photographic negatives come in contact with wet emulsion, a permanent brown stain is created. If inkjet negatives touch liquid, the ink runs. Use a hair dryer only on the cool setting or a fan to thoroughly dry the coating before laying a negative on top. Do not use electrical appliances near water. I use nylon screening from the hardware store extended over and stapled to canvas stretchers from an art store as a drying rack in a dark area. A plastic clothesline with plastic clothes pins, which are easier to clean, can be used to air dry finished prints.
6. Image. To make a positive print, rich in detail, either use a negative transparency the same size as the positive you wish to create, or use real objects as one of the many ideas in Generating Imagery: Analogue Methods, page 100. Even semitransparent objects, such as leaves, show the veins after proper exposure. Or, generate film images with a pinhole camera, also in Chapter 5. Brown printing will pick up and render a broad gradation of tones, but I prefer a slightly contrasty negative that would print with a #1 or 2 filter on polycontrast black-and-white paper. We have carefully worked out a wide tonal range digital profile (see Chapter 6, Making Negatives: Digital Method) for brown printing on Platine paper.
Because the emulsion is a bit expensive, I use a pencil to lightly draw around the edge of the image, and that outline provides a template for where I will coat. In addition, I use pencil on the back of the paper to write information such as paper brand, sizing if there is any, date, exposure source, and exposure time.
If you are using vegetation, such as flowers or leaves, place a sheet of plastic wrap from a grocery store or clear acetate from an art store above the dry Van Dyke emulsion and below the plant life. The heat from the exposure causes the vegetation to “sweat,” which can cause stains. Dry and press plants for better contact and, therefore, better resolution. If you do not use glass, carefully pin in place cuttings that can blow about or are far from the surface. You also can catch shadows on the emulsion.
7. Light. If you have built an ultraviolet light exposure unit as described in this book (Chapter 4), you probably will need ten minutes to expose a “normal” (not too dense or black and not too thin or clear) negative. Sunlight is also suitable and yields even deeper tones in less time on a sunny day. I find Van Dyke emulsion needs almost half the exposure that a cyanotype requires. Using a dense negative will take longer and, conversely, using a thin negative requires less time, but too thin a negative eliminates much of the detail that brown prints can render. Thick fabric will take longer to expose.
Mix and coat the chemicals in subdued light or under a safelight. I illuminate the coating area with an ordinary 40-watt tungsten bulb because I want to see where I have coated, and a yellow safelight, which is near in color to the emulsion, makes observation difficult. However, if you repeatedly get a silvery gray as streaks in the image or in the highlight areas of the finished print, the emulsion or brush might have fogged from being left under tungsten too long, and you might try a bright red safelight. The other cause could be that the emulsion was overheated when you dried it. At all times, protect with an opaque cover, such as a black plastic wrapper sheet film and photo paper are enclosed in, or garden mulching plastic, the emulsion you have poured from the bottle of mixed solution.
8. Neoprene gloves, respirator with toxic dust filter. The gloves should be worn while you work, and the respirator should be added when you are mixing raw chemicals and if you use a hair dryer to dry the emulsion. Gloves can pick up chemicals; clean them before you touch paper so that you do not leave gloved finger prints.
9. Newspaper, oilcloth or blotter paper, paper towels/sponge. Because Van Dyke brown print solution stains and can contaminate other sheets of paper and other surfaces, cover your worktable, which should be stable, hard, and smooth, with layers of newspaper that can easily be removed when dirtied. Oil cloth, available from the vermontcountrystore.com, oilclothbytheyard.com, and scandinaviandesigncenter.com, is just like the stuff from the 1950s and has a liquid-repellant surface. Frequently wipe it clean.
10. Printing frame. To achieve good contact between negative or flat object and emulsion, use a printing frame bought from one of the makers listed in Supply Sources; plate glass with other sheet of glass, Masonite, or foam core underneath; or follow the instructions for building a frame on page 80. In one of these aforementioned ways, you will be ensuring against blurry imagery by weighting down the negative, and if you have a split-back frame, you can inspect the image without moving the negative. Make sure glass is larger than the image, not the kind that protects against ultraviolet rays, and is clean and dry before each use. Foreign particles lodged in the glass can create dimples in the print. If I am using a printing frame without a hinged back, I create a hinge with the substrate by using clear tape on one edge of the negative, as described in Item 16 below.
11. Receiver. Use paper larger than the image for ease of coating it. Finished prints can be made on unbuffered, 100 percent rag paper of medium absorbency, while practice prints can be crafted on less-expensive paper that does not delaminate in water. Many stationery stores sell cotton-based Crane’s Kid Finish AS811, but it can be a little tricky to prevent from ripping if you use sheets larger than 8 × 10 in. (20.32 cm × 25.4 cm). I describe a simple method for protecting the paper while putting it through liquids in Chapter 4, Item 12. On the other hand, Crane’s is a perfect weight for using in a laser printer after brown printing on it, or as pages in an artist’s book. Photographer’s Formulary carries Crane’s 90 lb. cover wove paper from sheet size to rolls. Bostick & Sullivan sells the smooth Kozo, made in Japan from mulberry bark and cotton abaca. I often use an off-white or tan paper, so visually the print appears more continuous-tone. The brightest white without artificial whiteners can be obtained in the deliciously tactile, perfectly sized, but more expensive, Arches Platine, now available in two weights from Bostick & Sulivan. Keep in mind that the print might appear more contrasty due to the deviation between the deep browns of the image and white of the paper. My students have also used recycled book pages, handmade papers from India, and Rising Stonehenge.
I have printed Van Dyke brown on Tyvek™ (spun plastic that looks a bit like rice paper but is impressively durable and is used in sheets to make water-proof envelopes and in rolls to wrap houses during construction) by coating lightly with a sponge brush, working the emulsion in evenly with a dry sponge brush, and vastly over-exposing it.
You may be inspired by Talbot’s waxing of prints (see caption under the Reading Establishment photos that opened this chapter). He used this technique to make thin paper transparent enough to employ as a negative, yet the transparentizing of paper might be an aesthetic you are interested in because often you can see the fibers in the paper. In addition to wax, another method for accomplishing this appearance is described near the end of Chapter 4: Transparentizing Office Copies.
Natural fabrics, such as a close weave cotton and muslin, accept the brown print solution best and yield the deepest tones, but brown printing also can be done on painter’s cotton duck canvas and synthetic fabrics, such as bridal or slipper satin. Avoid permanent-press cloth, which repels the solution. It is easier to learn the technique on paper before you apply it to fabric. The Tips section of this chapter describes more about using fabric, and see Chapter 7, Cyanotypes, both the Materials and the Cyanotype on Fabric sections, for more details (page 159 and 166).
I always mark on the back edge of the substrate in pencil, or laundry pen with fabric, the information I find useful: name of surface, source of light, and exposure time and date. Writing on the back also helps me remember which is the side to coat, because once I divide a large sheet, I no longer can find the water mark (page 88) on every smaller piece I have made.
12. Sheet of glass or Plexiglas™ (optional). Angle the plexi in a sink, sprinkle it with a little water to form a suction with the back of your print, then lay the exposed print onto it while you gently hose running water on it. This system, which I learned from Bea Nettles, allows unexposed chemicals to drain off, preventing them from contaminating the print. Wrap cloth tape or duct table around the edges of glass to prevent it from cutting you and to cushion the glass from breaking.
13. Siphon washer. This gadget, available on eBay, works well when attached to a spigot and then to a photo tray in a sink for washing prints. Or, you can drill small holes up the sides of a dish tub or photo tray and gently run water directly from a faucet onto the back of the print. Both methods allow clean water to enter while contaminated water drains. If you do not have running water, fill the wash tray with water, agitate the print for 20 seconds, then dump the water and refill the tray. Keep repeating for 3–5 minutes for a first wash and 30 minutes for a final wash if you do not use hypo clear. Blot the print with a clean sponge afterward.
14. Sizing. Good rag papers tend not to need more sizing than the manufacturer has put in. With hemp, often with Rives BFK, and with absorbent surfaces, sizing is essential. Different sizings can affect the color of the final print, so experiment with methods described in Chapter 4 of the section Preparation for Light-Sensitive Methods. The gelatin sizing described in that chapter tends to darken the deep browns while keeping the whites pristine. If you do treat the paper, definitely size it evenly and thinly, as described in that chapter. Uneven and thick sizing can cause patchy stains on your print. Often, sizing improves the appearance of details in the image.
With fabric, use hot water and wash out the manufacturer’s sizing before printing. Hot water will preshrink the fabric, which is useful if you are going to employ another technique on top of Van Dyke. In Chapter 4 and the end of Chapter 7 on cyanotypes, I describe my method for stretching fabric before coating, exposing, and processing.
15. Storage bottle. A glass quart (1 L) fruit juice, recycled chemical, or vitamin bottle, or a brown plastic jar sold in photography shops, thoroughly washed and labeled as to contents and date mixed, is fine for storing the emulsion. You can even use a clear glass bottle if you carefully enclose it in an opaque bag, such as the plastic ones in which photographic paper and sheet film are wrapped. Store liquid chemicals in tightly capped containers in a cool, dry area. Be careful to stir, not shake the bottle, because if it has a metal top, the cap will eventually corrode from the chemicals and contaminate the emulsion. It has happened to me! I have a refrigerator in my studio, where I put solution in order to extend its life for over a year, but I use the emulsion at room temperature. The mixture should neither freeze nor heat up; children and pets should not have access to it; and the refrigerator where you might store chemicals should not be the one in which you store food.
16. Tape. If you are not using a hinged printing frame, use clear removable tape to form a fulcrum between the edge of one side of the negative and the substrate. The tape ensures that the negative does not move if, after you have placed it on the coated and dried paper, you want to check on the emulsion color as it is exposed. Do not press the tape down too hard, or it will lift up the emulsion when you try to remove it later. I tap the tape against my clothes to pick up a little lint and, therefore, help ensure that the tape will not be as sticky and will not remove the Van Dyke coating later. Cheap tape is better because it does not hold as strongly!
Some of my Museum School student have used a few pushpins, rather than tape, through the border on two corners of the negative and through the emulsion and paper and abutted glass up to the tacks. After processing the paper, damp pin pricks can be gently rubbed on the back so that the paper fibers close up and the holes are invisible. Or, you can save the tack holes if you want to line up the negative later to print a different technique on top of the brown print.
17. 32 oz. (1L) measuring cup or beaker, stirring rod, funnel, thermometer, soft and clean sponge. You will need nonmetallic implements. It is easier to see if the chemicals have gone into solution if you use clear plastic or glass. In addition, printed black numbers, rather than clear measurements, are easier to read once you put brown solution in it. If you notice sediment at the bottom of the bottle, pour the emulsion through a coffee filter in a funnel or you can get black spots in your print.
18. Toner (optional). I was surprised to discover that some prints fellow graduate students and I made 40 years ago had faded, while others of the same age had remained the original brown. Since I used the same paper and stored them in the same way for both sets of Van Dykes, I concluded that I had not been careful enough when processing the exposed emulsion. Perhaps I had not properly washed the print in the first bath and, therefore, had not removed the excess iron? Maybe I had not removed all the fixer? If you want to be more certain about permanency, you can use gold toner, which does alter the color from deep brown to warm brown: With gentle agitation, rock one exposed print at a time in a non-metallic tray of Carmen Lizardo’s acidifying bath, explained under “Chemicals,” Item 2, above, for two minutes. The liquid may look milky due to the unused silver that has been removed. Transfer the print to another tray of acidified water for two minutes. This tray’s contents should appear clearer. (If you are going to tone a second print, then beforehand, dump the first try, move the second try to be the first, and mix fresh acidifying bath for the second tray.) Wash the print in a third tray of regular running water, or change the tray’s water ten times for one minute. Carefully immerse the print into a ribless tray of diluted gold toner for five minutes, while gently rocking the tray. Gold toner kits, which you further dilute to a 5 percent solution as you use it, can be purchased from Bostick & Sullivan and Photographer’s Formulary Gold 231Toner at half strength; mix fresh toner for each print. Or purchase pre-diluted gold toner from Silverprint in the U.K. Fix as described in this chapter. Clear in 1 percent sodium sulfite, hypo clear, or Permawash™. Wash again for five to ten minutes. What you have done is replace silver with more stable gold. Chapter 3, Toning, describes other methods, such as selenium (very toxic) and Berg toners (the blue is really diluted cyanotype plus 28 percent acetic acid stop bath and the Berg copper toner brings the print back to the color before it was fixed).

8.3 Equipment You Will Need
EQUIPMENT YOU WILL NEED
Silver nitrate
Ferric ammonium citrate
Tartaric acid
Distilled water
Label and permanent marker
Brown bottle
Beaker
Funnel
Stirring rod
Thermometer
Tub
PROCEDURE
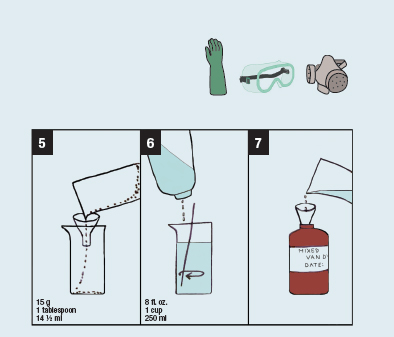
1. Adjust water temperature to 75° F (23.8°C).
2. Using a funnel, pour 90 g (124 ml) ferric ammonium citrate into a beaker.
3. With constant stirring, add water to make 8 fl. oz. (250 ml).
4. Pour the solution into a labeled brown bottle.
5. Pour 15 g (14 ½ ml) tartaric acid into a beaker.
6. With constant stirring, add water to make 8 fl. oz. (250 ml).
7. Add this mixture to the brown bottle containing the ferric ammonium citrate solution.
8. Pour 30 g (29 ½ ml) silver nitrate into beaker.
9. With constant stirring, add water to make 8 fl. oz. (250 ml).
10. Slowly pour the mixture from the bottle containing the ferric ammonium citrate and tartaric acid solution into the beaker with the silver nitrate.
11. Add enough water to make 30 fl. oz. (887 ml) for artificial light or 32 fl. oz. (1 L) for bright sunlight.
12. Pour the contents of the beaker into the brown bottle. Cover the bottle and shake the solution to ensure thorough mixing of chemicals.

8.4 Procedure
8.5 Procedure

8.6 Procedure
Please check the Making Negatives: Digital Method chapter, where a more precise method using the first test print to find the time for DMax (darkest brown) is described.

8.7 Coat the Paper
1. Coat the paper
Shake the bottle of room-temperature solution and pour 1 oz. (29 ml) into a glass or porcelain cup. To ensure that the solution does not draw up into the bristles, wet your brush in a little distilled water, then wipe it almost dry on a clean towel. Dip only the end of the brush into the emulsion and apply it to the paper, quickly and lightly moving the same solution around so as to avoid saturating one area. Coat beyond the image or coat an additional small piece of the same paper for watching the color change during the exposure. Let the paper sit in a dark place for a few minutes before you fan or hair dry on a cool setting.
Or, dry the emulsion flat or hang from a clothesline, in a dark and clean area. Make sure the coating is yellow, because if it appears brown, it has gone bad.

8.8 Expose the Print
Some printers partially dry the first coating with a hair dryer and then apply a second coat and dry that before exposure, to darken the shadow areas of the print.
2. Expose the print
Make a sandwich with backing board on bottom, paper facing emulsion side up, negative touching the emulsion and not reversed (aka “right reading”), heavy glass on top of the unit. Place the loaded print frame so that the emulsion faces the light source, in direct sunlight for 3–10 minutes, or under artificial ultraviolet light 6 in. (15.25 cm) away for 5–15 minutes. Either watch for a little more detail than you desire in the middle tones and the beginning of detail in the yellow-brown of the highlights, or watch the scrap paper turn from yellow to tan to brown to silver brown. Always turn off the UV light before you judge the color and never look at the bulbs without protective goggles.
Another method is described in the step-by-step photos of the Cyanotype chapter, page 153.

8.9 Develop the Paper
3. Develop the paper
Remove the negative from the print frame and set it aside in a clean place. Then, take the paper out from the print frame and wash it thoroughly with a gentle water spray followed by a tray wash until the cool, running water is clear (approximately 2–5 minutes for thick paper). If you instead use warm—not hot—water, wash for three minutes. An option at this point is to increase the contrast with a dichromate bath or to gold tone the print, as described in Toning, Chapter 3, and in Item 18 above.

8.10 Fix the Print
4. Fix the print
Mix fixer according to the manufacturer’s recommendations, then dilute it further by combining in a tray 2 oz. (59 ml) of the stock solution with 32 oz. (1 L) of water or use the thiosulfate recipe described in Item 2 of Materials. Immerse the print for five minutes while gently rocking the tray. Fixer will darken the image and make it permanent, but too long in the fixer can bleach the print. Since it is weak, fixer should be regularly changed when it no long darkens the image.

8.11 Inspect the Print
5. Inspect the print
Before the print enters the fixer, it will be a yellow-brown. As it fixes, it turns a true brown (this color change is one way to know if your fixer is good or needs replacing) and continues to darken as it dries.
6. Remove the fixer
Dilute the fixer remover according to manufacturer’s recommendation for photo paper (or sodium sulfite as described above, Item 2), pour it into a try, and immerse the paper for the suggested amount of time, usually three minutes. Gently rock the tray for the full time because fixer left in the print can ruin the paper and image over time! This is not an optional step.

8.12 Remove the Fixer
7. Finish the print
Water wash the print for 10–15 minutes in a tray fitted with a syphon, or frequently change water in a clean tray, then lift the print by one corner and let leftover liquid drain off. On a clean surface, blot excess water with a soft, uncontaminated sponge and dry in a clean area on a rack or a clothesline. The image continues to darken as it dries and oxidizes, so hold back judgment for 48 hours.
Once you have figured out a good exposure time, you can print the whole image with the grayscale if you are using the digital method described in Chapter 6.
Store brown print solution in a cool, dry place, such as a refrigerator, and the solution should last for months, even years, if the container is tightly capped. Do not store solution with food.
Cut the recipe in half if you are not doing a great deal of printing.
Wet emulsion shimmers, while dry emulsion is dull.
Silver nitrate has a tendency to precipitate to the bottom of the stock solution, if it has been sitting (even during the brief time you are working), so regularly stir the solution gently before using.
When applying the emulsion do not brush too hard or you can abrade the paper. Do not go back after the emulsion has started to dry in order to “touch up” the coating. The spot you coated will show up in the final print where the emulsion is doubled. It becomes darker, and a ring around the edge is obvious. Instead, every so often, hold the coated paper at an angle as you apply emulsion. You can observe wet areas, which glisten, and dry or uncoated areas, which are either matte or the color of the substrate.
If you mix blue or gum on top of a brown print, the bleach or peroxide you use as an optional intensifier for blueprinting and the dichromate sensitizer in gum printing will fade the brown print. So, start with a very dark (overexposed) brown print or do the brown printing last (although its dark color tends to obscure other colors).
Former Museum School student and artist Bill Durgin purposely underexposes a cyanotype then prints the same negative in Van Dyke over it, resulting in brown prints that are almost black. (Rembrandt often used ultramarine blue and umber pigments, rather than black, in the shadows of this paintings.) A different, two-toned effect can be created when you use a negative for one process and a positive for the other process.


8.13a and 8.13b Lynn Silverman, A Grove of Four Trees, 19 ½ × 14 in. (49.5 × 35.56 cm) each, Van Dyke on Fabriano paper, 1987.
Silverman made a series of brown prints with the subject matter of four trees growing together to form one large leafy mass. Inspired by imaginary relationships between the individual tree and the canopy, she employed masks (see Chapter 4, Creating the Photo-Printmaking Studio) and “sawing” the four trunks into strips, thereby transforming the grove into architectural or iconic significance. You also could selectively coat the paper, rather than brush on emulsion from corner to corner, in order to obtain a similar effect.
Blue usually will erase brown under it, so you can achieve an effect that preserves the cyanotype’s brush stroke. Or, you can use an overexposed brown under a diluted solution of blue so as to minimize the erasure.
Do not use tools and utensils from other processes with brown printing, or you can contaminate the emulsion. This rule holds true for all techniques.
A little sensitizer solution goes a long way: 1 teaspoon (3 ml) will coat an 8 x 10 in. (20 x 25 cm) sheet of smooth paper. Beware of overly saturated paper, which makes for longer exposures and can cause stains.
Be sure the emulsion is completely dry before exposure, or negatives can stick to it or be damaged, and the finished print will show black stains.
Rinse and dry your brush as soon as you finish coating the paper; do not wait until the end of a session, when the leftover emulsion on a brush might be accidentally exposed too long, even to a safelight.

8.14 Laura Blacklow, Untitled, from Backyard Botanicals, 19 × 26 in. (48.26 × 66 cm), combination cyanotype and Van Dyke brown print on Rives BFK paper. ©2011 LBlacklow. Collection of Ania and Gerry Gilmore.
My students and I have used blue and brown wet, or I have coated and exposed and developed an image with one process, then coated, exposed, and developed the same print with the other process, and sometimes even more of the same procedures. The cover of this book was done in this manner of repeated coatings. The combination yields unpredictably exciting colors, like greens and pinks. I do not use intensifier (for cyanotypes) because it wipes out the brown print underneath, and I do not use fixer remover/hypo clear (for brown prints) because it removes the unusual colors. But you have to use Van Dyke’s fixer, and I have found that the most important step for the brown print’s survival is to wash very carefully. Displaying the combination print under UV protective glass is imperative, too. As back up, I take excellent quality digital shots so I can make inkjet prints, also.
If you hang coated paper or fabric to dry on a clothesline, wash the clothespins and line before the next use or you can stain future pieces with contaminated solution.
If you use a standard print frame, unhinge a portion of the back and check one half of the print for color changes without moving the negative. Exposure is judged visually. With a thin (more transparent) negative, remove the paper at the tan-brown stage, and with a dense (black) negative, remove the paper when it turns deep silvery brown. Still, the best results occur with a properly made negative.
Photographers’ Formulary sells potassium dichromate for contrast control, which decreases the middle tones. Approximately 9–10 drops of a 10 percent dichromate solution is added to a 16 fl. oz. (500 ml) water first wash. A 10 percent solution is made by taking 1 oz. (29.5 ml) of water and slowly stirring in the dichromate until no more can be absorbed and the crystal begins to precipitate out. That is a 100 percent solution, so then add 9 oz. (266 ml) more water. Because dichromate is toxic, it is recommended that you mix the solution in a sink—not your kitchen sink—and wash all the utensils immediately after use. I recommend wearing neoprene gloves. Dispose of excess dichromate with copious amounts of water down a drain, not in a wastepaper basket. If you want to get rid of any quantity of dichromate, take it to a hazardous waste center. It is one of the worst polluting chemicals in this book!
If the print is too pale, increase the exposure or use a more transparent negative.
If the print is overexposed, so that the highlights are blocked and the brown is too dark, leave the print in the fixer longer than recommended until it comes back to the color you want. Make sure you remove the fixer afterward and thoroughly wash the print. If this procedure does not work, make another print with less exposure or make a denser negative.
To remove wrinkles, dampen the back of your dry print with a slightly wet, clean sponge, place the print face down in a hot (375°F or 191°C) dry mount press for 12–20 seconds, or press the back of the print with an iron on the cotton/linen setting. This procedure will darken the print, too.
See Chapter 3 for examples and instructions on toning brown prints to blue, yellow, copper, and silver after you fix the print. Consider extremely weak selenium toner to darken the brown color, before you fix the Van Dyke print (also described in Chapter 3). The toning chapter is written by Elaine O’Neil, whose quilt appears in Figure 8.15.
In Primitive Photography (listed in the Annotated Bibliography) Alan Greene describes a related process, the calotype, and his own salt printing method.
TIPS FOR BROWN PRINTING ON FABRIC
See the section Cyanotype on Fabric in Chapter 7, page 166, for lots more information.
Like paper, the fabric can be coated lightly with a brush or dipped in a tray of solution, but do not wring the cloth or you might find permanent lines in the coating. Be watchful, because thorough drying will take longer.

8.15 Elaine O’Neil, Night Visits, 72 × 92 in. (1.8 × 2.3 m), Selenium Toned Van Dyke brown print on cotton. ©1985 Elaine O’Neil.
A bat that made its final resting place in O’Neil’s attic became the subject for this comforter, based on a traditional quilt pattern. The artist photographed the deceased animal and used the negatives to print on pieces of cotton, which she exposed in sunlight and arranged and sewed into a complex pattern of light and dark, obtained by lesser or more exposure.
Do not air dry the freshly coated emulsion on humid days and nights or you may get a mottled print.
Here is a sad story that might help you remember always to fix, then remove the fixer from fabric and carefully final wash it. When I was learning these processes in graduate school—there were few modern instructions to refer to—at the Visual Studies Workshop, I labored many hours creating a brown print quilt from antique negatives, sewing the pieces together and embroidering details by hand. I did not fix the image pieces long enough nor did I bother using hypo clear because I did not know. I gave the quilt to my parents, who proudly displayed it near their living room window. Six months later, all that was left of the quilt was the stitchery and some cotton!
For more detail in the finished piece, use a warm, not hot, iron on the back of the coated fabric before exposure; in this way, your negative will be in in closer contact with the emulsion. Even better, you can stretch the fabric to eliminate wrinkles, as described in Cyanotypes on Fabric, page 166. Use plate glass during the exposure.
Brown printed fabric can be washed in cool water with mild liquid soap, such as Ivory or Woolite. Avoid detergents and soaps with chlorine, bleach, borax, or phosphates.
Brown prints can be dry cleaned.
NOTES
1 Coe, Brian, and Mark Haworth-Booth. A Guide to Early Photographic Processes. London: Victoria and Albert Museum, 1983, p. 17.
2 Crawford, William. The Keepers of Light: A History and Working Guide to Early Photographic Processes. Dobbs Ferry, NY: Morgan & Morgan, Inc., 1979, p. 16.