Making One of the Stock Solutions
Making the Other Stock Solution

7.1 Anna Atkins. Four pages from her books (see below). Upper left: Himanthalia lorea, had been owned by Sir John Herschel (!); Upper right: Callithamnion tetragonium; Lower right: Gigartina compressa; Lower left: Dictyota dichotoma, in the young state; and in fruit. Spencer Collection, The New York Public Library. The New York Public Library Digital Collections. 1843-10 1843;1843-1853 http://digitalcollections.nypl.org/items/510d47d9-4b41-a3d9-e040-e00a18064a99;510d47d9-4ae4-a3d9-e040-e00a18064a99;510d47d9-4a52-a3d9-e040-e00a18064a99;510d47d9-4adb-a3d9-e040-e00a18064a99.
Anna Atkins, an accomplished scientific draftsman, botanist, and thought to be the first female photographer, was taught the cyanotype process by her inventor-friend, Sir John Herschel. She recognized photography’s potential for book illustration when she lifted cyano-types out of its previous mathematical sphere with her impressions of algae. Her Cyanotypes of British and Foreign Flowering Plants and Ferns is the first book of photographic illustrations and the first to use photos with text (although it was printed in installments from 1843–l854) and the first photographically illustrated science book.
Cyanotypes, or blueprints, are light- to deep-Prussian blue images that can be inexpensively printed onto paper and fabric. Properly made, cyanotypes are permanent and can be combined with other hand-applied emulsions as well as traditional artists’ pigments and pastels. They tend to exhibit less middle tones than other processes described in this book, although there are ways to compensate for its higher contrast emulsion, as explained later in this chapter.
British astronomer and scientist Sir John Herschel (my personal hero, who, in 1819, discovered and freely shared how to “fix” silver-based photos with sodium thiosulfate—the fixer used to this day with Van Dyke brown prints and, slightly altered, with black and white emulsions) is reputed to have coined the terms "photography," "positive," "negative," and "snapshot". Historians credit Herschel with discovering blueprinting, or heliography with iron salts, in 1842. Calling the process “ferro prussiate,” he later used cyanotypes to reproduce his intricate mathematical tables. By 1880, blueprinting was used for duplicating engineering and architectural drawings. At the turn of the twentieth century, Henry LeSecq blueprinted inspired photographic images of Gothic structures in Paris for the French government. Although many early photographers were prejudiced by its commercial history and appalled at the blue tones we now value, Clarence White, a member of the British Pictorialist photography group called Linked Ring, made superb cyanotypes.
Until the advent of large digital printers and photocopiers, architects and engineers made blueprints or diazo prints on precoated paper, which they exposed through drawings done in pen-and-ink on tissue paper, vellum, or acetate. This precoated paper was not permanent and usually had to be processed in ammonia fumes, which can cause lung problems. However, the user of this book might be inspired by the technique of drawing on transparent or semitransparent materials, like the early practitioners of this process did, as describe on page 105 of Generating Images: Analogue Method.
Mike Ware (see Mike Ware’s New Cyanotype Process in Supply Sources), who is the first person to really change the recipe that others and I have used since the invention of cyanotype, notes, “the ability of the Prussian Blue lattice to act as host for relatively large amounts of impurity ions has recently been put to good use by ‘locking up’ the radio-activity that was deposited on the uplands of North Wales and Cumbria following the Chernobyl disaster. Spreading Prussian Blue on the contaminated soil inhibited the uptake of Caesium 137 by grass; our lamb chops were thus safeguarded from radioactive contamination.” Please see the books, listed in the Bibliography, that Ware has written on many of the historic processes; they are thoroughly researched, as well as infused with his subtle sense of humor. In addition, Ware makes a cyanotype kit that can produce more continuous tone blueprints with faster exposure times than the traditional method, although the Ware method does involve more chemical preparation. The kit is carried by many of the suppliers in the back of this book.
If potassium ferricyanide comes in contact with very concentrated acids, such as undiluted acidic acid stop bath, a poisonous hydrogen cyanide gas can be released. In addition, it is an irritant to eyes and skin. Immediately flush the affected area with large amounts of water for at least 15 minutes, removing contact lenses before rinsing eyes.
Both ferric ammonium citrate and potassium ferricyanide are toxic, so wear protective gloves when using these chemicals, and wear a protective mask when handling them in the powder form, so as to avoid inhaling the powder. Remove contaminated clothing and wash affected skin with soap and water.
Never ingest chemicals. (So, don’t eat when you are working.)
Disposal of even small amounts of cyanide, found in potassium ferricyanide, should be handled by waste disposal companies or household hazardous waste programs, usually available free or at minimal cost to noncommercial photographers in the United States. Most universities and schools also employ such a service. My city’s government warns its residents not to put cyanotyped materials in the recycle bin. We have a hazardous waste day and a center, where such materials can be brought.
John Basye, formerly of Blueprint/Printables, says that local sewage treatment plants want to know when effluent contains cyanide and may wish to test the quantity of cyanide occurring in your household wastewater. Most fire departments also want to know the type and location of chemicals stored in your home/studio. Even though ferric ammonium citrate itself does not burn, it can produce poisonous gas in a fire.
Do not pour solutions in the ground, into septic tanks, or down a storm drain. If there is more than one cup of blueprint chemistry to dispose of, evaporate it to a much smaller quantity, which you can label and take to a hazardous waste area.
Clearly label bottles and keep them out of the reach of children and pets.
1. Under subdued light, paper or fabric is coated with liquid yellow cyanotype solution, a combination of two (“A” and “B”) iron-based chemicals and water.
2. An enlarged negative or object is placed on top of the coated and dried surface. Ultraviolet light shines through the clearer parts of the negative or around the object and hits the coating, reducing some of the ferric salts of the ferric ammonium citrate to the ferrous state, and then combines with potassium ferricyanide, which turns the coating blue.
3. The negative is removed. The paper or fabric is developed in water, where the unexposed chemicals wash off to reveal the receiver. The exposed areas remain blue.
4. As the emulsion dries, it slowly oxidizes to a deeper blue.
More detailed descriptions of materials are given in Chapter 4, Creating the Photo-Printmaking Studio.
1. Applicators. Soft house painting brushes or polyfoam brushes 1 in. (2.5 cm) or wider suffice for coating the solution. Personally, I use the hake brush mentioned on page 92 because it is made without any metal that could be corroded, holds up for years when properly maintained, and coats as if it were gliding across the receiver. So that the brush will not pick up too much liquid, I cut approximately ¼ in (6 mm) evenly off the height of the bristles. Sometimes a few bristles will come loose, but you can usually pick them off after the emulsion is dried and before you expose it. Wash and dry brushes between each coating procedure because contaminated or exposed emulsion left on the brushes can produce imperfections in the print. Make sure that the brush, and especially a foam brush that tends to hold a lot of water, is almost completely dry before you use it again, or the water will dilute the chemistry. Avoid dipping metal brush parts in cyanotype solution. You can protect the metal ferule with clear nail polish.
The glass coating rod mentioned on page 268 saves on chemistry and can yield an almost machinelike even coating, or you can float one side of the paper in a tray of cyanotype emulsion or spray it on with an atomizer, spray bottle, or air brush, which also simplifies the application of the solution on large pieces of paper or fabric. Make sure you are wearing a respirator. Flat trays are better because ridges could damage the emulsion.
2. Chemicals. Please note: I have measured all these chemicals on a gram scale, then translated them into common measurements. You will need potassium ferricyanide, available at many photography stores as Farmer’s Reducer, and ferric ammonium citrate green anhydrous, a special-order item from one of the merchants listed in the Supply Sources. Although you can use brown ferric ammonium citrate, it requires much longer exposure times. You can buy pre-measured or pre-mixed chemicals worldwide at providers listed at http://www.alternativephotography.com/wp/directory-of-suppliers/chemicals-kits. Buying a kit or pre-mixed bottled chemicals, like the ones sold by Photographers’ Formulary and Bostick & Sullivan’s, is helpful if you want to try the process without buying large quantities of chemicals or if you are making only a few prints. Bostick & Sullivan’s cyanotype is costlier and takes a little longer to expose but can make prints with more tonal range. From Silverprint, a store in England, you can buy their Solar Paper, or you will find a similar product on fabric from Blueprints on Fabric in the United States. Silverprint also sells the Fotospeed Cyanotype Kit (liquid sensitizer containing Mike Ware’s new formula, mentioned earlier in this chapter, which is available from many sources worldwide), precoated paper and cotton, and raw chemicals.
Although different papers do not absorb the chemistry in the same amount and different coating methods require different amount of chemistry, generally you will need approximately 1 oz. (29.5 ml) of A and 1 oz. of B for six 8 × 10 in (20 × 25 cm) prints. The peak sensitivity of mixed A and B is two hours, but coated paper can be stored and used with reduced light sensitivity for a month.
A few artists use Vaseline as a resist because it repels the liquid cyanotype solution on paper and you get the color of the paper or fabric where the resist is. You can wash off the Vaseline at the end of your printing process with Woolite and water. I use rubber cement, which can be rolled off a dry cyanotype.
3. Distilled water. Sometimes tap water suffices for making the cyanotype solution, but using distilled water prevents the frustration of mixing up possible bad solutions. Or, use a chlorine filter with tap water. Distilled water is also good for rinsing your brush. A dish tub filled with hot tap water can be used to warm the distilled water (see Item 18).
4. Funnel. Use a glass or plastic funnel to pour dry chemicals when mixing the stock solutions. If mold forms in one of the stock solutions, you can strain it by pouring the liquid through a funnel fitted with a coffee filter, and it will still be good unless it has turned blue.
5. Grayscale and tape (optional). In order to tell if you got as many tones as possible in the developed print, you can employ a transparent Stouffer step tablet or make one digitally (see Chapter 6) next to the image area. Use Step 1 as DMax, the deepest blue with little or no detail. If you are not using a hinged printing frame, use clear removable tape to form a hinge between the edge of one side of the negative/scale and the substrate. The tape ensures that the negative does not move after you have placed it on the coated and dried paper. Do not press the tape down too hard, or it can lift up the emulsion when you try to remove it later. After the exposure, I actually remove only the grayscale and image, leaving the tape on the emulsion because it usually peels off in the wash water, thereby preventing it ripping the paper. Cheap tape is better because it does not hold as strongly!
6. Hair dryer, fan, or plastic clothesline and pins; drying rack. The emulsion has to be completely dried, because if photographic negatives come in contact with wet cyanotype solution, the blacks will bleach out. If inkjet negatives touch liquid, the ink runs. Wear a respirator and use a hair dryer on the cool setting or a fan to thoroughly dry the emulsion before laying a negative on top. Do not use electrical appliances near water. I use nylon screening from the hardware store extended over and stapled to painter’s canvas stretchers as a drying rack in a dark area. A clothesline and pins can be used to create a drip coating with wet emulsion or to dry finished prints (but make sure the line and pins are clean, a task made easier with plastic items).
7. Image. You will need a negative transparency the same size as the positive print you wish to create. Bear in mind that cyanotype is a contrasty process (there are fewer tones than a black-and-white photograph), and some detail can be lost. So negatives with a wide range of gray and black will reproduce with less separation in the blue shadows and midtones of the print. However, Chapter 6, “Making Negatives: Digital Method,” describes a method to tailor negatives for rendering an impressive tonal array. You can also create analogue negatives specifically for cyanotypes without a darkroom, with one of the many methods described in Generating Imagery: Analogue Methods, or with a pinhole camera as on page 110.
8. Laundry bleach or 3 percent hydrogen peroxide (optional). Dilute and use it to intensify the blue of the image, as described in the step-by-step instructions. Hydrogen peroxide solution will de-gas slowly and lose its potency; do not tightly cap the bottle. Of the two, laundry bleach is more harmful to the environment. In addition, a dilute acid, such as white vinegar from the grocer, can be added, drop by drop, to the mixed sensitizer if you need to increase the highlight range of the print.
Do not allow acid to come in contact with undiluted potassium ferricyanide.
9. Measuring cups or beakers and spoons. Inexpensive cookware, such as 4-cup (946 ml) glass measuring cups and a plastic tablespoon will do. You will need a plastic or glass utensil as a stirring rod for chemicals and water.
10. Neoprene gloves should be worn while you work. A respirator should be put on when you mix raw chemicals and if you are using a hair dryer to dry the emulsion.
11. Newspaper or oil cloth, paper towels or sponge. Cover your work area with layers of newspaper that can easily be removed when contaminated or with oil cloth (available from a hardware store or the Vermont Country Store, listed in Supply Sources) that you frequently wipe clean. Old chemicals can ruin future prints with stains, and after spending a fair deal of money on good paper, why risk damaging it?
12. Printing frame. To achieve good contact between negative or flat object and the cyanotype emulsion, use plate glass with Masonite, another piece of glass, or foam rubber on a stiff backing underneath and heavy glass on top; follow the instructions for building a frame on page 80; or buy a printing frame with a hinged back. You will be ensuring against blurry imagery. Make sure the set-up is larger than the image and that the clean, dry glass is not the kind that blocks ultraviolet light. Foreign particles lodged in the glass can create dimples in the print. If you are using vegetation, such as flowers or leaves, place a sheet of plastic wrap from a grocery store or clear acetate from an art store on top of the cyanotype emulsion. The heat from the exposure causes the vegetation to “sweat,” which can produce stains. Dry and press vegetation for better contact and, therefore, better, resolution. If you do not use glass, carefully pin in place plants that can blow about or are far from the surface. However, one of the print frame systems is especially effective if you use the sun because a frame prevents the negative from moving on a windy day.
13. Receiver and pencil. For rich blues, use non-buffered or even slightly acidic paper. My favorites are “bright” (this is a relative term) white rag papers such as Arches Acquarelle; Saunder’s Waterford, another bright white watercolor paper; and Strathmore 500 Drawing Bristol sheets with plate finish. Others might be Bienfang Rag Layout, kitikata, and rice paper (which you can buy in rolls or sheets and is intended for sumi and calligraphy) on the textured side. Magnani Prescia comes in pale blue and white and other colors; I like working on it, but Prescia is soft enough that sometimes gloved fingerprints show up, so I use paper bigger than the image. I always write on the back of the substrate in pencil or laundry marker on the border of fabric the information that I find useful: name of surface, source of light, exposure time. Writing on the back also helps me remember which is the side to coat because once I divide a large sheet, I can no longer find the water mark (see page 88) on every small piece I have made. Papermaker Michelle Samour has prepared terrific sheets with my students by pulping cotton rag and adding a ketene dimer emulsion as an internal size.
One of my former Museum School @Tufts students, Manon Whittlesey, blue printed over black-and-white silver gelatin fiber photographs, keeping in mind that where the emulsion is coated, it partially bleaches out the black-and-white image. You also can print on the back of fiber photographs, too. Other interesting surfaces include gampi paper, book pages, and cracked waxed paper. Each receiver will yield a different range and hue of blues and will require slightly different exposure times.
Patrick Hilferty printed on doorskin plywood by first preparing the surface with dilute Goldens Fine Pumice Gel. He also was successful with a precoat of acrylic medium mixed with volcanic ash (from ceramic suppliers and not greenware; be careful not to breathe it in) and Golden’s Absorbant Ground. Hilferty suggests using sanding sealer if you want to apply cyanotype more directly on wood. Wendy Mukluk states that other unusual surfaces include birch bark and metal, plaster and plastic prepared with a thin, fine layer of matte spray paint. In Jill Enfield’s Guide to Photographic Alternative Processes (see Bibliography), the author describes in detail how to print cyanotypes onto ceramics.
14. Sheet of glass or Plexiglas ™ (optional). Angle the glass in a sink, sprinkle the glass or Plexi with a little water to form a suction with the back of the paper, then lay the exposed print, image facing you, onto it while you develop the image with gently running water from a hose. This system allows unexposed chemicals to drain off, preventing them from contaminating the print. Wrap masking tape or duct tape around the edges to prevent glass from cutting you and to cushion the glass from breaking.
15. Siphon washer. This gadget, available on eBay, works well when attached to a tray in a sink to wash prints. A Rapid Washer is a tray connected to a faucet via a hose. Water rushes into the tray, flows over the print and empties by means of holes in the other end of the tray. You can make your own washer by drilling holes up the sides of a dish tub or photo tray and gently running water from a faucet on the back of the print (the pressure of the water can damage the image). These are inexpensive methods of washing and can work effectively if you either wash one print at a time or monitor to make sure the prints get sufficient agitation and do not stick together.
16. Sizing (optional). Rag papers usually are made with sizing, but if you use less expensive paper, some rice papers, hemp, or absorbent papers, you can try ¼ tsp. (1 ½ cc) of liquid gum Arabic from an art store carefully blended into 2 oz. (50 cc) of mixed A and B sensitizer. I use spray starch as described on page 88. If you apply sizing unevenly, your prints may appear blotchy. Apply cyanotype sensitizer on the correct side of the paper on which you will work, as described on page 88.
Barbara Hewitt, formerly of Bluprints/Printables (now known as Blueprints on Fabric, which packages pre-coated paper and fabric, available on their own website and from Freestyle Photographic Supplies), recommends washing out the manufacturer’s sizing in hot water before printing on fabric. It is meant to repel spilled liquids but makes the fibers almost impossible to coat.
17. Two dark storage bottles. Recycled brown glass bottles that the chemicals came in or brown glass pint (0.5 L) fruit juice or large vitamin jars are ideal, although increasingly difficult to find. Glass washes out more thoroughly, but plastic bottles might be your only choice. Do not use metal caps, which will corrode from exposure to the chemicals; I have seen it happen. The bottles should be washed every time fresh chemistry is poured in, and one should be labeled Cyanotype A, the other Cyanotype B, with the date each was prepared. Keep liquid in tightly closed brown bottles in a cool, dry area. They will preserve for six to nine months at the least. If the emulsion is not yellow-green when you mix A and B, consider disposing of the liquids and mixing new solutions. If you use such old solution, you will probably get a print that is pale blue, rather than the white of the paper, in the highlights. Eventually, the emulsion will not even yield any separation of tones.
18. Three ridgeless trays or tubs. They must be nonmetallic and larger than the print, as one holds the first wash (after the hose wash), another is for the optional intensifying solution, and the third contains the final wash water. A tub can also double as a container of hot water for heating up distilled water while making the stock solutions.
19. Ultraviolet light. Sunlight, rather than artificial light, yields the richest blues. However, outdoor exposures can be over an hour during the New England winter, whereas they may be ten minutes in the summer. A dependable artificial exposure unit is describe on page 83–84; it averages 18–20 minutes to expose a “normal” (not too dense or black and not too thin or clear) negative. Using a dense negative will take longer and, conversely, using a thin negative requires less time but usually renders less tonal separation.
Please see Chapter 4, Creating the Photo-Printmaking Studio, about how I illuminate my coating and developing area.
MAKING ONE OF THE STOCK SOLUTIONS
STOCK SOLUTION A
Stock solutions are the main concentrate of liquid chemistry from which working mixtures are made. This recipe is for exposing the emulsion under artificial light.

7.2 Equipment You Will Need
EQUIPMENT YOU WILL NEED
Ferric ammonium citrate
Brown bottle
Distilled water
Label
Funnel
Stirring spoon
Thermometer
Measuring cup
Tub
PROCEDURE
1. Adjust water temperature to 75° F (23.8°C).
2. Using a funnel, pour 90 g (124 ml) ferric ammonium citrate into glass beaker.
3. With constant stirring, add enough water to make 8 oz. (250 ml).
4. Stir solution until mixed and pour into a labeled brown bottle. Wash utensils in hot water after.

7.3 Procedure
MAKING THE OTHER STOCK SOLUTION
STOCK SOLUTION B
EQUIPMENT YOU WILL NEED
Potassium ferricyanide
Brown bottle
Distilled water
Label
Funnel
Stirring spoon
Thermometer
Measuring cup
Tub
7.4 Equipment You Will Need
PROCEDURE

7.5 Procedure
1. Keep water temperature at 75°F (23.8°C).
2. Using a funnel, pour 50 g (65 ml) potassium ferricyanide into a beaker.
3. With constant stirring, add enough water to make 8 oz. (250 ml).
4. Stir solution until mixed and pour into a labeled brown bottle. Thoroughly wash all utensils in hot water.

7.6 Preparing the Materials
1. Prepare the materials
Shake each bottle of solution, then mix 1 oz. (29 ½ ml) of A and 1 oz. of B together to coat six 8 × 10 in. (20.25 × 25.2 cm) sheets of paper. Use within two hours for maximum sensitivity. Please notice how, on this test print, I have drawn a rectangle for the image’s borders and have delineated strips within that rectangle and beyond its edges to represent 5-, 10-, 15-, and 20-minute exposure times. In addition, I have been careful to make sure that each test strip will include highlight, shadow, and midtones.

7.7 Coat the Paper
2. Coat the paper
Dip a brush in the mixture and apply a small amount to the paper, lightly moving the same solution around so as to avoid saturating one area. Coat beyond the image area or coat an extra swatch of test paper so you can watch the change in color during the exposure. It should now appear yellow-green and shiny. Use the cool setting of a hair dryer on both front and back of the substrate, air dry flat, or hang the paper in a darkened room to create drip patterns. The emulsion dries to a matte bright yellow.

7.8 Expose the Test Print
3. Expose the test print
Place the paper, coated side up, on a backing board or a hinged printing frame, then position the negative, correct-reading (the way you want the image to look) on the emulsion under glass. Place the loaded print frame in direct sunlight or under artificial ultraviolet light for 5–20 minutes. Using opaque cardboard or plastic, expose the print for the times you marked on the paper.
If you are using the digital method in Chapter 6, you need to expose a strip of imageless OHP on top of coated paper for the different minutes and find the deepest blue, which will be your exposure time. (You change the digital negative, not the base exposure time, to make an acceptable print.)

7.9 Judge the Exposure
4. Judge the exposure
As the emulsion is exposed, the cyanotype will turn from yellow-green to blue-green to iridescent blue. You can take the exposure frame into a shady spot or turn off the unit and carefully lift up the hinged negative or frame back. Check to see if the highlights of the print have started to appear.

7.10 Develop the Print
5. Develop the print
Remove the print and prop it on a piece of Plexiglas™ angled in the sink. Outside the image area, hose the paper gently with water, or rock it in a try of water, which you change frequently. No yellow should remain on the paper, and the water eventually should run clear. Then, gently rock the print for two more minutes in a tray of clean running water.

6. Intensify the print (optional)
Rock the print for up to 60 seconds in a tray of one capful of bleach or 3 percent hydrogen peroxide mixed with 32 oz. (1 L) water, until the image turns a deeper blue. (This deepening of the blue would also appear as the print dries and ages.)
7. Wash the print
Use the siphon or tub method to wash the print in constantly changing clean water for 10 minutes. Then blot excess water with a clean, soft sponge and air dry on a rack, hang from a clothesline, or use a hair dryer or fan.
Once the print has dried, choose the exposure you want. If you have used the digital method described in Chapter 6 of this book, make a new exposure that includes the image with the grayscale. Then, as described in that chapter, see that the grayscale shows all the steps necessary, or re-make the negative, which, in the long run, will save you lots of time!
To shorten the exposure time later, add a little extra ferric ammonium citrate to stock solution A. To increase the longevity of the stock solutions and to increase their solubility (good for less porous surfaces), add a pinch (approximately ¼ teaspoon or 1.25 g) of oxalic acid, a crystal purchased through chemical suppliers listed in Supply Sources.
If you will be exposing the emulsion to bright sunlight, cut the stock solution recipe to ¼ cup plus 1 tsp. (50 g or 65ml) ferric ammonium citrate with enough water to make 1 cup solution A and ⅛ cup (35 g or 59 ml) potassium ferricyanide with enough water to make 1 cup of solution B. Not only is this formula less expensive, but also it is kinder to the environment.
I learned the hard way that potassium ferricyanide, even in the dry form, goes bad, albeit slowly. After mixing a fresh batch of cyanotype solutions for a class demonstration, the exposures under my trusty ultraviolet unit were taking an hour and longer to obtain the normal, deep blue usually achieved in 20 minutes. So I did some troubleshooting, eliminating variables one by one. I dismissed the possibility that the emulsion was mixed incorrectly because all my students had watched me carefully measure. I knew I did not use a particularly dense negative for the demonstration. I tried replacing the ultraviolet bulbs, then using a new bottle of distilled water. Next, I rewashed all the mixing utensils to eliminate contaminants and opened a fresh jar of ferric ammonium citrate (which I knew could deteriorate with age or prolonged exposure to light) and mixed fresh solution A. Only when I opened a new bottle of potassium ferricyanide and mixed fresh B solution did the exposures return to normal.
Ferric ammonium citrate (solution A in this book) is readily affected by age and light, so make sure the brown bottle is tightly sealed. Notice, also, that the pre-measured solutions you order from suppliers may be labeled differently; just know that ferric ammonium citrate is a green powder and green-yellow liquid and that potassium ferricyanide is a red crystal and bright yellow liquid.
To enrich the deep blues of the cyanotype print, layer the emulsion twice. That is, let the first (thin) coating almost completely dry, then apply the emulsion a second time. Adjust the exposure, which will be only a little longer than if you were using a single coating. This method is rarely needed on good rag papers.
Rinse and carefully dry the brush as soon as you finish coating the paper. Shield remaining mixed emulsion with an opaque cover, such as the black plastic in which photo paper is wrapped or the opaque plastic used to mulch gardens.
Stir the solution if it has been sitting (even during the brief time you have been working). I teach in a chilly room, so I keep the emulsion warm, not hot, to maintain the chemicals in solution, rather than precipitate out. Warm solution also makes the emulsion speedier when exposed.
Mixed cyanotype solutions A and B last only one day. Blueprintables (now Blue Prints on Fabric) keeps mixed A and B solution for months in a porcelain tub covered with black plastic. Precoated paper will keep for a few days if stored in a light-tight box and for six months in a light-and air-tight bag. You can tell if the emulsion has started to go bad by observing the coating before exposure; it should be yellow-green. Even so, Blueprintables suggested that “soaking an oxidized dark print with little contrast in very hot water following the rinse out will brighten it significantly.”
Be sure the emulsion is completely dry before exposure, or negatives can be damaged and the final finished print will show purple moisture stains.
If you do not use glass, you can lay or pin plants or object on wet emulsion to expose. The articles will pick up blue color, so use ones that are disposable. In 70°F (21°C) to 85°F (20°C) weather, the emulsion also dries during the 5- to 10-minute exposure.
Uneven application of the solutions will cause streaks in the print. However, you might purposely coat cyanotype onto “distressed” wax paper or creased rag paper so that emulsion bleeds into the cracks.
If you hang coated paper or fabric to dry on a clothesline, wash clothespins and line before the next use, or you may stain future pieces with contaminated solution. Use plastic cord and pins because they are easily washed in hot water.
If you use a standard print frame, unhinge a portion of the back and without moving the negative, check highlights of the print for color changes. Exposure is judged visually. For instance, with a thin (more transparent) negative, remove the paper at the blue-green stage, and with a dense (black) negative, the paper should be deep or iridescent blue.
Exposures can be roughly calculated as you would a traditional black-and-white photograph, which is mathematically. That is, if you want the print to look twice as dark, expose it for twice the time, and the converse is true, too. However, when in doubt, overexpose, because you usually can save the print as explained in the next tip.

7.11 Laurie Snyder, Iron and Silver, cyanotype and Van Dyke brown print (Chapter 8) on Rives BFK from camera negatives and cliché verre negatives (ink drawings made on transparent material, described in Chapter 5). Artist’s book: 22 × 15 in. (56 × 38 cm) closed, 22 × 30 in. (56 × 76 cm) open, 1990. © Laurie S. Snyder.
Notice how Snyder uses the bleaching effect of cyanotype on the silver-based brown print emulsion to emphasize the brushed gesture.
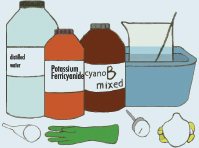
7.12 John C. Wood, Blow Rain Loons, cyanotype with silver print collage, Polaroid, crayon, stencil type, and graphite on BFK, 1985. ©John C. Wood Estate Trust
John Wood is known for his expressive drawings, as well as his experimental photographic work. He also was a beloved printmaking and photography teacher, concerned with preserving our ecosystem.
If the print is too blue, it probably was exposed too long, but you might rescue it by leaving it in the intensification bath a little longer or by toning it, as explained later in this chapter, to reduce the overall color (not a specific part). If the print is too pale, it probably was underexposed, so next time increase the exposure time, decrease the intensification time, or further dilute the intensification bath.
Chemical baths applied to the developed cyanotype can turn the image green, violet, black, purple, or red-brown. These toners are described later in this chapter, but they do tend to challenge the permanency of the cyanotype print.
If you are combining cyanotype with brown, casein, or gum printing (processes described in this book), do the cyanotype first or it will alter or obscure the image underneath because potassium ferricyanide is a photographic bleach. If you, being of the experimental nature, still choose to eliminate the under coating and want to blueprint second, dispense with the bleach intensifier. Fixer from the brown print (Chapter 8), additionally, can slightly lighten a blueprint.
Cyanotype works beautifully over dry palladium prints. Make the palladium print (Chapter 12) normally. Cyanotype does not affect palladium underneath, and this combination might be perfect for mixing a photogram with a photographic image separated by the processes, or for split toning a print. You even can develop the cyanotype in water and intensify with hydrogen peroxide without affecting the palladium print underneath. This amalgamation works well on many papers, including strong Japanese rice paper. Use separate brushes for each technique and wash each immediately. In addition, you can coat wet cyanotype and soon after coat wet palladium, dry expose, develop, and clear the combination as you do a palladium print. This wet on wet intentional “contamination” produces greens and yellows.
Other application methods include using a gloved finger, cotton swabs, or sponges to spread the emulsion.
With a brush or cotton swab, carefully put a solution of ¼ oz. (5 g) oxalic acid with 3 ½ oz. (100 ml) water as an after treatment to clear white areas of residual blue. See the Safety section on page 232 for handling oxalic acid.
If you do not wash the print enough, the white areas may turn blue while drying or form a blue puddle because some of the yellow emulsion is left on the paper. However, I have noticed that tap water I had been using for a 15-minute final wash now bleaches the whole print. I suspect that chloramine is being added in larger quantities by the city as a disinfectant, so the water has turned more alkaline. I have cut the final wash back to five minutes, which still rids the print of any residual intensifier or unwashed emulsion. John Barnier, in Coming into Focus: A Step-by-Step Guide to Alternative Photographic Printing Processes (see Annotated Bibliography), states that adding ¼ oz. (10 ml) vinegar of 27 percent acetic stop bath to 2.1 qt. (2 L) of water prevents bleaching from alkaline water.
To remove lavender moisture stains, try rewashing the print well and letting it dry. Often the lavender fades. If not, squirt ½ tsp. (2.5 ml) of mild liquid soap, such as Ivory or Woolite, in a clean tray. Add 1 gal. (3.8 L) water. Swish the print for a few minutes. Wash in plain water afterward.
If you notice water spots on the finished print, you probably dripped a liquid on the emulsion before you exposed it. If you find brown streaks, the cause could be drying the print in the sun or impurities in the water.
Store the coated paper or the finished print face up on a clean surface in a dark space. I use nylon screening from the hardware store, stapled to a wooden frame, for racks, and I frequently wash it. Old chemistry accidently picked up on your paper or fabric can stain through to the front. Contaminated blueprint chemistry stains purple.
Do not keep the print in an alkaline or buffered paper box.
You can touch up the blue print with a watercolor pigment such as Prussian Blue.
If a print starts to fade due to the action of ultraviolet light on alkaline paper, you can revivify it by storing it away from light for a few days.
Just as I was about to “go to press,” SMFA@Tufts colleague Jesseca Ferguson (see “Pinhole Photography”, pages 110–118, which she co-authored) urged me to look again at the work of Meghann Riepenhoff, whose work hung with ours in an exhibition, “Photography’s Blue Period,” at the Worcester Art Museum. Riepenhoff’s project, “Littoral Drift,” employs waves, wind, and sediment that leave physical traces through direct contact with her cyanotype-coated paper. See http://meghannriepenhoff.com/project/littoral-drift/.
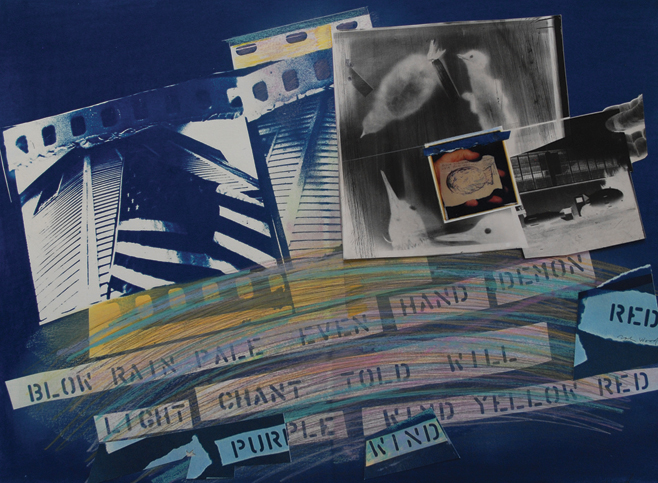
7.13 Jeannie Simms, Lesbos Cyanotypes, cyanotype on cotton, ripstop nylon, four 4 × 6 ft. (1.2 × 1.8 m) hanging panels, 2016. ©Jeannie Simms.
The artist (and Museum School faculty) collected bottles and other paraphernalia along the eastern shores of Lesbos, Greece from the same waters where thousands of people crossed from Turkey, with over 800,000 arrivals* in 2015. The bottles and miscellaneous items (toys, shoes, jewelry, sunglasses and even bones) were used to create photogram panels. *UNHCR Statistics, Dec 30, 2015
TIPS
In addition to the previous tips given in this chapter, the following tips are useful when printing cyanotypes on fabric.
It is easier to learn the technique on paper before you try fabric.
Certain natural textiles accept cyanotype solution better. More tightly woven fabrics, such as silk charmeuse, print a deeper blue than crepe de chine, which prints darker than pongee. Cotton print cloth provides darker blues than sheeting, which produces a deeper blue than knits or gauze. Cyanotype can be printed on flannel, hemp, duck canvas, chamois leather, cotton velveteen (where the image seems to rest in the fiber’s height), linen, and viscose/rayon. I know no one who has had success working on synthetics.
You can simply create visual variables if you use colored, rather than white, fabric, but do not use fabric that has been treated with liquid repellants; use ones that have been prepared for dying.
Fabric should be stretched to pull out wrinkles during coating. As described below, I use painter’s canvas stretchers from an art store or plastic embroidery hoops to pull the material tightly before coating. Some fabric artists use a batik frame or even an old picture frame.
I use a staple gun to attach and leave the fabric on the frame through the coating, exposing, washing, and drying in order to make up for it stretching when wet and possibly shrinking when dry. A frame, rather than coating a piece of cloth on top of scrap paper, also conserves the amount of chemistry you need. However, if you are going to coat a few pieces of cloth, stack them on top of each other so that the excess from the top piece goes through to the piece below it.
It helps maintain the fabric’s shape if the threads run parallel to the frame.
Use a laundry or permanent marker outside the image area to remind yourself of the type of fabric, exposure, etc. If the fabric is thick enough, mark on the back, so that you will know the correct side to coat. If it isn’t thick, mark the information on masking tape on the back, so you will know which side you coated because that is the side you will thoroughly dry before laying your negative on top.
Like paper, fabric can be coated lightly with a brush (foam brushes are superb), sprayed, or dipped into a tray of solution, but thorough drying will take longer because the fabric might seem dry when it isn’t. Another advantage of stretching the fabric is that it dries more quickly and without flapping in the breeze as shown in the illustrations in Figures 7.14 through 7.18.

7.14 Staple the fabric onto painter’s canvas stretchers but with the “bad” side out and “good” side in. Make sure that the stretchers are at least 2 in. (5 cm) larger all around than the glass and image.

7.15 Coat the stretched fabric on the good side. Do not drench the fabric, but use a foam brush for a smooth border and bristle brush if you want the strokes to show. Move the same emulsion around in different directions.

7.16 Notice that the correct side of the fabric is facing inside the basin of the frame so that negative and glass can be placed there. Dry both sides thoroughly with a hair dryer on a cool setting or with a fan.

7.17 In this picture, you can see that the negative and glass are placed inside the depth of the frame, facing towards the light source. Then, the whole set-up is placed in the UV unit.

7.18 The exposed fabric is developed with water and dried on the frame. Try to avoid spraying water too hard on the image. Image ©LBlacklow.
MORE TIPS FOR CYANOTYPE ON FABRIC
Fabric artist Eliza Proctor advised not to air dry the freshly coated emulsion on humid days and nights, or you may get a mottled print.
For more detail in the finished piece, use a warm, not hot, and dry, not steam, iron on the back of the coated and dried fabric before exposure, and use plate glass that does not block UV light during the exposure. In this way, your negative will be in closer contact with the sensitized surface and result in more detail.
Sandra Sider, in an article entitled “Blues in the Light: Cyanotype on Fabric,” in Fiber Arts (Sept/Oct 1986), suggests that cyanotypes impart an iron stain to the fabric that is permanent: “Even though cyanotypes might fade somewhat in ultraviolet light, the intensity of the blue can be revivified by storing the piece away from light for a short period of time” (a couple of days to a couple of weeks). Richard Farber explains in Historic Photographic Processes (see Annotated Bibliography) that a partial reduction of the Prussian blue to the white ferrous ferrocyanide occurs; this regenerative ability is unique in photography to the cyanotype.
Blueprinted fabric pieces can be washed in cool water with a mild liquid soap. Avoid detergents and soaps with chlorine bleach, phosphates, or borax. Baking soda by itself and baking soda in washing products or underarm deodorants will cause the blue to turn yellow. Powdered soap does not dissolve properly, creating spots on the fabric wherever granules touch the wet blueprint. Residue in and on washing machines where powdered soap is used also will affect the blueprint. Dry cleaning is not recommended.
Sometimes you can remove purple moisture stains in fabric by washing it in ½ tsp. (2.5 ml) liquid soap such as Ivory or Woolite mixed with 1 gal. (3.8 L) water. Carefully swish the cloth without creasing it for a few minutes. Wash in plain water. Rinse well afterwards, but do not wring dry. Washing blueprinted fabric will restore the blue color, but it is usually less intense. Powered and biodegradable soaps are not recommended. Use Spray ‘n’ Wash, K2R (available at hardware stores and the Vermont Country store listed in Supply sources), or Rit Grease, Stain, and Soil remover #90.
Never—in the coating, drying, or washing—wring the fabric, or you can create permanent marks.
Blueprints on Fabric (listed in Supply Sources) stocks precoated T-shirts, cotton, organza, and silk by the yard, and 6 in. (15 ¼ cm) square and larger cotton pieces. You can send them your fabric to coat, too.
Cyanotypes can be toned to other colors, but John Barnier, in Coming into Focus (see Annotated Bibliography) states that most toners, except the one with highly toxic lead acetate, which I do not recommend or write about due to health and environmental concerns, or the one with sodium borate, are not stable.

1. Make a few dark (overexposed) prints and let them dry for a day. Later, presoak them in water and sponge excess liquid off. Either pour the toning mixture into trays and bathe the print until you get the color you want, or apply the solution with a brush to selected areas. Keeping an untoned, wet print nearby will help you decide how long to tone.
2. For a gray to reddish tone, dissolve ![]() oz. (4.8 g) copper nitrate in 3.3 oz. (96 ml) distilled water, then add 5–7 drops household ammonia.
oz. (4.8 g) copper nitrate in 3.3 oz. (96 ml) distilled water, then add 5–7 drops household ammonia.
3. For brown to black tones, add ⅓ oz. (10 ml) ammonia hydroxide to 3.3 oz. (96ml) distilled water in one tray. (Alternately, you can use the yellow-tone recipe below to bleach the color out.) In another tray, combine a little more than ⅓ oz. (9.4 g) tannic acid, available at a pharmacy or wine-making store, with 17 oz. (500 ml) warm distilled water. You can also obtain tannic acid by seeping 10 pekoe tea bags in 2 cups (0.24 L) water. Immerse the cyanotype in the first solution until it practically disappears, wash it carefully for a few minutes, then wash it and put it in the second bath until you achieve the desired color. If the paper base and highlights look stained, you might not have washed the print long enough between the two baths. Black teas bags seeped in a similar way will impart dark tones, and you needn’t worry about bleaching.
Judy Seigel, long term editor of the World Journal of Post-Factory Photography, recommended this alternative formula for brown or black tones: add 1 teaspoon of tannic acid to 1 qt. (0.95 L) distilled water in a tray. In another tray, add 2 teaspoons sodium carbonate to 1 qt. (950 ml) water. Immerse the cyanotype in the first bath for 2 minutes, then rinse it and put it in the second bath. Rinse it again and put the print back in the first bath. Continue in this manner until you achieve the desired tone.
4. For yellow tones, Barbara Hewitt, formerly of Blueprint/Printable, recommends dissolving 1 tablespoon trisodium phosphate from a hardware store in 1 qt. (0.95 L) warm water. I have also used a weak solution of chlorine bleach from a grocery store to achieve the same effect.
TIPS FOR TONING CYANOTYPES
Once the mixture becomes exhausted and no longer affects the print, discard it and mix fresh toner. Wash the print carefully after toning.
Most of the necessary chemicals are available through Photographers’ Formulary, listed in Supply Sources.
Wear protective gloves and goggles when toning prints. Pour the toners into trays larger than your print.
Search for more formulae online at https://mpaulphotography.wordpress.com/2011/04/01/cyanotype-toning-the-basics/. Filipe Alves explains how to make blue and sepia split-toned pictures on www.alternativephotography.com. Or consult the directions in The Keepers of Light and Photo-Imaging: A Complete Guide to Alternative Process (see Annotated Bibliography).