
5
Mastering Color Controls
In This Chapter
![]() Exploring white balance and its effect on color
Exploring white balance and its effect on color
![]() Creating custom White Balance settings
Creating custom White Balance settings
![]() Bracketing white balance
Bracketing white balance
![]() Setting the Color Space (sRGB versus Adobe RGB)
Setting the Color Space (sRGB versus Adobe RGB)
![]() Taking a quick look at Picture Controls
Taking a quick look at Picture Controls

Compared with understanding certain aspects of digital photography — resolution, aperture, shutter speed, and so on — making sense of your camera’s color options is easy-breezy. First, color problems aren’t all that common, and when they are, they’re usually simple to fix with a quick shift of your camera's White Balance setting. And getting a grip on color requires learning only a couple of new terms, an unusual state of affairs for an endeavor that often seems more like high-tech science than art.
This chapter explains the aforementioned White Balance control along with other features that enable you to fine-tune the way your camera renders colors, whether you're shooting photos or recording movies.
Understanding the White Balance Setting
Every light source emits a particular color cast. The old-fashioned fluorescent lights found in most public restrooms, for example, put out a bluish-greenish light, which is why we all look sickly when we view our reflections in the mirrors in those restrooms. And if you think that your beloved looks especially attractive by candlelight, you aren't imagining it: Candlelight casts a warm, yellow-red glow that is flattering to the skin.
 Science-y types measure the color of light, officially known as color temperature, on the Kelvin scale, which is named after its creator. You can see the Kelvin scale in Figure 5-1.

Figure 5-1: Each light source emits a specific color.
When photographers talk about “warm light” and “cool light,” though, they aren’t referring to the position on the Kelvin scale — or at least not in the way most people think of temperatures, with a higher number meaning hotter. Instead, the terms describe the visual appearance of the light. Warm light, produced by candles and incandescent lights, falls in the red-yellow spectrum at the bottom of the Kelvin scale; cool light, in the blue spectrum, appears in the upper part of the Kelvin scale.
At any rate, most people don’t notice these fluctuating colors of light, because human eyes automatically compensate for them. Except in extreme lighting conditions, we perceive a white tablecloth as white no matter whether it’s lit by candlelight, fluorescent light, or daylight.
Similarly, a digital camera compensates for different colors of light through white balancing. Simply put, white balancing neutralizes light so that whites are always white, which in turn ensures that other colors are rendered accurately. If the camera senses warm light, it shifts colors slightly to the cool side of the color spectrum; in cool light, the camera shifts colors in the opposite direction.
The good news is that, as with your eyes, your camera’s Auto White Balance setting tackles this process well in most situations, which means that you can usually ignore it and concentrate on other aspects of the picture. But if the scene is lit by two or more light sources that cast different colors, the white balance sensor can get confused, producing an unwanted color cast like the one you see in the left image in Figure 5-2.

Figure 5-2: Multiple light sources resulted in a yellow color cast in Auto White Balance mode (left); switching to the Incandescent setting solved the problem (right).
I shot this image in my home studio — which is a fancy name for “guest bedroom” — using tungsten photo lights, which produce light with a color temperature similar to incandescent bulbs. The problem is that windows in the studio permit strong daylight to filter through. In Auto White Balance mode, the camera reacted to that daylight — which has a cool color cast — and applied too much warming, giving my original image a yellow tint. No problem: I switched the White Balance mode from Auto to the Incandescent setting. The image on the right in Figure 5-2 shows the corrected colors.
 There’s one problem with white balancing as it’s implemented on your D5500, though: You can't make this kind of manual White Balance selection if you shoot in the fully automatic exposure modes. So if you spy color problems in your camera monitor, switch to P, S, A, or M exposure mode.
The next section explains how to make a simple white balance correction; following that, you can explore advanced options.
Changing the White Balance setting
You can view the current White Balance setting in the Information and Live View displays, as shown in Figure 5-3. The icons in the figures represent the Auto setting; settings other than Auto are represented by the icons you see in Table 5-1.

Figure 5-3: A symbol representing the current White Balance setting appears in the displays.
Table 5-1 Manual White Balance Settings
|
Symbol |
Light Source |
|
|
Incandescent |
|
|
Fluorescent |
 |
Direct sunlight |
|
|
Flash |
|
|
Cloudy |
|
|
Shade |
|
|
Preset |
 In Live View mode, colors in the preview are rendered according to the current White Balance setting. If you're unsure of which setting to use, just experiment: After you adjust the setting, the preview updates to show you the effect on photo colors.
You can adjust the White Balance setting in two ways:
 Control strip: Activate the strip by pressing the i
button or tapping the i
icon on the display. Select the White Balance option, as shown on the left in Figure 5-4 to access the available settings, shown on the right.
Control strip: Activate the strip by pressing the i
button or tapping the i
icon on the display. Select the White Balance option, as shown on the left in Figure 5-4 to access the available settings, shown on the right.- Shooting menu: You also can access the setting from the Shooting menu, as shown in Figure 5-5. After selecting a setting, press the OK button or tap the OK symbol, labeled in Figure 5-5. (You also can just tap your desired setting twice to return to the Shooting menu.)

Figure 5-4: Select a White Balance setting by using the control strip.

Figure 5-5: To uncover more White Balance options, open the Shooting menu.
 When you go the menu route, you can access the following advanced white balance features:
- Fine-tune the settings. If you choose any setting but Fluorescent, pressing the Multi Selector right or tapping the Adjust icon labeled in Figure 5-5 takes you to a screen where you can fine-tune the setting, a process I explain in the next section.
- Select a specific type of fluorescent bulb. When you choose Fluorescent from the menu, as shown on the left in Figure 5-6, you can select a specific type of bulb. The selection screen, shown on the right in the figure, appears automatically when you tap Fluorescent in the initial menu; you can also display the screen by pressing the Multi Selector right. Either way, select the option that most closely matches your bulbs and then press or tap OK. Or, to go to the fine-tuning screen, press the Multi Selector right or tap the Adjust icon.
- Create a custom white balance preset. Selecting the PRE option as the White Balance setting enables you to create and store a precise, customized White Balance setting, as explained in the upcoming section “Creating white balance presets.” This feature provides the fastest way to achieve accurate colors when the scene is lit by multiple light sources that have differing color temperatures.

Figure 5-6: If you adjust the White Balance setting from the Shooting menu, you can select a specific type of fluorescent bulb.
The selected White Balance setting remains in force for the P, S, A, and M exposure modes until you change it. Get in the habit of checking the setting before every shoot to make sure that you don't need to modify it. Otherwise, your pictures may take on an unwanted color cast due to an incorrect setting for the new lighting conditions.
Fine-tuning White Balance settings
You can fine-tune any White Balance setting except a custom preset that you create by using the PRE option. Make the adjustment as spelled out in these steps:
-
Display the Shooting menu and select the White Balance option.
The menu of available settings appears.
- Highlight the White Balance setting you want to adjust.
-
Press the Multi Selector right or tap Adjust to display the fine-tuning screen, shown in Figure 5-7.
If you select Fluorescent, you first go to a screen where you select a specific type of bulb, as covered in the preceding section. After you highlight a bulb type, press the Multi Selector right or tap Adjust to get to the fine-tuning screen. -
Fine-tune the setting by moving the adjustment marker in the color grid.
I labeled the marker in Figure 5-7. The grid is set up around two color pairs: Green and Magenta, represented by G and M; and Blue and Amber, represented by B and A. To adjust the White Balance setting, move the marker in the direction you want to shift colors. You can either tap inside the grid, tap the arrows on the sides of the grid, or press the Multi Selector to reposition the marker.
As you move the marker, the A–B and G–M boxes on the right side of the screen show you the current amount of color shift. A value of 0 indicates the default amount of color compensation applied by the selected White Balance setting. In Figure 5-7, for example, I moved the marker two levels toward amber and two levels toward magenta to specify that I wanted colors to be a tad warmer. -
Tap OK or press the OK button to complete the adjustment.
After you fine-tune a White Balance setting, an asterisk appears next to the icon representing the setting on the Shooting menu, as shown in Figure 5-8. You see an asterisk next to the White Balance setting in the Information and Live View displays as well.

Figure 5-7: Move the black square around the color grid to fine-tune the selected White Balance setting.

Figure 5-8: The asterisk next to the White Balance setting name indicates that you applied a fine-tuning adjustment.
Creating white balance presets
If none of the standard White Balance settings does the trick and you don’t want to fool with fine-tuning them, take advantage of the PRE (Preset Manual) feature. This option enables you to do two things:
- Base white balance on a direct measurement of the actual lighting conditions.
- Match white balance to an existing photo.
Although you can create a preset using either method, you can store only one preset at a time. For example, if you create a preset based on lighting conditions on Monday and then decide on Tuesday to create a different one based on a photo, the light-based preset goes kaput.
The next two sections provide step-by-step instructions for creating both types of presets.
Setting white balance with direct measurement
To use this technique, you need a piece of card stock that’s either neutral gray or absolute white — not eggshell white, sand white, or any other close-but-not-perfect white. (You can buy reference cards, made just for this purpose, in many camera stores for less than $20.)
Position the reference card so that it receives the same lighting you'll use for the photo. Then take these steps:
-
Set the camera to the P, S, A, or M exposure mode.
If the exposure meter reports that the image will be under- or overexposed at the current exposure settings, make the necessary adjustments now. (Chapter 3 tells you how.) Otherwise, the camera can’t create your preset.
-
Frame your shot so that the reference card fills the viewfinder.
You must use the viewfinder to take the reference shot; you can't create a preset in Live View mode. - From the Shooting menu, select White Balance and then select PRE Preset Manual, as shown on the left in Figure 5-9.
-
Press the Multi Selector right to display the screen shown on the right in Figure 5-9.
You also can get to this screen by tapping the PRE Preset Manual menu item (left side of the figure) two times.
-
Select Measure, and press or tap OK.
A warning appears, asking you whether you want to overwrite existing data.
-
Select Yes and press or tap OK.
You see a message telling you to take your picture. You have about 6 seconds to do so. (The letters PRE flash in the viewfinder and Information display to let you know the camera is ready to record your white balance reference image.)
-
Take the reference shot.
Your camera may have a hard time autofocusing because the reference card doesn't contain any contrast. To solve the problem, use manual focusing.If the camera is successful at recording the white balance data, the letters Gd flash in the viewfinder and the message “Data Acquired” appears in the Information display. If the camera can’t set the custom white balance, you instead see the message No Gd in the viewfinder, and a message in the Information display urges you to try again. Try adjusting the lighting before doing so.

Figure 5-9: Select these options to set white balance by measuring a white or gray card.
You also can create a direct-measurement preset via the Information display. First, set the White Balance option to PRE. After you exit the menu or control strip and return to the Information display, press the OK button for a couple seconds until the letters PRE start to flash in the display. Then take your reference shot.
After you complete the process, the camera automatically sets the White Balance option to PRE so that you can begin using your preset. Your custom setting is stored in the camera until you override the setting with a new preset. Whenever you want to use the preset again, just choose PRE as the White Balance setting.
Matching white balance to an existing photo
Suppose that you’re the marketing manager for a small business and one of your jobs is to shoot portraits of the company bigwigs for the annual report. You build a small studio just for that purpose, complete with a couple of photography lights and a nice, conservative beige backdrop. Of course, the bigwigs can’t all show up to get their pictures taken in the same month, let alone on the same day. But you have to make sure that the colors in that beige backdrop remain consistent for each shot, no matter how much time passes between photo sessions. This scenario is one possible use for a feature that enables you to create a White Balance preset based on an existing photo.
Two words of caution:
- Basing white balance on an existing photo works well only in strictly controlled lighting situations, where the color temperature of the lights is consistent from day to day. Otherwise, the White Balance setting that produces color accuracy when you shoot Big Boss Number One may add an ugly color cast to the one you snap of Big Boss Number Two.
- If you previously created a preset using the direct measurement option, you wipe out that preset when you base a preset on an existing photo.
With those caveats out of the way, follow these steps to create a preset based on a photo:
-
Copy the picture that you want to use as the reference photo to your camera memory card, if it isn't already stored there.
You can copy the picture to the card using a card reader and whatever method you usually use to transfer files from one drive to another. Assuming that you're using the default folder names, copy the file to the 100D5500 folder, inside the main DCIM folder.
- Open the Shooting menu and select White Balance.
-
Select PRE Preset Manual and then press the Multi Selector right (or tap the PRE item on the screen one more time).
The screen shown on the left in Figure 5-10 appears.
-
Select Use Photo.
After you select the setting, the options shown on the right in Figure 5-10 appear. If you haven't yet used the photo option to store a preset, you see an empty white box in the middle of the screen, as shown in the figure. If you previously selected a photo to use as a preset reference, the thumbnail for that image appears instead.
-
Choose Select Image and select the photo you want to use as the preset reference photo.
After you choose Select Image, select the folder that contains the image you want to use. Thumbnails of images in that folder then appear. Select the photo you want to use to return to the screen shown on the right in Figure 5-10. Your selected photo appears on the screen, and This Image appears highlighted.
- Tap the return arrow or press OK to set the preset white balance based on the selected photo.

Figure 5-10: You can create a white balance preset based on a photo.
Whenever you want to base white balance on your selected photo, just set the White Balance setting to the PRE option.
Bracketing white balance
Chapter 3 introduces you to automatic exposure bracketing, which records the same image at different exposure settings or Active D-Lighting settings. You also can bracket white balance, creating a series of three images recorded at different white-balance settings.
Note the following details about this feature:
- Bracketing is available only in the P, S, A, and M exposure modes. Chapter 3 tells you how to use these exposure modes, if you haven't yet discovered them.
- You must set the Image Quality option to one of the JPEG options (Fine, Normal, or Basic). Why is the Raw (NEF) setting off limits? Because with Raw, white balance and other color settings aren't established until you process your images. So there's no reason to waste time bracketing white balance when you shoot Raw — you just adjust colors as you see fit during the Raw conversion process. (Chapter 9 shows you how to use the in-camera Raw converter.)
- You can apply white balance bracketing only along the blue-to-amber axis of the color grid. You can’t shift colors along the green-to-magenta axis, as you can when tweaking a specific White Balance setting.
- A single press of the shutter button creates all three images. The camera captures the first photo at the selected White Balance setting and then creates two copies, one shifted toward amber and one toward blue.
- You can shift colors from one to three steps between frames. As an example of the maximum color shift you can achieve, refer to Figure 5-11, which I created using a three-step shift. As you can see, even at that “max” setting, the differences among the shots are subtle.

Figure 5-11: I created three color variations by using White Balance bracketing.
To use White Balance bracketing, take these steps:
-
Set the Auto Bracketing Set option on the Custom Setting menu to White Balance, as shown in Figure 5-12.
Look for the option in the Bracketing/Flash section of the Custom Setting menu.
-
Enable bracketing and set the bracketing shift amount via the control strip, as shown in Figure 5-13.
As always, just press the i
button to display the control strip.After you enable bracketing, the Information display shows bracketing indicators, as shown in Figure 5-14, reminding you that white balance bracketing is in force. The same indicator appears in the lower-right corner of the Live View display.
-
To record the bracketed series, press the shutter button once.
The camera captures the first image at the current White Balance setting and then spends a few seconds creating two bracketed copies.
-
When you finish taking your bracketed shots, return to the control strip and turn off bracketing.
This step is important because the bracketing setting remains in effect even after you shut off the camera, and it's all too easy to overlook the fact that the feature is enabled when you head out for your next shoot.

Figure 5-12: Tell the camera you want to bracket white balance by way of this Custom Setting menu option.

Figure 5-13: Enable bracketing and set the amount of color shift from the control strip.

Figure 5-14: These markings remind you that white balance bracketing is enabled.
If you view your photos in a playback mode that displays color data, the White Balance readout indicates which shots were shifted along the color axis. For the amber version, you see the letter A; for the blue version, B. Next to the letter, the value 1, 2, or 3 indicates the increment of color shift. For the neutral shot, the readout displays 0, 0. Chapter 8 shows you how to view this type of data during playback.
Taking a Quick Look at Picture Controls
When you capture photos using the JPEG Image Quality settings (Fine, Normal, or Basic), colors are also affected by the Picture Control setting. This option affects other picture characteristics that the camera tweaks when you shoot in the JPEG format, including contrast and sharpening.
Sharpening is a software process that boosts contrast in a special way to create the illusion of slightly sharper focus. Let me emphasize, “slightly sharper focus.” Sharpening produces a subtle tweak; it's not a fix for poor focus.
In the P, S, A, and M exposure modes, you can choose from the following Picture Controls, represented on the menus and in the displays by the two-letter codes labeled in Figure 5-15. In other exposure modes, the camera selects the Picture Control setting.

Figure 5-15: This two-letter code represents the Picture Control setting.
- Standard (SD): The default setting, this option captures the image “normally” — that is, using the characteristics that Nikon offers up as suitable for the majority of subjects.
- Neutral (NL): At this setting, the camera doesn’t enhance color, contrast, and sharpening as much as in the other modes. The setting is designed for people who want to precisely manipulate these picture characteristics in a photo editor. By not overworking colors, sharpening, and so on when producing your original file, the camera delivers an original that gives you more latitude in the digital darkroom.
- Vivid (VI): In this mode, the camera amps up color saturation, contrast, and sharpening.
-
Monochrome (MC): This setting produces black-and-white photos. However, in the digital world, they’re called grayscale images because a true black-and-white image contains only black and white, with no shades of gray.
I’m not keen on creating grayscale images this way. I prefer to shoot in full color and then do my own grayscale conversion in my photo editor. That technique just gives you more control over the look of your black-and-white photos. Assuming that you work with a decent photo editor, you can control what original tones are emphasized in your grayscale version, for example. Additionally, keep in mind that you can always convert a color image to grayscale, but you can’t go in the other direction. You can create a black-and-white copy of your color image directly in the camera, in fact; Chapter 11 shows you how. - Portrait (PT): This mode tweaks colors and sharpening in a way that is designed to produce nice skin texture and pleasing skin tones. (If you shoot in the Portrait or Night Portrait Scene modes, the camera selects this Picture Control for you.)
- Landscape (LS): This mode emphasizes blues and greens. As you might expect, it’s the mode used by the Landscape Scene mode.
- Flat (FL): A close cousin to the Neutral setting, the Flat setting produces, well, flat-looking images with little contrast or sharpness and reduced saturation. Like Neutral, this one is meant for photos that you plan to edit extensively to alter color, contrast, and sharpening. It's also especially useful to videographers who plan to do a lot of post-processing to their footage. Nikon claims that this mode holds onto the widest possible tonal range that the camera can capture in the JPEG format. (Tonal range refers to the range of brightness values in an image.)
The extent to which Picture Controls affect an image depends on the subject, but Figure 5-16 gives you a general idea of what to expect from the six full-color options. As you can see, Standard, Vivid, and Landscape produce pretty similar results, as do Portrait and Neutral. As for Flat — well, to my eye, that rendition needs extensive editing to bring it to life. (Again, I don't recommend using the Monochrome setting; instead, shoot in color and then create a black-and-white copy later.)

Figure 5-16: Picture controls apply preset adjustments to color, sharpening, and contrast to images you shoot in the JPEG file format.
While you're new to the camera, I recommend sticking with the default Picture Control setting, Standard, which works well for most subjects. With all the other settings you have to worry about — f-stop, shutter speed, ISO, and all the rest — save experimenting with Picture Controls for a later day. In fact, if you really want to play with the characteristics that the Picture Control setting affects, you’re better off shooting in the Raw (NEF) format and then making those adjustments as you process your Raw images. The camera tags the Raw file with whatever Picture Control is active when you take the shot, and that tag is used to render the image during playback mode. But the image adjustments are in no way set in stone, or even in sand — you can manipulate your photo at will during the image-processing stage.
For example, when you use the camera's built-in Raw processor, a feature I explain in Chapter 9, you can experiment with different Picture Control settings to see how each one affects the image. You have the same option when you process your Raw images using the free Nikon software Nikon ViewNX 2. That program's Raw converters, as well as those found in Adobe Photoshop and other third-party programs, offer other ways to fine-tune color, contrast, and sharpness as well.
If you do want to change the Picture Control setting, you can get the job done quickly via the control strip, as shown in Figure 5-17, or the Shooting menu, as shown in Figure 5-18.

Figure 5-17: The fastest way to select a Picture Control is by using the control strip.
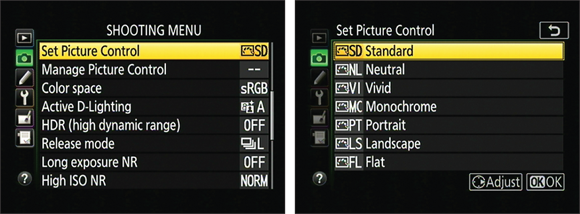
Figure 5-18: But the Shooting menu provides access to settings that let you tweak the results of each Picture Control.
Using the control strip is faster — just press the i button or tap the i icon on the monitor to bring up the strip — but the menu offers an option you can't get to from the strip: You can modify an existing Picture Control to increase or decrease color saturation, adjust the amount of sharpening, and so on. Press the Multi Selector right or tap the Adjust icon at the bottom of the screen shown on the right in Figure 5-18 to get to the options available for the current Picture Control.
To reserve page space in this book for functions that I believe are the most useful, I opted not to provide full details here about customizing Picture Controls. But you can find step-by-step instructions by going to the Extras page for this book at www.dummies.com/extras/nikon.