
7
Shooting, Viewing, and Trimming Movies
In This Chapter
![]() Recording your first movie using the default settings
Recording your first movie using the default settings
![]() Taking a still photo during recording
Taking a still photo during recording
![]() Understanding the frame rate, frame size, and movie quality options
Understanding the frame rate, frame size, and movie quality options
![]() Adjusting audio-recording options
Adjusting audio-recording options
![]() Controlling exposure during movie recording
Controlling exposure during movie recording
![]() Playing and trimming movies
Playing and trimming movies

In addition to being a stellar still-photography camera, your D5500 enables you to record HD (high-definition) movies. This chapter tells you everything you need to know to take advantage of the movie-recording options.
 Check that: This chapter tells you almost everything about movie recording. What's missing here is detailed information about focusing, which works the same way for movie shooting as it does when you use Live View to shoot a still photo. Rather than cover the subject twice, I detail your focusing options in Chapter 4 and provide just a basic recap in these pages.
Also be sure to visit the end of Chapter 1, which lists precautions to take while Live View is engaged whether you're shooting stills or movies. (To answer your question: No, you can't use the viewfinder for movie recording; Live View is your only option.)
For even more insights into recording movies with a dSLR, hop online and check out Nikon Cinema, at cinema.nikonusa.com.
Shooting Movies Using the Default Settings
Video enthusiasts will appreciate the fact that the D5500 enables you to tweak a variety of movie-recording settings. But if you're not up to sorting through those options, just use the default settings. (You can restore the critical defaults by opening the Shooting menu and choosing Reset Shooting Menu.) At these settings, you get a full HD movie with sound enabled.
 Movies are created in the MOV format, which means you can play them on your computer using most video-playback programs. You also can view movies in Nikon ViewNX 2, the free software provided with your camera. If you want to view your movies on a TV, see the end of Chapter 8 to find out how to connect your camera to your set.
The following steps show you how to record a movie using autofocusing. If you prefer manual focusing, just bypass the autofocusing instructions (again, you can find specifics on manual focusing during Live View in Chapter 4):
-
Set the Mode dial on top of the camera to Auto.
In this mode, the camera takes care of most movie settings for you, including ones that affect exposure and color.
-
Set the lens to autofocus mode.
Depending on your lens, you accomplish this by setting the lens switch to A, AF, or AF/M (auto with manual focus override). See your lens manual for help if you're unsure.
-
Engage Live View by rotating the Live View switch, shown in Figure 7-1, toward the back of the camera.
The viewfinder goes dark, and your subject appears on the monitor.
-
 Press the Info button until the display is set to Show Movie Indicators view, as shown in Figure 7-2.
Later sections decode the various bits of data; for now, just pay attention to the available recording time readout, labeled in the figure. At the default settings, your movie can be 20 minutes long, but that number presumes that your memory card has enough space on it to hold the entire movie. The maximum file size for a movie is 4GB (gigabytes).
If the upper-left corner of the screen displays the letters REC with a slash through them, something is amiss: That's the camera's way of telling you that movie recording isn't possible. You see this symbol if no memory card is inserted or the card is full, for example.
The picture-taking function of the Touch Shutter does not work during movie recording. (You see the word "Off" on the Touch Shutter icon on the right side of the screen, and tapping the icon does not enable the shutter-release option as it does during still shooting.) However, you can still use the touch screen to set focus and change camera settings. -
Set the Focus mode to AF-S or AF-F.
The right choice depends on two factors: whether you're shooting a moving subject or a stationary one and whether you require pristine audio. Here's what you need to know to make the call:
- AF-S: Choose this option if you expect your subject to remain the same distance from the camera throughout the movie — for example, if you're recording a piano performance. (Think AF-S, for stationary.) To set focus quickly, tap the screen on the spot you want to be in focus. Or press the shutter button halfway and then lift your finger off the shutter button. For movies, focus remains set at the current distance throughout your recording unless you tap the screen or press the shutter button halfway again to reset focus.
-
AF-F: This setting produces full-time, continuous autofocusing, with the camera adjusting focus as your subject moves or you pan the camera to follow the action. Focusing starts immediately after you set the Focus mode to AF-F. To lock focus, tap the screen or press the shutter button halfway. When you release the button or lift your finger from the screen, continuous autofocusing resumes. (In this case, using the shutter button to lock focus is easier than keeping your finger on the screen.)
 Although AF-F autofocusing is best for tracking moving subjects, the built-in microphone sometimes picks up the sound of the focusing motor. To avoid this issue, you can attach an external microphone and place it far enough from the camera body that it can't hear the focus motor. The only other solutions are to switch to AF-S mode and lock in focus before you begin recording or to use manual focusing.
 You can see the current Focus mode setting at the top of the monitor, as shown in Figure 7-2. To change the setting, use the control strip, as shown in Figure 7-3. Remember:
Press the i
button or tap the onscreen i
symbol to bring up the control strip.
You can see the current Focus mode setting at the top of the monitor, as shown in Figure 7-2. To change the setting, use the control strip, as shown in Figure 7-3. Remember:
Press the i
button or tap the onscreen i
symbol to bring up the control strip. -
Compose your initial shot in the monitor.
The shaded areas at the top and bottom of the monitor indicate the boundaries of the default frame size, 1920 x 1080 pixels, which produces a 16:9 aspect ratio. -
If necessary, move the focusing frame over your subject.
By default, the camera uses the Face-Priority AF-area mode, which means that if your scene contains a face, the focusing system automatically focuses on that portion of the frame. In this scenario, you see a yellow focus frame over the face. When the scene contains more than one face, you see multiple frames; the one with the interior corner markings indicates the face chosen as the focus point. You can use the Multi Selector or tap the screen to move the frame over a different face.
If the camera doesn't detect a face, it instead uses the Wide Area AF-area mode, and the focus frame appears as a red rectangle (refer to Figure 7-2). Again, use the touchscreen or Multi Selector to move the frame over your subject.
-
Focus the shot.
Again, with AF-F focusing, you don't need to do anything; just wait for the focusing frame to turn green, indicating that initial focus is set. If you use the touchscreen to set focus in the AF-S mode, focus is locked as soon as you lift your finger from the screen. Again, the focus frame turns green when focus is achieved. To use the shutter button to focus, press the shutter button halfway until focus is achieved. You can then take your finger off the shutter button, if you want.
-
 To begin recording, press the red movie-record button on top of the camera (refer to Figure 7-1).
Most shooting data disappears from the screen, and a red Rec symbol flashes in the upper center, as shown in Figure 7-4. As recording progresses, the area labeled Remaining recording time in the figure shows you how many more minutes of video you can record.
-
To stop recording, press the movie-record button again.
Your movie is recorded to the memory card.

Figure 7-1: Rotate the Live View switch to toggle between Live View and viewfinder photography.

Figure 7-2: Press the Info button to cycle through the Live View display modes until you see these movie-recording symbols.

Figure 7-3: Set the Focus mode via the control strip.

Figure 7-4: The red Rec symbol flashes while recording is in progress.
Two quick tips to add to these basics:
-
 Declutter the display by pressing the Info button. The display changes to the Hide Indicators display mode, shown in Figure 7-5. In this mode, four white horizontal marks appear to indicate the 16:9 movie-framing area; I labeled one of the marks in the figure. Press Info again to display a grid over the scene. Here's an important caveat, though: In these display modes, pressing the i
button brings up the control strip for still photography. To view the movie version, you must use the Show Movie Indicators display.
Declutter the display by pressing the Info button. The display changes to the Hide Indicators display mode, shown in Figure 7-5. In this mode, four white horizontal marks appear to indicate the 16:9 movie-framing area; I labeled one of the marks in the figure. Press Info again to display a grid over the scene. Here's an important caveat, though: In these display modes, pressing the i
button brings up the control strip for still photography. To view the movie version, you must use the Show Movie Indicators display. - You can stop recording and capture a still image in one fell swoop. Just press and hold the shutter button until you hear the shutter release. The number found within the brackets in the lower-right corner of the screen indicates how many still photos you can fit in the empty card space if you stop recording. As each second of recording ticks by and card space is depleted, the value that indicates the number of remaining still shots drops. For another option, you can save a single frame of your movie as a still photo. The last section of this chapter tells you how.

Figure 7-5: Press the Info button to hide most of the onscreen data.
Adjusting Video Settings
When you're ready to take more control over your movies, start by exploring the video settings detailed in the next three sections.
Choosing the video mode (NTSC or PAL)
The first option to consider is Video Mode, found on the Setup menu and shown in Figure 7-6. This setting determines whether movies adhere to the NTSC or PAL video standard. NTSC is used in North America; PAL is used in Europe and certain other countries. (Don't worry about what NTSC and PAL mean — they're just acronyms for the names of the standards.)

Figure 7-6: Set the video mode to the standard — NTSC or PAL — that's used in your country.
Your camera should already be set to match the country in which it was purchased, but it never hurts to check, especially because your decision affects your choice of movie frame rates, explained next. In fact, when you change the Video Mode setting, the camera displays a brief message alerting you to this fact.
Understanding the Frame Size/Frame Rate options
This setting determines the resolution, or frame size, of your movie, as well as the number of frames per second (fps), both of which affect video quality.
One way to access the setting is via the Movie Settings option on the Shooting menu, as shown in Figure 7-7. After you select the Frame Size/Frame Rate option, you see the settings screen shown in Figure 7-8.

Figure 7-7: You can access the Frame Size/Frame Rate option via the Movie Settings option on the Shooting menu.

Figure 7-8: These options appear when NTSC is selected as the video mode.
If you're a digital video expert, these options probably make perfect sense to you; take your pick and move on. If you're new to video, here's the information you need to decode the settings:
-
Frame size: The first pair of values shown for each Frame Size/Frame Rate setting indicates the number of pixels used to create the movie frame. In the world of HDTV, 1920 x 1080 pixels is considered Full HD, whereas 1280 x 720 is known as Standard HD and produces slightly lesser quality than Full HD (although I suspect few people can determine the difference). Both options result in a frame with a 16:9 aspect ratio.
Selecting the last option on the list steps the frame size down to 640 x 424 pixels, which translates to a regular definition (that is, not a high-def) movie. This setting also produces a movie that has an approximate aspect ratio of 3:2 rather than the HD 16:9 format. This smaller resolution can be useful for online videos.
-
Frame rate (fps): The value immediately following the frame size indicates the frame rate. This value, measured in frames per second (fps), determines the smoothness of the playback.
Your options here depend on whether you select NTSC or PAL as the video standard. Assuming NTSC as the video standard, the following frame rates are available:
- 24: This frame rate is the standard for motion pictures, giving your videos a softer, more movie-like look.
- 30: This setting is the standard for most network broadcast TV and produces a crisper picture than the 24 fps setting.
- 60: This option is often used for shooting video that will be played back in slow motion. With more frames per second, the video is smoother when you slow down the movie playback.
For PAL video, you can choose from 24, 25 (the PAL television broadcast standard), or 50 fps.
-
p: The p that follows all the settings refers to progressive video, which is one of two technologies used to record the lines of pixels that make up a digital video frame. The other technology is interlaced video. With interlaced video, a single frame is split into odd and even fields, or lines of pixels. The data from the odd lines is recorded first, followed rapidly by the data from the even lines — so rapidly, in fact, that the picture appears seamless during playback. With progressive video, all the lines are pulled out of the magic video hat in sequential order, in a single pass.
Your camera offers only progressive video, but don't fret: Progressive, the newer technology, delivers smoother, cleaner footage than interlaced video when you're shooting fast motion or panning the camera. In other words, you can now forget about that p in the setting name until you want to impress your friends during the next discussion of digital video. Say, "Oh, your camera can do 60 fps only as interlaced video? Mine offers 60 fps progressive."
Two more notes about this setting:
-
Viewing the current setting: See the little symbols appearing to the left of each setting in Figure 7-8? They're used in the monitor to indicate each setting, as shown in Figure 7-9. The first number specifies the vertical pixel count of the frame size; the p indicates progressive video, and the other number tells you the frame rate.
-
Changing the setting via the control strip: You also can adjust the Frame Size/Frame Rate option by using the control strip, as shown in Figure 7-10. In this case, the available Frame Size/Frame Rate settings are presented together with the Movie Quality option, which I explain in the next section. (Otherwise, you select the Quality setting separately via the Movie Settings menu option.) Together, these two settings affect the maximum length of the movie you can record. The gray box labeled Maximum movie length in Figure 7-10 updates to show you that length for the current combination of frame size/frame rate and movie quality. See the sidebar “Maximum recording times,” later in this chapter, for a rundown of how many minutes of footage you can record at each combo.

Figure 7-9: This data represents the current Frame Size/Frame Rate.

Figure 7-10: From the control strip, you select the Frame Size/Frame Rate and Movie Quality settings together.
Selecting the Movie Quality option
Next up on the list of video settings to digest is the aforementioned Movie Quality option. This setting determines how much compression is applied to the video file, which in turn affects the bit rate, or how much data is used to represent 1 second of video, measured in Mbps (megabits per second). You get just two choices: High and Normal (the default). The High setting results in a higher bit rate, which means better quality and larger files. Normal produces a lower bit rate and smaller files.
Because bit rate affects the size of the video file, it also determines the maximum length of the video clip you can create each time you press the movie-record button. Again, the sidebar “Maximum recording times” tells you the record-time limits at each combination of Movie Quality and Frame Size/Frame Rate setting.
As with the Frame Size/Frame Rate setting, you can select the Movie Quality setting via the Movie Settings option on the Shooting menu, as shown in Figure 7-11. Or you can use the control strip to select both the Frame Size/Frame Rate and Movie Quality setting together, as illustrated in Figure 7-10, in the preceding section.

Figure 7-11: This option determines the movie bit rate, which affects playback quality and file size.
One last tip about this setting: In the control strip and Live View display, a star appears with the Frame Size/Frame Rate setting when you select the High bit rate, as shown in Figure 7-12. No star means that the option is set to Normal.

Figure 7-12: The tiny star indicates the High Movie Quality setting; the star disappears when you select the Normal setting.
Controlling Audio
You can record sound using the camera’s built-in microphone, labeled on the left in Figure 7-13, or attach an external microphone such as the Nikon ME-1 to the jack labeled on the right in the figure. During on-camera playback, sound comes from the speaker, labeled on the left in the figure.

Figure 7-13: You can record audio with the internal microphone (left) or plug in an external microphone (right).
If you use the built-in mic, you can adjust two audio settings, Microphone and Wind Noise Reduction, explained in the next two sections. For an external mic, only the Microphone setting applies.
Choosing the Microphone setting (volume control)
The most critical audio-recording control is the Microphone setting, which affects sound volume. You have three options:
- Auto Sensitivity: The camera automatically adjusts the volume according to the level of the ambient noise. This setting is the default.
- Manual Sensitivity: You specify the volume level, with settings ranging from 1 to 20.
- Microphone Off: Choose this setting to record a movie with no sound or when you’re using an off-camera microphone and you don’t want the camera itself to record audio.
Symbols representing the current setting appear in the display, as shown in Figure 7-14. The microphone symbol indicates that audio recording is enabled; the letter A next-door indicates the Auto Sensitivity option. If you set the camera to Manual Sensitivity, your selected volume level appears instead.

Figure 7-14: These symbols indicate the current Microphone setting and volume level.
Beneath those symbols, you see two horizontal bars that indicate the volume level of the left and right audio channels that are recorded when you use a stereo microphone. (The built-in mic offers stereo recording.) For monaural recording, both bars reflect the same data.
Audio levels are measured in decibels (dB), and levels on the volume meter range from –40 (very, very soft) to 0 (as loud as can be measured digitally). Ideally, sound should peak consistently in the –12 range. The indicators on the meter turn yellow in this range, as shown in Figure 7-14. If the sound level is too high, the bar at the end of the meter turns red — a warning that audio may be distorted.
To adjust the Microphone setting, you can go two routes:
-
Control strip: Tap the i
symbol on the Live View display or press the i
button to display the control strip. Select the Microphone setting, as shown on the left in Figure 7-15, to display the second screen in the figure. Again, you see the volume meter plus symbols representing the Auto, Manual, and Off settings, as labeled in the figure.
If you choose Manual, as shown in the figure, set the volume by using the touchscreen controls (the yellow triangles above and below the volume box) or by pressing the Multi Selector up and down.
- Shooting menu: Choose Movie Settings from the menu and then select Microphone, as shown on the left in Figure 7-16. You then see the second screen in the figure, where you can select the Microphone setting you want to use.

Figure 7-15: You can adjust the Microphone setting from the control strip.

Figure 7-16: You also can access the Microphone option via the Movie Settings option on the Shooting menu.
Either way, choose the Microphone setting before starting the recording; you can’t change it while recording is in progress.
Reducing wind noise
Ever seen a newscaster out in the field, carrying a microphone that looks like it’s covered with a big piece of foam? That foam thing is a wind filter. It’s designed to lessen the sounds that the wind makes when it hits the microphone.
You can enable a digital version of the same thing via the Wind Noise Reduction option. Essentially, the filter works by reducing the volume of noises that are similar to those made by wind. The problem is that some noises not made by wind can also be muffled when the filter is enabled. So when you're indoors or shooting on a still day, keep this option set to Off, as it is by default. Also note that when you use an external microphone, the Wind Filter feature has no effect.
To turn Wind Noise Reduction on or off, use the control strip, as shown in Figure 7-17. Or visit the Shooting menu, open the Movie Settings screen, and choose Wind Noise Reduction.

Figure 7-17: You can access the Wind Noise Reduction setting via the control strip, as shown on the left; the symbol labeled on the right appears when the feature is turned on.
When the feature is enabled, the symbol labeled on the right in Figure 7-17 appears with the other microphone settings. The symbol disappears with Wind Noise Reduction turned off.
Exploring Other Recording Options
In addition to settings reviewed in the preceding sections, you can control a few other aspects of your cinematic effort. The following list runs through these options; Figure 7-18 labels the symbols that represent these settings in the display.
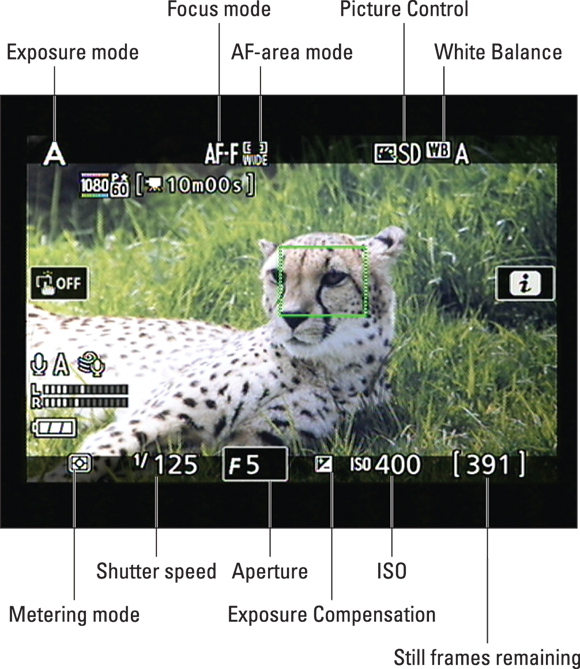
Figure 7-18: Here's your road map to other major settings you can monitor in the Show Movie Indicators display mode.
- Exposure mode: You can record movies in any exposure mode (Auto, Scene modes, Effects modes, P, M, and so on). As with still photography, your choice determines which camera settings you can access. (The Movie Settings menu options are available in all modes, however.)
- Exposure settings: The aperture (f-stop), shutter speed, ISO, Metering mode, and Exposure Compensation settings, all labeled in Figure 7-18, determine movie exposure. In the P, S, A, and M modes, as well as in Night Vision Effects mode, you have some control over all these options except Metering mode; the camera always uses Matrix metering for movie recording. See the next section for details on adjusting exposure. For all other exposure modes, the camera handles exposure automatically.
- Focus options: Your options are the same as for Live View still photography, detailed in Chapter 4. As a quick recap, you adjust autofocusing behavior through Focus mode and AF-area mode; look for the current settings in the spots labeled in Figure 7-18.
- Focus mode: Choose AF-S to lock focus when you press the shutter button halfway; choose AF-F for continuous autofocusing. See the first section of this chapter for details about how each option works for movie recording. For manual focusing, choose MF.
- AF-area mode: You can choose from Face Priority, Wide Area, Normal Area, or Subject Tracking. The default setting is Face Priority; if the camera doesn't detect a face in the frame, it automatically uses Wide Area focusing instead. With any of these modes, you start by moving the focusing frame over your subject. How things work from there depends on the specific mode; again, Chapter 4 provides step-by-step instructions.
Adjust both settings via the control strip; press the i
button or tap the screen i
symbol to bring up the strip. -
White Balance and Picture Control: The colors in your movie are rendered according to the current White Balance and Picture Control settings, both detailed in Chapter 5. However, you have control over these options only when the Mode dial is set to P, S, A, or M. The current settings appear in the areas labeled in Figure 7-18; you can adjust both options either via the Shooting menu or the control strip.
Want to record a black-and-white movie? Select Monochrome as the Picture Control. Instant film noir.
Manipulating Movie Exposure
Normally, the camera automatically adjusts exposure during movie recording. Exposure is calculated using Matrix (whole frame) metering, regardless of which Metering mode setting is selected. But in a few exposure modes, you can adjust exposure by changing the following settings:
- Shutter speed and ISO: Both options are set by the camera by default. But if you enable the Manual Movie Settings option on the Movie Settings menu, as shown in Figure 7-19, you can control both settings. (Look for the current settings in the areas labeled in Figure 7-18.) This path is one for experienced videographers, however. If you fit that category, here are a few things you need to know:
-
Exposure mode: You must set the Mode dial to M (manual exposure), and you must set the aperture (f-stop setting) as well as the shutter speed and ISO to dial in the correct exposure.
 To set the f-stop in M mode while the Manual Movie Settings option is enabled, you must exit Live View mode. Then adjust the aperture via the onscreen controls (start by tapping the arrow box under the aperture symbol). You also can just press the Exposure Compensation button while rotating the Command dial to set shutter speed. Rotate the Live View switch to return to Live View mode.
 -
Shutter speed: You can select shutter speeds as high as 1/4000 second. The slowest shutter speed depends on your chosen frame rate. For 24p, 25p, and 30p, you can drop as low as 1/30 second; for 50p, 1/50 second; and for 60p, 1/60 second. To set the shutter speed in M mode, you can use the touchscreen controls (start by tapping the shutter speed box) or by rotating the Command dial. (Remember that which frame rates are available depends on whether the Video Mode option on the Setup menu is set to NTSC or PAL.)
If you choose a shutter speed outside the stated ranges, the camera slaps your hand and chooses the closest in-range setting automatically. -
ISO: You can set the ISO value as low as 100 or as high as 25600. Note that Auto ISO Sensitivity control doesn't work when the Manual Movie Settings option is enabled; the camera sticks with your selected setting regardless of whether you enable Auto ISO — and, more importantly, regardless of whether your selected setting produces an under- or overexposed movie.
 To adjust ISO quickly, press the Fn button while rotating the Command dial. You can also select the ISO value via the ISO Sensitivity settings option on the Shooting menu or by using the Live View control strip
-
-
Aperture (f-stop): You can adjust the f-stop before (but not during) recording if you set the Mode dial to A (aperture-priority autoexposure) or M (manual exposure). This option enables you to control depth of field in your movies; Chapter 3 explains the aperture setting's role in depth of field.
In A mode, rotate the Command dial or use the touchscreen to change the f-stop (just tap the f-stop value at the bottom of the display to access the setting). Again, in M mode, first exit Live View mode and then press and hold the Exposure Compensation button while rotating the dial; rotate the Live View switch again to return to the movie screen. In either case, remember that the live preview doesn't indicate the depth of field that your f-stop setting will produce — the camera can't provide this feedback because the aperture doesn't actually open to your selected setting until you start recording.
-
Exposure Compensation: Exposure Compensation, detailed in Chapter 3, enables you to override the camera's autoexposure decisions, asking for a brighter or darker picture. You can apply this adjustment for movies when you use the following exposure modes: P, S, A, or M; any Scene mode; or the Night Vision Effects mode. However, you're limited to an adjustment range of EV +3.0 to –3.0 rather than the usual five steps that are possible during normal photography. Note that the display shows the plus/minus symbol you see in Figure 7-18 only when Exposure Compensation is in force.
To adjust the setting, use the control strip item highlighted in Figure 7-20. In any exposure mode except M, you also can press and hold the Exposure Compensation button while rotating the Command dial. (That button/dial combo adjusts the aperture when you use the M exposure mode.) Just to head off any possible confusion: For viewfinder photography, Exposure Compensation isn't needed in M exposure mode; if you want a brighter or darker exposure, you just change the aperture, shutter speed, or ISO Sensitivity settings. But because the camera doesn't give you control over shutter speed or ISO during movie recording — unless you enable Manual Movie Settings — you need some way to tell the camera that you want a brighter or darker picture in M mode, and Exposure Compensation is it.  Autoexposure lock: In any exposure mode except Auto or Auto Flash Off, you can lock exposure at the current settings by pressing and holding the AE-L/AF-L button. Chapter 3 also tells you more about autoexposure lock.

Figure 7-19: Enable this option to take control over movie exposure.

Figure 7-20: You can apply Exposure Compensation for movie shooting when you use certain exposure modes.
Screening Your Movies
 To play your movie, press the Playback button. In single-image playback mode, you can spot a movie file by looking for the little movie camera icon in the upper-left corner of the screen, as shown in Figure 7-21. A honking big "play" arrow also appears in the middle of the screen in the default playback display mode and in some other display modes. (Press the Multi Selector up/down to change the display mode.) The default display mode also shows other movie-related data, including the Frame Size, Frame Rate, and Movie Quality setting. (Remember: A star next to the Frame Rate value means that you set the Movie Quality option to High.)

Figure 7-21: When you use the default playback display mode, you see this movie data on the screen.
To start playback, tap the play arrow or tap the OK/Play box at the bottom of the screen. Or, if the touchscreen is disabled, press the OK button.
In the thumbnail and Calendar playback modes, both described in Chapter 8, you see little dots along the edges of image thumbnails to represent movie files. Tap the thumbnail or press OK to shift to single-image view and then start playback as I just described.
After playback begins, you see the data labeled in Figure 7-22. The progress bar and Time Elapsed value show you how much of the movie has played so far; you can also see the total movie length.

Figure 7-22: The icons at the bottom of the screen remind you which buttons to use to control playback.
You can control playback as follows:
- Exit playback: Press the Multi Selector up, tap the return arrow in the upper-right corner of the screen, or press the Playback button again.
- Pause/resume playback: If the touchscreen is enabled, tap the display once to pause; tap again to resume playback. You also can press the Multi Selector down to pause playback and press OK to resume playback. (That white circle labeled Playback control symbols in the figure is designed to remind you of the Multi Selector's movie-playback role.)
-
Fast-forward/rewind: Press the Multi Selector right or left to fast-forward or rewind the movie, respectively. Press again to double the fast-forward or rewind speed; keep pressing to increase the speed. Hold down the button to fast-forward or rewind all the way to the end or beginning of the movie.
You also can tap on the progress bar to advance or rewind the movie to the spot you tap.
- Forward/rewind 10 seconds: Rotate the Command dial to the right to jump 10 seconds forward through the movie; rotate to the left to jump back 10 seconds. Again, note the little wheel symbol in the lower-left corner of the frame: That's your reminder to use the Command dial to perform 10-second jumps through the movie. The camera pauses playback after every jump; tap the screen or press OK to resume playback.
-
Advance frame by frame: First press the Multi Selector down or tap the screen to pause playback. Then press the Multi Selector right to advance one frame; press left to go back one frame.

 Adjust playback volume: See the markings labeled Volume controls in Figure 7-22? They remind you that you can press the Zoom In button to increase volume and press the Zoom Out button to lower it. The number value tells you the current volume level (10, in the figure). You also can tap the symbols to adjust volume, but I find it difficult to tap just the right spot. And if you miss the tap target, the camera pauses the movie.
Trimming Movies
You can do some limited movie editing in camera. I emphasize: limited editing. You can trim frames from the start of a movie and clip off frames from the end, and that’s it.
To eliminate frames from the start of a movie, take these steps:
- Display your movie in single-image view.
- Tap the playback icon or press OK to begin playback.
-
When you reach the first frame you want to keep, pause the movie by tapping the screen or pressing the Multi Selector down.
The onscreen display updates to show you the controls that appear on the left in Figure 7-23.
-
Press the i button or tap the i symbol at the bottom of the screen.
You see the menu options shown on the right in Figure 7-23.
-
Select Choose Start/End Point.
You see the options shown in Figure 7-24.
-
Select Start Point.
You’re returned to the playback screen, which now sports a couple additional symbols. First, you see two yellow markers on the progress bar at the bottom of the screen. The left marker indicates the start point; the right marker, the end point. You also see an AE-L/AF-L symbol. (More about both these controls later.)
-
Press the Multi Selector up or tap the scissors symbol (lower-right corner of the frame) to lop off all frames that came before the current frame.
Now you see the options shown in Figure 7-25. To preview the movie, select Preview and press OK; after the preview plays, you’re returned to the menu screen.
-
To preserve your original movie and save the trimmed one as a new file, choose Save as New File and press OK.
Alternatively, you can opt to overwrite the existing file, but you can't get the original file back if you do.
A message appears, telling you that the trimmed movie is being saved. During playback, edited files are indicated by a little scissors icon that appears in the upper-left corner of the screen, as shown in Figure 7-26.
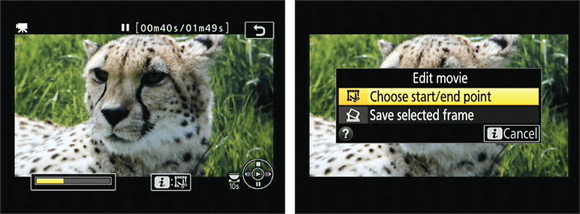
Figure 7-23: With the movie paused, press the i button or tap the i symbol to access the movie-editing screens.

Figure 7-24: To trim frames from the beginning of a movie, select the Start Point option.

Figure 7-25: Choose Save as New File to avoid overwriting the original movie file.

Figure 7-26: The scissors symbol tells you that you're looking at a trimmed movie.
To instead trim footage from the end of a film, follow the same steps but this time pause playback on the last frame you want to keep in Step 3. Then, in Step 6, select Choose End Point instead of Choose Start Point.
You can trim an already trimmed movie, by the way. So you can go through the steps once to set a new start point and a second time to set a new end point. Or, if you prefer, you can trim files from both the beginning and end of a movie in one pass. After you take Step 6, press the AE-L/AF-L button or tap the corresponding icon at the bottom of the screen. The marker at the right end of the progress bar turns yellow, indicating that you can now rewind the movie to the frame that you want to use as the end of the video. You can keep tapping or pressing the AE-L/AF-L control to toggle between the start/end point controls on the progress bar. To finalize the edit, press the Multi Selector up or tap the scissors symbol.
Saving a Movie Frame As a Still Image
You can save a frame of the movie as a still photo. Here’s how:
- Begin playing your movie.
-
When you reach the frame you want to capture, pause playback.
You can tap the screen or press the Multi Selector down to pause the movie.
- Press the i button or tap the onscreen i symbol to bring up the Edit Movie screen, shown in Figure 7-27.
-
Choose Save Selected Frame.
The frame appears on the monitor.
- Press the Multi Selector up or tap the scissors symbol in the lower-right corner of the screen.
-
On the confirmation screen that appears, select Yes.
Your frame is saved as a JPEG photo.
Remember a few things about pictures you create this way:
- When you view the image, it’s marked with a little scissors icon in the upper-left corner. (It looks just like the one labeled in Figure 7-26.)
- The resolution of the picture depends on the resolution of the movie: For example, if the movie resolution is 1920 x 1080, your picture resolution is 1920 x 1080.
- You can’t apply editing features from the Retouch menu to the file, and neither can you view all the shooting data that's normally associated with a JPEG picture.
Before you begin movie playback, you also can press the i
button to display a mini-menu that contains the Edit Movie option. Select that option to access the Edit Movie screen (the one shown on the right in Figure 7-23). After choosing the editing function you want to use, press OK to start playback and proceed as outlined in the steps here and in the preceding section.

Figure 7-27: This option lets you save a single frame as a JPEG image.