
8
Playback Mode: Viewing Your Photos
In This Chapter
![]() Exploring picture playback functions
Exploring picture playback functions
![]() Deciphering the picture information displays
Deciphering the picture information displays
![]() Understanding histograms
Understanding histograms
![]() Viewing pictures and movies on a television
Viewing pictures and movies on a television

Without question, my favorite thing about digital photography is being able to view my pictures the instant after I shoot them. No more guessing whether I captured the image or need to try again, as in the film days; no more wasting money on developing pictures that stink.
Seeing your pictures is just the start of the things you can do when you switch your camera to playback mode, though. You also can review settings you used to take the picture, display graphics that alert you to exposure problems, and magnify a photo to check details. This chapter introduces you to these playback features and also explains how to connect your camera to a television for playback.
Note: Some information in this chapter applies only to still photographs; if a feature also works for movie files, I spell that out. For the basics of movie playback, see the end of Chapter 7.
Adjusting Playback Timing Options
By default, the camera displays your photo for 4 seconds immediately after it finishes recording the picture data to the memory card. This feature is called Image Review.
 To take a longer look, press the Playback button to set the camera to playback mode. Your photo then appears for 5 minutes, after which the monitor goes to sleep if you don't press any buttons. (This auto shutdown is a Good Thing because the monitor is a major drain on the camera battery.)
If necessary, you can adjust the playback and Image Review duration from the Custom Settings menu. (Note that whatever setting you use for playback shutoff also affects the auto shutdown of menu displays.) To access the relevant settings, select the Timers/AE Lock menu option on the Custom Setting menu and then choose Auto Off Timers to display the screen you see on the left in Figure 8-1.

Figure 8-1: You can adjust the timing of auto shutdown during playback.
 You're offered these three general settings: Short, Normal (the default), and Long. But these settings apply a set of timing options to the Live View display and exposure meter display as well as to the playback/menus and Image Review displays. I suggest that you select Custom, as shown on the left in the figure, to display the screen shown on the right. You then can set the Playback/Menus timing and Image Review timing separately. (Chapter 10 goes into more detail about the automatic shutdown options.)
To turn off Image Review altogether, head for the Playback menu and set that option to Off, as shown in Figure 8-2.

Figure 8-2: To disable Image Review, set this option to Off.
Choosing Which Images to View
 Your camera organizes pictures automatically into folders that are assigned generic names: 100D5500, 101D5500, and so on. You can see the name of the current folder by looking at the Storage Folder option on the Shooting menu. (The default folder name appears on this menu as simply 100.) You also can create custom folders by using the process outlined in Chapter 10. Which folders' photos appear during playback depends on the Playback Folder option on the Playback menu, shown in Figure 8-3.

Figure 8-3: If your memory card contains multiple image folders, specify which folder you want to view.
You probably don't have to worry about this setting — all your photos likely are contained in one folder, and the camera selects that folder by default. But if you use a gargantuan memory card that contains zillions of images (and therefore may contain multiple folders), if you created custom folders, or if your card contains pictures taken on another Nikon camera, specify which folder you want to view by choosing one of the following options:
- D5500: All pictures taken with the D5500 are viewable, regardless of which folder they call home.
- Current: This setting is the default; the camera displays images contained in the folder selected as the Storage Folder option on the Shooting menu. Again, unless your card contains multiple folders, all your pictures are in that folder.
- All: This setting displays all pictures in all folders, even those you took with another camera, as long as the photos are in an image format that the camera recognizes.
Enabling Automatic Picture Rotation
When you take a picture, the camera can record the image orientation — whether you held the camera normally, creating a horizontally oriented image, or turned the camera on its side to shoot a vertically oriented photo. During playback, the camera can then read the orientation data and automatically rotate the image so that it appears in the upright position, as shown on the left in Figure 8-4. The image is also automatically rotated when you view it in Nikon ViewNX 2 and other photo programs that can interpret the data. If you disable rotation, vertically oriented pictures appear sideways, as shown on the right in Figure 8-4.

Figure 8-4: You can display vertically oriented pictures in their upright position (left) or sideways (right).
 Photographers use the term portrait orientation to refer to vertically oriented pictures and landscape orientation to refer to horizontally oriented pictures. The terms stem from the traditional way that people and places are captured in paintings and photographs — portraits, vertically; landscapes, horizontally.
Set up your rotation preferences by using the following Playback menu options, both shown in Figure 8-5:
- Auto Image Rotation: This option (highlighted in the figure) determines whether the orientation data is included in the picture file. The default setting is On.
- Rotate Tall: Found just below the Auto Image Rotation setting, this option controls whether the camera pays attention to the orientation data. This one is also enabled by default.

Figure 8-5: Visit the Playback menu to enable or disable image rotation.
Regardless of these settings, your pictures aren't rotated during the instant-review period. Nor are movie files rotated.
Viewing Images in Playback Mode
My guess is that you’ve already figured out the basics of picture playback. But you may not be familiar with all the tricks you can use when viewing your images, such as zooming in on an image for a close-up check or displaying multiple image thumbnails at a time. The next four sections introduce you to basic options; the later section "Viewing Picture Data" explains how to modify and understand the data that appears with photos during playback.
To use touchscreen controls during playback, set the Touch Controls option on the Setup menu to Enable or Playback Only. (The Playback Only setting disables touch operations during shooting.) If you're used to viewing photos on a smartphone or tablet, most of the touchscreen gestures will be familiar; if you need a primer in touchscreen terminology, see Chapter 1.
Displaying photos one at a time (single-frame playback)
For normal playback — that is, to see each photo one at a time, as shown in Figure 8-6 — take these steps:
-
Press the Playback button, labeled in Figure 8-6
.
The camera displays the last picture you took, along with some picture data, such as the filename of the photo and the date it was taken, as shown in the figure.
-
To scroll through your pictures, swipe a finger across the touchscreen, rotate the Command dial, or press the Multi Selector right or left.
I labeled the Command dial and Multi Selector in the figure. To view the next picture using the touchscreen, swipe your finger from right to left across the screen. Swipe from the left to go back one picture.
In single-frame playback view, you can magnify or reduce the display size by pinching outward or inward, respectively. You also can press the Zoom In and Zoom Out buttons, both labeled in Figure 8-6. The upcoming section "Zooming in for a closer view" talks more about this feature.If the picture's a loser, press the Delete button, also labeled in the figure. A confirmation screen appears; press the button a second time to erase the file. (See the next chapter for other ways to delete photos.)
- To return to picture-taking mode, press the Playback button again or press the shutter button halfway and then release it.

Figure 8-6: These buttons play the largest roles in picture playback.
Viewing multiple images at a time (thumbnails view)
Along with viewing images one at a time, you can display 4 or 12 thumbnails, as shown in Figure 8-7, or even a whopping 80 thumbnails.

Figure 8-7: You can view multiple image thumbnails at a time.
Use these techniques to change to thumbnails view and navigate your photos:
-
 Display thumbnails. If the touchscreen is enabled, pinch in: That is, put your thumb and a finger on opposite corners of the monitor and drag both toward the center of the screen. You also can press the Zoom Out button (refer to Figure 8-6).
Either way, your first pinch or press of the Zoom Out button cycles from single-picture view to 4-thumbnail view; keep pinching or pressing to shift to 12-picture view and then to 80 thumbnail view. One more pinch or press takes you to Calendar view, a nifty feature explained in the next section.
 Display fewer thumbnails. For touchscreen operation, pinch out: Place thumb and forefinger in the center of the screen and drag both toward the edge of the monitor. If you prefer, you can press the Zoom In button instead. Each pinch or press shifts you one step closer to full-frame view.
- Scroll to the next screen of thumbnails. Drag a finger up or down the screen or press the Multi Selector up and down.
- Select an image. To perform certain playback functions while in thumbnails view, such as deleting a photo or protecting it, you first need to select an image. A yellow box surrounds the selected image (refer to Figure 8-7). To select a different image, just tap its thumbnail. Or rotate the Command dial or use the Multi Selector to move the highlight box over the image. (This process works differently in Calendar view; again, see the next section for help.)
-
Shift directly from any thumbnails display to single-image view. Select the photo you want to view and then tap its thumbnail or press OK.
Displaying photos in Calendar view
In Calendar view, you see a little calendar on the screen, as shown on the left in Figure 8-8. By selecting a date on the calendar, you can quickly navigate to all pictures you shot on that day. A thumbnail-free date indicates that your memory card doesn't contain any photos from that day.

Figure 8-8: Calendar view makes it easy to view all photos shot on a particular day.
Here's how to take advantage of Calendar view:
-
Pinch in (on the touchscreen) or press the Zoom Out button as needed to cycle through the Thumbnail display modes until you reach Calendar view.
If you’re viewing images in full-frame view, for example, you need to pinch or press four times to get to Calendar view.
-
Select the date on which you shot the images you want to see.
A yellow box highlights the currently selected date. In Figure 8-8, for example, February 23 is selected. To select a different date, tap it in the calendar display or move the highlight box over it by using the Multi Selector or rotating the Command dial.
The number of the month appears at the top of the screen. To quickly scroll to a different month, tap one of the arrows on either side of the number. You also can use the Command dial or Multi Selector to travel from one month to the next.After you select a date, the right side of the screen displays thumbnails of pictures taken on that date.
-
To view all thumbnails from the selected date, tap the Zoom Out icon at the bottom of the screen, press the Zoom Out button, or press OK.
The Zoom Out icon is the one labeled "Tap to toggle … " in Figure 8-8. The thumbnail strip becomes active (refer to the right side of Figure 8-8), and you can scroll through the thumbnails by using the touchscreen, Command dial, or Multi Selector. The currently selected image is highlighted by a yellow box.
-
To temporarily display a larger view of the selected thumbnail, hold down the Zoom In button.
In the zoomed view, the image filename appears under the larger preview, as shown in Figure 8-9. When you release the Zoom In button, the large preview disappears, and the calendar display shown on the right in Figure 8-8 comes back into view. (There is no touchscreen option to perform this function.)
-
To jump from the thumbnail strip back to the calendar so that you can select a different date, tap the Zoom Out icon or press the Zoom Out button again.
You can keep pressing the button or tapping the icon to jump between the calendar and the thumbnail strip as much as you want.
-
To exit the thumbnail strip and view the selected image in single-image view, tap the thumbnail or press OK.
If the calendar page is currently active instead of the thumbnail strip, press OK twice (the first press takes you to the thumbnail strip).
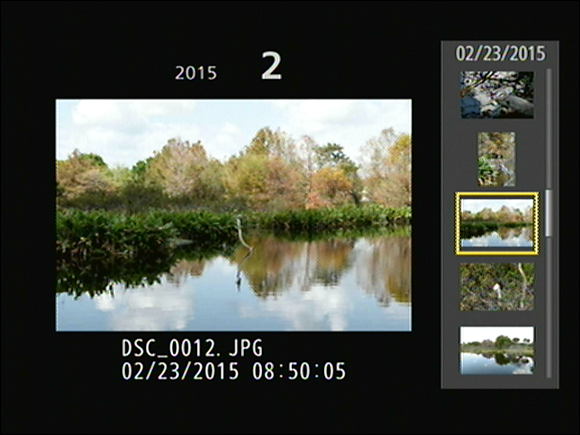
Figure 8-9: Highlight a photo in the thumbnail strip and press the Zoom In button to temporarily display it at a larger size.
After Step 6, you can return immediately to Calendar view by pressing the OK button but only if you don't scroll to the next or previous picture first. Otherwise, you have to cycle through all the thumbnail views to get to Calendar view.
Zooming in for a closer view
When you display a photo in single-frame view, as shown on the left in Figure 8-10, you can magnify it to get a close-up look at important details, as shown on the right. Here’s the scoop:

Figure 8-10: When viewing images in single-frame view (left), pinch out or press the Zoom In button to magnify the picture (right).
-
Zoom in. Pinch out on the touchscreen or press the Zoom In button. You can magnify the image to a maximum of 13 to 33 times its original display size, depending on the picture resolution (Image Size). Just keep pressing the button or pinching out until you reach the magnification you want.
- Zoom out. To zoom out to a reduced magnification, pinch in or press the Zoom Out button.
-
View another part of the magnified picture. When an image is magnified, a thumbnail showing the entire image appears briefly in the lower-right corner of the monitor (refer to the right side of Figure 8-10). The yellow outline in the thumbnail indicates the area that’s consuming the rest of the monitor space. To scroll the display and view a different portion of the image, you can use the Multi Selector or just drag your finger across the screen.
The bar at the bottom of the navigation window gives you an indication of the magnification level; the closer the white bar gets to the right end of the bar, the greater the magnification level.
After a few seconds, the navigation thumbnail disappears; just tap the screen or press the Multi Selector in any direction to redisplay it. -
Inspect faces. Try this trick to inspect each face in a group shot: First, magnify the image. The picture-in-picture thumbnail displays a white border around each detected face. (Typically, subjects must be facing the camera for faces to be detected.) An i symbol that sports a face and the word On also appears in the lower-left corner of the screen, as shown on the left in Figure 8-11.
 Next, press the i
button or tap that On symbol. A second symbol, decorated with a face and a Multi Selector symbol then appears, as shown on the right in the figure. You can tap that symbol or press the Multi Selector right or left to jump from face to face. Press OK to fill the frame with the selected face. Press the i
button or tap the i
symbol (now labeled Off) to turn the face-inspection feature off and return to the normal playback zoom behavior. (Like the navigation box, these icons disappear pretty quickly; just tap anywhere on the screen to redisplay them.)
Next, press the i
button or tap that On symbol. A second symbol, decorated with a face and a Multi Selector symbol then appears, as shown on the right in the figure. You can tap that symbol or press the Multi Selector right or left to jump from face to face. Press OK to fill the frame with the selected face. Press the i
button or tap the i
symbol (now labeled Off) to turn the face-inspection feature off and return to the normal playback zoom behavior. (Like the navigation box, these icons disappear pretty quickly; just tap anywhere on the screen to redisplay them.) - View more images at the same magnification. Here’s another neat trick: While the display is zoomed, rotate the Command dial to display the same area of the next photo at the same magnification. So if you shot the same subject several times, you can easily check to see how a particular detail appears in each one.
-
Return to full-frame view. You can switch from any magnification level to full-screen view by pressing OK.

Figure 8-11: After magnifying a group portrait, you can tap these icons to closely inspect each face in the picture.
Viewing Picture Data
In single-picture view, you can choose from the six display modes shown in Figure 8-12. By default, however, only the File Information display is available.

Figure 8-12: You can choose from six playback display modes.
To use any other display options, you must enable them from the Playback menu, by following these steps:
-
Open the Playback menu and choose Playback Display Options, as shown on the left in Figure 8-13.
A menu listing all hidden display modes appears, as shown on the right in the figure. A check mark in the box next to a display mode means that the mode is enabled.
-
To toggle a display mode on or off, tap it.
You also can highlight the mode and then press the Multi Selector right or tap the Select box at the bottom of the screen. Notice that the File Information option is missing from the menu — you can't disable this display mode.
- After turning on the options you want to use, tap or press OK.

Figure 8-13: You enable and disable display modes via the Playback menu.
After enabling the additional display modes and returning to playback mode, press the Multi Selector up or down to cycle from one display to the next.
The next several sections explain exactly what details you can glean from each display mode, save for the image-only mode. I present them here in the order they appear if you cycle through the modes by pressing the Multi Selector down. You can spin through the modes in the other direction by pressing the Multi Selector up.
File Information mode
In the File Information display mode, the monitor displays the data shown in Figure 8-14. Here's the key to what information appears, starting at the top of the screen and working down:
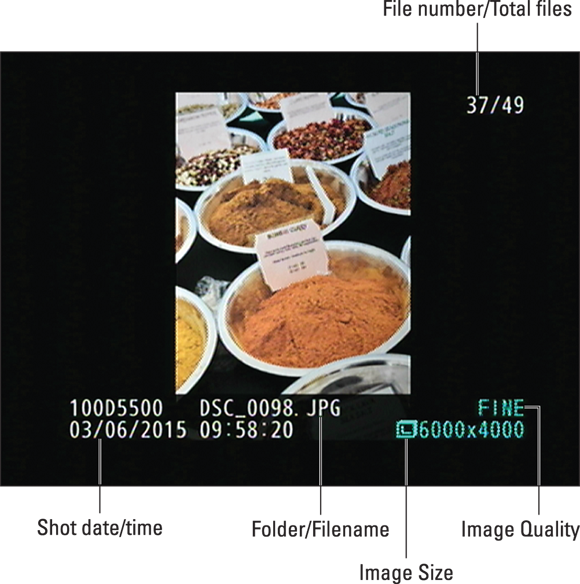
Figure 8-14: In File Information mode, you can view these bits of data.
- File number/Total files: The first value indicates the number of the currently displayed photo; the second tells you the total number of files in the same folder.
- Folder name: Folders are named automatically by the camera unless you create custom folders, a trick you can explore in Chapter 10. The first camera-created folder is 100D5500. Each folder can contain up to 999 images; when you exceed that limit, or the last photo you stored in that folder had the file number 9,999, the camera creates a new folder and assigns the next folder number: 101D5500, 102D5500, and so on.
-
Filename: The camera also automatically names your files. Filenames end with a 3-letter code that represents the file format, which is either JPG (for JPEG) or NEF (for Raw) for still photos. Chapter 2 discusses these formats. If you record a movie, the file extension is MOV; if you create a dust-off reference image file, an advanced feature designed for use with Nikon Capture NX 2, the camera instead uses the extension NDF. (Because this software must be purchased separately, I don’t cover it in this book.)
The first four characters of filenames also can vary as follows: - DSC_: You captured the photo in the default Color Space, sRGB. This setting is the best choice for most people, for reasons you can explore in Chapter 5.
- _DSC: If you change the Color Space setting to Adobe RGB, the underscore character comes first.
Each image is also assigned a 4-digit file number, starting with 0001. When you reach image 9999, the file numbering restarts at 0001, and the new images go into a new folder to prevent any possibility of overwriting the existing image files. For more information about file numbering, see the Chapter 1 section that discusses the File Number Sequence option, found on the Custom Setting menu. (I recommend keeping this option turned on.) - Date and Time: Just below the folder and filename info, you see the date and time that you took the picture. Of course, the accuracy of this data depends on whether you set the camera’s date and time values correctly, which you do via the Time Zone and Date option on the Setup menu.
- Image Quality: Here you can see which Image Quality setting you used when taking the picture. Again, Chapter 2 has details, but the short story is this: Fine, Normal, and Basic are the three JPEG recording options, with Fine representing the highest JPEG quality. Raw refers to the Nikon Raw format, NEF (for Nikon Electronic Format). If you captured the picture in both formats, you see Raw+Fine (or Normal or Basic). Only one thumbnail appears to represent each file.
- Image Size: This value tells you the image resolution, or pixel count. See Chapter 2 to find out about resolution.
Figure 8-15 shows you some additional symbols that appear when you use certain after-the-shot camera features, as follows:

Figure 8-15: These symbols appear only if you use the related playback and retouching features.
- Rating symbol: Chapter 9 explains how you can rate a picture or movie, assigning it one to five stars or, if you're totally disgusted with the file, labeling it with a trash can so that you can easily locate it to delete it. The rating shown in Figure 8-15 indicates a five-star photo, for example. (I grade on a curve.) If you don't assign any rating, this area of the playback screen appears empty.
- Protected symbol: The key icon indicates that you used the file-protection feature to prevent the image or movie from being erased when you use the camera’s Delete function. See the next chapter to find out more. (Note: Formatting your memory card, a topic discussed in Chapter 1, does erase even protected pictures.) Again, this area appears empty if you didn’t apply protection.
- Retouch symbol: This icon appears on images that you created by applying one of the Retouch menu features to a picture. (The camera preserves the original and applies your alterations to a copy of the file.) Chapter 11 explains this feature and other Retouch menu options. See Chapter 7 for help with the movie-editing function found on the menu; for edited movies, you see a little scissors icon instead of the Retouch symbol shown in the figure.
- Send to Smart Device symbol: After you tag a photo for Wi-Fi transfer to a smartphone or tablet, this symbol appears. Chapter 9 explains the Wi-Fi feature. (You can't transfer movies via Wi-Fi.)
Highlights (blinkies) mode
One of the most difficult problems to correct in a photo-editing program is known as blown highlights in some circles and clipped highlights in others. In plain English, both terms mean that highlights — the brightest areas of the image — are so overexposed that areas that should include a variety of light shades are instead totally white. For example, in a cloud image, pixels that should be light to very light gray become white due to overexposure, resulting in a loss of detail in those clouds.
Highlights display mode alerts you to clipped highlights by blinking the affected pixels on and off. But just because you see the flashing alerts doesn't mean that you should adjust exposure — the decision depends on where the alerts occur and how the rest of the image is exposed. If your subject appears fine and the blinkies are in the background, don't worry about it. If you adjust exposure to get rid of the blown highlights, your subject will then be underexposed. In other words, sometimes you simply can't avoid a few clipped highlights when the scene includes a broad range of brightness values.
Like all playback display modes except File Information, Highlights mode is disabled by default. Follow the instructions in the "Viewing Picture Data" section, earlier in this chapter, to enable it. You can get a look at the Highlights display in Figure 8-12; there's not much to it except the label Highlights at the bottom of the screen and the number of files/total number of files at the top. The rating, retouch, protected, and send-to-smart device markings also appear if you used those features. (Refer to Figure 8-15.)
RGB Histogram mode
Press the Multi Selector down to shift from Highlights mode to RGB Histogram mode, which displays your image as shown in Figure 8-16. Again, you can view your picture in this mode only if you enable it via the Display Mode option on the Playback menu. (See “Viewing Picture Data,” earlier in this chapter, for help.)

Figure 8-16: RGB Histogram mode presents exposure and color information in chart-like fashion.
Underneath the image thumbnail, you see just a few pieces of data. As with File Information mode, you see the Protected, Retouch, Rating, and Send to Smart Device icons if you used those features. Beneath that, you see the White Balance settings used for the shot. In the figure, the data shows that the picture was captured using the Auto White Balance with zero adjustment along the blue-to-amber axis and zero adjustment along the green-to-magenta axis. (Chapter 5 details White Balance options.) At the top of the display, you see the File number/Total files data, also part of the standard File Information display data.
The keys to this display mode, though, are those chart-like thingies called histograms. You get two types of histograms: The top one is a Brightness histogram; the three others are known collectively as an RGB (red, green, blue) histogram.
The next two sections explain what you can discern from the histograms. But first, here’s a cool trick to remember: If you press the Zoom In button in this display mode, you can zoom the thumbnail to a magnified view. The histograms then update to reflect only the magnified area of the photo. Use the Multi Selector or drag in the image thumbnail to scroll the display to see other areas of the picture. To return to the regular view and once again see the whole-image histogram, press OK.
Reading a Brightness histogram
You can get an idea of image exposure by viewing your photo on the camera monitor and by looking at the blinkies in Highlight mode. But the Brightness histogram provides a way to gauge exposure that’s a little more detailed.
A Brightness histogram indicates the distribution of shadows, highlights, and midtones (areas of medium brightness) in an image. Figure 8-17 shows you the histogram for the spice photo featured in Figure 8-16.

Figure 8-17: The Brightness histogram indicates tonal range, from shadows on the left to highlights on the right.
The horizontal axis of the histogram represents the possible picture brightness values — the maximum tonal range, in photography-speak — from the darkest shadows on the left to the brightest highlights on the right. And the vertical axis shows you how many pixels fall at a particular brightness value. A spike indicates a heavy concentration of pixels at that brightness value.
Keep in mind that there is no “perfect” histogram that you should try to achieve. Instead, interpret the histogram with respect to the distribution of shadows, highlights, and midtones that comprise your subject. You wouldn’t expect to see lots of shadows, for example, in a photo of a polar bear walking on a snowy landscape. Pay attention, however, if you see a very high concentration of pixels at the far right or left end of the histogram, which can indicate a seriously overexposed or underexposed image, respectively.
When shooting subjects that contain a significant amount of white, I usually underexpose the photo just a hair. That way, I make sure that I don't blow out highlights. In such cases, the histogram may show no or few pixels at the right end of the scale. Again, though, you have to read the histogram with an eye toward getting the exposure of the main subject correct. Had I increased exposure enough to grow the highlights pixel population for my spice photo, I could easily have created blown highlights in the silver edges of the spice bowls.
Understanding RGB histograms
When you view your images in RGB Histogram display mode, you see two histograms: the Brightness histogram, covered in the preceding section, and an RGB histogram. Figure 8-18 shows you the RGB histogram for the spice photo.

Figure 8-18: The RGB histogram can indicate problems with color saturation.
To make sense of an RGB histogram, you first need to know that digital images are known as RGB images because they’re created from three primary colors of light: red, green, and blue. Whereas the Brightness histogram reflects the brightness of all three color channels rolled into one, RGB histograms let you view the values for each channel.
When you look at the brightness data for a single channel, though, you glean information about color saturation rather than image brightness. (Saturation refers to the purity of a color; a fully saturated color contains no black or white.) I don’t have space in this book to provide a full lesson in RGB color theory, but the short story is that when you mix red, green, and blue light, and each component is at maximum brightness, you create white. Zero brightness in all three channels creates black. If you have maximum red and no blue or green, though, you have fully saturated red. If you mix two channels at maximum brightness, you also create full saturation. For example, maximum red and blue produce fully saturated magenta. And, wherever colors are fully saturated, you can lose picture detail. For example, a rose petal that should have a range of tones from medium to dark red may instead be a flat blob of pure red.
The upshot is that if all the pixels for one or two channels are slammed to the right end of the histogram, you may be losing picture detail because of overly saturated colors. If all three channels show a heavy pixel population at the right end of the histogram, you may have blown highlights — again, because the maximum levels of red, green, and blue create white. Either way, you may want to adjust the exposure settings and try again.
A savvy RGB histogram reader can also spot color balance issues by looking at the pixel values. But frankly, color balance problems are fairly easy to notice just by looking at the image on the camera monitor. See Chapter 5 to find out how to correct any color problems that you spot during picture playback.
Shooting Data display mode
Before you can access Shooting Data mode, you must enable it via the Playback Display Options setting on the Playback menu. See the earlier section “Viewing Picture Data” for details. After turning on the option, press the Multi Selector down to shift from RGB Histogram mode to Shooting Data mode.
In this mode, you can view up to five screens of information, which you flip through by pressing the Multi Selector up and down. Figure 8-19 shows just the first two screens of data.

Figure 8-19: Here you see two of the Shooting Data screens.
Most of the data you see won’t make sense until you explore Chapters 3 through 5, which explain the exposure, color, and focusing settings available on your camera. But I want to call your attention to a few facts now:
- The upper-left corner of the monitor shows the Protected, Retouch, and Send to Smart Device icons, if you used these features. If you assigned a rating to the file, the rating appears in the lower-left corner. Otherwise, these areas are empty, as in the figures. (Refer to Figure 8-15 to see each of these icons.)
- The current file number and total number of files appear in the upper-right corner of the display.
- The Comment item, which is the final item on the third screen, contains a value if you use the Image Comment feature on the Setup menu. I cover this option in Chapter 10 also.
- If the ISO value on Shooting Data Page 1 appears in red (refer to the left screen in Figure 8-19), the camera overrode the ISO Sensitivity setting that you selected in order to produce a good exposure. This shift occurs only if you enable automatic ISO adjustment in the P, S, A, and M exposure modes; see Chapter 3 for details.
- The fifth data screen appears only if you attach the optional GPS unit to the camera. The GPS location data appears on this screen.
Overview mode
In this mode, the playback screen contains a small image thumbnail along with scads of shooting data — although not quite as much as Shooting Data mode — plus a Brightness histogram. Figure 8-20 offers a look.
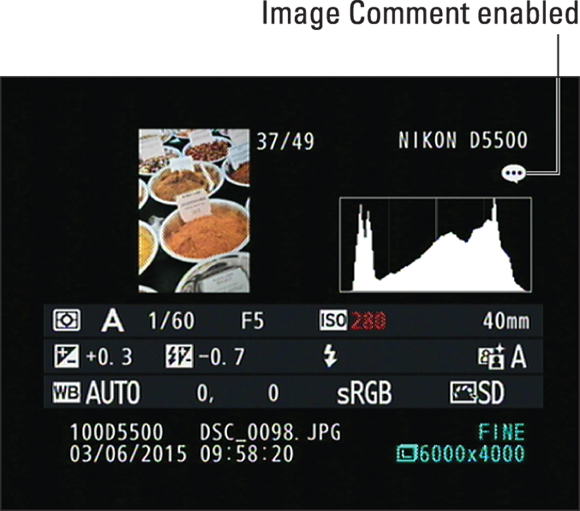
Figure 8-20: In Overview mode, you can view your picture along with the major camera settings you used to take the picture.
The earlier section “Reading a Brightness histogram” tells you what to make of that part of the screen. Just above the histogram, you see the Protected, Retouch, and Send to Smart Device symbols, if you used those features, and the File number/Total files data appears at the upper-right corner of the image thumbnail. If you used the Rating feature, the rating appears under the thumbnail. (Again, refer to Figure 8-15 to see these miscellaneous symbols.)
One more tiny symbol to notice: The speech bubble just above the histogram indicates that you enabled the Image Comment feature (Chapter 10). To actually read the comment, you need to go to the fourth data screen shown in Shooting Data display mode.
To sort out the maze of other information, the following list breaks down the five rows that appear under the thumbnail and histogram. In the accompanying figures as well as in Figure 8-20, I include all possible data simply for the purpose of illustration; if any of the items don’t appear on your screen, it simply means that the relevant feature wasn’t enabled when you captured the shot. Also note that if you're looking at a movie file, the screen shows only the third row of data, and the histogram represents the exposure of the first frame of the movie.
- Row 1: This row shows the exposure settings labeled in Figure 8-21, along with the focal length of the lens you used to take the shot. As in Shooting Data mode, the ISO value appears red (as in the figure) if you enabled auto ISO override in the P, S, A, or M exposure modes and the camera adjusted the ISO for you.
- Row 2: This row contains a few additional exposure settings, labeled in Figure 8-22. See Chapter 3 for explanations of all these settings except Flash Compensation and Flash Mode, which I cover in Chapter 2.
- Row 3: Items on this row, labeled in Figure 8-23, pertain to color options you can explore in Chapter 5.
- Rows 4 and 5: The final two rows of data (refer to Figure 8-20) show the same information you get in File Information mode, explained earlier in this chapter.

Figure 8-21: Here you can inspect major exposure settings along with the lens focal length.

Figure 8-22: This row contains additional exposure information.

Figure 8-23: Look at this row for details about color settings.
Viewing Your Photos on a Television
Your camera is equipped with a feature that allows you to play your pictures and movies on a television screen. In fact, you have three playback options:
- Regular (standard definition) video playback: Haven’t made the leap yet to HDTV? No worries: You can set the camera to send a regular standard-definition audio and video signal to the TV. The cable you need is even provided in the camera box. Look for the cable that has yellow, red, and white plugs at one end.
-
HDMI playback: If you have a high-definition television, you need to purchase an HDMI cable to connect the camera and television. You need a Type C mini-pin HD cable; prices start at about $20. Nikon doesn't make its own cable, so just look for a quality third-party version.
By default, the camera decides the proper HD video resolution to send to the TV after you connect the two devices. But you have the option of setting a specific resolution as well. To do so, select HDMI from the Setup menu, press OK, and select Output Resolution, as shown in Figure 8-24. Press the Multi Selector right or tap Output Resolution to access the available settings.
- For HDMI CEC TV sets: If your television is compatible with HDMI CEC, your D5500 enables you to use the buttons on the TV’s remote control to perform the functions of the OK button and Multi Selector during full-frame picture playback and slide shows. To make this feature work, you must enable it via the Setup menu. Again, start with the HDMI option, but this time, select Device Control and set the option to On.

Figure 8-24: Select options for HD playback here.
You need to make one final preflight check before connecting the camera and television: Verify the status of the Video Mode setting on the Setup menu. You have two options: NTSC and PAL. Select the video mode used by your part of the world. (In the United States, Canada, and Mexico, NTSC is the standard.)
After you select the necessary Setup menu options, grab your video cable, turn off the camera, and plug the cable into the camera. The connection port for a standard A/V cable is found under the door on the left side of the camera, as shown on the left in Figure 8-25. Look for the HDMI out port under the cover on the right side of the camera, shown on the right in the figure.

Figure 8-25: The video-out ports are under the little rubber doors on the sides of the camera.
The smaller plug on the A/V cable attaches to the camera. The yellow plug goes into your TV's video jack; the white one, to the left audio channel jack; and the red one, to the right audio channel jack. For HDMI playback, a single plug goes to the TV.
At this point, I need to point you to your TV manual to find out exactly which jacks to use to connect your camera. You also need to consult the manual to find out which channel to select for playback of signals from auxiliary input devices. Then just turn on your camera to send the signal to the TV set. If you don't have the latest and greatest HDMI CEC capability (or you lost your remote), control playback using the same techniques as you normally do to view pictures on your camera monitor. You can also run a slide show by following the steps outlined in Chapter 11.