
Chapter 1
First Steps, First Shots
IN THIS CHAPTER
![]() Preparing the camera for its first outing
Preparing the camera for its first outing
![]() Becoming acquainted with the touchscreen and other camera features
Becoming acquainted with the touchscreen and other camera features
![]() Viewing and adjusting camera settings
Viewing and adjusting camera settings
![]() Setting a few basic preferences
Setting a few basic preferences
![]() Taking a picture in Auto and Self-Portrait Shooting modes
Taking a picture in Auto and Self-Portrait Shooting modes
Shooting for the first time with a camera as sophisticated as the Nikon Z fc can produce a blend of excitement and anxiety. On one hand, you can't wait to start using your new equipment, but on the other, you're a little intimidated by all its dials, buttons, and menu options.
Fear not: This chapter provides information to help you become comfortable with your Z fc. The first section walks you through initial camera setup; following that, you can discover how to view and adjust picture settings and get my take on additional setup options. At the end of this chapter, I explain how to take pictures using the Auto and Self-Portrait Shooting modes, which offer point-and-shoot simplicity until you're ready for more advanced options.
Getting Started
As with any new camera, you need to take a few steps before you can shoot your first picture or video. First, juice up the camera battery using the supplied charger. You also need to check that the lens and memory card you plan to use are compatible with the camera. Here’s the score on those components:
- Lenses: The only lenses you can attach directly to the camera are Z-mount lenses. I show the camera in this book with the Nikkor DX 16–50mm Z-mount lens, which is available in a kit with the camera body. However, you may be able to use lenses that have a different mount, such as a Nikon F-mount, by purchasing the Nikon FTZ adapter. See the later section “Exploring a Few Lens Features” for more about the adapter and lenses in general.
SD (Secure Digital) memory card: You can see an SD card in Figure 1-1. This card comes in a variety of flavors, and the specs can be confusing, so if you need help choosing a card, see the sidebar “Memory cards: How big, how fast?” elsewhere in this chapter. For now, the only rule is that the maximum-capacity card you can use carries the label SDXC (Secure Digital eXtended Capacity).
 When handling an SD card, avoid touching the gold contacts on the back, labeled in Figure 1-1. Also make sure that the lock switch is in the unlocked position, as shown in the figure. When the card is locked, no pictures or other data can be added to it (or deleted from it).

FIGURE 1-1: Be sure that the card is unlocked, and avoid touching its gold contacts.
With those prelims out of the way, follow these initial setup steps:
- Turn the camera off.
- Install the battery and memory card into their shared compartment, shown in Figure 1-2.
Push in the battery until the yellow locking switch clicks into place. Orient the card so that the label faces in the direction shown in the figure and then press the bottom of the card down into the slot. Even though the camera is turned off, it lets you know when it recognizes the card, by briefly illuminating the card-access light, labeled in the figure.
 To remove the battery, lift the yellow switch to release its hold on the battery. To remove the card, press it down slightly and then let go; the card should pop partially out of the slot, enabling you to grab it.
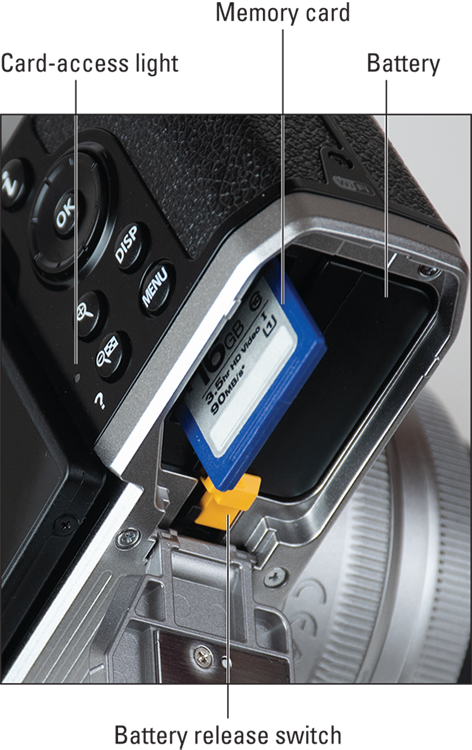
FIGURE 1-2: The battery and memory card go into the compartment on the bottom of the camera.
Attach a lens.
Remove the caps that cover the front of the camera and the back of the lens. Then locate the mounting index on the camera, labeled in Figure 1-3. (Unlike the mounting index on most Nikon cameras, this one is a black bar rather than a white dot.) Next, look for the mounting index on the lens. On most lenses, the mounting index is a white dot, as is the case with the lens shown in the figure, but it can vary, so consult the lens user guide. Align the lens mounting index with the camera’s mounting index and place the lens on the mount. Then rotate the lens toward the shutter-button side of the camera. You should feel a solid click as the lens locks into place.
To dismount a lens so that you can remove it, press the Lens-release button, labeled in Figure 1-3.
If you’re using the FTZ adapter to mount a lens, the process is similar, but read the adapter instruction manual for complete instructions on how to attach the adapter to the camera and mount a lens on the adapter.
Adjust the monitor position as desired.
When you first unbox the camera, the monitor is facing inward, protecting it from damage. Open the screen by placing your finger in the notch near the upper right corner of the monitor. Lift the monitor outward and away from the camera back. You can then rotate the screen so that it lies flat against the camera back, as shown on the left in Figure 1-4, or leave it hanging off the side of the camera, as shown on the right, rotating it to see the best view of your subject.
If you swing the monitor all the way out without rotating it, so that the the screen faces forward and peers at your subject from the same perspective as the lens, the camera enters Self-Portrait mode. Self-Portrait mode enables you to see yourself on the monitor while you shoot selfies, but it puts certain standard shooting options off limits. So avoid the forward-facing monitor position unless you want to use Self-Portrait mode. I explain Self-Portrait mode at the end of this chapter.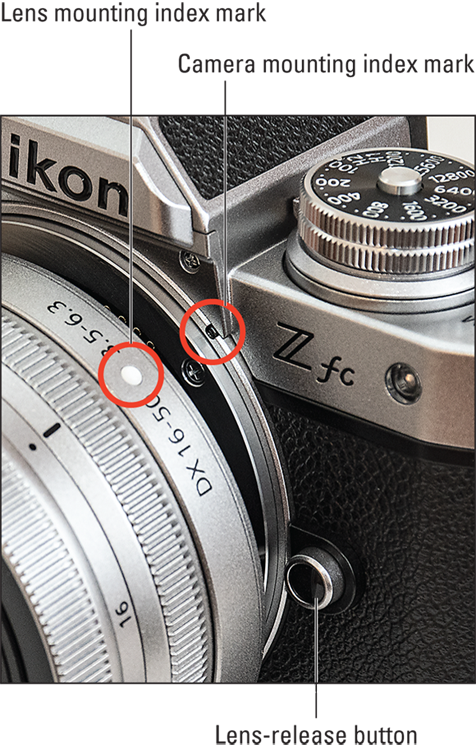
FIGURE 1-3: Position the lens so that its mounting index aligns with the one on the camera.
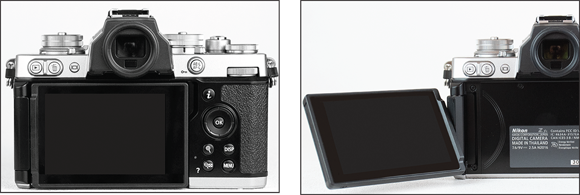
FIGURE 1-4: You can keep the monitor flat against the camera or rotate it to the side to allow for different viewing angles.
Turn on the camera and enter the language, time zone, and current date and time.
When you power up the camera for the first time, you can’t take any pictures until you select the language you want the camera to use for menus and other text in the displays. You also need to set the time zone as well as the current date and time. The easiest method is to use the touchscreen. To select an option, tap it on the monitor. When you finish adjusting the settings on a screen, tap OK to move to the next setup screen.
You also can use the Multi Selector, which is the four-way rocker switch that surrounds the OK button on the back of the camera. Press the edges of the Multi Selector up, down, right, or left to highlight an option; press OK to select the option. Press OK again after entering information.
If you’re using a retractable lens, extend the lens.
Some lenses, including the one featured in this book, are retractable — you can collapse them when you’re not shooting, saving space in your camera bag. Figure 1-5 shows you what I mean. On the 16–50mm kit lens, notice the black dot and black line on the lens; when the lens is fully retracted, the two are aligned, as shown on the left side of the figure.
If you turn on the camera when the lens is retracted, the camera asks you to extend the lens. To extend the 16–50mm kit lens, rotate the zoom barrel, labeled in the figure, toward the shutter button. To retract the lens again, rotate in the other direction until the dot and line are once again aligned. You need to apply a little pressure — just a little! — to extend the lens and to return it to the fully retracted position. (That resistance is a good thing because you can’t accidentally extend or retract the lens.)
 The black line on the lens is the focal length indicator. When you use a zoom lens (the 16–50mm kit lens is a zoom lens), the number that aligns with the indicator when the lens is extended represents the current lens focal length. In the figure, the focal length is 50mm, for example. If you’re unfamiliar with the term focal length, don’t worry about it. I cover that topic and other lens details later in this chapter, in the section “Exploring a Few Lens Features.”
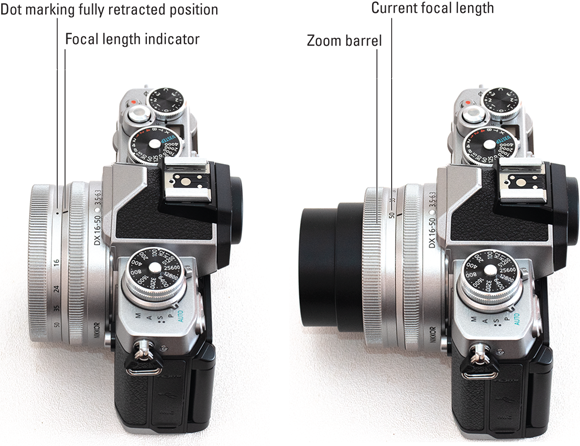
FIGURE 1-5: Here’s a look at the 16–50mm kit ens in its retracted position (left) and extended position (right).
Remove the lens cap.
Now the monitor displays a preview of what the lens is seeing, along with a bunch of data that you can ignore at the moment. If you look through the viewfinder, you see the same thing but with the data arranged a little differently than on the monitor.
 The eye sensor labeled in Figure 1-6 detects your eye when you look through the viewfinder. In response, the camera turns on the viewfinder display and turns off the monitor.
Don’t see anything in the displays? Assuming that you didn’t turn off the camera, it may be taking a nap to save battery power. To wake the camera, press the shutter button halfway and release it.
Adjust the viewfinder to your eyesight.
If you don't take this step, subjects that appear out of focus in the viewfinder might actually be in focus, and vice versa. If you wear glasses while shooting, adjust the viewfinder with your glasses on.To start, locate the diopter adjustment dial, labeled in Figure 1-6. Put your index finger on the dial, look through the viewfinder, and concentrate on the onscreen data. Then rotate the dial until the data appears sharpest. Ignore the live scene; it won’t get any more or less sharp, because you're not actually focusing the camera.
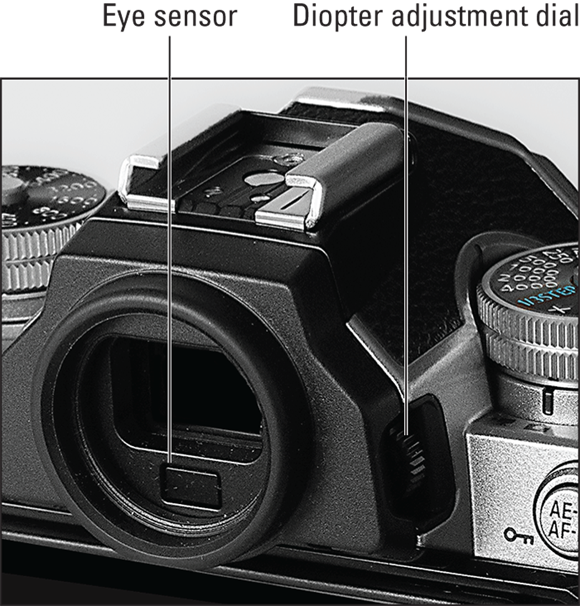
FIGURE 1-6: Rotate this dial to adjust the viewfinder to your eyesight.
That's all there is to it — the camera is now ready to go. If you’re itching to take a few test shots, flip to the end of this chapter for a primer in shooting in Auto mode and Self-Portrait mode, the simplest Shooting modes offered by the Z fc. Just promise to head back this way when you’re done, because the pages in between contain information that will help you better understand your camera’s basic operations.
Taking a Brief Camera Tour
The next several pages provide a basic “What’s this thing do?” overview of your camera’s external features.
In upcoming figures, some buttons bear multiple labels to indicate that they play different roles depending on what camera functions you’re using. For example, some buttons perform one job during shooting and another during picture playback. As Nikon does in the camera’s user manual, I refer to the button by the name that relates to the function I’m discussing. Don’t worry about memorizing the button names, though — when I give instructions in the book, the button appears in the margin or is labeled in a nearby figure.
Back-of-the-body controls
Starting in the upper left corner and working clockwise around the camera back, you find the following controls, shown in Figure 1-7:
 Playback button: Press to start reviewing your photos and videos; press again to return to shooting. Chapter 8 covers picture playback; for movie playback, see Chapter 7.
 Delete button: This button offers one way to erase files stored on the memory card. Chapter 9 has specifics.
 Monitor mode button: Pressing this button cycles through four Monitor mode settings, which determine when and whether the monitor and viewfinder displays are activated. Look for details on this fairly complex option later in this chapter, in the section “Choosing which displays are active.”
- Eye sensor: This window tells the camera when you’re looking through the viewfinder. At the default Monitor mode setting, the camera automatically turns off the monitor and fires up the viewfinder in response. When you take your eye away, the viewfinder goes dark and the monitor preview reappears. Note that the sensor can also be triggered when you move a finger or another object over it, so don’t panic if the monitor turns off and then on again briefly when your eye is nowhere near the viewfinder — you likely just covered the sensor for a second.
 AE-L/AF-L/Protect button: When shooting, holding down this button stops the camera from continually adjusting autoexposure and autofocus settings, locking in the current focus distance and exposure. Chapter 3 explains when this tactic comes in handy. During playback, pressing the button locks the file — thus the key symbol near the button — which protects the file from being accidentally deleted when you use the camera’s Delete tool. Formatting the memory card, a task you can perform via the Setup menu, does erase even protected files, however. See the later section “Reviewing a Few More Setup Options” for a better understanding of formatting. Chapter 9 has details about protecting and deleting files. You also have the option of using the button for a different playback function; Chapter 10 explains how to customize the button.
- Main command dial: You use this dial to perform a variety of functions, all spelled out as I give instructions throughout the book. For now, the thing to note is that there are two command dials. The Main command dial is on the back of the camera, positioned to make it easy to rotate with your thumb. The second dial, the Sub-command dial, is on the front of the camera; use your forefinger to rotate that dial. Adjusting some camera settings involves both dials (although you don’t have to rotate both at once, thankfully), so it’s important to know which is which. You can get a look at the Sub-command dial in the upcoming section “Front-of-the-camera features.”
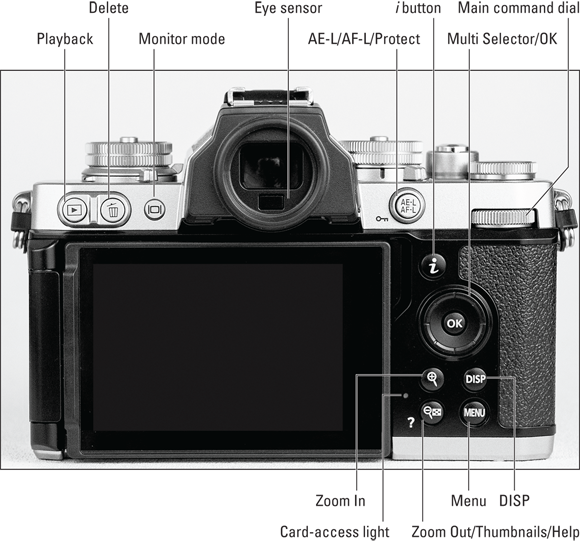
FIGURE 1-7: Familiarize yourself with these back-of-the-camera controls.
Multi Selector/OK button: This dual-natured control plays a role in many camera functions. You press the outer edges of the Multi Selector left, right, up, or down to navigate camera menus and access certain options. In this book, the instruction “Press the Multi Selector right” means to press the right edge of the Multi Selector. I use similar language when you need to press the left, top, or bottom edge.
At the center of the control is the OK button. When you’re choosing settings from menus, you press OK to finalize menu selections. During shooting, an OK symbol in the displays means that you can press OK to activate an autofocus feature called Subject-tracking AF, which I explain how to use in Chapter 4. During picture playback, the default function of the OK button is to magnify the image; see Chapter 10 if you want to use the button for a different playback purpose.
 i button: Pressing this button displays a special menu that gives you quick access to a handful of settings, as detailed in “Saving Time with the i Menu,” later in this chapter.
- Card-access light: When you insert a memory card, this light flashes briefly to indicate that the camera recognizes the card. After you take a picture or stop recording a video, the light appears until the camera finishes saving the file to the memory card. Don’t turn the camera before the light goes off; doing so can ruin the file.
 Zoom In: When you’re viewing photos, pressing the button magnifies the image and reduces the number of image thumbnails displayed at a time. Chapter 8 has details. During shooting, pressing the button magnifies the live preview so that you can take a close-up look at your subject. More details await in the later section “Magnifying the display.”
 Zoom Out/Thumbnails/Help button: During picture playback, pressing the button displays multiple image thumbnails on the screen or reduces the magnification of a photo, if it’s currently magnified. If you use the Zoom In button to magnify the display during shooting, press the Zoom Out button to reduce the magnification level.
The question mark near the button highlights a cool feature of many Nikon cameras: a built-in Help system. When you see a question mark on a camera screen, press the button to display information about the item that’s selected on the screen.
 DISP button: The abbreviation stands for display, which is fitting because pressing the button alters what data appears in the viewfinder and on the monitor. You can view all display options in the section “Customizing the shooting display,” later in this chapter.
 Menu button: Press this button to access camera menus. See “Navigating Menus,” later in this chapter, to find out how to use menus.
Topside controls
Figure 1-8 shows the top of the camera, which sports the following features:
- Speakers: When you play a video that contains an audio track, the sound comes wafting through these holes.
Shooting mode selector switch: Move the switch until the notch labeled “Selected Shooting mode” in Figure 1-8 aligns with your desired Shooting mode (Auto, P, S, A, or M). In the figure, Auto mode is selected. Your Shooting mode choice determines how much control you have over exposure and other camera features, including color and focusing options. See the end of this chapter for help with Auto mode; Chapter 2 explains more about all Shooting modes.
Some photographers substitute the term exposure mode for Shooting mode, which can lead novices to the mistaken idea that the setting only relates to picture or video brightness. Again, your choice also determines whether you can access many features totally unrelated to exposure. So in this book, I go with Shooting mode, as does the camera user manual.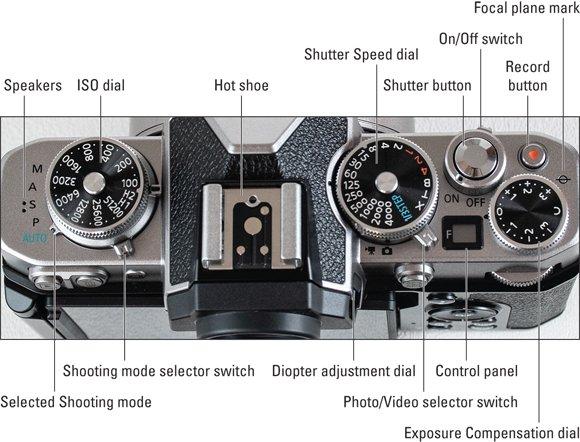
FIGURE 1-8: Controls on top of the camera put important shooting settings at your fingertips.
ISO dial: The ISO setting determines how sensitive the camera is to light, which in turn affects exposure. The black bar to the right of the dial points to the current ISO setting — 100, in the figure.
Before you can rotate the dial, you must press and hold the silver button in the center of the dial. After choosing the new setting, release the button to relock the dial. See Chapter 3 for complete coverage of ISO.- Hot shoe: A hot shoe is a connection for attaching an external flash head such as a Nikon Speedlight. See Chapter 3 for information about using flash with your Z fc. You can also attach certain other accessories, such as a wireless remote control or an external microphone.
- Shutter Speed dial: Another exposure setting detailed in Chapter 3, shutter speed determines the duration of the exposure. Like the ISO dial, the Shutter Speed dial sports a lock button. In this case, you don’t need to press the button to choose values ranging from the red 4 (4 seconds) to 4000 (1/4000 second). You only need to use the unlock button to access other settings (1/3 step, X, and so on). Chapter 3 provides a tutorial on using the dial and other ways to set the shutter speed.
- Photo/Video selector switch: Use this switch to tell the camera whether you want to shoot photos or videos. For photos, rotate the switch so that the black selector line is aligned with the still-camera symbol, as shown in Figure 1-8. For video, align the mark with the video-camera symbol.
- Control panel: This tiny display doesn’t really control anything; rather, it shows the current aperture setting, which is stated in terms of f-stops. Chapter 3 helps you understand this exposure setting. If no value appears, the camera is in power-saving mode, which shuts down this display and others. Press the shutter button halfway and release it, and the f-stop setting should appear. In some cases, the display shows data other than the f-stop, which I point out as necessary in later chapters.
- On/Off switch: Okay, I'm pretty sure you already figured out what this switch does. But you may be unaware that the camera has an automatic power-saving feature that puts the monitor and other battery-sucking parts to sleep if you don’t press any buttons for a certain period, fooling you into thinking that you turned off the camera. Wake the camera from its slumber by pressing the shutter button halfway and releasing it or by pressing any other button.
- Shutter button: When you press this button to take a picture, it’s critical to take a two-stage approach: Press and hold the button halfway down to initiate autofocusing. When focus is set, press the button the rest of the way to take the picture. If you’re using autoexposure, your half-press also launches that process, but at the camera’s default settings, exposure is adjusted up to the time you press the button all the way.
Exposure Compensation dial: Exposure Compensation is another exposure feature you can explore in Chapter 3. Spoiler alert: If you use any Shooting mode except M (manual exposure) and your picture comes out too dark, choosing a positive Exposure Compensation value should produce a brighter picture on your next shot. Choosing a negative value should produce a darker shot. I say should because in some situations, the feature can’t accomplish this exposure change.
The mark that indicates the current setting is the black mark to the left of the dial. In the figure, the selected value is 0, for no adjustment to exposure. This dial has no lock, so be careful not to inadvertently rotate the dial off your selected setting.
Record button: After moving the Photo/Video selector switch to the video position, press this button to start and stop recording.
When the switch is set to the photo position, you can press the button to hide data that appears in the displays. Press again to bring the data back. This feature assumes that you stick with the default photo-shooting role assigned to the button; Chapter 10 explains how you can change the button function from the default.- Diopter adjustment dial: Use this control to adjust the viewfinder focus to your eyesight as outlined at the start of this chapter.
- Focal plane mark: Should you need to know the exact distance between your subject and the camera, the focal plane indicator is the key. This mark indicates the plane at which light coming through the lens is focused onto the image sensor. Basing your measurement on this mark produces the most accurate camera-to-subject distance.
Front-of-the-camera features
Figure 1-9 provides a guide to the following features:
- Sub-command dial: This dial is the counterpart to the Main command dial on the back of the camera. As with the Main command dial, you rotate this one to select certain settings.
- Microphone: Almost hidden under the Nikon logo, two holes lead to the built-in microphone. Chapter 7 details microphone settings.
- AF-assist/Red-Eye Reduction/Self-timer lamp: In dim lighting, a beam of light shoots from this lamp to help the autofocus system find its target. When you use flash and set the Flash mode to Red-Eye Reduction, the lamp lights before the flash fires. The lamp also blinks to serve as a countdown timer when you set the Release mode to Self-Timer. Chapter 3 covers flash photography; Chapter 2 details Release modes.
- Function (Fn) button: By default, pressing the button during shooting gives you quick access to the White Balance setting, a color control you can read about in Chapter 5. You can change the action that the button performs; Chapter 10 shows you how.
- Lens-release button: Press this button to release the lens or FTZ lens adapter so that you can remove it from the camera.
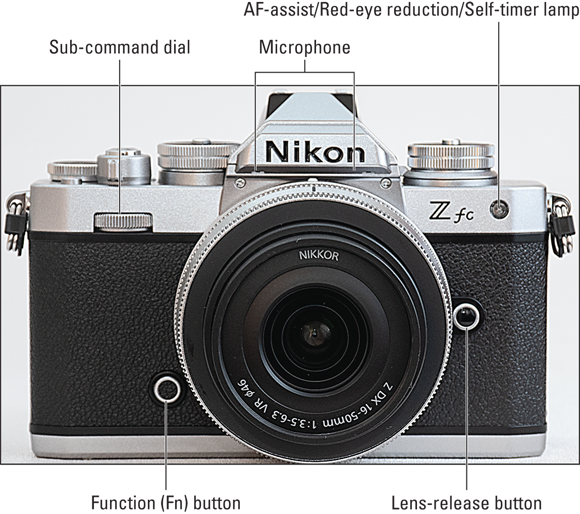
FIGURE 1-9: You can set the Function (Fn) button to perform various tasks.
Hidden connections
Lift the rubber cover up and away from the side of the camera to expose the following connection ports, labeled in Figure 1-10:
- HDMI connector: You can connect your camera to an HDTV so that you can view your photos and movies on the TV. You need to purchase a cable that has a regular HDMI plug at one end and a Type D HDMI plug at the other. The Type D plug goes into the camera. Chapter 10 has details on settings related to connecting via HDMI.
USB connector: You can connect your camera via a USB cable to your computer, to the optional AC-power adapter, and to certain portable power bricks. (Check the camera’s user manual for information on compatible power bricks).
Note these important details about the USB port:
- The camera’s USB port requires a cable that has a USB-C plug at one end. The type of plug you need at the other end depends on the USB port on the device you want to connect. Older devices usually have USB-A ports; newer devices typically offer USB-C.
- By default, the camera draws power from your computer when the two are connected. To put a stop to that, open the Setup menu and turn off USB Power Delivery. Just remember to turn the option back on if you want to later use the AC adapter or a power brick to charge the battery.
- When the battery is charging via the USB port, a light near the CHG (charge) label glows. The light turns off when the battery is fully charged. I labeled the light in Figure 1-10.
- Microphone jack: If you don’t want to use the camera’s built-in microphone, you can plug in an external wired mike here. The microphone must connect via a mini-pin plug (3.5mm diameter).
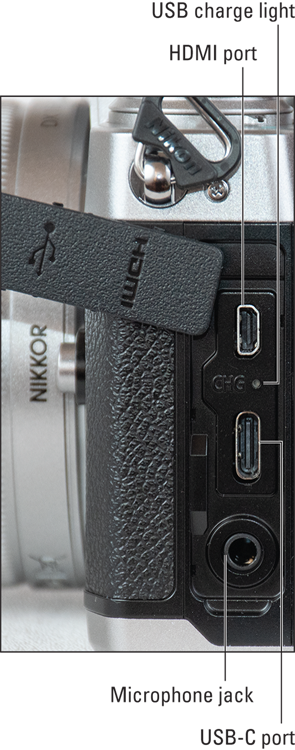
FIGURE 1-10: You can connect a variety of devices, including a microphone, to the camera.
Using the Touchscreen
If you've used a smartphone or tablet or another touchscreen device, working with the camera's touchscreen will feel familiar. Just as with those devices, you communicate with the camera by tapping the screen or by dragging one or two fingers across the screen. For example, you can tap a menu option to select it. And during picture playback, you can magnify a photo by placing your thumb and forefinger in the center of the screen and then dragging outward — a maneuver Nikon refers to as a stretch. Dragging inward from the edges of the screen — pinching — reduces the image magnification.
During shooting, you can tap the screen to set focus and take a picture. You also can tell the camera to set focus only or to disable both tap-to-focus and tap-to-shoot. For details on this feature, see the section “Using the Touch Shutter (or Not),” later in this chapter.
By default, the touchscreen is enabled. But if you often inadvertently tap the screen, resulting in an adjustment you didn’t intend, you can disable the touchscreen or use it just for playback. The following steps walk you through the process of adjusting this option and give you some practice in using the touchscreen:
- Press the Menu button to display the camera menus.
Sadly, no touchscreen control takes you to the menus.
Tap the Setup menu icon, labeled on the left in Figure 1-11.
The options on that menu appear to the right of the icons.
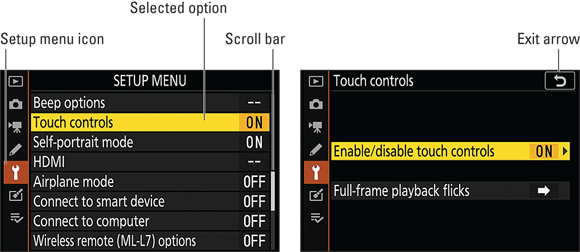
FIGURE 1-11: Enable or disable the touchscreen via this Setup menu option.
Drag your finger up or down the screen to scroll the menu to the page that contains the Touch Controls option.
The scroll bar, labeled in Figure 1-11, indicates how far you scrolled from the top or bottom of the menu.
- Tap Touch Controls to display the screen shown on the right in Figure 1-11.
Tap Enable/Disable Touch Controls to let the camera know when you want to be able to use the touchscreen.
You have three options: Playback Only enables the touchscreen for (surprise!) playback only. Disable turns off all touchscreen functions. The default setting, Enable, turns on all touchscreen functions. Tap your choice to return to the first Touch Controls screen. Or, to exit without making any changes, tap the exit arrow in the upper right corner of the screen, labeled on the right in Figure 1-11.
If you select Playback Only or Disable, you can’t use the touchscreen to switch back to Enable. You have to use the Multi Selector and OK button to change the menu setting, as outlined in the next section.On the screen shown on the right in Figure 1-11, tap Full-Frame Playback Flicks to set the playback frame-advance direction.
At the default setting, shown in the figure, a right-to-left flick scrolls from photo 1 to photo 2, and a flick in the other direction takes you back to picture 1. Choose left-to-right to reverse things. Again, tap your choice or tap the exit arrow to return to the main Touch Controls screen.
Tap the exit arrow on the Touch Controls screen to return to the Setup menu.
To exit menus and return to shooting, press the shutter button halfway and release it. You also can press the Menu button twice.
Navigating Menus
![]() If you followed the steps in the preceding section, you already had your first lesson in using menus. But there’s a bit more to know. First, a quick review: To display menus, press the Menu button. You see a screen similar to the ones shown on the left in Figures 1-11 and 1-12. The icons along the left side of the screen represent the menus; to the right of the icons are options associated with the selected menu. In Figure 1-11, the Setup menu is displayed. In Figure 1-12, the Custom Settings menu is selected. Table 1-1 offers a quick guide to the menu icons.
If you followed the steps in the preceding section, you already had your first lesson in using menus. But there’s a bit more to know. First, a quick review: To display menus, press the Menu button. You see a screen similar to the ones shown on the left in Figures 1-11 and 1-12. The icons along the left side of the screen represent the menus; to the right of the icons are options associated with the selected menu. In Figure 1-11, the Setup menu is displayed. In Figure 1-12, the Custom Settings menu is selected. Table 1-1 offers a quick guide to the menu icons.
Here's how to work your way through the menu maze:
- Select a different menu. Your fastest option is to tap the menu's icon. But you also can press the Multi Selector left to activate the icon strip, press up or down to select the icon that represents the menu you want to view, and then press right to access that menu’s options.
TABLE 1-1 Z fc Menus
Symbol
Open This Menu …
… to Access These Functions

Playback
Viewing, deleting, and protecting pictures

Photo Shooting
Basic photography settings

Video Recording
Options related to shooting videos

Custom Settings
Advanced photography, recording, and camera customization options

Setup
Additional basic camera operations

Retouch
Photo and video editing options


My Menu/Recent Settings
Your custom menu or a menu listing the 20 most recently used menu options
Select and adjust a menu option. Again, you can take advantage of the touchscreen or use the Multi Selector. The preceding section walks you through the touchscreen process. If using the Multi Selector, press up or down to scroll the menu until the option you want to change is highlighted. Press the OK button to display the available settings. Repeat the old up-and-down scroll routine until the choice you prefer is highlighted. Then press OK.
A right-pointing triangle next to a menu item means to tap the triangle or press the Multi Selector right to display a submenu.Menu items that are dimmed aren't available. For example, when you set the Shooting mode to Auto, you can’t access some advanced options.
Select items from the Custom Settings menu. Displaying this menu, represented by the Pencil icon, takes you to a screen that contains submenus that carry the labels a through g, as shown on the left in Figure 1-12. Each submenu holds clusters of options related to a specific aspect of camera operation. To reach those options, tap the submenu or highlight it with the Multi Selector and press OK. The right side of Figure 1-12 shows options included in the a submenu, for example.
In the Nikon manual, instructions reference Custom Settings menu items by a letter and number. For example, Custom Setting a1 refers to the first option on the a submenu. I try to be more specific, so I use the actual setting names.
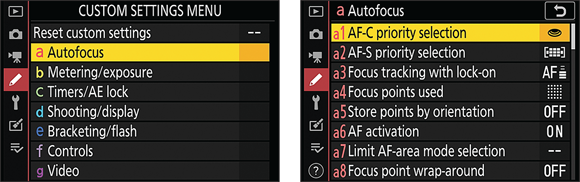
FIGURE 1-12: The Custom Settings menu contains seven submenus of advanced options.
After you jump to the first submenu, you can simply scroll up and down the list to view options from other submenus. You don't have to go back to the initial Custom Settings screen and select a submenu.Create a custom menu or view your 20 most recently adjusted menu items: The seventh menu is actually two menus that share an apartment: My Menu and Recent Settings, both shown in Figure 1-13. Each menu contains a Choose Tab option as the last item on the menu; select this option to shift between the two menus.
When My Menu is displayed, you can create a custom menu that contains your favorite options, saving you the trouble of jumping to different menus to access them. Chapter 10 details the steps. The Recent Settings menu lists the 20 menu items you ordered most recently. Again, the idea is to save you the time of wading through menus to find these options.
To remove an item from the Recent Settings menu, use the Multi Selector to highlight the item and then press the Delete button. Press Delete again to confirm your decision.
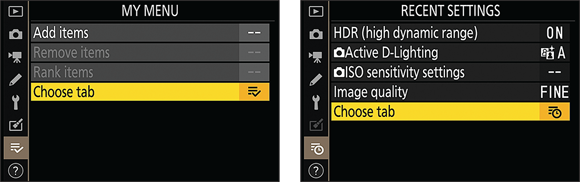
FIGURE 1-13: My Menu enables you to design a custom menu; Recent Settings offers quick access to the most recent menu options you selected.
Saving Time with the i Menu
![]() During shooting, you can gain quick access to certain settings by pressing the i button or tapping the i symbol on the monitor. The screen that appears, officially called the i menu, varies depending on whether you’re shooting photos or videos. The left side of Figure 1-14 shows the photo-shooting version. On your monitor, the menu is translucent so that your subject is still visible under it; in figures in this book, I gave i menu screens a black background to make it easier to see the symbols and numbers they display. If any options appear dimmed, the setting can’t be adjusted in the current Shooting mode or are incompatible with your lens.
During shooting, you can gain quick access to certain settings by pressing the i button or tapping the i symbol on the monitor. The screen that appears, officially called the i menu, varies depending on whether you’re shooting photos or videos. The left side of Figure 1-14 shows the photo-shooting version. On your monitor, the menu is translucent so that your subject is still visible under it; in figures in this book, I gave i menu screens a black background to make it easier to see the symbols and numbers they display. If any options appear dimmed, the setting can’t be adjusted in the current Shooting mode or are incompatible with your lens.
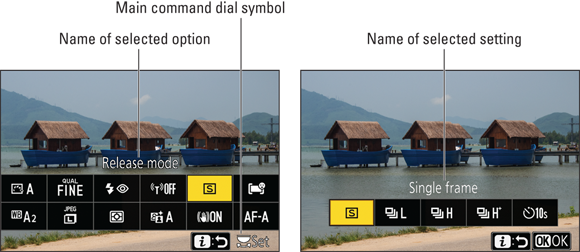
FIGURE 1-14: During photo shooting, press the i button to quickly access these settings.
Although the i menus make your life easier, I initially found the process of using them less than intuitive. Allow me to offer some insights that may spare you that confusion:
- A yellow highlight appears over the selected setting, whose name appears above the menu. On the left screen in Figure 1-14, the Release mode setting is active, for example. The S symbol in the menu itself indicates that the Single Frame option is selected for that setting. (Chapter 2 discusses Release mode options.)
- To display a second screen showing available options for a setting, tap the setting or use the Multi Selector to highlight it and then press the OK button. For example, if you tap the Release mode symbol in the i menu, the display shown on the right in Figure 1-14 appears. Tap or highlight the option you want to use and then tap OK or press the OK button to return to the i menu.
To display all available settings for the selected option on the same screen as the i menu, rotate the Main command dial. Now your screen may look something like the crowded mess you see in Figure 1-15. Here’s what’s happening: Rotating the Main command dial displays at least one strip of available settings for the selected menu option. That strip appears above the i menu. At the same time, the dial rotation selects the setting next to the previously selected one on the strip, depending on which direction you spin the dial. For example, I rotated the dial to the right, which changed the Release mode from S to L, which stands for Continuous Low. If the setting you select offers secondary options, they appear in a strip above the one initially displayed, as shown in the figure. The Continuous Low setting, for example, lets you choose how many frames per second you want to shoot: 2, 3, or 4. One of those options is highlighted — 4, in the figure — and that value appears on the main i menu. Rotate the Sub-command dial (the one on the front of the camera) to change this setting.
The camera offers onscreen symbols to remind you which dial to use to adjust which setting. For example, notice the symbol associated with the Main command dial, labeled in Figure 1-14, which indicates that you can rotate the dial to display and adjust the options for the highlighted setting above the i menu. The same symbol than appears on the initial settings strip, as shown in Figure 1-15, to remind you that you rotate the dial to choose from the available settings. When additional related options are available and the second strip appears, you see the dial that represents the Sub-command dial, as labeled in Figure 1-15. To hide the settings strips and return to the i menu, press the i button.- To exit the i menu, tap the i symbol at the bottom of the screen or press the i button again. You return to the live preview of your shot.
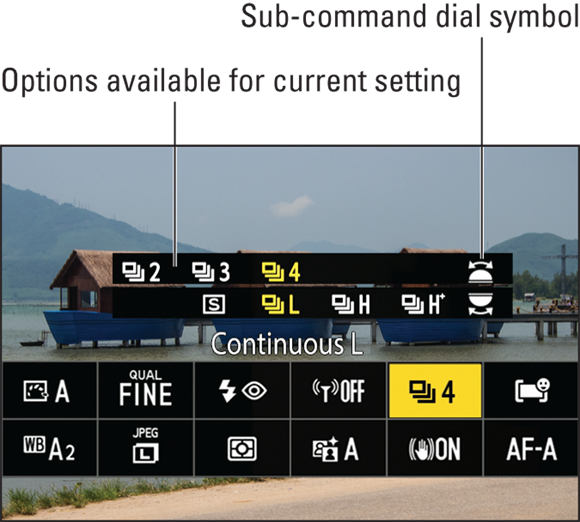
FIGURE 1-15: You can choose to view all available settings on the initial i menu screen, as shown here.
Here are two other bits of information about the i menu:
- When you’re viewing photos and videos, pressing the i button displays a menu offering playback features. The playback version of the i menu looks and works like a regular menu. Tap the item you want to select or use the Multi Selector to highlight it and press OK.
- You can customize the i menu to include different settings than are on the default menu. Chapter 10 shows you how. But I suggest that you leave the menu as is while you’re using this book. Otherwise, figures and instructions I present won’t match what’s on your i menu.
Looking at Display Options
Your camera can display live shooting previews, menus, and playback screens in the viewfinder and on the monitor. You can customize several aspects of the displays, as outlined in the next several sections.
Choosing which displays are active
![]() Notice the Monitor mode button just to the left of the viewfinder and labeled in Figure 1-16? Pressing the button changes the Monitor mode, which determines whether the monitor and viewfinder are enabled and the circumstances under which each display appears.
Notice the Monitor mode button just to the left of the viewfinder and labeled in Figure 1-16? Pressing the button changes the Monitor mode, which determines whether the monitor and viewfinder are enabled and the circumstances under which each display appears.
You can choose from four settings:
- Automatic Display Switch: This setting is the default. When you bring your eye to the viewfinder, the eye sensor labeled in the figure tells the camera to turn off the monitor and turn on the viewfinder. Take your eye away, and the opposite happens.
- Viewfinder Only: The monitor is disabled, and the live preview, menus, and other screens appear only in the viewfinder. Because the touchscreen is disabled along with the monitor, you must use the Multi Selector and OK button to choose menu options.
- Monitor Only: The opposite of Viewfinder Only, this setting disables the viewfinder; all screens appear on the monitor only. You can no longer use the viewfinder to compose your shots.
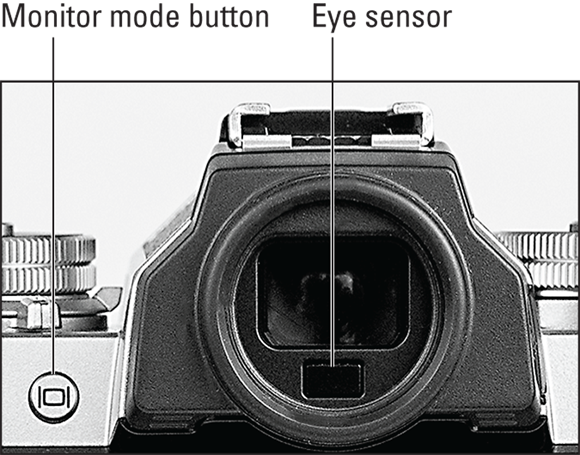
FIGURE 1-16: Press the Monitor mode button to cycle through four display on/off settings.
- Prioritize Viewfinder: When you’re shooting videos, everything works as it does when you use the Automatic Display Switch mode. But for photo shooting, the monitor is available only for displaying menus and for picture playback; you can only use the viewfinder to compose shots. The viewfinder display turns on when you put your eye to the eye sensor and turns off when you take your eye away. Nikon says that this mode is a nod to the way that digital SLR (dSLR) cameras worked before manufacturers figured out how to display live previews on the monitor. I personally don’t long for those olden days, but if you’re used to that camera behavior, you may like this setting.
The Monitor mode options aren’t complex, but they can become confusing when you change from one mode to the next. The camera displays a label telling you which mode is in force after you press the Monitor mode button, but you have to be looking at the right display to see it. During shooting, if you’re using the Automatic Display Switch setting and press the Monitor mode button, the monitor goes dark. The Viewfinder Only message appears in the viewfinder, but just for a few seconds. The same thing happens if you shift from Monitor Only to Prioritize Viewfinder. It’s pretty difficult to press the button with your eye to the viewfinder, so you’re likely to miss both alerts. Suffice it to say, if you have trouble figuring out which display is active after you press the Monitor mode button, I’ve had the same experience.
To cut down on the confusion, you may want to disable one or more of the four Monitor mode settings. (The camera forces you to keep at least one setting enabled.) I disable Monitor Only and Prioritize Viewfinder, keeping Automatic Display Switch and Viewfinder Only on. Pressing the Monitor mode button then toggles the camera between those two modes. I use Automatic Display Switch most of the time, but when I want to turn the monitor off to save battery power, I press the button to change to Viewfinder Only mode. I also switch to Viewfinder Only when a bright monitor might be distracting to others, such as when I’m shooting in a dark auditorium.
To cull the list of monitor modes, open the Setup menu and choose Limit Monitor Mode Selection, as shown on the left in Figure 1-17. You see the screen shown on the right. Next to each mode setting is a box that contains a check mark if the setting is enabled; by default, all four settings are enabled. To remove the check mark and disable a mode, highlight the mode and then tap Select or press the Multi Selector right. After making your selections, tap OK or press the OK button. If you later want to reenable a mode, navigate back to the menu option, highlight the mode, and use the same techniques to put a check mark in the box. Don’t forget to tap OK or press the OK button at the end of the process.
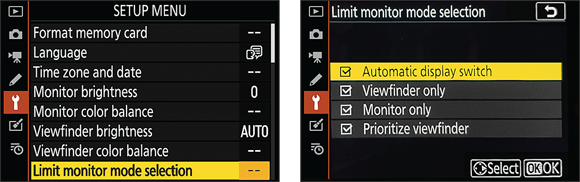
FIGURE 1-17: This Setup menu option determines how many settings are available when you press the Monitor mode button.
Decoding photo-shooting data
When the camera is set to shoot photos, the monitor displays data similar to what you see in Figure 1-18. The same data appears in the viewfinder, although it’s arranged a little differently.
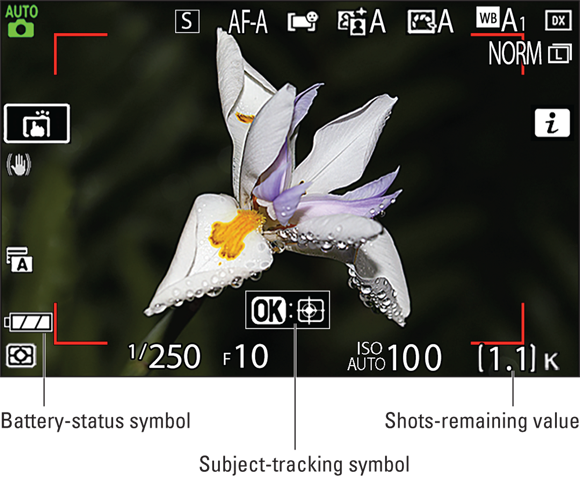
FIGURE 1-18: Keep an eye on the battery-status symbol and shots-remaining value as you shoot.
Most of the data relates to advanced settings that you can explore in later chapters, but I want to call attention to the following items labeled in the figure:
- Battery-status symbol: A full battery like the one shown in the figure shows that the battery is charged. When bars start disappearing from the symbol, it’s time to look for your battery charger.
Shots-remaining value: This number tells you how many pictures you can store in the space available on your memory card. If the number is greater than 1,000, the letter K appears, as shown in the figure, indicating that the value is shown in thousands. For example, 1.1K means the card can store 1,100 more pictures.
When you press the shutter button halfway, which initiates autofocusing and exposure metering, the shots-remaining value changes to indicate how many pictures can fit in the buffer, the onboard storage tank where the camera stores data until the entire file can be written to the memory card. The number is preceded by the letter r. For example, r26 in the shots-remaining display means that 26 photos can fit in the buffer. Normally, this value is important only when you’re shooting a continuous series of images in rapid succession. If the buffer value hits 0, you can’t shoot any more pictures until the camera finishes saving all the shots you just took. My guess is that you’ll rarely, if ever, exceed the buffer capacity; the main reason I even mention it is so that you know what’s going on when the buffer value replaces the shots-remaining value in the displays.- OK symbol: This symbol, labeled Subject-tracking symbol in the figure, is related to autofocusing. If you tap the symbol, the autofocus system begins tracking your subject as it moves through the frame, adjusting focus as necessary. This feature, Subject-tracking AF (autofocus), can be helpful or annoying, depending on your focusing goals. I explain the ins and outs of the option in Chapter 4; I call the symbol to your attention now because it’s all too easy to accidentally tap the symbol and initiate Subject-tracking autofocusing. The same thing happens if you press the OK button, by the way — an unwelcome surprise if you’re used to Nikon cameras that let you press the OK button to move the autofocus point to the center of the frame.
When you’re shooting video, some of the same symbols shown in Figure 1-18 appear, including the battery-status symbol and the OK symbol, but most are different. Rather than jump into video-specific data here, I cover it with other recording features in Chapter 7. The end of that chapter also details the data that appears when you play your videos. For help with picture playback data, which includes items like the photo’s filename and the settings used to take the picture, see Chapter 8.
Whether you’re shooting or reviewing photos and videos, keep an eye out for the warning symbols labeled in Figure 1-19. These appear only if there’s an issue you need to rectify. Here’s your decoder ring for these alerts:
- Heat warning: When you use certain features for an extended period, the camera can become overheated, especially in a warm environment. Because overheating can damage the camera, the displays are automatically disabled if the camera detects a critical heat level. When the heat gets to be too much, the camera displays a thermometer with a countdown timer showing how many seconds you have before the displays shut down. Turn off the camera for a few minutes, and you should be good to go again.
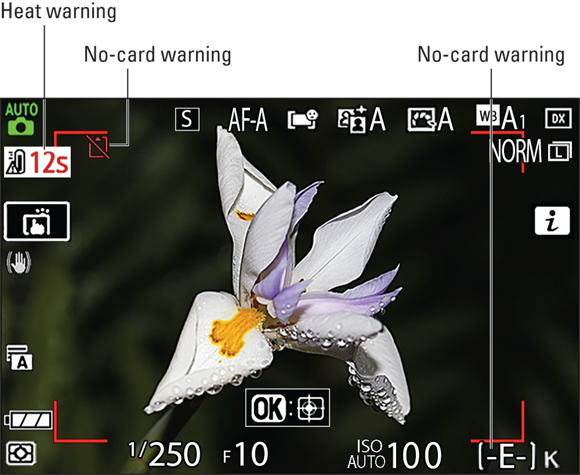
FIGURE 1-19: These symbols alert you to a problem with the camera or memory card.
- Memory-card warnings: Problems with the installed memory card are indicated differently depending on the situation. Here are a few possibilities:
- No memory card: If the shots-remaining value is replaced by the characters –E– and the red no-card warning appears, as shown in Figure 1-19, you neglected to put a memory card in the camera.
- Locked card: SD memory cards have a lock/unlock switch (refer to Figure 1-1). If the card is locked, no data can be stored on the card, and the camera displays a brief message asking you to unlock the card. Until you do, the word Card flashes in the display, and blinking dashes appear in the shots-remaining area.
- Full card: The word Full flashes in the display. Put in a new, empty card or delete files from the current one.
- Lens-connection warning: If the lens isn’t mounted properly on the camera, the characters F _ _ appear in the shots-remaining area. You also see two dashes blinking in the Control panel (the tiny window to the right of the Photo/Video switch on top of the camera).
- Camera malfunction warning: The letters Err (for error) flash to indicate a general malfunction. Try pressing the shutter button to see whether that action clears the problem. If you continue to see the error message, a visit to a local Nikon dealer or a call to the Nikon customer service line is your next step.
- Clock reset needed: A clock symbol means that the time-and-date information has been corrupted and needs to be reset. Enter the data using the Time Zone and Date option on the Setup menu.
Along with these alerts, the camera may display text messages telling you that it’s having other issues and suggesting how you can fix the problem. You can find a list of possible error messages and solutions in the electronic version of the camera manual, which you can download from the Nikon website.
Customizing the shooting display
You don’t need to stick with the default monitor and viewfinder display; you can use the following techniques to alter what you see:
- During shooting, press the DISP button to change the amount and type of picture-taking data that appears. Figure 1-20 shows the various monitor displays in the order they appear each time you press the DISP button. In the viewfinder, the same data appears, but with most of it appearing at the top and bottom of the display, as shown in Figure 1-21. Note that the Information display shown in Figure 1-20 is available only on the monitor and only during photo shooting. (All figures here show photo-related data; see Chapter 7 for help understanding video data.)
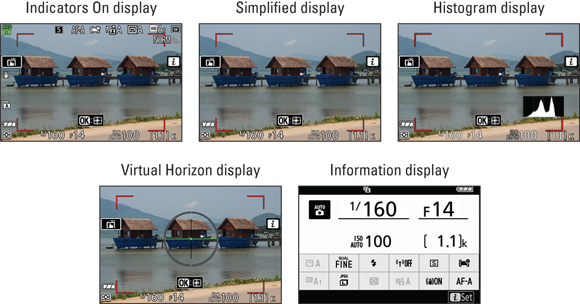
FIGURE 1-20: During photo shooting, press the DISP button to cycle through these monitor displays.
Some details to help you understand a few screens:
Histogram display: This mode displays a Brightness histogram, which is a chart that indicates the distribution of image brightness values from black to white. (I labeled the histogram in Figure 1-21.) The Brightness histogram offers a more reliable indicator of exposure than simply looking at the scene on the monitor, because the brightness of the image can be affected by the ambient light in which you view it. Chapter 3 explains how to read a Brightness histogram, but the short story is that lots of spikes at the far right end of the chart mean that the scene is likely overexposed (too bright), and a heavy concentration at the other end signals possible underexposure.
If the Brightness histogram doesn’t appear, open the Custom Settings menu, choose Shooting/Display, and check the status of the Apply Settings to Live View option. When this option is disabled, so is the Brightness histogram.
- Information display: This screen enables you to view picture-taking settings without the distraction of the live preview. You can modify this screen’s color scheme, switching from dark type on a light screen to white type on a dark screen. To do so, open the Setup menu and choose Information Display. Option B is the default; choose W for white type on a dark background.
- Virtual Horizon display: This feature is useful when you need to make sure that the camera is level to the horizon. If the two horizontal lines in the graphic are yellow, tilt the camera until they turn green, as in the figures, indicating a level position.
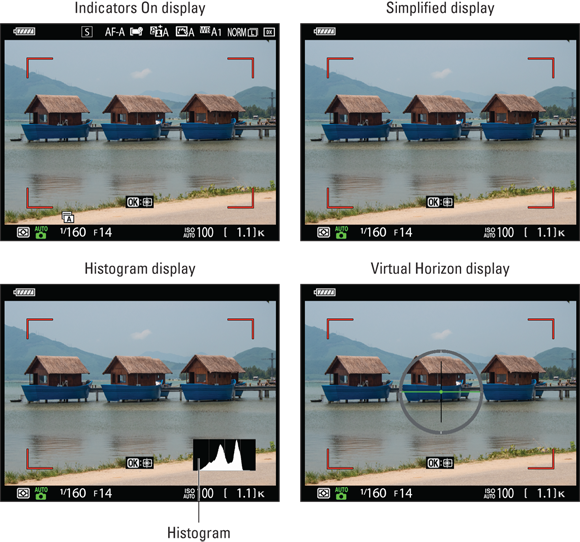
FIGURE 1-21: Data is arranged a little differently in the viewfinder, and the Information display is unavailable.
To quickly hide all data, press the red Record button on top of the camera. Press the button again to bring the data back into view. Of course, this trick only works when shooting photos; when you’re shooting videos, pressing the button starts and stops recording. Additionally, you can’t use the button to hide and display data if you use the customization options that I discuss in Chapter 10 to assign a different photo-shooting function to the button. - You can add gridlines to help align your shots, as shown in Figure 1-22. Open the Custom Settings menu, choose Shooting/Display, and select Framing Grid Display. You can choose a 3 x 3 or 4 x 4 grid design.
The camera enables you to adjust display brightness and color — but use caution. Normally, the live preview updates to reflect changes you make to color and exposure settings, which is obviously helpful when determining whether the new settings are on target. You can turn off these updates, but I can think of only one reason you may want to do so: When using the viewfinder, some people find that frequent display updates cause eyestrain.
Turn the feature on and off via the Apply Settings to Live View option, found in the Shooting/Display section of the Custom Settings menu. A reminder icon appears just above the Touch Shutter symbol on the monitor and in the upper left corner of the viewfinder. The symbol looks like a camera labeled with the word View! Turning off this setting also disables Histogram display mode. When you change the setting to On, the symbol disappears and Histogram display mode becomes available.You also can make wholesale baseline changes to display brightness and color via four options on the Setup menu: Monitor Brightness, Monitor Color Balance, Viewfinder Brightness, and Viewfinder Color Balance. But if you change any of these settings from their defaults, what you see in the displays may not provide an accurate reflection of the picture. For example, if you increase monitor brightness, an underexposed photo may look just fine in the displays.
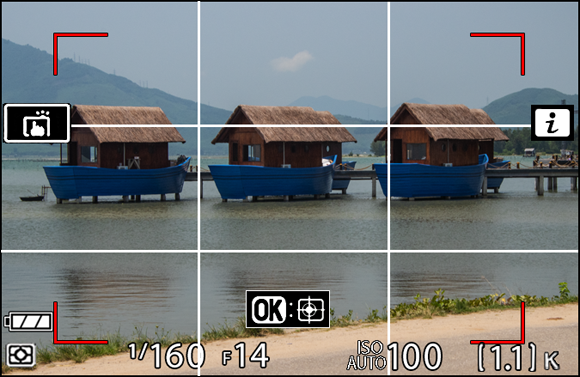
FIGURE 1-22: You can add gridlines to the displays as an additional framing alignment aid.
As you ponder these adjustments, keep in mind that what you see in the displays often doesn’t match what you see with your eyes exactly because the camera can’t capture all the variations in brightness and color that the human eye can discern. You may want to try using the Active D-Lighting and HDR features discussed in Chapter 3 to broaden the range of tones the camera can capture. If you determine that the camera displays are out of whack, I suggest taking the camera in for a service check, using the adjustment options as only a temporary solution.
You also can customize the displays you see when you’re reviewing photos and recording videos. Check out Chapter 8 for details on playback options; see Chapter 7 for video recording options.
Magnifying the display
![]() Whether you’re using the monitor or viewfinder to compose your shot, you can magnify the display by pressing the Zoom In button. You might want to zoom the display to double-check focus, for example.
Whether you’re using the monitor or viewfinder to compose your shot, you can magnify the display by pressing the Zoom In button. You might want to zoom the display to double-check focus, for example.
Figure 1-23 shows the monitor display at the normal magnification (left) and after one press of the Zoom In button. Each button press increases the magnification level. While the display is zoomed, a reference box appears briefly, as shown on the right in Figure 1-23. The yellow box indicates the area of the frame you’re inspecting. Press the edges of the Multi Selector to scroll the display to view hidden areas of the scene.

FIGURE 1-23: Press the Zoom In button to magnify the display; press Zoom Out to reduce the magnification.
![]() To reduce the magnification, press the Zoom Out button. Again, each press reduces the magnification level further.
To reduce the magnification, press the Zoom Out button. Again, each press reduces the magnification level further.
You also can magnify the displays during picture playback to inspect small details, such as whether someone’s eyes are closed in a portrait. (Blinkers, whaddya gonna do?) During playback, though, pressing the Zoom Out button also enables you to view thumbnails of multiple images on the screen and to switch to Calendar display view. Chapter 8 explains these playback zoom features and a few others that are unavailable during shooting.
One final note on zooming the shooting display: You can take a picture while the display is magnified, but the picture will contain the entire, unmagnified frame area. When the camera is set to record video, pressing the Record button restores the unmagnified view and, as with photo shooting, the entire frame is captured.
Using the Touch Shutter (or Not)
Another feature to get to know during your meet-and-greet with the camera is the Touch Shutter. The Touch Shutter enables you to focus and take a picture by simply tapping your subject once on the monitor. The focusing part of the feature assumes that the camera and lens are set to use autofocusing. (If you use the 16–50mm kit lens, that setting is the default.)
The Touch Shutter comes in handy on occasion — for example, when you’re using the Self-Portrait mode, outlined near the end of this chapter. But more often than not, I find myself mistakenly tapping the screen and taking a picture when I had no intention of doing so. Because the feature is enabled by default for photo shooting, my guess is that you’ve snapped a few errant pics as well. too. The good news is that you can disable the Touch Shutter or use it only for autofocusing, which is my choice. To cycle through the available settings, tap the Touch Shutter symbol on the monitor, labeled in Figure 1-24.
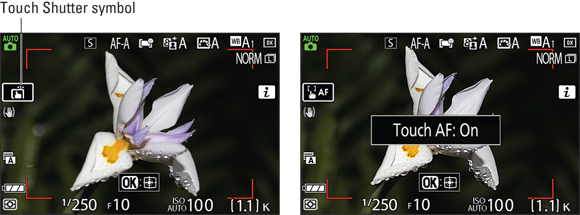
FIGURE 1-24: Tap the Touch Shutter symbol to cycle through the settings that determine what happens when you tap your subject on the monitor.
You can choose from four Touch Shutter settings, represented on the monitor by the symbols that appear in the margins here:
 Touch Shutter/Touch AF: The camera system sets focus on the spot you touch and then releases the shutter when you lift your finger off the monitor. Again, this setting is the default for photo shooting. It’s unavailable for video shooting.
 Touch AF: The camera sets focus on the object you tap but doesn’t release the shutter to take the picture. Instead, you use the shutter button to release the shutter.
 Off: Choose this option to disable both tap-to-focus and tap-to-shoot. By default, the camera then chooses the focus point for you; see Chapter 4 to find out how to take over that role.
 Position Focus Point: Tapping the screen selects a focus point but doesn’t initiate autofocusing. Press the shutter button halfway to start autofocusing.
When you use the default autofocus settings and the camera detects a moving subject, the camera begins tracking the movement as soon as you tap the touchscreen. As the subject moves, the camera adjusts the focusing distance or the focus-point position as necessary to keep your subject in its autofocus sights until the time you take the picture. You can get schooled on this feature and other focusing topics in Chapter 4.
Exploring a Few Lens Features
Aside from the basics of attaching a retractable Z-mount lens, which I provide at the start of this chapter, it’s difficult to provide specifics about using your lens, because I don’t know which make or model of lens you own. Features vary from lens to lens, so I urge you to read the lens instruction manual carefully for use and care information. I can offer the following general guidelines about how lenses work with the Z fc, though:
You can mount certain non-Z lenses on the camera by using the FTZ adapter. For example, Figure 1-25 shows a Nikon F-mount lens — specifically, the AF-S Nikkor 18–140mm lens — connected via the adapter. The adapter currently costs about $249. Check the adapter instruction manual to find out how to use it as a bridge between your lens and camera.
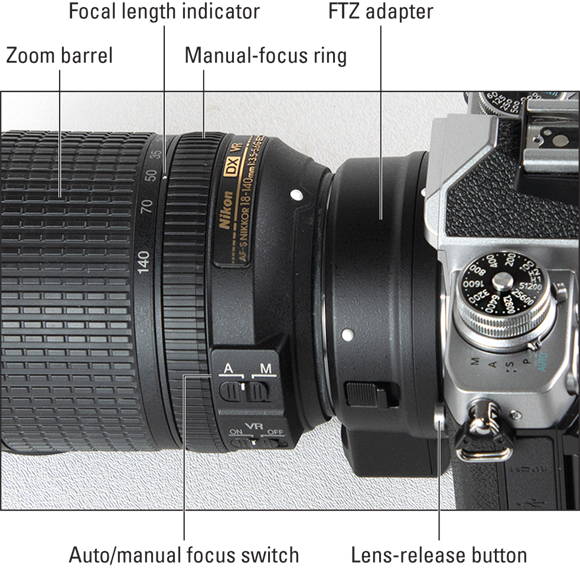
FIGURE 1-25: Using the FTZ adapter enables me to use one of my older Nikon lenses with the Z fc.
Not all lenses that fit the adapter can take advantage of all camera features. Some lenses aren’t compatible with the camera’s autofocusing system, for example, forcing you to rely on manual focusing. To get the scoop on how a lens will work with the camera, check the lens manufacturer’s website: Leading manufacturers provide information on Z-mount compatibility. In some cases, you may need to update the lens firmware (the software that operates the lens), which the manufacturer website should discuss as well.- With most zoom lenses, you zoom in and out by rotating the zoom barrel. The position of this lens component varies. Figure 1-25 shows you where to find it on the AF-S Nikkor 18–140mm lens; Figure 1-26, the Z-mount 16–50mm kit lens. Some zoom lenses have a push/pull arrangement instead, so again, consult the lens manual for specifics.
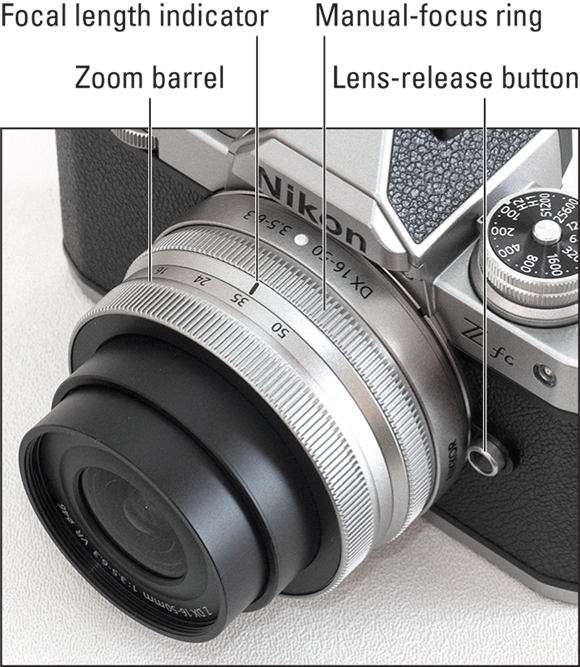
FIGURE 1-26: Here’s a look at the important components of the Z-mount 16–50mm lens.
The angle of view that a lens can capture is determined by its focal length. Focal length is measured in millimeters. The shorter the focal length, the wider the angle of view. As focal length increases, the angle of view narrows, and the subject occupies more of the frame.
Generally speaking, lenses with focal lengths shorter than 35mm are considered wide angle lenses, and lenses with focal lengths greater than 80mm are considered telephoto lenses. Anything in the middle is a “normal” lens, suitable for shooting scenes that require neither a wide nor narrow angle of view.
Focal length also affects depth of field, or the distance over which focus appears acceptably sharp. The shorter the focal length, the larger the depth of field. (Chapter 4 shows examples.)
- Zoom lenses, which offer a range of focal lengths, include a focal length indicator to tell you the current focal length. I labeled the indicator on the 16–50mm kit lens in Figure 1-26 (this is the same line that shows you where to align the lens to fully retract it). In the figure, the lens is set to the 35mm focal length. I also labeled the indicator for the lens shown in Figure 1-25; the focal length in that figure is 50mm.
You have to do some math to determine the actual focal length produced by a lens when it’s mounted on a Z fc. Argh! This issue breaks my longstanding rule that friends don’t let friends do math. Sadly, it’s critical to understanding your lens.
Here’s the deal: The angle of view produced by any focal length depends on the size of the camera’s image sensor, which is the component that replaces film in a digital camera. Because sensor sizes vary from camera to camera, the photo industry decided years ago to stick with the original focal-length standard, which was based on the size of a 35mm film negative. Digital cameras whose sensors are the same size as a 35mm negative are called full-frame cameras. With a full-frame camera, the focal length marked on the lens holds true.
Full-frame cameras are expensive though, which is why many cameras, including the Z fc, use smaller sensors. For reasons not worth exploring, the smaller sensor means that the lens doesn’t capture the same angle of view as it does on a full-frame camera. The frame area is reduced, as if you took a picture on a full-frame camera and then cropped the photo.
To figure out the actual focal length you’ll get from a lens on a non-full-frame camera, you have to know the camera’s focal length multiplier, sometimes known as its crop factor. You then multiply the focal length by that number to determine the resulting angle of view. With the Z fc, the multiplier is 1.5. So, for example, a 50mm lens produces the same angle of view as a 75mm lens mounted on a full-frame digital camera. Figure 1-27 offers an illustration to help you understand this concept.
To detach a lens (or the FTZ lens adapter), press the lens-release button, labeled in Figures 1-25 and 1-26. Then rotate the lens or adapter away from the shutter-button side of the camera and lift the lens off the mount.
Always switch lenses in a clean environment to reduce the risk of getting dust, dirt, and other contaminants inside the camera or lens. Changing lenses on a sandy beach, for example, isn't a good idea. For added safety, tilt the front of the camera body slightly down.How you set the lens to autofocusing or manual focusing depends on the lens. If your lens has a focus mode switch, set it to the method you want to use. The lens shown in Figure 1-25 has this switch, for example. On that lens, the autofocus position is labeled A; the manual focus position, M. Other lenses may use the labels AF and MF, and some may have a position marked AF/M. The latter indicates that you can set focus initially using autofocusing and then fine-tune focus manually, if needed.
The 16–50mm Z-mount lens featured in this book has no auto/manual focus switch. On this lens and others like it, you set the focus method on the camera via the Focus mode option. You can access this setting from the i menu, as shown in Figure 1-28, or from the Photo Shooting or Video Recording menu. For autofocusing, the default is AF-A, which is the most automatic of the settings. For manual focusing, choose MF.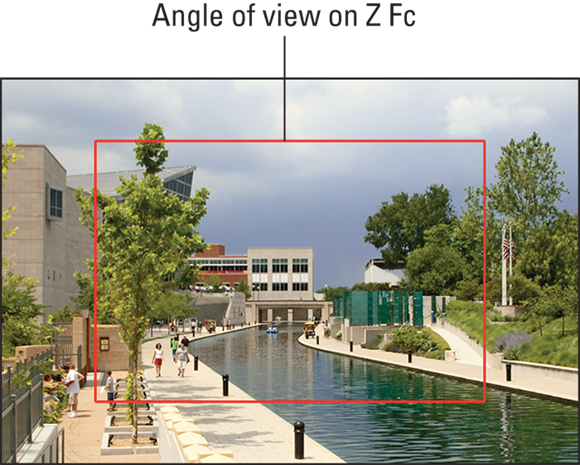
FIGURE 1-27: The red box shows the angle of view captured by a lens mounted on the Z fc as compared to the same lens mounted on a full-frame camera.
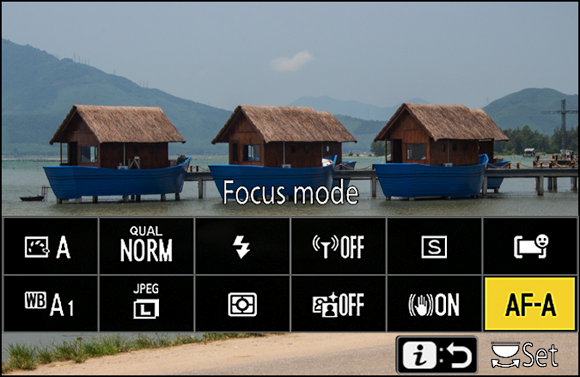
FIGURE 1-28: If the lens lacks an auto/manual focus switch, set the focus method through this i menu option.
If the Focus mode is dimmed, the setting is controlled by the lens switch. The setting shown on the menus reflects that lens-switch setting, and you may not have access to the same autofocus options as you do when using a Z-mount lens. Chapter 4 fully explains the Focus mode setting; for now, stick with the default, AF-A, as shown in Figure 1-28.
- You use different focusing techniques for autofocusing than for manual focusing. Chapter 4 provides all you need to know to take advantage of both options, but here’s a quick preview:
To autofocus, press and hold the shutter button halfway. One or more focus frames on the display turn green when focus is achieved. If you set the Touch Shutter to the Touch AF option, as outlined in the earlier section “Using the Touch Shutter (or Not), you can also tap your subject on the monitor to autofocus.
If the camera can’t focus, you may simply be too close to your subject; back away a little and try again. Also understand that autofocusing systems have trouble with subjects that lack distinct edges (border areas where strong color or brightness shifts occur).- To focus manually, rotate the focus ring on the lens. The placement of the manual-focus ring varies depending on the lens; I labeled the ones on the lenses shown in Figures 1-25 and 1-26, but check the lens instruction manual to locate the ring on your model. Don’t try to rotate the ring before setting the focus method to manual; doing so can damage the lens.
- If the lens offers anti-shake technology, enabling the feature can produce sharper handheld shots. The name varies depending on the manufacturer; Nikon calls it Vibration Reduction. But the goal is the same no matter the name: to compensate for small amounts of camera movement that might otherwise blur a photo when you don’t use a tripod. See the end of Chapter 2 for more about this helpful tool.
Reviewing a Few More Setup Options
Your camera offers scads of options for customizing its performance. I discuss many of them earlier in this chapter, and chapters in Part 2 explain settings related to actual picture and video shooting, such as those that control the camera’s autofocusing behavior. Chapters 10 and 12 talk about advanced customization options that are better left at their default settings until you're fully familiar with your camera. That leaves just a handful of options that I suggest you get to know at the start of your journey with the Z fc. The following list describes these options, all of which live on the Setup menu. Figure 1-29 shows the first page of the menu.
- Format Card: Formatting a memory card wipes it of all stored data and then sets it up according to specifications required by the camera. It’s a good idea to format a card the first time you use it in your Z fc. Just remember that formatting erases all existing files on the card, so, before formatting, copy to your computer or another storage device any files you want to keep.
- Non-CPU Lens Data: Modern lenses include a CPU, which is technology that transmits data about the lens to the camera so that lens and camera body work together as seamlessly as possible. If you mount a non-CPU lens on the Z fc, use this menu option to register the lens, which gives the camera a little bit of information about the lens. Assign the lens a number and then enter the maximum aperture and focal length of each lens. This data is then included in the hidden shooting information that’s recorded with each picture or movie file. (Chapter 8 explains how to view that data.) Don’t expect non-CPU lenses to be compatible with all Z fc functions even when registered, however. The rest of this book assumes that you’re working with a CPU lens.
Beep Options: By way of this setting, you can request that the camera emit a beep after certain operations, such as after it sets focus when you use some autofocus settings. When the touchscreen is enabled, you also can set the camera to beep every time you tap a screen item. Both sounds are disabled by default. After choosing Beep Options from the menu, change the Beep On/Off setting to On to enable all possible audible signals; choose Off (Touch Controls Only) to enable everything but touchscreen beeps. Use the Volume and Pitch options to modify the sounds you hear if beeps are enabled.
One option on the Photo Shooting menu, Silent Photography, disables beeps regardless of the Beep Options settings. Chapter 2 discusses the Silent Photography feature.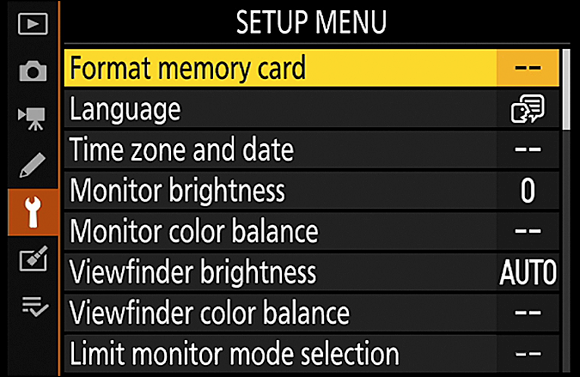
FIGURE 1-29: To scroll past the first page of the Setup menu, shown here, press the Multi Selector down or drag up on the touchscreen.
- Conformity Marking: I bring this one up just so that you know you can ignore it: When you select the option, you see logos indicating that the camera conforms with certain camera-industry standards. More symbols appear in the area behind the monitor; to see them, rotate the monitor out and to the side of the camera.
Energy Saving (Photo Mode): After a period of inactivity, the camera saves power by automatically turning off the displays as well as certain other functions that drain the battery. The auto-shutdown timing is based on the standby timer, which you can customize through the Power Off Delay option that I explain in Chapter 10. Energy Saving (Photo Mode) is a bonus power-saving option that affects just the displays and is in effect only when you’re shooting photos. When the option is on, as it is by default, the displays turn off about 15 seconds before the standby timer hits 0. Disable the feature, and the displays remain on until the standby timer reaches 0.
Even when set to On, this feature doesn’t engage when the camera is in Self-Portrait mode or when it’s connected to a computer or TV.
Slot Empty Release Lock: This option determines whether the shutter release is disabled when no memory card is in the camera. At the default setting, OK, you can take a temporary picture that you can view for a few seconds by pressing the Playback button. The playback display includes the word Demo. When playback ends, the photo disappears forever because the camera has nowhere to store the file. (The feature is provided mainly for use in camera stores, enabling salespeople to demonstrate the camera without having to keep a memory card installed.)
As outlined in the earlier section “Decoding photo-shooting data,” the camera displays various alerts when no memory card is in the camera. But I still suggest that you change the Slot Empty Release Lock setting to LOCK (Release Locked). It’s too easy to miss those warnings and the Demo message and think you’ve recorded a picture when you haven’t.Firmware Version: Select this option to view which version of the camera firmware, or internal software, your camera runs. You see the firmware items C and LF. At the time this book was written, C was version 1.20; LF was 1.01.
Keeping your camera firmware up to date is important, so visit the Nikon website (
www.nikon.com) regularly to find out whether your camera sports the latest version. You can find detailed instructions at the site on how to download and install any firmware updates.
Restoring Default Settings
To return your camera to its original, out-of-the-box state, the easiest method is to open the Setup menu and choose Reset All Settings, as shown in Figure 1-30. The only settings not affected are the camera language, time zone, date, and time. After you choose the menu option, the camera instructs you to turn off the camera and then turn it on again.
You also can restore defaults for certain menus only. At the top of the Photo Shooting, Video Recording, and Custom Settings menu, you find an option that resets that menu’s functions. Well, almost all functions: Resetting the Photo Shooting menu does not affect the Storage Folder option, which is a concern only if you create custom folders, as outlined in Chapter 10.
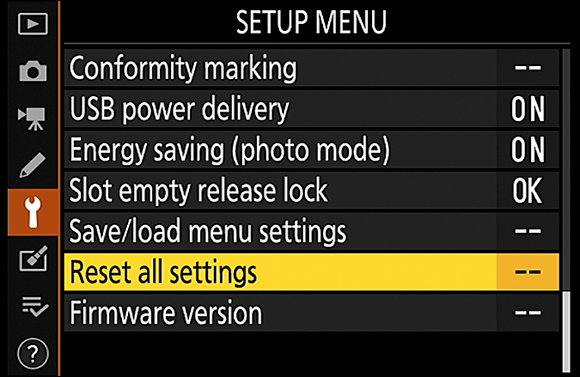
FIGURE 1-30: Choose this option to restore all default settings except the language, time zone, date, and time.
Shooting a Photo in Auto Mode
Ready to take your Z fc for a spin? The following steps walk you through the process of shooting a photo using the camera’s easiest Shooting mode, Auto. Don’t be alarmed by the length of the steps — some things just take a a lot of words to explain. My guess is that after you work through the steps once, you won’t need my help again.
The steps assume that you performed the initial camera setup procedure explained at the start of this chapter, and that you’re using the default settings that Nikon established before shipping your camera. If you changed any settings other than the language, time zone, date, and time, some aspects of taking a picture may not work as described here. Choose Reset All Settings from the Setup menu to return the camera to its original setup.
Additionally, the steps show you how to take a picture the old-fashioned way: using the shutter button to set focus and release the shutter. The other option, using the Touch Shutter, involves too many variables to get into here. (I introduce the Touch Shutter earlier in this chapter and discuss its autofocus features in Chapter 4, if you’re curious.)
With that preamble out of the way, here are the steps to follow:
- Turn on the camera.
- Rotate the Shooting mode selector switch to the Auto position, as shown in Figure 1-31.
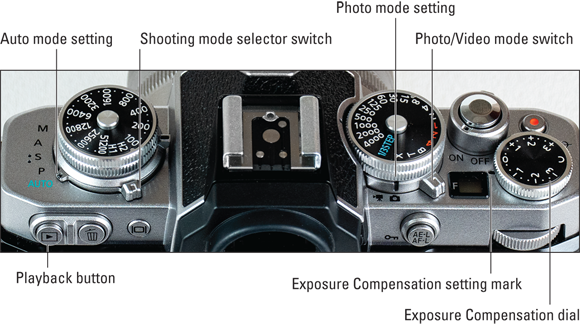
FIGURE 1-31: Set the shooting mode to Auto and the Photo/Video mode to photo.
- Set the Photo/Video mode switch to Photo mode, as shown in Figure 1-31.
Make sure that the Exposure Compensation setting is 0.
Exposure compensation enables you to adjust the brightness of the next photo you shoot. You use the Exposure Compensation dial, labeled in Figure 1-31, to set the adjustment amount. I detail this feature in Chapter 3; for now, just check that the 0 on the dial aligns with the Exposure Compensation mark, also labeled in the figure. If necessary, rotate the dial to set the amount to 0 (no adjustment).
If the lens has an auto/manual focus switch, set the switch to the autofocus position.
The switch should be labeled with an A or AF for autofocusing and M or MF for manual focusing. Not all lenses have such a switch; the 16–50mm kit lens featured in this book, for example, doesn’t offer an auto/manual switch. Instead, the focusing method is controlled by a camera setting, with autofocusing selected by default. If your lens doesn’t support autofocusing with the Z fc, the remaining steps for shooting are the same except that you have to focus manually. Check your lens user guide to find out how to do that.
Frame your subject so that it falls within the area indicated by the red focus frame marks, labeled in Figure 1-32.
At the camera’s default autofocusing settings, these marks indicate the area that the camera will consider when establishing focus. Focus is typically set on the object that’s closest to the lens or occupies the most space in the frame. The figure shows the marks as they appear on the monitor; they look the same in the viewfinder.
If you’re shooting a portrait, look for a yellow face-detection or eye-detection focus box, as shown in Figure 1-32.
The default settings also enable the Z fc’s human face- and eye-detection autofocusing feature. If the camera detects a face, it places a yellow focus frame over the face, as shown on the left in Figure 1-33. Then it goes a step farther, searching the area in the focus frame for an eye. If the camera detects an eye, the face-detection frame disappears and you see a smaller focus frame over the eye, as shown on the right in the figure. If more than one eye is detected, a yellow triangle appears on the side of the frame, as in the figure. To put the focus frame over another eye, press the Multi Selector in the direction you want the frame to move. Note that you can only move the box over an eye that the camera detects — if that eye is looking away from the lens, it probably won’t be available to use as a focus target.
In group portraits, multiple face-detection frames may appear. If so, the frame that has the yellow positioning triangle (or triangles, in some cases) represents the selected face. Again, you can use the Multi Selector to move the frame over the face you want to use as the focus target. After you move the frame over that face, the eye-detection frame may replace the face-detection frame.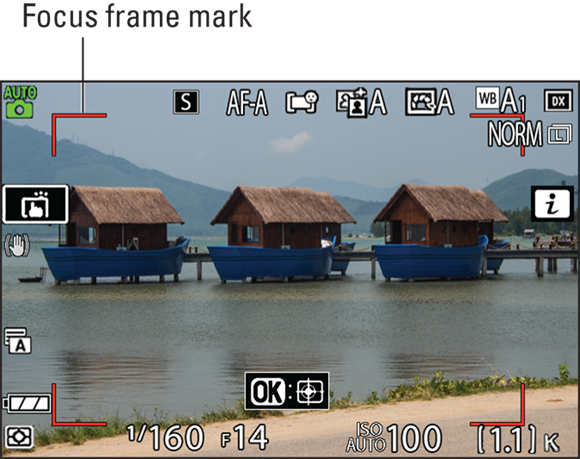
FIGURE 1-32: Compose the shot so that your subject is within the area bounded by the red framing marks.
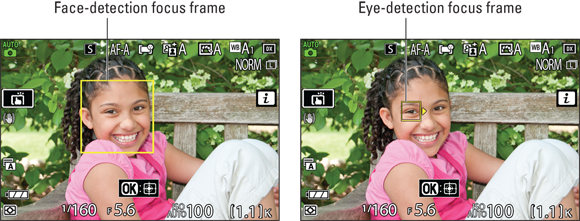
FIGURE 1-33: In portraits, a yellow box may appear over the subject’s eye; that eye will be used as the focus target.
Press and hold the shutter button halfway down.
The camera’s autoexposure and autofocusing systems kick into gear. In dim lighting, the AF-assist lamp on the front of the camera may shoot out a beam of light to help the camera find a focusing target.
Keep holding the shutter button halfway until one or more green boxes appear on the screen, as shown in Figure 1-34.
The green boxes indicate that focus was achieved; their location tells you the area the camera used to set the focusing distance. When no eyes are detected, you may see multiple boxes, as on the left side of the figure. The right side of the figure shows the focus-achieved box for eye-detection autofocus.
At the default settings, you can’t take the picture until focus is set. If the boxes don’t turn green, try moving a little farther from your subject. Every lens has a close-focusing limit, and you may have exceeded that distance. Chapter 4 helps you solve other focus problems.
- Press the shutter button the rest of the way down to take the picture.
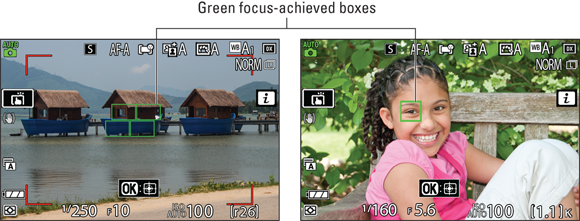
FIGURE 1-34: Wait for the green focus box(es) to appear before pressing the shutter button all the way.
- To view the photo, press the Playback button.
Chapter 8 details playback functions.
To exit Playback mode and return to shooting, press the Playback button again.
You also can just press the shutter button halfway and release it.
When you shoot moving subjects, you may get better focus results if you activate Subject-tracking autofocus. The camera then follows your subject as it moves through the frame, adjusting focus as necessary until you take the picture. I explain how to use Subject-tracking autofocus in Chapter 4; look in the section related to using Auto-area AF (autofocus) modes.
Trying Self-Portrait Mode
On most digital cameras — smartphone and tablet cameras excepted — taking a selfie involves a lot of trial-and-error because you can’t preview the shot on the camera monitor. You have to hold the camera at arm’s length, aim the lens at your face, and hope for the best. The Z fc’s Self-Portrait mode solves this problem, allowing you to see yourself in the monitor before you press the shutter button. Here's what you need to know to use this feature:
- Open the Setup menu and make sure that Self-Portrait mode is set to Enable. This setting is the default, but it doesn’t hurt to check.
To activate Self-Portrait mode, rotate the monitor to the front-facing position shown in Figure 1-35. You know Self-Portrait mode is engaged when the data on the monitor looks something like what you see in the figure, as opposed to the displays shown in Figure 1-34.
After moving the monitor to Self-Portrait position, don’t tilt it up or down. If you do, the camera returns to normal shooting, and the live preview displays the scene upside down. Also note that the Self-Portrait preview shows a reverse image of what the lens will record. Take that fact into account if it’s important for something in the shot to appear on a certain side of the frame in the photo.- The camera uses the default autofocusing setup explained in the preceding section. Again, start by positioning yourself within the red autofocus frame marks. Assuming that you’re facing forward and have your eyes open, the camera’s eye-detection feature should find your eye and place a yellow focus box over it, as shown in Figure 1-35. To select a different eye, press the Multi Selector in the direction you want to move the box.
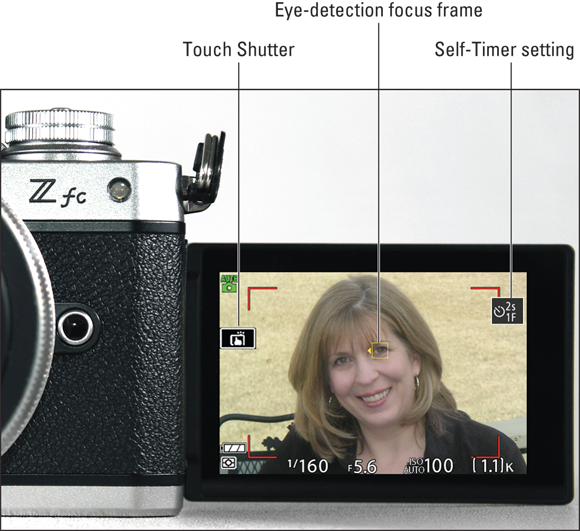
FIGURE 1-35: In Self-Portrait mode, you see this simplified display.
- Press the shutter button halfway to focus; press all the way to take the photo. You also have the option of using the Touch Shutter, labeled in Figure 1-35. At the default camera settings, tapping the Touch Shutter icon sets focus and then snaps the picture. See “Using the Touch Shutter (or Not),” earlier in this chapter, for help with this feature.
The Self-Timer option is your friend. This setting delays the photo capture for a few seconds after you press the shutter button or tap the Touch Shutter, giving you time to check your selfie head tilt in the monitor before the picture is taken. You also can tell the camera to take multiple shots at a time. To see the current setup, check the icon labeled Self-Timer setting in Figure 1-35. In the figure, the icon shows that the camera will use a 2-second delay and capture a single photo — these are the default settings. To change either setting, tap the icon. You can extend the delay time to 10 seconds and set the number of shots as high as 9.
When the Self-Timer is enabled, a countdown timer appears after you trigger the shutter release to let you know how many seconds remain until the picture is captured.
Here are a few other tips for using Self-Portrait mode:
- For more flexibility in your position with respect to the camera, consider using a remote control to trigger the shutter. You then don’t have to be close enough to reach the Touch Shutter or the shutter button. If you have a smartphone or tablet, you can use it as a remote control; see the appendix for details on how to make it so.
- When the Self-Portrait mode is active, you can’t display menus or switch to the Playback mode. However, a workaround enables you to view your picture on the monitor for a few seconds without shifting to Playback mode. To turn on this feature, rotate the monitor back to its normal, backward-facing position to exit Self-Portrait mode. Then open the Playback menu and set the Picture Review setting to either On or On (Monitor Only). Either setting results in your selfie appearing briefly on the monitor after you take the shot.
You can record movies in Self-Portrait mode, too. This option is useful if you’re into vlogging (video blogging, for the uninitiated) or you have another reason to record yourself on video. However, you can’t use the Touch Shutter or the Self-Timer option for recording video. Instead, press the red Record button to start recording and press it again to stop. The automatic eye-detection autofocus is set by default to focus on your eye and then track movement of your face, adjusting focus on your eye as needed throughout the recording.
After checking your position in the frame on the monitor, resist the temptation to keep looking at the screen as you record yourself. If you do, you’ll appear as if you’re looking at something off camera in the photo or video. Instead, look directly into the lens to make eye contact with the viewer.