
Publish/subscribe (often abbreviated to pub/sub) is probably the best-known one-way messaging pattern. We should already be familiar with it, as it's nothing more than a distributed observer pattern. As in the case of observer, we have a set of subscribers registering their interest in receiving a specific category of messages. On the other side, the publisher produces messages that are distributed across all the relevant subscribers. The following figure shows the two main variations of the pub/sub pattern, the first peer-to-peer, the second using a broker to mediate the communication:

What makes pub/sub so special is the fact that the publisher doesn't know who the recipients of the messages are in advance. As we said, it's the subscriber which has to register its interest to receive a particular message, allowing the publisher to work with an unknown number of receivers. In other words, the two sides of the pub/sub pattern are loosely coupled, which makes this an ideal pattern to integrate the nodes of an evolving distributed system.
The presence of a broker further improves the decoupling between the nodes of the system because the subscribers interact only with the broker, not knowing which node is the publisher of a message. As we will see later, a broker can also provide a message queuing system, allowing reliable delivery even in the presence of connectivity problems between the nodes.
Now, let's work on an example to demonstrate this pattern.
To show a real example of how the pub/sub pattern can help us integrate a distributed architecture, we are now going to build a very basic real-time chat application using pure WebSockets. Then, we will try to scale it by running multiple instances and using a messaging system to put them in communication.
Now, let's take one step at a time. Let's first build our chat application; to do this, we will rely on the ws package (https://npmjs.org/package/ws), which is a pure WebSocket implementation for Node.js. As we know, implementing real-time applications in Node.js is pretty simple, and our code will confirm this assumption. Let's then create the server side of our chat; its content is as follows (in the app.js file):
const WebSocketServer = require('ws').Server;

//static file server
const server = require('http').createServer(        //[1]
  require('ecstatic')({root: `${__dirname}/www`})
);

const wss = new WebSocketServer({server: server});  //[2]
wss.on('connection', ws => {
  console.log('Client connected');
  ws.on('message', msg => {                         //[3]
    console.log(`Message: ${msg}`);
    broadcast(msg);
  });
});

function broadcast(msg) {                           //[4]
  wss.clients.forEach(client => {
    client.send(msg);
  });
}

server.listen(process.argv[2] || 8080);
That's it! That's all we need to implement our chat application on the server. This is the way it works:
- We first create an HTTP server and attach middleware called
ecstatic(https://npmjs.org/package/ecstatic) to serve static files. This is needed to serve the client-side resources of our application (JavaScript and CSS). - We create a new instance of the WebSocket server and we attach it to our existing HTTP server. We then start listening for incoming WebSocket connections, by attaching an event listener for the
connectionevent. - Each time a new client connects to our server, we start listening for incoming messages. When a new message arrives, we broadcast it to all the connected clients.
- The
broadcast()function is a simple iteration over all the connected clients, where thesend()function is invoked on each one of them.
This is the magic of Node.js! Of course, the server that we implemented is very minimal and basic, but as we will see, it does its job.
Next, it's time to implement the client side of our chat; this is also a very small and simple fragment of code, essentially a minimal HTML page with some basic JavaScript code. Let's create this page in a file named www/index.html as follows:
<html>
  <head>
    <script>
      var ws = new WebSocket('ws://' + window.document. location.host);
      ws.onmessage = function(message) {
        var msgDiv = document.createElement('div');
        msgDiv.innerHTML = message.data;
        document.getElementById('messages').appendChild(msgDiv);
      };

      function sendMessage() {
        var message = document.getElementById('msgBox').value;
        ws.send(message);
      }
     </script>
  </head>
  <body>
    Messages:
    <div id='messages'></div>
    <input type='text' placeholder='Send a message' id='msgBox'>
    <input type='button' onclick='sendMessage()' value='Send'>
  </body>
</html>
The HTML page we created doesn't really need many comments; it is just a piece of straightforward web development. We use the native WebSocket object to initialize a connection to our Node.js server, and then start listening for messages from the server, displaying them in new div elements as they arrive. For sending messages, instead, we use a simple textbox and a button.
Note
When stopping or restarting the chat server, the WebSocket connection is closed and it will not reconnect automatically (as it would be using high-level libraries such as Socket.io). This means that it is necessary to refresh the browser after a server restart, to re-establish the connection (or implement a reconnection mechanism, which we will not cover here).
We can try running our application immediately; just launch the server with a command such as the following:
node app 8080
Note
To run this demo, you will need a recent browser which supports native WebSockets. There is a list of compatible browsers here: http://caniuse.com/#feat=websockets.
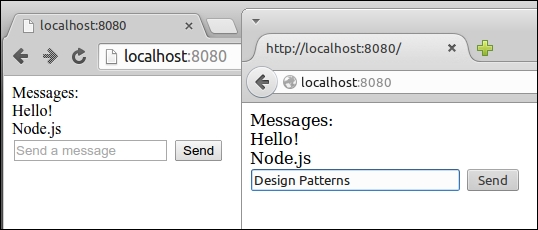
Pointing a browser to http://localhost:8080 should present an interface similar to the following:
What we want to show now is what happens when we try to scale our application by launching multiple instances. Let's try to do this, let's start another server on another port:
node app 8081
The desired outcome of scaling our chat application should be that the two clients connecting to the two different servers should be able to exchange chat messages. Unfortunately, this is not what happens with our current implementation; we can try that by opening another browser tab to http://localhost:8081.
When sending a chat message on one instance, we broadcast a message locally, distributing it to only the clients connected to that particular server. In practice, the two servers don't talk to each other. We need to integrate them.
We start our analysis of the most important pub/sub implementations by introducing Redis (http://redis.io), which is a very fast and flexible key/value store, also defined by many as a data structure server. Redis is more a database than a message broker; however, among its many features there is a pair of commands specifically designed to implement a centralized pub/sub pattern.
Of course, this implementation is very simple and basic, compared to more advanced message-oriented middleware, but this is one of the main reasons for its popularity. Often, in fact, Redis is already available in an existing infrastructure, for example, as a caching server or session store; its speed and flexibility make it a very popular choice for sharing data in a distributed system. So, as soon as the need for a publish/subscribe broker arises in a project, the most simple and immediate choice is to reuse Redis itself, avoiding the need to install and maintain a dedicated message broker. Let's work on an example to demonstrate its simplicity and power.
Note
This example requires a working installation of Redis, listening on its default port. You can find more details at http://redis.io/topics/quickstart.
Our plan of action is to integrate our chat servers using Redis as a message broker. Each instance publishes any message received from its clients to the broker, and at the same time it subscribes for any message coming from other server instances. As we can see, each server in our architecture is both a subscriber and a publisher. The following figure shows a representation of the architecture that we want to obtain:

By looking at the preceding figure, we can sum up the journey of a message as follows:
- The message is typed into the textbox of the web page and sent to the connected instance of our chat server.
- The message is then published to the broker.
- The broker dispatches the message to all the subscribers, which in our architecture are all the instances of the chat server.
- In each instance, the message is distributed to all the connected clients.
Let's see in practice how this works. Let's modify the server code by adding the publish/subscribe logic:
const WebSocketServer = require('ws').Server;
const redis = require("redis");                // [1]
const redisSub = redis.createClient();
const redisPub = redis.createClient();

//static file server
const server = require('http').createServer(
  require('ecstatic')({root: `${__dirname}/www`})
);

const wss = new WebSocketServer({server: server});
wss.on('connection', ws => {
  console.log('Client connected');
  ws.on('message', msg => {
    console.log(`Message: ${msg}`);
    redisPub.publish('chat_messages', msg);    // [2]
  });
});

redisSub.subscribe('chat_messages');           // [3]
redisSub.on('message', (channel, msg) => {
  wss.clients.forEach((client) => {
    client.send(msg);
  });
});

server.listen(process.argv[2] || 8080);
The changes that we made to our original chat server are highlighted in the preceding code; this is how it works:
- To connect our Node.js application to the Redis server, we use the
redispackage (https://npmjs.org/package/redis), which is a complete client that supports all the available Redis commands. Next, we instantiate two different connections, one used to subscribe to a channel, the other to publish messages. This is necessary in Redis, because once a connection is put in subscriber mode, only commands related to the subscription can be used. This means that we need a second connection for publishing messages. - When a new message is received from a connected client, we publish a message in the
chat_messageschannel. We don't directly broadcast the message to our clients because our server is subscribed to the same channel (as we will see in a moment), so it will come back to us through Redis. For the scope of this example, this is a simple and effective mechanism. - As we said, our server also has to subscribe to the
chat_messageschannel, so we register a listener to receive all the messages published into that channel (either by the current server or any other chat server). When a message is received, we simply broadcast it to all the clients connected to the current WebSocket server.
These few changes are enough to integrate all the chat servers that we might decide to start. To prove this, we can try starting multiple instances of our application:
node app 8080
node app 8081
node app 8082
We can then connect multiple browsers' tabs to each instance and verify that the messages we send to one server are successfully received by all the other clients connected to different servers. Congratulations! We just integrated a distributed real-time application using the publish/subscribe pattern.
The presence of a broker can considerably simplify the architecture of a messaging system; however, there are circumstances where it is not an optimal solution, such as, for example, when latency is critical, when scaling complex distributed systems, or when the presence of a single point of failure is not an option.
If our project falls in the category of possible candidates for a peer-to-peer message exchange, the best solution to evaluate is certainly ØMQ (http://zeromq.org, also known as zmq, ZeroMQ, or 0MQ); we already mentioned this library earlier in the book. ØMQ is a networking library that provides the basic tools to build a large variety of messaging patterns. It is low-level, extremely fast, and has a minimalistic API but it offers all the basic building blocks of a messaging system, such as atomic messages, load balancing, queues, and many more. It supports many types of transport, such as in-process channels (inproc://), inter-process communication (ipc://), multicast using the PGM protocol (pgm:// or epgm://), and, of course, the classic TCP (tcp://).
Among the features of ØMQ, we can also find tools to implement a publish/subscribe pattern, exactly what we need for our example. So, what we are going to do now is remove the broker (Redis) from the architecture of our chat application and let the various nodes communicate in a peer-to-peer fashion, leveraging the publish/subscribe sockets of ØMQ.
When we remove the broker from our architecture, each instance of the chat application has to directly connect to the other available instances in order to receive the messages they publish. In ØMQ, we have two types of sockets specifically designed for this purpose: PUB and SUB. The typical pattern is to bind a PUB socket to a port that will start listening for subscriptions coming from the other SUB sockets.
A subscription can have a filter that specifies what messages will be delivered to the SUB sockets. The filter is a simple binary buffer (so it can also be a string), which will be matched against the beginning of the message (which is also a binary buffer). When a message is sent through the PUB socket it is broadcast to all the connected SUB sockets, but only after their subscription filters are applied. The filters will be applied to the publisher side only if a connected protocol is used, such as, for example, TCP.
The following figure shows the pattern applied to our distributed chat server architecture (with only two instances, for simplicity):

The preceding figure shows us the flow of information when we have two instances of the chat application, but the same concept can be applied for N instances. The architecture tells us that each node must be aware of the other nodes in the system, to be able to establish all the necessary connections. It also shows us how the subscriptions go from a SUB socket to a PUB socket, while messages travel in the opposite direction.
Note
To run the example in this section, you need to install the native ØMQ binaries on your system. You can find more information at http://zeromq.org/intro:get-the-software. Note: this example was tested against the 4.0 branch of ØMQ.
Let's see how this works in practice by modifying our chat server (we will show you only the changed parts):
// ...
const args = require('minimist')(process.argv.slice(2));   //[1]
const zmq = require('zmq');

const pubSocket = zmq.socket('pub');                       //[2]
pubSocket.bind(`tcp://127.0.0.1:${args['pub']}`);

const subSocket = zmq.socket('sub');                       //[3]
const subPorts = [].concat(args['sub']);
subPorts.forEach(p => {
  console.log(`Subscribing to ${p}`);
  subSocket.connect(`tcp://127.0.0.1:${p}`);
});
subSocket.subscribe('chat');

// ...
ws.on('message', msg => {                                  //[4]
  console.log(`Message: ${msg}`);
  broadcast(msg);
  pubSocket.send(`chat ${msg}`);
});
//...

subSocket.on('message', msg => {                           //[5]
  console.log(`From other server: ${msg}`);
  broadcast(msg.toString().split(' ')[1]);
});

// ...
server.listen(args['http'] || 8080);
The preceding code clearly shows that the logic of our application became slightly more complicated; however, it's still straightforward considering that we are implementing a distributed and peer-to-peer publish/subscribe pattern. Let's see how all the pieces come together:
- We require the
zmqpackage (https://npmjs.org/package/zmq), which is essentially the Node.js binding for the ØMQ native library. We also requireminimist(https://npmjs.org/package/minimist), which is a command-line argument parser; we need this to be able to easily accept named arguments. - We immediately create our
PUBsocket and bind it to the port provided in the--pubcommand-line argument. - We create the
SUBsocket and we connect it to thePUBsockets of the other instances of our application. The ports of the targetPUBsockets are provided in the--subcommand-line arguments (there might be more than one). We then create the actual subscription, by providingchatas a filter, which means that we will receive only the messages beginning withchat. - When a new message is received by our WebSocket, we broadcast it to all the connected clients but we also publish it through our
PUBsocket. We usechatas a prefix followed by a space, so the message will be published to all the subscriptions usingchatas a filter. - We start listening for messages that arrive at our
SUBsocket, we do some simple parsing of the message to remove thechatprefix, and then we broadcast it to all the clients connected to the current WebSocket server.
We have now built a simple distributed system, integrated using a peer-to-peer publish/subscribe pattern!
Let's fire it up, let's start three instances of our application by making sure to connect their PUB and SUB sockets properly:
node app --http 8080 --pub 5000 --sub 5001 --sub 5002
node app --http 8081 --pub 5001 --sub 5000 --sub 5002
node app --http 8082 --pub 5002 --sub 5000 --sub 5001
The first command will start an instance with an HTTP server listening on port 8080, while binding a PUB socket on port 5000 and connecting the SUB socket to ports 5001 and 5002, which is where the PUB sockets of the other two instances should be listening at. The other two commands work in a similar way.
Now, the first thing we can see is that ØMQ will not complain if a port corresponding to a PUB socket is not available. For example, at the time of the first command, there is nobody listening on ports 5001 and 5002; however, ØMQ is not throwing any error. This is because ØMQ has a reconnection mechanism that will automatically try to establish a connection to these ports at regular time intervals. This feature also comes in particularly handy if any node goes down or is restarted. The same forgiving logic applies to the PUB socket: if there are no subscriptions, it will simply drop all the messages, but it will continue working.
At this point, we can try to navigate with a browser to any of the server instances that we started and verify that the messages are properly broadcast to all the chat servers.
Tip
In the previous example, we assumed a static architecture, where the number of instances and their addresses are known in advance. We can introduce a service registry, as explained in the previous chapter, to connect our instances dynamically. It is also important to point out that ØMQ can be used to implement a broker using the same primitives we demonstrated here.
An important abstraction in a messaging system is the message queue (MQ). With a message queue, the sender and the receiver(s) of the message don't necessarily need to be active and connected at the same time to establish a communication, because the queuing system takes care of storing the messages until the destination is able to receive them. This behavior is opposed to the set and forget paradigm, where a subscriber can receive messages only during the time it is connected to the messaging system.
A subscriber that is able to always reliably receive all the messages, even those sent when it's not listening for them, is called a durable subscriber.
- QoS0, at most once: Also known as set and forget, the message is not persisted, and the delivery is not acknowledged. This means that the message can be lost in cases of crashes or disconnections of the receiver.
- QoS1, at least once: The message is guaranteed to be received at least once, but duplicates might occur if, for example, the receiver crashes before notifying the sender. This implies that the message has to be persisted in the eventuality it has to be sent again.
- QoS2, exactly once: This is the most reliable QoS; it guarantees that the message is received once and only once. This comes at the expense of a slower and more data-intensive mechanism for acknowledging the delivery of messages.
Tip
Find out more in the MQTT specifications at http://public.dhe.ibm.com/software/dw/webservices/ws-mqtt/mqtt-v3r1.html#qos-flows.
As we said, to allow durable subscribers, our system has to use a message queue to accumulate the messages while the subscriber is disconnected. The queue can be stored in memory or persisted on disk to allow the recovery of its messages even if the broker restarts or crashes. The following figure shows a graphical representation of a durable subscriber backed by a message queue:

The durable subscriber is probably the most important pattern enabled by a message queue, but it's certainly not the only one, as we will see later in the chapter.
Tip
The Redis publish/subscribe commands implement a set and forget mechanism (QoS0). However, Redis can still be used to implement a durable subscriber using a combination of other commands (without relying directly on its publish/subscribe implementation). You can find a description of this technique in the following blog posts:
http://davidmarquis.wordpress.com/2013/01/03/reliable-delivery-message-queues-with-redis
http://www.ericjperry.com/redis-message-queue
ØMQ defines some patterns to support durable subscribers as well, but it's mostly up to us to implement this mechanism.
A message queue is normally used in situations where message can't be lost, which includes mission-critical applications such as banking or financial systems. This usually means that the typical enterprise-grade message queue is a very complex piece of software, which utilizes bulletproof protocols and persistent storage to guarantee the delivery of the message even in the presence of malfunctions. For this reason, enterprise messaging middleware has been, for many years, a prerogative of giants such as Oracle and IBM, each one of them usually implementing its own proprietary protocol, resulting in a strong customer lock-in. Fortunately, it's been a few years now since messaging systems entered the mainstream, thanks to the growth of open protocols such as AMQP, STOMP, and MQTT. To understand how a message queuing system works, we are now going to give an overview of AMQP; this is fundamental to understand how to use a typical API based on this protocol.
AMQP is an open standard protocol supported by many message-queuing systems. Besides defining a common communication protocol, it also provides a model for describing routing, filtering, queuing, reliability, and security. In AMQP, there are three essential components:
- Queue: The data structure responsible for storing the messages consumed by the clients. The messages from a queue are pushed (or pulled) to one or more consumers essentially, our applications. If multiple consumers are attached to the same queue, the messages are load balanced across them. A queue can be one of the following:
- Durable: This means that the queue is automatically recreated if the broker restarts. A durable queue does not imply that its contents are preserved as well; in fact, only messages that are marked as persistent are saved to the disk and restored in case of a restart.
- Exclusive: This means that the queue is bound to only one particular subscriber connection. When the connection is closed, the queue is destroyed.
- Auto-delete: This will cause the queue to be deleted when the last subscriber disconnects.
- Exchange: This is where a message is published. An exchange routes the messages to one or more queues depending on the algorithm it implements:
- Direct exchange: It routes the messages by matching an entire routing key (for example,
chat.msg). - Topic exchange: It distributes the messages using a glob-like pattern matched against the routing key (for example,
chat.#matches all the routing keys starting withchat). - Fanout exchange: It broadcasts a message to all the connected queues, ignoring any routing key provided.
- Direct exchange: It routes the messages by matching an entire routing key (for example,
- Binding: This is the link between exchanges and queues. It also defines the routing key or the pattern used to filter the messages that arrive from the exchange.
These components are managed by a broker, which exposes an API for creating and manipulating them. When connecting to a broker, a client creates a channel—an abstraction of a connection—which is responsible for maintaining the state of the communication with the broker.
The following figure shows us all these components put together:

The AMQP model is way more complex than the messaging systems we have used so far (Redis and ØMQ); however, it offers a set of features and a reliability that would be very hard to obtain using only primitive publish/subscribe mechanisms.
Tip
You can find a detailed introduction to the AMQP model on the RabbitMQ website: https://www.rabbitmq.com/tutorials/amqp-concepts.html.
Let's now practice what we learned about durable subscribers and AMQP and work on a small example. A typical scenario where it's important to not lose any message is when we want to keep the different services of a microservice architecture in sync; we already described this integration pattern in the previous chapter. If we want to use a broker to keep all our services on the same page, it's important that we don't lose any information, otherwise we might end up in an inconsistent state.
Let's now extend our small chat application using a microservice approach. Let's add a history service that persists our chat messages inside a database, so that when a client connects, we can query the service and retrieve the entire chat history. We are going to integrate the history service with the chat server using the RabbitMQ broker (https://www.rabbitmq.com) and AMQP.
The next figure shows our planned architecture:

As described in the preceding architecture, we are going to use a single fanout exchange; we don't need any particular routing, so our scenario does not require any exchange more complex than that. Next, we will create one queue for each instance of the chat server. These queues are exclusive; we are not interested in receiving any missed message when a chat server is offline, that's the job of our history service, which eventually can also implement more complicated queries against the stored messages. In practice, this means that our chat servers are not durable subscribers and their queues will be destroyed as soon as the connection is closed.
On the contrary, the history service cannot afford to lose any messages; otherwise, it would not fulfill its very purpose. The queue we are going to create for it has to be durable, so that any message that is published while the history service is disconnected will be kept in the queue and delivered when it comes back online.
We are going to use the familiar LevelUP as the storage engine for the history service, while we will use the amqplib package (https://npmjs.org/package/amqplib) to connect to RabbitMQ using the AMQP protocol.
Note
The following example requires a working RabbitMQ server, listening on its default port. For more information, please refer to its official installation guide at http://www.rabbitmq.com/download.html.
Let's now implement our history service! We are going to create a standalone application (a typical microservice), which is implemented in the module historySvc.js. The module is made up of two parts: an HTTP server to expose the chat history to clients, and an AMQP consumer which is responsible for capturing the chat messages and storing them in a local database.
Let's see what this looks like in the code that follows:
const level = require('level');
const timestamp = require('monotonic-timestamp');
const JSONStream = require('JSONStream');
const amqp = require('amqplib');
const db = level('./msgHistory');

require('http').createServer((req, res) => {
  res.writeHead(200);
  db.createValueStream()
    .pipe(JSONStream.stringify())
    .pipe(res);
}).listen(8090);

let channel, queue;
amqp
  .connect('amqp://localhost')                            // [1]
  .then(conn => conn.createChannel())
  .then(ch => {
    channel = ch;
    return channel.assertExchange('chat', 'fanout');      // [2]
  })
  .then(() => channel.assertQueue('chat_history'))        // [3]
  .then((q) => {
    queue = q.queue;
    return channel.bindQueue(queue, 'chat');              // [4]
  })
  .then(() => {
    return channel.consume(queue, msg => {                // [5]
      const content = msg.content.toString();
      console.log(`Saving message: ${content}`);
      db.put(timestamp(), content, err => {
        if (!err) channel.ack(msg);
      });
    });
  })
  .catch(err => console.log(err));
We can immediately see that AMQP requires a little bit of setting up, which is necessary to create and connect all the components of the model. It's also interesting to observe that amqplib supports Promises by default, so we leveraged them heavily to streamline the asynchronous steps of the application. Let's see in detail how it works:
- We first establish a connection with the AMQP broker, which is RabbitMQ in our case. Then, we create a channel, which is similar to a session that will maintain the state of our communications.
- Next, we set up our exchange, named
chat. As we already mentioned, it is a fanout exchange. TheassertExchange()command will make sure that the exchange exists on the broker, otherwise it will create it. - We also create our queue, called
chat_history. By default, the queue is durable; notexclusiveand notauto-delete, so we don't need to pass any extra options to support durable subscribers. - Next, we bind the queue to the exchange we previously created. Here, we don't need any other particular option, for example, a routing key or pattern, as the exchange is of the type fanout, so it doesn't perform any filtering.
- Finally, we can begin to listen for messages coming from the queue we just created. We save every message that we receive in a LevelDB database using a monotonic timestamp as key (https://npmjs.org/package/monotonic-timestamp), to keep the messages sorted by date. It's also interesting to see that we are acknowledging every message using
channel.ack(msg), and only after the message is successfully saved into the database. If the ACK (acknowledgment) is not received by the broker, the message is kept in the queue for being processed again. This is another great feature of AMQP for bringing the reliability of our service to a whole new level. If we are not interested in sending explicit acknowledgments, we can pass the option{noAck:true}to thechannel.consume()API.
To integrate the chat servers using AMQP, we have to use a setup very similar to the one we implemented in the history service, so we are not going to repeat it here in full. However, it's still interesting to see how the queue is created and how a new message is published into the exchange. The relevant parts of the new app.js file are the following:
// ...
  .then(() => {
    return channel.assertQueue(`chat_srv_${httpPort}`, {exclusive: true});
  })
// ...
  ws.on('message', msg => {
    console.log(`Message: ${msg}`);
    channel.publish('chat', '', new Buffer(msg));
  });
// ...
As we mentioned, our chat server does not need to be a durable subscriber, a set and forget paradigm is enough. So when we create our queue, we pass the option {exclusive:true}, indicating that the queue is scoped to the current connection and therefore it will be destroyed as soon as the chat server shuts down.
Publishing a new message is also very easy; we simply have to specify the target exchange (chat) and a routing key, which in our case is empty ('') because we are using a fanout exchange.
We can now run our improved chat architecture; to do that, let's start two chat servers and the history service:
node app 8080
node app 8081
node historySvc
It is now interesting to see how our system, and in particular the history service, behaves in case of downtime. If we stop the history server and continue to send messages using the web UI of the chat application, we will see that when the history server is restarted, it will immediately receive all the messages it missed. This is a perfect demonstration of how the durable subscriber pattern works!