
Chapter 3 Novell Management Tools
ConsoleOne is a Java-based tool for managing your network and its resources. It can be launched by running CONSOLEONE.EXE from where it was installed (default: SYS:PUBLICMGMTCONSOLEONE1.2BIN). By default, it lets you manage Novell eDirectory objects, schema, partitions, and replicas and NetWare server resources.
If you install other Novell products, the appropriate management capabilities are automatically snapped into the version of ConsoleOne installed on that server.
ConsoleOne is installed during the NetWare 6.5 installation, but can also be re-installed or installed locally from the Novell client’s CD.
ConsoleOne also supports remote server console access through a Java applet called RConsoleJ.
To access the NetWare 6.5 server console remotely, launch ConsoleOne and browse to the desired server. Select Tools, and then Remote Console.
Web Manager is a Web-based “home page” for accessing most of the NetWare 6.5 Web-based tools and services.
To access Web Manager, open your Web browser and enter your Web server’s domain name or IP address, followed by a colon and the Web Manager port, which by default is 2200. For example:
or
https://137.65.192.1:2200
iManager provides role-based management of your NetWare network, together with a nearly comprehensive set of administrative tools.
![]() You can use either a secure (HTTPS) or unsecure (HTTP) connection to access iManager. However, a secure connection is recommended.
You can use either a secure (HTTPS) or unsecure (HTTP) connection to access iManager. However, a secure connection is recommended.
![]() Once configured, you can access the iManager Web page by appending the iManager path (
Once configured, you can access the iManager Web page by appending the iManager path (/nps/iManager.html) to the IP address or DNS name of the server running iManager. For example:
https://www.quills.com/nps/iManager.html
or
https://137.65.192.1/nps/iManager.html
![]() To force iManager into Simple mode to support Federal accessibility guidelines, use the Simple mode path (
To force iManager into Simple mode to support Federal accessibility guidelines, use the Simple mode path (/nps/Simple.html). For example:
https://www.quills.com/nps/Simple.html
or
https://137.65.192.1/nps/Simple.html
![]() You will be prompted to authenticate using a valid eDirectory username. Users can access iManager features only for which they have been assigned rights.
You will be prompted to authenticate using a valid eDirectory username. Users can access iManager features only for which they have been assigned rights.
Once loaded, you will use iManager to perform most of the day-to-day administrative tasks in your NetWare environment, including management of most additional services that are available with NetWare 6.5.
NetWare Remote Manager (NoRM) is used for remote management of NetWare 6.5 servers.
![]() You can launch NoRM from Web Manager, or you can launch NoRM directly by the NetWare 6.5 server’s domain name or IP address, followed by a colon and the port number, which by default is
You can launch NoRM from Web Manager, or you can launch NoRM directly by the NetWare 6.5 server’s domain name or IP address, followed by a colon and the port number, which by default is 8009. For example:
https://www.quills.com:8009
or
https://137.65.192.1:8009
![]() You can also launch NoRM directly from the graphical server console by clicking the red N icon on the icon bar at the bottom of the GUI.
You can also launch NoRM directly from the graphical server console by clicking the red N icon on the icon bar at the bottom of the GUI.
![]() You will be prompted to authenticate. If your user object is in the same context as the server object, you can authenticate by common name only. Otherwise, you need to specify a full eDirectory username, including the leading dot. For access to all NoRM features, the user should have supervisory rights to the NetWare server.
You will be prompted to authenticate. If your user object is in the same context as the server object, you can authenticate by common name only. Otherwise, you need to specify a full eDirectory username, including the leading dot. For access to all NoRM features, the user should have supervisory rights to the NetWare server.
iMonitor is used for Web-based management of Novell eDirectory in your NetWare 6.5 network.
![]() Launch iMonitor from NoRM by selecting NDS iMonitor from the Managing eDirectory section in the left side navigation frame. Alternatively, you go straight to iMonitor by appending the iMonitor path (
Launch iMonitor from NoRM by selecting NDS iMonitor from the Managing eDirectory section in the left side navigation frame. Alternatively, you go straight to iMonitor by appending the iMonitor path (/nds) to the NoRM URL. For example:
https://www.quills.com:8009/nds
or
https://137.65.192.1:8009/nds
Since the release of NetWare 4 in the early 1990s, Novell has been working toward a consolidated management interface from which all administrative tasks can be performed. In that time, the primary issue hampering this effort has been how to deliver that management interface.
The first version of a centralized management interface was NWAdmin. NWAdmin was a Windows-based utility that delivered a graphical interface that allowed administrators to see the whole network from a directory-centric perspective rather than a server-centric perspective. It relied on the Novell client to provide network communications and access. NWAdmin also defined the standard look and feel for graphical management utilities that is still largely adhered to today.
NWAdmin supported an extendable plug-in architecture so new functionality could be added as necessary to manage new features and new products. This was accomplished through Windows-based programming techniques common at the time.
However, NWAdmin ran only on Windows and used a proprietary architecture. Rather than try to support multiple versions of NWAdmin, Novell moved toward a more open and standards-based management architecture based on Java programming techniques. Java promised the capability to “write once, run anywhere,” which was critical to Novell’s management plans.
In 1998, with the release of NetWare 5, Novell introduces its second-generation administrative utility known as ConsoleOne. Similar to NWAdmin, ConsoleOne is an extendable management architecture that supports snap-ins to extend its capabilities. Its Java-based design allows it to run on both workstations and the NetWare server itself, providing the first-ever graphical server console. However, it still required some type of Novell client support for network communications and access. In the years since its release, ConsoleOne has achieved respectable performance, a major deficiency in its early versions, and still serves as the preferred tool for managing Novell and third-party products and services.
With the release of NetWare 6, Novell started making the final management interface transition necessary to support its One Net initiative by introducing a set of Web-based management tools. Just as ConsoleOne untied the management console from Windows, iManager is untying the management console from the Novell client. iManager promises a true platform-independent management interface that can be used from any workstation at any location to perform network management and maintenance of any kind.
NetWare 6.5 introduces a greatly enhanced set of tools in iManager, nearly equaling that available from ConsoleOne. However, because every feature is not yet available in iManager, you will need to be familiar with the capabilities of each management interface. This chapter provides an introduction to the primary Novell management utilities, from ConsoleOne to iManager. It provides requirements and installation information for each utility, as well as an overview of its features and capabilities.
First, the chapter presents ConsoleOne, which is still the most comprehensive management interface for NetWare 6.5. We show how ConsoleOne can be used for both local and remote server administration as well as full eDirectory management.
Next, a new generation of Web-based management tools is presented, starting with iManager and its closely related sister utilities—NetWare Remote Manager (NoRM) and iMonitor. These browser-based utilities are close to eclipsing ConsoleOne for feature completeness and promise much more flexibility for network administrators looking to get their jobs done from any place at any time.
NetWare 6.5 includes ConsoleOne v1.3.6. ConsoleOne is a Java-based tool for managing your network and its resources. By default, it lets you manage
![]() Novell eDirectory objects, schema, partitions, and replicas
Novell eDirectory objects, schema, partitions, and replicas
![]() NetWare server resources
NetWare server resources
If you install other Novell products, additional capabilities are snapped in to ConsoleOne automatically. For example, if you install Novell eDirectory, the capability to configure the LDAP interface to eDirectory is snapped in to ConsoleOne automatically.
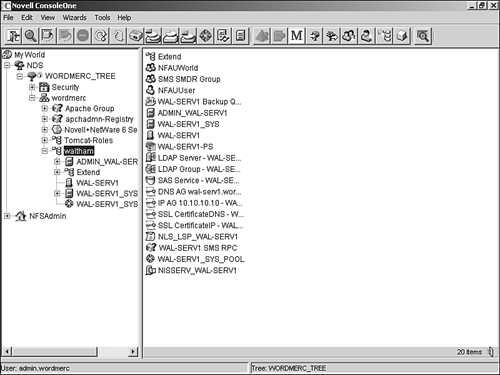
Because ConsoleOne is a Java-based application, it has a similar look and feel across all platforms, as shown in Figure 3.1.
Before looking at specific administrative tasks that are described throughout this book, it’s a good idea to get a feel for the basics of ConsoleOne administration. If you need a more detailed introduction to ConsoleOne, see the NetWare 6.5 online documentation.
The whole purpose of using eDirectory to manage your network is that it allows you to organize network resources so they can be managed more easily. A principal way of doing this is to organize objects into logical groupings known as containers. Because of inheritance rules, objects in a container are security-equivalent to the container itself; so, general object rights can be managed at the container level rather than the individual object level. For more information on eDirectory tree design, see Chapter 5. For information on network security with eDirectory, see Chapter 6.
Once you have located the objects you want to manage, you can change their behavior by modifying their properties. You can also create, delete, move, and rename objects as needed. To do any of these, right-click the object(s) you want to manage and select the desired operation from the drop-down menu. For example, to create a new object, complete the following steps:
1. Right-click the container in which you want the object stored, select New, and then the type of object you want to create. ConsoleOne will automatically limit the list of object types to those that are valid for the selected container.
2. Enter a name for the object.
3. Specify any other required or optional information, and then select OK.
WARNING
If you are attempting to modify a service-specific object for which you don’t have a snap-in, ConsoleOne will only show you a generic list of properties. Make sure you have a snap-in installed for all the objects with which you will be working.
ConsoleOne 1.3.6 lets you modify the properties of multiple objects of the same type simultaneously. To do this, complete the following steps:
1 Select the objects using one of the following methods:
![]() In the right pane, Shift-click or Ctrl-click multiple objects of the same type
In the right pane, Shift-click or Ctrl-click multiple objects of the same type
![]() Click a group or template object to modify its members
Click a group or template object to modify its members
![]() Click a container to modify the objects it contains
Click a container to modify the objects it contains
2. With the appropriate objects highlighted, select File from the menu bar, and then select Properties of Multiple Objects.
3. (Conditional) If you selected a container in step 1, in the Properties of Multiple Objects dialog box, double-click the object type from the Available Classes list that you want to modify.
4. On the Objects to Modify page, make sure only the objects that you want to modify are listed.
5. On the other property pages, make any changes you want to apply to all selected objects, and then select OK.
This greatly reduces the effort necessary to manage objects with similar attributes.
In the left pane, see the eDirectory container, which holds the eDirectory trees you are currently logged in to. If you log in to multiple trees, you will see them all listed here. To log in to a new eDirectory tree, select the NDS Authenticate button on the ConsoleOne toolbar and specify the tree name, context, username, and password.
If you are using DNS tree federation, you can access containers in other trees without logging in. To do this, complete the following steps:
1. In the ConsoleOne menu bar, select View, and then Set Context.
2. Enter the full DNS name for the eDirectory context you are trying to access, including an ending dns and period (.). For example:
testing.provo.quills.com.dns.
3. Click OK.
Once you are in an eDirectory tree or context and its objects are listed in the right pane, you typically browse to an object by opening container objects in the left pane until you arrive at the object.
ConsoleOne gives you the flexibility to customize views in both the left and right panes. However, except for window size, position, and view title, other custom viewing settings are lost when you exit ConsoleOne.
You can define the topmost object in the left pane by doing one of the following:
![]() If the object is a container that’s below the current top object, right-click the container object and select Set as Root.
If the object is a container that’s below the current top object, right-click the container object and select Set as Root.
![]() If the object is a container that’s above the current top object, double-click in the left pane until the desired container appears.
If the object is a container that’s above the current top object, double-click in the left pane until the desired container appears.
![]() If you want to reset My World as the Top object, right-click the up arrow in the left pane and select Show My World.
If you want to reset My World as the Top object, right-click the up arrow in the left pane and select Show My World.
The right pane in ConsoleOne defaults to what is known as the Console view. This is the most-used view for managing directory and server resources. However, you can switch back and forth between the Console view and other views, such as the Partition and Replica view, by right-clicking an object in the right pane, selecting Views, and then the desired view. For more information on the Partition and Replica view see Chapter 5.
Regardless of which view the right pane contains, you can show or hide the view title at the top of the right pane by selecting View from the menu bar and then Show View Title. A check mark is added to or removed from the menu item, depending on whether the view title is being shown or hidden.
ConsoleOne will be installed automatically to SYS:PUBLICMGMTCONSOLEONE1.2 during the NetWare 6.5 server installation. Furthermore, any products installed on the server will automatically place their ConsoleOne snap-ins in the correct location (SYS:PUBLICMGMTCONSOLEONE1.2SNAPINS) to function with this version. However, this means that different servers with different product sets may not have all the necessary snap-ins to manage services network-wide. So, if you are doing service-specific management, you should run ConsoleOne from a server where the service is actually installed.
If you want to install ConsoleOne on a workstation or an existing server, it is available on the NetWare 6.5 Client CD-ROM.
TIP
If you want to synchronize ConsoleOne snap-ins across servers, you can simply copy them from the SNAPINS directory on one server or workstation to that on another. Some snap-ins may have to register with ConsoleOne, in which case this method may not work.
To install and run ConsoleOne on one of its supported operating systems, complete the instructions in the following sections.
You can install and run ConsoleOne on a Windows workstation or server, or you can run it remotely from a NetWare or Windows server to which you have a mapped or shared drive.
WARNING
If you install and run ConsoleOne from a Windows workstation or server, you should also install the NetWare 6.5 snap-ins so that you will be able to manage all installed services. You will have to manually copy any third-party snap-ins not included on the NetWare 6.5 Operating System CD-ROM from the server on which the third-party service is installed.
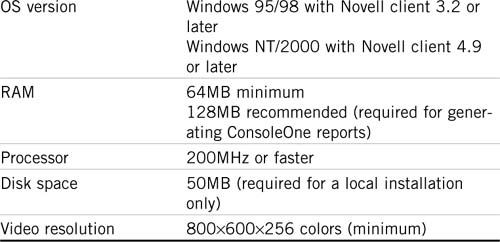
The following system requirements apply to ConsoleOne in the Windows environment:
Complete the following steps to install ConsoleOne on a Windows machine:
1. Close any ConsoleOne sessions currently running.
2. Insert the Novell client’s CD-ROM. If the CD does not auto-play, run WINSETUP.EXE from the root of the CD-ROM.
3. At the Novell Client Installation screen, select Novell ConsoleOne 1.3.6, and follow the onscreen prompts to complete the installation. If you do not need ConsoleOne reporting, you can choose not to install that snap-in.
4. Once ConsoleOne is installed, you will be returned to the Novell Client Installation screen.
5. Select NetWare 6.5 ConsoleOne Snapins.
6. Make sure you match your install path to that used to install ConsoleOne, and click Unzip to install the snap-in files.
7. Click Close once the file copy is complete to close the installation program. Click Exit to close the Client Installation screen.
TIP
If you are installing on a Windows server and you will run ConsoleOne remotely through drive sharing, don’t forget to share the folder where you install ConsoleOne.
Once installed, executing CONSOLEONE.EXE from the location where you installed it starts ConsoleOne. If you installed ConsoleOne locally, you will have a shortcut on your desktop.
To enable the new ConsoleOne Accessibility features for a Windows environment, you must first install the Java Access Bridge. The Java Access Bridge exposes the Java Accessibility API in a Windows DLL so that Windows Assistive Technologies can interact with Java applications that use the Java Accessibility API.
To set up the Java Access Bridge for use with ConsoleOne, complete the following steps:
1. Download the Java Access Bridge from the Java Access Bridge Web site at http://java.sun.com/products/accessbridge.
2. Unpack the Java Access Bridge into the C:ACCESSBRIDGE-1_0 directory and run the following command:
C:ACCESSBRIDGE-1_0INSTALLERINSTALL
TIP
For more information on installing and configuring the Java Access Bridge, see the Java Access Bridge readme (http://java.sun.com/products/accessbridge/README.txt).
3. Place a copy of the following files in your CONSOLEONEEXT folder. By default, this folder is at C:NOVELLCONSOLEONE1.2.
JACCESS-1_3.JAR
ACCESS-BRIDGE.JAR
4. Place a copy of following file in your JRELIB folder. By default, this folder is at C:NOVELLCONSOLEONE1.2.
ACCESSIBILITY.PROPERTIES
5. Copy the following files to your Windows DLL directory (for example, C:WINNTSYSTEM32 or C:WINDOWSSYSTEM):
JAVAACCESSBRIDGE.DLL
WINDOWSACCESSBRIDGE.DLL
With this installation process complete, ConsoleOne will now be able to interact properly with Windows Accessibility features.
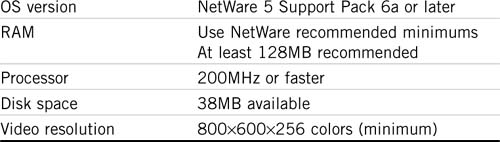
In addition to being installed during the NetWare 6.5 installation, you can install ConsoleOne v1.3 on existing NetWare servers. The following system requirements apply to ConsoleOne in the NetWare environment:
WARNING
ConsoleOne v1.3.6 is compatible with existing ConsoleOne v1.2 snap-ins, but not with v1.1 snap-ins. If you have any older applications that use these snap-ins, ConsoleOne v1.3 should not be installed on that server.
Complete the following steps to install ConsoleOne on an existing NetWare server:
1. At the Server console, type JAVA –EXIT to unload Java and any Java applications running on the server.
2. Make sure network users exit any ConsoleOne sessions currently in use.
3. From a Windows client, map a drive letter to the root of the server’s SYS volume.
4. From the same workstation, insert the NetWare 6.5 client CD-ROM. If the CD does not auto-play, run WINSETUP.EXE from the root of the CD-ROM.
5. At the Novell Client Installation screen, select Novell ConsoleOne and follow the onscreen prompts to complete the installation. If you do not need ConsoleOne reporting, you can choose not to install that snap-in.
Once ConsoleOne has been installed on the server, you can start the NetWare GUI and ConsoleOne simultaneously by typing the following command:
C1START
If the GUI is already started, select the Novell button in the lower-left corner, and select ConsoleOne from the menu. You will be required to authenticate to eDirectory before ConsoleOne will load.
You can also run ConsoleOne remotely from a Windows computer. First make sure you have a drive mapped to the SYS: volume of the NetWare server, and then you can create a shortcut to CONSOLEONE.EXE at the location where you installed it.
You can access ConsoleOne on Linux locally or remotely from another system through an X terminal session, provided the remote computer has an X Window subsystem.
NOTE
This release of ConsoleOne for Linux has been tested only on the IBM 1.3 Java Runtime Environment (JRE). This JRE is included in the ConsoleOne installation package in case you don’t have it. If you do have it, you can choose not to install it.
The following system requirements apply to ConsoleOne in the Linux environment:

WARNING
This release of ConsoleOne is not compatible with eDirectory versions prior to v8.5. If the installation routine detects an unsupported version of eDirectory, it will abort the installation.
Complete the following steps to install ConsoleOne on an existing Linux server:
1. At the Linux system, mount the Novell client’s CD-ROM and browse to the /consoleone folder.
2. Start the installation by typing the following at the system prompt: c1-install.
3. Follow the onscreen prompts to complete the installation. Remember, if you already have the IBM JRE v1.3 installed, you can skip that portion of the installation.
NOTE
You can uninstall ConsoleOne by entering c1-uninstall at the system prompt. c1-install and c1-uninstall both include some optional parameters for running in unattended mode or installing/uninstalling individual components. For details on the command syntax, type c1-install -h or c1-uninstall -h at the system prompt.
Both the install and uninstall routines maintain a log file in the /var directory that you can review at any time.
Use the following command to start ConsoleOne from either a local session or an X terminal (remote) session:
/usr/ConsoleOne/bin/ConsoleOne
You can access ConsoleOne on Solaris locally or remotely from another system through an X terminal session, provided the remote computer has an X Window subsystem.
NOTE
This release of ConsoleOne for Solaris has been tested only on the Sun 1.2.2-5a Java Runtime Environment (JRE). This JRE is included in the ConsoleOne installation package in case you don’t have it. If you do have it, you can choose not to install it.
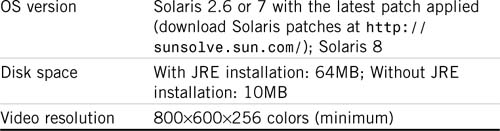
The following system requirements apply to ConsoleOne in the Solaris environment:
WARNING
This release of ConsoleOne is not compatible with eDirectory versions prior to v8.5. If the installation routine detects an unsupported version of eDirectory, it will abort the installation.
Complete the following steps to install ConsoleOne on an existing Solaris server:
1. At the Solaris system, mount the NetWare 6 client CD-ROM and browse to the /consoleone folder.
2. Start the installation by typing the following at the system prompt: c1-install.
3. Follow the onscreen prompts to complete the installation. Remember, if you already have the Sun 1.2.2-5a JRE installed, you can skip that portion of the installation.
NOTE
You can uninstall ConsoleOne by entering c1-uninstall at the system prompt. c1-install and c1-uninstall include some optional parameters for running in unattended mode or installing/uninstalling individual components. For details on the command syntax, type c1-install -h or c1-uninstall -h at the system prompt.
Both the install and uninstall routines maintain a log file in the /var directory that you can review at any time.
Use the following command to start ConsoleOne from either a local session or an X terminal (remote) session:
/usr/ConsoleOne/bin/ConsoleOne
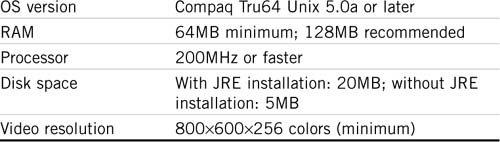
This is the first version of ConsoleOne that will run on a Tru64 system. You can run it locally or remotely from another system through an X terminal session, provided the remote computer has an X Window subsystem.
NOTE
This release of ConsoleOne for Tru64 has been tested only on the Compaq 1.2.2 Java Runtime Environment (JRE). This JRE is included in the ConsoleOne installation package in case you don’t have it. If you do have it, you can choose not to install it.
The following system requirements apply to ConsoleOne in the Tru64 environment:
WARNING
This release of ConsoleOne is not compatible with eDirectory versions prior to v8.5. If the installation routine detects an unsupported version of eDirectory, it will abort the installation.
Complete the following steps to install ConsoleOne on an existing Tru64 server:
1. At the Tru64 system, mount the NetWare 6 client CD-ROM and browse to the /consoleone folder.
2. Start the installation by typing the following at the system prompt: c1-install.
3. Follow the onscreen prompts to complete the installation. Remember, if you already have the Compaq 1.2.2 JRE installed you can skip that portion of the installation.
NOTE
You can uninstall ConsoleOne by entering c1-uninstall at the system prompt. c1-install and c1-uninstall both include some optional parameters for running in unattended mode or installing/uninstalling individual components. For details on the command syntax, type c1-install -h or c1-uninstall -h at the system prompt.
Both the install and uninstall routines maintain a log file in the /var directory that you can review at any time.
Use the following command to start ConsoleOne from either a local session or an X terminal (remote) session:
/usr/ConsoleOne/bin/ConsoleOne
Because the newer Web-based management tools are much easier to develop to, some of the newer management features are bypassing ConsoleOne and going straight to iManager. Several of the newer NetWare features, including Licensing and iPrint, are managed through iManager and are not available from ConsoleOne.
Much of the server management that previously required access to the NetWare server console can now be done with NoRM, discussed later in this chapter. NoRM lets you perform most management tasks that normally require access to the server console from a remote workstation or even from across the Internet. However, to manage any version of NetWare 5 or NetWare 6 remotely, you can also use RConsoleJ, which is part of ConsoleOne. Although RConsoleJ does not offer the flexibility of NoRM, it can save significant time by letting you manage servers to which you have a LAN/WAN connection.
NOTE
If you have NetWare 4.x or earlier servers on your network, you will have to use the DOS-based RConsole utility that shipped with these versions of NetWare. Consult your server documentation for more information.
RConsoleJ is a Java applet that provides a server “window” on your workstation from which you can use console utilities, load/unload NLMs, and change server configuration just as if you were using the server’s actual keyboard and monitor. Using RConsoleJ enables you to access the server from any workstation on the network, which gives you greater freedom when administering your network.
RConsoleJ requires the IP protocol to connect to NetWare servers remotely. However, if you want to use it to connect to a server that is running IPX only, you can do so by routing RConsoleJ communications through a secondary proxy server, which has both IP and IPX protocol stacks loaded. The proxy server acts as a gateway between RConsoleJ and the IPX server.
Because RConsoleJ is part of ConsoleOne, you can run it from any platform that supports ConsoleOne, including Windows, NetWare, Linux, Solaris, and Tru64.
To set up your network for RConsoleJ, you have to do the following:
![]() Set up the target server, which is the server you want to access remotely.
Set up the target server, which is the server you want to access remotely.
![]() (Conditional) Install proxy software on an IP server if the target server is only running IPX.
(Conditional) Install proxy software on an IP server if the target server is only running IPX.
![]() Install RConsoleJ software on the workstation or server from which you want to run the remote console session.
Install RConsoleJ software on the workstation or server from which you want to run the remote console session.
The target server is the server whose console you want to access during the remote console session. The target server can be running IP or IPX.
To prepare a target server, complete the following steps:
1. At the server console prompt load the following NLM:
RCONAG6
2. Enter the password you want administrators to use when accessing the target server from RConsoleJ. You do not need an eDirectory password because RConsoleJ does not use eDirectory.
3. Enter the TCP port number for the unencrypted session. The default value is 2034. If the server communicates using IPX only, enter –1 to disable TCP listening. To enable listening over a dynamically assigned port, enter 0.
4. Enter the TCP port number for the secure session. The default port number is 2036. Ensure the Key Material object named SSL CertificateDNS has been created.
5. Enter the SPX port number on which RCONAG6 will listen for a proxy server. The default port number is 16800. If the server communicates using IP only, enter –1 to disable SPX listening. To enable listening over a dynamically assigned port, enter 0.
This server will act as a middleman between the RConsoleJ client, which only communicates via IP and a NetWare server running on IPX. To do this, the RConsoleJ proxy server must have both IP and IPX protocol stacks loaded.
1. At the server console prompt, enter the following command:
RCONPRXY
2. Enter the TCP port number on which RCONPRXY will listen for RConsoleJ. The default value is 2035. To enable listening over a dynamically assigned port, enter 0.
Once the NetWare server is running the RConsoleJ proxy agent, the RConsoleJ client can communicate through it with the IPX target server.
The default AUTOEXEC.NCF file in NetWare 6.5 will include an optional command that you can uncomment to autoload RConsoleJ modules at startup. However, because loading these modules requires you to specify a remote password, it is more secure to use LDRCONAG.NCF, which lets you encrypt the password so that it cannot be viewed by anyone with access to the AUTOEXEC.NCF. LDRCONAG.NCF includes all the necessary RConsoleJ commands necessary to support RConsoleJ.
To create an encrypted remote password, complete the following steps:
1. Type the following command:
RCONAG6 ENCRYPT
2. Enter the password you want to use for remote console sessions.
3. Enter the other required port information as outlined in the previous section. The system will display the encrypted password value and a message prompting whether the RCONAG6 command should be written to the SYS:SYSTEMLDRCONAG.NCF file. To include the RCONAG6 command with your encrypted password in the LDRCONAG.NCF file, enter Y.
4. The system places a LOAD RCONAG command into the LDRCONAG.NCF file with the encrypted password as a parameter. To auto-load RCONAG6.NLM with an encrypted password on startup, use either NWCONFIG or EDIT to open the AUTOEXEC.NCF file. At the end of the file, enter the following:
LDRCONAG
5. Save and exit the AUTOEXEC.NCF file.
The server will now automatically load the necessary remote modules and your encrypted password whenever it is started.
To run RConsoleJ from a supported workstation or NetWare 6.5 server, do the following:
NOTE
If you are running RConsoleJ from a NetWare server, you can start it directly from the server GUI by selecting the Novell button and then selecting Programs and RConsoleJ. You can then continue with step 3.
1. Open ConsoleOne and browse to the server object you want to control.
2. Right-click the server object and select Remote Console.
3. In the RConsoleJ screen, shown in Figure 3.2, specify the required information and select Connect.

![]() Connection Options: Specify whether you are connecting via Secure or Unsecure IP. If you are using Unsecure IP, you can choose whether to connect directly or through a proxy.
Connection Options: Specify whether you are connecting via Secure or Unsecure IP. If you are using Unsecure IP, you can choose whether to connect directly or through a proxy.
![]() Remote Server: Specify the target server’s name for a direct connection or the proxy server’s name for a proxy connection. Enter the remote password. The port number will be automatically inserted unless you have changed it from the default.
Remote Server: Specify the target server’s name for a direct connection or the proxy server’s name for a proxy connection. Enter the remote password. The port number will be automatically inserted unless you have changed it from the default.
NOTE
If you are running ConsoleOne from a different server, or if you have installed ConsoleOne locally, you may be prompted to accept an unknown certificate. If so, click OK to accept the certificate and launch the RConsoleJ window.
For more information on using RConsoleJ, see the NetWare 6.5 online documentation.
NetWare Web Manager functions as a default Welcome page for a NetWare 6.5 server, and serves as a home page for the various Web services available in NetWare 6.5. As with other NetWare 6.5 Web services and tools, Web Manager leverages the latest version of the industry-leading Apache Web server for NetWare. Two instances of Apache can be installed on your NetWare 6.5 server. The Apache admin server is used by NetWare Web tools, leaving the other instance available for your eCommerce needs without further burdening it with network management overhead. For more information on Apache and other NetWare 6.5 Web services, see Chapter 9.
One of the primary advantages of using NetWare Web Manager is that you can easily access other browser-based management interfaces—including NetWare Remote Manager and iManager—and configure various services from any remote workstation that has Internet access. With Web Manager, you can accomplish the following tasks either locally (from within your WAN or LAN) or remotely:
![]() Install and configure many of the NetWare 6.5 Web services: In the left pane, you will see links to install several Web services, including Apache 2.0, UDDI Server, OpenSSH, and eGuide. Once installed, you can also manage the Web services from Web Manager by selecting your server name located under the appropriate service heading.
Install and configure many of the NetWare 6.5 Web services: In the left pane, you will see links to install several Web services, including Apache 2.0, UDDI Server, OpenSSH, and eGuide. Once installed, you can also manage the Web services from Web Manager by selecting your server name located under the appropriate service heading.
![]() Manage user authentication to your enterprise Web server: Web Manager supports authentication via either eDirectory or a local database. Novell recommends using eDirectory because it will manage both authentication and access rights. However, if your Web server contains mostly public information, authentication will not be a major issue, and the local database mode will work fine.
Manage user authentication to your enterprise Web server: Web Manager supports authentication via either eDirectory or a local database. Novell recommends using eDirectory because it will manage both authentication and access rights. However, if your Web server contains mostly public information, authentication will not be a major issue, and the local database mode will work fine.
![]() Modify Web Manager settings: To manage NetWare Web Manager settings, select the Admin Server Preferences icon in the gold box of the Web Manager home page. This is available only when using a secure and authenticated session for Web Manager.
Modify Web Manager settings: To manage NetWare Web Manager settings, select the Admin Server Preferences icon in the gold box of the Web Manager home page. This is available only when using a secure and authenticated session for Web Manager.
NetWare Web Manager is installed automatically during the installation of NetWare 6.5. After the installation, use a Web browser from a client computer in your network to access Web Manager. As you make configuration changes to the Web services available in NetWare 6, configuration files on the NetWare 6.5 server will be modified to support your changes.
In order to access Web Manager from an Internet connection outside your firewall, you will need to make sure that TCP port 2200 is opened through the firewall to the IP address of your Web server. Port 2200 is the default port through which you will access the Web Manager interface. If desired, this port can be changed as long as it doesn’t conflict with any other service on the NetWare 6.5 server.
To use Web Manager, you must be using a 4.x or newer Web browser such as Internet Explorer or Netscape Communicator. The browser must have Java or JavaScript enabled on your Web browser to use Web Manager because the configuration forms and other management tools require one or both of these forms of Java to function. To enable Java on your browser, complete the instructions in the following sections that correspond to the browser you are using.
To enable Java on Internet Explorer 4 or higher, use the following steps:
To enable Java on Netscape Navigator, use the following steps:
To enable Java on Netscape Communicator, use the following steps:
1. From the Communicator browser window, click Edit >> Preferences.
2. Select the Advanced category in the left column.
3. Check the Enable Java and Enable JavaScript check boxes.
4. Click OK.
To access Web Manager, open your Web browser and enter your Web server’s domain name or IP address, followed by a colon and the port number, which by default is 2200. For example:
https://www.quills.com:2200
or
https://137.65.192.1:2200
There isn’t a lot you need to do to get Web Manager set up once it is installed. Figure 3.3 shows the Web Manager home page. As Web services are installed, such as Apache Web server, FTP, and Web Search server, links to their specific management interfaces will become active in Web Manager. There are also a few configuration tasks of which you should be aware.
NOTE
When you select a Web Manager link, you may be prompted to accept an unknown certificate. If so, select Yes to continue or View Certificate to install the server certificate in your browser. Installing the certificate should prevent this message from appearing in the future.
By default, Web Manager uses port 2200, and secures its communications with SSL, using the server certificate that was created during the NetWare 6.5 installation. However, you have control over all three of these settings. To modify any of them complete the following steps:
1. From the NetWare Web Manager home page, click the Administration Server Preferences link. You may need to authenticate as a user with Supervisor rights to the tree.
2. In the Web Manager Port field, type the port number you want NetWare Web Manager to use. If you decide to do this, using a port number of 49152 or higher is the best bet. Ports below 49152 may be assigned for use by other services and should not be used. Pick an unassigned port between 49152 and 65000.
NOTE
For a complete list of registered port numbers, visit the Internet Assigned Numbers Authority (IANA) Web site at http://www.iana.org/assignments/port-numbers.
3. Under Encryption, click On to enable, or Off to disable SSL. By default, SSL is used to secure Web Manager communications by encrypting all information going out of or coming in to Web Manager. When enabled, you must use HTTPS to access Web Manager.
4. From the Server Certificates drop-down list, select the Server Certificate object you want to use for SSL encryption. NICI and Novell Certificate Server provide all the cryptographic underpinnings of Web Manager. They are installed by default as part of the NetWare 6.5 installation. Certificate Server provides the cryptographic key pairs and server certificate used by Web Manager. For more information on NICI and Certificate Server, see Chapter 6.
5. Click OK once all the desired changes have been made.
6. Restart Web Manager for the settings to take effect.
The Apache Web server logs the activities of all services running on it, including Web Manager. These log files track who has visited, what has been accessed, and what errors, if any, have occurred.
The Apache log files are stored in the default Common Log Format (CLF) that provides a fixed amount of information about Apache Web server activity.
The Access log file records information about requests to the server and the responses from the server. The Error log file lists all the errors the server has encountered, including unsuccessful login attempts and any other informational messages.
To view the available Web Manager log files, complete the following steps:
1. From the NetWare Web Manager home page, select the Administration Server Preferences link and choose either View Access Log or View Error Log.
2. In the Number of Entries field, type the number of lines you want the access log to display.
3. If you want to filter the log entries for a specific type of work, enter it in the Only Show Entries With field. The filter is case sensitive, so be specific!
4. Click OK to have your viewing options take effect. Use the Reset button to re-run the search and update the log file view.
Using these steps, you can locate specific errors or types of messages in order to keep track of network events.
NetWare 6.5 includes iManager 2.0, a Web-based tool for administering, managing, and configuring NetWare products, services, and eDirectory objects. iManager allows Role-Based Services (RBS) to give you a way to focus the user on a specified set of tasks and objects as determined by the user’s role(s). What users see when they access iManager is based on their role assignments in eDirectory.
iManager has been re-architected to use Novell’s exteNd Web services platform, and is in effect a management portal for Novell’s products and services. It runs on the Apache Web server for NetWare. For more information on Apache Web server for NetWare, see Chapter 9.
As you will see, many of the default management tasks formerly requiring ConsoleOne can now be done through a common Web interface with iManager. Among other things, you can define management roles to administer Novell Licensing Services (NLS), iPrint, DNS/DHCP services, and perform eDirectory object management. Over time, iManager will grow to replace ConsoleOne completely as Novell’s preferred management platform.
In some NetWare 6.5 installations and patterns, iManager will not be installed automatically. If you did not select to install iManager during the server installation, it can be manually re-installed through Deployment Manager or the graphical server console. To install iManager via Deployment Manager, complete the following steps:
1. Make sure you are logged in as a user with administrative rights to eDirectory and the NetWare server.
2. At the workstation, insert the NetWare 6.5 Operating System CD-ROM. Run Deployment Manager (NWDEPLOY.EXE) from the root of the CD-ROM.
3. In Deployment Manager, select Install NetWare 6.5 Products in the left pane, and click Remote Product Install in the right pane.
4. Select the target server from the list of available servers, and then click Next. Provide admin user information when requested.
5. At the Components screen, select iManager 2.0 and Apache 2 Web Server and Tomcat 4 Servlet Container and click Next. Make sure all other products are deselected. All the necessary application files will be copied to the target server. This might take a few minutes. You might need to restart these services manually from the server console. To do this, stop Tomcat by typing TC4STOP and stop Apache by typing AP2WEBDN. Restart the services by typing AP2WEBUP to restart Apache and TOMCAT4 to restart Tomcat.
6. At the Installation Complete screen, click Reset Apache to restart Tomcat and the Apache Web server. Close Deployment Manager once the installation is finished.
Once the files have been installed on the server, the exteNd environment in which iManager runs must be configured. To perform this initial configuration, complete the following steps:
1. Open a browser and go to the following URL:
http://<server IP address>/nps/servlet/configure.
2. Click the Start button.
3. Provide the LDAP name of an Admin user for the eDirectory tree in which the server resides. Use commas (,) instead of periods (.) in providing the distinguished name of the admin user object.
4. Select the PLATFORM.XAR file and click Next.
5. Accept the Novell exteNd Director 4.1 license agreement by selecting I Accept the Terms of the License Agreement, and click Next.
6. Select Custom Installation and click Next.
7. Specify the portal object to work with and click Next. You can choose an existing object or choose to create a new one. You will be asked to specify a distinguished name and password for the object.
8. At the Configuration screen, click Configure to set up the portal object in eDirectory. All of the portal modules to be configured will be listed.
Once the configuration has been written to eDirectory, and the portal object created, restart Tomcat and Apache 2 at the server console. To do this, stop Tomcat by typing TC4STOP and stop Apache by typing AP2WEBDN. Restart the services by typing AP2WEBUP to restart Apache and TOMCAT4 to restart Tomcat.
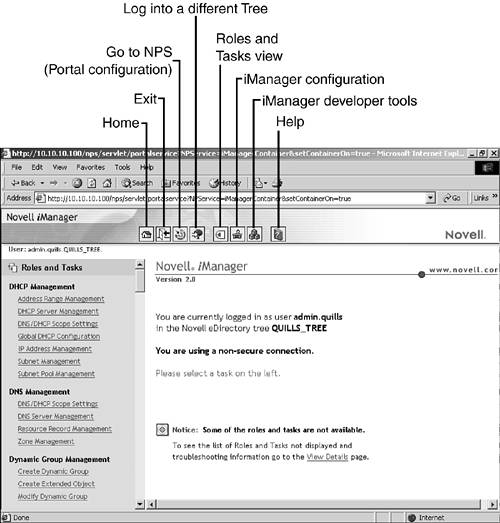
You can now open iManager from its URL, using either HTTP or HTTPS, at <server IP address>.iManager.html. You will be required to authenticate in order to access iManager, and will have access to only those features to which you have rights. For full access to all iManager features, authenticate as a user with Supervisory rights to the eDirectory tree (see Figure 3.4).

You can also open iManager in Simple mode (see Figure 3.5), suitable for compliance with Federal accessibility guidelines. It provides the same functionality as Regular mode, but with an interface optimized for accessibility by those with disabilities (for example, expanded menus for blind users who rely upon spoken commands). To use Simple mode, simply replace iManager.html with Simple.html in the iManager URL. For example:
https://www.quills.com/nps/Simple.html
or
https://137.65.192.1/nps/Simple.html
Using either interface, you will have access to only those features to which you have rights. For full access to all iManager features, authenticate as a user with Supervisory rights to the eDirectory tree.
As shown in Figure 3.3, iManager is organized into three main sections, or frames:
![]() Header frame: The Header frame is located at the top of the screen. It contains links to the Home, Roles and Tasks, Configuration, and Help pages, as well as an Exit link to close the browser window.
Header frame: The Header frame is located at the top of the screen. It contains links to the Home, Roles and Tasks, Configuration, and Help pages, as well as an Exit link to close the browser window.
![]() Navigation frame: The Navigation frame is located on the left side of the screen. It allows you to navigate among the various management tasks or directory objects, depending on the view that is selected. What you see is also constrained by the rights of your authenticated identity.
Navigation frame: The Navigation frame is located on the left side of the screen. It allows you to navigate among the various management tasks or directory objects, depending on the view that is selected. What you see is also constrained by the rights of your authenticated identity.
![]() Main Content frame: The Main Content frame occupies the middle-right of the screen. When you select a link in the Header or Navigation frames, the appropriate page will be displayed in the Main Content frame.
Main Content frame: The Main Content frame occupies the middle-right of the screen. When you select a link in the Header or Navigation frames, the appropriate page will be displayed in the Main Content frame.
Role-based services allow administrators to assign users a group of specific set of functions, or tasks, into Role objects. When users are assigned a given role, what they see when they access Novell iManager is based on their role assignments. Only the tasks assigned to the authenticated user are displayed. The role-based services available through iManager are represented by objects in eDirectory. The object types include
![]() RBS Collection: A container object that holds all RBS role and task objects for an eDirectory tree. You specify the location for this object during NetWare 6.5 installation.
RBS Collection: A container object that holds all RBS role and task objects for an eDirectory tree. You specify the location for this object during NetWare 6.5 installation.
![]() RBS Role: Specifies the tasks that users (members) are authorized to perform. Defining a role includes creating an RBS Role object and linking it to the tasks that the role can perform. RBS roles can be created only in an RBS Collection container.
RBS Role: Specifies the tasks that users (members) are authorized to perform. Defining a role includes creating an RBS Role object and linking it to the tasks that the role can perform. RBS roles can be created only in an RBS Collection container.
![]() RBS Module: A container inside of the RBS collection that organizes available RBS Task objects into functional groups. RBS modules let you assign users responsibility for specific functionality within a product or service.
RBS Module: A container inside of the RBS collection that organizes available RBS Task objects into functional groups. RBS modules let you assign users responsibility for specific functionality within a product or service.
![]() RBS Task: Represents a specific function, such as resetting login passwords. RBS Task objects are located only in RBS Module containers.
RBS Task: Represents a specific function, such as resetting login passwords. RBS Task objects are located only in RBS Module containers.
![]() RBS Scope: Represents the context in the tree where a role will be performed, and is associated with RBS Role objects. This object is dynamically created when needed, and automatically deleted when no longer needed.
RBS Scope: Represents the context in the tree where a role will be performed, and is associated with RBS Role objects. This object is dynamically created when needed, and automatically deleted when no longer needed.
WARNING
Never change the configuration of an RBS Scope object. Doing so can have very serious consequences and could potentially break the system.
During the iManager installation, the schema of your eDirectory tree was extended to support the RBS object types specified previously. It also created an RBS Collection container for your role-based services and installed the iManager plug-ins to support all currently available product packages. However, you can complete these tasks manually from iManager, if necessary.
To install RBS schema extensions, complete the following steps in iManager:
1. Select the Configure button.
2. Under RBS Configuration, select Extend Schema.
3. Select OK to add the new Role-Based Services schema extensions to the tree. If you get a message that the schema extensions have been previously installed, you are good to go.
To create the RBS Collection container, complete the following steps:
1. Select the Configure button.
2. Under Collection Configuration, select Create Collection.
3. In the Create Collection screen, enter the requested information and select OK.
![]() Name: Enter a name for the Collection object.
Name: Enter a name for the Collection object.
![]() Container: Specify a context for the Collection object.
Container: Specify a context for the Collection object.
To install product packages, complete the following steps in iManager:
1. Select the Configure button.
2. Under RBS Configuration, select Configure iManager. This launches the iManager configuration wizard.
3. At the Available Options screen, select Upgrade Collections and click Next.
4. Select the Collection object with which you want to work and click Next.
5. Provide the necessary information and click Start.
![]() Modules to Be Installed: Specify all RBS modules you want associated with the Collection.
Modules to Be Installed: Specify all RBS modules you want associated with the Collection.
![]() Scope: Specify the container for which the new role assignments, which will be created for the modules you are installing, will be active.
Scope: Specify the container for which the new role assignments, which will be created for the modules you are installing, will be active.
![]() Inheritable: Specifies whether the role rights will flow down to all containers under the specified scope.
Inheritable: Specifies whether the role rights will flow down to all containers under the specified scope.
6. Click Close once the update process has completed. This will return you to the iManager Configure screen.
In most cases you won’t have to do this manually, but its nice to know how it’s done…just in case.
RBS roles specify the tasks that users are authorized to perform. The tasks that RBS roles can perform are exposed as RBS Task objects in eDirectory. RBS tasks are created automatically during the installation of product packages. They are organized into one or more RBS Module containers, each of which corresponds to a different type of functionality within the product.
Create and assign a Role object by completing the following steps in iManager:
1. Select the Configure button.
2. Under Role Configuration, select Create iManager Role. Choose Create eGuide Role if you want to define a role specific to eGuide management.
3. In the Name screen, enter the requested information and click Next.
![]() Role Name: Specify a name for the Role object.
Role Name: Specify a name for the Role object.
![]() Collection: Specify a collection to hold the object.
Collection: Specify a collection to hold the object.
![]() (Optional) Description: Enter a role description, if desired.
(Optional) Description: Enter a role description, if desired.
4. From the All Tasks box, select those tasks that should be assigned to the role you are creating and click the right arrow to move them to the Assigned Tasks box. Click Next.
5. Specify the eDirectory objects and scopes for the role you are creating and click Add. You can select multiple objects to occupy the role, and multiple scopes for each object. The scope specifies the container at which the role will be active in the directory tree. Once all objects and scopes have been defined, click Next.
6. Review the role summary, and click Finish to create the new Role object.
Once created, you can modify RBS roles by completing the following steps in iManager:
1. Select the Configure button.
2. Under Role Configuration, select Modify iManager Role. Choose Modify eGuide Role if you want to modify an eGuide-specific role.
3. Make the desired task or role occupant changes. Click Modify Tasks to add or remove tasks from the Role. Click Modify Members to add or remove occupants from the role, or change the scope of an existing role occupant.
To delete any RBS object from your tree, complete the following steps in iManager:
If a good acronym is a sign of a successful product, NetWare Remote Manager (NoRM) is well on its way to greatness! NoRM provides most of the functionality of the console Monitor utility, together with functionality from several other console utilities, but also NoRM makes it available from a Web browser.
You can use NoRM to monitor your server’s health, change the configuration of your server, and perform diagnostic and debugging tasks. The following list outlines some of the major tasks you can perform with NoRM:
![]() Manage server health: Monitoring the health status of one or more servers, building groups of servers to monitor together, and accessing eDirectory health and troubleshooting tools (iMonitor)
Manage server health: Monitoring the health status of one or more servers, building groups of servers to monitor together, and accessing eDirectory health and troubleshooting tools (iMonitor)
![]() Configure server environment: Managing disk partitions; viewing information about hardware adapters, hardware resources, and processor(s); loading or unloading NLM programs, LAN drivers, or disk drivers (also uploading new NLMs from NoRM); monitoring server disk space and memory resources; accessing files on volumes and DOS partitions; managing server connections; configuring
Configure server environment: Managing disk partitions; viewing information about hardware adapters, hardware resources, and processor(s); loading or unloading NLM programs, LAN drivers, or disk drivers (also uploading new NLMs from NoRM); monitoring server disk space and memory resources; accessing files on volumes and DOS partitions; managing server connections; configuring SET parameters; scheduling console commands to run; and shutting down, restarting, or resetting a server
![]() Troubleshoot server problems by: Finding CPU hogs, finding high memory users, tracing ABEND sources, locating server process hogs, finding disk space hogs, seeing who is using a file
Troubleshoot server problems by: Finding CPU hogs, finding high memory users, tracing ABEND sources, locating server process hogs, finding disk space hogs, seeing who is using a file
Some of the principal tasks you can accomplish with NoRM include the following:
![]() Console Screens link: From this link on the Console Screens page, a Java applet allows you to view and run all the console screens just as though you were using the keyboard at the server console.
Console Screens link: From this link on the Console Screens page, a Java applet allows you to view and run all the console screens just as though you were using the keyboard at the server console.
![]() Console Commands link: From this link you can access a list of all the console commands. Viewing and printing them is now much easier.
Console Commands link: From this link you can access a list of all the console commands. Viewing and printing them is now much easier.
![]() Logging in: When you point your browser at NoRM, you will be prompted to authenticate before seeing any pages.
Logging in: When you point your browser at NoRM, you will be prompted to authenticate before seeing any pages.
![]() Admin and Non-Admin views: If you log in to NetWare Remote Manager as a user with Supervisor rights to the server object, you can access and perform all management options. If you log in as a user without these rights, you can see only the volumes, directories, and files to which you have rights. You can view files where you have read access rights and upload files into directories where you have write access. No management functions are available.
Admin and Non-Admin views: If you log in to NetWare Remote Manager as a user with Supervisor rights to the server object, you can access and perform all management options. If you log in as a user without these rights, you can see only the volumes, directories, and files to which you have rights. You can view files where you have read access rights and upload files into directories where you have write access. No management functions are available.
![]() Disk partition operations: As an alternative to using ConsoleOne to create, change, or remove partitions, volumes, and pools, you can now use the Partition Disks Operation features in NoRM.
Disk partition operations: As an alternative to using ConsoleOne to create, change, or remove partitions, volumes, and pools, you can now use the Partition Disks Operation features in NoRM.
![]() Profile CPU execution per NLM program: On multiprocessor servers, you can view how each NLM program is distributing its activity across the available processors.
Profile CPU execution per NLM program: On multiprocessor servers, you can view how each NLM program is distributing its activity across the available processors.
As you can see, NoRM is a very robust management utility that promises extremely flexible operation for today’s NetWare administrators.
With most installations and patterns for NetWare 6.5, NoRM is installed automatically. After the installation, use a Web browser from a client computer in your network to access NoRM. In order to access NoRM from an Internet connection outside your firewall, you will need to make sure that TCP port 8009 is opened through the firewall to the IP address of your Web server. Port 8009 is the default port through which you will access the Web Manager interface. If desired, this port can be changed as long as it doesn’t conflict with any other service on the NetWare 6.5 server.
To use NoRM, you must have a 4.x or newer Web browser such as Internet Explorer or Netscape Communicator. Make sure that Java or JavaScript is enabled on your Web browser. See the section on Web Manager for instructions on how to do this.
NoRM is accessible directly, or from the server console. To open NoRM directly, Open your Web browser and enter your Web server’s domain name or IP address, followed by a colon and the port number, which by default is 8009. For example:
https://www.quills.com:8009
or
https://137.65.192.1:8009
You might be prompted to accept an unknown certificate. At the Authentication dialog, enter the full username, with a leading dot, and password of a user with administrative rights to this server, and then select OK (see Figure 3.6).
To open NoRM from the graphical server console, simply click the red N button from the GUI.
NOTE
If you don’t log in as a user with administrative rights to the server, you will not have access to all pages necessary to manage your server remotely. You will see only pages that display the volumes, directories, and files for which you have trustee rights. In this case, you can view files (where you have read access), and upload files into directories where you have write access. You will not have access to any other management functions.
After logging in, your session for NetWare Remote Manager remains open until you close all your browser windows at that workstation. To log out of NetWare Remote Manager, close all the browser windows at the workstation from which you logged in.
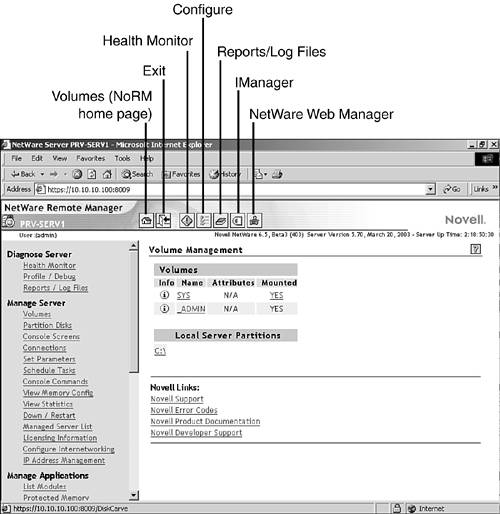
Similar to iManager, NoRM is organized into three main sections, or frames:
![]() Header frame: The Header frame is located at the top of the screen. It provides a semaphore (Green, Yellow, Red) assessment of the server’s health, in addition to other tools and the Volumes and Health Monitor pages in NoRM. Clicking the NetWare Remote Manager title in the header will take you to an About NoRM description of the software components of NoRM. Selecting the semaphore icon next to your server name will also take you to the Health Monitor page. By default, the Volumes page is always displayed when NoRM first starts.
Header frame: The Header frame is located at the top of the screen. It provides a semaphore (Green, Yellow, Red) assessment of the server’s health, in addition to other tools and the Volumes and Health Monitor pages in NoRM. Clicking the NetWare Remote Manager title in the header will take you to an About NoRM description of the software components of NoRM. Selecting the semaphore icon next to your server name will also take you to the Health Monitor page. By default, the Volumes page is always displayed when NoRM first starts.
![]() Navigation frame: The Navigation frame is located on the left side of the screen. It lists different management tasks, organized into groups that you can perform with NoRM. Each link takes you to the specific page(s) for performing that task. The list of available tasks in the Navigation frame can change based on the services and NLMs that you have loaded on the server.
Navigation frame: The Navigation frame is located on the left side of the screen. It lists different management tasks, organized into groups that you can perform with NoRM. Each link takes you to the specific page(s) for performing that task. The list of available tasks in the Navigation frame can change based on the services and NLMs that you have loaded on the server.
![]() Main Content frame: The Main Content frame occupies the middle-right of the screen. When you select a link in the Header or Navigation frames, the appropriate page will be displayed in the Main content frame. If an Information icon appears in the upper-right corner of the page, you can view help for the page that is displayed in the main content frame.
Main Content frame: The Main Content frame occupies the middle-right of the screen. When you select a link in the Header or Navigation frames, the appropriate page will be displayed in the Main content frame. If an Information icon appears in the upper-right corner of the page, you can view help for the page that is displayed in the main content frame.
From these frames you will be able to view and modify all features accessible through NoRM.
You can access NoRM configuration options by selecting the Configure button in the header. To access the configuration options you must be logged in as a user with supervisor rights to the server from which NoRM is being run. The NoRM Configuration settings are organized into four groups:
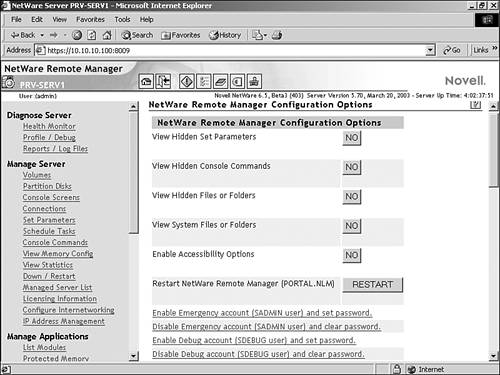
![]() NetWare Remote Manager configuration options: The following settings are used to configure NoRM views (see Figure 3.7):
NetWare Remote Manager configuration options: The following settings are used to configure NoRM views (see Figure 3.7):
![]() View Hidden
View Hidden SET Parameters: Toggles whether or not hidden NetWare console SET parameters are visible in the list of available SET parameters in NoRM and on the server console.
![]() View Hidden Console Commands: Toggles whether or not hidden server console commands are visible in the list of available console commands. This can be helpful for discovering undocumented commands.
View Hidden Console Commands: Toggles whether or not hidden server console commands are visible in the list of available console commands. This can be helpful for discovering undocumented commands.
TIP
Even if hidden, any SET parameter or console command can still be activated from either NoRM or the server console as long as you know the proper syntax.
![]() View Hidden Files or Folders: Toggles whether or not files and folders with the Hidden attribute set will appear in the page lists on NoRM or on the server console.
View Hidden Files or Folders: Toggles whether or not files and folders with the Hidden attribute set will appear in the page lists on NoRM or on the server console.
![]() View System Files or Folders: Toggles whether or not files and folders with the System attribute set will appear in the page lists on NoRM or on the server console.
View System Files or Folders: Toggles whether or not files and folders with the System attribute set will appear in the page lists on NoRM or on the server console.
![]() Enable Accessibility Options: Disables dynamic refresh of NoRM pages in order to conform to new federal accessibility guidelines. With this option enabled, Health Monitor pages will not refresh until a manual page refresh is performed. For more information on accessibility options, see the NetWare 6.5 online documentation.
Enable Accessibility Options: Disables dynamic refresh of NoRM pages in order to conform to new federal accessibility guidelines. With this option enabled, Health Monitor pages will not refresh until a manual page refresh is performed. For more information on accessibility options, see the NetWare 6.5 online documentation.
![]() Restart NetWare Remote Manager (PORTAL.NLM): If you make any changes to settings in this group, you must reset NoRM for the changes to take effect.
Restart NetWare Remote Manager (PORTAL.NLM): If you make any changes to settings in this group, you must reset NoRM for the changes to take effect.
![]() Enable Emergency Account (SADMIN user) and Set Password: SADMIN is a backup supervisor account that can be used when the Admin account or eDirectory is not working properly. It lets you perform maintenance tasks that do not require eDirectory. SADMIN is created when NoRM is installed.
Enable Emergency Account (SADMIN user) and Set Password: SADMIN is a backup supervisor account that can be used when the Admin account or eDirectory is not working properly. It lets you perform maintenance tasks that do not require eDirectory. SADMIN is created when NoRM is installed.
![]() Disable Emergency Account (SADMIN user) and Clear Password: Disable the emergency user account created by NoRM when it is installed, and clear the password that has been set.
Disable Emergency Account (SADMIN user) and Clear Password: Disable the emergency user account created by NoRM when it is installed, and clear the password that has been set.
![]() Enable Debug Account (SDEBUG user) and Set Password: SDEBUG is a limited access account suitable for debugging common server problems without granting access to data stored on the server.
Enable Debug Account (SDEBUG user) and Set Password: SDEBUG is a limited access account suitable for debugging common server problems without granting access to data stored on the server.
![]() Disable Debug Account (SDEBUG user) and Clear Password: Disable the emergency user account created by NoRM when it is installed, and clear the password that has been set.
Disable Debug Account (SDEBUG user) and Clear Password: Disable the emergency user account created by NoRM when it is installed, and clear the password that has been set.
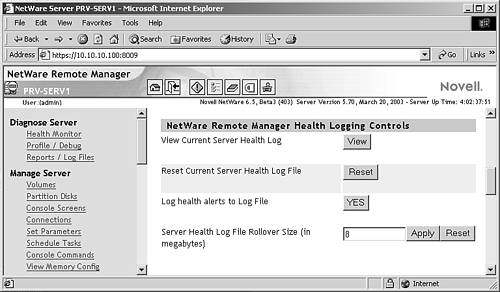
![]() NetWare Remote Manager Health Logging Controls:The following settings let you view and control the server health log (see Figure 3.8). From these settings you can view, clear, enable/disable, and restrict the maximum size of the server health log.
NetWare Remote Manager Health Logging Controls:The following settings let you view and control the server health log (see Figure 3.8). From these settings you can view, clear, enable/disable, and restrict the maximum size of the server health log.
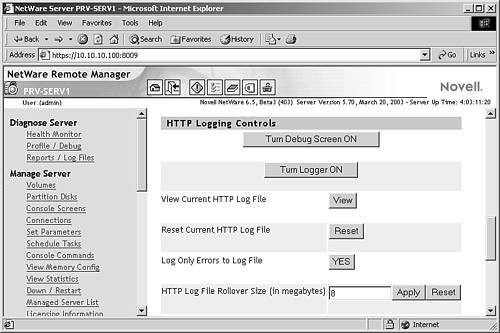
![]() HTTP logging controls: The following settings control log files in the NoRM environment (see Figure 3.9):
HTTP logging controls: The following settings control log files in the NoRM environment (see Figure 3.9):
![]() Turn Debug Screen On: When instructed by Novell Technical Services, turn this setting on to help debug a problem with the HTTPSTK module. You must also click the Turn Logger On button. The debug console screen journals debug information for the HTTP stack running on the server so that it can be reviewed for troubleshooting purposes.
Turn Debug Screen On: When instructed by Novell Technical Services, turn this setting on to help debug a problem with the HTTPSTK module. You must also click the Turn Logger On button. The debug console screen journals debug information for the HTTP stack running on the server so that it can be reviewed for troubleshooting purposes.
WARNING
This option will create significant server overhead and should not be used under normal operation.
![]() Turn Logger On: If logging has been turned off, clicking this button will turn it on.
Turn Logger On: If logging has been turned off, clicking this button will turn it on.
![]() View Current HTTP Log File: The log file contains the following information: an entry number; the date and timestamp in Greenwich mean time (GMT); hostname; the program making the call; the level of the call (whether it’s done by the server or by users); and a description of the entry itself with information including the IP address of the source machine making the request, messages, status, and so on.
View Current HTTP Log File: The log file contains the following information: an entry number; the date and timestamp in Greenwich mean time (GMT); hostname; the program making the call; the level of the call (whether it’s done by the server or by users); and a description of the entry itself with information including the IP address of the source machine making the request, messages, status, and so on.
![]() Reset Current HTTP Log File: This option clears the current log and begins a new one. Restarting the log is useful if you have made a configuration change to your server and want to begin a new logging session.
Reset Current HTTP Log File: This option clears the current log and begins a new one. Restarting the log is useful if you have made a configuration change to your server and want to begin a new logging session.
![]() Log Only Errors to Log File: This option controls whether or not all requests are logged to the file. When logging only errors to the file, it will take much longer to fill the file to its maximum size, but casual access to the server is not tracked.
Log Only Errors to Log File: This option controls whether or not all requests are logged to the file. When logging only errors to the file, it will take much longer to fill the file to its maximum size, but casual access to the server is not tracked.
![]() HTTP Log File Rollover Size (in Megabytes): This option sets a maximum size for the HTTP log file. If the available space on your volume
HTTP Log File Rollover Size (in Megabytes): This option sets a maximum size for the HTTP log file. If the available space on your volume SYS: is limited, you might want to limit the log file to a smaller size. If you want to gather more information over a longer period of time in the log file, you might want to increase the rollover size. When the file is full, the file is deleted and restarted. Automatic rollover guarantees that if logging is on, the log file always reflects the most recent activity on the server.
![]() HTTP Interface Management: The following settings control the basic configuration of NoRM (see Figure 3.10):
HTTP Interface Management: The following settings control the basic configuration of NoRM (see Figure 3.10):
![]() HTTP IP Address and Port Setup: From this link, you can configure the default TCP port for unencrypted access to NoRM (default
HTTP IP Address and Port Setup: From this link, you can configure the default TCP port for unencrypted access to NoRM (default 81), the alternate TCP port (default 8008), and the default SSL port (default 8009).
![]() Mail Notification Configuration: From this page you can specify a primary mail server, an alternate mail server, up to eight users in the notification list, and a Mail From identification. You can control which items to be notified about on the Health Monitor page.
Mail Notification Configuration: From this page you can specify a primary mail server, an alternate mail server, up to eight users in the notification list, and a Mail From identification. You can control which items to be notified about on the Health Monitor page.
![]() Change Minimum Startup Threads: This setting lets you define the number of worker threads that are created for NoRM at startup. At least one thread is required and other threads will be created as needed. These initial work threads will be built between the server and browser-based clients. The default is
Change Minimum Startup Threads: This setting lets you define the number of worker threads that are created for NoRM at startup. At least one thread is required and other threads will be created as needed. These initial work threads will be built between the server and browser-based clients. The default is 32. However, if memory is low, you might want to set this to 4 and let more threads be created as needed.
![]() Change TCP Keep Alive (in Seconds): This option lets you change the timeout for TCP sessions in NoRM. Default is 300 seconds (five minutes).
Change TCP Keep Alive (in Seconds): This option lets you change the timeout for TCP sessions in NoRM. Default is 300 seconds (five minutes).
![]() Access IP Address Access Control Page: From this page you can limit access to NoRM. You can specify IP addresses for workstations or specify a subnet and subnet mask for ranges of workstations from which to give access. Restricting access in this way can help secure remote access to your server.
Access IP Address Access Control Page: From this page you can limit access to NoRM. You can specify IP addresses for workstations or specify a subnet and subnet mask for ranges of workstations from which to give access. Restricting access in this way can help secure remote access to your server.
![]() Restart NetWare HTTP Interface Module (HTTPSTK.NLM): Changes to settings in this group require that HTTPSTK.NLM be reloaded. Select this button to perform the reload remotely.
Restart NetWare HTTP Interface Module (HTTPSTK.NLM): Changes to settings in this group require that HTTPSTK.NLM be reloaded. Select this button to perform the reload remotely.
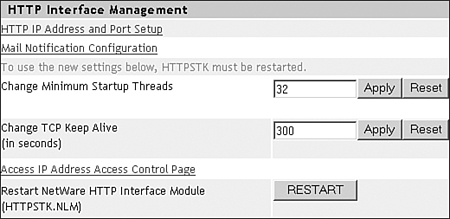
NOTE
By clicking the word Novell in the upper-right portion of the header frame, you can access the Novell Support Connection at http://support.novell.com/. From this site, you can get current updates, locate troubleshooting information, or open an online support incident.
You can add text, graphics, and custom links to the home (Volumes) page of NoRM by creating an HTML file named PRTLANNC.HTM, which contains the HTML code you want to add, and placing it in the server’s SYS:LOGIN directory. Any information in this file will appear at the bottom of the home page. See the NetWare 6.5 online documentation for more information.
NetWare 6.5 ships with iMonitor v2.1. It is accessible as a component of NoRM, and provides eDirectory management and repair capabilities similar to the server management capabilities offered by NoRM. The goal of iMonitor is to provide a Web-based alternative, and eventual replacement, for many of the traditional eDirectory management and trouble-shooting tools such as DSBrowse, DSTrace, DSDiag, and much of DSRepair.
iMonitor is capable of gathering information not only from NetWare 6.5 servers, but from most any version of eDirectory, including NDS version 4.11 or higher, and NDS or eDirectory running on any supported platform (NetWare, Windows NT/2000, Solaris, Linux, and Tru64).
Although iMonitor does provide tree-wide management, it is designed to get “down in the weeds” just like the console-based tools that you may have used in the past. It keeps track of the activities of the DSAgent running on each eDirectory server, so you can get an accurate picture of what is happening at any given time.
The following list identifies some of the major features offered by iMonitor in NetWare 6.5:
![]() General eDirectory tasks: This category of features includes search for eDirectory object(s), status of DirXML in your environment (if applicable), both pre-configured and customizable eDirectory reports, and detailed eDirectory error code and troubleshooting references.
General eDirectory tasks: This category of features includes search for eDirectory object(s), status of DirXML in your environment (if applicable), both pre-configured and customizable eDirectory reports, and detailed eDirectory error code and troubleshooting references.
![]() Monitor eDirectory agent health: This includes synchronization status, detailed synchronization information, known eDirectory servers, and partition and replica status for this server.
Monitor eDirectory agent health: This includes synchronization status, detailed synchronization information, known eDirectory servers, and partition and replica status for this server.
![]() Browse eDirectory agent: This lets you view eDirectory objects and attributes from the perspective of the server as well as viewing eDirectory schema on the server.
Browse eDirectory agent: This lets you view eDirectory objects and attributes from the perspective of the server as well as viewing eDirectory schema on the server.
![]() Configuring eDirectory agent: Configure partition lists, replication filters, background processes, agent triggers, login settings, schema and partition synchronization, and database cache settings.
Configuring eDirectory agent: Configure partition lists, replication filters, background processes, agent triggers, login settings, schema and partition synchronization, and database cache settings.
![]() Server-centric tasks: This includes Web-based versions of DSTrace, simplified DSRepair, and a background process scheduler. These services are available only for the server from which iMonitor is running.
Server-centric tasks: This includes Web-based versions of DSTrace, simplified DSRepair, and a background process scheduler. These services are available only for the server from which iMonitor is running.
As you can see, much of what was previously accomplished by console-based tools is now available via the Web-based interface of iMonitor.
iMonitor is installed automatically during the installation of NetWare 6.5. Because it shares resources with NoRM, the PORTAL and HTTPSTK.NLM programs must be loaded on the server. Entries are placed in the AUTOEXEC.NCF to accomplish this.
After the installation, use a Web browser from a client computer in your network to access iMonitor. To access iMonitor from an Internet connection outside your firewall, you will need to make sure that TCP port 8009 is opened through the firewall to the IP address of your Web server. Port 8009 is the default port through which you will access the Web Manager interface. If desired, this port can be changed as long as it doesn’t conflict with any other service on the NetWare 6.5 server.
To use iMonitor, use a current version of a Web browser, and make sure that Java or JavaScript is enabled on your Web browser. For steps on doing this, see the Web Manager section of this chapter.
To access iMonitor, open NoRM and browse down to the Manage eDirectory heading in the left column, and then select NDS iMonitor.
Alternatively, you can open iMonitor directly by opening your Web browser and entering your Web server’s domain name or IP address, the NoRM port number (8009), and the iMonitor path (/nds). For example:
https://www.quills.com:8009/nds
or
https://137.65.192.1:8009/nds
You might be prompted to accept a certificate. At the Authentication dialog box, enter the full username, with a leading dot, and password of a user with administrative rights to this server, and then select OK to display the screen shown in Figure 3.11.
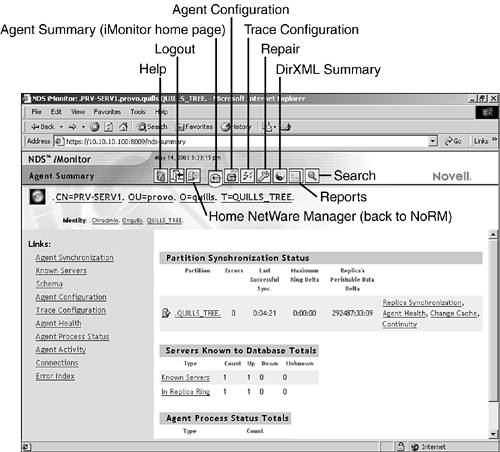
As with NoRM, your iMonitor session remains open until all browser windows at your workstation are closed.
Because it is a component of NoRM, iMonitor adheres largely to the same page layout as NoRM and iManager.
There are four possible frames to an iMonitor page:
![]() Header frame: The Header frame is located at the top of the screen. It provides a semaphore (Green, Yellow, Red) assessment of the eDirectory tree’s health, in addition to access to other iMonitor tools and the iMonitor configuration. Clicking the NDS iMonitor title in the header will take you to an About iMonitor description of iMonitor software components. By default, the Agent Summary page is always displayed when iMonitor first starts.
Header frame: The Header frame is located at the top of the screen. It provides a semaphore (Green, Yellow, Red) assessment of the eDirectory tree’s health, in addition to access to other iMonitor tools and the iMonitor configuration. Clicking the NDS iMonitor title in the header will take you to an About iMonitor description of iMonitor software components. By default, the Agent Summary page is always displayed when iMonitor first starts.
![]() Navigation frame: The Navigation frame is located on the left side of the screen. It lists different management tasks, organized into groups, which you can perform with iMonitor. Each link takes you to the specific page(s) for performing that task.
Navigation frame: The Navigation frame is located on the left side of the screen. It lists different management tasks, organized into groups, which you can perform with iMonitor. Each link takes you to the specific page(s) for performing that task.
![]() Main Content frame: The Main Content frame occupies the middle-right of the screen. When you select a link in the Header or Navigation frames, the appropriate page will be displayed in the Main Content frame.
Main Content frame: The Main Content frame occupies the middle-right of the screen. When you select a link in the Header or Navigation frames, the appropriate page will be displayed in the Main Content frame.
![]() (Conditional) Replica frame: When needed, the Replica frame will appear in the lower-left corner of the iMonitor frame. This will happen when another replica of the requested data exists, or when another replica has a different view of the information being presented in the Main Content frame. From the Replica frame you can change the replica that you are using to view the requested data.
(Conditional) Replica frame: When needed, the Replica frame will appear in the lower-left corner of the iMonitor frame. This will happen when another replica of the requested data exists, or when another replica has a different view of the information being presented in the Main Content frame. From the Replica frame you can change the replica that you are using to view the requested data.
The amount and type of information that you see in iMonitor is dependent on your current eDirectory identity and the version of the DSAgent with which you are currently working. As new versions of eDirectory are released, they will be updated to provide more information to iMonitor. Therefore, older versions of eDirectory or NDS, while still accessible via iMonitor, will not provide the same level of detail offered by eDirectory 8.7.
iMonitor can function in one of two possible modes. You don’t need to do anything to select between the two modes; iMonitor handles it automatically. However, it is important to understand them in order to properly interpret iMonitor data and navigate the eDirectory tree.
![]() Direct mode: Direct mode is used when iMonitor is gathering information or executing an operation on the same server from which iMonitor is running. The server-centric iMonitor features mentioned previously, which include DSTrace, DSRepair, and Background Scheduler, are available only from Direct mode. Direct mode gives you full access to all iMonitor features and is faster than Proxy mode, which is described next.
Direct mode: Direct mode is used when iMonitor is gathering information or executing an operation on the same server from which iMonitor is running. The server-centric iMonitor features mentioned previously, which include DSTrace, DSRepair, and Background Scheduler, are available only from Direct mode. Direct mode gives you full access to all iMonitor features and is faster than Proxy mode, which is described next.
![]() Proxy mode: Proxy mode is used when iMonitor is gathering information or executing an operation on a server other than that from which iMonitor is running. Proxy mode makes it possible to gather information and statistics from older versions of eDirectory or NDS. Proxy mode is the default method of operation for iMonitor, meaning that once iMonitor is opened, it will continue to run from the specified server until explicitly told to switch to an instance of iMonitor on a different server.
Proxy mode: Proxy mode is used when iMonitor is gathering information or executing an operation on a server other than that from which iMonitor is running. Proxy mode makes it possible to gather information and statistics from older versions of eDirectory or NDS. Proxy mode is the default method of operation for iMonitor, meaning that once iMonitor is opened, it will continue to run from the specified server until explicitly told to switch to an instance of iMonitor on a different server.
iMonitor chooses the mode based on the URL request submitted from your browser. If the URL contains a server query, iMonitor will use Proxy mode. If no server query is present, iMonitor will run the query against the local DSAgent using Direct mode.
The default configuration of iMonitor is suitable for most environments. However, iMonitor offers a configuration file, SYS:SYSTEMNDSIMON.INI, that allows you to customize iMonitor if desired. It lets you change both the general execution of iMonitor, as well as customize specific iMonitor features. For more information on iMonitor, see the NetWare 6.5 online documentation.