
Chapter 8: Marking Time with Calendar
In This Chapter
![]() Entering and editing events
Entering and editing events
![]() Working with multiple calendars
Working with multiple calendars
![]() Sharing your calendars
Sharing your calendars
![]() Publishing and subscribing
Publishing and subscribing
![]() Printing calendars
Printing calendars
What’s so great about a computerized calendar? After all, you’ve probably been jotting events down on a paper calendar of one sort or another as long as you can remember. (These days, your insurance agent sends you one for free every year.) What if you’re already using the Calendar app on your iPhone or iPad? Isn’t it more work to launch Calendar than to reach for that old paper standby?
Ah, good reader, there are indeed a number of good reasons to move from your old-fashioned paper calendar to Mountain Lion’s digital Calendar application! Sharing a common calendar with others in your home or office, for example — and imagine synchronizing the same calendar events between your Mac and your iPhone and iPad. Suddenly those events get a lot more convenient, and your day becomes more organized. And don’t forget that Calendar works hand-in-hand with other applications, like Contacts and Mountain Lion’s new Notification Center, too. (Read all about Contacts in Chapter 7 of this minibook, and Notification Center in Chapter 6.)
In this chapter, I show you how to take full advantage of the Mac OS X Calendar. You’ll have to figure out how to recycle that tired old paper dinosaur yourself.
Shaking Hands with the Calendar Window
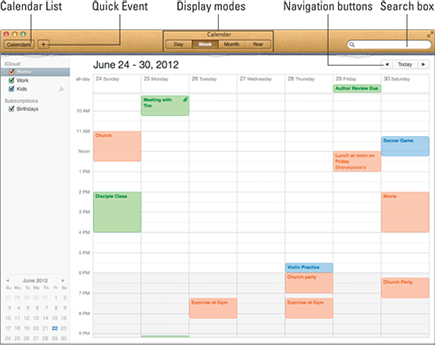
Launching Calendar requires only one click; Apple includes it as one of the default Dock icons. (Naturally, you can also launch the application from within Launchpad.) Figure 8-1 illustrates the Calendar window that appears.
Significant stuff of note includes
![]() Calendar List button: Click this button to hide or show the Calendar List, which makes it easy to select from multiple calendars or choose a subscription, which I discuss later in the chapter. By default, Calendar uses your iCloud account and stores your calendars online, automatically syncing your OS X Calendar data with your iOS devices.
Calendar List button: Click this button to hide or show the Calendar List, which makes it easy to select from multiple calendars or choose a subscription, which I discuss later in the chapter. By default, Calendar uses your iCloud account and stores your calendars online, automatically syncing your OS X Calendar data with your iOS devices.
![]() Quick Event button: A click of this button displays the Quick Event pop-up text box, where you can actually enter a free-form event using three criteria: the event name, the time, and the day of the week. (For example, one of the events shown in my calendar in Figure 8-1 was created with the text
Quick Event button: A click of this button displays the Quick Event pop-up text box, where you can actually enter a free-form event using three criteria: the event name, the time, and the day of the week. (For example, one of the events shown in my calendar in Figure 8-1 was created with the text Lunch at noon on Friday. Another example would be Doctors Appointment at 3PM on 06/28.) After you type the text and press Return, Calendar creates a one-hour named event at the time and on the day you specified, and displays the event in an Info dialog. Then all you have to do is click Done on the Info dialog to confirm.
![]() Display mode buttons: These buttons allow you to display your calendar in four different formats: by day, week, month, or year.
Display mode buttons: These buttons allow you to display your calendar in four different formats: by day, week, month, or year.
![]() Search box: Here’s a familiar face! Click in the Search box to search the current calendar for events by name, time, contents of the Notes field, or those folks you’ve invited.
Search box: Here’s a familiar face! Click in the Search box to search the current calendar for events by name, time, contents of the Notes field, or those folks you’ve invited.
![]() Navigation buttons: Click the Previous button to switch to the previous day, week, month or year (depending on your display mode). Click the Next button to switch to the upcoming day, week, month, or year. You can always return to today’s calendar by clicking the Today button.
Navigation buttons: Click the Previous button to switch to the previous day, week, month or year (depending on your display mode). Click the Next button to switch to the upcoming day, week, month, or year. You can always return to today’s calendar by clicking the Today button.
 If you appreciate menu controls, open the View menu and check out all these controls available there. Keyboard fans, you’re not shorted either: Switch display modes using the
 ![]() +1 through
+1 through ![]() +4 shortcuts. Pressing
+4 shortcuts. Pressing ![]() +→ acts the same as clicking the Next button, and
+→ acts the same as clicking the Next button, and ![]() +← works like the Previous button. To jump directly to today’s date, press
+← works like the Previous button. To jump directly to today’s date, press ![]() +T.
+T.
Maybe you don’t want a view of a standard calendar arrangement — that is, a week starting on Sunday that lasts for seven days. You might prefer a work week view, of Monday–Friday, of five days. To make the change, choose Calendar⇒Preferences and click the General tab to specify a number of important defaults: how many days you prefer in a week, when the week starts, and what time your day begins and ends.
Figure 8-1: The Calendar window can organize your very existence (well, almost).
Entering That Special Event
As I mention in the previous section, the Quick Event button can create an event with just a short phrase. However, there are even simpler (and more conventional) methods of adding events to your calendar. Besides clicking the Quick Event button, you can also start the ball rolling in three ways:
![]() Double-click a time or date. Calendar automatically creates a one-hour event and opens a text box where you can type the event name. Press Return after you type the name, and you’re done.
Double-click a time or date. Calendar automatically creates a one-hour event and opens a text box where you can type the event name. Press Return after you type the name, and you’re done.
![]() Right-click a time or date and choose New Event. Again, you get a text box for the event name. After you enter it, press Return.
Right-click a time or date and choose New Event. Again, you get a text box for the event name. After you enter it, press Return.
![]() Choose File⇒New Event or press
Choose File⇒New Event or press ![]() +N. Calendar displays the Quick Event text box, where you can choose the event name, time, and date, as I describe earlier.
+N. Calendar displays the Quick Event text box, where you can choose the event name, time, and date, as I describe earlier.
To delete an Event from your calendar, just right-click the Event block and choose Delete from the contextual menu.
Editing Existing Events
As you might imagine, adding default events works perfectly if every occasion in your life lasts only one hour. What if you need to change the duration, add information, or change an event after you create it?
First things first. Changing the duration of an event couldn’t be easier. Move your cursor over the top or bottom edge of any event block in your calendar, and it turns into a line with arrows pointing up and down, indicating that you can click and drag the edge of the event to change the starting or ending point.
As for adding information or changing an event, Calendar also allows you to edit any event to fine-tune it:
1. Click the event you want to change to select it and choose Edit⇒Edit Event from the menu.
You can also press ![]() +E, or double-click the event and click Edit. Figure 8-2 illustrates the sheet that appears. The event name is highlighted, so you can easily type in a new name immediately.
+E, or double-click the event and click Edit. Figure 8-2 illustrates the sheet that appears. The event name is highlighted, so you can easily type in a new name immediately.
2. Click a field to change it.
Some fields display text boxes, and others are pop-up menus or check boxes. I describe the available fields later in this section. Press Tab to move through the fields in succession.
The icons next to some fields that look like up and down arrows are pop-up menus. Click the up/down icon, and a pop-up menu appears, where you can make your selection.
3. After you finish your edits, click Done.
Click Revert to discard your changes and return the event to the original information.
If you need to see the particulars for an event without actually changing anything, right-click the event and choose Get Info from the menu that appears. The Get Info dialog displays the same information as the Event Edit sheet. (In fact, you can also edit from the Get Info dialog, but that’s a highly protected Top Secret.)
Figure 8-2: Edit info for an event.
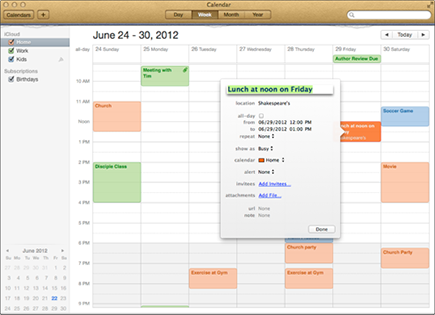
Besides the event name, the fields you can change (refer to Figure 8-2) when editing include
![]() The location: This appears in the Event block under the Event name.
The location: This appears in the Event block under the Event name.
![]() All-Day: If you select this check box, Calendar automatically reserves the entire day for the event. If you’re viewing your calendar in Week display mode, the application also moves the all-day event to the top of that day.
All-Day: If you select this check box, Calendar automatically reserves the entire day for the event. If you’re viewing your calendar in Week display mode, the application also moves the all-day event to the top of that day.
![]() Time and Date: Click the From/To dates for the event, and Calendar displays a nifty pop-up calendar, which you can use to select a new date. Click the From/To times and type in a new starting and ending time for the event.
Time and Date: Click the From/To dates for the event, and Calendar displays a nifty pop-up calendar, which you can use to select a new date. Click the From/To times and type in a new starting and ending time for the event.
![]() Repeat: If this event is a regular occurrence, you can specify that Calendar automatically repeat the event every day, week, month, or year at the same time. Alternatively, click Custom and then specify the frequency as well as how many days, weeks, months, or years to skip between events.
Repeat: If this event is a regular occurrence, you can specify that Calendar automatically repeat the event every day, week, month, or year at the same time. Alternatively, click Custom and then specify the frequency as well as how many days, weeks, months, or years to skip between events.
![]() Show As: Open this pop-up menu to specify whether your Calendar should show you as Busy or Free for this event when your calendar is viewed by others. (More on sharing calendars in the section titled, “Sharing Your Attractive Calendar.”)
Show As: Open this pop-up menu to specify whether your Calendar should show you as Busy or Free for this event when your calendar is viewed by others. (More on sharing calendars in the section titled, “Sharing Your Attractive Calendar.”)
![]() Calendar: From this pop-up menu, you can select which of your calendars should include this event. If you choose another calendar, the application automatically moves the event to the calendar you specified.
Calendar: From this pop-up menu, you can select which of your calendars should include this event. If you choose another calendar, the application automatically moves the event to the calendar you specified.
![]() Alert: If you want your event to fire an alert, open this pop-up menu to select the action your Mac should take. Mountain Lion can display a message using Notification Center (see Chapter 6 of this minibook), or display a message and play a sound to get your attention. You can also choose to receive an e-mail message sent automatically from Apple Mail, or open a file automatically on your Mac.
Alert: If you want your event to fire an alert, open this pop-up menu to select the action your Mac should take. Mountain Lion can display a message using Notification Center (see Chapter 6 of this minibook), or display a message and play a sound to get your attention. You can also choose to receive an e-mail message sent automatically from Apple Mail, or open a file automatically on your Mac.
![]() Invitees: You can add individuals from your Contacts database or enter e-mail addresses directly to specify the invitees for this event. Calendar automatically sends an event invitation to each contact.
Invitees: You can add individuals from your Contacts database or enter e-mail addresses directly to specify the invitees for this event. Calendar automatically sends an event invitation to each contact.
![]() Attachments: Click this link to associate one or more files to the event. (This is a great way to add a restaurant menu in PDF format to a lunch event, or the minutes from a previous meeting.) The folks whom you’ve invited to the event can also open the attachments.
Attachments: Click this link to associate one or more files to the event. (This is a great way to add a restaurant menu in PDF format to a lunch event, or the minutes from a previous meeting.) The folks whom you’ve invited to the event can also open the attachments.
![]() URL/Note: These free-form text fields allow you to enter a web address for the event as well as notes regarding the event.
URL/Note: These free-form text fields allow you to enter a web address for the event as well as notes regarding the event.
Keeping Track of Multiple Calendars
What’s that you say? You need more than just one calendar to keep your work, home, and school schedules in order? Luckily, Calendar allows you to create additional calendars at any time. The events from all your calendars will appear in the same display, so you can see the timeline of your upcoming days, weeks, and months at a glance.
To add a new calendar, choose File⇒New Calendar and select the desired account. By default, Calendar uses your iCloud account and stores your new calendar online. Type the name for your calendar and press Return, and your new calendar appears in the Calendar List. (If the Calendar List is hidden, click the Calendars button or choose View⇒Show Calendar List.) To delete a calendar, right-click the name in the Calendar List and choose Delete from the contextual menu.
Note that the events for each calendar can be individually enabled or disabled using the check box next to it. If you’re on vacation, for example, you can easily disable the display of your Work calendar events until you get back.
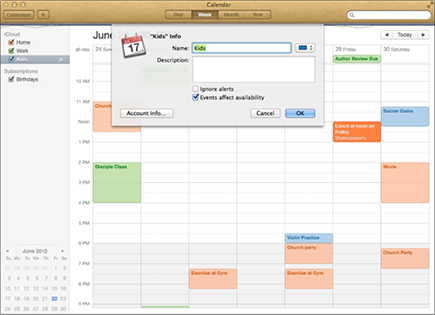
Personally, I find it much easier to distinguish between multiple calendars when I color-code event blocks. (Changing the color of a calendar also changes the color of its check box in the List.) To change a calendar’s color, right-click it in the Calendar List and choose Get Info from the menu that appears. Figure 8-3 illustrates the sheet that appears. Open the Color pop-up menu next to the Name text box and select just the right shade of magenta. While you’re reviewing the Info for the calendar, you’ll note that you can also change the name, add a description, or choose to ignore all upcoming alerts from this calendar. Click OK to save your changes.
Figure 8-3: The Info sheet for a calendar.
Sharing Your Attractive Calendar
Calendar allows you to distribute your calendar information with others through its nifty sharing feature. Apple’s iCloud service makes it easy to share calendars with an iPhone, iPad, or iPod touch. And, if you already set up your iCloud account when you installed Mountain Lion, those calendars appear in your List right now. That’s not all, though. You can also share calendars with other
![]() Macs running Mountain Lion (using the Calendars application)
Macs running Mountain Lion (using the Calendars application)
![]() Macs running Lion (using the iCal application)
Macs running Lion (using the iCal application)
![]() Folks running Microsoft Outlook on PCs and Macs
Folks running Microsoft Outlook on PCs and Macs
To share a calendar, to select it in the Calendar List and then choose Edit⇒Share Calendar. You’ll see the Sharing sheet that appears in Figure 8-4.
Figure 8-4: Preparing to share a calendar.
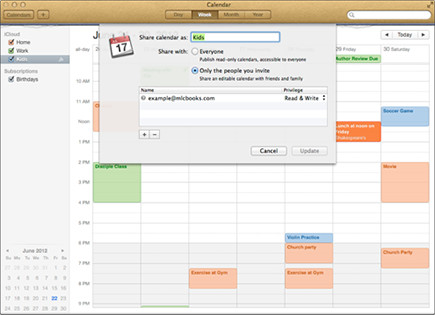
From here, you can choose to share a read-only version of the calendar with everyone (no one else is allowed to edit the Events), or invite specific people to share a read-write (editable) version of the calendar.
Selecting the Only the People You Invite radio button displays a list where you can add e-mail addresses by clicking the Add button (with the plus sign). You can also click the Privilege pop-up menu next to each e-mail address to assign that person either full read-write privileges or just the ability to read your calendar. (Naturally, if you choose to invite individuals with read-write access, you want only those people that should have the ability to edit events.) Then click Share, and a shared calendar appears with a radio signal icon in the Calendar List.
You can view and change the sharing settings for a selected calendar at any time by choosing View⇒Sharing Settings. To stop sharing a calendar, choose View⇒Stop Sharing.
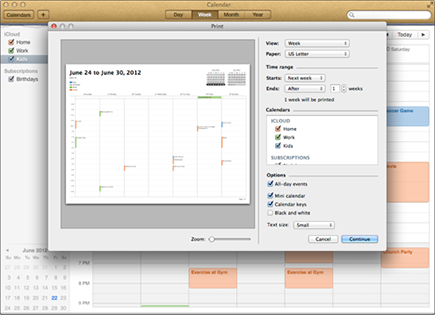
Putting Your Calendar on Paper
I know, I know, I’ve spent this entire chapter telling you how much better an electronic calendar is than your old paper version, but I also know that everyone needs a hard copy from time to time. Choose File⇒Print (or press ![]() +P) to display the initial Setup dialog you see in Figure 8-5.
+P) to display the initial Setup dialog you see in Figure 8-5.
Unlike other Mountain Lion applications, Calendar uses a two-step printing process. In the first Print dialog, you choose
![]() The calendar view you want: day, week, or month
The calendar view you want: day, week, or month
![]() The type of paper to use
The type of paper to use
![]() The date range
The date range
![]() Which calendar events to print
Which calendar events to print
Figure 8-5: Calendar offers a myriad of print configuration options.
After you set those choices, click Continue to move to the second step, where you encounter the more familiar Print dialog. From here, you can choose a printer, the number of copies, and specify which pages to print.
 To show all the available settings on the Print dialog, click the Show Details button at the bottom of the sheet.
Don’t forget Mountain Lion’s PDF feature! You can create a PDF file version of your calendar in a specified location, which is a handy trick if you need to check your calendar from time to time but don’t want to carry around a paper copy. To display a PDF file, just double-click it in the Finder window to launch the built-in Preview application, or simply select the PDF file in the Finder window and then press the spacebar for a Quick Look.