
A picture may be worth a thousand words, but it’s the rare presentation that doesn’t include at least some text. Deciding how to transform possibly boring facts into compelling word slides is often the most challenging part of creating a presentation, so words are a good place to begin before you get too hung up on design. If you’ve already worked up an outline in Word, skip ahead to Using a Word Outline to import it into PowerPoint.
Otherwise, open PowerPoint’s Outline view by clicking the Outline button at top of its pane. When you do so, the pane gets wider to accommodate your text, and the thumbnails are reduced to mere specks.
Each numbered slide icon at the left of the Outline pane represents an individual slide. Whatever you type adjacent to the slide icon becomes that slide’s title, whether or not there’s a title placeholder in the slide’s layout (see Figure 16-4). Indented lines below the title correspond to the slide’s subtitle and bullet text. (Bullet text refers to lines of text denoted by special bullets markers—see Formatting).
To generate more outline text, you can do any of the following:
Add a slide. Press Return after typing a title to start another title—and another slide. Each title corresponds to a slide.
Demote text. Press Tab to demote a title into a bullet point under the previous title or bullet point. (Demote is outlining jargon for “make less important,” or “move down one level in the outline.”) If you continue pressing Tab, you can continue the demotion, down to five levels below the title. PowerPoint indents the line of text farther and farther to the right as you press Tab. Alternatively, you can drag the slide or text to the right.
Promote text. Press Shift-Tab to promote a bullet point into a more important bullet point or—at the top level—to a slide title. Or you can drag text to the left to promote it. (Promote, as you might guess, means to “make more important,” or “move up one level in the outline.”)
Create another bullet point. Press Return after typing a bullet point to start another bullet point.
Add a slide beneath a bullet point. Press Shift-⌘-N after typing a bullet point to start a title for a new slide.
Expand or contract the slide outline text. Control-click (or right-click) a slide’s text and choose Collapse → Collapse to collapse the subtext of the selected slide or slides. Choose Collapse → Collapse All to hide the subtext of the entire outline—leaving only the slide titles visible. Control-click and choose Expand → Expand (or Expand All to again reveal the slides’ subtext).
Show formatting. To display the outline in the same fonts used in the slides, Control-click (or right-click) any of the slide text and choose Show Formatting.
Delete a slide. Select one or more slides, and then press Delete; Control-click (or right-click) the slide title and choose Delete Slide; or choose Edit → Delete Slide.
Move a slide. Drag the slide icon up or down the list, and drop it when the blue line is directly above the slide you want to move it above.
Duplicate a slide. Choose Edit → Duplicate slide, press ⌘-D, or Control-click (or right-click) the slide title and choose Duplicate Slide. PowerPoint creates the duplicate slide just below the original.
Note
You can select more than one slide by Shift-clicking or ⌘-clicking additional slides, or by dragging up or down through the slide text, or to the right of it. Then you can apply any of the above techniques to add, delete, move, or duplicate the selected slides.
If you’d rather push buttons than drag slides around directly in the Outline pane, choose View → Toolbars → Outlining to summon the Outlining toolbar (see Figure 16-4). It has buttons for promoting, demoting, moving, expanding and contracting, and showing formatting.
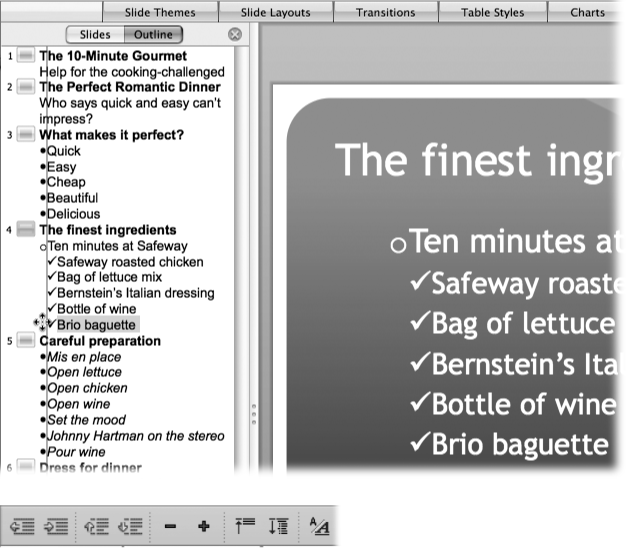
Figure 16-4. Top: You can drag topics or bullet points into a different order as you build your outline. The cursor changes to crossed arrows when you mouse over a draggable slide or bullet icon. A horizontal line indicates where PowerPoint thinks you want to place the item when you drag up and down to reorder; a vertical line indicates the indent level where PowerPoint intends to place the item. As you work on your outline in the left-hand Outline pane, you get to see your work in the Slide pane. Bottom: Choose View → Toolbars → Outlining to call forth the Outlining toolbar. Its button collection lets you promote, demote, or move items up and down the outline; collapse or expand subordinate items for one slide, or the whole outline; or hide or show the font formatting in the outline view.
As you’re creating slide text, remember that your audience will probably be reading everything for the first time, so it’s important not to pack too much text into each frame. Generally, it’s best to limit your slides to about seven lines, with no more than seven words on each line. Simpler is always better. As you type your slideshow’s outline, you can watch the slide being built in the Slide pane—handy feedback to avoid typing too much text for a bullet. (You can also type directly in the slide, as described on Working with Text.)
The PowerPoint outliner isn’t the only outliner in Office 2008. If, having cuddled up with Chapter 6 for several evenings, you’re already proficient with the outliner in Word, you may prefer to write up your slideshow in Word. Fortunately, you can easily transfer your outline into PowerPoint. It’s easiest if you began in Word: with the outline open in Word 2008, choose File → Send To → PowerPoint. PowerPoint opens (if it’s not already open) and converts the outline into a presentation automatically.
You can also import it from the PowerPoint end. To do so, you have to first save your Word outline in .rtf format—the only outline format PowerPoint is prepared to deal with. Then launch PowerPoint and choose Insert → Slides From → Outline File. Navigate to the Word document containing your outline and double-click it.
Whichever method you choose, PowerPoint produces one slide for every level 1 heading in your outline, and creates bullet points for every subheading, quickly creating the basis for a slide show.