
Now that you’ve built your individual slides, folded in your transitions, and sprinkled lightly with animations and sounds, it’s time to bake it at 350° for 45 minutes while you run through your final checklist and get dressed.
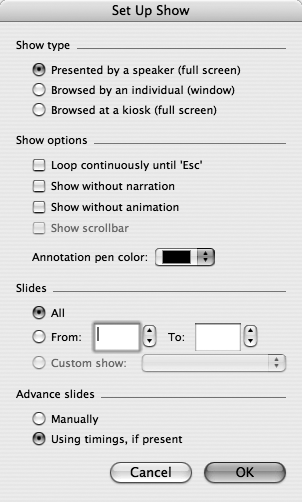
Before you slick your hair and stride onto the stage, the first preparatory step is to choose Slide Show → Set Up Show. In the dialog box that appears (see Figure 17-4), you can choose the type of presentation you want it to be—a typical full-screen slideshow, a small show for an individual reader to browse, or a self-running kiosk-style show that keeps playing until you (or the police) shut it off.
As P-Day (Presentation Day) draws near, you can use PowerPoint’s rehearsal mode to run through the slideshow and work out the timing. It can be very helpful to know how long it takes to show each slide, especially if you have a tight presentation schedule. This handy feature even lets you factor in sufficient time for the laughter to subside after your well-rehearsed “off the cuff” jokes.
To begin the rehearsal, choose Slide Show → Rehearse Timings. The screen fills with the first slide, and PowerPoint shifts into presentation mode. A tiny timer appears in the lower-right corner of the slide, ticking off the number of seconds the slide is spending onscreen. Each time you advance to a new slide, the timer resets itself to zero and begins the count anew for that slide.
When you’ve gone through the whole show, PowerPoint asks if you want it to record those timings for use later in an automated show. If you answer yes, PowerPoint logs the timings automatically in the “Advance slide” portion of the Slide Transition dialog box (Figure 17-1). The program then asks if you want it to note those timings in Slide Sorter view, as shown in Figure 17-5. You may as well do this; it’s pretty handy to see those time allotments, even if you decide to ignore them and advance the slides manually.
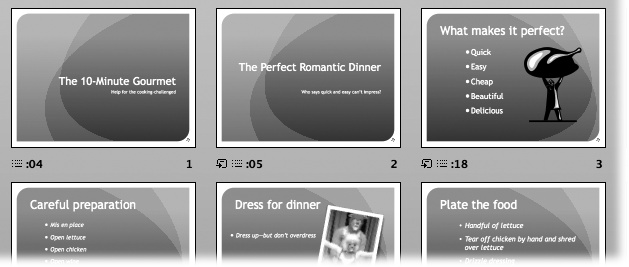
Figure 17-5. After you’ve completed your timing run, PowerPoint marks the slide duration beneath each slide in Slide Sorter view. The duration of transitions isn’t factored into the timing of each slide, so if you’ve chosen some of the slower transitions, take their length into account when calculating the timing of your show. If you click the icon beneath the slide, PowerPoint displays the transition in the thumbnail at high speed; click the build icon beneath the slide to watch the build at closer to real time.
If you choose PowerPoint → Preferences → View tab, you’ll find some useful preference settings that affect the appearance of the show you’re about to give. In the Slide Show area, for example, you’ll find a pop-up menu with these choices:
Pop-up menu button. Turning on this option means that when you twitch the mouse during your slideshow, PowerPoint will make a subtle toolbar appear in the lower-left corner. Clicking it gives you the same pop-up menu of useful controls (Next, Previous, End Show, and so on) that you usually get only by Control-clicking the screen (Figure 17-6).
[No Slide Show Controls]. If you choose this option, your slides remain unsullied by any toolbar, no matter how twitchy your mouse hand is.
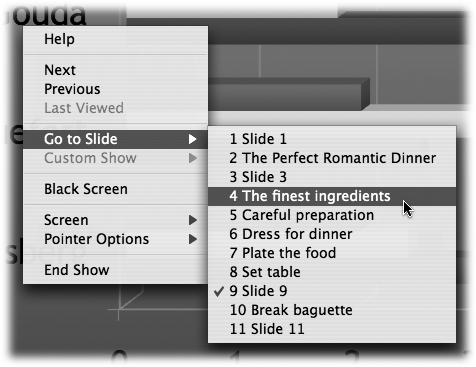
Figure 17-6. To view the contextual menu in a slideshow, either Control-click a slide or click the pop-up menu button in the lower left corner of the screen (if you’ve turned it on in the PowerPoint → Preferences → View tab). The resulting menu (shown here) gives you a lot of power. For example, you can choose Pen from the Pointer Options submenu and then scribble circles, arrows, underlines, and other real-time doodles on your slides during the presentation. (You can later erase your additions by choosing Screen → Erase Pen from the contextual menu, or just move to the next slide—PowerPoint doesn’t save your scribbles.)
Note
The Preferences → View tab also has an “End with black slide” checkbox—however the black slide it creates isn’t completely black. It creates a black slide emblazoned with the words “End of slideshow, click to exit.” What part of black slide doesn’t Microsoft understand? Take the time to create a real black slide as described in the box on Adding Narration.
Your formal wear is clean and pressed. Now the moment has come—it’s time to run your show. Any one of the following options starts the slideshow:
Click the Slide Show view button in the lower-left corner of the main window. (It looks like an old-time home movie screen—the rightmost button.) The slideshow starts with the selected slide.
Choose Slide Show → View Slide Show. The slideshow starts with the first slide.
Choose View → Slide Show. The slideshow starts with the first slide.
Press ⌘-Return. The slideshow starts with the first slide.
What happens next depends on your computer setup. If you have only one monitor, PowerPoint fills the screen with your first slide (or, if you clicked the Slide Show view button, with the slide that was previously selected). Unless you’ve chosen to use preset timings, the first slide stays on the screen until you manually switch to the next one (by clicking the mouse or pressing the Space bar, for example).
If you have two screens, the slide only appears on the secondary monitor. The main display—typically your laptop’s screen—turns into a command center called Presenter Tools (see Using Presenter Tools).
PowerPoint gives you several ways to move around inside a full-screen show. A simple mouse click or a press of the Space bar moves you to the next slide, as does pressing the down arrow or right arrow key. (One exception: If you’ve set up an animation on a slide, these advance keys trigger the animation instead of summoning the next slide.)
After you’ve reached the end of the show, PowerPoint returns you to its previous view.
Note
If you rehearsed your slideshow and chose to save your timings, the show will play automatically to the end, displaying each slide for the predetermined number of seconds.
While your slideshow is running, you can Control-click anywhere on the screen to bring up a contextual menu that gives you such self-explanatory navigation options as Next, Previous, and End Show (see Figure 17-6). It also gives you some less obvious options worth pointing out:
Black Screen blacks out the screen during a discussion.
Pointer Options, as you might imagine, let you pick the kind of onscreen cursor you want to use—Automatic, Hidden, Arrow, or Pen. (Automatic gives PowerPoint the authority to choose a pointer for you; Hidden makes the pointer go away; Arrow is the standard Mac arrow-shaped pointer; and Pen turns the pointer into a writing tool.)
Finally, the Screen submenu’s commands let you pause a running slideshow that’s otherwise on autopilot, or erase any graffiti that you made with the aforementioned pen tool.
Here’s the rundown on helpful keystrokes you can use while the slideshow is running:
Table 17-1. Keystrokes for Navigating Slide Shows
What to do | How to do it |
|---|---|
Next slide (or start an animation) | Mouse click, Space bar, Return, N, Enter, right arrow, down arrow, Page down |
Previous slide or animation | Left arrow, up arrow, Page up, P, Delete |
Jump to a certain slide number | Enter the slide number and then press Return |
Jump to the first slide/last slide | Home, End |
To/from a black screen | B, period |
To/from a white screen | W, comma |
Erase drawing onscreen | E |
Show or hide arrow pointer | A, = |
Change pointer to pen | ⌘-P |
Change pointer to arrow | ⌘-A |
Stop/restart a self-running slideshow | S, + |
End the slideshow | Esc, ⌘-. (period), - (hyphen) |
Go to the next hidden slide | H |
If you’ve ever had to rush through a presentation because you lost track of time or forgot what was coming up on the next slide, PowerPoint’s Presenter Tools is a blessing. While the video projector or other external monitor shows a full-screen presentation, this feature displays the current slide, notes, and upcoming slides in separate panes on your laptop (Figure 17-7). A clock at the top of the screen shows the time or counts the elapsed time since the beginning of the slideshow, so it’s easy to pace yourself. Best of all, you don’t even have to do anything extra to use Presenter Tools. If your computer supports non-mirrored video and you have a second monitor connected, this feature starts up automatically when you begin the slideshow.
All the shortcuts that work in full-screen mode also work in Presenter Tools. For example, you can advance to the next slide by pressing Return or Space bar. Or if you prefer, you can also navigate by clicking the green arrows at the top of the screen.
The Presenter Tools notes pane would be handy even if it only let you read your notes during a slideshow—after all, you can’t be expected to remember everything when you’re at the podium. But Presenter Tools goes a step further by letting you edit the notes during your presentation, too. It’s the ideal way to keep track of which jokes work and which slides make your audience wince in pain.