
Not only can you build your own toolbars in Excel, PowerPoint, and Word, you can also twist and shape the menus of these programs to suit your schemes. You can add and remove items from the various menus, and you can even move the menus themselves so that they appear in different places on the menu bar.
More than one Excel owner, for example, has found happiness by stripping out the commands he never used. Conversely, you’re missing out in Word if you don’t add commands to the menus that you usually need to trigger by burrowing through nested dialog boxes.
As noted earlier, choosing View → "Customize Toolbars and Menus” doesn’t just open the Customize dialog box. It also opens a strange-looking duplicate menu bar just beneath the real one. If you click a menu name on this Menu Bar “toolbar,” the menu opens, revealing all of the commands in that menu.
To add a command to a menu, choose, and click the Commands tab. Find the command that you want to add (by clicking the appropriate category on the left side first, for example). Then drag the command out of the Commands list and straight onto the name of the desired menu (on the duplicate menu bar), as shown in Figure 20-5.
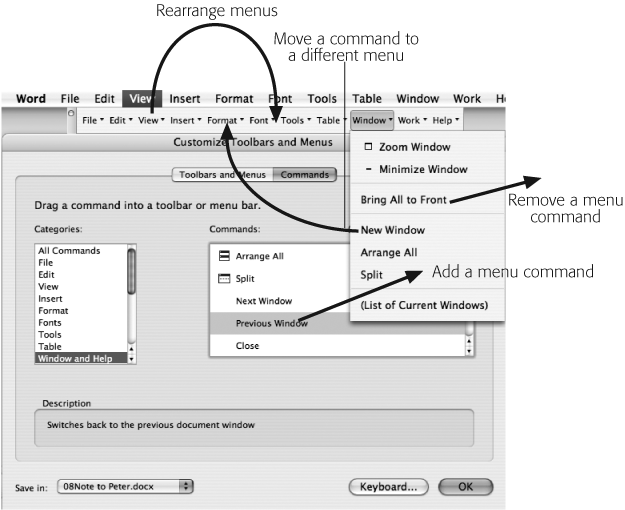
Figure 20-5. Once you’ve chosen Tools → Customize → Customize Toolbars/Menus, you see the duplicate, editable menu bar. By dragging menus and commands as shown here, you show Office how you want to modify your real menu bar.
Note
Excel has two menu bars—a Worksheet Menu Bar and a Chart Menu Bar. They’re listed individually in the Customize dialog box’s Toolbars tab. That’s because Excel’s Data menu changes into a Chart menu when you select a chart. These two menu bars are independent, so if you make changes to the Insert menu item on the Chart Menu Bar toolbar, those changes won’t be reflected in the Insert menu item on the Worksheet Menu Bar.
As you drag your command over the duplicate menu, the menu opens automatically. As you drag down the menu, a line shows you where the new command will appear when you release the mouse.
Suppose that you never use the Dictionary command in Excel’s Tools menu; the only word you need to know is “Profit.”
Getting rid of a menu command—whether you put it on the menu or not—is easy. Choose View → “Customize Toolbars and Menus” to summon the strange duplicate menu bar shown in Figure 20-5. Now click the menu title (in the duplicate menu bar) containing the command. Finally, drag the command itself off the menu.
Removing commands from menus doesn’t delete them from the program, of course. To restore a command you’ve removed from a menu, reinstall it as described in the previous section.
You can do more than just add commands to existing menus. You can also create completely new menus, name them whatever you please, and fill them with any commands you like, in any order you like. This feature opens up staggering possibilities of customization: You can create a stripped-down “just the commands you really need” menu for an absolute novice, for example.
To do so, choose View → “Customize Toolbars and Menus”, click the Commands tab, scroll to the bottom of the Categories list, and click New Menu. Drag the New Menu command from the Commands list (right side of the window) to the Menu Bar toolbar. Put it anywhere you want—between the File and Edit menus, for example, or to the right of the Help menu.
With the new menu still selected, Control-click your new menu and choose Properties from the shortcut menu. Type a name for your new menu into the Name field. Finally, press Return. (Control-clicking also brings up the Begin Group command, which inserts a separator line into your menu-under-construction.)
Your new menu is installed. Now you can add to it any commands you want, using the same technique described in “Adding a command,” on Redesigning Your Menus.
You don’t have to stare at the complex Microsoft menus that you rarely use. If you’re one of the 99.9% of people who never use the Work menu in Word, for example, by all means ditch it.
Doing so couldn’t be easier. Choose View → “Customize Toolbars and Menus” to make the phantom double menu bar appear. Point to the name of the menu you no longer need and drag it directly downward and off the menu bar. Once it’s gone, the other menus tighten up and fill its space. (Never fear: You can always bring it back, as described below.)
Even the order of menus on the menu bar isn’t sacrosanct in Office 2008. If it occurs to you that perhaps the Fonts menu should come before the Edit menu, choose View → “Customize Toolbars and Menus”. Now you can start dragging around the menu titles themselves (on the duplicate menu bar) until you’ve created an arrangement that you like.
While you’re at it, you can also drag individual commands from menu to menu. As shown in Figure 20-5, start by choosing View → “Customize Toolbars and Menus” from. Then bring the menu command to the screen by opening its current menu in the duplicate menu bar. Now drag the command to the name of a new menu, which opens automatically; without releasing the mouse, drag downward until the command is positioned where you want it. Finally, release the mouse button.
When you delete a command, it’s not gone from Office. You’ve merely removed it from its menu or toolbar, and it’s easy enough to put it back—a handy fact to remember the morning after a late night with some geek buddies that featured a pitcher of Red Bull daiquiris and some overzealous menu modifications.
Open the Customize window (by choosing View → “Customize Toolbars and Menus”). Click the Toolbars tab. In the list at left, click Menu Bar, and then click Reset. You’ve just restored your menus and commands to their original, factory-fresh condition.