
Whatever your document—term paper, resumé, or letter to the milkman—typos can hinder its effectiveness and sully your credibility. When you let mistakes remain in your document, your reader may doubt that you put any time or care into it at all. Word helps you achieve the perfect result by pointing out possible errors, leaving the final call up to you.
Tip
A spelling-related feature may have been benefiting you without you even noticing. When you incur a typo that even a Sominex-drugged reader would notice, such as wodnerful or thier, Word makes the correction automatically, instantly, and quietly. (Press ⌘-Z or F1 immediately afterward if you actually intended the misspelled version.) Technically, Word is using its spelling dictionaries as fodder for its AutoCorrect feature, as described on AutoCorrect.
As a bonus, the spell checker is smart enough to recognize run-together words (such as intothe and giveme) and propose the split-apart versions as corrected spellings.
There are two basic modes to Word’s spelling and grammar features:
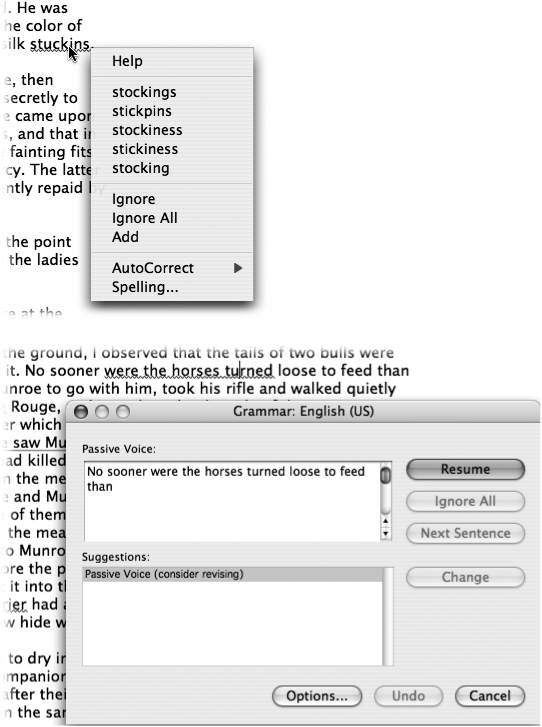
Word’s factory setting is to check spelling and grammar continuously, immediately flagging any error it detects as soon as you finish typing it. Each spelling error gets a red, squiggly underline; each grammatical error gets a green one. These squiggly underlines (which also appear in the other Office programs) are among the most noticeable hallmarks of Office documents, as shown in Figure 2-8.
If you can spot the problem right away—an obvious spelling error, for example—simply edit it. The squiggly underline disappears as soon as your insertion point leaves the vicinity. It’s often more fun, however, to Control-click (or right-click) each error (see Figure 2-8), which opens a shortcut menu to help you handle the correction process. Here are the commands you’ll find in this shortcut menu:
Help opens the Word Help system, as described in Appendix B.
The next segment of the shortcut menu lists spelling suggestions from Word’s dictionary. It says “(no spelling suggestions)” if Word has none.
If one of these suggestions is the word you were trying to spell, click it. Word instantly replaces the error in your document, thus evaporating the squiggly line.
Choosing Ignore All from the shortcut menu tells Word to butt out—that this word is spelled exactly the way you want it. Once you’ve chosen this command, the underlines disappear from all occurrences of that term in this document. (If you use the same spelling in a new document, however, Word will flag it as an error again. To teach Word the word forever, add it to the custom dictionary, as described next.)
As you’ve probably figured out by now, Word underlines a word not necessarily because it’s spelled incorrectly, but because it’s not on Word’s list of correctly spelled words. Occasionally, you have to “teach” Word a new word. The Add command does exactly that.
Word maintains word lists called custom dictionaries. When Word checks a word’s spelling as you type it, the Add command on the shortcut menu instantly adds that word to the current custom dictionary. (If the Add command is gray, you haven’t yet created a custom dictionary. See Custom Dictionaries and Preferred Spellings to create a dictionary, and bring the Add button to life.) You can also edit a custom dictionary directly, as described on Custom Dictionaries and Preferred Spellings.
Figure 2-8. Top: When Word is set to check spelling and grammar as you type, errors are underlined as you go. Control-clicking each error opens a shortcut menu that lists suggested spellings and commonly used “Spelling and Grammar” commands. Bottom: Control-click a green underline and choose Grammar from the pop-up menu to display the Grammar window, where Word explains what it thinks is the matter with your prose. Press Return if you don’t agree and want to move on to the next grammar error.
The AutoCorrect pop-up menu provides access to matching choices from Word’s AutoCorrect list (see AutoCorrect). Often, but not always, these choices are the same as the alternate spellings from the custom dictionary.
Spelling opens the Spelling dialog box and performs a spelling and grammar check on whatever you selected and clicked.
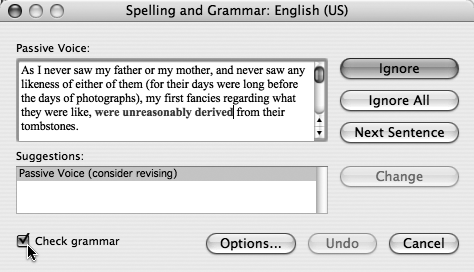
If it annoys you when Word flags incorrect or unusual spellings as you type, there’s something you can do about it. Turn that feature off, as described in Figure 2-10, and check spelling on demand—once at the very end, for instance. If that’s the way you like it, choose Tools → "Spelling and Grammar” (or press F7, or Option-⌘-L) to open the "Spelling and Grammar” dialog box (Figure 2-9).
Word scans your document, starting at the insertion point, and displays errors one by one in the “Not in dictionary” box, as shown in Figure 2-9. As a courtesy, Word shows you the “error” in context, placing the whole sentence in the text box with the specific spelling error shown in red. Your options are as follows:
Click Ignore (⌘-I) to skip over the error without doing anything. If you don’t want Word to flag this particular error again (in this document), click Ignore All (⌘-G).
As described under “Check spelling as you type,” clickingAdd (⌘-A) adds the highlighted word to the custom dictionary. From here on out, in every document, Word will understand this spelling to be a correct one.
In the lower Suggestions list box, Word shows you some similarly spelled words from your main and custom dictionaries. Using the mouse or the up/down arrow keys, highlight one of them and click Change to accept that spelling just this once, or Change All (⌘-L) to swap all occurrences of the highlighted word—in this document only—with the selected suggestion.
If you agree that something is misspelled, but you don’t see the correct spelling in the Suggestions list, you can make the correction directly in the top text area, using any of Word’s editing tools. (This is a handy trick when Word discovers a typo like “;lkjijjjjjjj”—a sure sign that you’d fallen asleep on the keys. Just drag across the mess—right there in the dialog box—and press the Delete key to fix the error.)
Then click Change or Change All, as described above, to apply your change to the document itself. You can also click Undo Edit (⌘-U) if you change your mind. (The Ignore button changes into Undo Edit as soon as you start typing in the window.)
Whether you make a choice from the Suggestions window or make a change in the editing window, clicking the AutoCorrect(⌘-R) button tells Word to make the change from now on, using the AutoCorrect feature (see AutoCorrect). When you do so, Word enters your typo/correction pair to its AutoCorrect list, which you can view by choosing Tools → AutoCorrect and scrolling through the list. (See AutoCorrect for more information on working with the AutoCorrect dialog box.)
The Undo (⌘-U) button is a lifesaver for the indecisive. Once you’ve made a correction, after you’ve clicked Change, and even if you’ve created a new AutoCorrect pair, you can click Undo and take back your last change. Better still, the Undo command works even after you click Change, and Word has moved on to the next error. In that case, Word backtracks to the previous change and undoes it. In fact, you can keep on clicking Undo and reverse all the changes you’ve made since the beginning of your document.
The Undo button is particularly valuable when you’re spell checking rapidly and realize that you’ve just accepted one of Word’s suggestions a bit too hastily.
The Options (⌘-O) button opens the "Spelling and Grammar” panel of the Preferences dialog box, shown in Figure 2-10.
Close (Esc) calls a halt to the spelling and grammar check and dismisses the dialog box.
Over the years, Word’s grammar checker has grown smarter and less likely to underline perfectly correct sentences or make incorrect suggestions. Sometimes, however, you still need to rely on your own knowledge of grammar (and a healthy dose of common sense) in order to decide when to accept Word’s suggested grammar changes—and when to click Ignore.
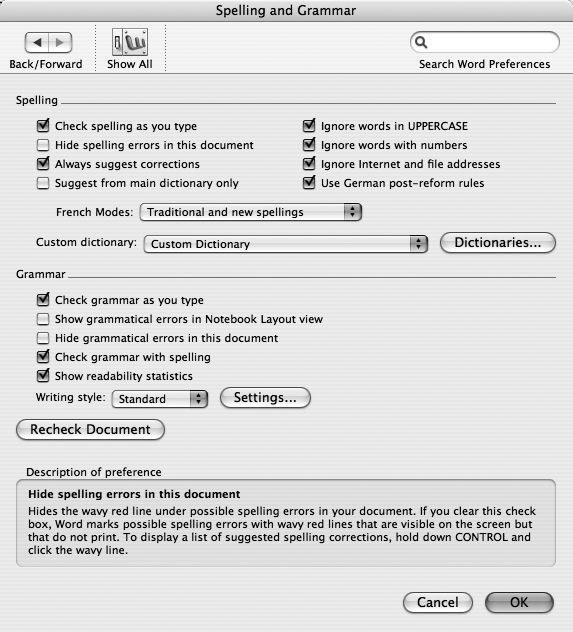
To tell Word how much (or little) help you need with your spelling and grammar, choose Word → Preferences; in the Preferences dialog box, click the “Spelling and Grammar” button. You’ll find these options:
Check spelling as you type turns on and off the red, wavy underlines that mark spelling errors in all Word documents.
Hide spelling errors in this document turns off “Check spelling as you type” in the current document only.
Always suggest corrections prompts Word to show you alternative spellings during spelling checks using the Spelling dialog box. Without this option, Word will flag errors without proposing suggestions.
Note
Control-clicking a squiggly-underlined word produces spelling suggestions regardless of the “Always suggest corrections” setting.
Figure 2-10. The Word → Preferences → “Spelling and Grammar” panel is command central for making Word’s spelling and grammar features work for you. When you click “Check spelling as you type” or “Check grammar as you type,” Word automatically unchecks the “hide” choices. You can still turn on “Hide spelling errors” or “Hide grammatical errors” to temporarily remove Word’s squiggly underlines on a document-by-document basis.
Suggest from main dictionary only instructs Word to use only the list of words that came installed with it, ignoring your custom dictionaries. (See Custom Dictionaries and Preferred Spellings for more detail on custom dictionaries.)
Turn on Ignore words in UPPERCASE if you frequently use acronyms or stock symbols (such as WFMI or ADM). Otherwise, Word interprets them as misspelled words.
Turn on Ignore words with numbers if you’d like Word to leave words like 3Com and R2D2 alone.
Ignore Internet and file addresses governs whether or not Word interprets URLs (www.missingmanuals.com) and file paths (Macintosh HD:Users:[user name]:Documents:Tests) as spelling errors. Because it’s unlikely that most Web addresses are in Word’s dictionaries, you’ll usually want this option turned on.
Use German post-reform rules. Turning on this box tells Word to use the new German spelling rules that were instituted in the 1990s—in Germany. (So if it works only on German-language Macs, why turn it on with English-language Macs? It actually helps with the spell-checking if some or all of the text is German.)
Custom dictionary. See Custom Dictionaries and Preferred Spellings for a full explanation of this feature.
Check grammar as you type turns on and off the green, wavy underlines that mark what Word considers grammatical errors in all Word documents.
Show grammatical errors in Notebook Layout view. In Word’s Notebook Layout view (The Notebook Layout Toolbar), many of your notebook ramblings are incomplete thoughts, little more than notes to yourself, stuff that you either don’t need (or don’t want) Word to check for grammatical correctness. If you don’t want Word to check grammar in Notebook Layout view leave this box turned off. (Word still checks grammar in all the other views, just like normal.)
Hide grammatical errors in this document turns off “Check grammar as you type” in the current document only.
Turn off Check grammar with spelling to proceed through spelling checks without stopping for grammar issues.
Show readability statistics may please educators and testers, but is probably of little value to anyone else. If you turn on this checkbox, Word applies a readability formula to the document. (“Check grammar with spelling” has to be on as well.) The readability formula calculates an approximate grade level based on the number of syllables, words, and sentences in the document. These statistics are displayed in a box at the end of the spelling and grammar check.
Word uses one of two formulas to interpret the results. The Flesch Reading Ease score uses a scale of 0 to 100, with 100 being the easiest. A score of 60 or 70 indicates text that most adults could comfortably read and understand. The Flesch-Kincaid Grade Level Score, on the other hand, calculates grade level according to U.S. averages. A score of 8, for example, means that the document is on the eighth-grade reading level. For a general audience, that’s a good level to shoot for.
Either way, remember that this is a software program analyzing words written by a human being for specific audiences. By no means, for example, should you base somebody’s entrance to a school on these scores—they’re only crude approximations of approximations.
Grammar can be very subjective. Contractions, for example, aren’t incorrect; they’re just appropriate in some situations and not in others. In an academic or medical paper, long sentences and the passive voice are the norm; in a glossy magazine article, they’re taboo. On the other hand, other kinds of errors, such as writing the contraction “it’s” when you mean the possessive “its,” are things you always want to avoid. And when writing poetry or a play in dialect, the usual rules of grammar simply don’t apply.
In other words, there are different writing styles for different kinds of documents. Word not only recognizes that fact, it lets you choose which one you want to use in a given situation. Better still, it lets you decide which specific grammatical issues you want flagged.
To select a writing style from Word’s preconfigured list, choose Word → Preferences → “Spelling and Grammar”. In the resulting dialog box, choose a writing style from the pop-up menu near the bottom of the box under Grammar.
To customize writing styles to your own needs, thus becoming your own grammar czar or czarina, click Settings. The Grammar Settings dialog box opens, as shown in Figure 2-11. (If the Grammar settings are dimmed in the dialog box, it’s because the Grammar module isn’t installed. See Appendix A for installation instructions.)

Figure 2-11. You can modify existing writing styles (Standard, Casual, Formal, or Technical), or create your own combination of grammar standards (Custom), by turning options in the list on or off. Clicking Reset All returns the currently selected style to its original condition. (To restore all writing styles to their original settings, you have to reset them one by one.)
The choices you make from the pop-up menus under Require apply to all writing styles. Each menu gives you a chance to customize points of style that are more a matter of individual choice than grammar. Word doesn’t automatically check for any of the three Require items listed here: whether you put a comma after the second-to-last item in a list (as in: planes, trains, and automobiles), whether punctuation goes inside or outside of quotation marks, or the number of spaces between sentences.
If you learned how to write in England, you probably put periods and commas after the quotation marks at the end of a quote. In the United States, punctuation is expected to go before the quotes. Choose “inside” or “outside” from the second pop-up menu to have Word check if you’re doing it consistently, one way or the other.
If you’re sending your text to an editor or layout person for desktop publishing, you’ll probably be asked to put just one space between sentences; you probably learned how to type with two spaces after every period. You can choose 1 or 2 from the bottom menu to instruct Word to check the spacing for you.
You can create your own unique style by choosing Custom from the pop-up menu at the top of the box and turning on any combination of options. When you click OK, the custom style applies to your document; you can’t name the style or create more than one custom style at a time.
As noted earlier, Word maintains a list of thousands of words that it “knows” how to spell. When it checks your spelling, Word simply compares the words in your document to the words in the list.
To teach Word the words that you use frequently, you have two options: You can add them to a custom dictionary, or, if you have large batches of words that you only use for specific situations, you can create multiple custom dictionaries. Then choose which dictionary you wish to apply to the document you’re currently working on.
You can’t add words directly to Word’s main (built-in) dictionary, which is permanently “hard-wired”—specially encoded for speed. In fact, you aren’t even allowed to see the main dictionary. However, when you add words to a custom dictionary, Word uses them seamlessly along with the main dictionary (as long as you haven’t turned on the “Use main dictionary only” box in the Word → Preferences → “Spelling and Grammar” panel).
To add words to a custom dictionary, choose Word → Preferences, then click the “Spelling and Grammar” panel (Figure 2-10). Now click the Dictionaries button. In the Custom Dictionaries dialog box that opens (Figure 2-12), one custom dictionary is listed and checkmarked, meaning that it’s currently in use. Any words that you’ve ever added to Word’s dictionary during a spell check appear in this custom dictionary.
To review the list of words, click Edit. (If a message appears to warn you that Word will now stop checking your spelling, click Continue.) Suddenly, all your added words appear listed in a new Word document, which you’re now free to edit. You can add, delete, and edit words using any of Word’s editing tools; just remember to use the Return key to ensure each word is on a separate line.
In some cases, you may want to create a new custom dictionary for specific projects. For instance, suppose that you’re writing something in a foreign language or a paper filled with technical terms. If you add these foreign or technical terms to the same custom dictionary that you use for everyday correspondence, they’ll show up in spell checks and sometimes even create false errors.
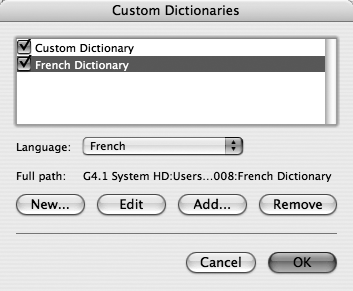
Figure 2-12. The checked boxes show the custom dictionaries currently in effect. Uncheck one if you would like Word to stop using it in spell checks. For example, if you turn off French Dictionary, Word will interpret French words as spelling errors.
To create a new custom dictionary, click New in the Custom Dictionaries dialog box (Figure 2-12). Type a name for the new dictionary, and then click Save. Word saves the new custom dictionary in your Home folder’s Library → Preferences → Microsoft folder.
Now you can add words to the custom dictionary in one of two ways:
To add new words occasionally, in the course of your everyday writing career, click the name of the desired dictionary in the Custom Dictionaries dialog box. (Turn off any other dictionaries that may be listed in the box. Otherwise, Word will add newly learned terms to the default custom dictionary, for example, instead of your own foreign/technical one.) Then just go to work in your document. Whenever you check spelling, choose Add to place the unfamiliar term in your new custom dictionary.
You can also add words all at once, by selecting the custom dictionary in the Custom Dictionaries dialog box and clicking Edit as described above. If there’s a list of vocabulary words or technical terms in front of you, simply type or paste them into the text document that is the custom dictionary. Just make sure that each word is on a separate line before you click Save.
You can also copy and paste words from one custom dictionary into another. Thus, you can always copy the contents of the original custom dictionary into your specialized dictionary, so that you’ll have constant access to all your preferred spellings.
Tip
When editing custom dictionaries, you can access them easily by going directly to the Library → Preferences → Microsoft → Office 2008 folder in your Home folder (although you could create and store a custom dictionary anywhere). You can open them easily in a program like TextEdit and edit away.
You can also rename these files. For example, if you’ve created new custom dictionaries, you may want to rename the default custom dictionary “original,” “default,” or “old.”
After creating a new custom dictionary, you may decide to exclude it from certain documents. To do so, turn off its box in the Custom Dictionaries dialog box as described in Figure 2-12.
If you select a dictionary and click Remove, it disappears from this list and no longer appears in the pop-up menu in the Preferences → “Spelling and Grammar” panel. This is the way to go if you never again want this custom dictionary as an option and don’t want anyone else to see it in Preferences. However, a removed custom dictionary doesn’t go away forever. It remains in the Library → Preferences → Microsoft → Office 2008 folder (in your Home folder), or wherever you stored it on your Mac’s hard drive. To return it to the Custom Dictionaries dialog box, click Add and choose it in the Add Dictionary dialog box.
If your new dictionary is in a foreign language, there’s an extra step. After creating the new custom dictionary, as described above, select the new foreign dictionary in the Custom Dictionaries dialog box. Then choose the appropriate language from the Language pop-up menu. Now Word will know to apply the correct spelling rules for that language.
From now on, before you check spelling, you can specify which custom dictionaries you want Word to consider as it pores over your document. To do so, choose Word → Preferences → “Spelling and Grammar” panel, and then choose a custom dictionary from the pop-up menu.
As noted earlier, you can’t edit the built-in Word dictionary. The previous discussions guide you through adding words to Word’s spelling knowledge—but how do you delete a word from the built-in dictionary? After all, as noted above, the main dictionary is a hermetically sealed, specially encoded, untouchable entity that you can’t edit using any tool known to man.
The answer: by creating an exclude dictionary, which is a special kind of dictionary document format that stores the words that you want Word to flag as spelling errors. Whereas a custom dictionary “teaches” Word which words are spelled correctly, the exclude dictionary teaches Word what spellings are wrong, even though Word’s main dictionary lists the spelling as correct.
For instance, say you prefer “focussed” to “focused.” The second spelling, “focused,” is the one that comes installed in Word. You should put the word “focused” into the exclude dictionary, so that Word will question that spelling during spell checks, giving you a chance to change it to “focussed.”
To create an exclude dictionary, open a blank document. Type or paste in any standard spellings that you want Word to treat as errors. For instance, if you work for the Trefoil Theatre, you’ll want to put “Theater” in the exclude dictionary. (The exclude dictionary is case sensitive; if you want Word to flag both “focused” and “Focused,” for instance, you need to type both versions into the dictionary.)
When your list of excluded spellings is complete, choose File → Save As. In the Save box, navigate to the Home Folder → Library → Preferences → Microsoft → Office 2008 folder. Before saving, also do the following:
Type a name for the exclude dictionary. “Exclude dictionary” is fine.
Most importantly, you must choose a special format for this dictionary. In the Format pop-up menu, choose Speller Exclude Dictionary.
Click Save. You have to quit and relaunch Word for the exclude dictionary to take effect.