
Beneath the Font and Styles panes of the Formatting Palette, you’ll find “Alignment and Spacing”, “Bullets and Numbering”, and “Borders and Shading”—settings that affect entire paragraphs. Just as the Formatting Palette’s top section provides the most useful controls of the Format → Font dialog box, its third section gives a subset of the Format → Paragraph dialog box (Figure 3-8, left).
And just as character formatting applies either to highlighted text or to text you’re about to type, paragraph formatting applies to only a selected paragraph, several selected paragraphs, or the paragraph you’re typing in (the one containing the blinking insertion point).
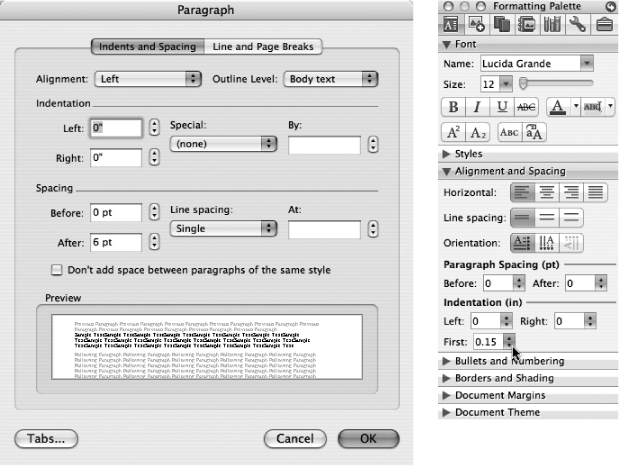
Figure 3-8. Left: Format → Paragraph (or Option-⌘-M) summons the Paragraph dialog box, showing all the controls that apply to the selected paragraphs. Right: The expanded Formatting Palette reveals the most useful controls. For example, the controls at the bottom of this panel are a quick way to change indents.
When you click the “Alignment and Spacing” title bar, the Formatting Palette expands to reveal all the commands that control how your text lies on the page (Figure 3-8, right).
These icons illustrate how your paragraph will be aligned with the left and right page or column margins: left aligned, centered, right aligned, or fully justified. (Justified refers to straight margins on both sides. Word automatically adjusts the spacing between letters and words to make the right margin come out even, exactly like a newspaper. Justification works best if you turn on hyphenation, too, as described on Automatic Hyphenation.)
You may find yourself changing alignment frequently when writing something like a newsletter, where it’s common to go from a centered headline to a left-aligned article to a justified column of classified ads. Fortunately, alignment is fully equipped with keyboard shortcuts: ⌘-R right-aligns the current paragraph, ⌘-L is for left alignment, ⌘-E centers the current line or paragraph, and ⌘-J justifies the current paragraph.
The amount of space between lines of text is called line spacing, or, in homage to the typewriter, single-, double-, or triple spacing. Since Word isn’t constrained by the clicks of a typewriter’s platen (the roller in a typewriter that guides the paper), you have much more line spacing flexibility.
Word’s factory setting is for single-spaced lines, like the ones in this book. If you like more space between lines, or if you’re required to use double-spacing for schoolwork or legal work, use these icons to change the spacing. The three line-spacing controls on the Formatting Palette correspond to single-spaced, one-and-a-half-spaced, and double-spaced text.
Note
In the olden days when printing presses used metal type, typesetters controlled line spacing by inserting thin strips of lead between the lines of metal type to give wider spacing. In the jargon of typesetters—and that of many desktop publishers—line spacing is still called leading (rhymes with “bedding”).
Choosing Format → Paragraph → “Indents and Spacing” tab generates even more spacing options. As shown in Figure 3-8, you can choose a setting from the pop-up menu under “Line spacing” and, to get even more specific, type an exact number in the At box.
At least. Choose this setting to add graphics or vary font sizes within a paragraph. In the box, type a minimum number of points (12 is a good size for single spacing). Word now will automatically adjust the spacing to accommodate any larger items in a line.
Tip
Here’s a trick you can use in this or any Office 2008 measurement text box: You don’t have to be content with points as the units. After typing the number you want, type cm, mm, in, or pi for centimeters, millimeters, inches, or picas, respectively. The software makes the conversion automatically.
Exactly. Choose this setting for projects where you’ve been asked to use a specific line spacing in points. Enter the number of points in the box. (If any letters or pictures are too high for the spacing you’ve specified, they’ll simply be decapitated.)
Multiple. Use this setting to refine the double-single-triple spacing system. For instance, choosing Multiple and entering 1 in the At box denotes single spacing. Typing 1.3 in the At box tells Word to increase single-spacing by 30 percent. Specifying 3 in the At box creates triple spacing.
Finally, you can change line spacing using the keyboard: ⌘-1 tells Word to single-space the current paragraph, ⌘-5 is for one-and-a-half space (1.5, that is), and ⌘-2 results in double-spacing.
The Orientation icons on the Formatting Palette aren’t actually paragraph-specific, like the other controls in their section. In fact, they work very differently depending on what you’re editing:
In a Text box, they rotate text inside the box (see Formatting Within Text Boxes).
In a table cell, they rotate the text in the selected cell (see Repeat table headings).
If you’ve divided your document into sections (Inserting and Removing Section Breaks), you can use one of these icons to rotate entire pages within a document—to get a couple of horizontally oriented (landscape) pages in a document whose pages are otherwise oriented vertically (portrait). Here’s the trick: Before using the Orientation controls, insert a “Section Break (Next Page)” break before and after the pages you want rotated (Transferring styles).
If your document has neither tables nor section breaks, these icons rotate your entire window by 90 or 180 degrees. They don’t affect how the document is printed; for that purpose, use the Orientation icons in the File → Page Setup dialog box. Instead, this feature rotates the image of your document onscreen to make it easier for you to edit the text that you’ve rotated 90 degrees, such as the vertical label of a table cell.
If you’re in the habit of pressing Return twice to create space between paragraphs, it’s time to consider the automatic alternative. The Paragraph Spacing tools on the Formatting Palette let you change the amount of space that appears, automatically, before and after the current or selected paragraph. (The same controls show up in the Format → Paragraph → “Indents and Spacing” tab, as shown in Figure 3-8.) When you click the arrows beside the Before and After boxes, the spacing increases and decreases in 6-point increments. For finer control, you can enter any numbers you wish into the boxes. (4 to 8 points is a good place to start.)
Change the spacing in the Formatting Palette or Paragraph dialog box at the outset of your document, or press ⌘-A to select all existing paragraphs first. The advantage of doing it this way is that the extra space is added automatically, with no danger of accidentally deleting any of the extra line breaks. Furthermore, if you change your mind about the extra space, you can press ⌘-A and readjust the paragraph spacing, without having to delete any extra line breaks.
To the horror of designers and typesetters everywhere, most people indent the first line of each paragraph by hitting the Tab key. Trouble is, Word’s tab stops are automatically set at half-inch intervals—much too wide for professional use.
It’s a far better idea (from the purist’s standpoint, anyway) to use Word’s dedicated indenting feature, which lets you specify individual paragraph margins (and first-line indents) that are independent of the document margins (see Indentation).
Tip
If you do indeed press Tab to begin a paragraph, Word tries to guide you toward the proper way. It automatically moves the first-line indent marker (see Figure 3-15) to the first tab stop on your ruler. Now you’ve got a quick way to correctly indent your paragraphs. Adjust the marker (making the indent smaller, for best results) and then type away. All subsequent paragraphs will have the same first-line indent.
If you’d prefer that Word abandon this behavior, choose Word → Preferences → Edit panel and turn off “Tabs and backspace set left indent.” Now the Tab key and indents are totally disconnected.
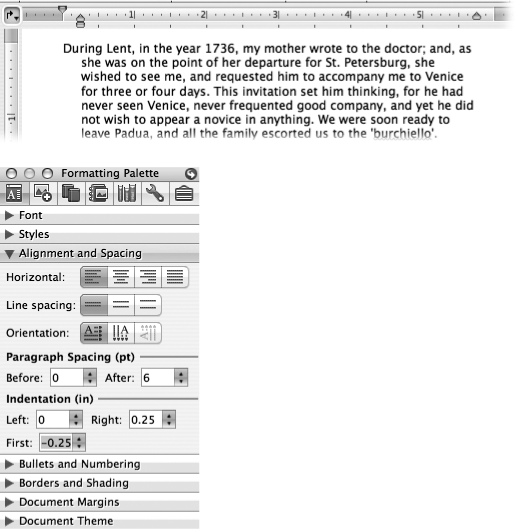
There are two ways to adjust indents for highlighted paragraphs: by dragging the indent markers on the ruler (Figure 3-9), or by setting numerical values (in the Formatting Palette or Format → Paragraph → “Indents and Spacing” tab). When you want to give a paragraph its own distinctive style, use one of these indents:
First line indent. Drag the top-left marker (the first-line indent handle) to where you’d like the first line of each paragraph to begin. One-quarter inch is a typical amount. To set an exact measurement, adjust the First indent setting in the Formatting Palette (or choose “First line” from the Special pop-up menu in the Paragraph dialog box).
Hanging indent. As shown in Figure 3-9, you create a hanging indent by dragging the lower, house-shaped marker. (The square left-indent marker moves along with it.) To set an exact measurement, type a negative number into the First box on the Formatting Palette (such as -.25”); or, in the Paragraph dialog box, click the “Indents and Spacing” tab and select Hanging from the Special pop-up menu.
Left and right indents. Left and right indents are the internal left and right margins for a paragraph. Most people aren’t aware of them, because they usually match the right and left margins of the document. But there are times when you want a paragraph to be narrower—either indented from the left margin or on both sides—such as when creating a block quote, for example (a longish quotation that you want separated from the rest of the text).
To adjust the paragraph margins for highlighted text, drag the left and right indent markers (identified in Figure 3-9) on the ruler, or change the Left and Right settings on the Formatting Palette. (The “Indents and Spacing” tab of the Paragraph dialog box have the same options.) The distances you specify here are measurements from the document’s right and left margins, not from the edges of the paper.
Tip
You can also drag the first-line indent or left-indent marker left, into the margin, to make a line or paragraph extend into the margin. This is called a negative indent, which gives the effect of a hanging indent without changing the left margin. However, if you have a narrow left margin and use negative indents, you may get an error message when you print the document. That’s because the negative indent is too close to the left edge of the page.
To tell the truth, the era of the Tab key is fading. In the typewriter days, it was useful in two situations: when indenting a paragraph and when setting up a table. But in the Computer Age, newer, far more flexible tools have replaced the Tab function in both of those circumstances. The indentation controls described above are much better for paragraph indents, and the Table tool (Charts and Spreadsheets) is a far superior method of setting up tabular data.
Still, millions of people are more comfortable with the tab-stop concept than Word’s newfangled tools. This section shows how those tools work (and assumes that you remember how tab stops work on typewriters).
Every Word document has a ruler (choose View → Ruler if you don’t see it), which starts out with an invisible tab stop every half inch across the page. These are the default tab stops. You can prove that they exist by pressing Tab over and over again, watching as the insertion point moves from one to the next, exactly as on a typewriter.
But the default tab stops aren’t permanent; they start to disappear when you do the following:
Choose Format → Tabs to open the Tabs dialog box (Figure 3-10) and change their placement (in the “Default tab stops” box). You can do this by clicking the arrow buttons beside the box or by entering a new setting.
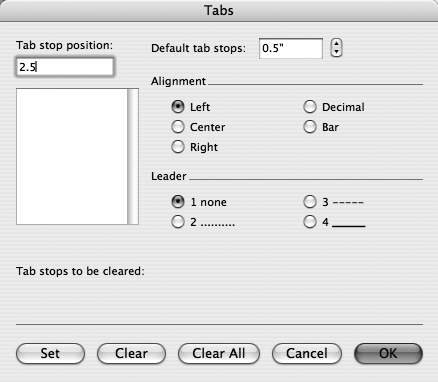
Figure 3-10. You can change the spacing of the automatic tabs in the “Default tab stops” box (or by clicking the arrows next to it). You can also add a tab leader—that is, a dashed line, dotted line, or underline that automatically fills in the gap between the end of your previous typing and the tab stop.
Set new tab stops, as described next. When doing so, all of Word’s default tab stops to the left of your hand-placed tabs disappear. For instance, when you set a new tab at .75” from the margin, the default tab stop at .5” goes away; when you press Tab, the insertion point goes straight to .75”. (All remaining default tab stops to the right of the new tab remain in place until you add more new tab stops.)
The quickest way to set new tab stops is by using the ruler; just click anywhere in its tick marks to place a new tab stop. After tabs are set, you can reposition them by simply dragging them along the ruler. To delete one, drag it directly down off the ruler until it disappears into thin air.
To place tabs more precisely, choose Format → Tabs (or double-click any tab stop on your ruler) to open the dialog box shown in Figure 3-10. Any hand-placed tab stops are found in the list at the left, according to their distances from the left margin.
To create a new tab, type its location in the “Tab stop position” box, choose an alignment (described next), and click Set (or press ⌘ -S). To delete a tab, click it in the list and then click Clear (or press ⌘ -E). To change a tab’s position, clear the existing tab and type the new position in the “Tab stop position” box. To delete all tabs in the list, click Clear All (⌘ -A). Press Return or click OK when you’re ready to close the Tabs box.
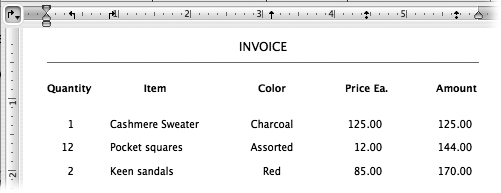
When clicking a tab stop in the dialog box list, you’ll be shown its alignment. As shown in Figure 3-11, pressing the Tab key doesn’t necessarily align your insertion point with the left side of your tab stop. The following types of tab alignments help you arrange text on the page:
Left (⌘ -L). This is the kind of tab stop you’re probably used to. When you press Tab and then start typing, your text flows rightward from its origin beneath your tab stop.
Centered (⌘ -N). The text is aligned with the tab stop at its centerline, creating a balanced effect that’s ideal for things like invitations and brochures.
Right (⌘ -R). When you press Tab and then start typing, your text flows leftward from its origin beneath your tab stop. Several of these rows together create a neat right margin.
Bar (⌘ -B). This kind of tab stop isn’t a tab stop at all. Instead, it’s a method of producing a vertical line down your page, directly beneath the tab stop. You don’t even have to press Tab to get this vertical line; any paragraph that includes this type of tab on the ruler continues the line down through the page. (Insert your own joke here about picking up the bar tab.)
Decimal (⌘ -D). This behaves exactly like a right tab stop—until you type a period (a decimal point, in other words), at which point your text flows to the right. In other words, this very useful tab type lets you neatly align a series of numbers (such as prices), so that the decimal points are aligned from row to row.
You don’t have to use the Tabs dialog box to change tab-stop alignment, by the way. If you click the tab well at the upper-left corner of the ruler (see Figure 3-11), you can choose a tab alignment from the pop-up menu. If you then click the spot on the ruler where you want the tab, you’ll plant that tab type. For example, to set a left tab at 1/4”, choose Left from the tab well’s pop-up menu, then click at 1/4” on the ruler.
When you set, clear, and move tabs, the changes apply to the paragraph containing your insertion point. Often, however, you’ll want to use the tab settings for many paragraphs—or an entire document. Here are the ways you can do that:
Set the tabs before you start typing. This is a common trick if, for example, you need to insert a little columnar table in the middle of a report. Every time you press Return to begin a new line, the same tab stops will be available.
Select all paragraphs. If you’ve already done some (or a lot of) typing, select the paragraphs by dragging over them, or press ⌘ -A to select the entire document. Set tabs as described above.
Make tab stops part of a style. If you make your preferred tab stops part of a style (see Styles), you can apply them to any paragraph just by clicking that paragraph and choosing from the Style menu on the Formatting Palette. If you’re really attached to certain tab stops, you can even make them part of your Normal style.
Black text on a white page is clear and easy to read, but it can get monotonous. When a little zest is required, try using borders, background shading, and fill patterns to emphasize various parts of your document. For instance, light gray background shading can highlight a useful list in the middle of your article. A plain border can set off a sidebar from the body of your text. And a fancy border can be part of an invitation.
To put a border around some text, first select the text in question; to put a border around an entire paragraph, just click anywhere in the paragraph. Click anywhere in the “Borders and Shading” title bar on the Formatting Palette to expand its panel, as shown in Figure 3-12. The controls are:
Type. Clicking the square icon next to Type opens a palette of placement choices for your border: a square, a line above or below, and so on. Click the one you want. The light dotted line, No Border, automatically turns off the remaining controls described here.
Figure 3-12. Top: As you work, watch what happens in the Preview box at the right of the dialog box. The only way to see how the final result really looks, however, is to return to your document. Bottom: Although Word gives you plenty of options for line styles and fill patterns, simpler is usually more effective. Here10% gray shading and a one-half point drop-shadow border highlight a bit of vital information.
Style. This pop-up menu shows a selection of solid, dashed, and multiple-line styles to apply to the border you’ve just specified.
Color. Clicking the color square displays Word’s standard palette of 70 colors. You can choose one, or click More Colors to use Office’s color-picking tools, as described on Fill Color: Standard palette.
Weight. This control denotes the thickness of the line in points (1/72 of an inch). The pop-up menu shows a variety of thicknesses ranging from 1/4 point to 6 points.
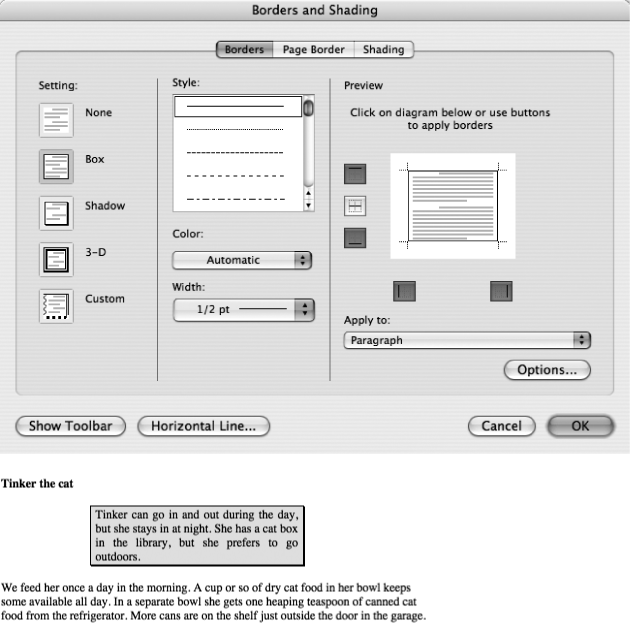
For more customization options than those available on the Formatting Palette, highlight the paragraphs you want to change and choose Format → "Borders and Shading”. The dialog box shown in Figure 3-12 opens. When you click the Borders tab, you see these options:
Setting. Most of the time, you’ll choose to put a box around your paragraphs, as represented by one of the lower icons on the left (Figure 3-12). The shadow and 3-D options create a very professional, modern look.
If you choose Custom, Word doesn’t assume anything—not even that you want a four-sided box. As the Custom button implies, you can usse a different line style on each side of the box—solid top and bottom and dotted on the sides, for instance. Click the sides you wish to use from the buttons in the Preview panel, then design each one in the Style panel. Click the side button again to make changes.
Style. Choose a line style, a width in points, and a color.
Horizontal Line. Rather than a border, this tool adds a horizontal line under the paragraph in question. The line is actually a picture embedded into your document; that’s why the lines you choose from are stored in a clip art folder (Microsoft Office 2008 folder → Office → Media → Clipart → Lines). You also have the option of turning on “Link to File” to make the line a linked object instead of an embedded one. These lines are mostly intended for use on Web pages. (See 3-D Rotation for more detail on linked and embedded objects.)
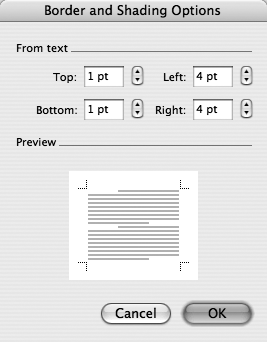
Options. Clicking Options opens a dialog box where you can choose how far away from the text you want to set your border. The automatic settings are 4 points on each side, 1 point top and bottom. If you have room, consider increasing the amount of space between the text and border for a clean, elegant look.
Note
If your text is in a text box (see Text Boxes), don’t add a border around it—you’ll just end up with two borders. Text boxes come with built-in borders, which you can format using the line tools on the Drawing toolbar and the Colors and Lines tab of the Format → Text Box tab.
That said, you can put borders on parts of the text inside text boxes. (If you also want to hide the border surrounding the text box, click the border, then choose No Line from the Line Color palette on the Drawing toolbar.)
Once your border is complete, click OK. You can now use the tools in the "Borders and Shading” section of the Formatting Palette (or the “Tables and Borders” toolbar) to make further refinements.
When it’s time to create a title page, certificate, or phony diploma, nothing says “professionally published” more than a handsome border around the edges of your page. To add one, choose Format → “Borders and Shading” → Page Border tab. (The Formatting Palette has no controls for adding a page border, but if you decide to add one at the last minute, you can add a quick and dirty border from the Print dialog box, as described on Layout.)
Most of the tools for designing a page border are the same as those for a paragraph border (described previously). But there are subtle differences: Page borders trace the page margins, regardless of the size or amount of text on the page, and the page border changes size automatically as you change the margins (Margins).
The Page Border tab lists a few extra features specific to page borders:
Art. The Art pop-up menu has dozens upon dozens of small clip-art border motifs in repeating patterns (little marquees, banners, and—for those Halloween party invitations—black cats).
Apply to. This menu on the Page Border tab lets you put a border on the first page of your document or section only. (Can you say “title page”?)
Options. The Options button opens a dialog box with settings that control how the border frames the page, including the Margin settings described in Figure 3-13.
Figure 3-13. The Margin settings control the distance of the text from the margin (or the paper edge, depending on what you choose from the “Measure from” menu). The border, however, still hugs the margins. In other words, when you increase the Margin settings in this dialog box, the text area will decrease as it moves farther in from the page margins. (Yes, some of the text may flow onto the next page as a result.)
“Align paragraph borders and table edges with page border” does more than align them; it actually connects them if they’re adjacent. Thus, the side borders of a paragraph will extend out to and meld with the side borders of the page.
Turn on “Always display in front” unless you plan to place text boxes or images over the page border. (If you do so, you may want to give the border a lighter shading or lighter color.) The “Surround header” and “Surround footer” options determine whether the page border encompasses the header and footer (see Headers and Footers) along with the rest of the page.
When you decide to fill in a gray or colored background behind a paragraph or text box, the key words to remember are light and subtle. Patterns and shading can make text difficult to read, and the interference is often worse on the printed page than on the screen.
To put a fill or pattern behind text, you have to first select the text (or click anywhere in a paragraph). Click anywhere in the "Borders and Shading” title bar on the Formatting Palette to expand the panel, as shown in Figure 3-14, top.
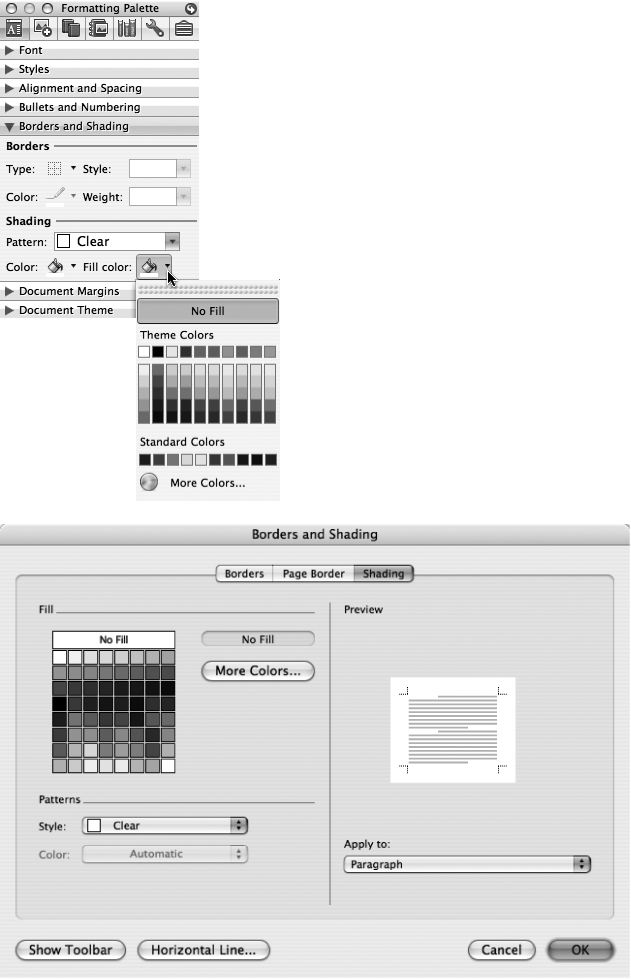
Figure 3-14. Top: The Formatting Palette reveals that even if you don’t think you’re using a pattern, you are. Text with no background or a plain, unshaded fill color has a clear pattern. The Fill color is a background that underlies both text and any pattern you apply. Bottom: The “Borders and Shading” dialog box has even more options.
Pattern. The Pattern pop-up menu gives you a long list of choices, from Clear (no pattern), to a series of percentages of halftone shading (like newspaper photographs), to line patterns such as diagonal stripes. Most of the time, you’re probably best off leaving this pop-up menu alone; use the "Fill color” control instead for a professional, even tint.
Pattern color. If you decide to choose a pattern, use the “Pattern color” pop-up menu to select its color. The color you choose here becomes the “black” color of the pattern you chose from the Pattern pop-up menu.
Fill. This is the color that appears behind text or under any pattern you’ve chosen. You can choose from 40 colors and 24 grayscale shades.
Note
There’s a difference between choosing No Fill and White fill color. No Fill is transparent, meaning when you layer a picture beneath text with no fill, you can see the picture. On the other hand, when you layer something beneath text with White fill, the fill blocks out whatever’s below.
You can combine these options in fascinating and grisly ways. For example, any pattern you choose overlies the fill color of your paragraph, even if that’s No Fill, in which case all you see beneath the pattern is the color of the paper. When you choose one of the percentage shadings from the Pattern pop-up menu, you’re choosing a percentage of black or color to overlie the fill color.
A few extra features are available only in the Format → “Borders and Shading” dialog box. For example:
You can control how far the fill extends beyond the text. For example, after choosing a fill color, choose Format → “Borders and Shading” → Borders tab. You’ll notice that the None border setting is chosen. However, you can now click the Options button and adjust the “From text” settings, as described on Shading. The settings will apply to the boundary of the fill, as if it were an invisible border.
Also in the “Borders and Shading” dialog box, the Horizontal Line button opens a “Choose a Picture” dialog box showing the decorative horizontal lines in Word’s clip art gallery. Select one and click Insert to place the line across the text at the insertion point. (You can’t make borders with these lines, just horizontals.)