
- Office 2008 for Macintosh: The Missing Manual
- A Note Regarding Supplemental Files
- The Missing Credits
- Introduction
- I. Word
- 1. Basic Word Processing
- 2. Editing in Word
- 3. Formatting in Word
- 4. Styles, Page Layout, and Tables
- 5. Working Collaboratively
- 6. Working with Notebooks, Outlining, and Master Documents
- Notebook Layout View
- Outline View
- The Document Map
- Master Documents
- 7. Editing Long Documents
- Headers and Footers
- Citations
- Bibliographies
- Footnotes and Endnotes
- Line Numbers
- Templates
- AutoSummarize
- Fields
- Bookmarks
- Captions
- Cross-References
- Creating a Table of Contents
- Indexing
- Mail Merges
- Macros
- 8. Moving Beyond Text: Publishing Layout View
- 9. Word Meets Web
- II. Entourage
- 10. Email, Address Book, and Newsgroups
- The Big Picture
- Setting Up Entourage
- Sending and Receiving Mail
- Address Book
- Newsgroups
- 11. Calendar, Tasks, and the Project Center
- The Calendar
- Recording Events
- What to Do with an Appointment
- Saving Calendars as Web Pages
- Tasks and the To Do List
- My Day
- Office Reminders
- Categories
- Project Center
- Accessing Projects from Other Office Programs
- Notes
- Synchronization
- Multiple Identities
- Finding Messages
- Links
- Checking Your Spelling
- The Script Menu
- 10. Email, Address Book, and Newsgroups
- III. Excel
- 12. Basic Excel
- Spreadsheet Basics
- Formula Fundamentals
- Excel, the List Maker
- 13. Formatting and Charts
- 14. Formula and Database Magic
- 12. Basic Excel
- IV. PowerPoint
- 15. Planning and Creating Great Presentations
- 16. Building a PowerPoint Presentation
- 17. Polishing and Presenting in PowerPoint
- V. Office As a Whole
- 18. Saving Time with the Project Gallery and Toolbox
- 19. Making the Most of Graphics
- 20. Customizing Office
- VI. Appendixes
- A. Installation and Troubleshooting
- B. The Office Help System
- C. Office 2008, Menu by Menu
- Application Menu
- Entourage Menus
- File Menu
- Edit Menu
- Undo
- Redo
- Cut
- Copy
- Copy to Scrapbook
- Paste
- Paste From Scrapbook
- Paste Special
- Clear
- Select All
- Duplicate
- Delete
- To Do
- Categories
- Projects
- Share Item
- Do Not Share Item
- Get Properties
- Auto Text Cleanup
- Increase Font Size
- Decrease Font Size
- Add to (or Remove from) Favorites Bar
- Find
- Advanced Search
- Find Related Items
- View Menu
- Message Menu
- Resend
- Send Message Now
- Send Message Later
- Receive Entire Message
- Edit Message
- Reply
- Reply to All
- Reply to Sender
- Forward
- Forward as Attachment
- Redirect
- Mark as Read
- Mark as Unread
- Mark All as Read
- Mark as Junk
- Mark as Not Junk
- Block Sender
- Check Names
- Insert
- Remove Background Picture
- Signature
- Priority
- Security
- Add Attachments
- Save All Attachments
- Remove All Attachments
- Remove Unsafe Attachments
- After Sending, Move To
- Apply Rule
- Move To
- Add To Address Book
- Internet Headers
- Source
- Format Menu
- Tools Menu
- Window Menu
- Help Menu
- Scripts Menu
- Excel Menus
- File Menu
- Edit Menu
- View Menu
- Normal
- Page Layout
- Toolbox
- Formatting Palette
- Object Palette
- Formula Builder
- Scrapbook
- Reference Tools
- Compatibility Report
- Project Palette
- Elements Gallery
- Toolbars
- Customize Toolbars and Menus
- Ruler
- Formula Bar
- Status Bar
- Header and Footer
- Comments
- Custom Views
- Full Screen
- Zoom
- Sized with Window
- Chart Window
- Insert Menu
- Format Menu
- Tools Menu
- Data Menu
- Chart Menu
- Window Menu
- Help Menu
- PowerPoint Menus
- File Menu
- Edit Menu
- View Menu
- Normal, Slide Sorter, Notes Page, Presenter Tools, Slide Show
- Master
- Header and Footer
- Hide/Show Comments
- Grayscale
- Toolbox: Formatting Palette, Object Palette, Custom Animation, Scrapbook, Reference Tools, Compatibility Report, Project Palette
- Elements Gallery
- Toolbars
- Customize Toolbars and Menus
- Ruler
- Guides
- Zoom
- Insert Menu
- Format Menu
- Tools Menu
- Slide Show Menu
- Window Menu
- Help Menu
- Word Menus
- File Menu
- Edit Menu
- View Menu
- Draft, Web Layout, Outline, Print Layout, Notebook Layout, Publishing Layout
- Toolbox: Formatting Palette, Object Palette, Citations, Scrapbook, Reference Tools, Compatibility Report, Project Palette
- Elements Gallery
- Toolbars
- Customize Toolbars and Menus
- Navigation Pane
- Ruler
- Header and Footer
- Footnotes
- Markup
- Reveal Formatting
- Full Screen
- Zoom
- Insert Menu
- Format Menu
- Font Menu
- Tools Menu
- Table Menu
- Window Menu
- Work Menu
- Help Menu
- Index
- About the Author
- Colophon
- Copyright
When you start with a blank document, Word provides a one-inch margin at the top and bottom of the page, and a stately one-and-a-quarter inch margin at each side.
Most people never change these settings. In fact, in its own, almost accidental way, Microsoft has dictated the standard margin formatting for the world’s business correspondence. But if you learn how to work with margins—as well as paragraphs and indentation—you can give your document a distinctive look, not to mention fit much more text on a page.
You can adjust the margins of a Word document in either of two ways: by entering exact measurements (in the Formatting Palette or the Document dialog box), or by dragging the margins directly on the ruler.
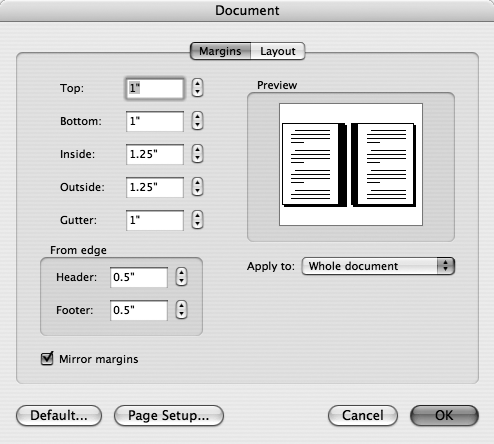
To use the numeric option, choose Format → Document → Margins tab, or click the Document Margins title bar on the Formatting Palette. There you’ll find individual boxes that let you specify, in inches, the size of the left, right, top, and bottom margins.
To set your margins by dragging, which produces immediate visible feedback, you need to be in Print Layout view (View → Print Layout) or Publishing Layout view (View → Publishing Layout).
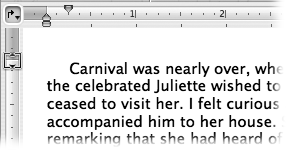
Left, Right, Top, Bottom. To set margins by dragging, point to the line where the ruler changes from white to blue, without clicking. (The blue area is outside the limits of the margin.) When the cursor changes to a box with double arrows, drag the margin line to any point on the ruler you wish (see Figure 3-15). Now you can change the margins on both the horizontal and vertical rulers.
Tip
You may find it extremely hard to adjust the left margin, since the trio of indent markers (Figure 3-15) lies directly on top of the blue/white boundary. Move the cursor slowly from one indent marker to the other until the Left Margin screen tip appears and the cursor shape changes as shown in Figure 3-13. However, you may find it much easier to just move the first-line indent handle out of the way while you adjust the margin.
Figure 3-15. The house-shaped controls in the top ruler set indents (Indentation). This example shows a first-line indent. Drag the blue/white boundaries in either ruler to adjust the margins.
Header and Footer. Headers and footers (see Headers and Footers) appear within the normal margins. For instance, if you’ve set the bottom margin for 1”, you can have the page number (footer) appear a half-inch from the edge of the paper—half an inch below the bottom of the text. To do so, set the Footer margin for 0.5”, as shown in Figure 3-15.
Word’s gutter and mirror margin features make margins work when your document is destined to be bound like a book. In an open book, the gutter is the term for the inner margins where the pages attach to the spine. Usually, the gutters have to be wider than the outer margins to allow room for the binding and the spine. (You may want to talk to your publisher—the fine people at Kinko’s, for example—to learn about margin requirements.) Word can add this extra space automatically. For instance, if you set a gutter space of 0.25”, Word will add a quarter-inch to the gutter margin on each page.
Another useful tool for book margins is the mirror margin feature, which is designed to let you set up margins that are uneven on each page, but reflected on each two-page spread (see Figure 3-16).
-
No Comment