
Your teachers were right: The more time you spend on the outline, the less work you’ll have to do when it comes time to write your actual paper, article, or book. Word’s automated Outline view frees you from the drudgery of keeping track of all the letters and numbers in an outline, while encouraging you to categorize and prioritize your ideas.
Note
Before Notebook Layout view, Outline view used to be the only way to organize your thoughts with levels. And it’s still a darn good way to do so. Although you can’t use audio notes in Outline view, it does give you access to more of Word’s other features. For example, you can’t insert hyperlinks in Notebook Layout view, but you can in the Outline. Neither can you apply Styles to the Notebook (that’s one of the reasons it sloshes around your intricately formatted documents), but you can in Outline view.
To outline your document from the beginning, open a blank document and choose View → Outline, or click the second tiny icon at the lower-left corner of your document window. (You can also apply Outline view to an existing document, which is described later in this section.)
Whenever you switch to Outline view, the Outline toolbar appears (see Figure 6-8). When you first start typing, your words are formatted as Heading 1—the highest level in the outline hierarchy. (Outline headings correspond to Word’s built-in heading styles.)
Now you’re ready to build your outline. Press Return after each heading. Along the way, you can create the subheadings using either the mouse or the keyboard, as described next.
Promoting and demoting. Moving topics out toward the margin (toward Heading 1, making them more important) or inward (less important) promotes or demotes them, identical to the same functions in the Notebook Layout view (Setting Text Levels with the Keyboard and Mouse).
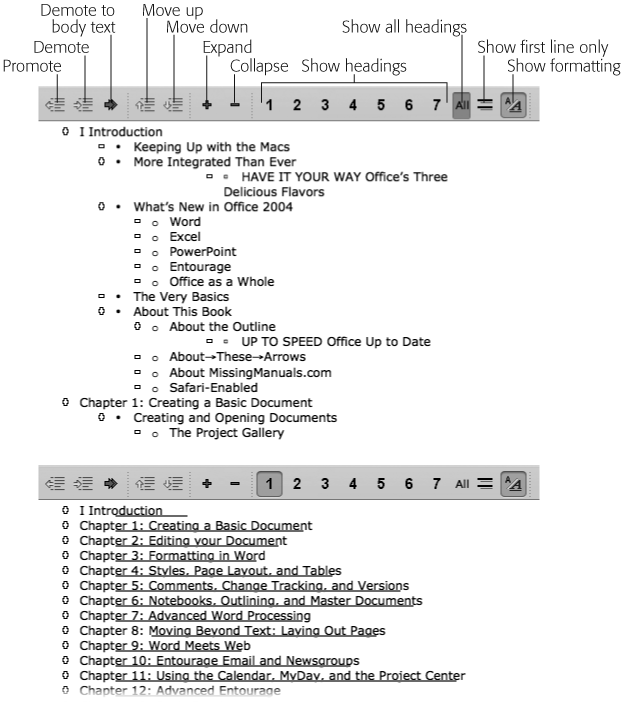
Figure 6-8. Top: A full-fledged outline in progress. The most important buttons on the toolbar are identified here. Bottom: By clicking the big 1 on the toolbar, you hide all but the primary Level 1 headings, giving an easy overview of your document. You can drag topics around using their bullets as handles.
To promote or demote a heading, click it and then press Tab (to demote) or Shift-Tab (to promote). Keep pressing until you reach the desired level. (You can also press Tab or Shift-Tab before typing a heading.)
Or, if you’re a mouse-driven kind of person, click the Promote and Demote buttons at the left of the Outline toolbar (see Figure 6-8). Keyboard Shortcuts: Shift-Control-left arrow to promote; Shift-Control-right arrow to demote. You can also drag with the mouse, as shown in Figure 6-9.
Tip
You can promote or demote an entire batch of headings at once. Drag through an outline to select certain headings, or neatly select a heading and all of its subheadings by clicking the + symbol. (To eliminate subtopics from the selection, first click the + sign, then Shift-click where you want the selection to end.)
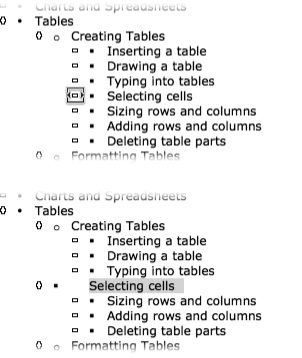
Figure 6-9. Top: You can promote a heading just by dragging it. As you drag the icon next to a paragraph, the cursor turns into a box with arrows. Now drag the margin line out to the desired level. Bottom: When you release the mouse, you’ve just promoted the heading. A paragraph of body text turns into a heading using the same technique.
Inserting body text. You wouldn’t impress many people if you wrote nothing but headlines. Fortunately, you can flesh out your headings with regular body text by clicking the double-arrow icon on the Outline toolbar. (It stands for Demote to Body Text, which actually demotes the text to the Normal style.) Use this style, denoted by a tiny white square in Figure 6-9, for the actual, longer-than-one-line paragraphs and thoughts that constitute the main body of your writing. Keyboard shortcut: Shift-⌘-N.
Rearranging headings. To move topics up and down on the page without promoting or demoting them, just drag them by the + and - handles (see Figure 6-9). Alternatively, you can select the topic or topics and click the Move Up and Move Down arrows on the Outline toolbar. Keyboard shortcuts: Control-Shift-up or -down arrow.
Breaking up headings. You’ll probably come across instances, especially when outlining an existing piece of writing (see below), where you need to separate one sentence from the previous one in order to make it a new topic. Just click before the first letter of the sentence and then press Return to put it on a new line.
The whole point of creating an outline is to organize the topics you’re presenting, to ensure that all the major points are there, and to arrange them in a logical order. Therefore, it’s helpful to see just your main points at a glance, unencumbered by the minor details. Here are ways you can control how much you see:
To show only Level 1 headings: To get a quick “big picture” view of your outline, click the large numeral 1 on the Outline toolbar, or press Shift-Control-1; now Word shows only your Level 1 headings, the real main points of your document. Everything else is temporarily hidden.
Similarly, clicking 2 (or pressing Shift-Control-2) shows heading Levels 1 and 2, so you can check how your subtopics are looking, and so on. (Figure 6-8 shows this trick in action.)
To collapse only one section of an outline: Double-click the puffy + sign next to it. All subtopics of that heading disappear, leaving just a gray bar behind as evidence that something’s been hidden. To expand it again, double-click the + again. (Double-clicking a minus sign doesn’t do anything, since there’s nothing to collapse.) This trick is helpful when you’re closely examining a small portion of a long outline and just want to move some minor details temporarily out of your way.
To view first lines only: Click the Show First Line Only button on the Outline toolbar, or press Shift-Control-L, to make Word hide everything but the first line of every paragraph—whether it’s a heading or body text.
To hide all body text: You can collapse all the material that you’ve relegated to body text so that only headings are visible by clicking the All button on the Outline toolbar (or pressing Shift-Control-A).
To expand everything: In an outline where you’ve collapsed at least one heading somewhere, the All button takes on a different role. Clicking it now expands any headings or body text that have been collapsed. Click All or press Shift-Control-A to get everything out in the open and return to work. (If you click All again at this point, it hides all body text and returns to its role as body-text toggle.)
Say you’ve been typing away on your latest essay or annual report, and you’re stuck. You’ve run out of ideas, and the ones you did have no longer look so clear now that you see them onscreen. It’s still not too late to apply the organizational power of an outline. Just choose View → Outline; Voilà! Word displays your document in outline format, using your own line breaks, indents, and headings as a guide. Now you can use the navigational tools described to reprioritize and clarify your thoughts.
If what you remember about outlining came from high school English class, you may be wondering about the I’s and a’s and funny little iii’s that you were taught to use as outline numbers. Not only can Word number your headings and subheadings automatically, but it can also automatically renumber the outline as you move topics around.
To add numbering to an outline, select the whole outline (Edit → Select All or ⌘-A) and choose Format → “Bullets and Numbering” → Outline Numbered tab. Then choose an outline style as shown in Figure 6-10. Now continue working as usual with your outline. Even if you drag topics around or insert new ones, Word automatically updates the numbering.
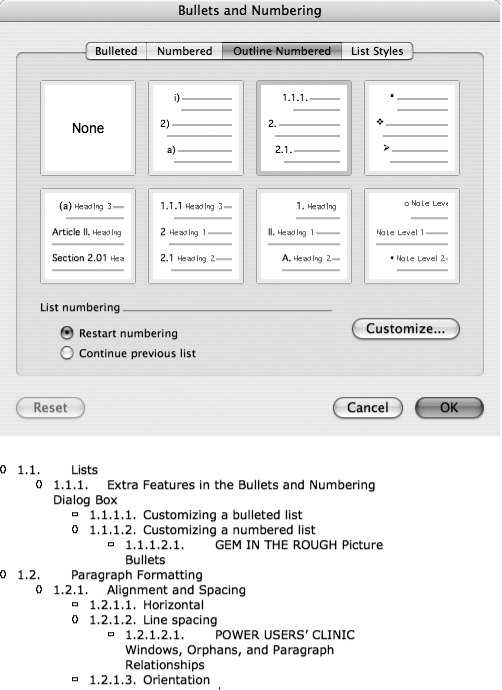
Figure 6-10. Top: When this dialog box appears, choose one of the seven outline styles; the ones on the bottom row add numbering and apply heading styles to the text on each level. There’s also an option for automatically adding the “Article” and “Section” labels used in legal documents (Article 1, Article 2…), and another for using Outline format for chapter headings. If one of the numbering styles displayed fits your needs, click it and then click OK. If not, see “Customizing an Outline in the next section. Click OK when you’re set. Bottom: The resulting outline is numbered automatically, according to the style you’ve selected.
You can’t edit a numbered outline in your document; when you click the numbers or letters, nothing happens. But what if you’re starting a new section with a completely different outline in it, and want the numbers to start all over again? Double-click the number or letter, or click the heading whose number you wish to change and choose Format → “Bullets and Numbering” → Outline Numbering tab, and click Customize. To change the number of the current heading, you have to first change the number in the “Start at” box, as shown in Figure 6-11. Any numbered headings following this one will be numbered in a continuing order.
The seven built-in numbering formats cover most purposes, especially if you’re creating the outline for your own benefit. But if you’ve been asked to turn in a document in outline format, if you’re using Word to create a legal document, or if you’re one of those people who can always see improvements through tinkering, you may need to tinker with the outline’s formatting to get just the right result.
To set up an unusual numbering style for your outline, choose Format → “Bullets and Numbering” → Outline Numbered tab, and click Customize.
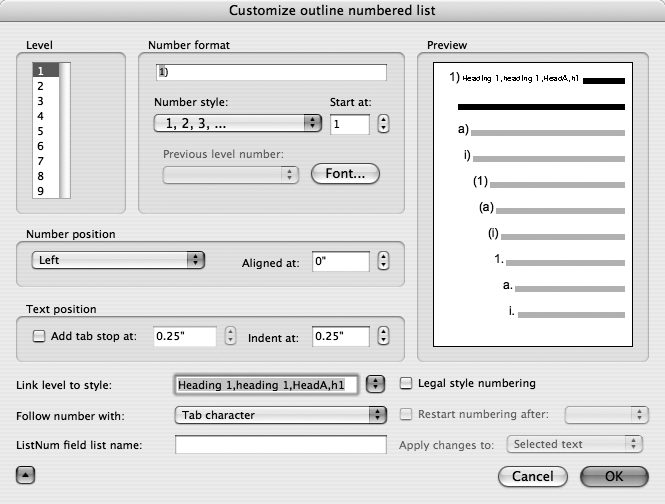
When the Custom Outline dialog box first opens, as shown in Figure 6-11, the settings you see pertain to the numbering style you’ve chosen in the “Bullets and Numbering” dialog box, and to the current heading level at the insertion point.
In the Level box at the left, choose the outline level you want to tailor. For instance, you can live with Word’s built-in typeface for chapter titles, but want your secondary headings to look different. In that case, leave Level 1 alone and click the 2 in the Level box. The Preview box presents an example of the current numbering; it changes as you make changes in the Custom Outline dialog box.
The Number Format panel shows the numbering style—letter, Roman numeral, and so on—for the current level.
Word generally begins counting headings with the number 1. But if you want to print out an outline that’s supposed to be a continuation of another document, you may want its numbering to start with, say, 17. That’s the number you type into the Start at box.
Choose from the Previous level number menu when you want to display level numbers together. Ordinarily, the title might be numbered 1, and the three subheadings a, b, and c. But if you want the subheads numbered 1a, 1b, and 1c instead, choose Level 1 from this menu. This numbering tactic is useful when your outline has long paragraphs, since it’ll keep you from getting lost in the levels.
The Font button lets you choose a font and typeface for the outline number only. (To change the font for the heading text, use “Link level to style” as described below.)
The Number position panel is where you can choose left, centered, or right alignment, relative to the distance between the text (see below) and the left margin. The Aligned at box is where you set the left indent. Watch what happens in the Preview box as you click the arrows.
The Text position box sets the distance of the text from the left margin. It operates independently of the number position.
If you click the blue arrow button, the dialog box expands, sprouting a handy fold-out panel showing even more intimidating-looking options.
In the Link level to style menu, you can choose to apply any of the styles in the current document template (see Styles) to the level that you’re formatting.
The Follow number with menu lets you insert a tab, a space, or nothing at all between the number and the text. (You do it here because you can’t directly format outline numbers in your document, not even in Outline view.)
The ListNum field list name box lets you lets you name the outline list template. Then you can insert a ListNum field that references that outline number list by name.
Check the Legal style numbering box to apply legal style (no letters, no capital Roman numerals) to any numbering style. This box grays out the “Number style” menu and gives Legal style numbering complete control.
When you choose a new level in the Level box, the Restart numbering after box is turned on automatically. That’s because each subtopic is numbered from the beginning, under the main topic that contains it (1a, 1b; 2a, 2b)—unless you take a unique approach to counting, you wouldn’t want your headings to go 1a, 1b, 2c, 2d, for example. Thus, under subheading (a), sub-subhead numbers start again with i, ii, iii, and so on, as shown in Figure 6-11.
Click OK to close the Customize box and apply your selections from the “Bullets and Numbering” dialog box. If you plan to always use the outline in Outline view, you’re done; otherwise, consider switching into Draft or Print Layout view for further refinement. You’ll discover that the nice, even indenting of your various headings in Outline view may not exist in Draft or Print Layout view. As a result, you may have to adjust the indentation of your various heading styles to make the indenting levels correspond in the other views.