
- Office 2008 for Macintosh: The Missing Manual
- A Note Regarding Supplemental Files
- The Missing Credits
- Introduction
- I. Word
- 1. Basic Word Processing
- 2. Editing in Word
- 3. Formatting in Word
- 4. Styles, Page Layout, and Tables
- 5. Working Collaboratively
- 6. Working with Notebooks, Outlining, and Master Documents
- Notebook Layout View
- Outline View
- The Document Map
- Master Documents
- 7. Editing Long Documents
- Headers and Footers
- Citations
- Bibliographies
- Footnotes and Endnotes
- Line Numbers
- Templates
- AutoSummarize
- Fields
- Bookmarks
- Captions
- Cross-References
- Creating a Table of Contents
- Indexing
- Mail Merges
- Macros
- 8. Moving Beyond Text: Publishing Layout View
- 9. Word Meets Web
- II. Entourage
- 10. Email, Address Book, and Newsgroups
- The Big Picture
- Setting Up Entourage
- Sending and Receiving Mail
- Address Book
- Newsgroups
- 11. Calendar, Tasks, and the Project Center
- The Calendar
- Recording Events
- What to Do with an Appointment
- Saving Calendars as Web Pages
- Tasks and the To Do List
- My Day
- Office Reminders
- Categories
- Project Center
- Accessing Projects from Other Office Programs
- Notes
- Synchronization
- Multiple Identities
- Finding Messages
- Links
- Checking Your Spelling
- The Script Menu
- 10. Email, Address Book, and Newsgroups
- III. Excel
- 12. Basic Excel
- Spreadsheet Basics
- Formula Fundamentals
- Excel, the List Maker
- 13. Formatting and Charts
- 14. Formula and Database Magic
- 12. Basic Excel
- IV. PowerPoint
- 15. Planning and Creating Great Presentations
- 16. Building a PowerPoint Presentation
- 17. Polishing and Presenting in PowerPoint
- V. Office As a Whole
- 18. Saving Time with the Project Gallery and Toolbox
- 19. Making the Most of Graphics
- 20. Customizing Office
- VI. Appendixes
- A. Installation and Troubleshooting
- B. The Office Help System
- C. Office 2008, Menu by Menu
- Application Menu
- Entourage Menus
- File Menu
- Edit Menu
- Undo
- Redo
- Cut
- Copy
- Copy to Scrapbook
- Paste
- Paste From Scrapbook
- Paste Special
- Clear
- Select All
- Duplicate
- Delete
- To Do
- Categories
- Projects
- Share Item
- Do Not Share Item
- Get Properties
- Auto Text Cleanup
- Increase Font Size
- Decrease Font Size
- Add to (or Remove from) Favorites Bar
- Find
- Advanced Search
- Find Related Items
- View Menu
- Message Menu
- Resend
- Send Message Now
- Send Message Later
- Receive Entire Message
- Edit Message
- Reply
- Reply to All
- Reply to Sender
- Forward
- Forward as Attachment
- Redirect
- Mark as Read
- Mark as Unread
- Mark All as Read
- Mark as Junk
- Mark as Not Junk
- Block Sender
- Check Names
- Insert
- Remove Background Picture
- Signature
- Priority
- Security
- Add Attachments
- Save All Attachments
- Remove All Attachments
- Remove Unsafe Attachments
- After Sending, Move To
- Apply Rule
- Move To
- Add To Address Book
- Internet Headers
- Source
- Format Menu
- Tools Menu
- Window Menu
- Help Menu
- Scripts Menu
- Excel Menus
- File Menu
- Edit Menu
- View Menu
- Normal
- Page Layout
- Toolbox
- Formatting Palette
- Object Palette
- Formula Builder
- Scrapbook
- Reference Tools
- Compatibility Report
- Project Palette
- Elements Gallery
- Toolbars
- Customize Toolbars and Menus
- Ruler
- Formula Bar
- Status Bar
- Header and Footer
- Comments
- Custom Views
- Full Screen
- Zoom
- Sized with Window
- Chart Window
- Insert Menu
- Format Menu
- Tools Menu
- Data Menu
- Chart Menu
- Window Menu
- Help Menu
- PowerPoint Menus
- File Menu
- Edit Menu
- View Menu
- Normal, Slide Sorter, Notes Page, Presenter Tools, Slide Show
- Master
- Header and Footer
- Hide/Show Comments
- Grayscale
- Toolbox: Formatting Palette, Object Palette, Custom Animation, Scrapbook, Reference Tools, Compatibility Report, Project Palette
- Elements Gallery
- Toolbars
- Customize Toolbars and Menus
- Ruler
- Guides
- Zoom
- Insert Menu
- Format Menu
- Tools Menu
- Slide Show Menu
- Window Menu
- Help Menu
- Word Menus
- File Menu
- Edit Menu
- View Menu
- Draft, Web Layout, Outline, Print Layout, Notebook Layout, Publishing Layout
- Toolbox: Formatting Palette, Object Palette, Citations, Scrapbook, Reference Tools, Compatibility Report, Project Palette
- Elements Gallery
- Toolbars
- Customize Toolbars and Menus
- Navigation Pane
- Ruler
- Header and Footer
- Footnotes
- Markup
- Reveal Formatting
- Full Screen
- Zoom
- Insert Menu
- Format Menu
- Font Menu
- Tools Menu
- Table Menu
- Window Menu
- Work Menu
- Help Menu
- Index
- About the Author
- Colophon
- Copyright
The Document Map doesn’t actually look like a map. It looks like a portable table of contents that’s open as you read. This unusual view can save you hours of tiresome scrolling (see Figure 6-12).
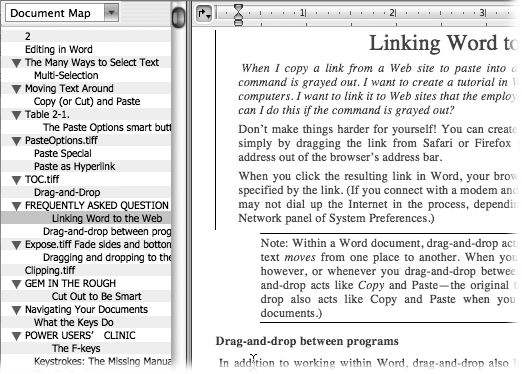
Figure 6-12. When you click a heading in the left pane of the Document Map, you automatically jump to that point in your document in the right pane. There’s no quicker way to get from one place to another in a long document. Plus, when you click the mouse somewhere in your document, that topic is highlighted in the Document Map.
In essence, the Document Map is a navigating pane revealing just the headings in a document. A heading, in this case, can be any text in one of Word’s built-in heading styles, a style you’ve based on one of the built-in heading styles, or text to which you’ve applied an outline level.
To see the Document Map, you need to open the Navigation Pane. You can do that by either choosing View → Navigation Pane or clicking the Navigation Pane icon on the Standard toolbar. A narrow panel with its own vertical scroll bar opens on the left side of your document window. From the little menu at the top of the pane, choose Document Map. (Your other choice—Thumbnails—is described on Adding template pages and in Figure 6-13.)

Figure 6-13. For truly visual creatures, Word has a great way to hunt for pages in a long document—the Navigation Pane’s Thumbnail view. To use it, click the pop-up menu at the top of the Navigation Pane and choose Thumbnail view. The Thumbnail view displays a miniature picture of every page in your document. To go to the page, just click its thumbnail. If a page isn’t visible, use the scroll bar to move to it.
The Document Map doesn’t have a horizontal scroll bar at the bottom; if you can’t read the full text across the Document Map pane, drag the narrow bar—the resize bar—to widen its pane. However, you can read the full text of any topic without resizing: point the cursor at any line of text, and a screen tip appears, revealing the full text.
The flippy triangles in the Document Map work just like those in any Finder window: Click one to reveal or conceal all its subtopics. If you’re a fan of contextual menus, you can also Control-click (or right click) a heading in the Document Map, and choose Expand, Collapse, or any of the level headers that you’d like to see.
Because the items shown in the Document Map have levels, like headings and outline topics, you can collapse or expand the entire “outline” so that, for example, only the Level 1 and Level 2 headings show up, exactly as you can in Outline view. To do so, Control-click in the Document Map pane and choose a heading level from the contextual menu (as mentioned above). If you choose Show Heading 4, for instance, the Document Map displays only Levels 1 through 4, hiding everything else.
To dismiss the Document Map, choose View → Navigation Pane again, double-click the resize bar, or click the Navigation Pane icon in the Standard toolbar.
The Document Map automatically shows up as black Lucida Grande text with blue highlights. To jazz up the Document Map font (or just make it less ugly), choose Format → Style and choose Document Map in the Styles list box. Click Modify to bring up the Modify Style box.
Now choose Font from the Format menu. Whatever font, color, size, case, or text effect you specify now will apply to all text in the Document Map.
Tip
At this point, you can even change the highlight color, which appears when you click a heading in the Map. Click OK; then, from the Format pop-up menu, choose Borders. Click the Shading tab in the resulting dialog box. Choose a new fill color as described on Fill Color: Standard palette.
Click OK, OK, and Close when you’re satisfied. (Clicking Apply changes the current paragraph in your main document to the Document Map style; that’s probably not what you want to do.) If you have a change of heart at this point, press ⌘-Z to restore the Document Map to its original, bland condition.
-
No Comment