
In the beginning, there was Word 5.1. It had fonts, sizes, styles, tables, and graphics. But the people weren’t satisfied. They wanted to bind together many different chapter documents into a single, unified book. They wanted to knit together files written by multiple authors who had edited their respective sections simultaneously on the network. They wanted to print, spell check, or find-and-replace across dozens of different Word files at once, or generate tables of contents, indexes, and cross-references for all component Word files at once.
On the sixth day, Microsoft created the Master Document. (Really, it looks like they created it on the fifth day. They saved the sixth for Notebook Layout view and Zune.) Notebook is perhaps the simplest form of outlining, while Outline view is more capable, more complex. Finally, Master documents are the Mother Lode of document organization.
But on the 2008th day—or version—Microsoft decided that this might be just too much for the average Word fan to comprehend and hid access to this feature behind an innocuous button in the Outlining toolbar. No longer would the multitudes be mystified by Master Document in the View menu.
Without a doubt, a Master Document looks much like an outline. However, each heading in the Master Document can refer to a section or an entirely different Word file. As in the Document Map, you click these headings in Master Document view to travel directly from one part of the overall document to another.
In essence, a Master Document is a binder containing the individual Word files that comprise it (which Microsoft calls subdocuments). Each subdocument can be formatted independently, moved or removed, split up, or combined with another subdocument—all while remaining safely under the umbrella of the Master Document. The Master Document concept is slightly alien, difficult to understand, and sometimes a bit flaky; but if you’re putting a book together, Master documents may be the only way to go.
Warning
Master documents are sometimes a cause of document corruption. When you’re using this feature, back up your work even more frequently than usual.
To start building a Master Document, open a new document, choose View → Outline, and click the button at the right end of the Outlining toolbar. The Master Document toolbar appears, and your document is set up for outlining (see Figure 6-14).
Setting up your über-document is exactly like creating an outline (see Outline View), in that you use all the same techniques. Each heading, however, will eventually become the name of a separate file on your hard drive. Because a Master Document will wind up as a herd of individual files, you’d be wise to save it on your hard drive in a folder of its own; the subdocuments will wind up there, too.
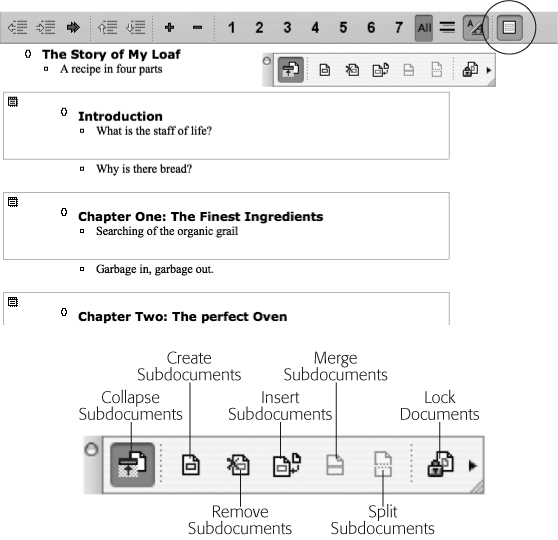
Figure 6-14. Top: Click the Master Document View button (circled) in the Outlining toolbar to expose the Master Document toolbar and create a Master Document like this one, showing three subdocuments. A subdocument icon, like the ones at far left, represents each document (Introduction, Chapter One, and so on). Bottom: The Master Document toolbar has the buttons you need to manage this kind of meta-document.
To spin off a particular heading as a subdocument, click it and then click the Create Subdocument button on the Master Document toolbar (see Figure 6-14). (You can also highlight several headings [and text, if desired] at once before clicking the Create Subdocument button. Just make sure the first heading is at the level you’ll want represented as subdocuments.)
A light gray box that defines the boundaries of the document appears onscreen; you can type or paste into it. Behind the scenes, you’ve just created a new, linked file in your Master Document’s folder (Figure 6-15). You or your network comrades can edit these individual files independently; whenever you open up the Master Document, you’ll see the changes reflected.

Figure 6-15. Behind the scenes, each master document is comprised of individual Word documents on your hard drive. If you click the Collapse Subdocuments icon on the toolbar, the nature of your subdocuments becomes all too real—you see only hyperlinks to their locations on your hard drive, spelled out as file paths.
Note
Subdocument files are stored in the same folder as the Master Document and behave like perfectly normal Word files. But don’t drag their icons to another folder; rename them by clicking the icon’s name, and so on. If you do, the Master Document won’t be able to find them. Instead, move and rename subdocuments using the techniques described later in this section.
The safest way to copy a Master Document and all its subdocuments to another location is to select them all and move them all at once. Better still, just move the folder containing them.
You can turn an existing Word document on your hard drive into a new subdocument, too. Just click the Insert Subdocument icon on the Master Document toolbar to open its dialog box. When you navigate to and select a file and click Open, the contents of the document appear in your Master Document as a subdocument, just like all the others.
Master Documents look and act vastly different in each of Word’s views. If you can remember to switch into the correct view, you’ve won more than half of the Master Document game. Here’s what each view does to a Master Document:
In Draft view, subdocuments become sections (see Inserting and Removing Section Breaks), with a section break separating each. Use Draft view to type and edit your document. Be careful not to remove the section breaks. Removing them will inadvertently combine the Word documents that make up your Master.
If, in Draft view, your document looks like a series of hyperlinks, with no other text, you have two choices: Click on a hyperlink to open that subdocument in a new window, or choose View → Outline, click the Master Document View button, then click the Expand Subdocuments button on the Master Documents toolbar. Now when you return to Draft view, the text in your Master Document will flow continuously, with a section break between subdocuments.
Web Layout, Print Layout, and Publishing Layout views function just as they normally do. Your document appears to be a seamless whole, with no visible breaks between subdocuments.
Outline view turns the Master Document into one big outline; here too, if you see hyperlinks instead of text, expand the subdocuments as described above. This view is useful for organizing your document at any stage of the process because it’s so easy to drag-and-drop. In Outline view, subdocuments are represented by continuous section breaks.
If you convert your Master Document to Notebook Layout view (The Notebook Layout Toolbar), you get a beautiful notebook with each subdocument in a tabbed section of its own.
Note
If you sense a pattern here, you’re right. A subdocument in Master Document view and a tab in Notebook Layout view are both represented, in Draft view, by continuous section breaks (Inserting and Removing Section Breaks).
In Master Document view, not only can you see all your subdocuments, you can also open them, arrange and organize them, and control access to them.
When you click the Collapse Subdocuments button (first on the Master Document toolbar), something odd happens: Each subdocument is listed as a blue, underlined hyperlink, with only its heading visible (Figure 6-15). The rest is collapsed, exactly as in an outline. The text of the hyperlinks can look unfamiliar to you, since they’re the folder path and file name of the subdocument. Clicking a link opens the subdocument in its own window.
You also see a padlock icon next to each collapsed heading. It’s a persistent bug; that document isn’t, in fact, locked in any way. If you double-click the heading (to open the file into its own window) or expand it, you’ll find that it’s easily editable.
Tip
You can lock a subdocument so that it’s protected from errant mouse clicks in Master Document view; just click in the expanded subdocument and click the padlock icon on the toolbar. Even so, double-clicking its small subdocument icon or its collapsed heading opens it into its own window, which is easily editable. In other words, the Lock function doesn’t give what you’d call government-level security.
But when you open a subdocument into its own window, the padlock in the Master Document indicates that you (or anyone else) can’t edit the same document in Master Document view. The lock feature is really effective only when sharing a Master Document over a network, where it prevents two people from editing the same document at the same time.
Once you’ve collapsed your subdocuments, you can drag their little document icons up or down to rearrange them (or press Delete to remove them).
When you then click the Expand Subdocuments button on the Master Document toolbar (the very first icon again), the subdocuments open within the Master Document window. A light gray box outlines the contents of the subdocument in outline form.
Don’t rename or move a subdocument in the Finder; if you do, the Master Document will no longer be able to find it. If you really want to rename or move one of these documents, do so from within the Master Document, like this:
Open the subdocument using any of the methods described above, and choose File → Save As.
Type a new name for the subdocument and, if desired, choose a new location for it. Click Save or press Return.
With these two steps, you’ve updated the Master Document’s link to the subdocument. The next time you open the subdocument from within the Master Document, the one with the new name and location will open. (The subdocument with the old name and location is still there, sitting on your hard drive as an independent Word document. You can delete it, unless you have some further use for it.)
Suppose you want to chop a long chapter into two shorter ones. Or perhaps two people who were collaborating on a report have had a big fight, requiring you to solve the problem by giving them individual assignments. Fortunately, the process of dividing a subdocument in two, which Word calls splitting, is comparatively painless.
To do so, expand the subdocuments in Master Document view. Click where you want your split-off document to begin, and then click the Split Subdocument button on the Master Document toolbar.
At other times, you may want your subdocuments to meld together. For instance, you may want to combine two short chapters into one longer one, without restarting the pagination. You could cut and paste text from one subdocument into another, but there’s a more elegant way, which Word calls merging.
To perform this task, move the subdocuments that you intend to merge so that they’re next to each other in your outline. Highlight them, and then click the Merge Subdocument button on the Master Document toolbar.
The new, merged subdocument carries the name of the first subdocument that you combined. The original, unmerged versions of the second (and other) subdocument files remain in their original folder locations on your hard drive, but they’re no longer connected to the Master Document.
The Remove Subdocument button on the Master Document toolbar doesn’t actually delete it (for that, see below). Instead, this function brings the document’s contents into the Master Document itself, so that it’s no longer linked to an external file on your hard drive. For example, you might use it when, for formatting reasons, you want your introduction to be part of the Master Document, instead of giving it a subdocument of its own.
To do so, expand the subdocuments. Click the subdocument icon, and then click Remove Subdocument on the Master Document toolbar. The contents of that subdocument now appear in the body of the Master Document. (You can delete the old subdocument file, which is now orphaned on your hard drive—unless you want to keep it as a backup.)
Deleting a subdocument from a Master Document is easy: With the subdocument expanded and unlocked (see Master Document Security), click the subdocument icon to select it and then press Delete. (When you delete a subdocument, you only remove it from the Master Document; you don’t actually delete its file. The original subdocument file is still in the same folder where you left it, and where it will stay until you Trash it.)
Like all Word documents, every Master Document is based on a template (see Templates). Not surprisingly, all subdocuments have the same template as the Master Document. What is surprising, and potentially confusing, is the fact that a subdocument can have its own template, independent of the Master Document—and yet it can still take on the Master Document template when you want it to.
In Master Document view, all subdocuments share the same Master Document template—its styles, headers, footers, and so on. When you print from this view, all subdocuments print in the styles of the master template, resulting in a very consistent look. But when you open a subdocument in its own window, the subdocument’s own independent template applies—with its own type styles, headers, footers, and so on. All the template parts listed on The Organizer can operate independently in the Master Document and its subdocuments.
Master documents were designed for sharing. The fact that two different people can simultaneously work on subdocuments of the same Master Document makes collaboration easy. When the individual subdocuments are done, you can review and print the finished product in Master Document view, ensuring that the formatting is consistent throughout. An added challenge, however, is keeping people from messing with subdocuments that they shouldn’t, whether or not they’re doing it maliciously.
The simplest (and most easily foiled) way of keeping someone from tampering with a subdocument is to lock it, as described on Moving and renaming subdocuments. When a subdocument is locked, you can open and read it, but you can’t edit or change it.
Fortunately, anytime someone is working on a subdocument, it gets locked automatically when viewed by anyone else on the network. It remains locked until its editor finishes and closes it.
Unfortunately, locking a subdocument by using the Lock Subdocuments button is a good way to prevent others from making accidental changes to it, but it doesn’t actually lock out those who know about the Lock Document button. For true security, Master Documents and subdocuments need to be password-protected just like any other document. As always, you can password-protect either the Master Document or (if you’ve opened one into its own window) a subdocument; either way, the instructions on The Ruler apply.
One of the most popular uses for Master Documents is file sharing. For instance, members of a public relations department can each work on a separate section of their company’s annual report. The report is a Master Document, and each section is a subdocument.
Here are a couple tips for successful Master Document file sharing:
Choose one person to be team leader. That person will format the Master Document, assign and keep a safe record of the passwords, and oversee the final proofreading and distribution of the completed document.
Make sure all Macs involved are networked and set up for file sharing. If any team members aren’t familiar with file sharing, arrange consultations with the network administrator. To learn more about setting up file sharing, choose Help → Mac Help in the Finder and search for file sharing, or consult Mac OS X: The Missing Manual.