
All of the careful setup you’ve done up till now leads up to your goal: telling Entourage to check for incoming mail and send any outgoing mail. The basic process is easy, but several subtleties can make your email experience more satisfying.
Tip
You can also set up Entourage to check your email accounts automatically according to a schedule, as described on Advanced Mail-Getting Features.
When Entourage opens for the first time, you’ve got mail; the Inbox contains a message for you from Microsoft. It wasn’t actually transmitted over the Internet, though—it’s a starter message built into Entourage just to tease you. Fortunately, all your future mail comes via the Internet.
You get new mail and send mail you’ve written using the Send & Receive command. You can trigger it in any of several ways:
Click the Send/Receive button in the toolbar.
Choose Tools → Send & Receive → Send & Receive All (or choose from the submenu which account you wish to send and receive email from).
Press ⌘-K.
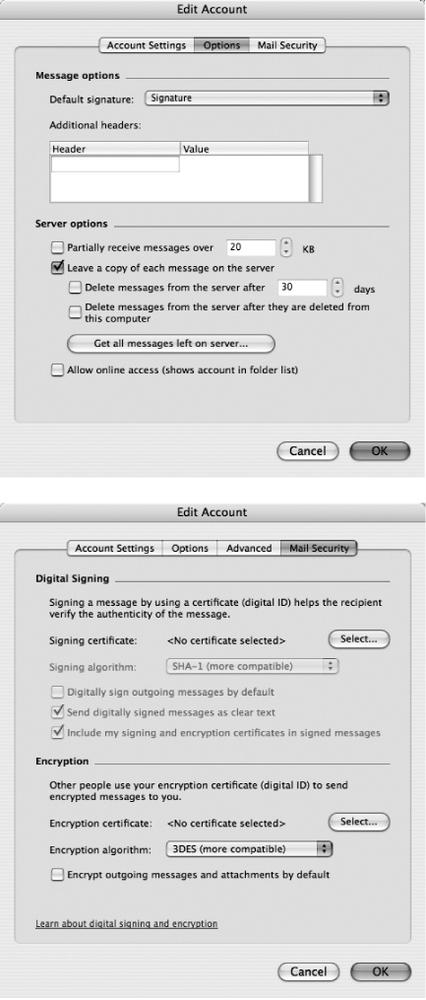
Figure 10-6. Top: Clicking the Options tab reveals a slew of options that aren’t available through the Account Setup Assistant. For example, if you have a slow connection, you can choose to just partially receive large messages, and if you’d like to access your mail from more than one computer, you can choose to leave a copy of the messages on the server. Bottom: The Mail Security tab lets you choose email-specific security options.
Now Entourage contacts the mail servers listed in the account list, retrieving new messages and downloading any files attached to those messages. It also sends any outgoing messages and their attachments.
Tip
After it’s done, Entourage tries to communicate its success or failure by playing a cheerful chime—one for “You’ve got mail,” a different one for “You’ve got no mail,” and so on. You can change these sounds, opt to have Entourage flash the menu bar instead, elect to have Entourage bring itself in front of your other open Mac programs when there’s new mail, or even choose a completely different sound set. All of this fun awaits in the Entourage → Preferences → General Preferences → Notification tab. Oh yes, you can also turn off notifications altogether.
In the list on the right side of your screen, new messages appear in bold type. Folders containing new messages show up in bold type, too (in the Folder list at the left side of the screen). The boldface number in parentheses after the word “Inbox” lets you know how many of its messages you haven’t yet read.
Finally, after downloading the messages, Entourage applies its filters—what it calls Rules—to all new messages, putting mail from mailing lists into specific folders, for example. You’ll find more on rules on Setting up message rules.
While it’s connecting to the Internet and transferring messages, Entourage reports briefly on its activity at the bottom of the main window. If you’d like more detail, open Entourage’s Progress window, as shown in Figure 10-7, by choosing Window → Progress or pressing ⌘-7.
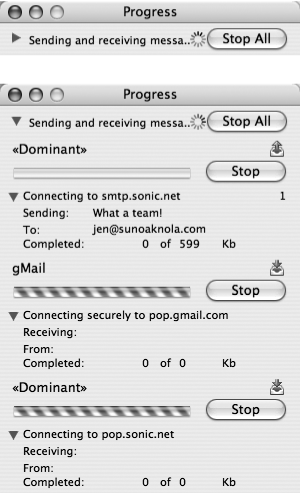
Figure 10-7. Top: The progress window first appears as a small window with a flippy triangle on the left side. Bottom: When you click it, the window shows you all of the details as it makes a network connection: what server has been checked, the number of messages left to be downloaded, where they’re coming from and how much of each message is left to be downloaded.
You don’t have to check all of your email accounts whenever you want to get mail. Suppose, for example, you’re having a holiday weekend at home and don’t really care to see any email from your work account, but to want to see any messages that come to your personal account.
You can exclude an account (or several accounts) from the “Send & Receive All” routine easily enough. Open the Accounts window (Tools → Accounts), double-click the account’s name, turn off “Include this account in my “Send & Receive All’ schedule,” click OK, and close the Accounts window.
But suppose you usually want to check all accounts, but occasionally want to check only one of them. On such an occasion, choose that account’s name from the Send/Receive menu button on the main Entourage window. (Alternatively, choose the account name from the Tools → Send & Receive submenu.)
Hundreds of thousands of people are perfectly content using Entourage for email just as it comes out of the box. But if you’re willing to open the hood and modify a few technical options, you can unleash some awesome variations on the “Click a button to download mail” routine.
Stop pressing a button to check your email. You can set up Entourage to check your email according to a regular schedule. To be sure, this is an advanced feature, which may force you to think, just for a moment, like you’re a computer. But there’s no debating the convenience of receiving messages throughout the day, moments after your correspondents click their send buttons. (On the other hand, some folks enjoy the uninterrupted peace and quiet of their workday, and prefer to take a virtual walk to the post office once or twice a day.)
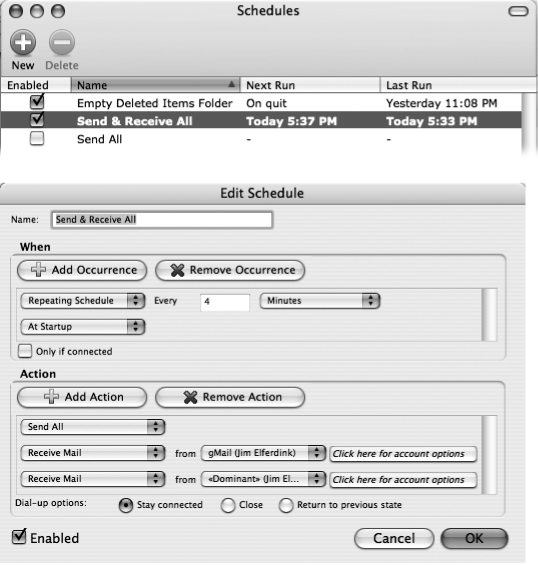
To create a schedule, choose Tools → Schedules to bring up the Schedules window (Figure 10-8, top). Click the New button in the window’s toolbar, which brings up the Edit Schedule window with an untitled schedule (Figure 10-8, bottom). (If you want to edit an existing schedule—for example, Send & Receive All might be the only schedule you really need—double-click it in the Schedules window.)
In this window, you can set three options: the schedule’s name, when it happens, and what happens. To give the schedule a name, just type it in the Name field at the top of the window.
The When portion of this window lets you determine when a schedule runs, using a pop-up menu:
Manually. Nothing happens automatically. To run the schedule, you’ll have to choose its name from the Tools → Run Schedule submenu. In other words, it’s not a schedule.
At Startup. Entourage runs the schedule whenever you launch the program.
On Quit. Entourage runs the schedule when you quit the program.
Timed Schedule. You can set specific times and days for schedules to run. That is, you can set a schedule to run every Thursday and Sunday at 12:20 p.m., if you like.
Figure 10-8. The Entourage Schedules window (top) shows all of the schedules available in your copy of Entourage. When you click the New button to create a new schedule (or double-click an existing schedule to edit it), the Edit Schedule window appears (bottom). Here you direct Entourage what to do and when to do it.
Repeating Schedule. Unlike with a timed schedule, you can set a schedule to run at regular intervals, such as every 5 minutes or every hour.
Recurring. This option lets you use a schedule to run in a recurring pattern over a defined period of time—such as monthly on the 21st day of each month for a period of three months, starting two months from today. (Somewhere someone needs this option.)
For Timed schedules and Recurring schedules, you can set the particulars by clicking the button next to the pop-up menu, which opens a window where you can set exact days, hours, and minutes for schedules to run.
By clicking the Add Occurrence button, you can add up to three “triggers” for this automated action. For example, you might set up a Timed Schedule, an At Startup schedule, and an On Quit and schedule, so that, for example, your email gets checked once when Entourage is launched, then every 10 minutes, and once again when Entourage quits.
Tip
If you connect to the Internet with a modem, turn on “Only if connected,” to prevent Entourage from trying to connect to the Internet to run the schedule (dialing furiously and seizing control of your phone line over and over again). Instead, Entourage will trot off to the Internet only if your Mac is already connected.
Now that you have specified when your schedules are to be run, you need to determine what happens when a schedule is run; Entourage can do much more on a timetable than check your mail. Control these options in the Action section of the Edit Schedule window. The pop-up menu has eight options:
Receive Mail. Entourage connects to a mail server and downloads any waiting mail. This is an ideal action to schedule at startup.
Receive News. If you want to download the latest newsgroup postings (see Newsgroups), you can tell Entourage to download that information—another one that’s useful in a startup schedule.
Send All. This action sends all waiting mail—a useful one to schedule for when you quit Entourage. That way, you can make sure that all of your outgoing mail goes out before you walk away from your Mac.
Run AppleScript. AppleScript scripts can be made to do just about anything—they’re especially good for integrating functions of several programs, not just email (for additional details see AppleScripting Office). For instance, you could tell Entourage to run a script that backs up your Documents folder onto a different hard drive when you quit Entourage. (AppleScript is a programming language—an easy one to master, but still a programming language. Information and links to online resources are also available at Apple’s AppleScript Web site, www.apple.com/applescript. You can also read all about it in AppleScript: The Missing Manual. )
Delete Mail. Trashes Entourage mail from your Deleted Items folder, which might be something that you want to do whenever you quit the program.
Delete Junk Mail. Empties your junk mail folder—this is another cleanup chore you might want Entourage to do when it quits. If you do, however, you’re getting rid of a safety net for good mail sorted into the junk mail folder by mistake.
Launch Alias. This schedule item opens an alias to any document or program on your hard drive—powerful stuff if you want to launch, say, your Web browser whenever you launch Entourage.
Excel Auto Web Publish. This item has to do with Excel’s Save As Web Page feature, which lets you publish an Excel workbook as a Web page automatically.
So why is an Excel option showing up in an Entourage dialog box? When you set a workbook to publish on the Web on a recurring basis, Excel hands the task off to Entourage’s scheduling feature, where it appears as a schedule. Once it’s in Entourage, you can further customize when the automatic publishing of that workbook takes place. When Entourage executes an Auto Web Publish schedule, it opens the workbook in Excel and saves it as a Web page. (This option isn’t available unless you’ve already created an autopublishing workbook in Excel.)
Once you’ve selected one of these options, you can also select parameters for it. For example, if you choose Receive News, you can specify which subscribed newsgroups (see Newsgroups) you want to read.
You can add dozens of actions to take place in a single schedule. To add an action, click the Add Action button. A new pop-up menu appears. (To delete one, too, click its line in the dialog box and then click the Remove Action button.) At the bottom of the dialog box, the Enabled checkbox lets you turn this schedule on or off—as does clicking the same-named checkbox in the Schedules window (Figure 10-8, top).
Entourage comes with three prefab schedules you can edit to meet your own ends: Empty Deleted Items Folder, which deletes all messages in the Deleted Items folder; Send & Receive All, which sends all outgoing mail and receives any waiting mail for all the accounts you’ve set up; and Send All, which sends all outgoing mail without checking for incoming mail. You can run these schedules, as well as any you’ve set up yourself, by choosing from the Tools → Run Schedule submenu.
As noted earlier in this chapter, the world’s most common email account types are POP (in which your messages are transferred from the Internet to your hard drive) and IMAP (in which your messages always remain on your mail server rather than your computer). The kind of account you have depends on your ISP.
But like other hip email programs, Entourage can let you use POP accounts almost as if they were IMAP accounts—that is, you can grab your messages without removing them from your Internet server. Better yet, the program can download only the headers of the messages, which takes but an instant, even over a slow (or expensive) connection. Once you have the headers, you can survey the subject lines or the names of the senders, and choose which messages you want to download in their entirety.
This feature is ideal for use when you’re staying in a remote getaway cabin, dialing your Internet account over a slow modem connection, for two reasons. First, you’re spared the tedium of downloading a bunch of messages and attachments you don’t really need while on retreat. Second, the mail stays on the server until you delete it manually; it’ll still be there when you return home, when you can again download the messages, this time onto your main Mac.
Note
Most Internet service providers allow you to accumulate only 5 or 10 megabytes’ worth of mail. Beyond that limit, incoming messages get “bounced” back to their senders. In other words, you can’t delay downloading your messages indefinitely, and attachments can easily consume a lot of your quota. Unfortunately, there’s no way within Entourage to see how much space your mail is using on your ISP’s server. Depending on your ISP, you may be able to see that information if you logon to your email account via Web-mail.
Microsoft calls this feature online access, by which it means that you’ll access mail in this account only via the Internet, rather than downloading it to your hard drive. To set up your account this way, choose Tools → Accounts, which brings up the Accounts window. Double-click the account that you want to make available for online access.
In the resulting Edit Account window, click the Options tab and turn on “Allow online access,” as shown in Figure 10-9. You wind up with a new icon in the Folder Items pane: the online representation of your account, bearing the same name.
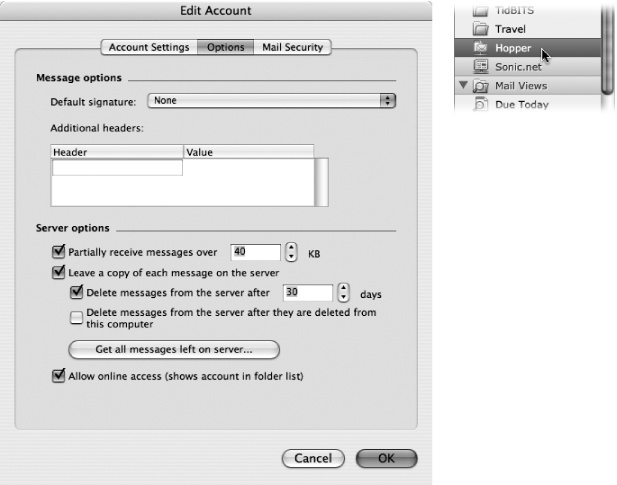
Figure 10-9. The Edit Account window (left) contains the “Allow online access” checkbox. The icon titled Hopper, located below the list of folders (right), is an online email account. When you select it, Entourage lets you read messages directly from the server without downloading them—particularly useful if you use more than one computer to check email.
Setting up an account for online access doesn’t remove its mail or folders from your hard drive. It just sets up an additional, different way of accessing the account, as represented by a new icon in the Folder List for that account. (Yes, this is confusing.)
Tip
When you set up an account for online access, it’s usually a good idea to turn off Entourage’s Preview pane (View → Preview Pane). You’ll see why in a moment.
To make Entourage check the mail server for new messages sent to this account, click this icon in the Folder Items list—just one click. Entourage starts by downloading only the header information of the waiting messages: subject lines, sender names, date and time the message was sent, and so on. It doesn’t download the messages themselves.
If you see a message whose subject line or sender looks promising, click it. If Entourage’s Preview pane is showing, Entourage downloads the message and shows it there. If not, double-click the message to make Entourage download it and display it in the message window.
Either way, the message also remains on the mail server—that’s the big difference between using the online access feature and using the Send & Receive command for that account.
To delete mail from an online account, select the messages that you want to delete, and then press the Delete key. (Now you see why it’s a good idea to turn off the Preview pane—when you click a message to delete it, you simultaneously tell Entourage to download it if the Preview pane is on the screen.)
The message doesn’t move, but a “deleted online message” icon appears in the message’s Online Status column (see Figure 10-10). When you next connect to that account in online mode, Entourage deletes the message from the server, if you’re still connected to the Internet.
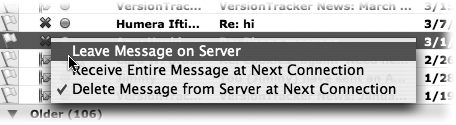
Figure 10-10. Online messages that you’ve deleted still show up in the message list, bearing an icon that looks like a red X. The next time that you connect to an online account, any messages that are marked for deletion will be shown the door. If you change your mind, you can click the deleted online message icon and choose “Leave Message on Server”.
On the other hand, if you change your mind and want to keep a message you’ve marked for deletion, click the deleted online message icon. From the pop-up menu, choose Leave Message on Server, so that the “deleted online message” icon disappears. The message will be there waiting for you when you check your email account in one of the “normal” ways.
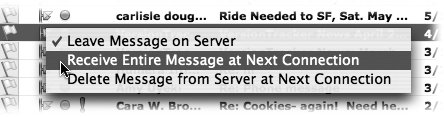
For road warriors stuck with slow modem connections, you can tell Entourage to grab only the first portion of a message, so that you don’t have to sit through an hour-long modem connection to download that “You Want It When?” cartoon that your aunt thought was just so funny.
To do this, select Tools → Accounts and then open the account for which you want to limit the size of downloaded messages. Click the Options tab at the top of that window, and then turn on “Partially receive messages over _ _ _ KB.” You can set how much of a message you want to grab (see Figure 10-9). If you decide that you want to download the entire message, click the broken-envelope icon; choose “Receive Entire Message at next Connect” from the menu that pops up (Figure 10-11).
When you’re in the plane or riding the Greyhound, you probably don’t have an Internet connection. In such situations, you may want to read your email and write replies—but you’ll undoubtedly be annoyed that, every 15 minutes or so, Entourage tries vainly to get online, triggering an avalanche of error messages.
To return serenity to Entourage world, choose Entourage → Work Offline. A checkmark appears next to the menu item and “You are working off-line” appears in the lower right corner of the main window. From now on, you can read and write replies to your email without interruption. In fact, if you click Send & Receive, Entourage asks if you’re sure you want to go online before it attempts to make a connection. (Choose Entourage → Work Offline again to remove the checkmark from the menu item and return to the normal “connect when ready” mode.)
Seeing a list of new messages in Entourage is like getting wrapped presents; the best part is yet to come. There are two ways to read a message: using the preview pane, and opening the message in its own window. Most email maestros prefer using the preview pane for most email reading. You can quickly scan through your messages using the up-and down-arrow keys, seeing entire short messages and the top part of longer messages in the preview pane. Then when you come across a message you really want to see—like one containing a large photo of your granddaughter—you can open the message in its own window (Figure 10-12).

Figure 10-12. When you open an email message by double-clicking it, you may see several things in addition to the text of the message: the attachments and the attachment control buttons, basic information (such as who sent the message, when it was sent, and its subject), and an email toolbar complete with buttons for Reply, Forward, Delete, and so on.
To preview a message, first make sure the preview pane is showing. Choose View → Preview Pane and choose whether you want the Preview Pane to the right of your message list (⌘-) or below it (Shift-⌘-). The Entourage main window splits in half and the preview pane opens either to the right of the message list or below it. When you click a message’s name in the message list, the body of the message appears in the preview pane. Don’t forget that you can adjust the relative sizes of the list and preview panes by dragging the gray border between them.
To open a message into a window of its own, double-click it in the list pane, or press Return to open the selected message. An open message has its own toolbar, with essential buttons for replying, forwarding, deleting, and so on.
Tip
When a sender’s name or the email subject is too long to display in the message list, Entourage trims it, and adds an ellipsis (…) to let you know there’s more to this item. You can, if you like, resize Entourage’s columns to make more room for this text: just drag the border between the columns. You can also point to a particular bit of abbreviated text without clicking. A small, yellow tooltip appears, revealing the entire, unabridged text.
Regardless of your viewing preference, any attached pictures, sounds, or movies also appear in the body of the message. You can even play those sounds and movies in the email message itself. (Entourage displays and plays any kind of file that QuickTime can understand—JPEG, GIF, PICT, Photoshop files, and so on—and can also call on Mac OS X’s graphics smarts to preview Acrobat PDF documents.)
Tip
If the text of a message is too small to read, Control-click (or right-click) and choose Increase Font Size from the pop-up menu. If a message’s text is too big (for a narrow window or a laptop screen, say), choose Decrease Font Size from the pop-up menu.
Once you’ve read a message, you can view the next one in the list either by pressing ⌘-] (press ⌘-[ for the previous message) or by clicking it in the list pane. (If you’re using the preview mode, and haven’t opened a message into its own window, you can also press the up or down arrow keys to move from one message to the next.)
Tip
To mark a message that you’ve read as an unread message, so that its name remains bolded, choose Message → Mark as Unread (Shift-⌘-T), Control-click (Windows refugees can right-click) the message and choose Mark as Unread from the shortcut menu.
If you’re a neatnik and prefer not to see the messages you’ve already read—but don’t want to throw them away—you can hide them. Just choose View → Unread Only (Shift-⌘-O). To bring the hidden messages back, choose View → Unread Only again. This setting applies to the currently selected folder only. If, on the other hand, piles of paper and stacks of mail give you a sense of comfort, don’t freak out if all your messages have disappeared. You’ve probably inadvertently applied this command; choose View → Unread Only to remove the checkmark from that menu item and restore your missing messages.
After you’ve received some messages in Entourage, you’ll notice that some of those messages have icons at the left side of their list-view lines. These badges or flags give you useful information about the messages:
To Do Flag. This leftmost column always shows a gray flag icon, but it turns red (
 ) if you click it (or click the To Do flag button in the toolbar) to designate this message as one requiring action—and to add it to your to do list. When you check it off your To Do list or click the flag icon a second time, Entourage replaces the red flag with a green check mark (
 ). See Flagging messages for more details about flagging messages.
Links. A chain-link icon here (
 ) indicates that a message has been linked to another message, calendar event, task, note, or the like. (See “Flagging messages” for more on linking.)
Online Status. An icon that looks like an emaciated folder (
 ) indicates that a message has only been partially retrieved—a dead giveaway that you’ve turned on the “Partially receive messages over” option described on Offline access. A red X through it (
 ) indicates that the message has been deleted from the server in an online account (The cabin-in-the-woods feature: online accounts). Finally, an icon with a superimposed clock face indicates that the message will be fully downloaded the next time that you connect.
Status. The status column shows the status of particular messages. A blue bullet next to a sealed envelope (
 ) means that the message has been received but not yet read. A curved blue arrow facing left (
 ) denotes a message that you’ve answered. A purple, angled arrow facing right (
 ), on the other hand, indicates that you’ve redirected the message (see Redirecting messages). An orange arrow facing right (
 ) denotes mail that you’ve forwarded to someone else.
Note
Unfortunately, Entourage displays these last three icons only after your replies, forwards, and redirects have actually been sent, rather than when you write the reply, or choose to forward or redirect a message. As a result, it can be difficult to determine whether or not you’ve processed a message if you don’t happen to be connected to the Internet.
If you modify the text of a message you’ve received (see Editing messages), the status column shows a pencil and notepad icon (
 ). If a message is associated with a calendar event (or invites you to an event—see Deleting Events), the message status icon shows a small calendar (
 ). (Caution: the calendar status overrides things like the symbols for forwards and replies.)
Priority. This column’s icons indicate a message’s priority: a red exclamation point (
 ) for Highest priority; an orange one for High priority; a dark blue downward arrow (
 ) for Low priority; and a pale blue downward arrow for Lowest priority. No icon means Normal priority.
Attachments. If a message has one or more files attached (see Prioritizing messages), a paper-clip icon (
 ) appears in this column.
Digital signing. If you see a padlock icon (
 ) in this column, it means the message has been digitally signed. That is, the sender added a certificate that helps verify that the sender is indeed who he says he is, and the message hasn’t been tampered with in transit (see Sending and Receiving Mail).
Groups. If you’re using Entourage’s groups view of email or newsgroup messages (see the box below), the group title bar displays a flippy triangle (
 ) at the left: click the triangle to expand or collapse the list of messages in the group.
After you’ve set up your Entourage email account, and email starts arriving, the fun really begins. Assuming you want to do more than just watch your Inbox fill up, you’ll have to do something with those messages in the following ways:
Sometimes it’s junk mail, sometimes you’re just done with it. Either way, it’s a snap to delete a message that’s before you on the screen, whether it’s in a preview pane, in its own message window, or just highlighted in the message list: simply press the Delete key. Alternatively, you can:
Press the forward-delete key, if your keyboard has one.
Press ⌘-Delete.
Click the Delete (trash can) button on the toolbar.
Choose Edit → Delete Message.
Control-click (or right-click) the message in the list, and choose Delete Message.
You can also delete a batch of messages at once by highlighting them or their group header and then using the delete button, menu command, or keystroke.
Tip
If you’re viewing a message in a separate window, and you want to delete it and move to the next in one easy step, press Option-⌘-]: that’s the same as the key command for moving to the next message (⌘-]) plus the Option key. If you want to delete the current message and move to the previous message, press Option-⌘- [ instead.
Either way, the message or messages don’t actually disappear, just as moving a file icon to the Mac’s Trash doesn’t actually delete it. Instead, these commands move the messages to Entourage’s Deleted Items folder. If you like, you can click this icon to view a list of the messages you’ve deleted. If you spot something in there you’d like to preserve, you can rescue messages by dragging them into any other mail folder (such as right back into the Inbox, as shown in Figure 10-13).
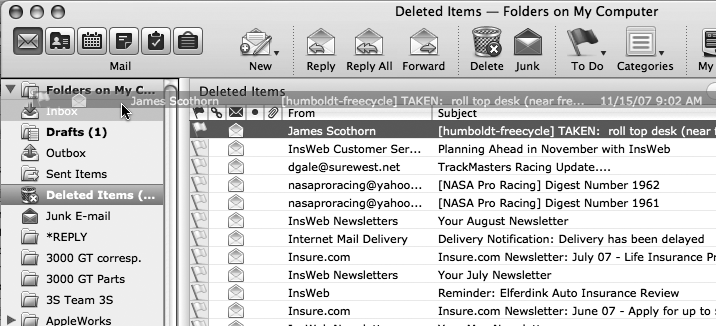
Figure 10-13. By dragging an item out of the Deleted Items folder, you can save it from certain doom. On the other hand, you can delete messages by dragging them into the Deleted Items folder.
Entourage doesn’t truly vaporize messages in the Deleted Items folder until you “empty the trash.” You can empty it in any of several ways:
Control-click the Deleted Items folder. Choose “Empty Deleted Items” from the shortcut menu.
Control-click (or right-click) the Deleted Items folder and choose Empty Deleted Items from the pop-up menu.
Choose Tools → Run Schedule → Empty Deleted Items Folder.
Click a message, or a folder, within the Deleted Items Folder list and then click the Delete icon on the toolbar (or press ⌘-Delete). You’ll be asked to confirm its permanent deletion.
Set up a schedule to empty the folder automatically when you quit Entourage, for example, or to delete only messages that are older than, say, 60 days. See Advanced Mail-Getting Features for instructions.
To reply to a message, click the Reply button in the toolbar, choose Message → Reply, or press ⌘-R. Entourage creates a new, outgoing email message, pre-addressed to the sender’s return address.
To save you additional time, Entourage pastes the entire original message at the top of your reply, complete with the > brackets that serve as Internet quoting marks (Entourage indents quoted text in HTML messages). (It’s also a feature you can turn off; choose Entourage → Mail & News Preferences, click the Reply & Forward tab, and turn off “Include entire message in reply.”) Entourage also tacks Re: (“regarding”) onto the front of the subject line, a long-standing convention of Internet email, and prefixes the quoted message with a one-line label indicating who originally wrote it, and when it was written.
Tip
If you need to quote only part of a message in your reply, select the text you want to quote before you choose Message → Reply (or simply press ⌘-R). Entourage creates a reply that includes only the text you selected as the “quotation.” See Editing messages to find out why keeping your quoted material brief is a thoughtful gesture for your correspondents. (This same technique lets you print only a portion of an email message as well.)
Meanwhile, if you want to include text you’ve copied from some other source—a Word file, for example—as a quotation, click in your message where you’d like the text to appear, and choose Edit → Paste Special → Paste As Quotation (or press Control-⌘-V). Entourage inserts the text in the clipboard as it would any other quoted material in your email message.
Your cursor appears at the bottom of the message area, below any quoted text; you can begin typing your reply. (If you’d rather see your insertion point above the quoted text, choose Entourage → Preferences → Reply & Forward and turn on the checkbox marked “Place insertion point before quoted text.”) You can also do any of the following:
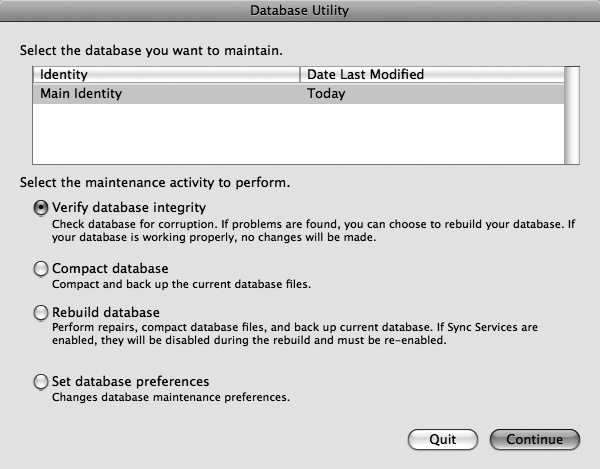
Figure 10-14. If Entourage is acting strangely, or you’d just like to compact its database to make it a smaller, more efficient file, then hold down the Option key while you launch the program to summon the Database Utility.
Edit the Subject line or the original message.
Use the Return key to create blank lines within the bracketed original message in order to place your own text within it. Using this method, you can splice your own comments into the paragraphs of the original message, replying point by point. The quoting brackets preceding each line of the original message help your correspondent keep straight what’s yours and what’s not.
Attach a file (see Step 6: Add any file attachments).
Note
If the original message came with an attached file, Entourage doesn’t fasten the attachment to the reply.
There are two basic kinds of replies. Create them by choosing commands from the Message menu, Control-clicking (or right-clicking) the message in the list and choosing from the shortcut menu, or by using the toolbar buttons.
A standard reply (click the Reply button) goes only to the sender of the message. If that sender is a mailing list (see the box on the facing page), then the message may be sent to the entire mailing list—which may not be what you intend. Check the To address to make sure you’re sending a message to the right place!
Reply To Sender (available in the Message menu) creates a reply that goes to the person who wrote the original message (or posted the message to a newsgroup; see Usenet Netiquette). Use this option if you’d like to reply privately to a message posted to a mailing list or a newsgroup, avoiding sending the message to the entire mailing list or group. (If you use this command on a message that didn’t come from a mailing list or a newsgroup, Entourage treats it as a standard reply.)
The Reply To All command addresses a message to all recipients of the original message, including any Cc recipients. This is the button to use if you’re participating in a group discussion; all six of you can carry on an email correspondence, always sending each response to the other five. (Reply To All doesn’t send the reply to anyone who may have been in the secret Bcc field, as described on Step 1: Addressing the message.)
Tip
Entourage starts out placing the insertion point at the bottom of any quoted text in a reply. As mentioned above, you can put your response above the quotation, by choosing Entourage → Preferences → Reply & Forward and turning on the “Place insertion point before quoted text” checkbox. However, if you use a signature (Step 5: Adding a signature) Entourage still places your signature at the very bottom of the message—where it may never be seen beneath all the quoted material. Keep your reply and your signature above the quoted material by clicking the button in the same preferences window marked, “Place reply at top of message and include From, Date, To, and Subject lines from the original message.”
Entourage lets you edit a message somebody else wrote. For once in your life, you can edit down some overly loquacious person without hurting his feelings.
Just double-click a message to open it into a window, and then choose Message → Edit Message. (If it’s HTML formatted, it becomes a plain-text message.) Feel free to delete or rewrite the text. When you close the window, Entourage asks if you want your changes preserved. After you click Save, a pencil and notepad icon appears next to the message’s name, a reminder of your meddling.
Some messages are forwarded and replied to about 900 times. With each round, more quoting brackets get added at the beginning of each line. Sooner or later, these messages become almost illegible (see Figure 10-15, top). Fortunately, Entourage can usually clean up a message’s text. It can, for example, make a message’s text all uppercase or all lowercase, increase or decrease its quoting levels (those multiple brackets >>>), or even straighten out curly quotes (which often arrive at the other end of Internet email as gobbledygook).
The most useful of these tools is Rewrap Paragraphs. When you have a badly wrapped message, the Edit → Auto Text Cleanup → Rewrap Paragraphs command (or click the Rewrap Text icon) does its best to remove all those funky line breaks so that the message is clean and legible once again.
Figure 10-15. Top: You can see how forwarding email multiple times can badly mangle the text. Bottom: After choosing Edit → Auto Text Cleanup → Remove Quoting, and Rewrap Paragraph commands, the message’s lines are neat and tidy—though the virus hoax message may still not be worth reading.
Tip
When you use the Rewrap Paragraphs command on a message you’ve received, Entourage asks if you want your changes to the original made permanent. Sometimes that’s just fine, but other times you may want to keep the original (bad) formatting around, just in case Rewrap Paragraphs messed up a chart or specially formatted text like song lyrics.
No biggie: You can have both the original and the cleaned-up version. Just make a duplicate of the message (select the message, choose Edit → Duplicate Message), and then use Entourage’s formatting tools on the copy.
Instead of replying to the person who sent you a message, you may sometimes want to forward the message—pass it on—to a third person. You can do that in one of two ways: pass the message along as is, or package it up in an attachment to a new message.
To send a message off just as it came, click the Forward button in the toolbar, choose Message → Forward, or press ⌘-J. A new message opens, looking a lot like the one that appears when you reply. But first you have to address it just like you would any other outgoing message. Once again, before forwarding the message, you can edit the subject line or the message itself. (For example, you may wish to precede the original message with a comment of your own, along the lines of: “Kate: I thought you’d be interested in this joke about Mozart.”) Entourage inserts one-line labels indicating what part of your message is the forwarded content, which helps eliminate confusion.
When you forward a message this way, Entourage puts the insertion point at the top of the message, and inserts labels—“Forwarded message” and “End of Forwarded Message”—to indicate where the forwarded message starts and stops. You can also tell Entourage to use Internet-style quote characters (“>”) before the forwarded text: choose Entourage → Mail & News Preferences, select the Reply & Forward pane, and check “Use quoting characters when forwarding.” (You can also change the starting position of the insertion point from this panel—though be aware that these preferences control replying and forwarding.)
If you have a long message that’s like a document in itself, you might want to keep it separate from the text you’re adding, so you can have Entourage turn the mail into an attachment. This method also keeps the material safe from prying eyes until your recipient chooses to open the attachment. To do so, click Message → “Forward as Attachment”, and take it from there.
A redirected message is similar to a forwarded message, with one extremely useful difference: when you forward a message, your recipient sees that it came from you—just as if you’d written the whole thing yourself. But when you redirect a message, your recipient sees the original sender’s name as the sender; the message bears almost no trace of your involvement. In other words, a redirected message uses you as a low-profile relay station between two other people.
Treasure this Entourage feature; plenty of email programs, including Microsoft’s own Outlook and Outlook Express for Windows, don’t have a Redirect command at all. You can use it to transfer messages from one of your own accounts to another, or to pass along a message that came to you by mistake. You might use it when, for example, you, a graphic designer, receive a question from a customer about the sales tax on his bill. You could redirect it to someone in the accounting department, who could respond to it directly just by clicking Reply. You’d then be mercifully insulated from any ensuing discussion of sales tax.
To redirect a selected message, choose Message → Redirect, or press Option-⌘-J. Entourage presents an outgoing copy of the message for you to address. You’ll notice that unlike a forwarded message, this one lacks quoting brackets. You can’t edit a redirected message; the whole idea is that it ends up at its destination unaltered. If you need to make a comment to the new recipient, use Forward or Forward as Attachment instead.
Note
When you redirect a message, you do leave some electronic fingerprints on it. If the recipients look at the Internet headers of a message you’ve redirected, they’ll see information Entourage inserted indicating who resent the message, and there may be other clues. Entourage inserts these details both to help avoid confusion and to prevent abuse.
To print a message choose File → Print or press ⌘-P; the Entourage Print dialog box pops up, so that you can specify how many copies you want, what range of pages, and so on. Finally, click Print.
Organizers take note—Entourage lets you create as many new folders in the Folder list as you need. Then, by dragging messages from your Inbox onto one of these folder icons, you can file away your messages into appropriate topics. You might create one folder for family messages, another for order confirmations when shopping on the Web, another for correspondence relating to an important project, and so on. In fact, you can even create folders inside these folders, a feature beloved by the hopelessly organized: your Family folder might have subfolders for each branch of the family tree.
Figure 10-16. Create as many folders and subfolders as you need to organize your email life. Use the flippy triangles to reveal or conceal subfolders. For quick access to your favorite folders, use Entourage 2008’s new Favorites Bar by dropping a folder into it from the folder list. Remove a folder favorite by dragging it off the Favorites Bar. If you don’t see the Favorites Bar—or don’t want to see it—choose View → Show (or Hide) Favorites Bar.
To create a new folder, choose File → New → Folder, press Shift-⌘-N, or choose New Folder from the New menu button on the Entourage toolbar. A new folder appears in the Folder list, sporting the imaginative moniker “untitled folder.” Just type a new name and then press Return.
Tip
To rename a folder you’ve created, click it once to select it, and then click its name. Now rename the folder as you would any Macintosh icon. You can’t rename or delete Entourage’s built-in folders (Inbox, Drafts, Sent Items, and so on), but your own folders are up for grabs.
You can move a message into a folder in any of three ways:
Drag it out of the list pane onto the folder icon. You can grab any part of a message in the list as a handle. You can also select and drag a bunch at once.
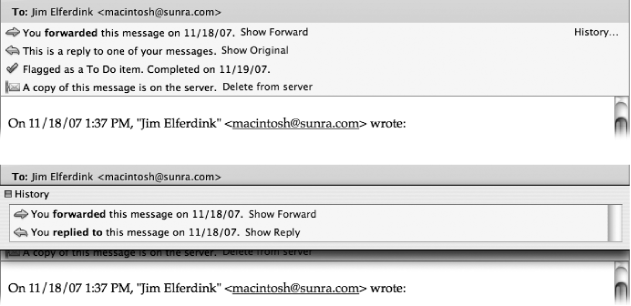
Figure 10-17. Whenever you reply, forward, flag, or do something else to a message, Entourage keeps a record of it and displays your most recent actions in the yellow box at the top of the message (top). If it has further information about this message’s past life, it displays the History link at the right side of the yellow box. Click it to reveal the rest of the story of this message’s existence (bottom).
Highlight a message in the list pane, or several, and then choose Message → Move To and select the folder from the submenu. Alternatively, press Shift-⌘-M to open a window listing all the folders in the Folder list. Highlight the folder you want (by clicking or typing the first couple letters of its name). Then press Enter or Return (or click Move).
Control-click a message (or one of several that you’ve highlighted); from the resulting shortcut menu, choose Move To and select the folder from the submenu.
Note
At the bottom of the folder pane, below any folders you create, you’ll find Mail Views. Although they appear in the folder pane, they’re not folders. They’re actually Saved Searches, formerly known as Custom Views—one-click message filters that help you zoom in on different aspects of your message collection. You can’t drag messages into these pseudo-folders. See Prioritizing messages for more particulars on Mail Views.
Tip
When you click a flippy triangle in the Folder list (or highlight a folder and press ⌘-right arrow), you get to see any folders within that folder, exactly as in the Finder’s List view. You can drag folders inside other folders, nesting them to create a nice hierarchical folder structure. (You can drag a nested folder back into the list of “main” folders—just drag it to the “On My Computer” item at the top of the folder list.)
You can also drag messages between folders. Just drag a message from the message list onto the desired folder at the left side of the screen.
This can be a useful trick when applied to a message in your Outbox. If you decide to postpone sending it, drag it into any other folder (like Drafts). Entourage won’t send it until you drag it back into the Outbox.
Sometimes you’ll receive an email message that prompts you to some sort of action, but you may not have the time (or the fortitude) to face the task at the moment. (“Hi there…it’s me, your accountant. Would you mind rounding up your expenses for 1993 through 2006 and sending me a list by email?”)
That’s why Entourage lets you flag a message, summoning a little red flag in the Status column next to a message’s name and—new in Entourage 2008—automatically adding that message to your To Do list. Since all flags are now To Do items, all flags also have due dates. The quickest way to add a To Do flag is to click the message’s gray flag icon in the message list. When you do so, Entourage creates a To Do item with your standard due date. (You can set your standard To Do due date by choosing Entourage → Preferences → General Preferences → To Do List and selecting one of the intervals from the pop-up menu: Today, Tomorrow, This Week, Next Week, or No Date.)
To choose a different due date, select one or more messages, and then click the pop-up menu next to the flag button in the toolbar and choose from the pop-up menu (see Figure 10-18), or Control-click (or right-click) the message and choose from the To Do submenu. If you select Choose Date, the Dates and Reminder window appears. Here you can specify the Start date (when you want the item to appear in your To Do list), the Due date (when the item is actually due), and a reminder (an Office Reminder window that pops up on your screen to help jog your memory).
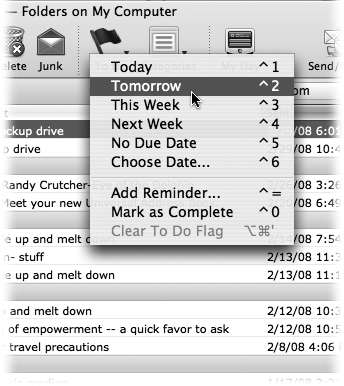
Figure 10-18. Use the To Do Flag’s pop-up menu to choose exactly when you need to respond to the selected message. If you do a lot of flagging, consider learning the keyboard equivalents listed in the menu (the chevron symbol stands for the Control key). Add a reminder to any flag, mark the item as completed, or clear the flag entirely using the final commands in this menu.
To view the messages you’ve flagged, you can do one of three things: Choose View → Flagged Only to display all the flagged messages in the current folder, click the Flagged search icon (Entourage Functions) in the Mail Views folder at the bottom of the folders pane, or switch to Entourage’s Tasks function (Tasks and the To Do List) and examine your To Do List.
Email messages can be much more valuable when they’re linked to other bits of Entourage information, such as other messages, calendar events, notes, and so on—yet another payoff of having an email program with built-in calendar and address book info. For example, you can link a message to a calendar event; thereafter, you’ll be able to click the link in the appropriate calendar day square to consult the original message (because it contained directions, for example).
Entourage creates some links for you automatically: for instance, when you reply to a message (or forward or redirect it), Entourage automatically creates a link between the original message and your response. That’s how the message history feature works (see Figure 10-19). When flagging a message for follow-up (see Flagging messages), you create a reminder that links to the original message.
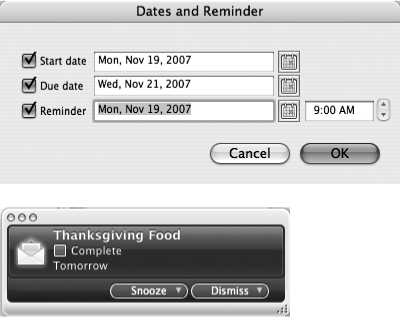
Figure 10-19. When you select a message and choose Choose Date from the Flag button’s pop-up menu, besides the date it appears in your To Do List and the date it’s due (top), you can set an Office Reminder to pop up at an appointed time to gently nudge you toward action (bottom).
Chapter 13 has full details on links. In the meantime, here’s a summary that’s specific to email:
In addition to responding to messages, you can link messages in three other ways: by opening the links menu, creating a link to an existing item, and creating a link to a new item.
Open Links. To open the Links window, choose Tools → Open Links or click the Link button in the toolbar (if you’ve added that button by customizing your toolbar—see The Toolbar). In the Link To window for the selected message, you can create or remove links to existing or new items. You can also open the item on the other end of a link.
Link to Existing Item. You can create a link to one of seven kinds of existing Entourage info-bits: another (email) Message, a Calendar Event, a Task, a Note, a Contact (address book entry), a Group, or even a File on your hard drive. (This last feature can be extremely handy. You might link a message about the date of your Macworld Expo talk to, for example, the Word document containing your outline.)
To link to an existing item, choose the kind of link you want to make from the Tools → Link to Existing submenu, and then select the item to which you want to link. You can also create such a link from the Link To window.
Link to New Item. You can also link a message to a Message, Calendar Event, Task, Note, Contact, or Group that you’re about to create—that is, you can simultaneously create a link and the item it’s linked to. This is handy when you suddenly get the inspiration to create a link, but you haven’t yet created the item on the other end of that link. Perhaps an email message from your epicurean friend contains a recipe for garbanzo bean stew and makes you think, “Ooh, I need to remember to bring a dish to Hari’s potluck next week!” you can create a link from that message to a new calendar item, then create the event using Entourage’s Calendar feature.
To create a link to a new item, choose the kind of link (and new item) that you want to create from the Tools → Link to New submenu. Once you’ve created a link, a small chain-link icon appears in the Links column in the message list.
To remove a link, open the Link To window (choose Tools → Open Links, choose Open Links from the Link pop-up button in the toolbar, or click the link column next to the message in question). Once the Link To window is open, select the link, and then click the Remove button at the top of the window.
You can set one of five priority levels for messages that you send or receive: Highest, High, Normal, Low, and Lowest. Once you’ve assigned priorities to your messages, Entourage can sort them so that the most important messages appear at the top.
To set a message’s priority, highlight its name in the List pane and then choose from the Message → Priority menu. To sort messages by priority, click the Priority column header (the exclamation-point icon at the left side of the List pane). The first time you click, Entourage sorts your messages from highest priority to lowest; the second time, it lists them from lowest to highest importance.
Note
You’re not the only one who can set a message’s priority. Sometimes incoming messages have their priority already set—invariably to Highest (for those who think their messages are vital) or Lowest (for those considerate about sending out genuinely unimportant mail). You can change this setting for a received message according to your priorities by choosing from the Message → Priority submenu.
Sending little text messages is fine, but it’s not much help when somebody wants to send you a photograph, a sound recording, a Word or Excel document, and so on. Fortunately, enclosing such items as file attachments is one of the world’s most popular email features.
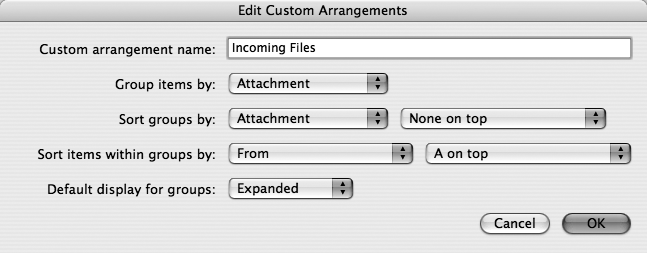
Figure 10-20. In order to sort and display your mail differently depending on the task at hand, you can create several custom arrangements and quickly switch between them by choosing View → Arrange By. The oddly named secondary “Sort groups by” pop-up menu determines whether the chosen group ends up at the top of the list or not.
When you receive an email message with an attachment, you may notice that it often takes much longer than usual to download from the Internet. That’s because attached files are typically much larger than email messages. (For more information on attaching files to send to others, see Step 6: Add any file attachments.)
When you’ve received a message with an attachment, a small paper-clip icon appears in the attachments column at the far left of the List pane.
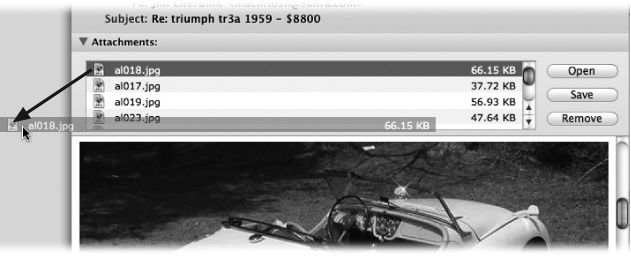
Unlike, say, America Online or Eudora, Entourage doesn’t store downloaded files as normal file icons on your hard drive. Instead, they’re stored in the Entourage database—a big, specially encoded file on your hard drive. To extract an attached file from this mass of data, you first have to open the message (either in the Preview pane or by opening the message into its own window). Now you’ll see a new section in the window labeled Attachments, as shown in Figure 10-21, listing any files that came along with the message.
If you expand the flippy triangle to the left of the word Attachments, you see a list of the files, complete with their icons, plus three buttons: Open, Save, and Remove. At this point, you can proceed in any of several ways:
Click one of the file icons (or Shift-click to select several, or click one and then press ⌘-A to highlight them all), and then click Save. The Save Attachment dialog box appears, so that you can specify the folder where you want to save the files on your hard drive.
Drag a file icon (or several selected ones) clear out of the message window and into a folder or onto any visible portion of your desktop, as shown in Figure 10-21.
Figure 10-21. When you receive an attachment via email, you see it represented just above the message text. Nearby buttons let you open, save, or remove the attachment. But when you drag an attachment’s icon onto your desktop (or into a folder) you copy the file out of the Entourage world and into your Macintosh world, where you can file it, trash it, open it, or manipulate it as you would any file.
Double-click the attachment’s icon in the message (or highlight it and click Open). If you were sent a document—a photo, Word file, or Excel file, for example—it now opens in the corresponding program (Photoshop, Word, Excel, or whatever).
Highlight an icon (or several) and click Remove. You’ve just detached and discarded the file.
Tip
It’s easy to set up Entourage to save all incoming file attachments into a particular folder on your hard drive—or onto your desktop for easy retrieval—saving you the step of manually saving or dragging them. (This arrangement should sound familiar to America Online, Eudora, and Claris Emailer fans.)
The trick is to use the message rules described in the next section. One of them has an option to save all file attachments (or only those from certain senders) automatically into a folder you specify.
Several factors may be at work if you’re unable to open a file attachment. For starters, your correspondent’s email program may have compressed or encoded the file to make it take less time to send. If you’re having trouble getting a file to open, therefore, your first step should be to drag the attachment’s icon onto that of StuffIt Expander, a free program that you can download from www.stuffit.com.
StuffIt Expander can gracefully decode and decompress just about any compressed or stuffed file, including those with file name suffixes like .sit, .cpt, .hqx, .gz, .z, .arc, .uu, and .zip.
Tip
Of course, Mac OS X generally hides these extensions, but you can always see a file’s hidden extension by highlighting it, choosing File → Get Info, and looking in the Name & Extension section.
If the file still won’t open, even after being decompressed, then you may be dealing with a file from a Windows PC. Some you can open relatively easily; some require more work, and some won’t work on Macs at all.
Warning
Although there are no Mac OS X viruses, Mac fans can fall victim malicious bits of code—malware—on the Internet in the form of Trojan horses. These aren’t technically viruses, since you have to download and install them. But you’re not installing what you think you are—hence the term “Trojan horse.” But so far, none of these have caused trouble for more than a handful of people
The best clue is the three-letter file name extension on the file’s name. For example:
.doc, .xls, and .ppt. These extensions identify Microsoft Office documents created before the advent of Office 2007 for Windows and Office 2008 for Mac—Word, Excel, and PowerPoint, respectively. You can usually open these documents with Office 2008 by double-clicking them, but if that doesn’t work, drag the document to the icon of the appropriate Office program.
.docx, .xlsx, and .pptx. These extensions identify the new style of Word, Excel, and PowerPoint documents created in the XML file format. They open with no ado in Office 2008.
.mpg. You’ve been sent an MPEG movie, and you can usually play it using QuickTime Player.
.wmf, .wma, .wmv. You’ve been sent a file encoded in Windows Media Format—a Microsoft media format similar to QuickTime. You can play these files in QuickTime player with the addition of a special component called Flip4Mac. Go to www.flip4mac.com and look for the Get WMV Player Free button.
.mp3, .wav, and .aif. MP3 files are compact, great-sounding music files. They’re what Apple’s iTunes and iPod are all about. If an MP3 file doesn’t play when you double-click it, drag it onto the iTunes icon.
.ra, .rm, or .ram. This file is an audio, video, or streaming media item in RealPlayer format. Neither QuickTime nor Windows Media Player can play these items. Get a copy of RealPlayer at www.real.com.
.bmp. This is a Windows Bitmap file. You should be able to open this type of graphic using Mac OS X’s Preview program, or Word 2008.
.tif or .tiff. TIFF graphics files are common in desktop publishing. (The graphics in this book, for example, are TIFF files.) If you can’t open it by double-clicking, the Mac OS X Preview program can show it to you. Word can also open TIFF images.
.psd. A Photoshop document. You can view these in Preview if you don’t have Photoshop.
.exe. This extension denotes an executable file for Windows—like a Mac program is executable on a Mac. By itself, your Mac can’t run Windows programs, just as Windows computers can’t run Macintosh programs. But you can run .exe files and any other Windows programs on an Intel Mac running Windows with BootCamp or Parallels.
.bat, .pif, .scr, or .com. These are other kinds of Windows programs, which you can’t run on the Mac (unless it’s an Intel Mac running Windows). They’re also, unfortunately, often associated with email-based worms and viruses. They can’t harm a Mac, but delete them anyway, so that you don’t pass them along accidentally to a Windows-using friend.
.jpg or .gif. You can open these graphics files in Word, PowerPoint, Preview, or Safari. In fact, you often see these images or photographs right in the body of the email messages that brought them to you.
.pdf. This downloaded item is probably a manual or brochure. It came to you as a portable document format file, better known as an Adobe Acrobat file. Entourage generally shows you a preview of the PDF file right in the email message, but you can also open the document with either Preview or the free Adobe Reader (www.adobe.com).
.html or .htm. A file whose name ends in .html or .htm is a Web page. In the beginning, Web pages hung out only on the Internet. These days, however, you’re increasingly likely to find that you’ve downloaded one to your Mac’s hard drive (it may be a software manual for some shareware, for example). To open the Web page, double-click in the attachment area of the message to open it in your Web browser, or drag the document to the visible area of a Web browser window, if you already have one running.
.vcf. You’ve got yourself an electronic “business card,” called a vCard, containing contact information that you can add to your Entourage Address Book. See Importing Contacts.
.rtf. RTF stands for Rich Text Format, and indicates a formatted word processing document as described on Paste Special. Word 2008 opens this kind of file with ease.
.wps. This file was created using Microsoft Works, an all-in-one software suite that’s something like AppleWorks. Unfortunately, Office 2008 can’t read these files; ask your correspondent to export the file as RTF, plain text, or another format if possible. For a greater feeling of self-reliance, buy a file-conversion program like MacLinkPlus (www.dataviz.com).
.wpd. This suffix denotes a WordPerfect document. Several years ago, WordPerfect was the dominant word processing program for PCs. (The file name extension .doc “belonged” to WordPerfect files, in fact, until Microsoft co-opted it for use with Microsoft Word—one of many actions that caught the Justice Department’s attention over the years.) Office 2008 can’t open WordPerfect files directly. Here again, reach for MacLinkPlus or ask your correspondent to export the document as RTF, HTML, or plain text.
.fp5 and .fp7. These are FileMaker Pro databases (www.filemaker.com).
If you were sent a file with a three-letter code not listed here, you may well have yourself a Windows file that can be opened only by a Windows program that you don’t actually own. You might consider asking your correspondent to resend it in one of the more universal formats described above.
Once you know how to create folders, the next step in managing your email is to set up a series of message rules (or filters) that file, answer, or delete incoming messages automatically based on their contents, such as subject, sender, or size. Message rules require you to think like the distant relative of a programmer, but the mental effort can reward you many times over; message rules turn Entourage into a surprisingly smart and efficient secretary.
Select an email message of the type you’re creating a rule for before you start setting up the rule. That way, Entourage fills in the appropriate text (see step 4, below) as you choose the filtering criteria. Then follow these steps:
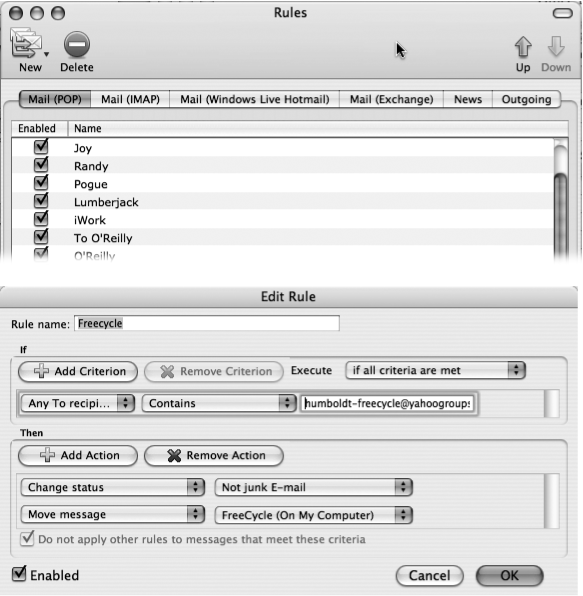
Choose Tools → Rules.
The Rules dialog box appears, as shown in Figure 10-22, top. As you can see, the tabs here let you set up different rules for each kind of email account (POP, IMAP, Hotmail, Exchange), plus separate rules for newsgroups (Newsgroups), and outgoing messages.
Figure 10-22. Top: Mail rules can help file your messages, serve as an email autoresponder, or call important messages to your attention. Choose Tools → Rules and click the appropriate Mail tab to create or view your rules. Select a rule to see what it does, and use the Up and Down buttons (or just drag the rule) to specify the order in which Entourage runs the rules. Bottom: Double-click a rule to open the Edit Rule dialog box, where you can specify or modify what the rule does.
Click the tab you want to work with, and then click New.
The Edit Rule dialog box appears (Figure 10-22, bottom).
Use the top options to specify how Entourage should select messages to process.
For example, if you’d like Entourage to watch out for messages from a particular person, you would set up the first two pop-up menus to say “From” and “Contains,” respectively.
To catch messages pertaining to your eBay buying and selling hobby, set the pop-up menus to say “Subject” and “Contains.”
If you click Add Criterion, you can set up another condition for this message rule. For example, you can set up the first criterion to find messages from your uncle, and a second that watches for messages from your cousin in order to sort them both into the Family folder.
If you’ve set up more than one criterion, use the “Execute” pop-up menu to indicate whether the message rule should apply if all the conditions are true, or if any one of them is true.
You can also set up catch-all rules that do their thing unless any or all criteria are met. For instance, if you’re using an account purely for internal email at your company, you can set up a rule for that account that files away (or deletes) all mail except messages from an address containing your company’s “.com” name.
Specify which words or people you want the message rule to watch out for.
After you’ve used the two criterion pop-up menus, a text box appears. Into this box, type the word, name, or phrase you want Entourage to watch out for—a person’s name or email address, or eBay, in the previous examples.
In the lower half of the box, specify what you want to happen to messages that match the criteria.
If, in steps 1 and 2, you’ve told your rule to watch for mail containing eBay in the Subject line, here’s where you can tell Entourage to move it into, say, an eBay folder.
With a little imagination, you’ll see how the options in this pop-up menu can do absolutely amazing things with your incoming email. Entourage can delete, move, or print messages; reply, forward, or redirect them to somebody; automatically save attachments into a downloads folder you’ve set up; or when you receive messages from some important person, play a sound, animate the Entourage icon in the Dock, or display a dialog box.
In the very top box, name your mail rule. Click OK.
Now the Rules dialog box reappears (Figure 10-22, top). Here, you can manage the rules you’ve created, choose a sequence for them (those at the top get applied first), and apply them to existing messages.
Tip
Entourage applies rules in the order they appear, from top to bottom, in the Rules window. If a rule doesn’t seem to be working properly, it may be that an earlier rule is intercepting and processing the message before the “broken” rule even sees it.
To fix this problem, try moving the rule up or down in the list by selecting it and then clicking the Up or Down buttons or by just dragging the rule up or down the list. When troubleshooting rules, it may help to selectively turn preceding rules on or off.
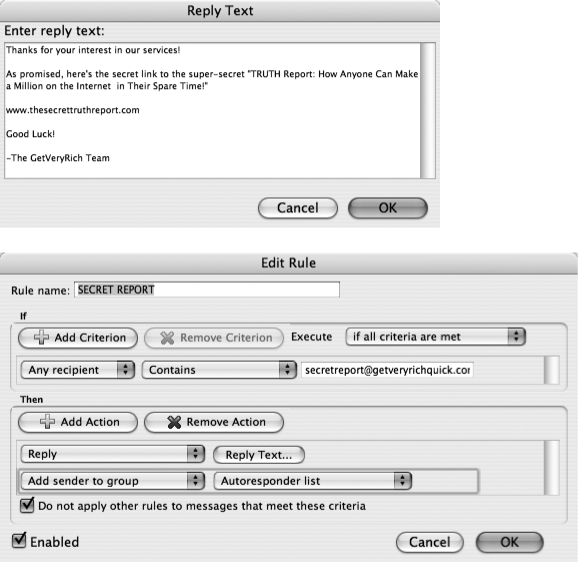
Figure 10-23. In this example, if Entourage receives an email message to a specified address—one you set up specifically to collect sales leads, for example—it sends an email reply using the text you create after clicking the Reply Text button (top) and adds the sender’ s address to a special group (bottom) in your Entourage Address Book (see Address Book).
To create an email message in Entourage, use one of these tactics:
Choose File → New → Mail Message.
Press ⌘-N. (If you’re using an Entourage function that has nothing to do with email—the Calendar or Tasks, for example—press Option-⌘-N instead.)
Click the New button on the toolbar or choose Mail Message from its pop-up menu.
In each case, an empty email message window appears, filled with email composition tools.
The first thing you’ll see when you create a new email message is the address pane, a pop-up window with four buttons, three address fields, and a list of addresses from your Entourage Address Book (see Figure 10-24). The fields here are labeled To, Cc, and Bcc, each of which has its own purpose:
To. Most of the time, you’ll type your correspondent’s email address here. If the recipient’s email address resides in your address book, Entourage can autocomplete it for you after you start typing. Just keep typing until it narrows it down to the one address you want—or scroll through the suggestions until you find the correct address, and double-click it or press Enter.
Cc. Cc stands for carbon copy; the name harks back to the days of typewriters, when creating a copy of a document required inserting carbon paper between two sheets of typing paper. In email terms, putting someone’s email address in the Cc area means, “No reply required; just thought you’d want to see this.” People listed in the Cc field receive a copy of the message, but aren’t the primary recipients.
Bcc. A blind carbon copy is a secret copy. This feature lets you send a copy of a message to somebody secretly, without any of the other recipients knowing that you did so. The names in the To and Cc fields appear at the top of the message for all recipients to see, but nobody can see the names you type into the Bcc box.
You can use the Bcc field to quietly signal a third party that a message has been sent. For example, if you send your co-worker a message that says, “Chris, thanks for staying late last night and helping Mr. Harris—I wish everybody at this office showed the kind of dedication to the job that you do,” you could Bcc your boss or supervisor to clue her in to this outstanding employee without embarrassing Chris.
The Bcc box is useful in other ways, too. Many people send email messages (containing jokes, or press releases, for example) to a long list of recipients. If the names are in the To or Cc fields, then everybody gets to see everybody else’s address—a definite no-no among privacy advocates.
But if the sender used the Bcc field to hold all the recipients’ email addresses, none of the recipients will see the addresses of any of the others.
Tip
After addressing a message, you can drag the addresses back and forth among these three blanks: from the To box into the Cc box, for example.
If you want to send a message to more than one person, click the Add button and type in a second (or third, or fourth) email address, or just press the Tab key or click in an empty area of an addressing box and start typing. As in most dialog boxes, press the tab key another time to jump to the next field (to proceed from the To field to the Cc field, for example).
You don’t have to remember and carefully type out all those email addresses, either. As you type, Entourage compares what you’re typing with the names in your Entourage Address Book. If it finds a match—that is, if you’ve typed tonand your Address Book contains the name Toni Martin, for example, Entourage sprouts a list of that and any other ton matches. The more letters you type, the closer Entourage zeroes in on your intended addressee. Entourage also remembers the last 200 addresses you’ve sent mail to and received mail from that aren’t in your address book, which can be handy when you think of something you’d like to add to a recent exchange. (You can turn this feature off or simply clear out the list in Entourage → Preferences → Mail & News Preferences → Compose if it bothers you.)
You can choose from this list of proposed addressees either by pressing Return when Entourage highlights the correct name, by pressing the up- or down-arrow key to highlight a name, and then pressing Return, or by clicking a name. If none of Entourage’s guesses are correct, just keep typing; Entourage quietly withdraws its suggestions.
Alternatively, you can access your address book by clicking the Address Book button just above the To field (see Figure 10-24).
Tip
The tiny icon that appears in front of each email address that you’ve entered indicates Entourage’s understanding of the address. If you see a tiny humanoid figure, (similar to the MSN Messenger icon) you’ve input an address that’s in the Entourage Address Book; if you see a blue circle/button symbol, you’ve typed an address that’s not in your Entourage Address Book. (Of course, you can always add one of these addresses to your Entourage Address Book just by Control-clicking it and choosing “Add to Address Book” from the shortcut menu.)
A green question mark indicates Entourage doesn’t understand the address, probably because it isn’t a correctly formed email address—you may have included a space in the address by mistake, for example.
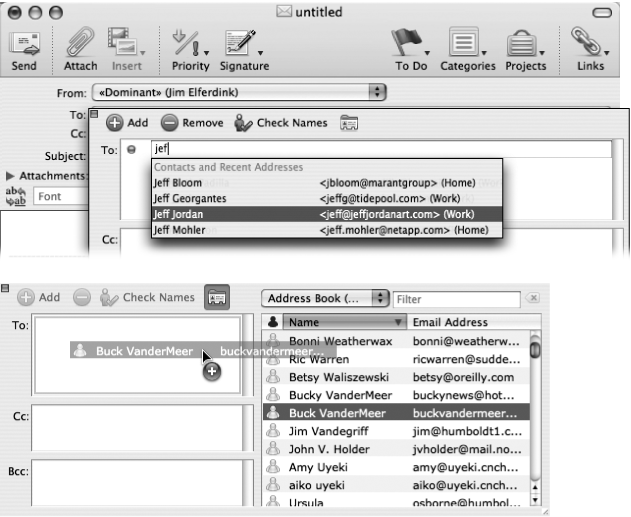
Figure 10-24. Top: As you type an address, a pop-up menu of matching names from your address book appears. Click the one that you want, press Tab to accept the highlighted name and enter another one. Or press Return to use the highlighted name, close the addressing window, and move to the Subject line. Bottom: Click the Address Book icon in the Address pane’s toolbar, scroll up and down your list of contacts, and drag addresses into the To, Cc, or Bcc panes. If you just double-click a name it goes directly into the To pane. Repeat the process to add more names.
Across the top of the address window are a few handy buttons. Add opens up a new empty row in the current addressing field, where you can specify an additional address. The Remove button removes a selected recipient’s row. Check Names is handy if you don’t know a coworkers email address and you’re connected to your company’s LDAP address directory (see Step 1: Addressing the message) in hopes of turning up the correct address.
Tip
You can use the Tab key to move between address fields, subject line, and the message’s body text.
If you have more than one account set up in Entourage, a From pop-up menu appears above the message’s addressees. Choose from that pop-up menu to pick the account you want to use to send the message.
Some people, especially in the business world, get bombarded with email. That’s why it’s courteous to put some thought into composing the Subject line (use “Change in plans for next week” instead of “Hi,” for example). Then press the Tab key to make your cursor jump into the large message area. Don’t make your subject too long: remember, most people will see it in a list with other information like your name and the date and time you sent the message, and the subject may get compressed or truncated. If you try to send a message without a subject, Entourage will warn you this isn’t a very good idea, but it’s not a fatal one either. You can go ahead and send it. Entourage will automatically insert “<no subject>” as a subject line. And your recipient’s spam filter may possibly delete it.
After you’ve addressed your message and given it a subject, it’s time to write your message. To do this, just click (or Tab into) the message area and start typing. You can use all the standard editing techniques, including selection, drag-and-drop, and the Cut, Copy, and Paste commands, to rearrange the text as you write it.
As you type, Entourage does something rather wonderful (or alarming, depending on your point of view): it checks your spelling as you go, using a red squiggly underline to mark questionable spelling. To check for possible alternative spellings for a suspect word, Control-click the red-squiggled word; a list of suggestions appears in a shortcut menu. Choose the word you really intended, or choose Add to add the word to the Office 2008 dictionary.
If you want to spell-check a message all at once, choose Tools → Spelling (or press Option-⌘-L) after composing it. (To turn off automatic spell checking, choose Entourage → Preferences → General Preferences → Spelling tab, and turn off “Check spelling as you type.”)
Tip
You can use the same keyboard shortcuts in Entourage that you use in Word (such as ⌘-right arrow to move the cursor one word to the right)—a great timesaver. Just choose Entourage → Preferences → General Preferences → General tab, and make sure that “Use Microsoft Office keyboard shortcuts for editing text” is turned on.
That same preference tab lets you make Entourage resemble Word in other ways, too. It lets you turn on automatic whole-word selection, “smart cut and paste” (spaces are automatically added or removed as necessary when you insert or delete text), and a Font menu that shows fonts in their own typefaces. Similarly, the Spelling tab in the General Preferences dialog box gives the same control over spell-checking options that Word does.
All of this should sound familiar; it’s precisely the same basic mechanism that Word 2008 employs when it looks for spelling mistakes on the fly, as described on Check Spelling as You Type.
Tip
If you’re composing a long email message and need a break, or it’s one you don’t want to send until later, choose File → Save or press ⌘-S to save the message in your Drafts folder. To reopen a saved draft, click the Drafts folder in the Folder list, and then open the draft that you want to work on from the list on the right.
When it comes to formatting a message’s text, you have two choices: plain text or HTML (hypertext markup language). Plain text means that you can’t format your text with bold type, color, specified font sizes, and so on. HTML, on the other hand, lets you use formatting commands such as font sizes and bold text.
But there’s a catch: although nowadays nearly all email programs can read HTML-formatted email, they don’t always handle it the same way. An HTML message that looks fine for you may be incomprehensible for someone using another email program. HTML messages can also be much larger (and therefore slower to download on slow Internet connections) than plain-text messages, especially if you include pictures, sounds, or other multimedia elements.
So which should you choose? Plain text lends a more professional, old-hand feeling to your messages—but, more important, it’s the most compatible. Whether your recipient uses a high-end workstation, a Web browser, a cell phone, or a 20-year-old terminal in a dusty university basement, a plain-text message almost always gets through intact. (There are some exceptions: accented characters and language encodings may complicate the issue.)
HTML-formatted messages, on the other hand, may not arrive intact. Your recipient may see a plain-text version of the message, which Entourage includes as a courtesy, but some email programs can’t even display that neatly.
In general, you’re better off using plain text for most of your messages, and sending HTML only when you need it and you’re sure your recipients can see it. To specify which format Entourage uses for all outgoing messages (plain text or HTML), choose Entourage → Preferences → Mail & News Preferences → Compose, and select a format from the “Mail format” pop-up menu.
You can also change formats on a message-by-message basis. For example, if you generally like to send plain-text messages, you can switch one particular message into HTML mode by clicking the Use HTML button to the left and just above the body text area (see Figure 10-25), or choose Format → HTML. Either action activates the HTML toolbar, which you can use to add pizzazz to your messages. This toolbar is broken up into six sections:
Fonts. The two controls in this section let you choose a font and font size for your email.
Styles. Just as you’d expect in a word processor, you can choose Bold, Italic, Underline, or Teletype (which puts the selected text into a fixed-width font) styles for your text.
Figure 10-25. HTML-based email lets you exercise some control over the layout of your email messages, including font, color, and text alignment. The HTML toolbar, shown just above the message body, is similar to what exists in many word processing programs. With it, you can turn plain text into an HTML-formatted masterpiece. But please remember, formatting exists to clarify communication, not obfuscate it.
Alignment. Lets you choose left, center, or right paragraph alignment.
Numbering, Bullets and Indents. Lets you put the selected text in a bulleted or numbered list. It also lets you set the indent level of the selected text for some good organizational formatting.
Color.These two controls let you choose a text color and a background color for your email messages. You can choose from one of 16 prefab colors, or you can mix your own (see Fill Color: Standard palette).
Rules. There’s only one button here, the Horizontal Line button, which puts a horizontal rule (in other words, a line) at the insertion point.
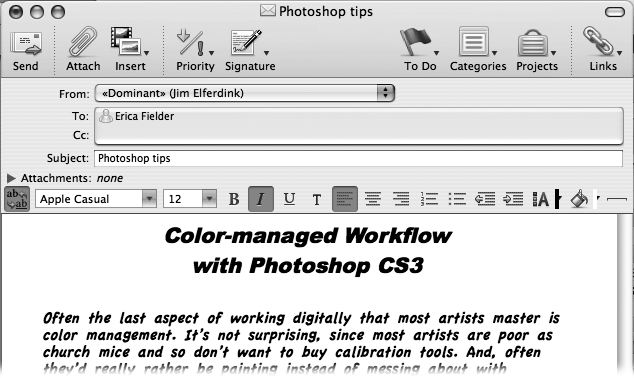
Remember: when it comes to email formatting, less is more. If you go hog-wild formatting your email, you may make the message hard to read, especially for people using email programs that interpret the HTML codes differently than Entourage does.
You can also insert pictures, sounds, or movies into HTML email messages. Type your message, place the insertion point where you’d like the item to appear, and then choose the appropriate command from the Message → Insert menu. Entourage asks you to locate and double-click the file you want to insert.
Tip
You can also drag the icons of graphics and movies right into the window of an outgoing HTML email message, where they appear at the insertion point. For sounds and background graphics, on the other hand, you have to use the Message → Insert menu.
Note that Entourage automatically converts TIFF and PICT images into JPEG format when you add them to HTML messages. If you need your recipient to receive these files unaltered, send them as standard file attachments instead of inserting them or dragging them into the window.
Once you’ve inserted a media item into a message, you can only move it around by inserting Returns and spaces in front of it. To delete a picture, sound, or movie, backspace over it, or select it and then press the Delete key. To remove a background image, select Message → and Remove Background Picture.
Tip
Just as file attachments can make an email message enormous, images, sounds, and movies can mean that your message will be measured in megabytes. That’s fine if all your recipients have fast connections like cable modems. But if one of them is trying to check email using a dial-up connection, your ultra-cool inline images, movies, and sounds will become a giant headache.
Signatures (or “sigs”) are bits of text stamped at the bottom of your email or newsgroup messages. Signatures began as a way to provide contact information without having to type it out in every message. But as online culture evolved, signatures became personal statements. A signature may contain a name, a postal or email address, a memorable quote, or even art composed of typed characters.
To create a signature, choose Tools → Signatures, which brings up the Signatures window. In it, you’ll see something called the Standard signature. You can edit this signature by double-clicking it, or you can create any number of new signatures by clicking the New button. Either way, you get an editing window where you can type your new signature. (Your signature can be either plain text or HTML-based, as described in the previous section.)
Note
If you format your signature with HTML, Entourage automatically converts it to plain text when you write a plain-text message. Be sure your signature looks good in either format!
Once you’ve created one or more signatures, you can tack them onto every outgoing message or on a message-by-message basis:
Always append a signature. Choose Tools → Accounts. In the Accounts window, double-click the account in question. (You can have a different standard signature for each account.)
In the resulting window, click the Options tab to reveal a pop-up menu of signatures. Select the signature that you’d like to have at the bottom of every email message created using that account. (You can always override this choice on a message-by-message basis.)
Tip
If you turn on the Random checkbox, Entourage will randomly select one of these gems to grace the bottom of every email message that you send. This is the way to rotate your pithy quotes from, say, The Secret without seeming repetitive to your correspondents. (Select Tools → Signatures, and then click the Random checkbox to turn on this feature.)
Message by message. After writing your message, choose the signature you want from the Signature pop-up button (the little pen) in your message’s toolbar. Entourage pastes the signature at the location of your insertion point.
You read about receiving attachments earlier in this chapter; sending them sometimes involves a little extra brainwork.
To attach a file or files to an outgoing email message, Microsoft, in its usual fashion, gives you several different methods to choose from:
Drag-and-drop. If you can see the appropriate Finder window or item on the desktop behind the Entourage window, you can drag file or folder icons directly off the desktop and anywhere into the outgoing email message window, or to Entourage’s icon on the Dock.
Add button. Click the Attach button in the message’s toolbar, or click the Add button in the Attachments section of the outgoing email window. Either way, the Choose Attachment dialog box appears. Navigate to, and highlight, the file or folder you want to send, and then click Open.
Use a menu. Choose Message → Add Attachments (or press ⌘-E) to do the same thing.
Once you’ve attached files, their names appear in the message’s Attachments section, seen in Figure 10-26.
Attaching files is the easy part; knowing how to encode those files can be tricky. Not all computers (including the mail servers that transmit messages) can understand Macintosh files. Furthermore, a few email servers still mangle anything that isn’t a plain-text message. Encoding your attachments is the solution to both problems.
Unfortunately, different computers recognize different file-encoding schemes. Encoded improperly, the file turns into gibberish and can’t be opened on the other end.
To make matters even more complicated, files can also be compressed (as StuffIt or ZIP archives, for example) to make them smaller and reduce the amount of time it takes to send and receive them.
Fortunately, Entourage uses an encoding scheme called AppleDouble, which both Macs and Windows PCs can reconstitute. And it compresses your files only if you attach an entire folder (not individual files). It uses ZIP compression in that case, which Macs and PCs can decompress with no trouble.
There may be times, however, when you want to change these options. For example, you may want to turn on the ZIP compression for a single large file. Or you may have trouble sending files to someone using the factory settings, so you want to try different settings.
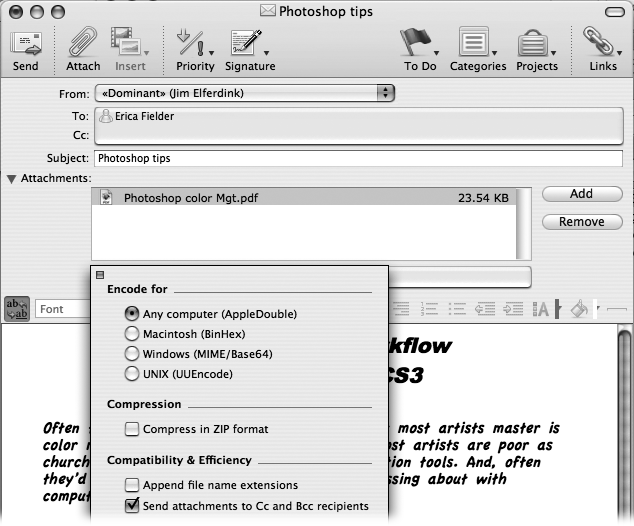
Figure 10-26. A file’s icon appears in the attachment section of the message window; click the “Encode for…” button below that panel to change the encoding, compression, and compatibility options. By clicking a couple of radio buttons and checkboxes, you can be sure that your recipients can open the attachment each and every time. The “Append file name extensions” is an incredibly valuable option, especially when sending files to Windows fans. If you failed to add the .doc, .xls, or .ppt to the end of their names, Entourage can do it for you at this stage.
Tip
However you choose to encode your file, be considerate of the recipient’s time. About half of the email users in the United States still connect to their email servers with a dial-up connection. Sending attachments larger than a couple of megabytes can tie up their connection for a long time while it downloads. If you have a really large file to send, it’s best to check with the recipient before sending. If it’s just too big, you might have to put it on a CD-ROM and snail-mail it.
To change encoding and compression options, click the gray “Encode for” button just below the Attachments window (see Figure 10-26). A little pop-up window appears where you can change the encoding, compression, and compatibility options:
Any computer (AppleDouble). This encoding scheme flattens a Mac file into something that other kinds of computers can read, including mail servers and Windows machines.
Macintosh (BinHex). This encoding method is for Mac-to-Mac transfers only. Use it only when you’ve tried sending a file to another Mac fan using the AppleDouble setting and had no luck.
Windows (MIME/Base64). This encoding method is for sending files to Windows and some Unix computers. Again, use it only when you’ve had no luck using AppleDouble.
Unix (UUEncode). UUEncode (which stands for Unix-to-Unix Encode) is the best thing for sending to a Unix or Linux fan. (It’s also useful when you don’t know what email program or operating system your recipient is using and AppleDouble doesn’t work; UUEncode has been around so long that almost any email program can open UUEncoded messages.)
Compression (Compress in ZIP format). As noted earlier, Entourage automatically compresses your attachments when they’re included in a folder. Both Mac and Windows fans can easily unzip these archives.
Tip
When sending a file to a Windows PC, Entourage has the potential to end your “they can’t open my files” headaches forever. Just remember to follow three steps in the Encoding window shown in Figure 10-26: Use no compression; use AppleDouble encoding; and turn on the “Append file name extensions” checkbox. Your Windows friends can open Office for Mac files easily, as long as they have Office on their computer. However, in order to open Office 2008’s XML format files (the ones with .docx, .xmlx, and .pptx extensions) they need Office 2007 for Windows—which many Windows fans still don’t have. Play it safe by sending your Office files in 97/2004 format (which bear the file extensions.doc, .xml, and .ppt), unless you’re certain your recipients are completely up to date, Office-wise.
To remove an attachment, select its icon in the expanded Attachments window and press the Delete key (or click Remove). (Dragging an attachment out of the Attachments window doesn’t remove it from the message. Instead, it makes a copy of the file where you drag it—unless you drag it to the Trash can in the Dock.) You can also remove all attachments in one fell swoop by choosing Message → Remove All Attachments.
Once your message is put together properly, you can send it in any of several ways:
Click the Send button in the message’s toolbar.
Press ⌘-Return (Send Message) or ⌘-K (Send & Receive All).
Choose Message → Send Message Now.
If you want to wait until the next time Entourage is connected before sending the message, choose Message → Send Message Later, press Shift-⌘-Return, or Shift-⌘-K.
When Entourage finishes sending the message, it disappears from your Outbox, and reappears in the Sent Items folder for your reference. (If you’re a person of steely nerve and impeccable memory, you can turn off this feature; choose Entourage → Preferences → Mail & News Preferences → Compose, and turn off “Save copies of sent messages in the Sent Items folder.”)
Different companies, organizations, and groups have different email cultures, so email norms might vary from place to place. But over the years, general rules of Internet etiquette—that is, netiquette—have evolved. Knowing a little netiquette not only saves you embarrassment in public forums like mailing lists, but also makes your messages more understandable.
Most of these items apply to newsgroup postings as well as ordinary email, but a few points of netiquette apply strictly to newsgroups:
Use your real name. Entourage lets you enter anything you like for your name when you set up an account (see Setting Up Entourage). But using your real name gives you more credibility and lets your friends and correspondents more easily manage mail from you.
Note
An exception to this rule would be a newsgroup or mailing list where the privacy of participants is very important, such as online support groups. For these cases, consider using another email address managed via a separate Entourage account. The account can use whatever pseudonym (and signature) you like. (See Setting Up a Second Email Account for information on setting up multiple accounts.)
Write clearly. Since email is a written medium, good writing can make you look really good. You don’t have to be Shakespeare or even sound like a professional author. But make sure your message includes all the information your correspondent may need, check your grammar, and use Entourage’s spell checker. Also, make allowances for people whose writing seems awkward or difficult to understand: English may be the most common language on the Internet, but it’s not the primary language for millions of Internet users.
Be civil. Some people write things in email that they would never dare say to your face. No matter how offended you might be, responding in kind just makes things worse. The best response to rude email is no response at all.
Quote sparingly. When quoting another message, only quote enough material so your correspondent knows what you’re talking about. Quoting the entire message makes it harder for your correspondent to understand what you’re saying. You can also put your responses in between bits of quoted text, which makes it obvious what you’re replying to.
Use blank lines. Nothing is less inviting to readers than a solid page of text, devoid of paragraphs. Insert blank lines between paragraphs and quoted material in your message.
Put angle brackets around URLs. If you put a Web address (URL) in a message, surrounding it with angle brackets <like this> turns it into a live, double-clickable link in a wide range of email programs.
Avoid all caps. Capital letters are difficult to read on computer screens and MAKE YOU LOOK LIKE YOU’RE SHOUTING.
Write specific subjects. Remember that the subject of a message is one of the few things (besides your name) that your correspondents see in a typical mailbox listing. Make your messages easy to find later by using specific subjects. “Lunch at Little John’s Monday at 12:30?” is a better subject line than simply “Psst! You hungry?”
Don’t forward chain letters. It’s okay, you’re not going to have bad luck if you don’t forward that message to 10 people. Virtually all chain letters—even those claiming to help a sick child, stop an Internet tax bill in Congress, report a dangerous new computer virus, or contain best wishes from the Dalai Lama—are hoaxes. They display your gullibility, waste time, and annoy a lot of people. If you hanker to send on one of these messages, check it out first at www.snopes.com or www.hoaxbusters.org.
The following points are particularly relevant to mailing lists:
Don’t use HTML formatting. There’s bound to be someone—or a lot of someones—on a mailing list who can’t handle, or can’t abide, HTML-formatted messages. Furthermore, many mailing lists are available as digests where all the messages each day are sent as one large message late at night, rather than as individual messages throughout the day. HTML-formatted messages often don’t come across in digests at all.
Don’t send file attachments. It’s almost always wrong to send a file attachment to a mailing list, even if it’s small. If you must make a file available to a mailing list, put it up on a Web or FTP site for interested members to download (Apple’s .Mac service is perfect for this sort of thing). Then all you have to do is put a URL in your message.
Keep your sig short! Your signature (Step 5: Adding a signature) should be four lines or less.
Stay on topic. Most mailing lists are devoted to a particular subject, and your messages should be reasonably “on topic” for that list. It wouldn’t be appropriate to discuss sports cars on a mailing list dedicated to acoustic guitars, or ask questions about Apple’s latest Mac models on a mailing list devoted to 1970s television sitcoms. On the other hand, there’s probably an appropriate mailing list for almost anything you want to discuss (and lots of things you wouldn’t be caught dead discussing)!
Keep private conversations off lists. Sometimes it’s more appropriate to reply to a particular list member privately rather than the entire list. In those cases, just write a private email to the person.
Trim the quoting down to the essential. When you send a reply to somebody’s posting, trim out all of the >quoted >portion except the part in question. Nobody needs to read the entire treatise again.
Finally, as tempting as it may be to send out flurries of advertising about your products or business using the Internet, it’s a bad idea. Spam isn’t only illegal in many jurisdictions (meaning you can be sued), it’s guaranteed to get your Internet account shut down without notice. It’s fine to keep in contact with current customers via email if they’ve given you permission, but quite another to use the Internet as a means to harass others.