
Once you’ve entrusted your agenda to Entourage, you can start putting it to work. Microsoft Entourage is only too pleased to remind you (via Office Reminders) of your events, to reschedule them, to print them out, and so on. Here are a few of the possibilities.
To edit a calendar event, open its event window either by double-clicking its name on the calendar or by highlighting it and choosing File → Open Event (⌘-O) or pressing Return. The calendar event pops up in its window, exactly as shown in Figure 11-4. Alter any of its settings as you see fit.
Tip
When changing only an appointment’s category, bypass the event dialog box. Instead, just Control-click the appointment’s block or its name, and choose Categories from the resulting shortcut menu. (Or select an event and use the Categories button’s pop-up menu in the toolbar.) Click a category to assign the event to that category. Note that it’s perfectly OK for an event to have more than one category. You can unassign an existing category by clicking it again.
You don’t have to bother with this, however, if all you want to do is reschedule an event, as described next.
If an event in your life gets rescheduled to a new date that’s currently visible on the screen, then you can simply drag it to that new date to officially reschedule it (see Figure 11-8).
Tip
If you’d like to duplicate an event—if you had so much fun having lunch with that old flame that you’d like to do the same thing the day after tomorrow, for example—press Option while you drag the original appointment.
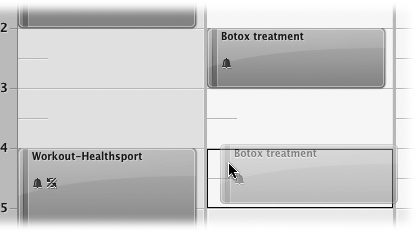
Figure 11-8. You can drag an appointment vertically in its column to make it earlier or later in the same day, or horizontally to another date. If you invited people to an event that you’re editing, Entourage asks if you want to send an update to your invites, so that they’re always kept in the loop.
Alas, Entourage doesn’t let you copy, cut, or paste calendar events. If something is postponed for, say, a month or two (that is, to a calendar “page” that would require scrolling), you have no choice but to double-click its name and then edit the Starting and Ending dates or times.
Note
When rescheduling a recurring event, Entourage applies the change only to the event you’ve moved, leaving the rest of the recurring events intact. If you want to change the time or date of the whole series, open the event for editing. Only then does Entourage ask whether you want changes applied to just the event you opened, or all the recurring events.
If a scheduled meeting becomes shorter or your lunch hour becomes a lunch hour-and-a-half (proven to boost productivity!), changing the length of the representative calendar event is as easy as dragging the top or bottom border of its block in any column view (see Figure 11-9).
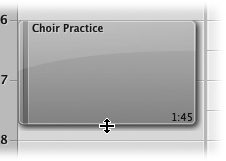
Figure 11-9. You can resize any Entourage calendar event by dragging its border. As your cursor touches the top or bottom edge of a calendar event, it turns into a horizontal line with the arrows above and below. You can now drag the border to make it encompass more or less time on your calendar. As you drag, Entourage displays a helpful reminder of the event’s total time.
Entourage has a user-friendly way of committing your calendars to paper. To get there, choose File → Print, or press ⌘-P.
In this window, you can exercise control over how Entourage prints your calendar by changing the control settings you’ll find grouped near the middle of the window: Print, Start and End dates, Layout, and Form.
The Print pop-up menu presents four options regarding what to print: a Daily Calendar, a Calendar List, a Weekly Calendar, and a Monthly Calendar (see Figure 11-10).
Start and End let you specify start and end dates for the printout.
Layout lets you choose which portions of the calendar to print. You can select Events or Tasks, or only certain kinds of tasks, or only items from a certain project or category. It also lets you specify whether cut lines or “punch holes here” indicators appear on each sheet, for trimming and punching your pages to fit a day planner (described next).
Form. If you use a paper-based, binder-style day planner (such as a Franklin-Covey, Day-Timer, or Day Runner), you’re in luck. Entourage lists canned layouts for the most popular formats in the Form pop-up menu.
Standard print options. The other options are identical to those presented in Chapter 1. You may choose your printer, presets, number of copies, and the page setup. Then you can preview the print job, save it as a PDF, or fax it.
To delete an appointment, first select it, then simply press the Delete key or Control-click (or right-click) the appointment and choose Delete Event from the pop-up menu. (There are other ways, if you’re looking to waste time: select the event and click the Delete button in the toolbar, choose Edit → Delete Event, press ⌘-Delete). In the confirmation dialog box, click Delete (or press Return).
Note
If you delete a recurring event (like a weekly meeting), Entourage asks if you want to delete just that particular instance of the event or the whole series. Unlike Entourage 2004, Entourage 2008 deletes the one occurrence of the event rather than the series when you press Return, so if you’re fast-fingered you won’t lose the entire series. You’re welcome.
At last it’s time for you to harness Entourage’s combined calendar/email/address-book power. Thanks to a cross-platform data-exchange standard called iCalendar, you can send invitations or meeting requests to others and, if they have an iCalendar-aware email/calendar program (such as Entourage, Outlook, iCal, Lightning, or Sunbird), they can easily reply to accept your invitation.
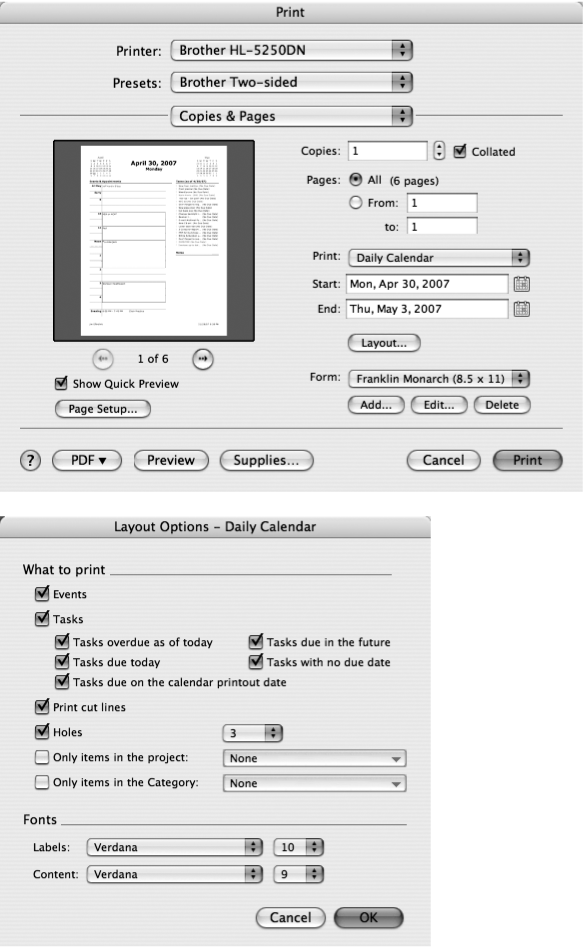
Figure 11-10. Not surprisingly, you press ⌘-P to invoke the Print dialog box—though it now features the many printing options for Entourage calendars (top). As shown here, you can even shape them to fit paper planners. If your planner brand isn’t listed in the form section, click Add Form to set the margins so that they fit your printer. Click the Layout button to open the Layout Options window (bottom) where you can control which calendar elements you wish to print.
If you click the Invite button in an event window’s toolbar (see Figure 11-4), Entourage sprouts an Invite field. Use it just like the “To” field in an email message, as described in Chapter 10; that is, specify the email addresses of anyone that you’d like to invite to the event. If they’re already in Entourage’s address book (covered in Chapter 10), you save a lot of time, thanks to the pop-up menu of contacts and recent addresses that match the few letters you’ve typed. Type the invitation message you want your invitees to see in the blank white notes area at the bottom of the Event window.
Once an invitation becomes part of an appointment, the toolbar sports these new buttons:
Note
You can also choose Event → Send Invitation Now (or press ⌘-Return) to send your invitation; or choose Event → Send Invitation Later (or press Shift-⌘-Return) to add the outgoing email messages to your Outbox without actually sending them. They won’t get broadcast until you use the Send All or Send & Receive All command, as described on Sending and Receiving Mail.
If you’re on the receiving end of one of these meeting summonses, but you don’t use Entourage (or another iCalendar-aware email program) as your email program, you get a note like the one shown in Figure 11-11.
Warning
Even among iCalendar-aware programs, invitations don’t always work perfectly. With other people using Entourage or folks using Outlook on the same Exchange server (see the box on View panel), you’ll probably have good luck. In other cases, you may just get an attachment with an .ics extension. If you open an .ics file in Entourage, you’ll see the event appear in your calendar, but you won’t get the Accept and Decline options, and there may even be errors in the time and date. You’ve been warned.
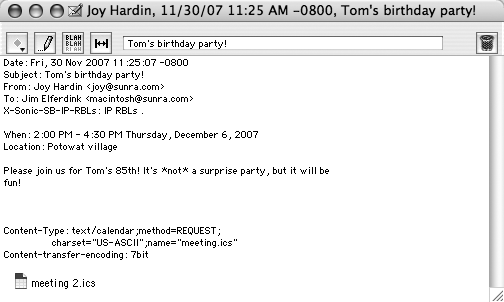
Figure 11-11. In other email programs like Eudora, invitations sent from Entourage look like ordinary email messages. They contain the relevant time and location information and whatever note the sender created in the body of the message. Attached to the message is the iCalendar data file (meeting 2.ics, in this case). Though Eudora doesn’t know what to do with it, double-clicking it inserts the event into iCal, or another iCalendar-aware program.
But if you are using Entourage as your email program, a special thrill awaits: The invitation inserts itself into your calendar, complete with times and reminders (Figure 11-12). You even get a yellow banner in the email message window that lets you respond to the invitation by clicking either the Accept, Decline, or Accept Tentatively links at the top of the message. (Buttons with the same functions also appear in the toolbar at the top of the email message.)
Clicking any of these links sends an email message back to the sender, whose copy of Entourage now offers even more surprises.

Figure 11-12. Top: When you receive an invitation in Entourage that’s from Entourage, you’ll see Accept, Tentative, and Decline buttons at the top of the message. Bottom: If you click any of the three buttons, Entourage asks whether you want to send a response with or without comments, or not send any response at all.
Now suppose you’re the person who sent the original invitation. As your invitees reply to your note, one of two things might happen:
If you sent the invitation to somebody who doesn’t use Entourage, you’ll simply receive an uninspired email message that says, for example, “OK, I’ll be there.”
After reading this reply, double-click the event on your calendar that represents the get-together. In the event window, you’ll see a yellow banner across the top of the message indicating that you’ve sent invitations. It also contains a “View attendee status” link. When you click the link, a floating window appears that lists all the people you invited, complete with a pop-up menu that lets you track their responses: No Response, Accepted, Tentative, or Declined. Use the pop-up menu to update the list, according to the reply you just received.
If you sent the invitation to somebody who does use Entourage, life is sweet indeed. The program automatically updates the Attendee Status window, based on the button that your prospective guest clicked (Accept, Tentative, or Decline) upon receiving the invitation.
Whenever you change the specifics of a calendar appointment about which you’ve sent invitations (such as its date), Entourage offers to send an updated email message to the guests. The buttons in the upper-left corner of the event dialog box now read Send Update and Send Later (if you’ve customized the toolbar).
Your Entourage calendar doesn’t come with any holidays listed. By creating a customizable calendar that can reflect the holidays of different countries, cultures, or religious beliefs, Microsoft didn’t presume to know what you celebrate. Fortunately, it’s easy to tell Entourage what you want.
To import a set of holidays into Entourage’s calendar, choose File → Import. Entourage’s Import assistant opens, and gives you the option to import holidays. Choose Holidays and click the right arrow.
Now Entourage presents a list of dozens of countries and religions for which you can import holidays (see Figure 11-13). Turn on the checkboxes next to the countries or religions whose holidays you want to import, and click OK. Those holidays now appear in your Entourage calendar.
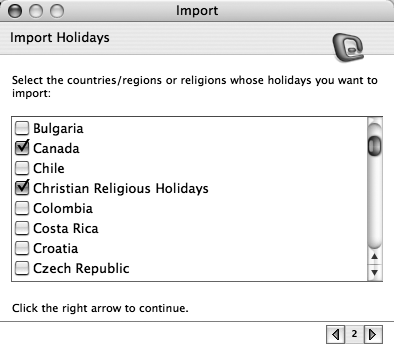
Figure 11-13. To add holidays to your Entourage calendar, click Holidays, turn on the checkbox next to the country or religious holidays you want to import, and then click the right arrow button. Entourage takes care of the rest. You can import, one, some, or all of these holidays, if you like. As a convenience, Entourage labels them with the category called, as you might expect, Holidays.