
Entourage lets you create a To Do list of any kind of tasks you can think up, and it does its best to help you accomplish these objectives, goading you with gentle reminders if you so desire. You can also add just about any other kind of Entourage item to your To Do list and benefit from similar reminders.
You can put Entourage into Task view either by clicking the Tasks button at the upper left, choosing View → Go To → Tasks, or pressing ⌘-5. Entourage displays a simple list of tasks, complete with due dates and categories (see Figure 11-16). In the Tasks and To Do List pane on the left you’ll discover the two parts of Entourage’s To Do system, labeled Tasks and To Do List.

Figure 11-16. Entourage’s Tasks toolbar includes three specifically task-related buttons—New, Status, Due Date, and To Do—as well as a few of the old favorites. Use the Tasks and To Do pane to choose to view the entire To Do List, the Tasks list, or one of the filtered Tasks Views. The Quick Filter bar below the toolbar lets you quickly locate tasks containing certain words or that you’ve assigned to certain categories or projects.
The To Do chores that you create from scratch Entourage calls Tasks, keeping them in the Tasks list and also in the To Do List. If however you create a To Do item by flagging an email message, calendar event, project, or contact, then Entourage adds those items to the To Do List only. Click the icons in the Tasks and To Do List pane to switch between the two lists.
When you first enter the Tasks module, Entourage shows you a simple list of all tasks you’ve entered or imported—a view which you can alter to suit your preferences. To do so, cruise over to the View menu and select one of the following (the menu command changes slightly depending on which list you’re viewing, Tasks or To Do List):
All Tasks (All To Do Items). This screen shows all the tasks or To Do items in your busy life; it’s the view Entourage shows you unless you choose otherwise. It even displays the tasks you’ve completed—something that makes most people feel terrific.
Incomplete Tasks (Incomplete Items). Displays everything that you have yet to complete. In most cases this is more useful, and definitely less cluttered, than displaying All Tasks (To Do Items).
Completed Tasks (Completed Items). Displays all the items you’ve checked off as completed.
Due Today. Focuses on the present; this option shows just what’s due today.
Due This Week. Displays everything that’s due in the current week. (The current week is defined by the Calendar work week settings you choose in Entourage → Preferences → General Preferences → Calendar.)
You can also filter the tasks with the options displayed in the Tasks Views pane at the left of the window. Click the flippy triangle next to Tasks Views to see them all:
Changed in the Past 7 Days. Shows every task that you’ve edited in the last seven days.
High Priority. Gives you a list of tasks that you’ve marked high priority (described on the next page).
Due Today. Shows just today’s items.
Incomplete. Displays all the tasks that lie before you.
Overdue. You can view incomplete tasks whose due date has come and gone—helpful for setting a new due date, or perhaps deleting with a smile.
Category and Project. You can view tasks by category or project. In this case, you can select only from categories or projects that you have assigned to tasks. For example, if you have no tasks assigned to the Work category (lucky you!), that category doesn’t appear as an organizing option.
No matter what view you select, there are five columns to the left of the tasks’ subject:
Links (indicated by a tiny chain-link icon) shows if the task is linked to any other item, such as a message or a calendar event (see Linking tasks).
Status (indicated by a tiny checkmark icon) shows a checkbox, which you can turn on when the task is complete (or sooner, as you realize some things just aren’t worth your time).
Priority (indicated by a tiny exclamation point) is the same as the priority column found in Mail—Highest, High, Normal, Low, and Lowest. It helps you keep focused on your highest priorities.
Recurring (indicated by a double arrow) shows, at a glance, whether the task is a one-time deal or something you can look forward to on a continuing basis.
Reminder (indicated by a tiny alarm clock) shows a similar alarm clock icon if you’ve set a reminder for a particular task—in other words, it’s a reminder reminder.
You specify what appears in the rest of the columns—the Task subject, Start Date, Completed Date, Categories, and Project —when you create your To Do items, described next.
To create a new Entourage Task, take your pick of the usual array of options:
Choose File → New → Task.
If you’re already in the Tasks view, press ⌘-N.
Click the New toolbar button. (If you’re not already viewing your To Do list, choose Task from the New pop-up button.)
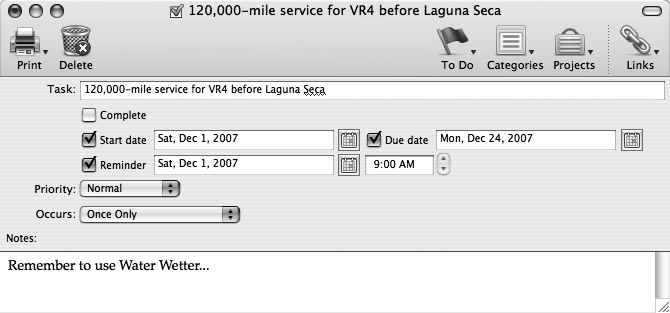
An Untitled task window appears (Figure 11-17). Conduct your task-recording business like this:
Type a name for the task.
This becomes the subject that appears in your Tasks list. Do yourself a favor and make it a good, descriptive one: “Meeting with professional organizer,” for example, instead of just “Meeting.”
Change its priority, if you like.
If you take a moment to categorize your tasks this way, you’ll be able to sort your task list by priority. Every creative soul invents more tasks than are doable, so why not focus on the most important ones?
Specify a due date for this item, if you like.
Turn on “Due date” and enter a deadline date. Feel free to use any of the same date-setting tricks described on Recording Events.
Figure 11-17. The task window lets you create, edit, print and delete tasks; but more importantly it lets you see the entire task configuration at a glance.
There’s only one difference between a dated To Do item and one that doesn’t have a due date: When the specified date goes by, an incomplete To Do item shows up in boldface in the Tasks window. If you double-click it, you’ll see “Due yesterday,” “Overdue by_ days,” or Overdue next to an attention-getting alarm clock icon at the top of the task’s description window.
If this To Do item reflects a recurring task, such as your weekly bath, use the options in the Occurs pop-up menu.
You’ll be able to specify a duty that recurs daily, weekly, monthly, or yearly. The Occurs options here work much like those described for events on Recording Events.
Tip
If you set your task to recur, a new Edit button pops to the right of the Occurs pop-up menu. You can click this button to further refine the recurrence. However, if you turn on the “After task is complete, create a new task due in _”, then once you check off the task, the next one resets to one day (or week, month, or year) from when you got it done, not the original recurrence date. This is perfect if you have to submit a report, say, every 30 days, but not on the same day every month.
Turn on the Reminder checkbox, and set a date and time for the reminder to poke its nose into your computer reverie—in the form of a pop-up dialog box displayed by the Office Reminders program.
See Office Reminders for more on reminders.
Make notes for more information.
Tab to the Notes box to type or paste text that helps describe your task.
Assign it to a project, if you like.
If you’ve created any projects in Entourage’s Project Center, they’re listed under the Projects button.
When you’ve tweaked your task configuration to perfection, close the window (press ⌘-W).
Entourage closes the window, saves your task, and adds it to the To Do List.
If you need to create more tasks (new opportunities constantly arise), press ⌘-N, and then start over again at Step 1.
Once you’ve recorded some To Do items, you can manipulate them in ways that should be familiar if you’ve used the Entourage calendar.
Change a task’s name by selecting the task, clicking the task’s subject, and then waiting about one second for the editing box to appear. Type a new name and then press Enter or Return. You can change its category or project by clicking in either of those columns; a pop-up menu of your choices appears.
You can change a task’s priority, repeat status, and so on, by double-clicking its name in the Tasks list (or by highlighting it and pressing ⌘-O, or choosing File → Open Task). The dialog box shown in Figure 11-17 reappears, allowing you to change any aspect of a task.
After finishing a task, you can celebrate by turning on its checkbox in your list. Once you do so, Entourage puts a line through the task to give you the satisfaction of crossing it off your list. If a task’s window is open, you can also turn on the Complete checkbox and then close the window. (When you check off a recurring task, Entourage only marks that specific instance complete. The next recurrence will rise like a phoenix from the ashes when due.)
To delete a task, click it in the task list and then either press the Delete key, click the Delete button, press ⌘-Delete, or choose Edit → Delete Task. (You’ll be asked to confirm the deletion. And that’s fortunate, because no Undo command exists, and the deleted task doesn’t go into the Deleted Items folder; instead, it’s gone forever.)
Tip
You can select multiple tasks (in preparation for deleting them en masse, for example) just as you would email messages: using either the Shift-clicking or ⌘-clicking tricks described in the box on How to Process a Message.
It’s easy enough to print out a list of your to-dos. To print only some of them, start by highlighting the ones you want (see the preceding Tip).
Now press ⌘-P or choose File → Print. This triggers the custom Entourage Print window, which lets you choose which tasks to print (all tasks, selected tasks, tasks due today or this week, and so on), what style you want to use for printing them, and whether you want to print those pages on standard paper or special FranklinCovey, Day-Timer, or Day Runner paper.
When you finally click Print, you’re on your way to a hard copy reminder of the errands and objectives that await you.
Linking tasks to other Entourage items is a great use of the Links function, since it lets you draw connections between the tasks that you’re working on and any email messages, calendar events, or contacts that might be related to them. When you have a task’s window open, you can create a link with the click of a Links button, which opens the Links window. If you use the Links button’s pop-up menu, your choices let you link that task either to an existing Entourage item or to a new one you create on the spot. In the Tasks list, click and hold for a second in the Links column to access the pop-up menu.