
Now that you’ve gone through the trouble of making your sheets look their best with killer formatting and awe-inspiring charts, and you’re set to print them out (and show them off).
Viewing a print preview before you send your spreadsheet to the printer can save you frustration and time, and help save an old-growth forest that would otherwise be harvested for the sake of your botched spreadsheet printouts. If you’ve used previous versions of Excel, you may recall that both Excel and Mac OS X had very similar print-preview functions. For Excel 2008, Microsoft has done away with the program’s Print Preview altogether—a shockingly un-Microsoftian feature-reduction if ever there was one—leaving the print-preview function now entirely up to Mac OS X.
Tip
To check out your page-break preview without doing a print preview first, just choose View → Page Layout View or click the Page Layout View button at the bottom-left of the Excel window.
As in any Mac OS X–compatible program, you turn a document into a print-preview file by choosing File → Print and then, in the Print dialog box, clicking the Preview button at the bottom. Your Mac fires up the Preview program, where you see the printout-to-be as a PDF. Use the commands in the Display menu to zoom in, zoom out, scroll, and so on. Each page appears as a separate page image, with thumbnails of all the pages lined up in Preview’s drawer at the side of the window.
Tip
To print just a certain portion of your spreadsheet, select the cells that you want to print and then choose File → Print Area → Set Print Area. This command tells Excel to print only the selected cells. To clear a custom print area, select File → Print Area → Clear Print Area. Alternatively, you can set a print selection for just a current print job by selecting the cells you want to print and then clicking the Selection option button in the Print What section of the Print dialog box.
If you’ve been working on your spreadsheet in Page Layout View, then any print preview may be a bit redundant. Instead, you can quickly flip through the Quick Preview right in the Print dialog box to get a general idea of your spreadsheet’s pagination (see Figure 13-23).
Don’t miss the best part of the Print dialog box—the PDF button. Choose Save as PDF from its menu to turn your printout into a PDF—or Acrobat—file that you can send to almost anyone with a computer, so they can open, read, search, and print your handiwork. (The software they need is Acrobat Reader, which is free, or Preview, which comes on the Mac.) Other options in this menu let you, among other things, fax a PDF save it into your iPhoto library, or attach it to an email message (but only if you’re using Apple Mail—see the box on Page Setup for a workaround).
If you’re not seeing what you’d like to in the Quick preview window, click the Cancel button to cancel the print job and go back to configuring your document.
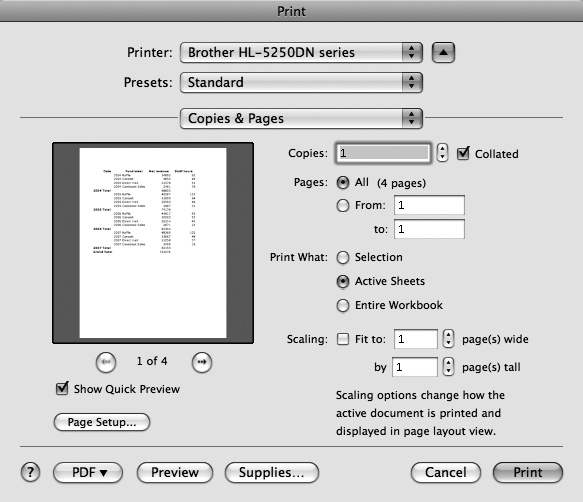
Figure 13-23. When you choose File → Print, the standard print dialog box appears, subtly enhanced with Excel-only features. Use the Print What radio buttons to choose between entire workbook, just the active sheets, or only a selected area. If you need to be sure to squeeze all the rows or columns onto a certain number of pages, click the Scaling checkbox and enter the number of pages wide, and tall. This feature frequently comes in handy to fit a just-slightly-larger-than-one-page spreadsheet onto one page.
Excel’s Page Setup dialog box (Figure 13-24) is far more comprehensive than the Page Setup that appears when you choose File → Page Setup in TextEdit, for example. In it, you can control how pages are oriented, how spreadsheets fit on a page, the print quality, the margins, how headers and footers are printed, and the order in which pages are printed. These same controls are also available—and much more accessible— through the Formatting Palette’s Page Setup pane.
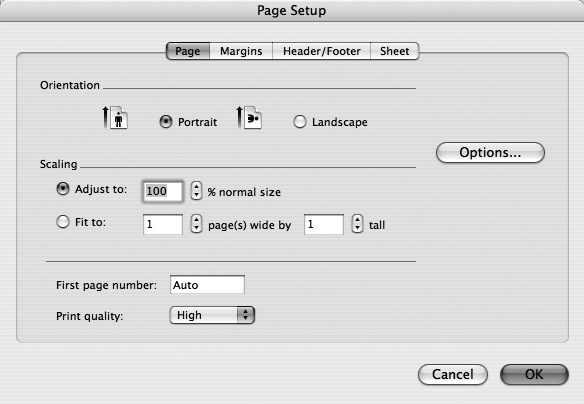
Figure 13-24. The Page tab of the Page Setup dialog box is another place to start if you want a spreadsheet to print on one page. A click in the “Fit to” radio button (in the Scaling area) automatically adjusts your spreadsheet’s print size to fit on a sheet of paper. If you want it to fit on more than one sheet, adjust the numbers in the “Fit to” area.
In the Page tab, you can change the orientation for the print job (Portrait for the usual up-and-down style or Landscape for a sideways style—often the preferred spreadsheet format), reduce or enlarge the printout by a certain percent, or—using the “Fit to” radio button—force the spreadsheet to fit onto a certain number of printed pages. (Using this control, of course, affects the printout’s type size.) If you don’t want the pages of your spreadsheet numbered 1, 2, and so on, then type a different number into the “First page number” field. This is how you force Excel to number the pages beginning with, say, 5 on the first printed sheet.
Note
Setting the starting page number in the Page tab won’t make page numbers appear on your sheets; you have to also initiate page numbering in the Header/Footer tab. The easiest technique is to choose a page number option from the Header or Footer pop-up menu.
An Options button on the right brings up the more familiar Page Setup dialog box for your printer, where you can set more of your printer’s options (such as paper size).
The Margins tab (Figure 13-25, top) lets you specify the page margins for your printout (and for the header and footer areas). You can also tell Excel to center the printout on the page horizontally, vertically, or both. The Options button, once again, summons the standard Page Setup dialog box for your printer.
If you want something printed on the top or bottom of every page (such as a title, copyright notice, or date), it’s time to visit the Header/Footer tab (Figure 13-25, bottom).
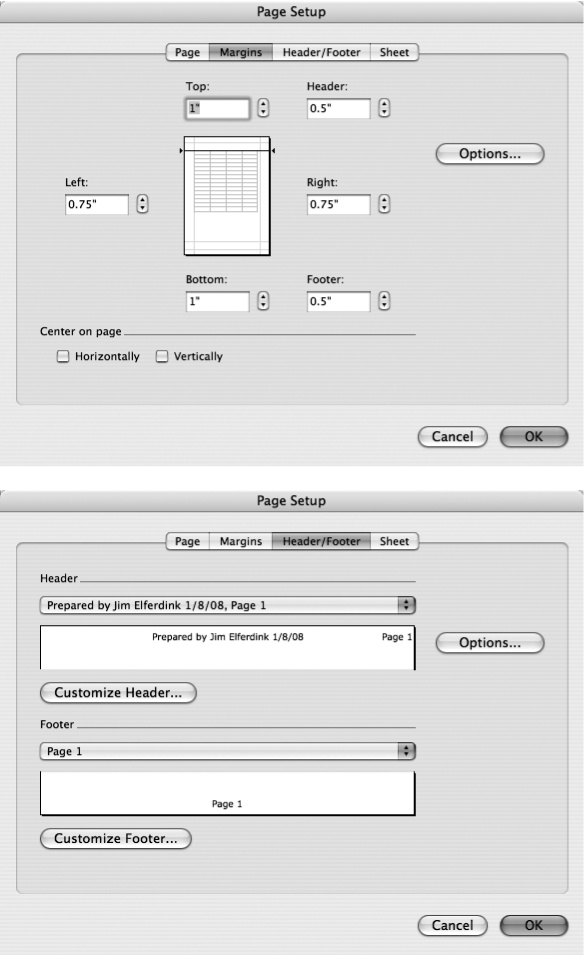
Figure 13-25. Top: The Margins portion of the Page Setup window gives you power over your sheet’s margins when printed, naturally. It lets you set top, left, right, and bottom margins, and it gives you the chance to determine how much top and bottom space is left over for headers and footers—useful if you have particularly large headers and footers. The checkboxes at the bottom of the box let you set how—and whether—your printouts are centered on the page. Bottom: The Header/Footer part of the Page Setup dialog box is where you can set text to be printed on the top or bottom—or both—of every page.
Here, you can use the Header or Footer pop-up menu to choose from a selection of prepared headers and footers—”Creating and Opening Documents of 7,” “Confidential,” and so on.
If the header or footer message you want isn’t there, click the Custom Header or Custom Footer buttons to bring up a customization dialog box. In it you can enter your own header or footer text; click the Font button to format the text; and use the remaining buttons to insert placeholder codes for the current page number, the total number of pages, the current date, the current time, the file name, and the tab name.
You can combine these codes with text that you type yourself. For example, in the “Center section” box, you could type, DVD Collection Status as of, and then click the fourth icon. Excel inserts the code &[Date]. Now whenever you print this document, you’ll find, across the top of every page, “DVD Collection Status as of 9/15/08,” or whatever the current date is.
The last section of the Page Setup dialog box, called Sheet, gives you yet another way to specify which portions of the sheet are to be printed (Figure 13-26). You can type starting and ending Excel coordinates—separated by a colon—into the “Print area” box, or click the cell-selection icon to return to the spreadsheet to select a region of cells you want printed.
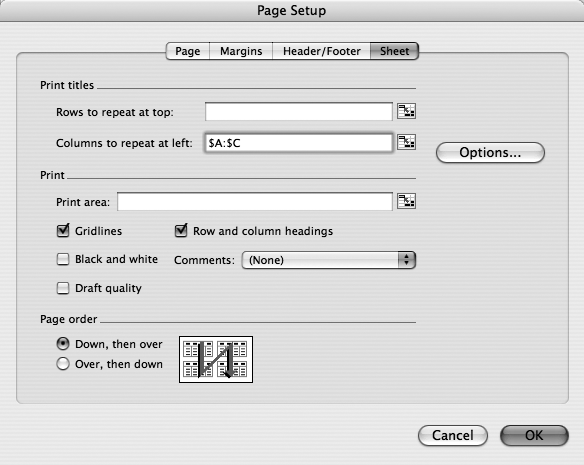
Figure 13-26. The Sheet portion of the Page Setup window lets you set a print area (if you haven’t already done so). If you want to display a certain range of data on every page, you can specify that certain rows repeat at the top of each page and/or columns repeat on the left of each page. It gives you five print options, letting you choose to print gridlines, row and column headings, print in black and white or draft quality, and print comments you may have added to the spreadsheet. Finally, you can choose print order: whether pages are printed down and then over, or over and then down.
You’ll also find the following in the Sheet tab:
Rows to repeat at top, Columns to repeat at left. If you’ve carefully typed the months of the year across the top of your spreadsheet, or product numbers down the left side, you’ll have a real mess on your hands if the spreadsheet spills over onto two or more pages. Anyone trying to read the spreadsheet will have to refer all the way back to Creating and Opening Documents just to see the labels for each row or column.
Excel neatly avoids this problem by offering to reprint the column or row labels at the top or left side of each printed page. To indicate which row or column contains these labels, click the appropriate “Print titles” field, and then type the desired row number or column heading directly in the spreadsheet. Or click the cell-selection icon just to the right of each field; this shrinks the dialog box so you can more easily select the repeating cell range.
Grid lines, Row and column headings. For years the answer to one of the world’s most frequently asked spreadsheet questions—“How do I get the gridlines to print?”—was buried here in the fourth tab of a buried dialog box. And it still is—but you can more easily access this control via the Formatting Palette’s Page Setup pane.
Excel never prints gridlines or the gray row and column headings unless you turn on their corresponding checkboxes here.
Black and white, Draft quality. Use these two checkboxes when you’re in a real hurry. Draft quality speeds up printing by omitting graphics and some formatting. “Black and white” means that your printer won’t bother with time-consuming color, even if color appears in the spreadsheet.
Comments. Use this pop-up menu to specify where comments (see Flag for Follow-Up) appear on the printout—on its last page, or right where you put them in the spreadsheet itself.
Page order. Use this to control whether Excel prints a multiple-page spreadsheet column by column (of pages), or row by row.