
From its binder-like appearance to its ability to take “dictation,” Notebook Layout view is Microsoft’s attempt to let your computer work as you do. To that end, they designed something where you can take notes quickly and rearrange them as you wish.
Choose File → Project Gallery, click the Word Notebook icon, and begin typing. Each new block of text starts out as Note Level 1, as you can see by a quick glance at the Formatting Palette. By hitting Tab, you can indent text under a heading to indicate that it applies to, and should be grouped with, that header, as shown in Figure 6-1. This is great stuff when taking notes in class, at a meeting, or just capturing concepts from your head. Additionally, you can click the little button to the left of each block of text and move it wherever you want on the page.
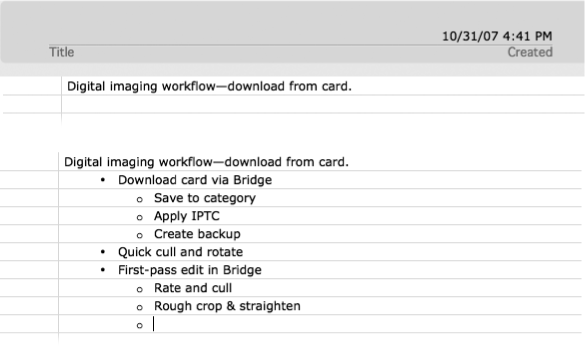
Figure 6-1. Top: As you type into a freshly created Notebook document, text flows onto the page automatically set to Note Level 1. Bottom: After you finish the sentence or thought, press Return, and then Tab, to indent the next section of text, shown at center. Pressing Shift-Tab moves the indent back toward the left—promoting the line to a higher level of importance.
If you already have a non-Notebook Word document in front of you, select View → Notebook Layout to open Notebook Layout view. Alternately, you can click the Notebook Layout view Icon (it’s the right-most of the view icons) at the bottom left of your page. Or, for the keyboard- and shortcut-crazed among you, Option-⌘-B also takes you to the Notebook Layout view. However you invoke the view, the first thing you see on your Notebook Layout view journey is the pop-up message shown in Figure 6-2.
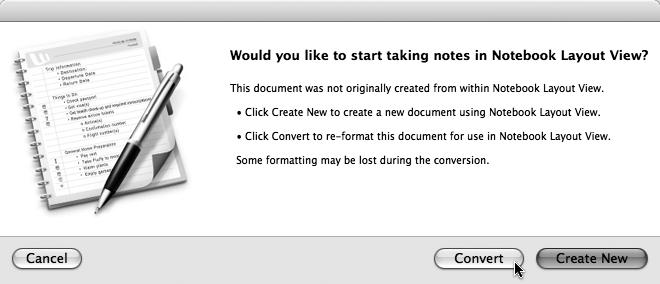
Figure 6-2. If you convert a regular document to Notebook Layout view, inserted pictures may get sloshed around or columns reorganized. You can return to your previous view but that won’t undo the changes wrought by the Notebook view to paragraph styles, headers, footers, and so on.
However you get there, once you arrive in Notebook Layout view, you see a clean new sheet (assuming you’re starting with a new document) of lined notebook paper. Kinda makes you want to take a pen to your computer screen, doesn’t it? But please, despite the temptation, don’t scrawl “Timmy likes Sally” or “Mr. Quackenbush is a nerd,” on your computer screen. Replacing computer screens gets real expensive, real quick.
Like much of Word 2008, the Notebook Layout view is intuitive. As you type, words dance (or spew—mood depending) onto the page. You’ll notice, however, that each paragraph, block of text, or picture is marked with a clear/gray bubble to its left. The bubble is similar to the little rectangle you see in Word’s Outline view (Outline View), but much easier to use. Furthermore, you can take that bubble and drag (it turns blue) your text wherever you like on the page. In fact, there’s much more you can do with your text than reposition it, and most of those capabilities reside on the aptly named Notebook Layout view Standard toolbar, as shown in Figure 6-3.
The Notebook Layout view significantly changes the Standard toolbar into something that’s tailored to the view at hand. Everything you need waits for your click on the toolbar or folds neatly into the ever-useful Formatting Palette.
Note
In addition to the transformation of the Standard toolbar, you’ll notice that most of Word’s other toolbars become completely unavailable when you’re in Notebook Layout view. Check the View → Toolbars menu—they’re just not there. Apparently, Microsoft wants to get all possible distractions out of your way when you’re taking notes. On the other hand, if you’re used to using Word’s more advanced features like Change Tracking or even Style formatting, you may find Notebook Layout view more of a hindrance than a help.
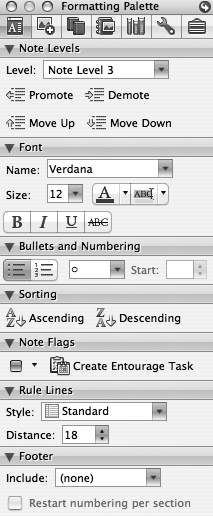
Figure 6-3. When you enter the world of Notebook Layout view, the Formatting Palette morphs to provide the appropriate commands. Here you can adjust the indent level, the font, bullets and numbering, and “paper” style; sort your notes or add a footer; and add checkboxes to your notebook items or even turn them into Entourage tasks.
Appearance. Click here to choose the “paper” style for your notebook. If you find those binder rings get in your way while you’re writing (left-handed, perhaps?), select one of the Without Notebook Rings styles.
Scribble. A pen icon represents the Scribble tool. Click here to turn your mouse into a pen with which you can draw on your document. The cursor changes to look like a pen. Press and hold the mouse button to draw.
Scribble’s convenient for drawing quick graphical marks, such as arrows, or circling important sections of your document, but it’s a tad too cumbersome to write more than a word or two. The pop-up menu beside the Scribble icon presents thickness options for your pen’s point, and you can also choose an ink color on the palette that pops beside each pen thickness. The Scribble pop-up menu has the following options:
—Fine Point. Draws a thin line. You can also click the arrow to the right and choose a color.
—Very Fine Point. You guessed it—draws an even thinner line. Again, click the arrow to the right for your color perusing enjoyment.
—Medium Point. The point of choice for those who like fat pens.
Eraser. The Eraser removes AutoShapes drawn with the Scribble tool. It’s very simple. Click the Eraser, and then click the object to remove it. Faster than a Red Sox World Series sweep, and way easier.
Select Objects. Click the Select Objects icon, and drag over an area to select any objects within it. You’ll find this especially useful when you need to select a group of objects or when you’ve sent an object behind the text, making it difficult to select.
Audio. Clicking the microphone displays the Audio Notes toolbar. Using this toolbar, you can make your computer take dictation. For more details, see Important Enough to Track in Entourage?.
Quick Search. As described in Figure 6-4, the Quick Search is a very useful tool that cuts the clicks from thought to located word.

Figure 6-4. When you’re notebooking it, the Notebook Layout view’s Standard toolbar replaces Word’s Standard toolbar. One of its most convenient tools is the Quick Search window. Click in the window, type in your search terms, press Return, and Word buzzes through the document, rooting out every occurrence in this section.
Notebook Layout view comes into its own when you’re either taking notes on your laptop during a meeting or trying to get your arms around that huge project that you and your fellow visionaries brainstormed. It’s not a view you’ll often use when composing your romance novel. But that’s okay; Notebook does what it does pretty darn well, by automatically and clearly applying outline levels to every thought you type.
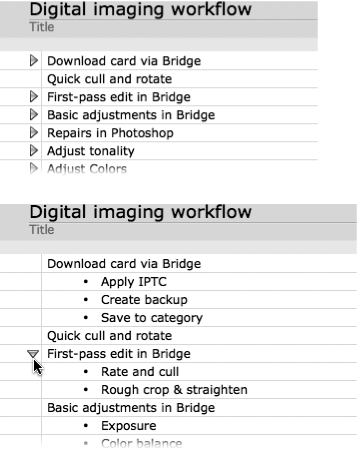
The cool thing about all this leveling business is the flexibility it provides when you’re viewing and organizing your Notebook document. If a heading, any heading, in the document has subheadings beneath it, Word tags the heading with a big blue flippy triangle, as shown in Figure 6-5. You can click this triangle to expose or hide the subheadings.
Note
Levels are kind of like golf. The lower the number, the better (more important) the level. Level 1 is the highest level, level 2 is next, and so on.
You can set text levels with various combinations of the Tab key, as described below. You can, of course, highlight text and drag it with the mouse, just like any other text, but you may find it quicker to learn a few shortcuts and never take your hands off the keys as the ideas come gushing out.
Tab or Control-Shift-Right arrow. These commands demote the text one level of importance and tuck it neatly beneath the text above it. You can also use your mouse to drag the note bubble to the right.
Shift-Tab or Control-Shift-Left arrow. These commands promote the text one level, moving it back out toward the margin, where items of greater importance reside. You can also use your mouse to drag the note bubble to the left.
Control-Tab. Indents the first line of text one tab without changing the level.
Figure 6-5. You can expand or collapse the subheadings in your Notebook. At top, headings are collapsed, displaying only the top-level text. After clicking the flippy triangle, the subheadings pop out, as shown at bottom. As you can see here, it’s possible to have several levels of embedded headings. Wherever there are subheadings, you’ll see the renowned flippy triangle—though it disappears once you click it to expand the topic. Mouse over that topic again, and the triangle reappears.
Control-Shift-Up arrow. Moves the selected paragraph up. Note that this keystroke physically moves the paragraph; it may change its note level as well, depending on the paragraph above it.
Control-Shift-Down arrow. Moves the selected paragraph down, again without changing its note level.
Control-Shift-A. Expands all text under all headings. Great if you want to see everything you’ve written.
Control-Shift-<number>. Displays the selected note level. For example, Control-Shift-1 displays all the Level 1 notes.
If you prefer clicking buttons to elevate or reduce the importance of text the Note Levels section of the Formatting Palette is at your disposal. To open Note Levels, click the Note Levels title bar.
To promote text (raise it’s level), click anywhere in the text line, and then click the Promote icon. To demote the text, click in the text line and click the Demote icon. If you need to demote or promote text several levels, it’s easier to use the level pop-up menu on the Note Level section. Just click the arrow to the right of the level window and then click the level you desire. You can also press Tab (to demote) or Shift-Tab (to promote), as described earlier. Keep pressing until you reach the desired level. (Additionally, you can press Tab or Shift-Tab before typing a heading.)
The Move Up and Move Down icons don’t change a level’s level, so to speak, but rather alter the position of the text on the page, one line at a time. If you want to move the text up, select it and click Move Up. You can do the same thing by clicking on the clear/gray bubble to the left of the text and dragging it to the new position.
As you’ve probably gathered by now, there are myriad ways to sort your headings and organize and reorganize your notes. You can drag notes (and objects), promote and demote headers, and move them up and down. It’s cool, it’s easy, and it’s fast.
What’s even faster is Notebook’s ability to sort your data via the sorting function that’s added to the Formatting palette whenever you work in Notebook Layout view. Select the section (see Inserting and Removing Section Breaks) you wish to sort (the sorting commands sort a section or a selection, not the entire document), open the Sorting pane by clicking Sorting title bar, and click either Ascending or Descending.
Ascending sorts from the top of the page to the bottom, 1 through 9, then A through Z. For example, it would place a heading beginning with “Aplomb,” before a heading beginning with “Zealot.”
Descending sorts from the top of the page to the bottom, Z through A, then 9 through 1.
Okay, you’ve organized your notes into some form of logic. Everything to do with the company party is listed under the Level 1 heading of Company Party, and all things pertaining to the boss’s favorite client is tucked under the client’s name. But what if you have some questions about items in both categories, need to remind yourself to order the party food, and prepare a report for that number one client, and just keep in mind what is what, and set priorities for both? There are two ways of quickly transforming your notes into a to-do list: the Note Flags feature in Notebook Layout view, or by marshalling the forces of Entourage.
The Note Flags panel of the Formatting Palette has a pop-up menu that lists checkboxes and other items for just about every flagging purpose. Place a flag in the margin next to anything in your notebook by first clicking the text (anywhere in the text line), and then selecting the flag from the list. To remove the flag, select it again in the Formatting Palette.
Note
You can’t apply a flag to a graphic. If you select a graphic, the Formatting Palette no longer includes the Note Flags section. You may, however, click a line near the graphic and place your flag there.
The obvious checkboxes are great for placing beside items on your Notebook list. Once placed, you can click the box to place a check in it. So, after you’ve finished that step in the project, you can check it off. Instant gratification!
Pretty icons beside your notes are all well and good, but what if you want to take your reminder out of Word and into the real world? If you use Entourage to organize your life, you could launch that program and start a new task. Fortunately, there’s no need to subject yourself to that kind of strain. Just click Create Entourage Task in the Note Flags section of the Formatting Palette. Doing so opens a dialogue box where you can set the date and time when you wish to be reminded of the selected task.
This cross-program feature is a great timesaver and an ideal way to follow up on the notes that you took at yesterday’s meeting. Simply click in the line of text you wish to remember, let’s say “Prep sales report for Olsen by Tuesday noon,” click Create Entourage Task, and set an appropriate reminder, for, say Tuesday morning.
Hey, that’s what everyone wants to do. Spend a little less time clacking on the keyboard and a little more time living a private version of the Corona commercials. Well, Notebook Layout view can’t deliver a cold one to your hammock, but it can get your hands off the keyboard with the Audio Notes toolbar and its capabilities. For example, you’re sitting in that three-hour, Monday night sociology class. Just call up Word, open a new document in Notebook Layout view, turn on Audio Notes, and let it run. Then, as you type notes, Word automatically inserts icons that link to an audio snippet of whatever it was recording when you were typing.
The beauty of this arrangement is that you don’t have to worry about typing every word the professor drones. Just type main points; you can click and listen to the recording to refresh your memory later. You can also link audio notes to previously written text—something that’s convenient if you wanted to connect a complex description to a point that you briefly touched on in your written notes. This feature is really designed for laptop Notebook note-takers, but works on any Mac with a built-in mic (like iMacs) or with an attached external mic (like a Mac Pro). Just be sure to grab a chair near a power outlet when you cart your Mac Pro into class. Here’s how to enter your audio notes and listen to them later.
To enter an audio note, click in the text where you wish to insert the audio note, click the microphone to display the Audio Notes toolbar, click the Record button, and start speaking (or you may need to stop talking so that your microphone can hear the important stuff). Or, just click the microphone and type away. Word automatically creates new audio notes every few lines. Click Stop (the blue square on the Audio Notes toolbar) when you wish to stop recording. When you pass the cursor over the text, the blue speaker pops into the left margin.
Note
Choose Word → Preferences → Audio Notes to adjust the recording quality for your notes. Word’s standard setting of Medium quality produces monaural MP4 files at a relatively low sample rate—perfect for voice recording or lecture notes. If you require higher quality, or have attached a stereo microphone (the built-in mic in your laptop is mono), you may want to increase the quality settings. However, higher-quality means your notes take up more—perhaps much more—space on your hard drive.
To listen to a note, click the blue speaker icon, which pops up in the left margin of the page as you mouse over notated text. Your recording fills the air, and if you wish it to fill a little more or less, you can adjust your Mac’s output volume using the volume control near the right end of your menu bar or by choosing System Preferences → Sound → Output. You’ll find more playback controls in the Audio Notes toolbar, conveniently described below. To display the toolbar, click the Audio toolbar icon. The toolbar, as shown in Figure 6-6, inserts itself beneath the standard toolbar.
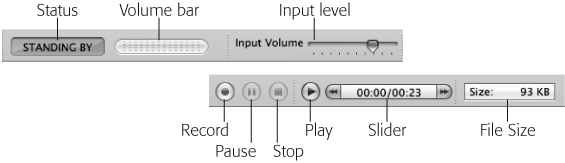
Figure 6-6. The Audio Notes toolbar (shown here divided in half to fit on the page) provides the controls needed to insert sound into your document. Keep an eye on the Size measure as you record: larger files take longer to save and email.
Tip
Perhaps you’d like to share your captured verbal brilliance with someone who doesn’t have access to your computer. Don’t worry, Word 2008 has you covered. You can export your audio notes to another medium. Choose Tools → Audio Notes → Export Audio. Word exports all the audio in the notebook document as an MP4, AIFF, or WAV file (depending on your Audio Notes Preferences settings) to a location of your choosing. After you’ve done that, you can burn the file to a CD or transfer it to your iPod and take it wherever you like. It’s a dream come true for those folks who truly like to hear themselves talk.
The Audio Notes Toolbar includes several functions:
Recording Status. Located on the far left of the toolbar, the status bar shows whether you’re in Standing By (or playing) or Recording mode.
Volume. The Volume bar measures how loudly the computer hears you (or whatever it’s hearing). For example, if you clap, the bar spikes (swings to the right). If you get really quiet, centering yourself in that peaceful place that only you know, the bar settles to the left…at least until your kids storm exuberantly into the room.
Input Volume. The input volume slider sets the input volume. Move it to the left if you’re loud (or a close talker), move it to the right if you have a soft voice or are recording your professor in a classroom.
Recording Button. As you might expect, the recording button starts the recording process. Click it to start recording the lecture, or talk normally (unless your “normally” means whispering or mumbling). Watch the size display on the right of the toolbar as you talk to see how much hard-drive space you’re eating up.
Pause Button. Pauses the recording. Use it if you either wish to return later to add to your audio note, if the cat has your tongue, or if your professor launches into one of his interminable digressions about how things were when he was in college. Pausing the recording lets you add more material to the same recording when you resume. If you click the Stop button, you’ll need to start a new recording.
Stop. Stops the current recording.
Play. The Play button plays the selected recording. A small speaker that appears as you pass your mouse over it designates an audio note. Select an audio note and click Play to hear it. Double-clicking the speaker also starts playback.
Slider. This small bar tracks the progress of the currently playing audio note. You can also slide the slider anywhere in the window to begin the audio note at that point. That trick can be quite useful if you left a contact phone number at the very end of a 30-second message. Skip to it straight away—just place the slider near the end and click Play.
Tip
Although the blue speaker pops up whenever you pass your mouse over an audio note, it’s much easier to draw attention to the note with a line of text such as, “Monday meeting,” or whatever. Click Show All Audio Markers in the status bar at the bottom of the window to display all the speaker icons. Now you can spot them without mousing around.
By now you’re a pro at putting words onto notebook pages. It’s also important to understand how to manipulate the pages themselves, specifically how to make changes to entire sections by adding improvements such as headers, footers, or removing the characteristic lined paper look. Notebook Layout view pages, referred to as sections, are an important organizational tool.
Note
Notebook pages really aren’t—pages, that is. The Notebook Layout’s sections are continuous sheets of paper, kind of like a Web page. In fact, you can’t insert a page break into a notebook. If you convert the notebook to a different Word view, such as Draft or Print Layout, you’ll see that, behind the scenes, Word delineates each tabbed section with a section break (Column break).
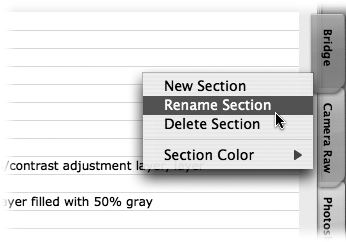
A title resides at the top of each section. Initially—because Word 2008 can’t read your mind—it’s blank (the title, not your mind), but you can fill it in by clicking in the title block (as shown in Figure 6-7), and typing whatever you wish. This label doesn’t, however, change the title on the tab located on the right of the notebook page. To change these tab titles, double-click the tab, type your new tab title, and press Return.
Reordering the sections of your notebook is simple. Click on a section tab and drag it to its new location.
Notebook Layout view’s factory settings include lined paper. It’s a curious, if understandable, decision by Microsoft. Curious, because on a computer, you don’t need lines to keep your writing even; understandable, because it’s a notebook view, and the lines make your computer screen look like a notebook.
Text is positioned exactly between the lines, so if you increase the space between the lines (using the Rule Lines pane of the Formatting Palette), you’ll increase the space between each line of text.
You can choose whether the lines appear on the page or not in the Rule Lines section of the Formatting Palette. You can choose Standard or None from the Style menu.
Standard. This factory setting gives each page lines that look like notebook paper, with text spaced between the lines. It’s great most of the time you’re in Notebook view, because it reminds you you’re supposed to be, well, taking notes.
None. Removes all the lines. If the lines bug you, choose this setting and get a clean sheet of paper on which to type.
A separate menu, Distance, sets the spacing between the lines, in points (Font Sizes). Obviously, the larger the number, the greater the spacing.
Oddly enough, you can choose to number your notebook pages in a footer, even though you’ll only see this page number when you print your notebook, click Print Preview, or switch to another view, such as Print Layout view. Numbering is a good idea if you intend to print your document, so you’ll know you’ve got all the pages in the correct order.
To include page numbers, click the flippy triangle next to Footer in the Formatting Palette. The footer options are either None (no footer), or Page Numbers. Choosing Page Numbers plops them at the bottom of your pages. You can also choose to have Word begin renumbering the pages with each new tabbed section.