
When you need to refer to another work—a book, journal article, Web page, or interview—you have to cite the source accurately and succinctly. Loved and loathed by scholars the world over, the citation, that indispensable and unavoidable footnote to any kind of serious research, provides a standardized style for these vital scraps of information. However, getting all those commas, colons, quote marks, italics, and underlines in just the right places has driven many great minds to near distraction—and created employment for many grad students as publication deadlines loom.
One standard format for citations is called MLA (Modern Language Association) style, and it looks like this:
Smith, Charles D. “The ‘Crisis of Orientation’: The Shift of Egyptian Intellectuals to Islamic Subjects in the 1930s.” International Journal of Middle East Studies 4 (1973): 382–410.
Note
The three biggies in the style world are MLA, favored by humanities scholars; APA (American Psychological Association), favored by psychologists and sociologists; and CMS or Chicago (Chicago Manual of Style), favored by historians. For more information visit any of their Web sites: www.mla.org, www.apastyle.org, and www.chicagomanualofstyle.org.
Word 2008’s Citations feature can make even the most staid academics utter a subdued “Ye haw!” The Citations Palette occupies prime real estate in the Toolbox, two tabs to the right of the Formatting Palette. It’s essentially a mini database dedicated to tracking every possible form of reference citation (Figure 7-6).
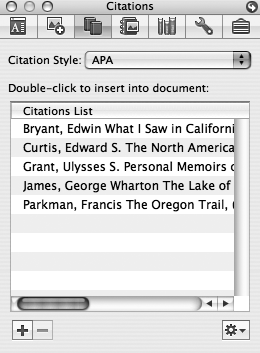
Figure 7-6. Word 2008’s new Citations palette lets you build a database of all your reference citations, and then insert them into footnotes, bibliographies, or the body of the text by double-clicking an item in this list. Use the plus-sign button to add a new item. You can select an item and use the minus-sign button to remove it from your collection unless you’ve inserted it within your document’s body text.
The Citations palette lets you assemble a list of references and then select and insert them—in perfectly formatted style—into a footnote, endnote, bibliography, or anywhere else. Here are the steps:
Open the Citations palette, choose your favored style from the Citation Style pop-up menu: APA, Chicago, MLA, or Turabian, and then click the plus sign button at the bottom.
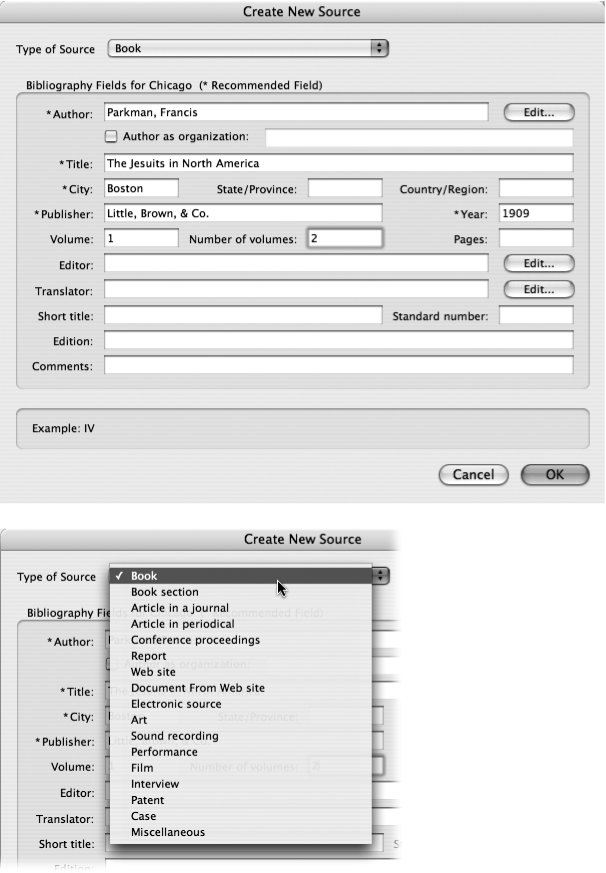
The Create New Source window appears, ready for you to begin filling in the salient bits of data for this particular source (Figure 7-7).
Use the Type of Source pop-up menu to narrow the data fields to what’s needed, for example, for a book, article, or interview.
Depending on your choice of citation style, the most vital fields display asterisks next to their names. Use the tab key to move through the fields, noting the Example pane at the bottom of the window showing the correct format for each entry.
Figure 7-7. Top: The Create New Source dialog box lets you track a huge number of data fields for each citation, but only those marked with an asterisk are required for your chosen citation style. Bottom: Use the “Type of Source” pop-up menu to choose just what type of document, artwork, or interview you’re dealing with.
Enter each name in the Last, First and Middle fields, and then click the Add button.
Word adds the name to the box at the bottom of the window. Repeat the process to add more names and if necessary use the Up, Down, or Delete buttons to get your list in the proper order. Click OK, and Word adds the multiple-name listing to the Create New Source window—punctuated just so, according to your selected style.
Once you’ve filled in as many fields as you need, click OK to close the dialog box and add the new source to the list in the Citations palette.
If you need to edit one of your citations, select it in the list, click the Actions button (it looks like a gear) at the bottom of the window, and choose Edit Source from the pop-up menu. The Edit Source dialog box appears, ready for you to add or change the citation information.
To add a citation to a footnote or endnote, create a footnote as described above, and then double-click one of the citations in the Citations palette.
Word inserts it at the insertion point, precisely formatted according to your chosen style.
Note
Deleting citations in the body text is tricky. When you insert a citation into a footnote, endnote, or bibliography, Word inserts it as text you can edit like any other text. However, when you insert a citation into your document’s body text, Word inserts it as a text field (see Fields) containing the author’s last name and publication date in parentheses, for example, (Parkman, 1910). If you want to remove one of these text fields, you’ll find that you can’t do it in the normal way with the Delete key. Instead, select the field and choose Edit → Cut.
As you build your list of citations, Word actually saves this list in two places—one for the document, which it calls Current list; and one that’s available in every Word document, which it calls Master list. Whenever you add a new citation, it ends up on both lists. This way, your collection of citations is always available when you begin writing a new document on a related topic. Click the Actions (gear) button in the Citations palette and choose Citation Source Manager to access both lists. This window, which seems to be a direct descendent of Apple’s venerable Font/DA Mover program of 1984, lets you move citations from one list to the other (see Figure 7-8).