
- Office 2008 for Macintosh: The Missing Manual
- A Note Regarding Supplemental Files
- The Missing Credits
- Introduction
- I. Word
- 1. Basic Word Processing
- 2. Editing in Word
- 3. Formatting in Word
- 4. Styles, Page Layout, and Tables
- 5. Working Collaboratively
- 6. Working with Notebooks, Outlining, and Master Documents
- Notebook Layout View
- Outline View
- The Document Map
- Master Documents
- 7. Editing Long Documents
- Headers and Footers
- Citations
- Bibliographies
- Footnotes and Endnotes
- Line Numbers
- Templates
- AutoSummarize
- Fields
- Bookmarks
- Captions
- Cross-References
- Creating a Table of Contents
- Indexing
- Mail Merges
- Macros
- 8. Moving Beyond Text: Publishing Layout View
- 9. Word Meets Web
- II. Entourage
- 10. Email, Address Book, and Newsgroups
- The Big Picture
- Setting Up Entourage
- Sending and Receiving Mail
- Address Book
- Newsgroups
- 11. Calendar, Tasks, and the Project Center
- The Calendar
- Recording Events
- What to Do with an Appointment
- Saving Calendars as Web Pages
- Tasks and the To Do List
- My Day
- Office Reminders
- Categories
- Project Center
- Accessing Projects from Other Office Programs
- Notes
- Synchronization
- Multiple Identities
- Finding Messages
- Links
- Checking Your Spelling
- The Script Menu
- 10. Email, Address Book, and Newsgroups
- III. Excel
- 12. Basic Excel
- Spreadsheet Basics
- Formula Fundamentals
- Excel, the List Maker
- 13. Formatting and Charts
- 14. Formula and Database Magic
- 12. Basic Excel
- IV. PowerPoint
- 15. Planning and Creating Great Presentations
- 16. Building a PowerPoint Presentation
- 17. Polishing and Presenting in PowerPoint
- V. Office As a Whole
- 18. Saving Time with the Project Gallery and Toolbox
- 19. Making the Most of Graphics
- 20. Customizing Office
- VI. Appendixes
- A. Installation and Troubleshooting
- B. The Office Help System
- C. Office 2008, Menu by Menu
- Application Menu
- Entourage Menus
- File Menu
- Edit Menu
- Undo
- Redo
- Cut
- Copy
- Copy to Scrapbook
- Paste
- Paste From Scrapbook
- Paste Special
- Clear
- Select All
- Duplicate
- Delete
- To Do
- Categories
- Projects
- Share Item
- Do Not Share Item
- Get Properties
- Auto Text Cleanup
- Increase Font Size
- Decrease Font Size
- Add to (or Remove from) Favorites Bar
- Find
- Advanced Search
- Find Related Items
- View Menu
- Message Menu
- Resend
- Send Message Now
- Send Message Later
- Receive Entire Message
- Edit Message
- Reply
- Reply to All
- Reply to Sender
- Forward
- Forward as Attachment
- Redirect
- Mark as Read
- Mark as Unread
- Mark All as Read
- Mark as Junk
- Mark as Not Junk
- Block Sender
- Check Names
- Insert
- Remove Background Picture
- Signature
- Priority
- Security
- Add Attachments
- Save All Attachments
- Remove All Attachments
- Remove Unsafe Attachments
- After Sending, Move To
- Apply Rule
- Move To
- Add To Address Book
- Internet Headers
- Source
- Format Menu
- Tools Menu
- Window Menu
- Help Menu
- Scripts Menu
- Excel Menus
- File Menu
- Edit Menu
- View Menu
- Normal
- Page Layout
- Toolbox
- Formatting Palette
- Object Palette
- Formula Builder
- Scrapbook
- Reference Tools
- Compatibility Report
- Project Palette
- Elements Gallery
- Toolbars
- Customize Toolbars and Menus
- Ruler
- Formula Bar
- Status Bar
- Header and Footer
- Comments
- Custom Views
- Full Screen
- Zoom
- Sized with Window
- Chart Window
- Insert Menu
- Format Menu
- Tools Menu
- Data Menu
- Chart Menu
- Window Menu
- Help Menu
- PowerPoint Menus
- File Menu
- Edit Menu
- View Menu
- Normal, Slide Sorter, Notes Page, Presenter Tools, Slide Show
- Master
- Header and Footer
- Hide/Show Comments
- Grayscale
- Toolbox: Formatting Palette, Object Palette, Custom Animation, Scrapbook, Reference Tools, Compatibility Report, Project Palette
- Elements Gallery
- Toolbars
- Customize Toolbars and Menus
- Ruler
- Guides
- Zoom
- Insert Menu
- Format Menu
- Tools Menu
- Slide Show Menu
- Window Menu
- Help Menu
- Word Menus
- File Menu
- Edit Menu
- View Menu
- Draft, Web Layout, Outline, Print Layout, Notebook Layout, Publishing Layout
- Toolbox: Formatting Palette, Object Palette, Citations, Scrapbook, Reference Tools, Compatibility Report, Project Palette
- Elements Gallery
- Toolbars
- Customize Toolbars and Menus
- Navigation Pane
- Ruler
- Header and Footer
- Footnotes
- Markup
- Reveal Formatting
- Full Screen
- Zoom
- Insert Menu
- Format Menu
- Font Menu
- Tools Menu
- Table Menu
- Window Menu
- Work Menu
- Help Menu
- Index
- About the Author
- Colophon
- Copyright
Imagine this scenario: Five minutes to get to the professor’s office, and you suddenly remember that she wanted you to include an abstract (a summary) at the beginning of your thesis. Or this one: You proudly plunk your report on your boss’s desk and he says, “I’m not reading all this. Give me the 15-minute version.” Word’s AutoSummarize feature just may come to the rescue.
Unfortunately, Word doesn’t actually read your document and then write a well-crafted summary. (Maybe in Word 2028.) What Word does is scan the document for frequently used words, then string what it believes to be the key sentences together into a summary. (“Key sentences” are those that include those most common words.) In other words, you’re best off setting fairly low expectations for this feature. Think of AutoSummarize as something that helps you come up with a rough summary; you can (and should) edit the summary later.
POWER USERS’ CLINIC: Using a Template as a Startup Item
Word automatically unloads any global templates you load (other than the Normal template) when you quit Word. When you open Word again, the Normal template is the only global template automatically loaded.
If you want to make the AutoText entries and other attributes of another global template available all the time, you can pursue one of these two avenues:
Copy them into the Normal template using the Organizer, as described on The Organizer.
Turn the additional global template into a startup item.
To do the latter, navigate to the template on your Mac’s hard drive; it’s probably in the Home → Library → Application Support → Microsoft → Office → User Templates folder → My Templates. Click the template’s document icon to select it and choose File → Duplicate. Drag the copied file to the Microsoft Office 2008 → Office → Startup → Word folder (to make it available to everyone who uses your Mac), or to your Home → Documents → Microsoft User Data folder if you want this template to pertain only to your account.
From now on, this startup template is automatically loaded to every Word document you open. In other words, this global template isn’t automatically unloaded when you quit Word.
Open the document you wish to summarize; choose Tools → AutoSummarize. Word immediately gets to work, compiling a list of key words in your document and flagging the sentences that contain them. Since it may take some time, especially in a long document, kick back and watch some TV. If nothing’s on, you can press ⌘-period to cancel the process.
When Word’s behind-the-scenes work is done, it presents you with a dialog box like the one in Figure 7-16.
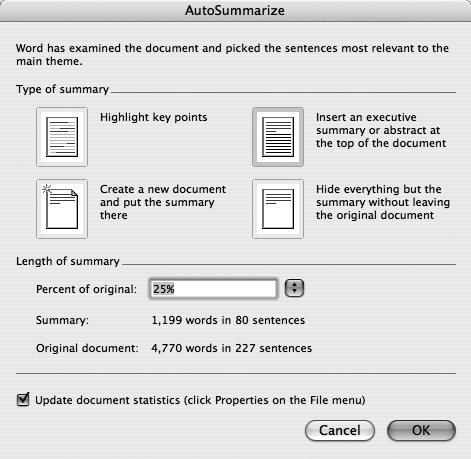
Figure 7-16. If you’ve filled in the Keywords and Comments boxes on the File → Properties → Summary tab, uncheck the “Update document statistics” box here. Otherwise, Word will replace your keywords and comments with its own keywords and summary.
The icons under the “Type of summary” heading let you choose how you want Word to display the summary it has generated:
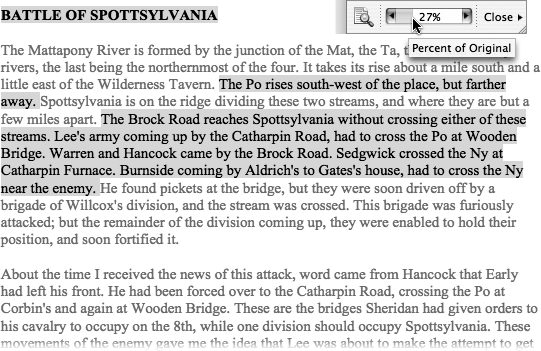
Click Highlight key points if you’d like to scroll through your document and see which sentences Word flagged as being key points for inclusion in the summary as in Figure 7-17. This option is an effective way to see how Word has interpreted your document.
Figure 7-17. The only way to really interpret Auto Summarize’s results is by using the “Highlight key points” summary. This way, you can see Word’s summary in context as you flip through the document. This view displays a tiny toolbar (upper-right) that lets you switch between the highlighted view and the Hide everything view, and adjust the percentage of the original included in the summary.
When you click OK, your document appears with yellow highlighting on certain sentences. You also get a tiny toolbar containing a button for toggling between the summary and the highlighted version, as well as a slider for adjusting the length of summary percentage (see Fields). Click Close on this toolbar to return your document to its original condition.
Insert an executive summary copies the sentences Word has chosen as representative and displays them at the beginning of the document. If the summary is either too long or too sketchy, press ⌘-Z to undo the AutoSummary. Now see “Length of summary” below.
Create a new document opens a blank Word document and puts the summary there (instead of at the top of the document).
Hide everything is the choice for those who aren’t ready to commit. When you click OK, it shows you the summary, hiding the balance of the document without actually closing it. A small toolbar also opens, where you can adjust the length of the summary (see below), and toggle between the summary and the full document.
Under Length of summary at the bottom of the dialog box, Word shows you the length of the summary relative to the full document. The default setting is 25 percent, which means that the summary is exactly one-quarter the length of the document as a whole. When you change the percentage and then click OK, the AutoSummarize dialog box goes away, and Word re-creates the summary according to your whims.
-
No Comment