If the term mail merge is new to you, it may be because “mail merge” is a kinder, gentler euphemism for its result: form letters. Or maybe it’s because you’re familiar with Microsoft’s previous name for this function: data merge. In any case, a mail merge grabs information from a database and uses that information to automatically fill in the blanks of a Word file, as in, “Dear <<name>>, As a fellow <<city>> resident, I thought you might be interested in contributing <<income>> to our fundraiser.” In this example, a mail merge can effectively churn out what seem to be personal, individually written letters. Merging data can also create labels, envelopes, or a catalog.
Having Office 2008 on your Mac puts you at a definite advantage: You get to use all of Word’s document-beautifying features (see Chapter 3) to write the placeholder letter, and you have your choice of programs to organize the data. You can use an existing Excel file, your Entourage Address Book, a FileMaker Pro database, or a Word table to supply the data you want plugged into the generic letter.
The placeholders Word uses when you write the letter are fields (see Fields). And because fields can process information like computer code, Word mail merge documents are very powerful. For example, you can set them up to prompt you for information before proceeding with the merge (“What dollar amount to ask for?”).
To make these interactive functions easier to use, Office 2008 offers the Mail Merge Manager. Just as the Formatting Palette consolidates dozens of different formatting features, so the Mail Merge Manager also collects and automates the features you need for four of the most popular merges: form letters, labels, envelopes, and catalogs.
Before you begin your mail-merge experience, decide what computer document will contain the source data—the names and addresses for your form letters and envelopes, for example, or the items and prices in your inventory database that you’d like to merge into an attractive catalog.
The most common data source is a database of names, addresses, and other personal information. Office 2008 can grab data from Word tables, tab-delimited text files (such as ASCII), Excel files, the Entourage address book, or FileMaker Pro databases.
As you delve into merges, you’ll need familiarity with two important pieces of database terminology: records and fields. A field is a single scrap of information: a phone number or a shoe size. (This database field isn’t quite the same thing as the gray-text placeholder Word fields described earlier in this chapter—although the database kind of field will indeed be represented by a Word field in your form letter.) A record is the complete set of fields for one form letter, mailing label, or envelope—the name, address, phone number, and so on.
Tip
Whether you create a new database for your merge or use an existing one, make sure that each record is set up the same way. If you’re using a database where the first and last names are in separate fields in some cases and together in others, you’re going to have trouble getting the merge to work properly.
Let’s say you have a bunch of application slips filled out by kids signing up for your hockey lessons, and you want to write each student a welcome letter. However, you don’t have the database in electronic format yet. The easiest way to start a data source file is to launch Word and choose Tools → Mail Merge Manager. What you’ll see is something like Figure 7-28.
The list of database fields you’ll need depends on what you plan to say in the form letter. In the example in Figure 7-28, the coach realized that she’d need the date, first and last name, address, shoe size, school grade, the instructor name, and the entrance where the student’s hockey class would gather for its first meeting. A few fields already in the database for other purposes—phone number, for example—won’t be used in this letter; that’s OK.
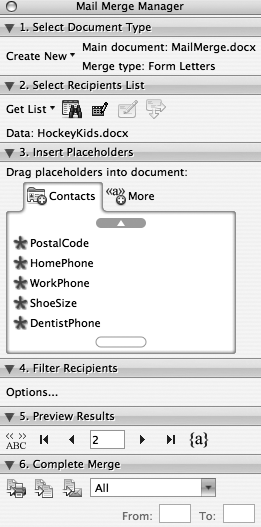
Figure 7-28. The mail-merge feature of Word isn’t a shining example of simplicity. But the section structure of the Mail Merge Manager palette, which looks a lot like the Formatting Palette, at least makes the steps sequential. The file name and main document type appear here—in this example, it’s called MailMerge.docx (see it near the top?). So does the database you’ve selected (see it in the Select Recipients List?). At the very bottom are the controls you use to actually perform the merge. If you want to abandon the main document and start again, choose Create New → “Restore to Normal Word Document” on the Mail Merge Manager.
To create a data source for your project, proceed as follows:
Open the main document.
“Main document” means the file that will contain the letter itself—the text that won’t change from one printout to the next. Choose Tools → Mail Merge Manager, if the palette shown in Figure 7-28 isn’t already open.
On the Mail Merge Manager’s top pane, marked “1. Select Document Type,” choose Create New → Form Letters.
Along with form letters, Word also lets you create labels, envelopes, or a catalog. Continue working your way down the numbered panes of the Mail Merge Manager.
On the Mail Merge Manager’s Select Recipients List section, choose Get Data → New Data Source.
As you can see from the pop-up button, Word comes ready to access information from your Office (Entourage) Address Book, a FileMaker database, or other data file—or to create a new list of data from scratch. That’s what you’ll be doing in this example.
The Create Data Source dialog box appears, as shown in Figure 7-29. It has a list of suggested fields for form letters. Edit the list of fields by adding and changing fields you need, or removing fields you don’t, also as shown in Figure 7-29.
Figure 7-29. Scroll through the “Field names in header row” box and click “Remove Field Name” for any you don’t plan to use. To add fields you’ll need for your hockey letter (DentistPhone, for instance), type them in the “Field name” box and click Add Field Name. Note that Word doesn’t permit spaces in field names.
Click OK. Name the database (Hockey Kids, for instance) and click Save.
You’ve just created a Word document with a table containing the fields you created in step 3 above, that will hold all your data.
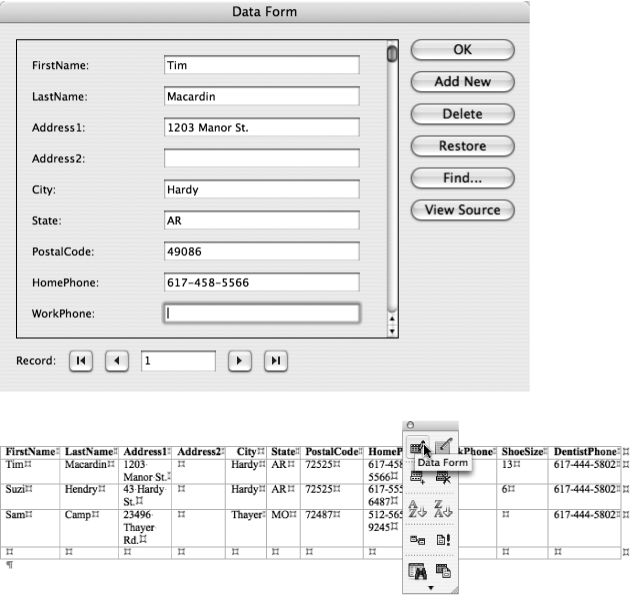
Now you’re confronted with a Data Form window like the one shown in Figure 7-30. It’s time to play fill-in-the-blanks; use this dialog box to type in the information for each kid in your class. (Alternatively, you can choose File → Open, open your Hockey Kids document, and add rows to the Word table you’ll find there. See Charts and Spreadsheets for full details on working with tables).
Figure 7-30. Top: When entering data in a Data Form you can click View Source at any time and see all your data in table form. This data source is a regular Word document you can see any time by choosing File → Open. Bottom: When working on the data source document you can return to the Data Form dialog box at any time by clicking the Data Form button on the Database toolbar.
Enter the first kid’s name, address, and other bits of information, pressing Tab to jump from blank to blank. Click Add New to save the first record and clear the form for the next set of data.
Click Delete to “backspace” over the record you just entered; click Restore to bring it back. The counter at the bottom reminds you where you are; use the navigation buttons to move backward and forward through the records.
When you’re finished typing in the data, click OK.
A list of the fields you’ve created appears on the Mail Merge Manager (see Figure 7-28).
To add more records to your data source at a later time, you have two alternatives. As mentioned above, you can open your Hockey Kids document, and add rows to the Word table you’ll find there. You can also click the Edit Data Source button in the Select Recipients List section of the Mail Merge Manager palette, to pull up the Data Form shown in Figure 7-30, top. Once the data source is open, you can use the Database toolbar to sort and edit it. (If you don’t see this toolbar, choose View → Toolbars → Database.)

You’re ready to perform the merge; skip ahead to Merging Straight to the Printer.
To merge an existing database into a form letter or envelopes, say in FileMaker Pro or Excel, you have to first save the database file. Then follow the steps below:
Open your form letter (or create a new blank document).
If the Mail Merge Manager palette isn’t already open, choose Tools → Mail Merge Manager.
On the Mail Merge Manager palette, choose Create New → Form Letters (for this example).
If you’ve already produced a main document with fields, then add to your existing database a first record (a header row) whose entry names match the fields in your main document (see the box on Using an Existing Data Source).
On the Mail Merge Manager, choose Get List → Open Data Source.
If the existing database is in FileMaker Pro or your Office Address Book in Entourage, choose the appropriate command from this pop-up button instead. (You need a copy of FileMaker Pro on your Mac for that option to work.)
Navigate to the file on your Mac and click Open.
You’re ready to proceed. If you haven’t written your form letter yet, go to the next section. When both your form letter and data source are ready, go to Previewing, Formatting, Preparing to Merge.
When you’re ready to write the actual form letter, you have a choice—like thousands of Publishers’ Clearinghouse Sweepstakes form letter writers before you. You can either use an existing Word file as the body of the Mail letter, or start from scratch.
To showcase the power of fields in a mail merge document, here are the steps used to create the letter shown in Figure 7-31, bottom. In the Mail Merge Manager, make sure the flippy triangle next to Insert Placeholders is pointing downward and click the Contacts tab, so that you can see the fields available in your data source. (If you haven’t selected or created a data source, see “Creating a new data source” on Creating a New Data Source or “Using an existing data source” above.)
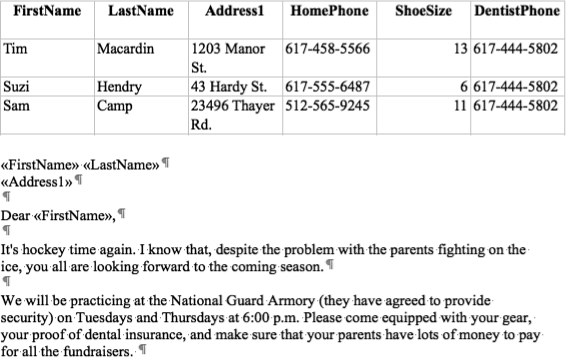
Figure 7-31. This data source (top) was created in Excel, and the form letter, ready for merging (bottom), was created in Word. The first row of the spreadsheet is the header row, displaying the field names.
Open a new Word document. Type the date, if you like, and then press Return two or three times.
You’re about to insert the first addressee’s mailing address, as is customary in a standard business letter. But you don’t want to have to type that information—that’s so 1985. You want Word to fill it in for you, not just on this letter, but on every one of the 44 letters you’re about to write and print.
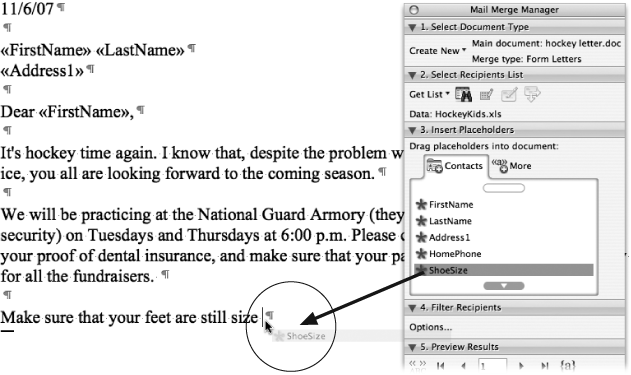
Drag-and-drop merge fields from the Mail Merge Manager palette to place the mailing address into the letter, as shown in Figure 7-32.
Type Dear and a space, and then drag-and-drop the FirstName field.
Word represents the field (which, when you print, will be replaced by somebody’s actual first name) using brackets. You should now see, in other words, Dear <<FirstName>>.
If your data source has a field for titles (such as Mr., Ms., or Dr.), you can insert it instead, add another space, and then drag the LastName field: Dear <<Title>> <<LastName>>.
Continue writing the letter, drag-and-dropping merge fields as appropriate.
See Figure 7-32 for an example.
Figure 7-32. You build your form letter by dragging the fields from the Mail Merge Manager directly into the letter. This example is almost complete; the ShoeSize field is one of the last fields to add to the form letter. As you drag the field, carefully position the insertion point in your text before you drop it.
Insert an Ask field to collect the instructor’s name for the letter.
Our hapless hockey coach still doesn’t know who the instructor will be. In fact, she won’t know until it’s almost time for the letters to go out. Therefore, she’ll fill in the instructor’s name during the merge itself.
Here’s where the Fill-in field comes in. On the Insert Placeholders section of the Mail Merge Manager palette, click the More tab, drag “Fill-in” to the point in the letter where the instructor’s name should go. A dialog box appears; in the Prompt box type What’s the instructor name?, or something else that will help you (or whoever’s filling in the forms) remember what was supposed to go there.
This dialog box also gives you a chance to specify a fallback entry—default text that will appear in the letter in case you don’t get the instructor list on time
(“name to be determined,” for example). If you turn on the “Ask once” box, Word will ask you once for the missing information, then merge it into all the letters.
Tip
You may be tempted to use the Fill-in field with abandon, so that Word will ask you, in the process of printing out the form letters, to fill in personalized information for each record. But you can’t see the records during the merge, so you won’t have any way of knowing which information should be filled in for each person’s letter.
The way to customize the Fill-in field is with a query (Merging Straight to the Printer). For instance, filter the student database by grade and then conduct a separate pass for each, so that you can type a different instructor name for each batch of letters.
After you’ve prepared a main document and inserted merge fields, you can see how the document will look with the actual data.
On the Preview Results section of the Mail Merge Manager palette, click the View Merged Data button (ABC). Word shows you the first finished form letter, complete with Dear Garfinkle (or whatever the FirstName is in the first record from your data source). Click the arrows in the box on the Preview Results pane of the Mail Merge Manager to browse the other merged records.
In Preview mode, you can make formatting changes to the main document as well as to the merge fields. Just select text or fields in the usual way and use the Formatting Palette to add bold, italic, or other formatting. (When you reformat a field, the change applies to that entire field—for all documents in the merge.)
Once you’ve filled and prepared a data source, designed a main document, and outfitted it with merge fields, you’re ready to merge. Check the top two panels of the Mail Merge Manager to ensure that the file names of your main and database documents appear correctly. Use the Preview Results feature as described above. Proofread your main document carefully, especially if you have numerous records in your database—you don’t want a tiny mistake copied many times over! Finally, do a final save on your main document and your data document.
When everything looks good, Word stands ready to merge your data and your form letter in any of three ways: sending it directly to the printer, merging into a new Word document, or merging into outgoing email messages.
If you’ve already previewed your merge, simply click the Print button (on the Standard toolbar) or the Merge to Printer button in the Complete Merge pane of the Mail Merge Manager (Figure 7-28). Specify the number of copies you need in the print dialog box and hit Return. Word prints the merged documents on your labels or paper.
The pop-up menu in the Complete Merge pane of the Mail Merge Manager is automatically set to All, meaning that Word will print a merged document for all records in your chosen data source. The other choices are Current Record (to print just the record you’re currently previewing in the document window) and Custom.
When you click Custom, you can use the From and To boxes below it to specify a range of records to merge. For example, if you have sticky laser labels that come 30 on a sheet, and you just want to print the first page of labels, enter 1 and 30; Word will print only the first 30 records (that is, one page of labels). For the second page, enter 31 and 60, and so on.
If you want to print nonconsecutive records, use the Mail Merge Manager’s Query Options. This feature lets you filter your records before merging (choose only the records that meet certain criteria) or sort them into a certain order.
With your main and data source documents chosen in the Mail Merge Manager, turn your attention to the fourth pane labeled Filter Recipients and click Options. The dialog box shown in Figure 7-33 appears. Let’s say you want to send a special letter to clients in Baltimore, letting them know that you’re going to be visiting their city next month. Your data source contains all your clients, even those in San Francisco, whom you obviously don’t want to receive the same letter.
Since you’re filtering by city, choose the City field on the Query Options → Filter tab and type in Baltimore in the “Compare to” box. Set the Comparison pop-up menu to “Equal to”. As you can see in Figure 7-33, there are lots of filtering options. You’ve just completed a query that states, “If the City field is equal to Baltimore, then include this record.”
You can even apply more than one query. For example, you could set the second line to read “Or, City, Equal to, Washington.” By choosing Or from the first pop-up menu, you also added your clients from Washington to the list—since they’re near enough to visit you in Baltimore. When you use the Or pop-up, you’re adding more records to your first batch—when you use And, you’re further filtering the results of your earlier query. For example, you can filter out the people who have a work phone number and who live in your state. You can filter out people who live in Baltimore or Washington and have a shoe size greater than nine (perhaps you’re a traveling hockey skate salesman). Filtering specificity is limited only by your imagination and the data fields you have to choose from.
You may want to use a second Query Option—Sort Records—before printing your merge documents so that the pages that emerge from your printer in some sort of order. For example, you might want them sorted by state for bulk mailing purposes, or sorted by city if you’re a traveling salesman.
Click the Sort Records tab in the dialog box Query Options and select up to three sorting criteria by choosing data fields from the Sort by pop-up menus and clicking Ascending or Descending to determine the sorting order (see Figure 7-33).
Click OK when you’re done; now you can print the merged documents as described earlier.
Instead of sending your form letters (or mailing labels) to a printer, it’s often more useful to have Word generate a brand-new Word document, looking exactly as though a tireless secretary had painstakingly typed up a copy of each form letter with the correct addresses inserted. This is the only way to go if, for example, you want to tweak the wording, adding a personal touch to each outgoing letter independently. You can always print the thing after looking it over and editing it.
Creating a new mass form-letter document is easy: After setting up your main document and data source, click the Merge to New Document icon in the Complete Merge pane of the Mail Merge Manager palette. Word churns for a moment and then produces the document (with a page break automatically inserted after each copy of the letter). Save the merge document to your hard drive. Edit, add your personal flourishes, print, or duplicate it just as you would any Word document.
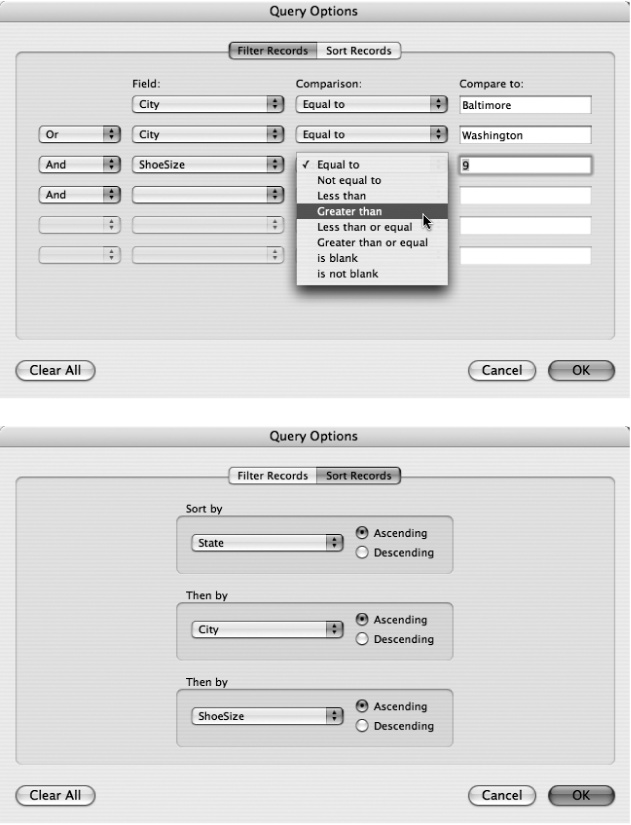
Figure 7-33. Top: Use this collection of pop-up menus to create a filter to home in on the target audience for your mail merge. Bottom: Clicking the Sort Records tab lets you sort your data records so they’ll print out in a logical order. You can combine filtering and sorting, and you can click back and forth between the Filter Records and Sort Records tabs as you craft your query. (If the Office Address Book is your source, this dialog box looks a bit simpler, with checkboxes that let you select only certain names and addresses for inclusion).
All this talk about mail merging to a printer using actual paper is so old school—nowadays form letters just as often end up as email messages. And of course Office 2008 comes with a feature that lets you send out form letters by email. Here’s how this feature works:
Create a form letter main document and a source document as described on the previous pages.
For best results, don’t use complex formatting, since some people can only view email as plain text (see Chapter 9).
Click the “Generate e-mail messages” icon on the Mail Merge Manager’s Complete Merge.
If the button is dimmed, it could be that Entourage isn’t selected as your default email program. Open Apple’s Mail program, choose Mail → Preferences → General and choose Microsoft Entourage from the Default email reader pop-up menu. Quit Mail and start again from step 1.
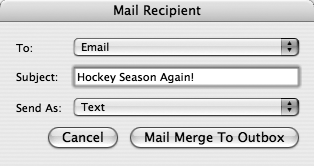
If all is well, the Mail Recipient dialog box opens—as shown in Figure 7-34.
Figure 7-34. You can choose to send mail-merged email as plain text, formatted text, or as an attachment to a blank message. If you send the letter as a file attachment, the name of your attachment will be the same as the file name of your main document. You may want to rename it for the benefit of your recipients, especially if you have a tendency to give documents unflattering names, like Damn Hockey Season Again.
Using the To pop-up menu, choose the field containing the email addresses. Type a subject for your email message.
For example, Hockey time!
Using the bottom pop-up menu, specify how you want to send the letter. As text (that is, plain text in the body of the email), as an attachment (which creates a Word attachment on a blank email message), or as an HTML Message (formatted text in the body of the email). Click Mail Merge to Outbox.
The Mail merge proceeds as usual: Word asks you to type Fill-in fields, and so on. Entourage opens automatically, and you can watch the boldface digits next to its Outbox skyrocket as Word crams newly generated messages into it. There they wait until you click Send (or until a scheduled Send runs). There’s no preview, but you can open any of the merged emails in the Outbox and look at or edit them.
Two of the most common Word mail merges are automated for you: address labels and envelopes. Either way, this is an extremely powerful feature that lets you combine the database flexibility of your Entourage Address Book with the formatting smarts of Word. Whether you’re the local Scoutmaster or an avid Christmas card sender, letting Word prepare your mass mailings beats addressing envelopes by hand any day.
Prepare for one of these data merges as follows:
Prepare a data source, as described on Preparing Data Sources.
Know the size of the labels or envelopes you’re going to use. Have some on hand as you begin the process. (You can buy sheets of self-adhesive labels at Staples or any other office supply store; Avery is one of the best-known names and the Avery label style numbers are the gold standard of mail merging mavens everywhere. These labels come in every conceivable size and shape; the 30-per-page version—Avery 5160—is the most popular.)
Set aside some time for trial and error.
Make sure that the labels you buy will fit into your printer and feed smoothly—buy inkjet or laser labels, for example, to match your printer.
To create labels, open a new blank Word document and proceed as follows:
Choose Tools → Mail Merge Manager.
The Mail Merge Manager palette appears.
On the Mail Merge Manager, choose Create → Labels.
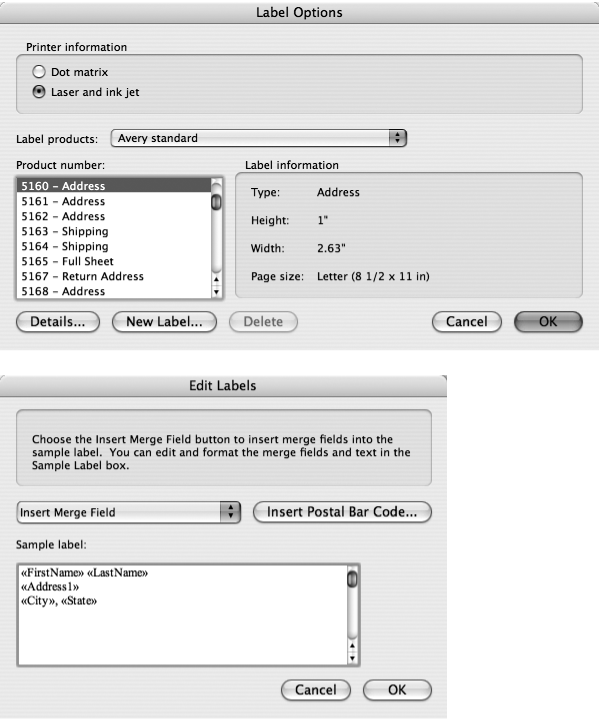
The Label Options dialog box appears (see Figure 7-35, top). Unless you’re that rare eccentric who uses a dot matrix (impact) printer, leave “laser and inkjet” selected.
From the “Label products” pop-up menu, select the brand of labels you have.
Word lists every kind of label you’ve ever heard of, and many that you haven’t.
Tip
If you’ve bought some oddball, no-name label brand not listed in Word’s list, click New Label. Word gives you a dialog box, complete with a preview window, for specifying your own label dimensions. (But before you go to that trouble, look carefully at the fine print on the package, where it probably says something like “Equivalent to Avery 5164.”)
Inspect your label package to find out what label model number you have; select the matching product in the “Product number” list box. Click OK.
The main document becomes an empty sheet of labels. It’s time to start dragging field names from your source document.
On the Mail Merge Manager, use the Get List pop-up button to select the database or file containing your addresses.
For example, to use your Entourage Address Book, choose Office Address Book from this menu. If your addresses are stored in an Excel spreadsheet or a tab-delimited text file, choose Open Data Source instead (then navigate to your database or data source file and open it).
If you haven’t set up your database yet, choose New Data Source and follow the steps on Creating a New Data Source.
Figure 7-35. Top: Avery 5160 is one of the most popular label products; it comes with 10 rows of three labels each. Bottom: If you’re assembling a bulk mailing and therefore need to bar code your own envelopes, click “Insert Postal Bar Code.” Word asks you to select the name of the merge field where your Zip codes are, then prints the corresponding bar code on each envelope or label. Your mail is likely to reach its recipient faster if you use these bar codes.
In the Edit Labels dialog box that appears, choose field names from the “Insert Merge Field” pop-up menu to build your address.
As shown at the bottom of Figure 7-35, use the Space bar and Return key as you go. For example, choose FirstName, insert a space, choose LastName, then press Return to start a new line. Choose City, type a comma if you like, and then choose State; add two spaces before choosing Zip code. (If you want to change the font and other formatting at this point, see the box on Editing labels.)
Click OK.
You return to your main document window, where placeholders for your labels now appear. (Click the <<abc>> icon on the Mail Merge Manager’s Preview Results pane to preview the actual names and addresses as they’ll be printed.)
If you want to further format individual labels, you can do so now using the Formatting Palette. Just select the text or the field placeholders to format them.
Load a piece of plain paper in your printer and click the “Merge to Printer” button in the Mail Merge Manager’s Complete Merge pane.
This way, you can check to see if the labels are properly aligned without wasting an expensive sheet of labels. Hold the paper printout over a label sheet and line them up in front of a window or light.
If you need to tweak your labels’ alignment, choose Create New → Labels on the Mail Merge Manager and click Details.
A dialog box pops up, displaying the dimensions and specifications of your currently chosen label model, along with boxes and arrows for adjusting them. Adjust the Top margin or Side margin to shift the text up, down, and side-to-side in order to better fit on the labels. Then print another test sheet to be sure your changes had the intended effect.
When everything’s working properly, load the labels into your printer, and click the “Merge to Printer” button again. Click Print.
Tip
Take advantage of the Merge → Custom pop-up menu (see Merging Straight to the Printer) if you have a long mailing list. Some printers tend to jam if you try to print too many pages of labels at once.
You can edit a label document by opening it, just like any main document. But because of the unique problems involved in changing a sheet of labels, Word provides a couple of special tools. To make changes to an existing label document, proceed as follows:
Open the label document.
Word opens the document and the Mail Merge Manager. (If not, choose Tools → Mail Merge Manager.)
Click the “Add or remove placeholders on labels” button.
It’s the third icon in the Select Recipients List section of the Mail Merge Manager palette. The Edit Labels dialog box opens, as shown in Figure 7-35.
Make changes to the label format.
Add or remove merge fields or change text formatting, for example, by selecting the merge fields and using the Formatting Palette. Click OK and proceed with the merge.
You can also edit labels right in the main document, which you may find easier than using the Edit Labels dialog box. The secret is in the “Fill in the items to complete your document” button on the Mail Merge Manager (the fourth icon in the Select Recipients List section of the Mail Merge Manager palette). Here’s how to use this method of label editing:
Open the label document; click the first label on the page.
Word opens the document and the Mail Merge Manager. (If the Mail Merge Manager isn’t open, choose Tools → Mail Merge Manager.)
Edit the label document.
For instance, you can drag merge fields from the Mail Merge Manager, type additional text, and format the text or field placeholders (font, color, and so on). Remember, you’re doing this only in the first label.
Click the “Fill in the items to complete your document” button on the Mail Merge Manager.
Word changes all labels on the sheet so that they match the changes you just made in the first label.
When you’re satisfied with the way things look, merge and print the labels as described on the previous pages.
Printing envelopes on computer printers has always been an iffy proposition; in essence, you’re trying to cram two or three layers of paper through a machine designed to print on sheets only one layer thick.
If your printer has guides for feeding envelopes and is envelope-friendly, so much the better. Additionally, you may find that some brands of envelope fit your printer better than others.
When you’re ready to begin, open a new blank document and follow these steps:
Choose Tools → Mail Merge Manager, and then choose Create New → Envelopes.
The Envelope dialog box opens, as shown in Figure 7-36. If you don’t care for Helvetica, Arial, or whatever, click Font to call up a Font dialog box. You can use any of Word’s fonts and effects.
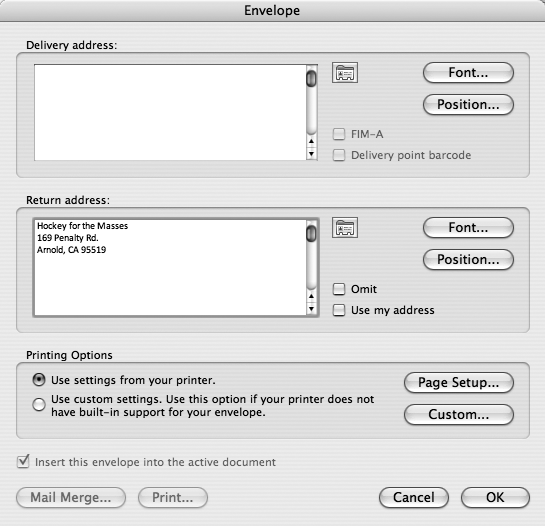
Figure 7-36. If your return address doesn’t automatically appear in the Return Address window, type in the address you want to use in the “Return address” box. Or, you can check the “Use my address” box to pull up the name and address you entered when you set up Office 2008. Turning on Omit will print the envelopes with no return address at all—so you can use preprinted envelopes or use up your supply of stick-on labels from Amnesty International.
Leave the Delivery address box empty, but include a return address if you want one.
Type your return address, or turn on “Use my address” to import your address from Entourage, or turn on Omit to leave the return address blank.
Click Position. In the Address Position window, click the arrows to move the return and delivery addresses around on the envelope, if necessary.
If the return address is too close to the envelope edges, for example, or the delivery address is too low, now’s your chance to fix it.
Click Page Setup.
Word opens your printer’s usual Page Setup dialog box. Choose the envelope size from the pop-up menu and click OK. (If you don’t see the correct size, click Cancel; under Printing Options, click the “Use custom settings” button, then click Custom. In the Custom Page Options dialog box, choose an envelope size and tell Word how you plan to feed it into the printer.)
Click OK, and then OK again to dismiss the Envelope dialog box.
Your chosen envelope format appears in the main document; it’s time to “type in” the addresses you want to print.
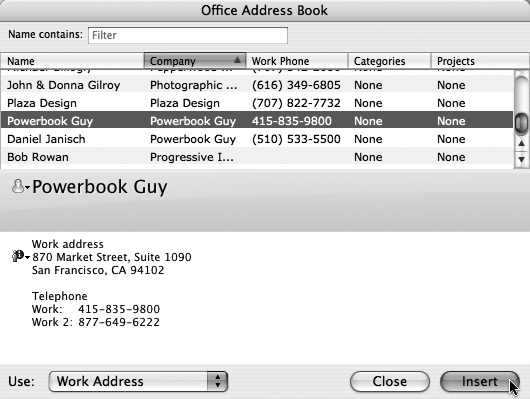
If you want to print just one address from your Entourage Address Book, click the Address Book icon at the upper right of the Delivery Address window, and proceed as shown in Figure 7-37.
If you want to run an actual mass printing of envelopes, however, do this:
On the Mail Merge Manager, choose Data Source → Get Data → Open Data Source; select and open your database.
Again, Excel spreadsheets, FileMaker databases, and tab-delimited text files are fair game. If you haven’t set up your database yet, choose New Data Source and follow the steps on Creating a New Data Source.
Drag field names from the Merge Field panel of the Mail Merge Manager into the address box of the envelope in the main document.
Add spaces and line breaks in the usual way, as shown in Figure 7-36.
Prepare your printer’s feed for envelopes; click Merge → “Merge to Printer”. Click Print.
If the envelope gods are smiling, your printer now begins to print the envelopes perfectly. (If they’re not, then you may discover that you’ll have to rotate the envelopes in the paper slot, or worst case, remove the envelope with a pneumatic tool borrowed from your local garage). Depending on your printer model, you may have to print one envelope at a time—if so, choose Current Record from the drop-down menu at the bottom of the Mail Merge Manager.