
As mentioned before, most people who are serious about creating Web pages use programs like Dreamweaver or GoLive. But Word can convert any of its own documents into a Web page, ready to “hang” on the Internet. Make no mistake: Professional Web designers will sneer at your efforts, since Word fills the resulting behind-the-scenes HTML code with acres of unnecessary computer instructions that can make a Web page take longer to load into visitors’ browsers. Furthermore, they can also render your design layout imprecisely. But when you need to create only the occasional simple Web page, or when saving money and a short learning curve are more important to you than impressing professional Web designers, Word can suffice.
Before you start working on your Web page in Word, it’s a good idea to have a plan of action. Take a blank piece of paper (really—paper and pencil work great for this!) or Word document, draw a box for each page of your Web site, and label them to figure out how many Web pages your site will have, and how they’ll be connected by navigational links. For instance, you might have a home page, an FAQ (frequently asked questions) page, a page of scanned photos, a long article on a page of its own, and a page with your contact information. Figure 9-1 shows an example sketch.
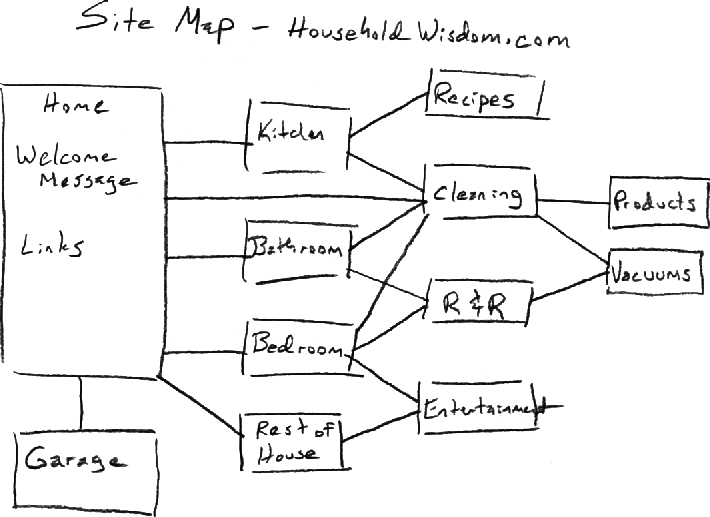
Figure 9-1. You’ll save yourself from temporary insanity if you begin your Web design with a site map sketched on paper. Draw arrows in all the directions that you’re going to link the pages together, remembering that you’ll want to link each page back to the home page, or at least to the page before it.
Once you’ve figured out which Web pages you’ll need, create individual Word documents to represent those pages. You may need to use Word’s advanced graphics and design tools—especially tables and hyperlinks—much more in a document that will ultimately become a Web page than, say, a run-of-the-mill memo. But otherwise, editing and designing a Web-bound Word document is similar to editing and designing any other Word file.
Tip
The following pages assume that you’re interested in designing your Web pages essentially from scratch. If you have Web page templates from an earlier version of Word, feel free to add them to your Home → Library → Application Support → Microsoft → Office → User Templates → My Templates folder, making them available via the File → Project Gallery command. If the Web page you have in mind fits one of those basic styles, by all means use the template to save time. See Opening Documents for more on the templates.
Keep your site’s graphic design simple. Although Word’s Web tools let you use a riot of background and font colors, nothing looks cleaner and more readable on the Web than black type on a plain, light background. Still, Word 2008 comes with a laundry list of canned presets for Web pages (and other documents), called Themes. Each theme incorporates professionally coordinated choices for font, bullet graphics, horizontal lines, headings, background colors, and other elements.
To review your options, click the flippy triangle next to the name Document Theme in the Formatting Palette (see Figure 9-2). Use the buttons above and below the six thumbnails representing the Theme’s font and color combinations. Click one of the thumbnails to select a theme. Each theme has a color scheme, a collection of coordinated colors. If you’d prefer a different color scheme, you can substitute any of the dozens of other color groupings by choosing one from the Colors pop-up menu. Similarly, change the Theme font by choosing a new one from the Fonts pop-up menu.
Word doesn’t display the background settings in the Document Theme pane. Instead, choose Format → Background to display the Background palette (see Backgrounds). As you make these changes, Word applies them to your Word document, where you’ll notice major differences only if you used Word’s built-in heading styles, picture bullets, horizontal lines, and hyperlinks. (These are the elements a theme can affect.) If you’ve already saved the document as a Web page, or if you’re in Web Layout View, you’ll also get the full effect of the background pattern, picture, or color.
Finally, after applying the theme and returning to your document, you can tailor it to your liking. Just use the Formatting Palette and Word’s other tools to change the font color, border style, and so on.
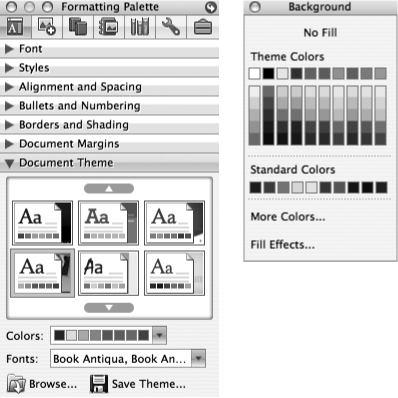
Figure 9-2. Left: The Document Theme pane of the Formatting Palette lets you choose from the dozens of pre-designed themes displayed here as thumbnails. Right: Choose Format → Background to open the Background palette in order to adjust background color or fill. If you use the Colors or Fonts pop-up menus or the Background palette to make changes to one of the existing themes, click Save Theme to preserve this combination in your My Themes folder. From now on it will be available at the top of the scrolling theme thumbnails, separated from the stock themes by a gray line.
Although a white or very light background is your best bet for Web page legibility, Word lets you choose anything, from graceful to hideous, as the backdrop for your page. It can be a solid color background, a pattern or gradient, or a picture (see Figure 9-3). If you don’t specify a background color, your visitors’ Web browsers will use a default color, which is usually white or light gray.

Figure 9-3. Click Fill Effects on the Background palette, click the Picture tab, and then click Select Picture to choose a picture file from your hard drive. If you choose a large picture it fills your Web page; if you choose a small picture, Word tiles the image across the page.
To choose a background color for your Web page, choose Format → Background; in the Background color palette, click one of the color blocks to make it the background color. You can choose a different color by clicking More Colors and using one of Word’s color pickers as described on Fill Color: Standard palette. If you choose No Fill, your background will be the default color of your reader’s Web browser.
Note
When you’re adding a background color to a Web page template that already contains a background pattern, the color overrides the pattern. To remove the color and restore the pattern, click No Fill on the Background color palette.
You can also click Fill Effects on the Background palette; you’ll be shown a wide range of fancy backdrops, from burlap to shimmering gradients. (See Chapter 19 for more on these options.) Most of them are much too busy for a Web page that you actually expect people to read. For the sake of humankind, please use background textures, patterns, pictures, and gradients sparingly—with only very light colors—or not at all. In Web page design, less is truly more. When you choose a color, it appears instantly as the background of your Web page document. Word automatically switches into Online Layout view, if you weren’t there already.
You specify the color for the text of your Web page just as you would in any Word document—for example, using the Font Color button on the Formatting Palette.
When choosing a font color, the most important thing to remember is how it will show against your background. Remember, you want a lot of contrast between the background color and the font color. Black, blue, and red are good font color choices for light backgrounds.
White text on a black background sounds elegant, but it’s not a good choice when working on a Web page in Word, since the black background shows up only in Web Layout view. When you switch to Normal view, you’ll get white text on a white background—the 21st century version of invisible ink without the whole lemon-on-paper-held-up-to-a-light thing. You lose the ability to print your page from Draft view for the same reason.
Also, be aware that some people, in a vain attempt to load Web pages faster, turn off graphics in their Web browser. (In Safari, for instance, you do this by choosing Safari → Preferences → Appearance and turning off the checkbox for “Display images when the page opens.”) Because background pictures and patterns are, in fact, graphics, readers who’ve turned graphics off won’t see them. Instead, they’ll simply see your text against their browser’s automatic background color, which is usually white or light gray—yet another reason why black, red, and dark blue are safe font colors for Web pages.
You can use any of Word’s text formatting—such as different fonts, typefaces, and paragraph formatting—in documents you’ll be saving as Web pages, but bear in mind that they may look different, or be lost completely, depending on your reader’s browser. (See Chapter 3 for more detail on text formatting.)
Word also has another special effect for use on Web pages: scrolling text. Use it with caution—since animated text, as noted earlier, strikes many Web denizens as extremely annoying. Scrolling or marqueeing text is, unfortunately, a very popular text effect on Web pages. As shown in Figure 9-4, a single dialog box lets you determine all aspects of how the text looks and scrolls.
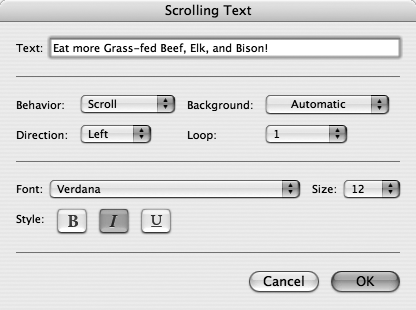
Figure 9-4. The Font pop-up menu in the Insert → HTML Object → Scrolling Text dialog box lets you apply scrolling to text in any Word font. Scrolling or “marqueeing” text rolls across the width of your Web page from one side to the other like your very own CNN news crawl.
To open this box, highlight the text you want to scroll and then choose Insert → HTML Object → Scrolling Text. Choose a font, size, and typestyle in the lower panel of the dialog box, a different background color from the Background pop-up menu, and an animation style from the Behavior, Direction, and Loop pop-up menus.
For example, Scroll makes the text roll across the screen just like the letters on the marquee of a Broadway theater. (Use the Direction pop-up menu to specify whether it starts from the left or the right.) It goes all the way across until it disappears, then reemerges at the opposite edge and starts over again. From the Loop menu, choose the number of times you want the scrolling action to take place: one through five times, or Infinite.
Slide scrolls the text to the opposite edge of the page, and then stops. Alternate means that the text bounces back and forth across the screen as though in a slow-motion game of Pong. See how easy it is to be annoying?
Note
Please use the scrolling text feature with caution. It’s difficult to read, and often adds little to your page. People browse the Internet for information, not to exercise their eyes as they attempt to track scrolling text.
To edit your scrolling text, select the text and choose Insert → HTML Object → Scrolling Text. Make any changes in the Scrolling Text dialog box. You won’t see any text animation in Word; you have to save the result as a Web page and then open it in a Web browser.
Tip
A quick way to look at your Web page in a browser as you work on it is to save the Word document, then drag the proxy icon—the little icon in front of the document name in the document window’s title bar—to your open browser window or the browser’s icon in the Dock. Using this method, you can view the page in browsers that aren’t set as your default browser. It’s always a good idea to view your page in various browsers to be sure the page appears properly no matter which browser your viewer is using. To open your page in your default browser, choose File → Web Page Preview, as described on Hyperlinks.
These days, it’s a very rare Web page whose design is nothing but a single river of text running down the middle of the page. Most professional Web pages, including those at www.macworld.com, www.nytimes.com, and www.missingmanuals.com are composed of several parallel columns. Each can contain an independent flow of text, as well as such standard elements as a graphic or navigation bar.
To create this effect in Word, use a Word table, as described in Chapter 4. Aligning objects using HTML alone is notoriously difficult. But if you compose your Web page with a table, you can use its rows and columns to align the text and graphics on your page. If you hide the borders, as described in Figure 9-5, your visitors won’t even be aware that they’re viewing a table. (You can still view the gray gridline indications in Word, but they won’t show when the finished Web page is viewed in a browser.)
A single cell of your table can be extremely tall, if necessary. If yours is like a typical Web page, in fact, the entire page may be composed of a single row of the table, whose cells stretch the full height of the page. That’s perfectly OK, and it’s a clever way to get two or three parallel columns with independent text flows. (See Charts and Spreadsheets for information on creating Word tables.)
Tip
Consider using nested tables for the smaller objects in your Web page. For example, create a table eight cells long by two cells wide to hold a list of links. Fill the table, then drag it into a large cell in your main table. The main table will help align the list relative to the rest of the page. (See the list of links in Figure 9-5, for example.)
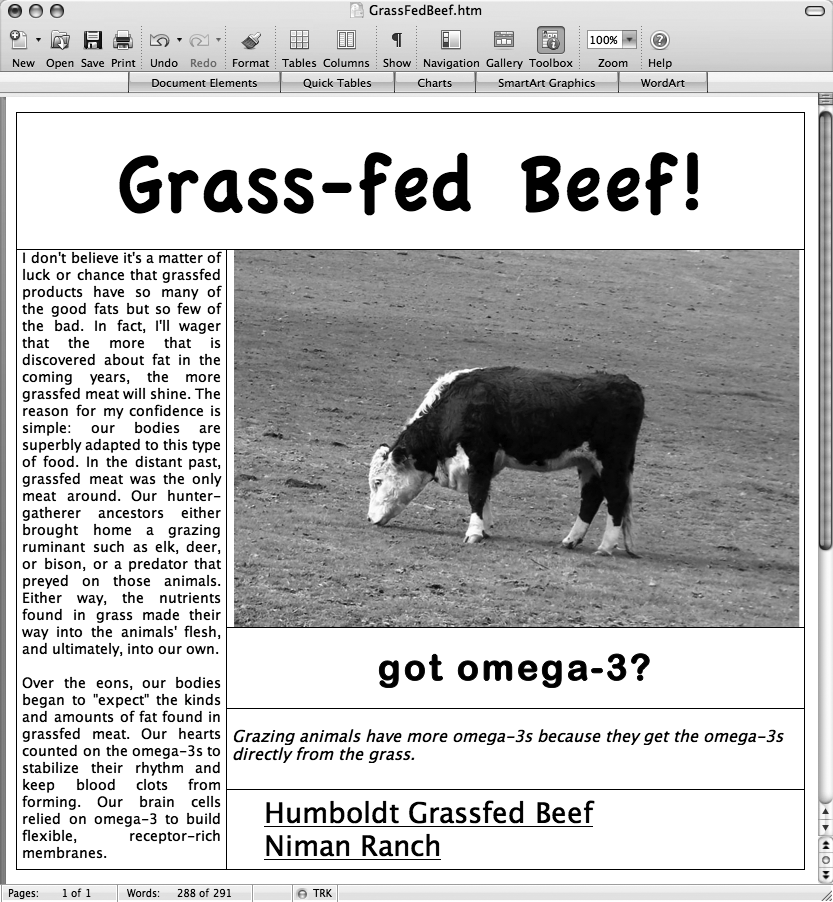
Figure 9-5. A simple Web page laid out in a Word table. The table gridlines properly line up the text blocks, bullets, and links with each other. To make the black lines disappear, choose Table → Table Properties; click the “Borders and Shading” button; click None, OK, and OK. You can also select the entire table and choose No Border on the “Borders and Shading” panel of the Formatting Palette.