
Most of Entourage’s calendar is intuitive. After all we’ve been using calendars of one kind or another successfully for centuries.
In many ways, Entourage’s calendar isn’t very different from those analog versions we leave hanging on our walls for months past their natural life span. But Entourage has several advantages over paper calendars. For example:
Entourage can automate the process of entering repeating events, such as weekly staff meetings, birthdays, anniversaries, or Pilates classes.
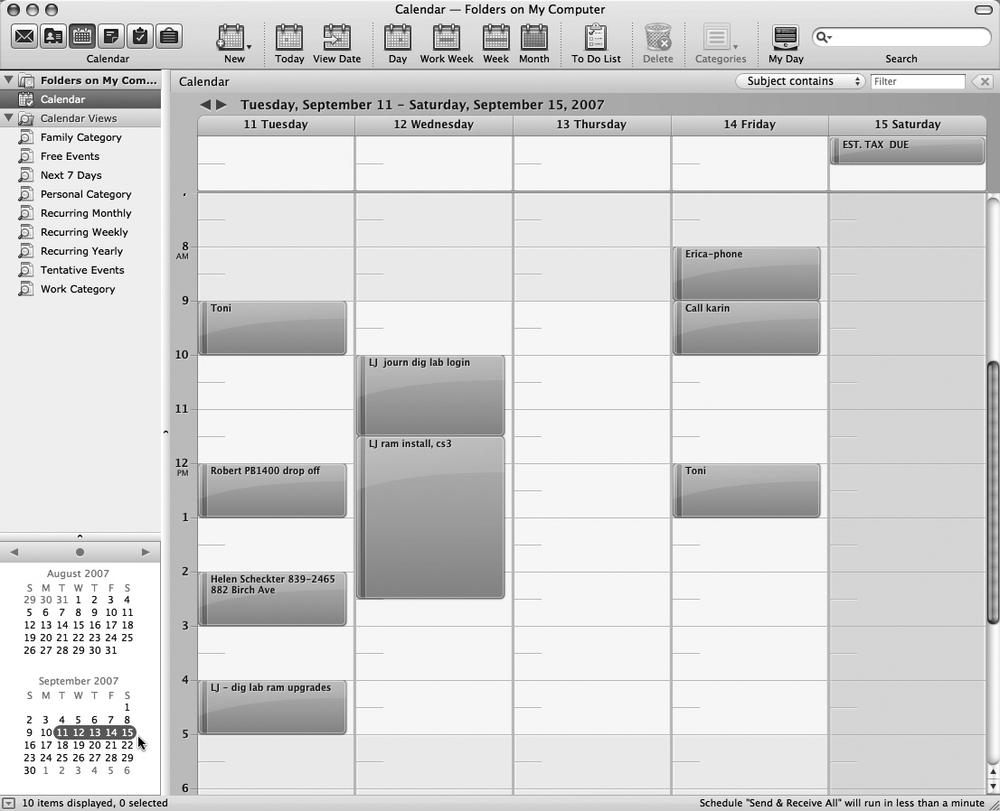
Figure 11-3. When you drag the cursor across a set of dates in the mini calendar, the main calendar shows nothing but those days. You can select as many as six weeks worth using this method. Just drag from the first date to the last date you want to see—you can even drag across months. Entourage displays today’s date in red and underlined on the mini calendar in an effort to keep you from coming unstuck in time.
Entourage can give you a gentle nudge (with an Office Reminder in a pop-up dialog box) when an important date is approaching.
Entourage can automatically send invitations to other people to let them know about important meetings. (Let’s see one of those “Humboldt Honeys” calendars do that! )
Entourage’s calendar integrates with the Project Center by placing important project—or email follow-up, or task—dates on your calendar if you so desire.
You can record an appointment using any of several methods, listed here in order of decreasing efficiency:
When viewing a column view, such as a day, week, or work week, drag vertically through the time slots that represent the appointment’s duration, and then double-click within the highlighted area (see Figure 11-4).
Double-click a date in any of the calendar views.
Click the New toolbar button.
Choose File → New → Calendar Event (or press ⌘-N).
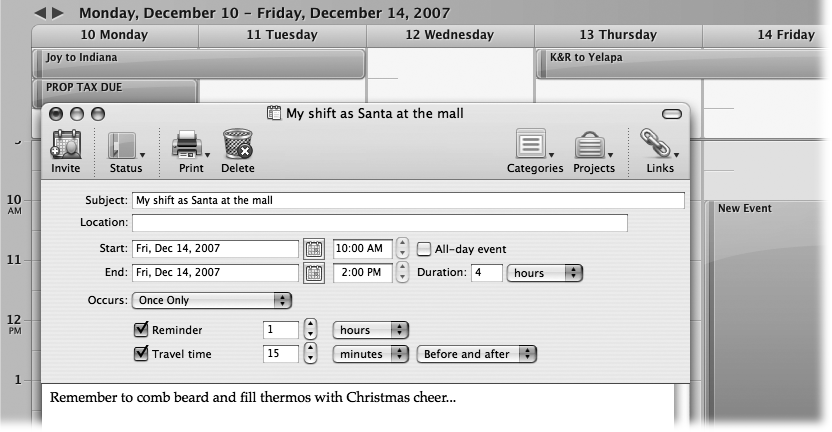
Figure 11-4. You can open a window that creates a new event by double-clicking a highlighted swath of hours on any column view (background). With the help of the calendar event window, shaping an event to do exactly what you want is easy. By twiddling a few of these knobs and buttons, you can change a 10-minute event into an all-week extravaganza; and you can invite all your closest friends and co-workers, and set a reminder so it you don’t miss it.
In each case, Entourage brings up a New Event window, depicted in Figure 11-4. Here’s an unusually elaborate example of how you might enter an appointment:
Type a name for this appointment into the Subject line.
For example, you might type Pebble Beach Concourse.
Press Tab to jump to the Location field. Specify where this event is to take place. For example, Carmel.
This field makes a lot of sense; if you think about it, almost everyone needs to record where a meeting is to take place. You might type a reminder for yourself like My place, a specific address like 212 East 23, or some other helpful information like a contact phone number or flight number.
You can also leave this field empty if it’s not important to you.
Press Tab. Specify the starting date, if necessary.
If you began this entire exercise by double-clicking a date in Entourage’s month view, or by dragging through time slots on one of the Entourage calendar displays, then skip this step, since Entourage has automatically filled in the date you indicated. Helpful, no?
Otherwise, you can change the date here in two ways. First, you can edit the date displayed here, using this format—12/12/02—to specify the date. (If you omit the year, Entourage assumes you mean this year.)
Or you can prefer to click the tiny calendar button next to the Starting Date field. A mini calendar window appears; move to the month you want by clicking the arrows at the top, and then click the date you want (or the Today button) to close the mini-calendar. You’ve successfully filled in the Start and End date fields.
Press Tab. Specify the ending date.
Most events, thank goodness (unless it’s a week of swimming with dolphins in Bimini), start and end on the same day. Entourage saves you time by making that assumption, and setting both Start and End dates to match. (The only time you have to type the ending date manually is if it’s later than the starting date.) Entourage lets you type an ending date earlier than the starting date for an event, but complains only when you actually try to save the event.
Turn off the “All-day event” checkbox, if necessary, and then specify the Start and End times.
If you opened this dialog box by dragging through time slots on the Entourage calendar, then skip this step. Like the ideal administrative assistant that it is, Entourage has already filled in the Start and End times for you.
Otherwise, turn off “All-day event” (unless, of course, this event really will last all day; we’ve all had meetings like that). Doing so prompts the Start and End time boxes to appear. You can adjust the times shown here by typing, clicking buttons, or a combination of both. For example, start by clicking the hour, then increase or decrease this number by clicking either of the arrow buttons or by pressing your up and down arrow keys. (Of course, you can also type a number.) Press Tab to highlight the minutes, and repeat the arrow buttons-or-keys business. Finally, press Tab to highlight the AM/PM indicator, and type either A or P to change it, if necessary. (You can also press the up or down arrow keys to toggle between AM and PM.)
Tab once again to highlight the End time field.
By now, you’re probably exhausted just reading the steps required to set up, say, a lunch meeting. That’s why it’s usually quicker to begin the appointment-entering process by dragging vertically through an Entourage calendar column display; it spares you from having to specify the date and time.
Use the Occurs pop-up menu if an event will recur according to a predictable schedule.
The Occurs pop-up menu contains common options for recurring events: once a week, on a particular day of every month, on a particular day each year, Every Day, or Every Weekday. You can select any of these items, or move immediately to the Custom option, which opens the Recurring Event window (Figure 11-5). Use the Recurring Event window to indicate how often the event recurs (Daily, Weekly, Monthly, or Yearly). Once you’ve clicked the appropriate button, an additional set of controls appears, offering such plain-English variations as “Every January 14,” “The second Tuesday of January,” “The third Tuesday of every _ months,” and so on.
Figure 11-5. If you’ve indicated a Weekly repeat, you can specify that this event takes place more than once a week by turning on the days-of the- week checkboxes. This event—a running workout—takes place Sunday, Tuesday, and Thursday of each week, rain or shine.
The bottom part of the box lets you indicate how long this event will keep repeating. If you click “No end date,” you’ll be stuck with seeing this event repeating on your calendar until the end of time (a good choice for recording, say, your anniversary—especially if your spouse consults the same calendar). You can also turn on “End after _ occurrence(s),” a useful option for the kids’ springtime soccer practice. You can also turn on “End by”, and specify a date that will cut off the repetitions; use this option to indicate the last day of school, for example.
Click OK when you’ve finished setting up the repetition. To the right of the Occurs pop-up menu, there should be a plain-English summary of the options you set up.
Set a reminder, if you like.
The Reminder section of the dialog box lets you set a reminder that pops up on your screen at a preset time. (Office Reminders have to be turned on for reminder windows to appear; for more about Office Reminders, see Office Reminders.) You can specify how much advance notice you want for this particular appointment. For your favorite TV show, you might set up a reminder only five minutes before air time; for an important birthday, or anniversary you might set up a 10-day warning to allow yourself enough time to buy a present, mail a card, or book a flight to Puerto Vallarta. (Entourage starts out proposing 15 minutes in advance for every reminder. You can change this setting in Entourage → Preferences → General Preferences → Calendar.)
If the event requires getting to the church on time, for example, turn on “Travel time” and then enter the amount of cushion you want to leave yourself for traffic and the like.
Tip
If a reminder pops up when you’re concentrating on something else, click the Snooze button (Figure 11-6) to erase the reminder from your screen for the default snooze time (which you can change in Entourage → Preferences). Use the Snooze button’s pop-up menu to eradicate this reminder for some other period of time. If you’ve already taken care of this event or just decided that you don’t like your computer bossing you around, click the Dismiss button—or if you’re being bugged by several reminders on your screen at once use the Dismiss button’ s pop-up menu and choose Dismiss All.
Figure 11-6. The Office Reminders program, which comes with Office 2008, handles reminders for events and tasks. When a reminder comes due, Office Reminders pops a little window in front of whatever else is on your screen. You can then choose to deal with the matter immediately, and drop what you’re doing to run out the door—or perhaps first click the calendar icon to open the event and check the details.
Press Tab. In the white, empty notes area, type or paste any helpful text.
Here’s your chance to customize your calendar event. You can add any text that you like in the notes area—driving directions, contact phone numbers, a call history, or whatever. Several pages’ worth of information can fit here.
If you choose to use the Invite feature described on Deleting Events, Entourage includes the text you place here in the email invitations you send out.
Specify a category or project for this appointment, using the pop-up menu at the right end of the toolbar.
See Turn Office Reminders sounds on or off to read more about categories. For now, it’s enough to note that Entourage’s color-coded categories are helpful in distinguishing your calendar events at a glance. Family events might show up in blue, for example, and work events in red.
For more information on the Project Center, see Project Center. The short story: Assigning an event or appointment to a project displays the appointment with the project, and color-codes the appointment with a circle in the color you assigned to the project.
Close the event window if you’ve previously instructed Entourage to always save your appointments. Otherwise, press ⌘-S-, then close the event window (by pressing ⌘-W, for example).
Your newly scheduled event now shows up on the calendar, complete with the color coding that corresponds to the category you’ve assigned. (In month views, the text of the event itself reveals the color; in column views, the block of time occupied by the event reflects its category color.) Appointments that last longer than one day (such as vacations) appear as category-colored banners that stretch across squares on the month view; in column views, they appear just beneath the date at the top of the column (see Figure 11-7).
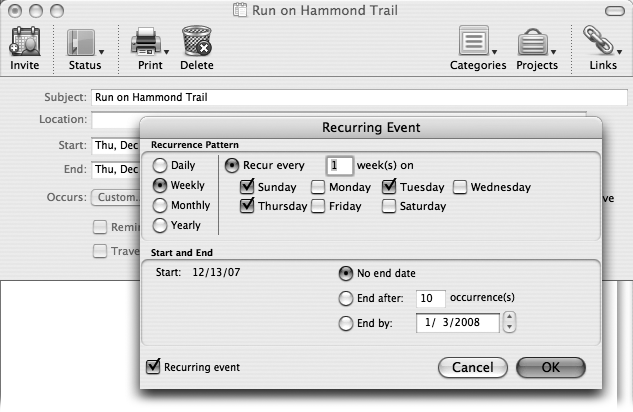
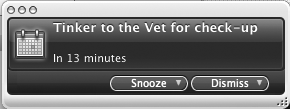
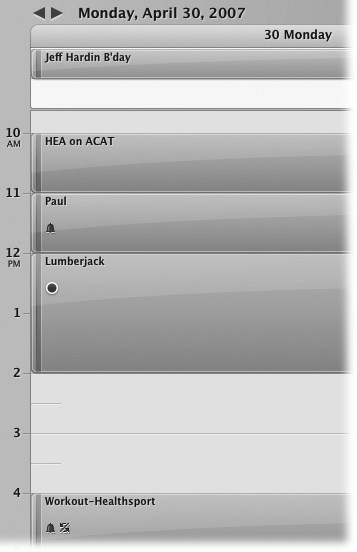
Figure 11-7. After you’ve created your event, it dutifully appears in your daily calendar nestled among your other calendar events. This column view shows All-day events (or banner events) at the top of the calendar, above the start of your day. Then, each event shows up as a colored box in the column. If an event has a reminder, a small bell icon appears in the box; if the event contains a note, it shows a notepad icon; if the event is recurring, it shows two arrows in a yin-yang arrangement; and if you’ve assigned an event to a project, a colored bullet alerts you to its status. (Events that are 30 minutes or less don’t have room to display these icons.)