
Chapter 9
Getting to Know Microsoft PowerPoint
IN THIS CHAPTER
![]() Using different views
Using different views
![]() Considering the 10/20/30 rule for your presentation’s content
Considering the 10/20/30 rule for your presentation’s content
![]() Creating an outline of your presentation
Creating an outline of your presentation
PowerPoint is the Office app you use to create presentations, also known as slide shows. We’d be surprised if you haven’t seen someone using PowerPoint to deliver a message to a group at some point in your life. Heck, kids have been using PowerPoint for presentations at school for years.
A PowerPoint presentation is a series of slides that contain text, graphics, video, sound, or a combination of any of these elements. You can display everything on a slide all at one time or introduce individual items on a slide one at a time. You can also animate the transition from one slide to the next. Used judiciously, PowerPoint creates attractive, appealing, and dramatic slide shows that you can use to sell, convince, persuade, inform, entertain, and more. Put another way, when you have a point to make, PowerPoint helps you make it memorable.
You can share a PowerPoint presentation with other people in many ways. You can
- Project a presentation onto a large screen for a large audience.
- Show a presentation on a TV or an external monitor connected to your Mac.
- Broadcast a presentation wirelessly to a streaming device, such as an Apple TV or a wireless projector.
- Display a presentation on your laptop or desktop computer screen for a smaller audience.
- Save a presentation as a video file, a Photos album, or a PDF document you can share with other people.
- Share a presentation with others via websites such as SlideShare (
www.slideshare.net/) or authorGEN (www.authorgen.com) or save it as a video file and upload it to YouTube (www.youtube.com). - Print the presentation so that you can provide it to others as a hard copy (sans any audio or video you’ve added, of course).
Furthermore, all PowerPoint files you create on the Mac work fine in PowerPoint for Windows, and vice versa.
In this chapter, we introduce you to the latest Microsoft PowerPoint for Mac and get you comfortable with its interface elements and how they work. You explore PowerPoint menus, the ribbon, toolbars, and palettes; check out the various views; find out how to navigate the program; and understand how to get a presentation started by organizing your thoughts in an outline.
Creating PowerPoint presentations isn’t hard, but creating good ones takes some thought and planning. Don’t worry: If you read the entire chapter, you’ll know what you need to create a decent slide show — and how to avoid goofing up. So, without further ado, go ahead and start working with PowerPoint.
Viewing Slides with Various Views
You can view your work in PowerPoint in seven ways: normal, slide sorter, slide show, notes page, outline (discussed at the end of this chapter), reading, and presenter views. The program also has three master views — slide, handout, and notes — which we cover in Chapter 10.
You can choose any view from the View menu, or you can click the icons on the right side of the status bar of every document window to easily switch to any of the four primary views (normal, slide sorter, reading, and slide show), as shown in Figure 9-1. (That’s pretty good thinking on Microsoft’s part because these four views are the ones you use most often.)
The following sections take a closer look at each view.

FIGURE 9-1: These icons invoke the four views used most often in PowerPoint.
Normal view
Normal view, shown in Figure 9-2, is your workhorse view and the one where you’ll probably spend the most time.
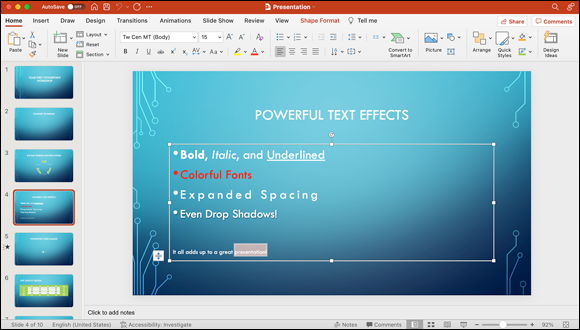
FIGURE 9-2: In normal view, you do most of the work on your slides.
In normal view, you edit and format the text on your slides and arrange objects — text boxes, graphics, or both — on your slide. Note that in Figure 9-2, Slide 4 is selected in the left pane, which is known as the Slides pane. So Slide 4 is what you see and work on in the right pane. To edit a different slide, you just click it in the left pane and it appears in the right pane, ready for editing.
To make the Slides pane wider or narrower, first click the bar separating the left and right panes (refer to Figure 9-2). Then drag to the right to make the pane wider or drag to the left to make it narrower.
Also note that, in contrast to Word, which lets you type text directly into a document, all text on a PowerPoint slide is contained in text boxes. In Figure 9-2, for example, the text box in the slide is selected, so we can use its handles to enlarge, shrink, or rotate it. Also, the last word of text in the text box is selected, so we can apply font and paragraph formatting to the word.
We tell you much more about normal view in later pages and chapters, so we're leaving it at that for now.
Slide sorter view
Slide sorter view, shown in Figure 9-3, is just what its name implies — the view used to rearrange the order of your slides.
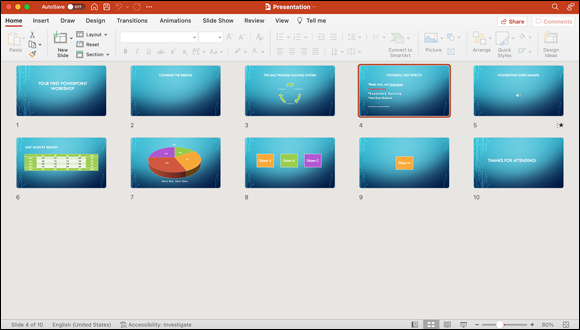
FIGURE 9-3: Slide sorter view lets you rearrange the order of your slides.
Just click the slide you want to move, drag it where you want it, and drop it there. It couldn’t be easier.
 If you hold down the Option key, dragging a slide (rather than moving it) creates a duplicate of it. This is standard operating procedure in the Mac world when you’re duplicating something.
You can also drag and drop slides in the left pane of normal view to reorder them. But reordering your slides is much easier when you can see all of them at the same time, as you can in slide sorter view.
Slide show view
Slide show is the view you use to present your slide show to others. When you switch to this view, PowerPoint hides everything else — the menu bar, document windows, toolbars, palettes, and other elements — and your active slide takes over the entire screen, as shown in Figure 9-4.
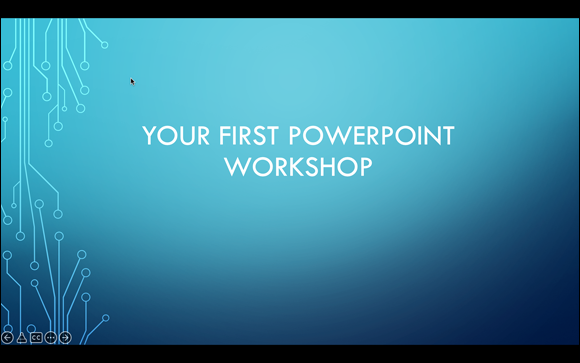
FIGURE 9-4: Slide show view: a full-screen rendition of your slides.
You can find out in Chapter 12 much more about the features you can use in your slide shows. For now, we want to tell you just one more thing — how to get out of slide show view.
You can do so in three ways:
- Press the Esc key on your keyboard.
- Click the options icon (a circle containing an ellipsis) in the lower-left corner and then select End Show at the bottom of the menu, as shown in Figure 9-5.
- Right-click anywhere on the slide and then choose End Show from the pop-up menu.
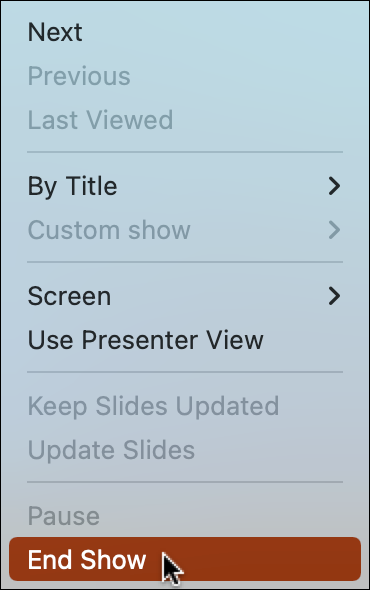
FIGURE 9-5: Use this menu to get out of slide show view.
Notes page view
You can add notes to any slide, if you want. Notes page view displays your slide above a large area where you can type those notes, as shown in Figure 9-6. Heck — fling caution completely to the wind and drag graphics there, too!
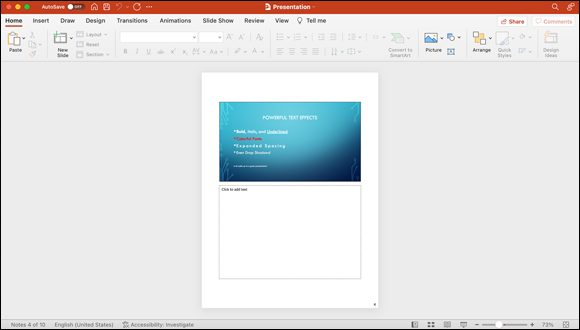
FIGURE 9-6: Notes page view = slide + notes.
You can also add notes in normal view, but the notes area is much, much smaller. To clarify, it’s a very tiny area below the active slide. If your notes are longer than a few sentences, notes page view is a better bet.
The formatting and look of the notes pages is determined by the notes master, which we describe in Chapter 10. We also tell you more about working with notes in Chapter 11.
Presenter view
Presenter view, which is what the presenter sees on a secondary screen while slides are displayed on the primary screen, is shown in Figure 9-7. This view has a set of tools that provide additional control over your slide shows.
You can find out in Chapter 12 how to use these tools to deliver better presentations.
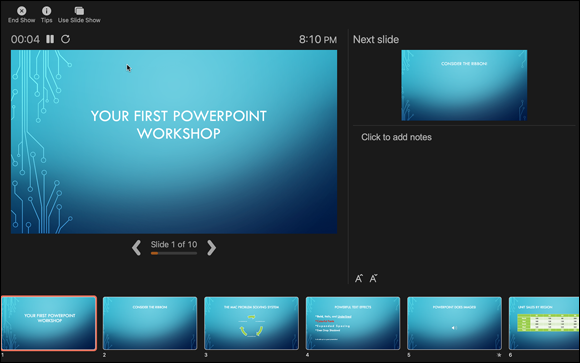
FIGURE 9-7: Presenter view makes presenting your slides easier than using slide show view.
Reading view
Reading view, shown in Figure 9-8, is basically a simple way to read through your slide show without being in presenter or slide show view. A resizable full-screen window opens when you enter reading view; simply click each slide to continue to the next.
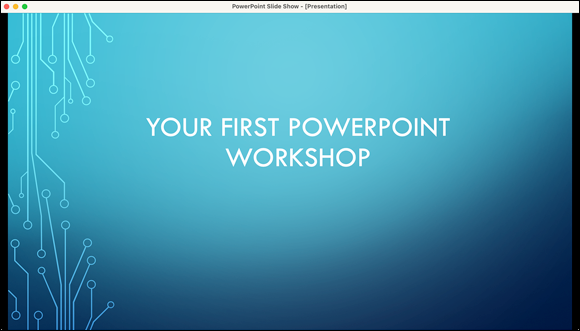
FIGURE 9-8: Just click a slide to progress through your slide show in reading view.
You can exit reading view in a couple of ways:
- Press the Esc key on your keyboard.
- Click all the way through each slide until the reading view window closes and you’re returned to the view of your slides you were using before entering reading view.
 If you click the red dot in the upper-left of the reading view window, PowerPoint thinks you want to close the entire presentation. If you don’t want to exit the presentation, click the Cancel button when prompted to save any changes.
Planning Your Presentation: A Few Tips for Making Your Slide Shows Better
The rest of the PowerPoint chapters focus on designing slides and slide shows and delivering presentations. In this section, we offer some food for thought before you start creating presentations.
Use the 10/20/30 rule
Allow us to pass along some excellent PowerPoint advice from someone who has probably seen more PowerPoint presentations than anyone we know. We are talking about Guy Kawasaki, the former Apple evangelist and founder of Garage Technology Ventures. In his opinion, every presentation should adhere to the 10/20/30 rule:
A PowerPoint presentation should have 10 slides, last no more than 20 minutes, and contain no font smaller than 30 points.
Check out Guy’s website at www.guykawasaki.com, and also give a listen to his fascinating podcast, Guy Kawasaki’s Remarkable People, on Apple’s Podcasts app.
Guy’s three suggestions make a lot of sense:
- Use the fewest number of slides possible to convey your message.
- Take as little time as you can to make your points.
- Be aware that text that’s smaller than 30 points is hard to read from a distance and may not get your ideas across.
We suggest that you give the 10/20/30 rule some thought as you create your PowerPoint presentations. It certainly isn’t the only school of thought: Some people believe that slides should have no bullets, for example, and others believe that presentations should have no slides. And, you’ll surely want to (or need to) violate one or all of these rules.
Start with an outline
PowerPoint provides an outline mode that you can use to develop the first draft of your presentation, and we recommend that you use this mode. If you just dive in and start creating slides, you’re liable to spend too much time making them look pretty and not enough time thinking about the message you’re trying to deliver.
By using an outline, you can focus on organizing your thoughts and continue to refine text in the outline until you’re satisfied that it gets your points across clearly. After you’re happy with the outline, you can start turning it into slides. But until the prose is perfect (or close to it), we suggest that you don’t even think about slides.
To create an outline, you can either start a new PowerPoint document by choosing File ⇒ New Presentation or open a presentation you’ve already created. Next, select Outline view from the View menu.
Outline view, shown in Figure 9-9, displays the text content of your slides in outline format in the left sidebar. This view doesn’t show any graphics, freeing you up to see only the text they contain for better reading and organization.

FIGURE 9-9: Outline view displays an outline of your slides on the left side.
Just click to the right of the first slide icon (where we typed Your First PowerPoint Workshop in Figure 9-9) and start typing. Press Return at the end of each topic. To make a topic subordinate to the item above it, press the Tab key. To elevate the topic, press Shift+Tab.
Or, if you’re more comfortable using the mouse than the keyboard, move the cursor over the box to the left of any slide title, topic, or subtopic. After the cursor is properly positioned over the box, it changes into the move cursor, which looks like a crosshair with arrows pointing up, down, left, and right. When the cursor changes, click and drag to the left or right to indent or unindent, respectively, or drag up or down to move the item to a different location in the outline.
Note that whatever text you type in the outline in the left pane automatically appears on the slide in the right pane. We suggest that you pay no attention to the slide for now. Just type the words and arrange them into slide titles, topics, and subtopics. Keep working on your outline until you feel that it tells the story you’re trying to tell in the fewest possible slides and words.
Finally, you can import slides from an outline you’ve already created in Word. (Note that the Word document must be saved in Rich Text Format, or RTF.) After you decide on the place in the PowerPoint Outline pane where the imported material should start, click the slide at the spot where the slides should be imported. In the menu at the top of the screen, choose Insert ⇒ Slides From ⇒ Outline, and then select the outline file on your computer. Just remember to format the headline for each slide with the Heading 1 style and to format bullet points with Heading 2 through 9 styles before you save the Word document. Text that isn't styled with one of the Heading styles won't appear in PowerPoint.
Now you can start thinking about what you want your slides to look like, which, not coincidentally, is the topic we cover in the rest of Part 3.