
Chapter 12
Presentation Prowess
IN THIS CHAPTER
![]() Maximizing your presentation by using menus, toolbars, and tools
Maximizing your presentation by using menus, toolbars, and tools
![]() Getting the most out of the proofing and research tools
Getting the most out of the proofing and research tools
![]() Adding hyperlinks to your slides
Adding hyperlinks to your slides
![]() Narrating your slides
Narrating your slides
![]() Setting the timing on your slides
Setting the timing on your slides
![]() Using the PowerPoint presenter tools to enhance your presentation
Using the PowerPoint presenter tools to enhance your presentation
This chapter moves beyond merely creating a basic PowerPoint presentation and looks at ways to make the process better, faster, and easier, along with providing advice on how you can improve the presentations you create.
The bulk of the chapter describes a handful of tools that make PowerPoint easier to use or that help you create better PowerPoint presentations. The good news is that many of these tools work the same as their counterparts in Microsoft Word. So, if you’re a Word user, you may already know how these tools work. (See Chapters 4 through 8 if you want to know more about working with Word.)
The chapter ends with some tips for adding panache and style to your live presentation.
Working with the Basic PowerPoint Tools
You may already be familiar with some or all of the tools discussed in the following sections: customization, spelling and grammar checking, researching, revision tracking, and templates. We remind you briefly of what each tool does and where to find more information in earlier chapters.
Ribbon and Quick Access toolbar customization
Customizing PowerPoint is easy: You can rearrange tabs and tab groups on the ribbon and add or delete most commands in custom ribbon tabs. You can also add, delete, or rearrange commands on the Quick Access toolbar. In Chapter 3, we cover customizing in all your Office apps, but in case you don’t feel like flipping to that chapter, let’s review it here.
Customize ribbon tabs and tab groups by rearranging them
Here are the steps for rearranging ribbon tabs or tab groups:
- Choose PowerPoint ⇒ Preferences to open the PowerPoint Preferences dialog.
- Click the Ribbon & Toolbar button.
-
Select the Ribbon tab near the top of the dialog.
As shown in Figure 12-1, the dialog is divided into two sections: Choose Commands From and Customize the Ribbon.
- On the Customize the Ribbon pop-up menu, select an option.
-
Click the tab you want to move and drag it to its new location in the list.
You can also rearrange tab groups that reside in tabs. However, you can’t rearrange commands or move them from one tab or tab group to another.
- Click the Save button in the lower right to save your changes.
Note in Figure 12-1 that the main tabs in the tabs list might also include tab groups, which are subcategories within the tab. For example, in Figure 12-1, we expanded the Home tab so you can see the Clipboard, Font, Paragraph, and other tab groups listed below it.

FIGURE 12-1: Rearrange ribbon tabs and commands in PowerPoint Preferences.
 Display or hide ribbon tabs and tab groups by selecting or deselecting the check box to the left of their names.
Creating ribbon tabs and tab groups
Another level of customization is creating custom ribbon tabs and tab groups. To do so:
- Choose PowerPoint ⇒ Preferences to open the PowerPoint Preferences dialog.
- Click the Ribbon & Toolbar button, and then select the Ribbon tab near the top of the dialog.
-
Click the + button at the bottom of the tabs list on the right, as shown in Figure 12-2, and choose New Tab from the menu.
If you want to create a tab group instead of a tab, choose New Tab Group from the menu.
- Select the New Tab (Custom) that now appears in the tabs list.
- Click the options icon (circled ellipsis) at the bottom of the tabs list, and select Rename from the menu.
- In the Display Name field, enter the desired name in and then click Save.
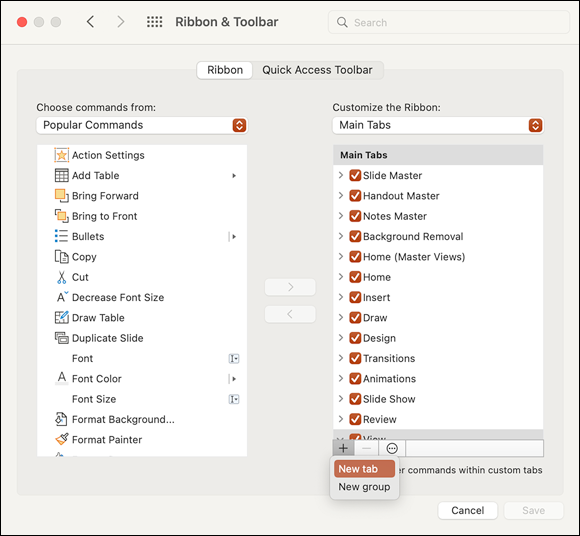
FIGURE 12-2: Create a custom ribbon tab by clicking the + button.
Customizing the Quick Access toolbar
The Quick Access toolbar is a holding place for tools you use frequently in your presentation. The tools it provides are the same in every window.
You can find the Quick Access toolbar, shown in Figure 12-3, at the top of every presentation window, just above the ribbon and to the immediate right of the red, yellow, and green buttons in the top left.

FIGURE 12-3: The Quick Access toolbar provides quick access to frequently used tools.
Follow these steps to customize the Quick Access toolbar:
- Choose PowerPoint ⇒ Preferences to open the PowerPoint Preferences dialog.
- Click the Ribbon & Toolbar button, and then select the Quick Access Toolbar tab near the top of the dialog.
- In the Choose commands from pop-up menu, select an option. Scroll through the list of available commands, and then click to select the one you want.
-
Click the > in the middle of the dialog, shown in Figure 12-4, to add the selected command to the Customize Quick Access Toolbar commands list.

FIGURE 12-4: Customize Quick Access toolbar commands in PowerPoint Preferences.
To remove a command from the Quick Access toolbar, select it in the Customize Quick Access Toolbar list and then click < in the middle of the dialog. - Drag and drop commands in the order you would prefer them to appear in the Quick Access toolbar.
- Click Save in the lower-right corner to save your changes.
Proofing and reference tools
The spelling checker in PowerPoint works the same as the one in Word, as do many of the reference tools — the thesaurus, encyclopedia, dictionaries, and Translator tools. If you need help using any of these tools, refer to Chapter 6.
The one thing Word has that PowerPoint doesn’t is grammar checking. If you aren’t confident of your grammatical prowess, you might want to export your presentation in a format that Word can relate to and use the Word grammar checker on the text in your slide show. To do so, follow these steps:
- On the View menu at the top of the screen, choose Outline.
- Click anywhere in your outline in the left sidebar and choose Edit ⇒ Select All (or press ⌘ +A).
- Choose Edit ⇒ Copy (or press ⌘ +C) to copy the text to the clipboard.
- Launch Word and, if you don't see a blank document, choose File ⇒ New Document to create one.
- Choose Edit ⇒ Paste (or press ⌘ +V) to paste the text from the clipboard into the Word document.
No images, graphics, slide backgrounds, or shapes appear in Word, nor does text you’ve added to individual slides in text boxes. Only text in slide titles, lists, and other placeholders that appear on the slide master are pasted into Word.
In Word, choose Tools ⇒ Spelling and Grammar to check the spelling and grammar of the text you just pasted. When you’re satisfied with the spelling and grammar, follow these steps to paste the text back into PowerPoint:
- Choose Edit ⇒ Select All (or press ⌘ +A) to select all text in the Word document.
- Choose Edit ⇒ Copy (or press ⌘ +C) to copy the text to the clipboard.
- Switch to PowerPoint, click anywhere in the outline, and choose Edit ⇒ Select All (or press ⌘ +A) to select all text in the outline.
-
Choose Edit ⇒ Paste (or press ⌘ +V).
This step replaces the old text in the outline (before spelling and grammar checking) with the text on the clipboard.
Commenting on slides
Working with others is a good way to get multiple viewpoints and solicit feedback for your presentation materials. PowerPoint offers the Comments feature, allowing each collaborator a way to leave comments that other collaborators can read and respond to.
Before you add a comment, determine whether it should apply to the entire slide or to a particular element on the slide (such as a graphic, link, or text). To comment on an entire slide, select the slide; to comment on an element in a slide, select the element.
After you select a slide or a slide's element, you can add a comment in multiple ways:
- Choose Insert ⇒ Comment from the menu at the top of the screen. The Comments task pane opens on the right side along with a new comment box.
- Click the New Comment button on the ribbon’s Review tab. The Comments task pane opens with a new comment box.
- Click the Comments button in the upper-right of the presentation window and then click the New button in the Comments task pane that appears (see Figure 12-5) to open a new comment box.
After the new comment box opens in the Comments task pane, simply begin typing your comment. Click the paper airplane icon or press ⌘ +Enter (or ⌘ +Return) to post your comment.
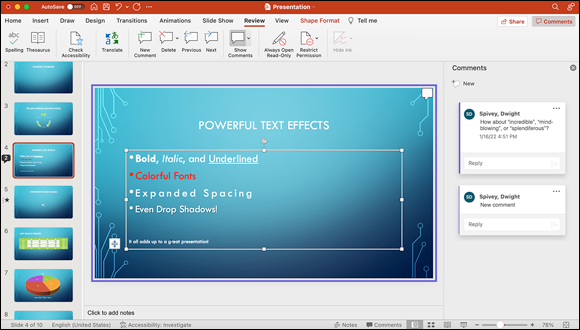
FIGURE 12-5: PowerPoint comments look like this.
Here are your options for working with PowerPoint comments:
- To move a comment that applies to the entire slide: Click and drag its speech bubble to a new location on the slide.
- To delete a comment: Click the comment, click the Delete button on the Review tab, and then select Delete from the pop-up menu.
- To hide (or show) comments: Click the Show icon (it's a toggle) on the ribbon’s Review tab.
Comments don’t appear when you present slides in slide show view, so you don’t have to hide them before you make your presentation.
To review all comments in a presentation, click the Next Comment button until you’ve seen them all.
Templates and other miscellaneous tools
A few features that work the same in PowerPoint as in Word include templates, themes, AutoCorrect, and AutoFormat.
 Don’t forget that you can create a presentation using the colors, fonts, images, and slide master items that you like and then save it as a template for reuse. If your business uses PowerPoint often, you can give a consistent look to your business presentations by creating a standardized design template for everyone to use. (If you need details on working with templates, see Chapter 7.)
AutoCorrect and AutoFormat (choose Tools ⇒ AutoCorrect Options) are as useful in PowerPoint as they are in Word and work the same, as described in Chapter 6. In fact, Word, Excel, and PowerPoint share the same AutoCorrect and AutoFormat items. So if you create a new AutoCorrect entry in Word, it works in PowerPoint (and Excel) as well.
Using Hyperlinks
When you make a PowerPoint presentation to an audience, you might want to demonstrate a feature in another piece of software or show a web page as an example. You could pause the slide show by pressing the Esc key, switch to Finder or your web browser, and show the appropriate item. But that method would be tacky in the middle of a presentation.
The alternative solution that PowerPoint offers is to hyperlink to those items directly from the slide show. For example, if you want to display your website in the middle of a slide show, you add a clickable hyperlink to the slide. Then when you're ready to show the website, you click the link and — presto! — the website magically appears.
Here’s how to add a hyperlink to a slide:
-
In normal view, select the item you want to use as the hyperlink.
In this example, we want to turn the first bulleted item on the slide,
www.boblevitus.com, into a hyperlink. -
Choose Insert ⇒ Hyperlink, or press ⌘ +K.
The Insert Hyperlink dialog opens.
- Click the Web Page or File tab.
- In the Address field, type the URL of the web page.
-
(Optional) Click the ScreenTip button in the upper-right corner of the Insert Hyperlink window and add a ScreenTip.
A ScreenTip pops up in a little box when you hover the cursor over the link.
- Click OK.
Now, whenever the slide appears onscreen during a presentation, you can click the link (ours is shown in Figure 12-6) and the web page opens in your web browser. When you're finished with the web page and close the web browser (or hide it using ⌘ +H, if you prefer to leave it open), you return to the slide show automatically.

FIGURE 12-6: The link as it appears onscreen in our slide show.
Simply closing the tab of your web page doesn’t return you to your slide show; you must quit the browser or hide it.
The Hyperlink dialog has two other tabs — This Document and E-Mail Address — which let you create links to a document or to a preaddressed email message.
You can use hyperlinks also to navigate to other slides in a presentation. See the section on creating interactivity with action buttons in Chapter 11 for details.
Recording Narration
Sometimes you may want to add narration to your slide show — to supply information or provide a more personal touch or for use as an unattended slide show. To add narration, follow these steps:
- Click the slide where you want to begin the recording.
-
Choose Slide Show ⇒ Record Slide Show (or click the Slide Show tab on the ribbon and then click the Record Slide Show icon).
PowerPoint automatically enters presenter view, with recording tools at the top of the screen, as shown in Figure 12-7.
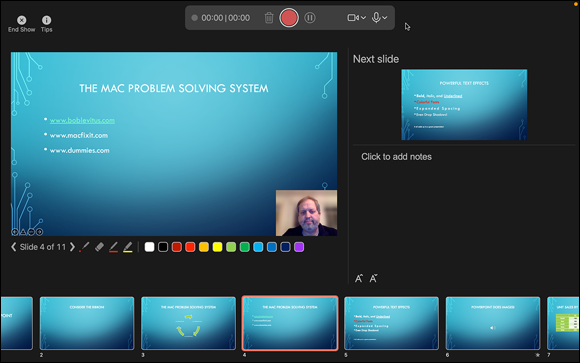
FIGURE 12-7: Recording tools appear at the top of the screen when recording a narration for a slide.
- To begin recording, click the red record button at the top of the screen.
- Speak your narration as you click the mouse or use the arrow keys to advance the slides.
- To stop the recording, click the red stop recording button at the top of the screen.
- To exit presenter view, press the Esc key (or click the End Show button in the upper-left corner).
If you’d rather show your presentation without narration, you can turn it off as needed — for example, if you have to provide updated narration while your show runs. Click the Slide Show tab and disable the Play Narrations check box before starting your show.
Making the Most of Your PowerPoint Presentation
After you’ve done everything you want to do to your presentation, it’s finally ready for the big screen. In this section, we cover some tools and tips that can help your presentation run smoothly in front of an audience.
Rehearsing and setting slide timings
Rehearsing a presentation in the privacy of your home or office — before you even think about doing it in front of a live audience — is always a good idea. You might even want to run through it more than once.
 Don’t even consider standing in front of an audience and reading slides to them. Doing so is an insult to their intelligence and makes you look like an amateur presenter. Your job as the presenter is to weave a story around the bullet points on each slide — not to read the words verbatim.
If your presentation has a time constraint, you should also rehearse your timing, to ensure that you can present all material in the time allotted.
Fortunately, PowerPoint has a tool to help you to both rehearse and time your rehearsal. To use this tool, choose Slide Show ⇒ Rehearse Timings (or click the Slide Show tab on the ribbon and then the Rehearse Timings icon). Your slide show starts immediately in presenter view. Pretend that you’re standing in front of a room full of people and begin talking as though you were on stage. Click the mouse or use the arrow keys to advance to the next slide at the appropriate time.
When you’re finished, click the End Show button in the upper-left corner to end the rehearsal. A dialog appears and informs you of the total running time for the slide show. It asks whether you want to record the new slide timings and use them when you view the slide show, as shown in Figure 12-8.
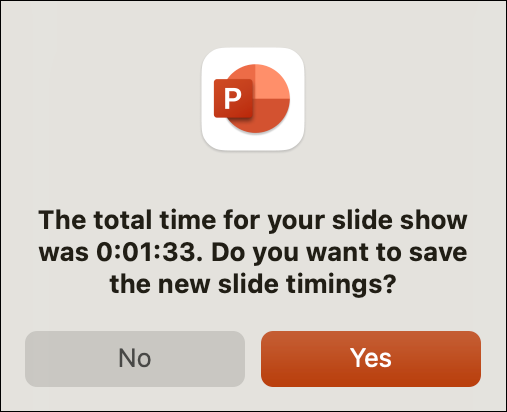
FIGURE 12-8: Decide whether or not to keep your slide timings.
Note the total time for your rehearsal. If it’s too long or too short, click No in the dialog and try again. If your presentation is the right length, click Yes to save the timing for each slide. The next time you run the slide show, the slides advance automatically according to the timings you just used in the rehearsal. If you intend to manually click the mouse or use the arrow keys to advance the slides when you’re ready (which we always do), click No. (This is ideal when you’re pausing to answer questions from your audience.)
If you save the timings and later decide that you prefer to advance slides manually, choose Slide Show ⇒ Set Up Show and select the Manually radio button in the Advance Slides section. Better still, turning off timings this way doesn’t delete them, which means you can turn them back on at any time by selecting the Using Timings, If Present radio button in the Advance Slides section. (From the Slide Show tab on the ribbon, you can turn off timings by deselecting the Use Timings check box.)
You can also use the Rehearse with Coach option to have PowerPoint’s Presenter Coach feature provide feedback to you. You’ll be alerted if you use too many filler words (such as um) or if you use culturally sensitive terms, if you’re reading the slides verbatim, and more. Give it a shot by clicking the Rehearse with Coach button on the ribbon’s Slide Show tab.
Using the presenter tools
PowerPoint offers a presenter view to help you hone your slide presentations. If your computer has two monitors connected, as it does when you’re using a projector, you can see presenter view on your laptop screen and show slides on the second screen (the projector). But even if you have only one display available, presenter view is handy for rehearsing your presentation.
A picture is worth a thousand words, so Figure 12-9 shows presenter view in action.
Here’s a blow-by-blow description of each tool:
- Thumbnails: Enables you to gain immediate access to any slide in the show. Without thumbnails, you might have to click repeatedly, or even stop and restart the show, to display an earlier or later slide out of sequence.
- Current Time: Displays the current time.
- Timer: Keeps track of how long you’ve been speaking. Click the play/pause icon to start and pause the timer, or click the reset icon (circular arrow) to reset the elapsed time display.
- Audience view: Shows the material being projected on the second screen in a two-screen setup.
- Next slide and previous slide arrows: Displays the next and previous slides. (D’oh.)
- Preview window: Shows the next slide or, if you’ve added animation to a slide, the next object.
- Notes: Displays any notes you may have added to your slides.
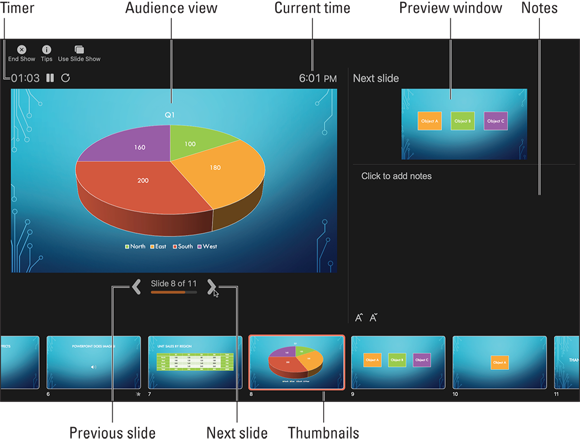
FIGURE 12-9: The presenter view screen.
Working with a single display
If you don’t have two displays, don’t fret. Although you can’t use the Presenter Tools screen during your slide show, PowerPoint has some other tools you can use.
When you’re presenting in slide show view, notice the little icons in the lower-left corner of the slide. If you don’t see the icons, move the cursor and wait a few seconds for them to appear. The icons are tools to assist you if you’re presenting on a single monitor (see Figure 12-10).
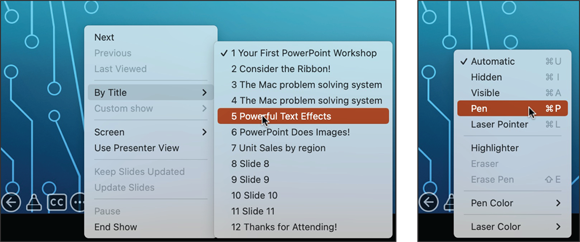
FIGURE 12-10: Several handy tools can assist you while working in Presenter mode.
Most of the menu options are self-explanatory, but here’s the scoop on what you can do with the ones that may not be crystal clear:
- Custom Show: Link to another slide show.
- Black and White Screen (in the Screen menu): Switch to a completely black or white screen. A black (or white) screen works great at the beginning of a presentation (when you don’t want to reveal anything) — or in the middle of a presentation if you’ve paused to go on a tangent and don’t want the current slide to distract the audience. Click anywhere on the slide to dismiss the screen and return to the current slide. Alternatively, you can press B on the keyboard to turn the screen black; pressing B again returns the screen to the current slide. If you prefer a white screen over black, the W key works similarly as a toggle to white and then back to the slide.
- Erase Pen: Erase anything you’ve written on a slide with the Pen tool.
- Pointer Options: The pointer is a bit more versatile than you might assume at first glance. Here’s some of what you can do with it:
- Automatic (⌘ +U): Automatically show the pointer cursor when you move the mouse, and hide the pointer after a few seconds of inactivity. This default setting is usually your best option.
- Hidden: Hide the cursor.
- Arrow (⌘ +A): Display the pointer cursor all the time, even after a few seconds of inactivity.
- Pen (⌘ +P): Switch to the pen tool, which you can use to annotate a slide, as shown in Figure 12-11.
- Pen Color: Choose the color of the pen.

FIGURE 12-11: Annotating a slide with the pen tool.