
Chapter 18
Emailing with Outlook
IN THIS CHAPTER
![]() Setting up email
Setting up email
![]() Sending and receiving email messages
Sending and receiving email messages
Sure, Outlook is a full-featured email client, but it’s about as useful as a pound of dirt until you set things up correctly. Luckily, Microsoft has made the configuration process for most of us as automatic as possible, and even the folks who have to resort to setting things up manually will find the process easier than configuring Outlook’s previous iterations. (That’s our idea of progress — limiting the amount of technobabble required to make something work.).
This chapter shows you how to set up Outlook for email, and you'll also find out how to use Outlook to send, receive, and manage email. We present it all with a minimum of fuss and no splitting headache — promise.
Setting Up Outlook for Email
When sending and receiving email are working properly, we take them for granted. But you must configure your mail client software (Outlook) properly before any sending or receiving can occur.
That’s the bad news. The good news is that after you’ve configured Outlook properly, you’ll probably never have to do it again (unless you change your internet service provider or your account information changes).
The first thing you need to do is get Outlook and your mail server connected. You can start by configuring Outlook for email. Outlook supports IMAP and POP email accounts, as well as Outlook.com, Google, iCloud, Exchange, Yahoo!, and other popular email providers.
You have two ways to set up your email: automatically and manually. The automatic way is, as you might expect, much easier and the best way to set up the aforementioned providers, so we suggest that you try it first. As a matter of fact, Outlook is going to try hard to set things up automatically, as its prompts during the account setup process do their best to hide the fact that a manual option is even available. In case the automatic process doesn’t work for you, or if your email provider requires you to set things up manually, we tell you how to perform a manual setup.
Setting up your email automatically
You use the Outlook Account Setup Assistant to configure your email access automatically. To do so, follow these steps:
-
Choose Tools ⇒ Accounts.
The Accounts pane appears in the Outlook Preferences dialog.
-
Click + (add account) at the bottom of the window, and then click New Account.
The Set Up Your Email dialog appears, as shown in Figure 18-1.
 In this chapter, we cover how to set up a typical ISP or web-based email account. If you need to connect to your company’s Microsoft Exchange server, ask your network administrator for the specific configuration settings it requires.
 - Type the email address for the account you want to configure, and then click the blue Continue button.
-
Follow the prompts to complete your account authentication.
The steps vary, depending on the type of email account you’re adding. (Sorry, but there are simply too many variations at this stage of the process to cover in this book.) You may be whisked away to another window, or perhaps even your default web browser, to enter your password information and allow Outlook permission to access your account and its features.
After you’ve successfully authenticated your account, Outlook lets you know that it's been added, as shown in Figure 18-2.
If the automatic configuration wasn't successful, Outlook displays a dialog with an error message, possibly indicating why it couldn’t access your account. Double-check that your email username and password information are correct, and then give it another try. If you continue to be unsuccessful, you’ll want to reach out to your email provider for assistance.
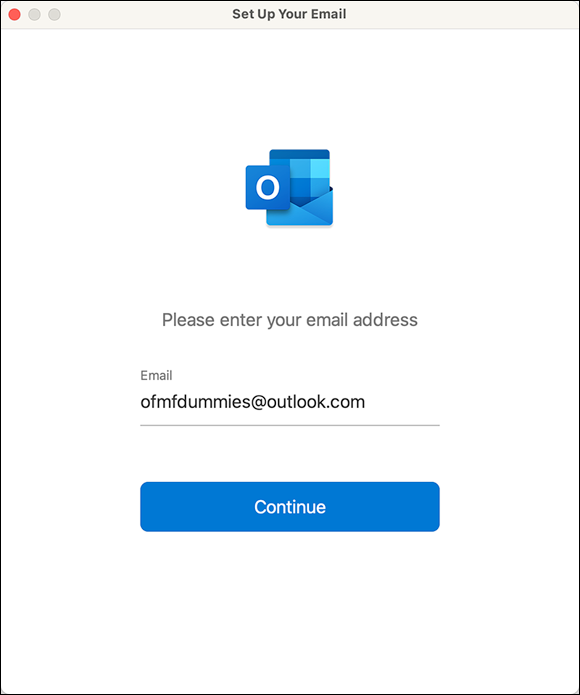
FIGURE 18-1: Enter your email account information here.
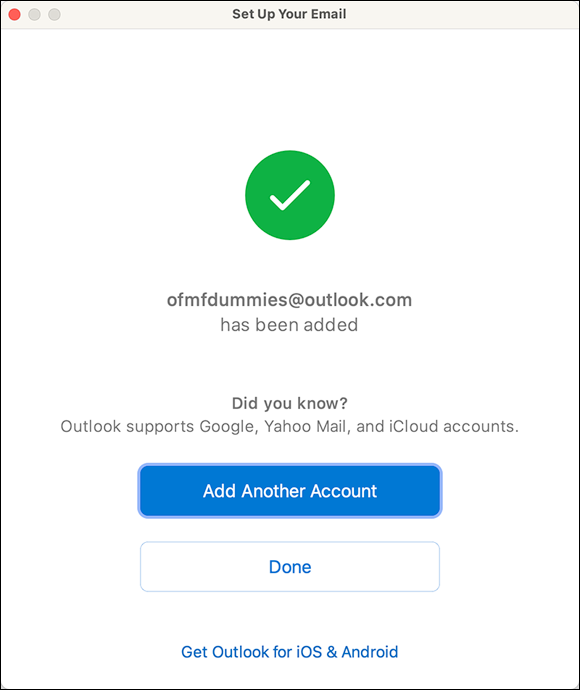
FIGURE 18-2: A successful automatic configuration has set up an Outlook account.
-
(Optional) To add another account, click the blue Add Another Account button.
Follow the prompts, as you did in Step 4.
- When you've finished adding accounts, click Done.
-
Verify that all information on the screen is accurate.
Note that your new account appears in the left sidebar of the Accounts pane, as shown in Figure 18-3.
If this was the first account you added to Outlook, it's marked as the default account. If you’ve added multiple accounts and the wrong one is set as the default, click the one you want to make the default, click the options icon (circle with an ellipsis) at the bottom of the sidebar, and click Set as Default.
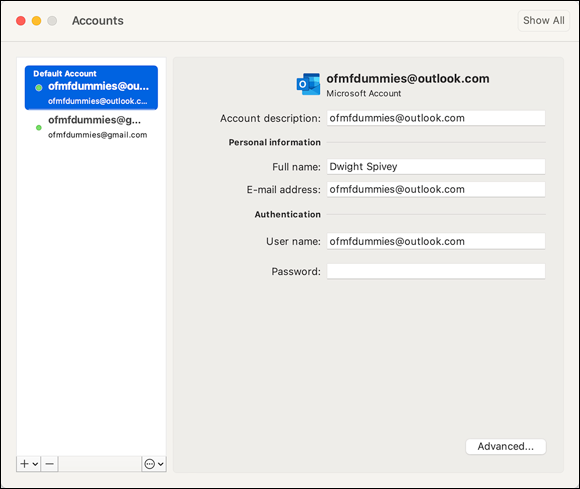
FIGURE 18-3: Email accounts that you’ve added to Outlook appear in the Accounts pane.
Don’t worry if you don’t understand some of the technical babble you may see in the Accounts pane (again, what you may see varies widely depending on the email provider). Settings such as Incoming Server and Use SSL to Connect are correct already if automatic configuration was successful. Make sure, however, that your full name appears as it should — if not, click in the Full Name field and type a moniker.
 Do you have a number of different email accounts from the same email provider (such as two iCloud accounts)? If so, you might want to add a descriptive name to each account so that they're easier to tell apart (for example, Dwight’s Work Account and Dwight’s Personal Account). Simply click in the Account Description field and type the new name.
 - To close the Accounts pane and return to the main Outlook Mail window, click the red circle in the upper-left corner.
If you ever want to change anything about this account, simply click its name in the Accounts pane (which you open by choosing Tools ⇒ Accounts). But because you just verified that everything about this account is working properly, you probably don’t want to change anything at this time.
Setting up your email account manually
A few email providers require you to manually add email accounts to email apps like Outlook. To do so:
- Choose Tools ⇒ Accounts to open the Accounts pane.
-
Click the down arrow next to the add icon (+) at the bottom-left of the Accounts pane and choose New Account from the pop-up menu.
The Set Up Your Email dialog appears.
-
Type your email address for the new account, and then click the Continue button.
If Outlook is unable to configure the account automatically, the screen shown in Figure 18-4 appears, with a list of email providers and an IMAP/POP option.
- To continue manually, click the IMAP/POP button.
-
In the Type pop-up menu, choose the type of account you want to set up: IMAP or POP.
See the nearby sidebar “How to find information about your email account” for tips on locating your account type and other information.
- Fill in the fields shown in Figure 18-5:
- Email Address: The email address for this email account, which you entered earlier.
- Username: The name you use to log in to your email account (not your full name, most likely). It appears in the From field in outgoing email messages, so don’t get cute here.
- Password: The password for this email account, which you entered earlier.

FIGURE 18-4: Click the IMAP/POP button to manually add your email account.
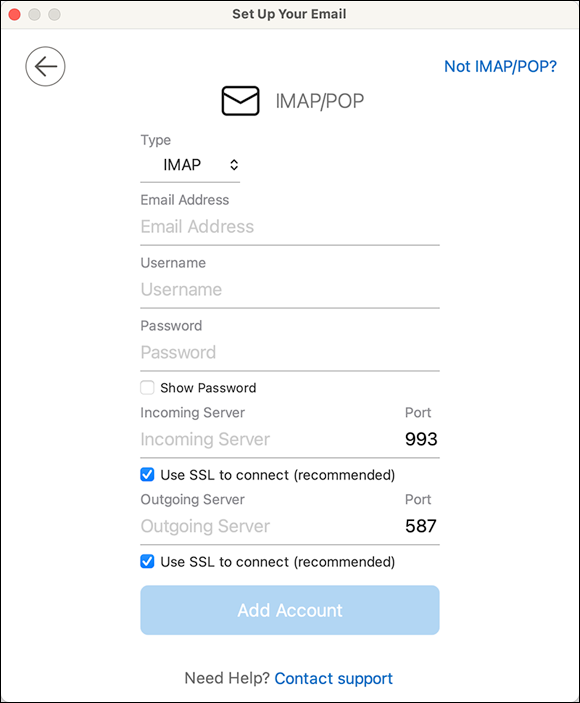
FIGURE 18-5: Additional settings appear when you add an email account manually.
- Incoming Server: The name of the mail server that receives your mail.
-
Outgoing Server: The name of the SMTP server that sends your mail.
Filling in the Incoming and Outgoing Server fields might be tricky. If you don’t know the name of your mail and SMTP servers, refer to the nearby sidebar “How to find information about your email account.”
- When you’ve finished filling in these fields, click the blue Add Account button.
Alas, when you set up an account manually, Outlook will attempt to verify the account information and refuses to add the account if anything is wrong.
-
Choose File ⇒ New ⇒ Email (or press ⌘ +N).
You can instead click the Home tab on the ribbon and then click the New Email icon (it's the first icon in the Home group).
- If you have more than one account, in the From pop-up menu choose the one you just set up manually.
- In the To field, type the email address of the same manually added account.
-
In the Subject field, type Test.
You don’t need to type anything in the body of the message, unless you want to.
- Click the Send icon in the message window (near the upper-left corner).
Wait a few minutes and then choose Tools ⇒ Send & Receive, or press ⌘ +Control+K, or click the Send & Receive icon on the Home tab of the ribbon.
At this point, one of the following should have happened:
- The test message arrived safely in your Outlook inbox.
- The test message is still sitting in your outbox, and an error message has appeared on your screen.
If you received an error message, go to Tools ⇒ Accounts and double-check the settings for the account. If you’re convinced they’re correct, get in touch with your email provider’s support team to get help.
The Use SSL to Connect (Recommended) option is frequently the cause of issues with sending and receiving email. In the settings for your account, you'll see one check box for the incoming server and one for the outgoing server. Select or deselect one or both to see if that resolves the error message.
Sending, Receiving, and Managing Your Email
The Outlook Mail module offers everything you need to send, receive, and manage email from one account or many. This section tells you how to do all these things and more.
Creating and sending messages
One primary purpose of an email program is, of course, to create and send email messages. If you sent yourself a test message, as described earlier in this chapter, you know how to create a message already. We describe the task here as well, and show you some cool things you can do to messages you create, such as format and beautify the text, add attachments, and create and use multiple signatures.
To create a message, follow these steps:
-
Choose File ⇒ New ⇒ Email to open a new email window.
You can instead press ⌘ +N or throw caution to the wind and click the New Email icon on the Home tab of the Outlook ribbon.
- If you have more than one email account, choose from the From pop-up menu the one you want to use to send this message.
- Address your message in one of these ways:
- Click in the To field and type a recipient’s email address. If the recipient is in your contacts, simply click the person's name when it appears as you type. Repeat as necessary to add other recipients.
 Click the little address book card icon (shown in the margin) to open the Search Contacts and Rooms window, as shown in Figure18-6, and then drag and drop the contact into the To field. When you’ve finished adding recipients, click the little red circle in the upper-left corner of the Search Contacts and Rooms window. To restrict your search to just contact names, click the Search All Fields pop-up menu and click Search Names Only.
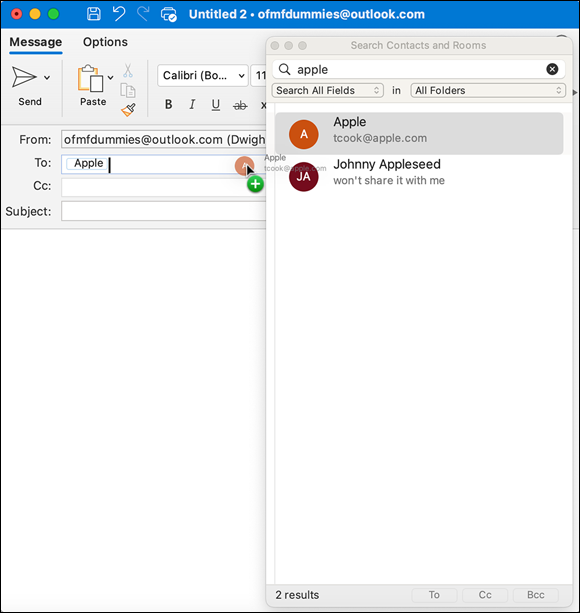
FIGURE 18-6: Dragging and dropping is one way to add a recipient.
- Adding a subject line to any email you send is considered good form, so type a subject in the Subject field.
-
Click in the body of the email and type your message.
If you’re a good typist and prefer to use the keyboard instead of the mouse, press the Tab key to move forward from field to field or press Shift+Tab to move backward from field to field. Try it — you’ll like it.
At this point, you can click Send in the toolbar and send the message, but read on if you want to make your message prettier first.
Formatting your message text
![]() To format the text in your message, HTML formatting must be turned on, which, luckily, it is by default. If it’s turned on (and we remind you that it is by default), you can select a portion of the text and choose a font, size, style, and justification and all the other items in the Message tab above the body of the message. But if formatting is turned off, the formatting icons on the message window ribbon appear dimmed and are unavailable. Honestly, we can’t think of a good reason why you’d turn off this feature, but if the notion strikes you, it’s simple to do. To toggle between HTML modes, click the Options tab of the message window ribbon and then click the Format Text switch (which is green and displays HTML when the option is enabled).
To format the text in your message, HTML formatting must be turned on, which, luckily, it is by default. If it’s turned on (and we remind you that it is by default), you can select a portion of the text and choose a font, size, style, and justification and all the other items in the Message tab above the body of the message. But if formatting is turned off, the formatting icons on the message window ribbon appear dimmed and are unavailable. Honestly, we can’t think of a good reason why you’d turn off this feature, but if the notion strikes you, it’s simple to do. To toggle between HTML modes, click the Options tab of the message window ribbon and then click the Format Text switch (which is green and displays HTML when the option is enabled).
 To format text, you must first select the text you want to format and use the Message tab to apply the formatting (font, font size, font color, bold, and italic, for example). Figure 18-7 shows the various formatting options.
Including attachments
Sometimes, you'll want to send a file, known as an attachment, to someone by email. To attach a file to a mail message, drag the file from Finder to the message window.
If the file is a media file (an image file, an audio file, or a movie file, for example) and you drag it to the body of the message, the file appears in the body of your message, where it can be seen or played — an embedded attachment. (Note, however, that not all email programs allow this feature. If the recipient’s email program is set to accept only plain-text messages, the media file doesn’t show up. Any formatting you apply to text in an HTML message doesn’t show up if the recipient is using a text-only email app.)
 As with text formatting, adding an attachment to a message increases the amount of data that has to be sent, resulting in longer transmission times. If you’re sending a high-resolution photo or a long video clip, for example, you can easily add several megabytes of data to a single email message. If the message is returned by the recipient’s email server as undeliverable because it’s too large, you know that the attachment added too much bulk.
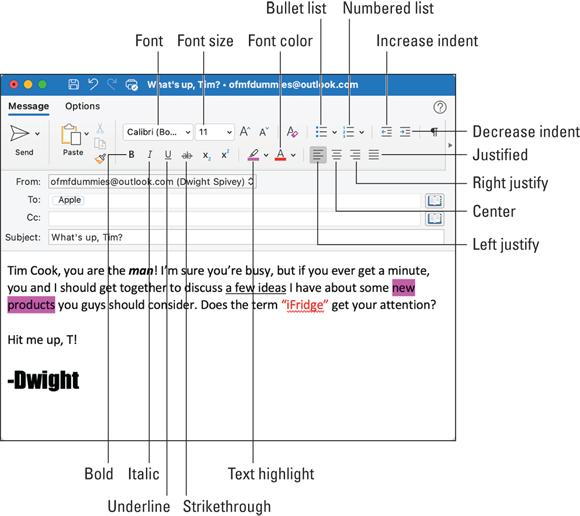
FIGURE 18-7: The Message tab and its options for formatting text.
You can also click the Attach File icon on the Message tab to select one or more files from the familiar File Open dialog. After you’ve attached one or more files to a message — in other words, without embedding them in the body of the text — they appear in the Attachment line under the Subject field, as shown in Figure 18-8. To the right of the filename is its size.
To remove a file from the Attachment line, click the small arrow to its right and then click Remove, as shown in Figure 18-8.
Click the tiny arrow to the right of any file in the Attachment line and choose Preview to open the Quick Look display for that file. Outlook doesn’t have to launch the app. For example, you can view a Word document without waiting for Word to load.
The names and sizes of media files embedded in the body of the message don’t appear in the Attachments line, and you can’t remove them by selecting them from the menu shown in Figure 18-8. To remove a media file from the body of your message, select it in the body of the message and then press Delete.
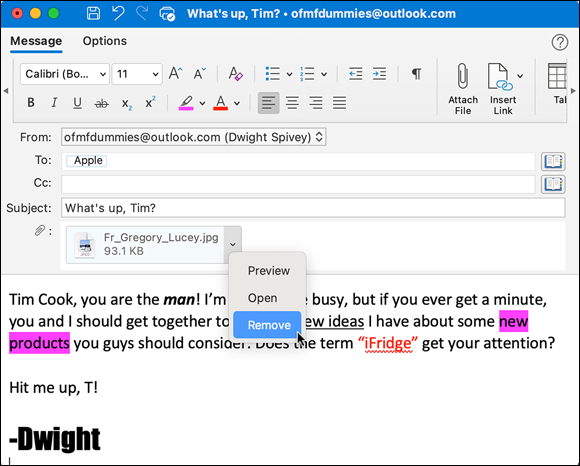
FIGURE 18-8: You can remove attachments as easily as you can add them.
Adding a signature
You can have Outlook automatically add a signature to the end of your email messages. You can create and reuse as many signatures as you like.
Many people have at least two signatures for their messages — one for personal email and another for business.
Here’s how to create and use signatures:
-
Choose Outlook ⇒ Preferences and then click the Signatures icon.
The Signatures pane appears in the Outlook Preferences dialog.
- Click + (add a signature) in the middle left of the pane, and a new window appears for you to customize the signature.
-
In the Signature Name field, type a new name for the signature.
Your name is used as the starting point for all new signatures.
- Type the signature in the body portion of the window, as shown in Figure 18-9.
- (Optional) Select the text in your signature and use the familiar tools on the Signature window's ribbon to format the text to your liking.
-
To add the new signature to your Signatures list, click the red circle in the top-left corner of the Signature window, and then click Save when prompted.
You’re then returned to the Signatures pane of the Outlook Preferences dialog.
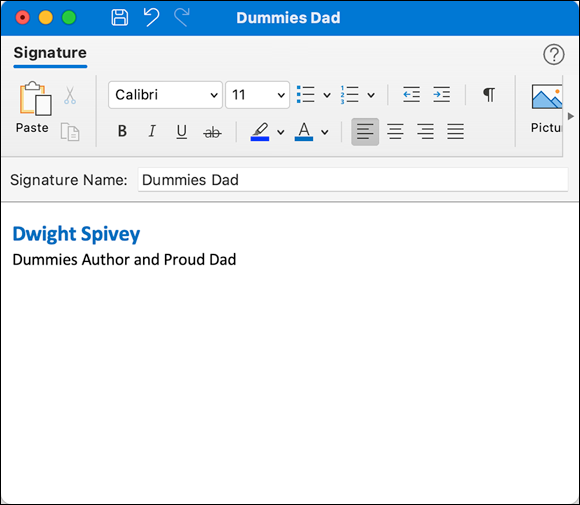
FIGURE 18-9: A signature is great way to spice up and personalize your emails.
-
(Optional) To specify which signature will be added automatically to your messages:
- In the Choose Default Signature area, click the Account pop-up menu and select an account.
- Click the New Messages menu, the Replies/Forwards menu, or both, and select a signature.
To turn off the automatic default signature feature, click the pop-up menu and choose None.
- Close the Signatures pane by clicking the red Close button in the upper-left corner.
That’s it. To add a signature to a message manually, click the Message tab in the email window and then click the down arrow next to the Signature icon. It’s just under the Picture icon on the ribbon, and its icon looks like a tiny pen writing on paper. If the icon is hidden, you might need to click the arrow on the right side of the ribbon or expand the email window by clicking and dragging its right edge. On the menu that appears, choose the signature you want to use. It’s then inserted in the message at the current insertion point.
To give you an idea of how versatile the Outlook signature feature can be, we have created five signatures— Consulting, Long, Short, XLong, and XShort. Each is slightly different from the others, and we select the one that’s the most appropriate before we send a message.
No law says that this feature must be used for only signatures. If you have other boilerplate text you use often, you can create a signature of it. Then to insert it into a message, click the Signature icon on the message window's ribbon and choose the boilerplate signature from the pop-up menu.
Receiving messages
This section shows you how to get your mail both manually and automatically. Then you look at ways to manage junk mail with the built-in Outlook junk mail filter.
Checking for messages manually
You can receive mail manually any time you like. From the ribbon, click the Home tab and then click the Send & Receive icon toward the right. Menu lovers can click Tools ⇒ Send & Receive. From the keyboard — the fastest method, of course — simply press ⌘ +Control+K. In a few seconds (or minutes, depending on your connection speed and the size of your messages), your new messages appear in your inbox.
But who wants to remember to go fetch email a dozen times a day? Fortunately, Outlook lets you set up schedules for automatically sending and receiving mail.
Scheduling an email to be sent later
Sometimes you may prefer to go ahead and write an email but have it sent at a later time. An example of this type of email is a weekly newsletter.
This is a great feature, but it’s limited to Microsoft Exchange email accounts, including Outlook.com and Microsoft 365 accounts.
To schedule an email:
- Create your email message.
-
Click the tiny arrow next to the Send button and then click Send Later.
If you don’t see the tiny arrow next to the Send button, your email account doesn’t support this feature. Try selecting a different email account in the From field, if you have multiple accounts. - In the fields provided, shown in Figure 18-10, select the date and time you’d like this email to be sent.
- To set the scheduled deliver, click the Send button.
If you want to cancel or reschedule the delivery, go to the Drafts folder for the account, select the scheduled email, and click the Cancel Send button. You can then send the email immediately, reschedule the date and time for delivery, or cancel the email.
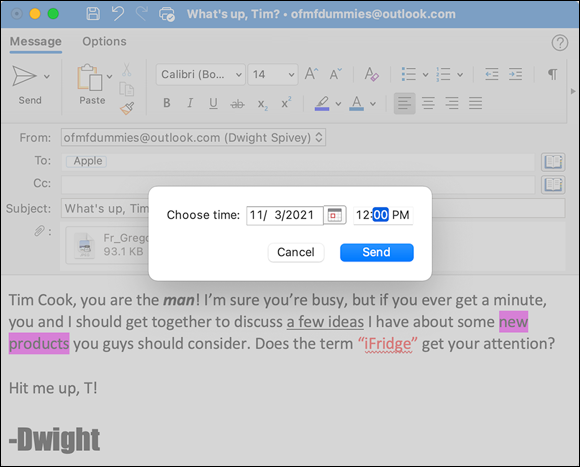
FIGURE 18-10: Schedule certain emails to be sent at a later date or time or both.
Dealing with junk mail
Nobody likes it, but everyone gets it. We're talking about junk mail, also known as spam. Fortunately, Outlook has tools to filter spam before it arrives in your inbox and quarantine it in a special Junk Email folder.
The junk email feature has changed a bit over the years. Outlook used to act as the main traffic cop of your email messages for most, if not all, account types. That’s no longer the case, because Microsoft now believes that your ISP or email provider should bear some or all of the load. That’s why the junk email feature works for only IMAP and POP email accounts.
If you enable IMAP or POP for an email account such as Google (check with Google or your ISP or email provider to find out how to do this), you’ll need to add the account to Outlook manually for Outlook’s junk email feature to work with it.
Here’s how to set up and use the junk email tools.
-
Choose Tools ⇒ Junk Email Preferences to open the Junk pane, as shown in Figure 18-11.
If the Junk Email Preferences option is dimmed, your email account doesn't support it. And if your accounts are not IMAP or POP, you won’t see them in the Junk pane under the “These Settings Only Apply To” section on the left.

FIGURE 18-11: Allow and block senders using the tabs in the Junk pane.
-
To make sure that email from specific senders is always delivered to your inbox and not filtered by the junk email tool:
- Click the Safe Senders tab.
- Click + at the bottom of the window.
- Type the email address of the sender you want to allow.
You can also simply add a domain to this list, which allows any email from that domain to come through unscathed. For example, if you want to allow all emails from dummies.com, just type dummies.com in the field.
If an email address is in your Outlook contacts, it’s never classified as junk (unless you add that address to your Blocked Senders list, which we cover in the next step). -
To make sure that email from specific senders is always filtered by the junk email tool and sent to the Junk Email folder for the account they’re sent to:
- Click the Blocked Senders tab.
- Click + at the bottom of the window.
- Type the email address of the sender you want to thwart.
You can also add a domain to this list, to block all email from that domain. For example, if you want to keep out all emails from dummies.com, just type dummies.com in the field.
- Click the red circle in the upper left to close the Junk pane.
Now Outlook will evaluate all your incoming mail for the affected accounts and direct to the Junk Email folder any message it thinks is spam.
Each email account has its own Junk Email folder, so be sure to check them all if you have multiple email accounts. When you first start using this feature, you probably should look in all your Junk Email folders regularly, just in case a piece of good mail has been misclassified.
If you receive a junk mail message in your inbox, you can get rid of it in several ways:
- Select the message and choose Message ⇒ Junk Mail ⇒ Mark as Junk, or press ⌘ +Shift+J. Or from the ribbon’s Home tab, click the Move button, click the Junk button, and then select Junk, Not Junk, or Block Sender.
- Right-click the message directly in the list and choose Junk Mail ⇒ Mark as Junk from the contextual menu.
Either method helps train the junk mail filter so that the next time you receive a similar message, Outlook is more likely to automatically classify it as junk.
Conversely, if a piece of good mail accidentally ends up in a Junk Email folder, select the message and choose Message ⇒ Junk Mail ⇒ Mark As Not Junk (or press ⌘ +Shift+Option+J). You can also toggle off Junk Email status by right-clicking the email and selecting Junk Mail ⇒ Mark as Not Junk in the contextual menu. This action alerts the filter that messages similar to this one are probably okay.
Sometimes, Outlook suspects that a message is junk mail but isn’t sure. In these cases, the mail appears in your Junk Email folder with a note that says something like “This message appears to be Junk. Links and other functionality will not work.” You also see a Mark as Not Junk button. If you click this button, the message is marked as Not Junk and returned to the proper folder from whence it came.
Finally, to add a sender to your Blocked Senders list, select the message from that person and choose Message ⇒ Junk Mail ⇒ Block Sender. The sender’s address is added to the Blocked Senders tab in the Junk pane. (And yes, as you may have guessed, you can right-click any message in the list, choose Junk Mail, and then click Block Sender. You’re so predictable, Microsoft!)
To remove a domain or address from the Safe Senders or Blocked Senders tabs in the Junk pane, just select it and press Delete, or click the — icon below it.
Managing your email
It’s an immutable law of nature: The longer you use an email account, the more mail you'll receive. We’ve had multiple email accounts for more than a dozen years, and our email programs now store more than 60,000 messages. Although most people don’t keep that much old email around, you still need to manage however much you have. So here are some tips, hints, and techniques for managing the email you send and receive.
Organizing your messages in folders
Outlook lets you create unlimited folders and subfolders, so take advantage of this feature. As the number of messages you have increases, it makes sense to start organizing them into folders rather than let them all sit in your inbox.
To create a new folder, choose File ⇒ New ⇒ Folder. If you want the folder to appear as a subfolder of another folder, first select the parent folder and then choose File ⇒ New ⇒ Folder. (You can also right-click the parent folder and choose New Folder from the menu that appears.) When the folder appears in the folder list, double-click it and type a name for it. You can create as many or as few folders and subfolders as you like.
Later, if you want to change the name of a folder or subfolder, click the name, click the name a second time (this isn’t a double-click; pause between the first and second click), select the old name and delete it, and then type a new name.
Now, after you read a message in your inbox, drag it to the appropriate folder, where it is saved forevermore. You can also right-click the message, select Move from the pop-up menu, and choose the folder you want to move the email to.
Searching your messages
In the upper-right corner of the main window’s toolbar is the search field, which you can use to search for email messages or any other item in Outlook (contacts, events, to-do items, or tasks, for example). The search field is your friend, so use it often. Following are some tips for using it effectively.
You can limit your search to a single folder, if you want. Just click the folder before you start typing in the search field. Or click the On My Computer folder to search all messages you’ve saved in folders or subfolders.
When you type text in the search field, a couple of things happen. First, Outlook displays the Search tab on the ribbon and immediately makes that tab active. Also, a set of very useful filters appear on the ribbon below the search field (shown in Figure 18-12), allowing you to specify search criteria. Our favorite filters include
- Current Folder and Subfolders: Include just the parent folder or all subfolders.
- All Items: Delve through all the data in Outlook, including other modules such as People and Notes.
- Attachments: Check for messages with attachments of a certain size (helpful for searching and deleting old messages that are taking up too much disk space).
- Date Received and Date Sent: “I know I sent that last Friday, but where is it?” If you organize by using subfolders and you’ve moved that message out of your outbox, these options are your ticket.
- Advanced: Click this icon to build your own, custom search.
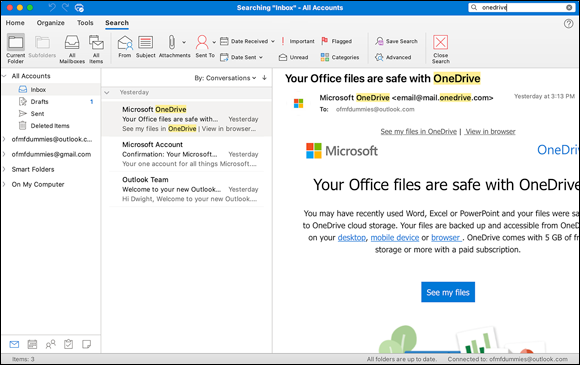
FIGURE 18-12: The Search ribbon provides an abundance of tools to narrow your searches.
The advanced search feature is especially powerful. Figure 18-13 shows the advanced search header, which appears under the ribbon when you click the Advanced icon — each button in the header is a pop-up menu, allowing you to build such criteria as Priority Is High or Read Status Is Forwarded. Click the first button to choose the base criterion, and then click the second button to choose the corresponding modifier.
Note that to the far right of the buttons are two more buttons: a minus sign (–) and a plus sign (+). The + lets you specify additional search criteria, allowing you to build some truly specific searches. Click the minus sign to remove a criterion.
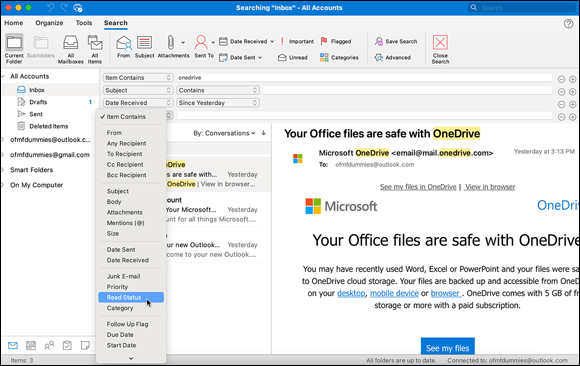
FIGURE 18-13: An advanced search lets you apply a multitude of filters at one time.
Finally, the Save Search icon on the Search tab lets you save a search in the Smart Folders folder, which appears in the Navigation pane to the left of the window. If you find yourself searching for the same thing over and over again, click the Save Search icon, and the next time you want to run that search, you can just click its name in the Smart Folders folder. Sweet!
The items in the Smart Folders folder are saved searches. To prove it, right-click any item in the Smart Folders folder and choose Edit. The criteria for the search appears, which you can change if you want.
Creating rules for received messages
Wouldn’t it be nice if Outlook were smart enough to play a sound and display a dialog to alert you whenever new mail from your mom arrives? No sweat — it can do that and much more by using rules.
Rules work on the if-then principle: If something is true (or false), then an action occurs (or doesn’t occur). A specific example will help you understand, so here’s how to create a rule that makes a sound (three times) and presents a dialog every time new mail from Mom arrives:
- Choose Tools ⇒ Rules to open the Rules pane in the Outlook Preferences window.
-
Click + (add) at the bottom of the pane.
The Edit Rule dialog appears, as shown in Figure 18-14.
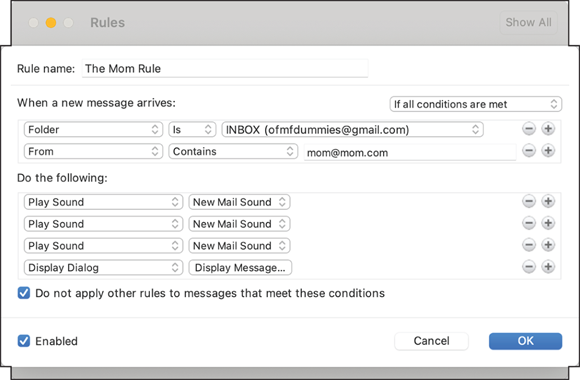
FIGURE 18-14: Set up conditions for your rule.
- In the Rule Name field, type The Mom Rule.
-
Make the choices shown in Figure 18-14 from the pop-up menus, clicking Add Action to add the second, third, and fourth items.
The only item in the When a New Message Arrives section should look like From Contains [email protected].
The items in the Do the Following section should look like this:
- Play Sound — New Mail Sound
- Play Sound — New Mail Sound
- Play Sound — New Mail Sound
- Display Dialog
- Click the Display Message button next to the fourth item (Display Dialog) and type An email from your mother has arrived.
- Click OK to close the Dialog Text dialog.
- Click OK to close the Edit Rule dialog.
That’s it. Note that the rule now appears in the Rules list next to the proper classification (typically IMAP, POP, or Outgoing). The next time an email message from Mom arrives, the New Mail sound plays three times and a dialog with the message “An email from your mother has arrived” appears onscreen.
That’s one example of a rule, and a simple one at that.
Here’s a rule we use often: “I’m out of the office and not reading mail.” It goes like this: For every message we receive, send a reply that says, “I’m out of the office and not reading my mail again until the Twelfth of Never. Please resend your message after that, if you want me to see it.”
Don’t forget to disable or delete the rule when you return from your trip on the Thirteenth of Never or else the message will continue to be sent automatically, even though you’re no longer out of the office. To disable a rule, display the Rules pane again and deselect the check box next to the name of the rule in the list. (You can select the check box again to turn it on the next time you need it.) To delete a rule entirely, click it to select it in the list and then click the − (delete) button at the bottom.
The possibilities are almost limitless, so be creative and create some rules yourself.